On November 2023 AWS announced the Preview going live for the new feature AWS Console-to-Code. Two months later, in this blog, we will explore this feature, learn about how to use it, what are the limitations, etc.
AWS Console-to-Code
What is the AWS Console-to-Code feature?
It’s the latest feature from AWS made available in the EC2 console that leverages Generative AI to convert the actions performed on the AWS EC2 console into the IaC (infrastructure as Code) code! It’s a stepping stone towards IaC creation methods in the world of AWS cloud.
The actions carried out on the AWS console during the current session are monitored by the feature in the background. These recorded actions are then made available to the user to select up to 5 of these actions, along with their preferred language. AWS then utilizes its Generative AI capabilities to automatically generate code that replicates the objectives achieved through manual actions on the console.
It also generates the AWS CLI command alongside the IaC code.
The usefulness of the AWS Console-to-Code feature
With the current list of limitations and the preview stage, this feature might not be a game changer but it does have potential in the future. The AWS Console-to-Code feature will surely help developers and administrators to get the IaC skeleton quickly to start from and speed up the IaC coding with less effort.
This feature simplifies the process of generating AWS CLI commands, eliminating the need to constantly consult documentation and manually construct commands with the correct arguments. As a result, it accelerates automation deliveries with reduced effort.
By the way, there is no additional cost to use Console-to-Code so it doesn’t hurt to employ it for initial IaC drafting!
Limitation of AWS Console-to-Code feature
Currently, it’s in the ‘Preview’ phase.
Only available in North Virginia (us-east-1) region as of today.
It can generate IaC code in the listed types and languages only –
CDK: Java
CDK: Python
CDK: TypeScript
CloudFoprmation: JSON
CloudFoprmation: YAML
It does not retain data across sessions. The actions that are performed in the current session are made available for Code Generation. Meaning if you refresh the browser page, it resets the action list and starts recording afresh.
Up to 5 actions can be selected to generate code.
Actions from the EC2 console only are recorded. However, I observed even a few actions like Security Group creation or Volume listing, etc. are not being recorded.
How to use the AWS Console-to-Code feature
Login to the EC2 console and select region N. Virginia (us-east-1)
On the left-hand side menu, ensure you have a Console-to-Code link.
Perform some actions in the EC2 console like launching an instance, etc.
Navigate to Console-to-Code by clicking on the link in the left-hand side menu.
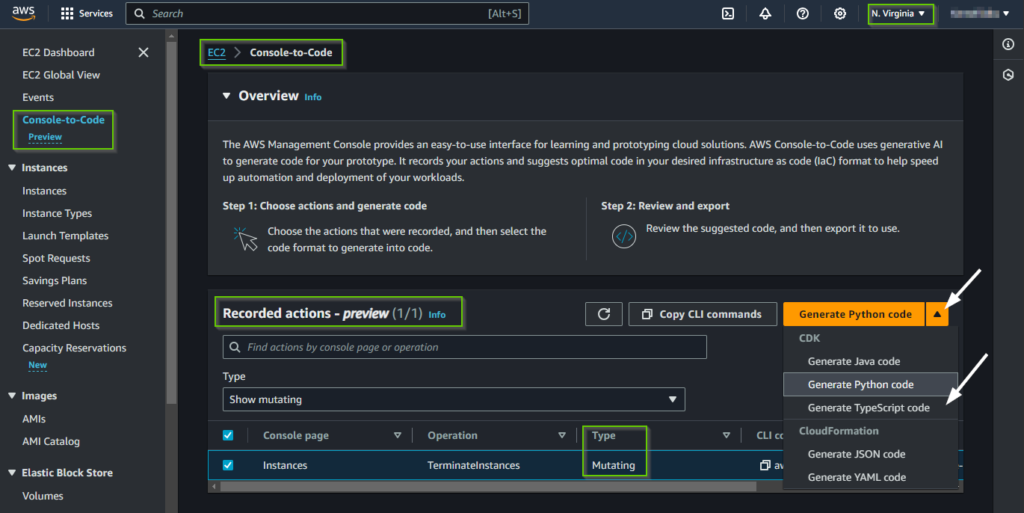
It will present you with a list of recorded actions. Select one or a maximum of 5 actions for which you want to generate code. You can even filter the recorded actions as per their Type:
Show read-only: Read-only events like Describe*
Show mutating: Events that modified/created/deleted or altered the AWS resources.
Click on the drop-down menu and select the type and language for the code.
AWS console-to-code recorded actions
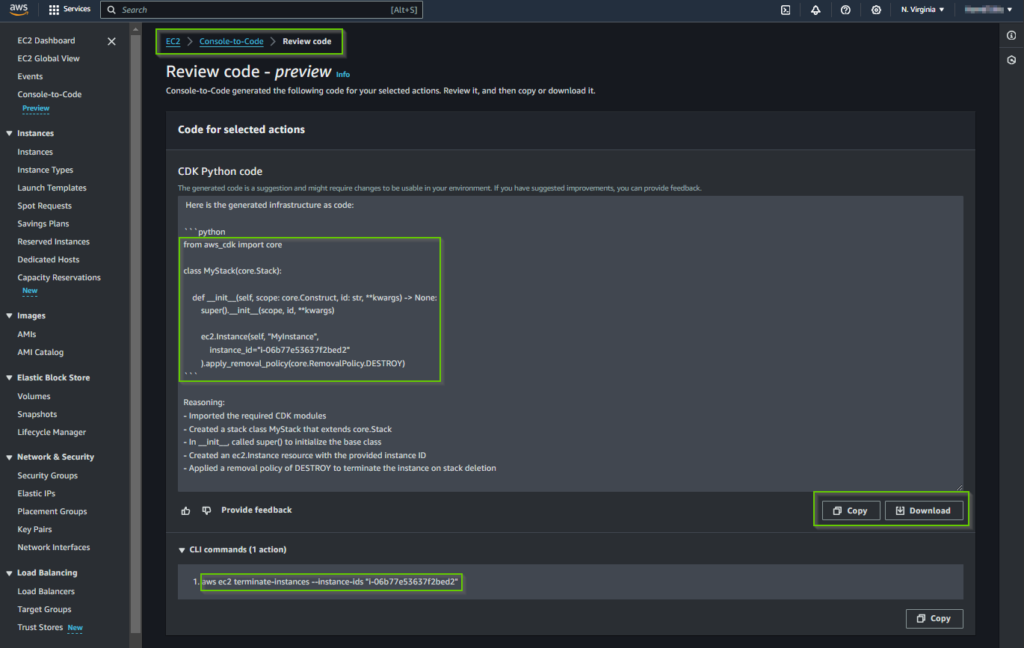
It should start generating code.
After code generation, you have an option to copy or download it. You can also copy the AWS CLI command on the same page.
Python code generated by AWS Console-to-Code
It also provides the generated code’s explanation at the bottom of the code.
A quick rundown on how to install Cluster Autoscaler on AWS EKS.
CA on EKS!
What is Cluster Autoscaler (CA)
Cluster Autoscaler is not a new word in the Kubernetes world. It’s a program that scales out or scales in the Kubernetes cluster as per capacity demands. It is available on Github here.
For scale-out action, it looks for any unschedulable pods in the cluster and scale-out to make sure they can be scheduled. If CA is running with default settings, then it checks every 10 seconds. So basically it detects and acts for scale-out in 10 secs.
For scale in action it watches nodes for their utilization and any underutilized node will be elected for scale in. The elected node will have to remain in an un-needed state for 10 minutes for CA to terminate it.
CA on AWS EKS
As you know now, CA’s core functionality is spawning new nodes or terminating the un-needed ones, it’s essential it must be having underlying infrastructure access to perform these actions.
In AWS EKS, Kubernetes nodes are EC2 or FARGATE compute. Hence, Cluster Autoscaler running on EKS clusters should be having access to respective service APIs to perform scale out and scale in. It can be achieved by creating an IAM role with appropriate IAM policies attached to it.
Cluster Autoscaler should be running in a separate namespace (kube-system by default) on the same EKS cluster as a Kubernetes deployment. Let’s look at the installation
How to install Cluster Autoscaler on AWS EKS
Creating IAM role
IAM role of Autoscaler needs to have an IAM policy attached to it with the below permissions –
You will need to use this policy ARN in eksctl command. Also, make sure you have an IAM OIDC provider associated with your EKS cluster. Read more in detail here.
As mentioned above, we need to have an IAM role in a place that can be leveraged by Cluster Autoscaler to perform resource creation or termination on AWS services like EC2. It can be done manually, but it’s recommended to perform it using eksctl command for its comfort and perfection! It takes care of trust relationship policy and related conditions while setting up a role. If you do not prefer eksctl then refer to this document to create it using AWS CLI or console.
You need to run it from the terminal where AWS CLI is configured.
NAMESPACE: ns under which you plan to run CA. Preference: kube-system
CLUSTER-REGION: Region in which EKS Cluster is running
MANAGED-POLICY-ARN: IAM policy ARN created for this role
# eksctl create iamserviceaccount --cluster=blog-cluster --namespace=kube-system --name=cluster-autoscaler --attach-policy-arn=arn:aws:iam::xxxxxxxxxx:policy/blog-eks-policy --override-existing-serviceaccounts --region=us-east-1 --approve
2022-01-26 13:45:11 [ℹ]  eksctl version 0.80.0
2022-01-26 13:45:11 [ℹ]  using region us-east-1
2022-01-26 13:45:13 [ℹ]  1 iamserviceaccount (kube-system/cluster-autoscaler) was included (based on the include/exclude rules)
2022-01-26 13:45:13 [!]  metadata of serviceaccounts that exist in Kubernetes will be updated, as --override-existing-serviceaccounts was set
2022-01-26 13:45:13 [ℹ]  1 task: {
    2 sequential sub-tasks: {
        create IAM role for serviceaccount "kube-system/cluster-autoscaler",
        create serviceaccount "kube-system/cluster-autoscaler",
    } }2022-01-26 13:45:13 [ℹ]  building iamserviceaccount stack "eksctl-blog-cluster-addon-iamserviceaccount-kube-system-cluster-autoscaler"
2022-01-26 13:45:14 [ℹ]  deploying stack "eksctl-blog-cluster-addon-iamserviceaccount-kube-system-cluster-autoscaler"
2022-01-26 13:45:14 [ℹ]  waiting for CloudFormation stack "eksctl-blog-cluster-addon-iamserviceaccount-kube-system-cluster-autoscaler"
2022-01-26 13:45:33 [ℹ]  waiting for CloudFormation stack "eksctl-blog-cluster-addon-iamserviceaccount-kube-system-cluster-autoscaler"
2022-01-26 13:45:50 [ℹ]  waiting for CloudFormation stack "eksctl-blog-cluster-addon-iamserviceaccount-kube-system-cluster-autoscaler"
2022-01-26 13:45:52 [ℹ]  created serviceaccount "kube-system/cluster-autoscaler"
The above command prepares the JSON CloudFormation template and deploys it in the same region. You can visit the CloudFormation console and check it.
Installation
If you choose to run CA in different namespace by defining custom namespace in manifest file, then replace kube-system with appropriate namespace name in all below commands.
Download and prepare your Kubernetes to manifest file.
Apply the manifest to your EKS cluster. Make sure you have the proper context set for your kubectl command so that kubectl is targeted to the expected EKS cluster.
# kubectl apply -f cluster-autoscaler-autodiscover.yaml
serviceaccount/cluster-autoscaler configured
clusterrole.rbac.authorization.k8s.io/cluster-autoscaler created
role.rbac.authorization.k8s.io/cluster-autoscaler created
clusterrolebinding.rbac.authorization.k8s.io/cluster-autoscaler created
rolebinding.rbac.authorization.k8s.io/cluster-autoscaler created
deployment.apps/cluster-autoscaler created
Add annotation to cluster-autoscaler service account with ARN of the IAM role we created in the first step. Replace ROLE-ARN with IAM role arn.