Basic Linux and Unix fundamentals of file permissions and ownership. Learn what are they and how to set/edit them in different ways.
One of the basic fundamentals while learning Linux or Unix is file permissions and their ownership. One should be clear about what is file ownership is and what its permissions mean. in *nix world, everything is treated as file devices and directories too. Each file has its own owners and permissions. Permission data decides who can do which operations on that file.
Ownership :
Each file has two ownership details attached with it: Owner and group.
The owner is the user (listed in /etc/passwd) who owns that file. He must have created that file or previous owner of file/superuser made him the owner of that file. Owning a file means all owner level permissions are applicable to that user for that particular file.
A group is a group (listed in /etc/group) who has rights on that file. Group-level permissions are applicable to that group. This detail introduced so that a large number of people’s access can be managed for that file with only one set of permissions.
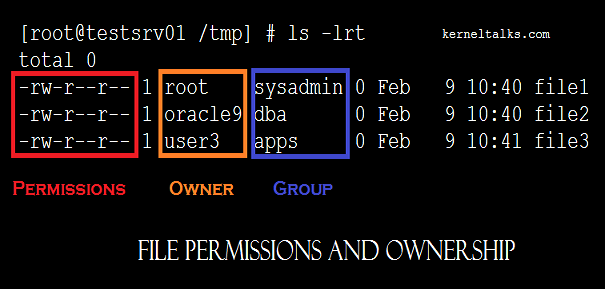
Files owner details can be seen in ls -lrt output under 3rd and 4th column as below :
# ls -lrt
total 0
-rw-r--r-- 1 root    sysadmin 0 Feb  9 10:40 file1
-rw-r--r-- 1 oracle9 dba      0 Feb  9 10:40 file2
-rw-r--r-- 1 user3   apps     0 Feb  9 10:40 file3
In above example,
root, oracle9, and user3 are owners.
sysadmin, dba, and apps are groups.
Sometimes you see numbers instead of the owner or group. Those are orphaned files whose owner or group does not exist on the system.
How to change file ownership :
To change file ownership you have to use change owner (chown) command. The command should be supplied with a new owner and group along with a file name whose ownership needs to be changed.
# ls -lrt
-rw-r--r-- 1 user2 dba 0 Feb  9 10:40 file1
# chown root:sysadmin file1
# ls -lrt
-rw-r--r-- 1 root sysadmin 0 Feb  9 10:40 file1
Observe the example above how it changed owners. To run successful chown command, you must be the current owner of that file or you must be a superuser.
Permissions :
Permissions control how and who access the file and perform operations on it. There are 3 permissions parameters defined in *nix world: read, write, and execute. It has number representation as well.
- Read permission denoted by 4 or
r - Write permission denoted by 2 or
w - Execute permission denoted by 1 or
x
If you see, the above example again, the output’s first column is permission details. That is 10 character field which can be decoded as :
- File bit
- Read bit for owner
- Write bit for owner
- Execute bit for owner
- Read bit for the group
- Write a group for group
- Execute bit for the group
- Read bit for others
- Write bit for others
- Execute bit for others
File bit denotes the type of file. There are various values you can see here. Few are as below :
d: directory-: filel: Symbolic linkb: block device file
The rest are 3 sets of 3 bit each for the owner, group, and others. Others mean any user id which is not the owner or part of the specified group. For example -rw-r--r-- means its a file, which can be read & write by the owner and can only be read by group members, others. -rwxrwxrwx means read, write, and execute permissions to all!
Whenever a file is created, its default permissions are decided by umask value defined in the system.
How to change file permissions :
To change file permission, you need to use chmod command. You have the liberty to specify only one set of permissions (for user or group or others) or all three sets, use of character, or number representation of permissions and owners.
Below are few examples :
# chmod 744 file1      <<Set rwx to owner & read for group, owners
# chmod o+x file1      <<Adds execute permission for others
# chmod u+x,g+x file1  <<Adds execute permission for owner and group
# chmod u-x file1      <<Removes execute permission for owner
How to change directory permissions recursively
Recursively means changing permission of all the files and directories upto depth 1 in directory. To change directory permission recursively you need to use switch -R along with chmod command followed by directory.
For example :
root@kerneltalks # chmod -R 755 /tmp/testdata
root@kerneltalks # ls -lrt /tmp/testdata
total 0
-rwxr-xr-x 1 root    sysadmin 0 Feb  9 10:40 file1
-rwxr-xr-x 1 oracle9 dba      0 Feb  9 10:40 file2
-rwxr-xr-x 1 user3   apps     0 Feb  9 10:40 file3
As you can see in the above output after changing permission recursively, all files within /tmp/testdata directory changed permissions to 755.
