
A step by step procedure to create an application load balancer for a web application.


This article will walk you through the steps to create an application load balancer and then testing. ELB can be used in Amazon ECS as well, but for this exercise, we will be using the below architecture, which is running webservers on EC2, not in containers. Its a subset of our custom VPC –

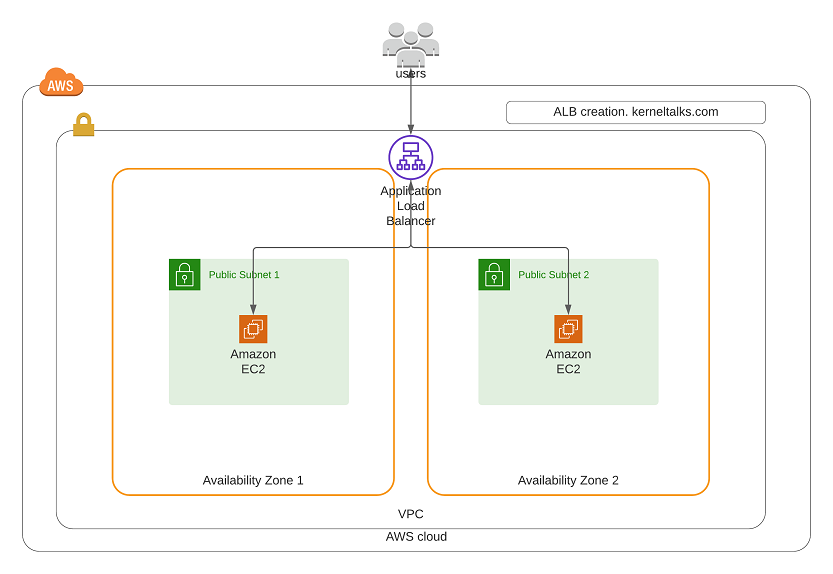
We have 2 EC2 instances running Apache webserver in 2 different public subnets. Application Load Balancer will receive traffic from the internet and forward it to the back-end EC2 instances.
Lets dive into ALB creation procedure –
- Log in to the EC2 dashboard.
- On the left navigation panel, click Load Balancers under the Load Balancing section.
- On the load balancer page, click on the Create Load Balancer button.
- You should be seeing load balancer creation wizard –

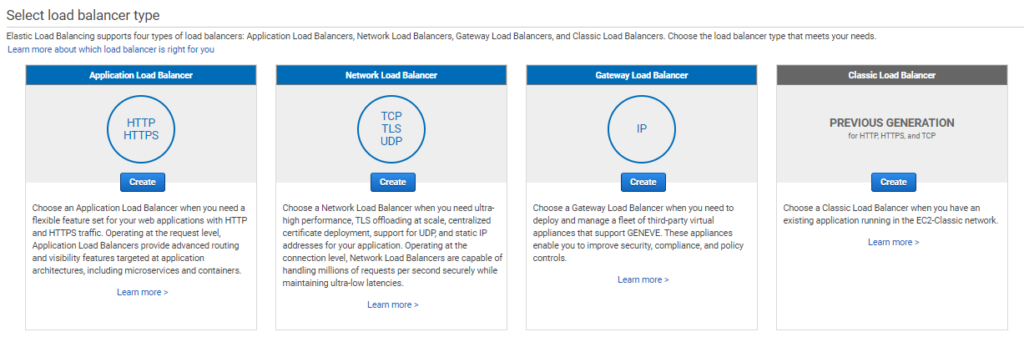
Here you need to select type of load balancer to create:
- Application load balancer: For load-balancing HTTP, HTTPS web traffic.
- Network load balancer: For load balancing TCP, TLS, UDP network traffic.
- Gateway load balancer: For load balancing virtual appliances traffic over GENEVE.
- Classic load balancer: Old ELB tech.
Click on the Create button under the Application load balancer to proceed. Load balancer configuration wizard should open up.

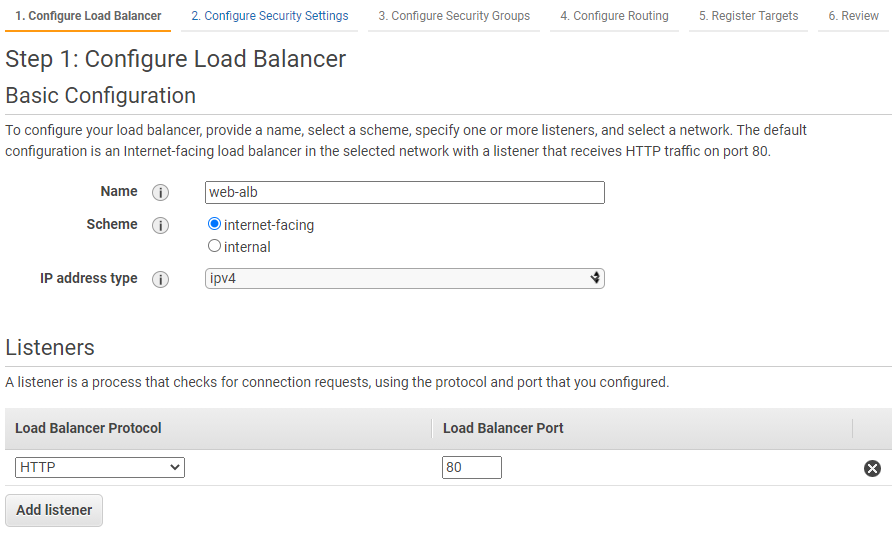
Fill in details –
- Name: Name for ALB.
- Scheme: Choose internet-facing since we are configuring the web load balancer.
- IP address type: Select the addressing type.
- Listeners: Choose HTTP with port 80. If your application is on HTTPS, then select accordingly.

- VPC: Select VPC under which ALB will be deployed.
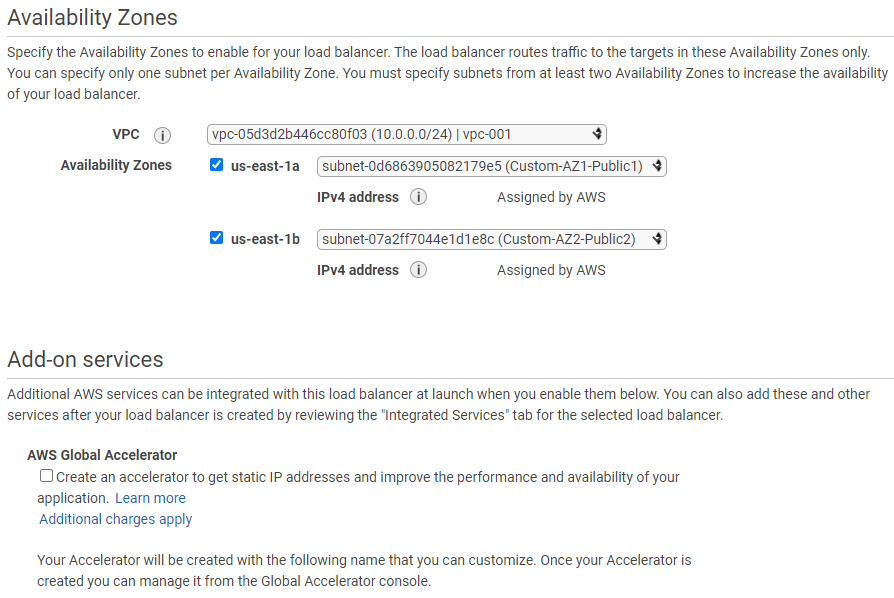
- Availability zones: Select minimum 2 for HA. If you are creating internet-facing ALB, then subnets should have a route to the internet gateway, i.e., public subnets. You can select only one subnet per AZ.
- AWS Global accelerator: For performance. This is part of integrated service and can be modified later as well.
- Tags: Tagging.
- Click on the Next: Configure Security Settings button at the end.
Since HTTP was selected in the basic configuration, a security notice should appear.


Click again on the Next: Configure Security Settings button in the end to proceed.

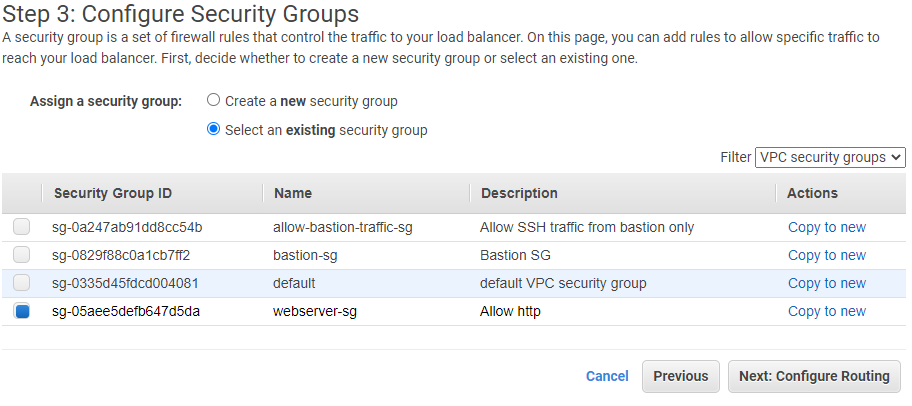
Create new or select an existing security group for ALB. We are selecting here existing SG, which allows HTTP traffic.
Click on Next: Configure Routing button.

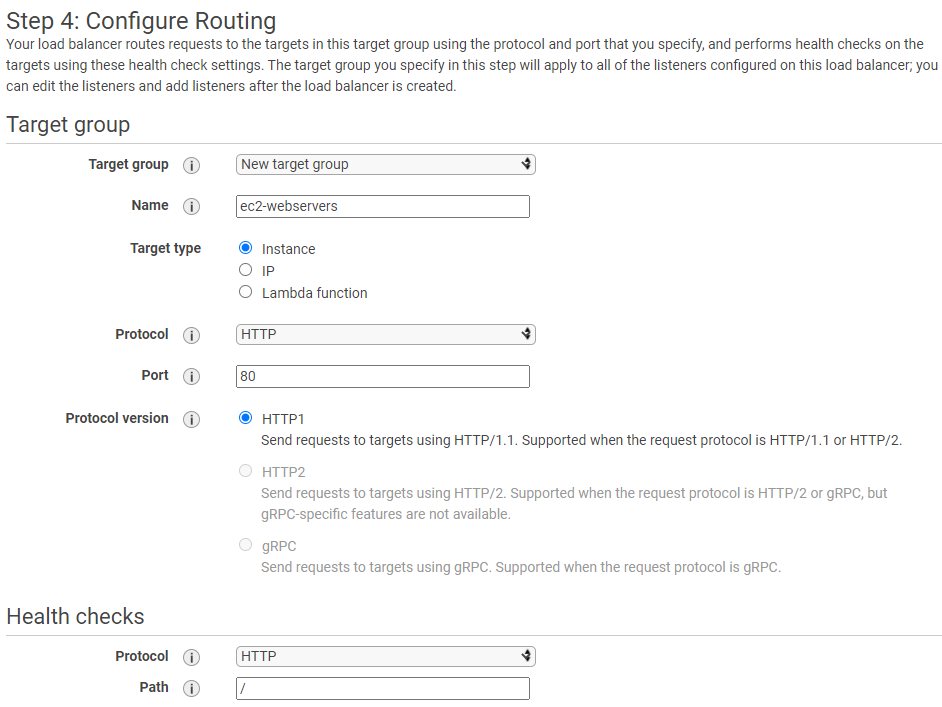
In the routing section, we are configuring the destination for ALB. Here, ALB will come to know where it needs to direct traffic once it receives the traffic. As per our design, we are going to direct traffic to 2 EC2 instances.
- Target group
- Target Group: Create new or use existing. It’s a collection of resources acting as targets for ALB.
- Name: for identification.
- Target type: In our case, its instance.
- Protocol: HTTP or HTTPs
- Port: Depends on your web application listening port. I am using the default web server listening on port 80
- Protocol version: Again depends on the web application.
- Health checks
- Protocol: To be used by ALB to perform health checks on the target type.
- Path: ALB will reach out to this path using the mentioned protocol to determine health or target.

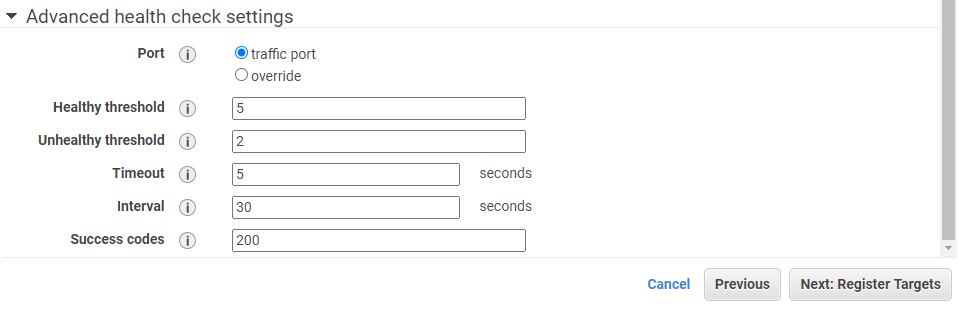
- Advanced health check settings
- Port: Communication port for a health check.
- Healthy threshold: Number of consecutive successful health check before marking any unhealthy target as healthy. Range 2-10.
- Unhealthy threshold: Number of consecutive failed health checks to mark a target as unhealthy. Range 2-10.
- Timeout: If no response is received within this timeframe, mark the health check as failed. Range (2-120 secs)
- Interval: Time between health checks (5-300 secs)
- Success codes: HTTP code to be received back for marking health check as a success.
Click on Next: Register Targets button.

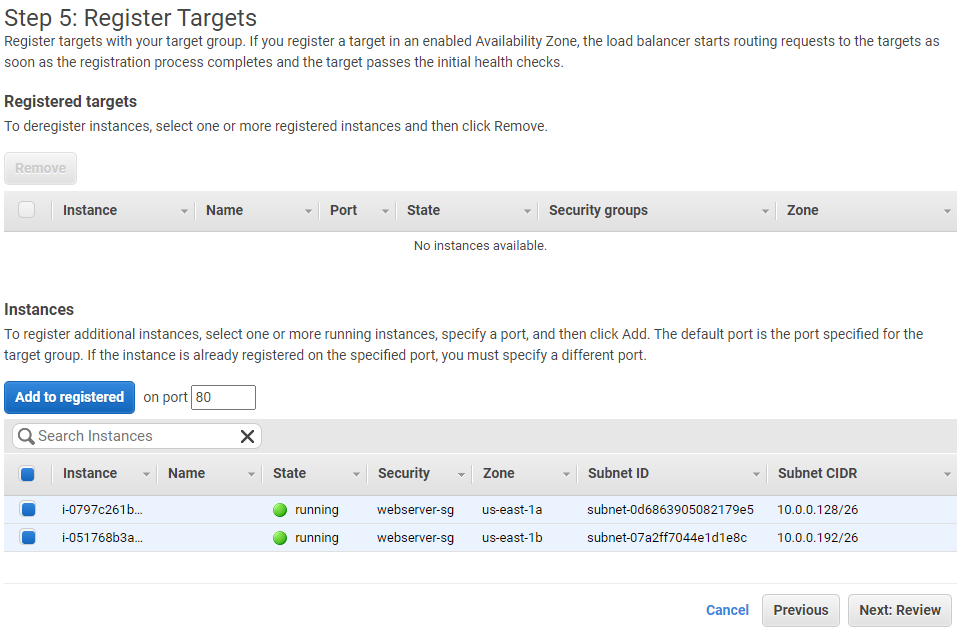
As you can see, we have 2 EC2 instances running in different zones that are available to register as a target for ALB. Meanwhile, also verify that both instances are serving the webpage properly.

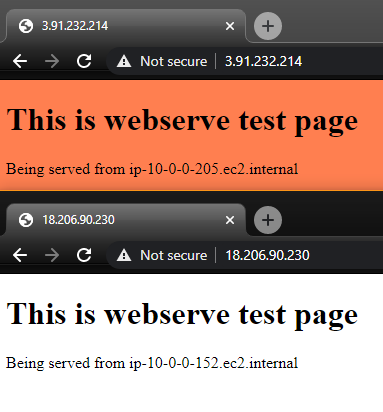
Both our webservers are serving different webpages (to test on ALB later). We verified it by using the public Ip of the EC2 instances.
Now, select instances serving web traffic and click on the Add to registered button.

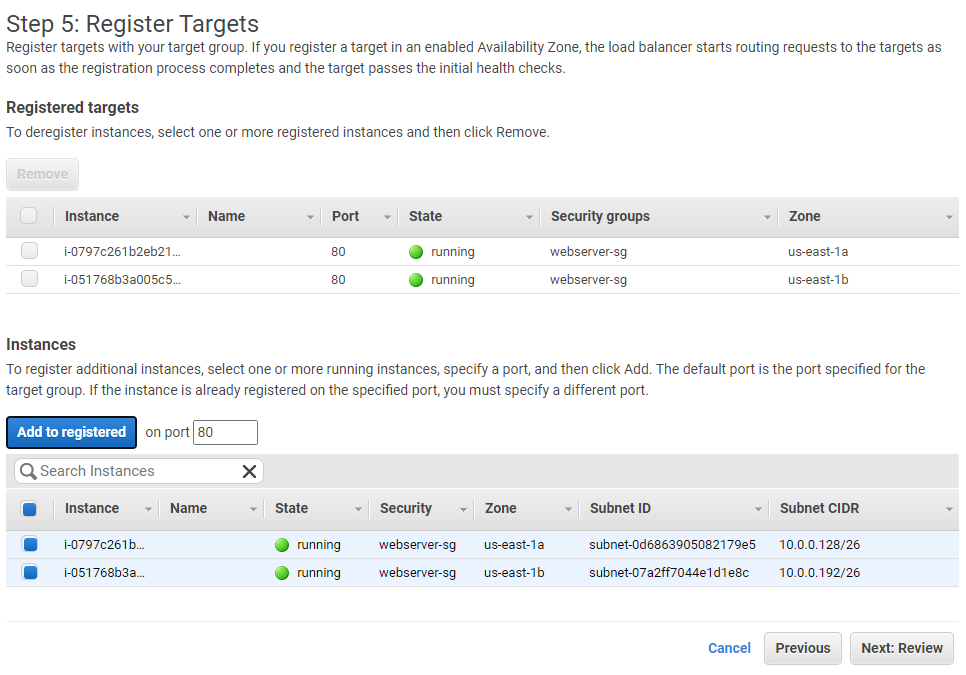
Both targets should be registered and list under the registered target list. Verify and then click the Next: Review button.

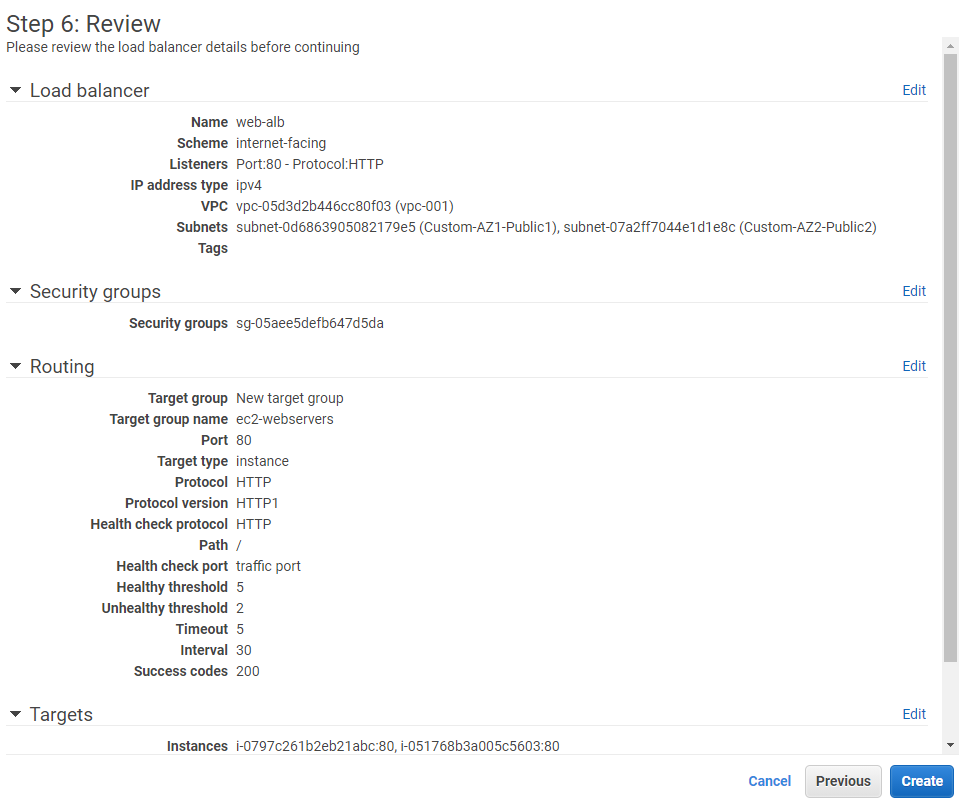
Review all configurations and click on Create button.

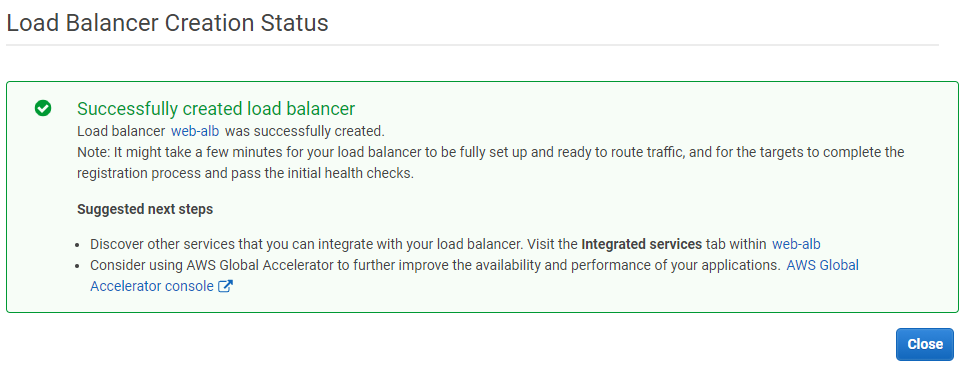
You should be seeing success message like one above.
Click the Close button, and it will take you to the load balancers page. In here, newly created application load balancers should be listed, and mostly it’s in provisioning state. After a couple of minutes, it should go into an Active state once at least one target passes the health check.

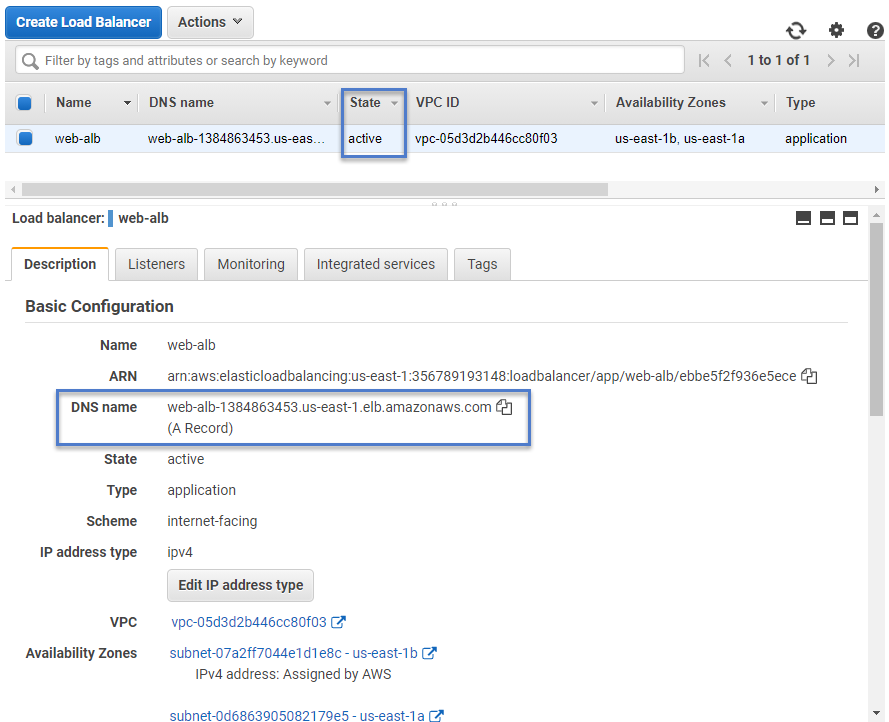
Once ALB is active, grab the DNS name from the ALB details screen and load it in the browser. It should populate the webpages from either of the EC2 targets.

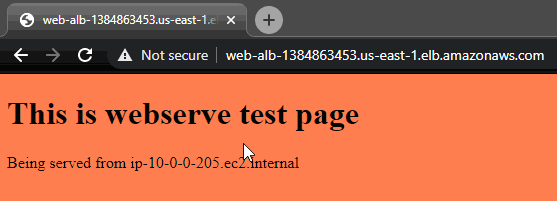
The above small GIF shows the same ALB DNS loads web page from different backend targets. I created distinct web pages to identify the difference and functionality of ALB. In the real world, it should be serving the same page as any of the backend targets.
That’s it! We created an Application load balancer that serves the webpage from different backend servers!