A quick post on how to forward SSH key in Putty on Windows.
PuTTY SSH agent forwarding
Let’s start with some basics about SSH key/agent forwarding. Then we will dive into how to configure it in putty.
What is SSH key/agent forwarding?
Traditionally we used to have password-based authentication for Linux servers. In this age of cloud, all the Linux servers deployed in the cloud come with default key-based authentication Authentication is done using pair of keys: Private key (with user) and Public key (stored on server). So every time you connect to the server you need to supply your private key for authentication.
If you are using some jump server or bastion host for connecting servers then you need to store your private key on that server (jump/bastion). So that it can be used for authentication when connecting to servers. This leaves a security risk of the private key being exposed/accessed by other users of jump/bastion host.
In such a scenario, SSH agent forwarding should be used. SSH agent forwarding allows you to forward the SSH key remotely. That means you can authenticate without storing the key on the jump/bastion host! Putty takes care of using the key stored on your local computer and forward it so that it can be used for remote authentications.
How to configure SSH agent forwarding in Putty?
It can be done by using utility pagent.exe which comes with PuTTY. pagent.exe is an SSH authentication agent for PuTTY. It can be downloaded for free from PuTTY website along with the PuTTY executable.
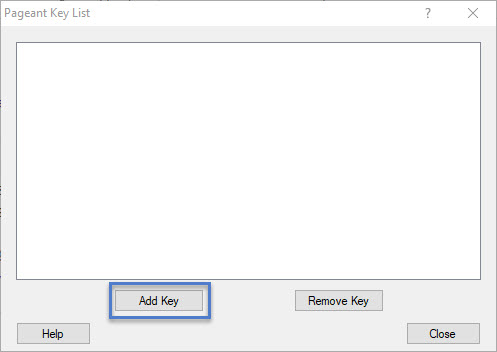
Now Open pagent.exe. It will start in the background. You can click on pagent icon in the taskbar and bring it to the foreground. You should see the below screen –
pagent list of keys
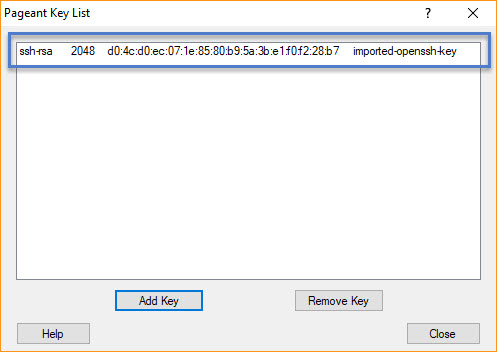
Click on the Add Key button. Browse your PPK key stored on the local computer and click Open. Key will be added to the database and you should see it in the key list as below –
Imported key
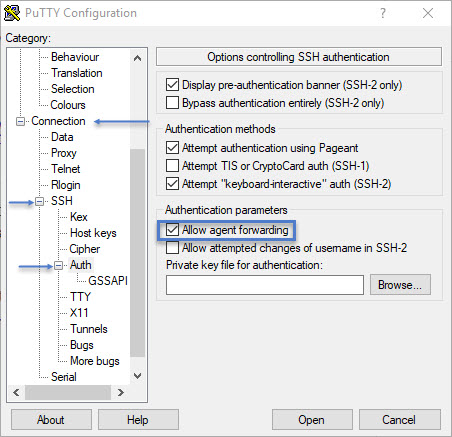
Now click the Close button. Make sure pagent is running in the background. And open PuTTY. In the left panel of the category, goto Connection > SSH > Auth and select the checkbox next to Allow agent forwarding
PuTTY agent forwarding
Now you are ready to connect to your jump/bastion host. And from there to the remote Linux machines. You will not be prompted for key since it’s already added to pagent and PuTTY is making sure to forward it for further connections!
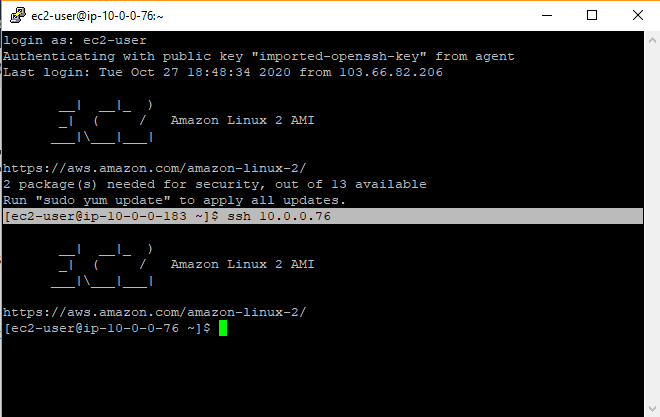
Below is my test where I connected my instance in a private subnet without supplying the SSH key in command.
Login using SSh agent forwarding!
That’s all! You can add a number of keys in pagent and use them without leaving a key footprint on intermediate servers!
Everything you need to know about Bastion host in AWS infrastructure.
All about bastion host!
In this article, we will touch base below points in context to bastion host:
What is a bastion host?
What is the role of bastion host in AWS infrastructure?
How to deploy and configure a bastion host?
Lets start with the introduction to bastion host.
What is bastion host?
A bastion host is a Windows or Linux machine sitting in the Public subnet of your AWS infrastructure. It’s a machine that is used to securely access the rest of the infrastructure for administration purposes. Since you don’t want to expose everything in your infra to the internet, the bastion host will do that heavy lifting and hence securing the infrastructure.
As this host is exposed to the internet it is recommended to implement a strong system hardening on this machine. Secure this machine at OS level with all available hardening techniques since this machine is a gateway to your whole infrastructure.
What is the role of bastion host in AWS infrastructure?
As explained above, the bastion host will be used to access the rest of the infrastructure. for administrative tasks. Sometimes, cloud newbies treat bastion host as a way of accessing instances in the private subnet only. But that’s not it. One should block access (SSH or RDP) to instances in the public subnet as well and allow them only through the bastion host.
This way one can secure administrative level access to instances in public and private subnets. And this is the recommended practice. Your all instances no matter they are in which subnet should be accessible via bastion host only.
In a nutshell, bastion hosts used to secure administrative access to instances in private and public subnets.
How to deploy bastion and configure host?
For this exercise, we will deploy Linux bastion host in the same architecture which we used while creating our last custom VPC. In the case of the Windows environment, SSH can be replaced with RDP, and Linux bastion can be replaced with a Windows machine. Bastion host deployment and configuration can be summarised as –
Deploy EC2 instance in the public subnet (that’s your bastion host)
Create a new security group which allows SSH traffic from bastion to destination public and private subnets
Attach security group to instances
Lets dive into it.
For step 1, I deployed Amazon Linux 2 EC2 instance. You can even use customized AMI which has all hardening already done, logging enabled for a bastion, etc things. But for this exercise, I will be using normal Amazon Linux AMI. The SG created along with this launch should allow SSH traffic from 0.0.0.0/0. Let’s tag this SG as bastion-sg
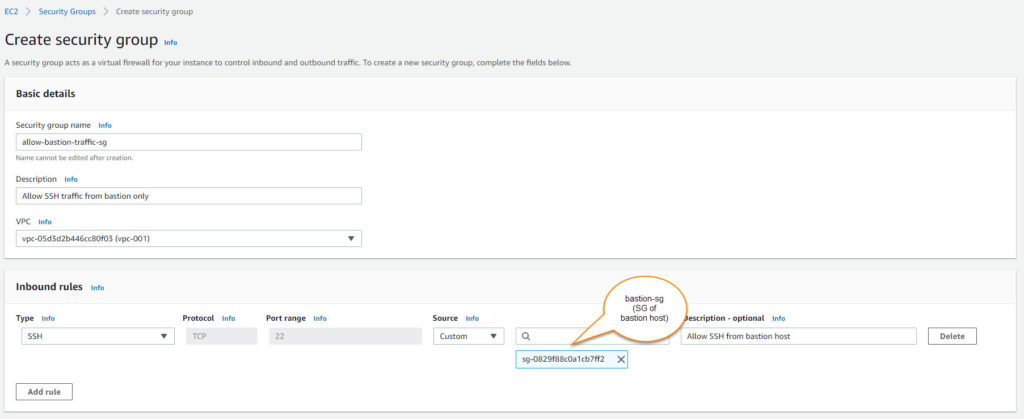
Now, it’s time to create a custom security group to allow bastion traffic to instances. Custom SG is handy so that you can attach it instances while launching and you don’t need to manually edit instances security groups to allow bastion traffic. On other hand, in this SG we are allowing traffic from SG of bastion host. So even in future IP of bastion host gets changed (or even bastion host gets replaced) we don’t have to edit any SG settings anywhere. The only thing you need to keep in mind that, you need to deploy a new bastion host with the existing bastion SG.
On the left navigation plane, click on Security Groups
Now on the security groups page, click on the Create security group button
You will be presented with the below screen :
Create custom security group
You need to fill in below details-
Security group name: For identification
Description
VPC: Select your VPC from the dropdown.
Inbound rules: Allow SSH from SG of bastion host (bastion-sg from step 1)
Outbound rule: Keep it default. Allow all traffic.
Tags: optional.
This SG (allow-bastion-traffic-sg) to be attached with instances launched in public/private instances. Make sure you remove the existing default SG attached to them which allows SSH traffic from 0.0.0.0/0 OR edit an inbound rule in the existing SGs which allows this.
It confirms that SSH traffic to all instances in your VPC will be allowed only from the bastion host.
At this stage, bastion host SG should have below inbound rule:
Inbound rule for bastion host SG
And instances in VPC (any subnet) should have below inbound rule where the source is bastion-sg (SG of bastion host):
Inbound rule for instances
We are all set! It’s time to test. Below are 2 instances for testing. Once is the bastion and another is launched in the private subnet. This could work with an instance in the public subnet as well but they will be having public IP allocated as well so to avoid confusion I took an instance from the private subnet.
Instance details
I logged in to the bastion host using its public IP. Remember, we deployed bastion host in public subnet hence it will get public IP on launch. And since public IP reachable over the internet, I can directly putty to public IP of bastion host.
Once I am in the bastion host, I tried to ssh to the private IP of an instance launched in the private subnet. Since instance is launched in a private subnet, it won’t be allocated with the public IP so it’s not reachable over the internet. So I have to use a bastion host to get into it and it worked!
Note: I used PuTTY SSH agent forwarding here so I did not have to supply the SSH key in command when connecting to the private instance.
SSH from bastion to private instance
In such a way you can secure administrative access to your instances in VPC (inside public and private subnet) by using bastion hosts.
A quick article on AWS VPC creation along with screenshots.
VPC Creation!
In this article, we will be creating a custom VPC in the AWS account and check all available options along with screenshots. You must be aware that every AWS account comes with a default VPC already created for you. Few of the AWS services require the existence of this default VPC while it’s recommended to have custom VPC for some. So without further delay, let’s start with some VPC introduction.
What is VPC?
VPC stands for Virtual Private Cloud. It’s your own isolated network section in the AWS cloud. It’s safe to say it’s your own small cloud within the AWS cloud! VPC can be visualized as the outer boundary of your account in AWS within which you deploy all your cloud resources.
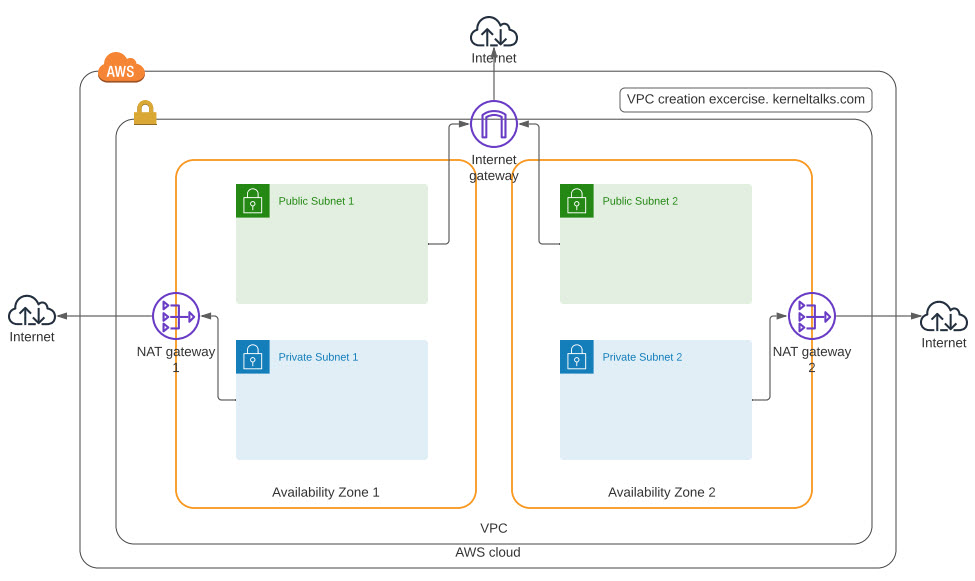
For this exercise we will try to implement below design in AWS.
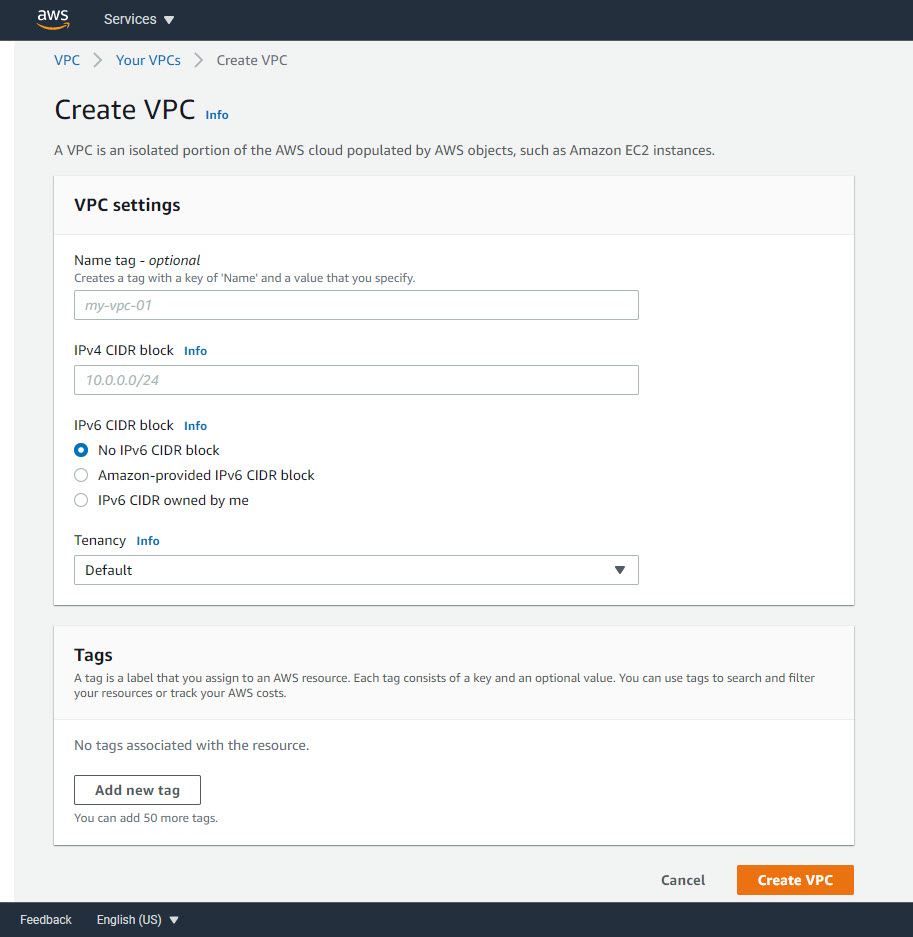
Now on the VPC page, click on the Create VPC button
You will be presented with the below screen :
Create VPC screen
Here you can fill in below details-
Name tag (optional): For identifying your VPC within your account.
IPv4 CIDR block: This CIDR block will be available throughout your VPC. Make sure you choose wisely to support your IP appetite. You can later add 4 more secondary CIDR blocks to VPC. Plan accordingly.
IPv6 CIDR block: Depending on your requirement. You can specify your own block or use Amazon assigned one.
Tenancy: Choose how your instances will be launched.
Default: Follow the tenancy attribute defined at instance launch
Dedicated: Regardless of tenancy type selected at instance launch, always launch an instance on dedicated hardware.
Tags: Add tags to manage billing, identification, etc. If you choose the Name tag in the first field then it will appear here automatically.
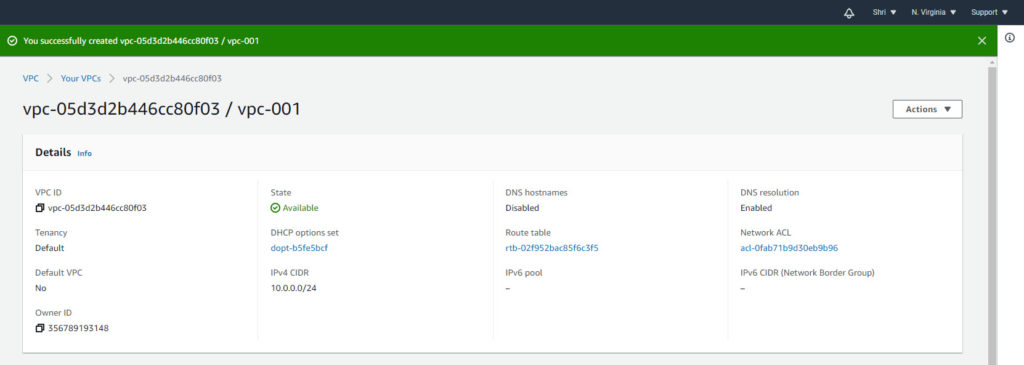
Once you fill everything, click Create VPC and your VPC will be created. You should be seeing a confirmation screen-
VPC Creation confirmation
Now, your VPC is created. You need to remember below points when you create custom VPC with this method :
Along with this VPC below resources are created automatically –
1 NACL
All traffic is allowed in and out with ALLOW rule with rule number 100
Also has the * DENY rule which means if the packet does not match any of the specified rules it will be denied.
1 DHCP options set
With Internal domain name
No NTP servers defined
Name servers pointing to Amazon-provided DNS
You can not edit it. You can delete this one and create a new one.
1 route table
All traffic destined to remain within VPC i.e. Target defined as local
1 security group
All Traffic allowed in inbound and outbound rules.
You need to create below manually –
Subnets
Internet gateway (If Public subnet is created)
NAT gateways (For internet access to Private subnet)
So to launch an instance in this VPC you have to create a subnet first.
How to create subnets in custom VPC?
Lets go ahead and create subnets in our custom VPC.
Subnet creation needs proper planning. You need to decide on how you want to use your available IP pool. For example, since we have used the 10.0.0.0/24 CIDR block while creating VPC, we have 256 IPv4 addresses available in our VPC. I plan for –
Use of 2 availability zones for HA
Each zone should have 1 public and 1 private subnet.
IPs to be spread across all subnets equally.
So in a nutshell I have to spread 256 IPs in 4 subnets. Also, you should be aware that in each subnet 5 IPs are not available for use –
First IP: Network address
Second IP: AWS VPC router
Third IP: AWS DNS
Fourth IP: Reserved by AWS for future use
Last IP: Broadcast and since the broadcast is blocked in AWS this IP can not be used.
Now, 4 subnets that mean 20 IPs are reserved and not available to us. So in total, we have 246 IPs available to use when we create below 4 subnet –
10.0.0.0/26
10.0.0.64/26
10.0.0.128/26
10.0.0.192/26
Calculation is done! Its time to create subnets in AWS console.
Note: For CIDR notation understanding use https://cidr.xyz/ and for subnetting use online subnet calculators.
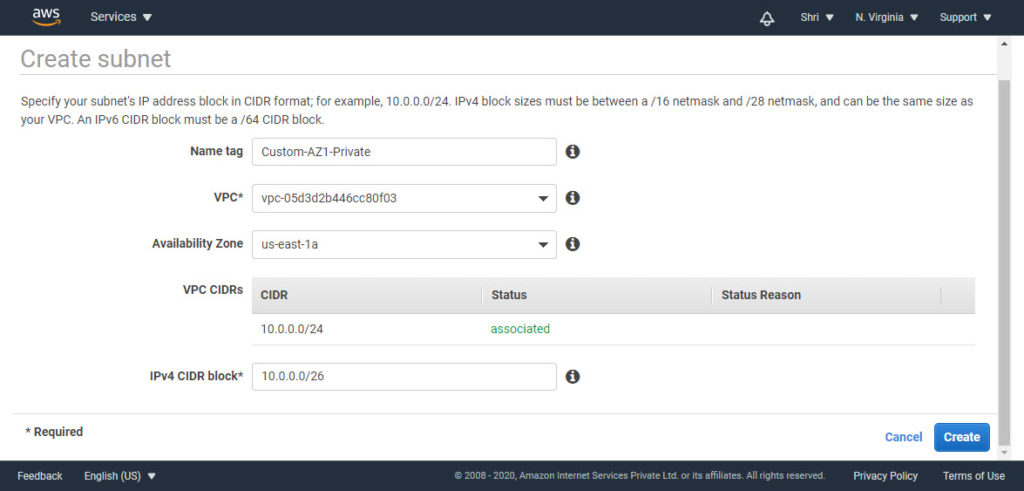
On the same VPC AWS console, in the left navigation pane click on Subnets. Then click on the Create subnet button. You should see below screen –
Create subnet screen
Here we need to fill in –
Name tag: For identification purpose
VPC: Select your custom VPC from the dropdown.
Availability Zone: Select desired AZ from drop-down
IPv4 CIDR block: Choose from your calculation (which we did earlier)
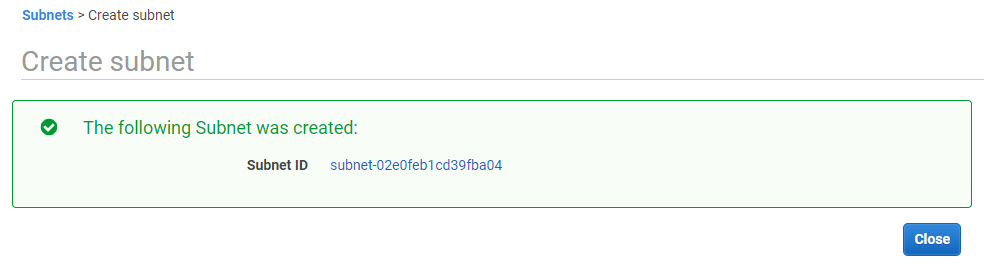
Once done, click Create button. Your subnet should be created and you will see confirmation like this –
Subnet created.
Repeat the same process to create the rest of the subnets. Once all subnets are created you should see them in the subnet dashboard.
Subnet list
If you observe here, all subnets will be associated with the same route table which was created during VPC creation. This needs to be changed.
For public subnet, we need to create an internet gateway, create a custom route table who has a route to this IG, and then associate public subnets to that route table. This way we will enable internet connectivity for public subnets.
Optional: You can enable Auto-assign IPv4 setting in Public subnet settings which will enable auto-assign public IPv4 addresses to instances launched in this subnet.
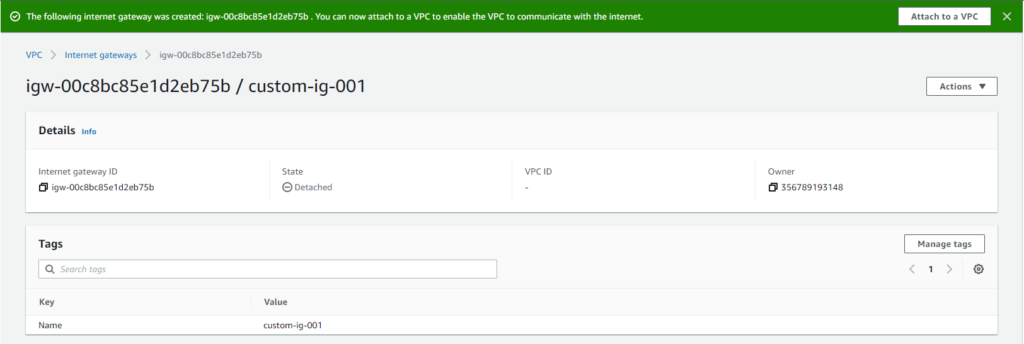
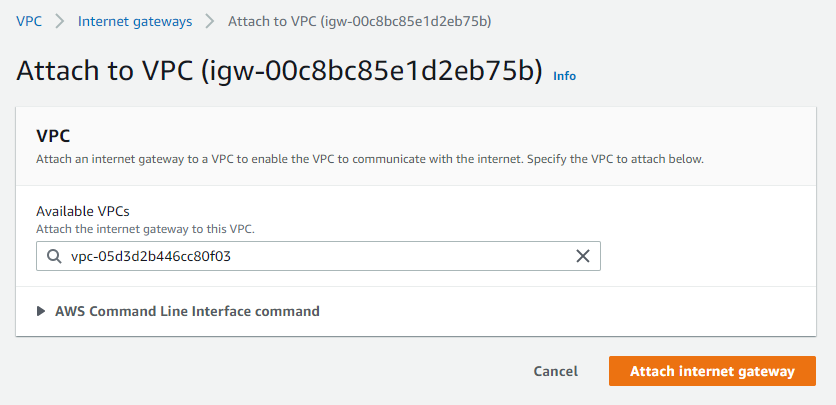
How to create Internet Gateway and associate them with subnet?
On the left navigation plane, click on Route Tables
Now on the route tables page, click on the Create route table button
Where you just need to add a Name tag for it, select custom VPC from the drop-down and click the Create button
Your route table will be created.
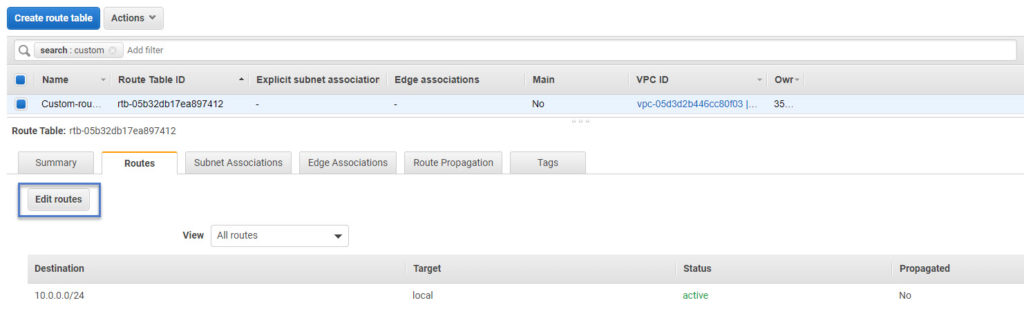
Now go back to Route Tables screen and select the recently created route. And click on Routes tab
Edit routes in route table
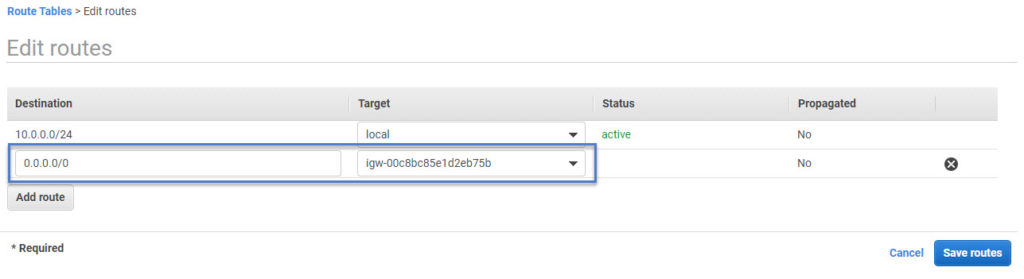
In the edit route screen, you need to add a route for destination 0.0.0.0/0 with a target to a recently created internet gateway. And then click Save routes. Make sure you keep the existing local route since it’s needed within VPC communication.
Adding internet route to route table
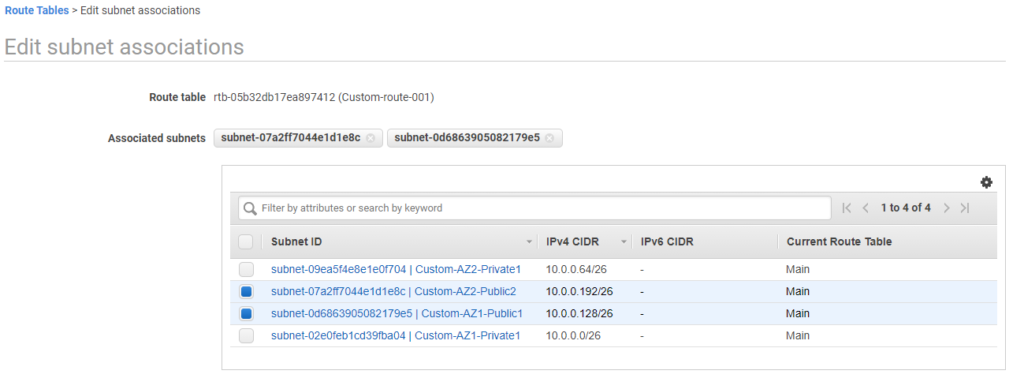
Now the internet route table is ready. We need to associate it with the public subnets created in earlier steps.
Select Subnet Associations tab under same route table and click on Edit subnet associations button
Subnet associations
Select public subnets and click Save
At this stage, our subnets are properly segregated as public and private. Public subnets are associated with route table having a route to the internet and private subnet associated with route table having route for only within VPC communication.
The last piece of the puzzle is to create a NAT gateway for instances in the private subnet. Using NAT gateway, those instances can access the internet for downloading updates, etc. and yet they won’t be accessible from the internet i.e. not exposed on the open internet.
If you want absolute isolation from the internet for a private subnet then you can skip the NAT gateway topics.
Elastic IP availability is the pre-requisite for creating a NAT gateway. If you don’t have an Elastic IP allocated in your account, please get it allocated first.
On the left navigation plane, click on Elastic IPs
Now on the Elastic IPs page, click on the Allocate Elastic Ip address button
Where you just need to add a Network Broder Group for it and click the Allocate button.
Network broder group is a collection of AZs where allocated Elastic IPs will be available for use. In a nutshell, you will be choosing a region here since Elastic IPs are regional resources.
On the left navigation plane, click on NAT Gateways
Now on the NAT Gateway page, click on the Create NAT gateway button
Where you need to add a Name tag for it, Subnet, Elastic IP and click the Create internet gateway button
make sure you select public subnet here and Elastic Ip which we got allocated in the previous step.
NAT Gateway is now created. We need to create a custom route table which has a target to this NAT gateway. Follow the same procedure we seen above for IG and associate private subnet to this new custom route table.
Route to NAT gateway
Repeat the same [procedure to create NAT gateway in another Availability zone as well so that it can be tagged to private subnet in that AZ. Remember NAT gateway is not a regional resource. You need to create it per availability zone.
At this stage, both subnets are all set for instance deployments.
A public subnet is associated with a routing table having a route to the Internet gateway
A private subnet is associated with route table having a route to NAT gateway
This completes our custom VPC creation and we achieved the targeted design !