Category Archives: Cloud Services

AWS cloud terminology

Understand AWS cloud terminology of 71 services! Get acquainted with terms used in the AWS world to start with your AWS cloud career!

AWS Cloud terminology

AWS i.e. Amazon Web Services cloud platform providing list of web services on pay per use basis. It’s one of the famous cloud platforms to date. Due to flexibility, availability, elasticity, scalability, and no-maintenance, many corporations are moving to the cloud.  Since many companies using these services, it becomes necessary that sysadmin or DevOps should be aware of AWS.

This article aims at listing services provided by AWS and explaining the terminology used in the AWS world.

As of today, AWS offers a total of 71 services which are grouped together in 17 groups as below :

Compute

It’s a cloud computing means virtual server provisioning. This group provides the below services.

  1. EC2: EC2 stands for Elastic Compute Cloud. This service provides you scalable virtual machines per your requirement.
  2. EC2 container service: Its high performance, highly scalable which allows running services on EC2 clustered environment
  3. Lightsail: This service enables the user to launch and manage virtual servers (EC2) very easily.
  4. Elastic Beanstalk: This service manages capacity provisioning, load balancing, scaling, health monitoring of your application automatically thus reducing your management load.
  5. Lambda: It allows you to run your code only when needed without managing servers for it.
  6. Batch: It enables users to run computing workloads (batches) in a customized managed way.

Storage

It’s cloud storage i.e. cloud storage facility provided by Amazon. This group includes :

  1. S3: S3 stands for Simple Storage Service (3 times S). This provides you online storage to store/retrieve any data at any time, from anywhere.
  2. EFS: EFS stands for Elastic File System. It’s online storage that can be used with EC2 servers.
  3. Glacier: Its a low cost/slow performance data storage solution mainly aimed at archives or long term backups.
  4. Storage Gateway: Its interface which connects your on-premise applications (hosted outside AWS) with AWS storage.

Database

AWS also offers to host databases on their Infra so that clients can benefit from cutting edge tech Amazon have for faster/efficient/secured data processing. This group includes :

  1. RDS: RDS stands for Relational Database Service. Helps to set up, operate, manage a relational database on cloud.
  2. DynamoDB: Its NoSQL database providing fast processing and high scalability.
  3. ElastiCache: It’s a way to manage in-memory cache for your web application to run them faster!
  4. Redshift: It’s a huge (petabyte-size) fully scalable, data warehouse service in the cloud.

Networking & Content Delivery

As AWS provides a cloud EC2 server, its corollary that networking will be in the picture too. Content delivery is used to serve files to users from their geographically nearest location. This is pretty much famous for speeding up websites nowadays.

  1. VPC: VPC stands for Virtual Private Cloud. It’s your very own virtual network dedicated to your AWS account.
  2. CloudFront: Its content delivery network by AWS.
  3. Direct Connect: Its a network way of connecting your datacenter/premises with AWS to increase throughput, reduce network cost, and avoid connectivity issues that may arise due to internet-based connectivity.
  4. Route 53: Its a cloud domain name system DNS web service.

Migration

Its a set of services to help you migrate from on-premises services to AWS. It includes :

  1. Application Discovery Service: A service dedicated to analyzing your servers, network, application to help/speed up the migration.
  2. DMS: DMS stands for Database Migration Service. It is used to migrate your data from on-premises DB to RDS or DB hosted on EC2.
  3. Server Migration: Also called SMS (Server Migration Service) is an agentless service that moves your workloads from on-premises to AWS.
  4. Snowball:  Intended to use when you want to transfer huge amount of data in/out of AWS using physical storage appliances (rather than internet/network based transfers)

Developer Tools

As the name suggests, its a group of services helping developers to code easy/better way on the cloud.

  1. CodeCommit: Its a secure, scalable, managed source control service to host code repositories.
  2. CodeBuild: Code builder on the cloud. Executes tests codes and build software packages for deployments.
  3. CodeDeploy: Deployment service to automate application deployments on AWS servers or on-premises.
  4. CodePipeline: This deployment service enables coders to visualize their application before release.
  5. X-Ray: Analyse applications with event calls.

Management Tools

Group of services which helps you manage your web services in AWS cloud.

  1. CloudWatch: Monitoring service to monitor your AWS resources or applications.
  2. CloudFormation: Infrastructure as a code! It’s a way of managing AWS relative infra in a collective and orderly manner.
  3. CloudTrail: Audit & compliance tool for AWS account.
  4. Config: AWS resource inventory, configuration history, and configuration change notifications to enable security and governance.
  5. OpsWorks: Automation to configure, deploy EC2 or on-premises compute
  6. Service Catalog: Create and manage IT service catalogs which are approved to use in your/company account
  7. Trusted Advisor: Its AWS AI helping you to have better, money-saving AWS infra by inspecting your AWS Infra.
  8. Managed Service: Provides ongoing infra management

Security, Identity & compliance

Important group of AWS services helping you secure your AWS space.

  1. IAM: IAM stands for Identity and Access Management. Controls user access to your AWS resources and services.
  2. Inspector: Automated security assessment helping you to secure and compliance your apps on AWS.
  3. Certificate Manager: Provision, manage, and deploy SSL/TLS certificates for AWS applications.
  4. Directory Service: Its Microsoft Active Directory for AWS.
  5. WAF & Shield: WAF stands for Web Application Firewall. Monitors and controls access to your content on CloudFront or Load balancer.
  6. Compliance Reports: Compliance reporting of your AWS infra space to make sure your apps and the infra are compliant with your policies.

Analytics

Data analytics of your AWS space to help you see, plan, act on happenings in your account.

  1. Athena: Its a SQL based query service to analyze S3 stored data.
  2. EMR: EMR stands for Elastic Map Reduce. Service for big data processing and analysis.
  3. CloudSearch: Search capability of AWS within application and services.
  4. Elasticsearch Service: To create a domain and deploy, operate, and scale Elasticsearch clusters in the AWS Cloud
  5. Kinesis: Stream’s large amounts of data in real-time.
  6. Data Pipeline: Helps to move data between different AWS services.
  7. QuickSight: Collect, analyze, and present insight into business data on AWS.

Artificial Intelligence

AI in AWS!

  1. Lex: Helps to build conversational interfaces in an application using voice and text.
  2. Polly: Its a text to speech service.
  3. Rekognition: Gives you the ability to add image analysis to applications
  4. Machine Learning: It has algorithms to learn patterns in your data.

Internet of Things

This service enables AWS highly available on different devices.

  1. AWS IoT: It lets connected hardware devices to interact with AWS applications.

Game Development

As name suggest this services aims at Game Development.

  1. Amazon GameLift: This service aims for deploying, managing dedicated gaming servers for session-based multiplayer games.

Mobile Services

Group of services mainly aimed at handheld devices

  1. Mobile Hub: Helps you to create mobile app backend features and integrate them into mobile apps.
  2. Cognito: Controls mobile user’s authentication and access to AWS on internet-connected devices.
  3. Device Farm: Mobile app testing service enables you to test apps across android, iOS on real phones hosted by AWS.
  4. Mobile Analytics: Measure, track, and analyze mobile app data on AWS.
  5. Pinpoint: Targeted push notification and mobile engagements.

Application Services

Its a group of services which can be used with your applications in AWS.

  1. Step Functions: Define and use various functions in your applications
  2. SWF: SWF stands for Simple Workflow Service. Its cloud workflow management helps developers to co-ordinate and contribute at different stages of the application life cycle.
  3. API Gateway: Helps developers to create, manage, host APIs
  4. Elastic Transcoder: Helps developers to converts media files to play of various devices.

Messaging

Notification and messaging services in AWS

  1. SQS: SQS stands for Simple Queue Service. Fully managed messaging queue service to communicate between services and apps in AWS.
  2. SNS: SNS stands for Simple Notification Service. Push notification service for AWS users to alert them about their services in AWS space.
  3. SES: SES stands for Simple Email Service. Its cost-effective email service from AWS for its own customers.

Business Productivity

Group of services to help boost your business productivity.

  1. WorkDocs: Collaborative file sharing, storing, and editing service.
  2. WorkMail: Secured business mail, calendar service
  3. Amazon Chime: Online business meetings!

Desktop & App Streaming

Its desktop app streaming over cloud.

  1. WorkSpaces: Fully managed, secure desktop computing service on the cloud
  2. AppStream 2.0: Stream desktop applications from the cloud.

How to open port on AWS EC2 Linux server

Small tutorial with screenshots that show how to open port on the AWS EC2 Linux server. This will help you to manage port-specific services on the EC2 server.

Open port on AWS EC2 Linux

AWS i.e. Amazon Web Services is no new term for the IT world. It’s a cloud services platform offered by Amazon. Under its Free tier account, it offers you limited services free of cost for one year. This is one of the best places to try out new technologies without spending much on the financial front.

AWS offers server computing as one of their services and they call them EC (Elastic Computing). Under this, we can build our Linux servers. We have already seen how to set up a Linux server on AWS free of cost.

By default, all Linux servers build under EC2 has post 22 i.e. SSH service port (inbound from all IP) is open only. So, if you are hosting any port-specific service then the relative port needs to be open on the AWS firewall for your server.

Also, it has port 1 to 65535 are open too (outbound for all traffic). If you want to change this you can use the same below process for editing outbound rules too.

Setting up a firewall rule on AWS for your server is an easy job. You will be able to open ports in seconds for your server. I will walk you through the procedure with screenshots to open a port for the EC2 server.

Step 1

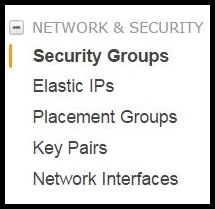
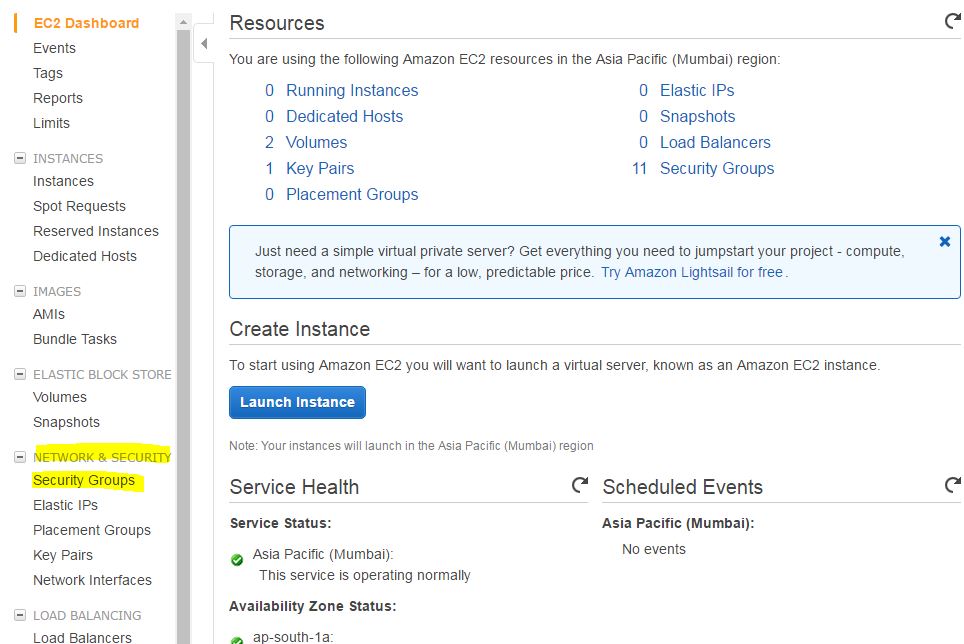
Log in to the AWS account and navigate to the EC2 management console. Go to Security Groups under Network & Security menu as highlighted below :

AWS EC2 management console

Step 2

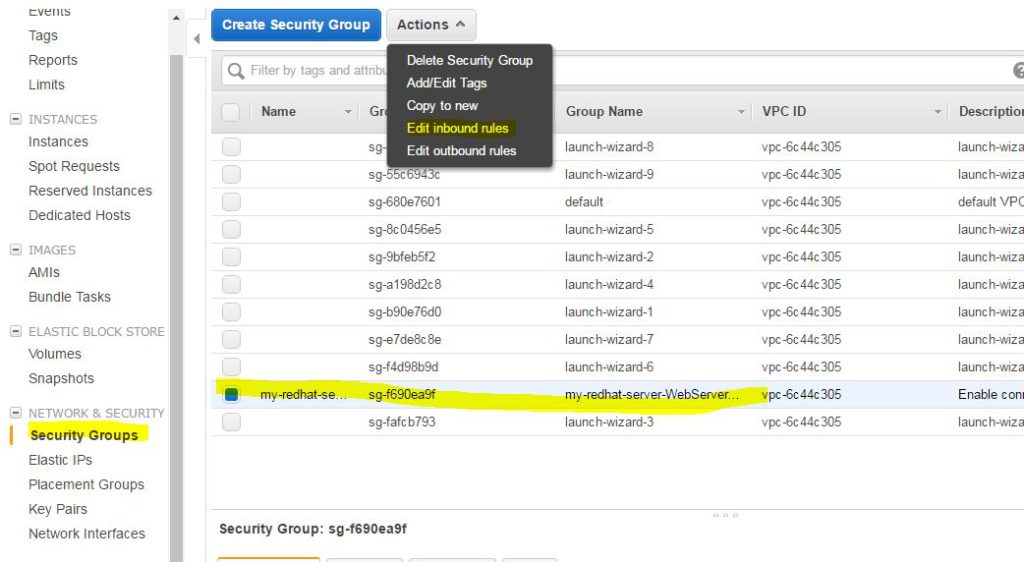
On Security, Groups screen select your EC2 server and under Actions menu select Edit inbound rules

AWS inbound rules menu

Step 3

Now you will be presented with an inbound rule window. You can add/edit/delete inbound rules here. There are several protocols like HTTP, nfs, etc listed in the drop-down menu which auto-populate ports for you. If you have customer service and port you can define it too.

AWS add inbound rule

For example, if you want to open port 80 then you have to select :

  • Type: HTTP
  • Protocol: TCP
  • Port range: 80
  • Source: Anywhere (Open port 80 for all incoming req from any IP (0.0.0.0/0),  My IP: then it will auto-populate your current public internet IP

Step 4

That’s it. Once you save these settings your server inbound port 80 is open! you can check by telneting to port 80 for your EC2 server public DNS (can be found it EC2 server details)

You can also check it on websites like ping.eu.

The same way outbound rules can be edited too! These changes are active on the fly and don’t need any downtime.

How to install EC2 Linux server in AWS with screenshots

Learn how to install the EC2 Linux server of your favorite distro on the Amazon Web Services cloud platform. Free Linux server for learning and practicing. 

Amazon Web Services AWS is one of the cloud platforms which offers various computing facilities online. For a free tier account, there are enough services offered for a normal user who aims for testing or learning new technologies without spending much. You can sign up for a free account (12 months free) here which will require your valid mobile number and credit card information for validation.

In this post, we will be using AWS to install the Linux server which we can use for practice/ hand-on experience at home. One of the other alternatives is to install Vmware on your desktop/laptop and then install Linux in its virtual machine. But this way requires a good hardware configuration of your laptop/desktop. Hosting your Linux on cloud is much easy and it’s not costing you anything for low usage!

AWS offers below a list of distros to install on its EC2 (server computing module) platform.

  • Redhat
  • Cent OS
  • Debian
  • Fedora
  • Gentoo
  • OpenSuse
  • Suse Linux
  • Ubuntu
  • Amazon Linux

You can have a hand on to all these distros within minutes after signing up for your account!  Of course, you will be having root administrator access on these systems! Let’s walk through steps to get your Linux server ready in minutes on AWS.

Step 1.

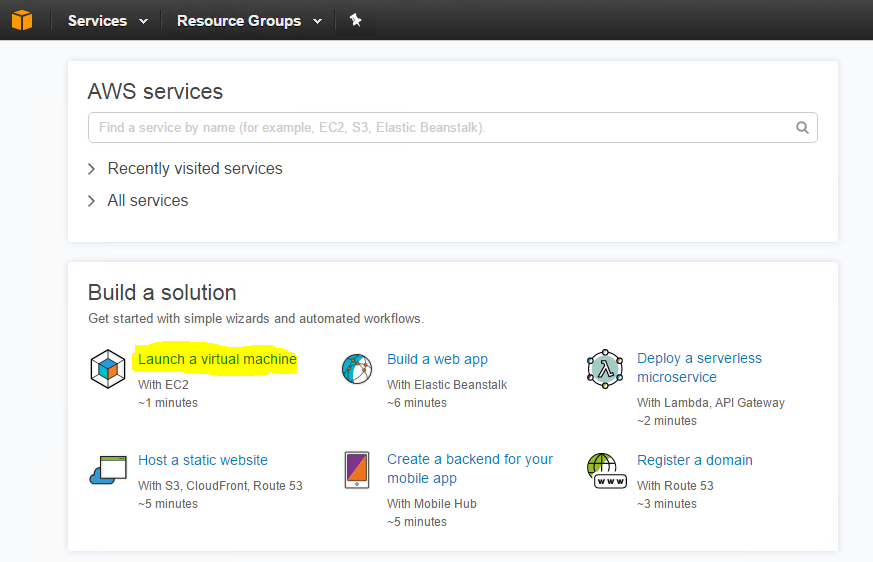
Login to AWS account and from landing page select “Launch a virtual machine” under ‘Build a solution’ screen.

Step 2.

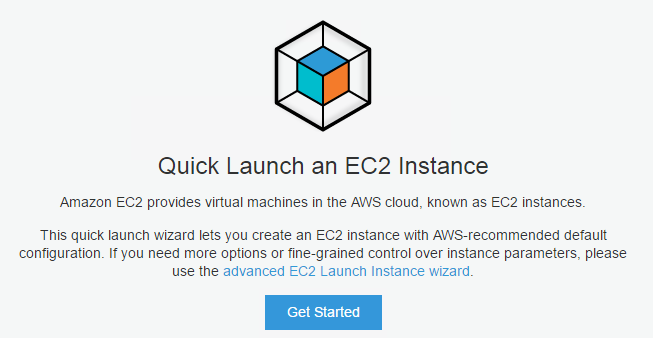
You will be presented with the ‘Quick Launch EC2 Instance’ screen. Here you will be able to launch a wizard to get your task done fast or you can go through Advanced selections to decide your final virtual server config. We will be going with a normal wizard. Click the “Get Started” button here.

Step 3.

Now we will walk through wizard for creating our Linux virtual server.

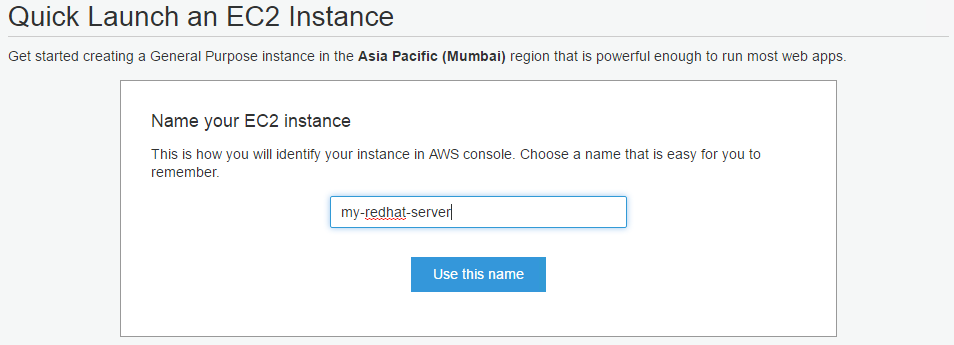
Name your EC2 instance :

Your EC2 linux virtual server name of your choice.

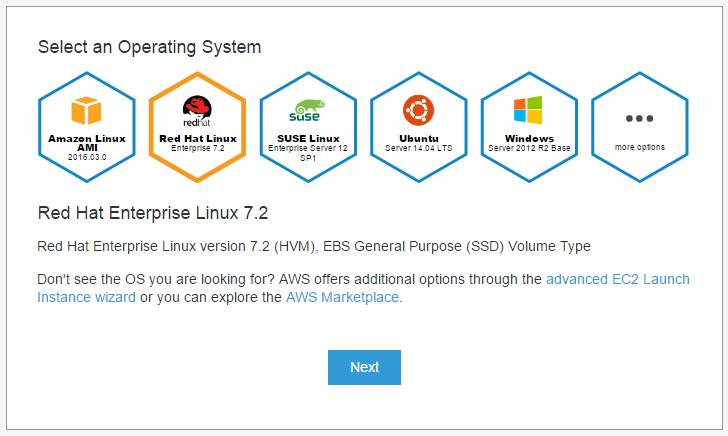
Select your operating system. We are selecting RedHat here.

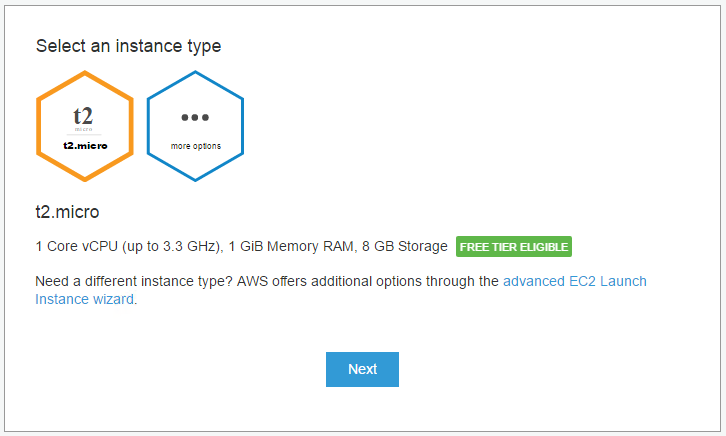
Select an instance type.

This is the type of hardware config you will be needing. For free account, you will be able to select those instances only which is tagged with “Free tier eligible”. Here we are selecting default t2.micro instance which has Single core CPU, 1 GB RAM, and 8GB of HDD.

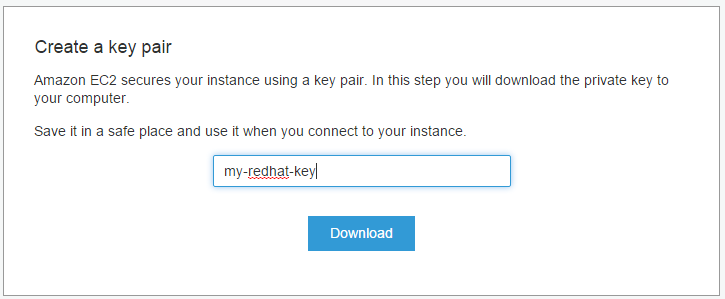
Create a key pair.

This is an important screen. Here you will be given one Private key to download. You will require this key to authenticate yourself while logging into this EC2 Linux server when ready. Give the name of your choice and download the key file and keep it safe.

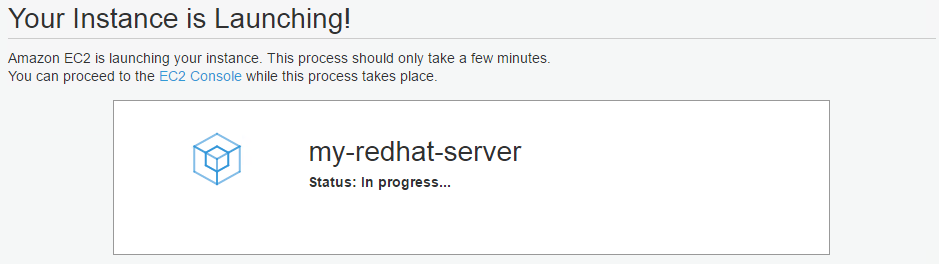
Create this instance.

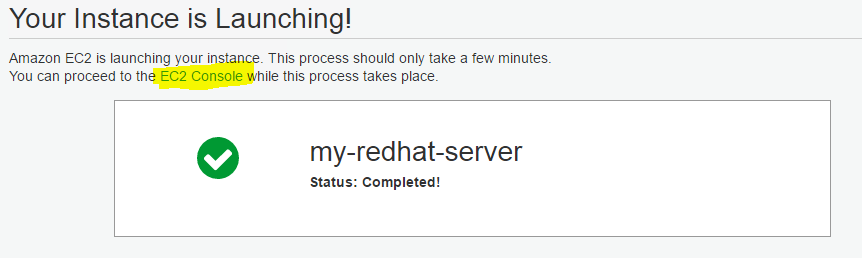
Finally hit create button and your server will be ready in 2 minutes. You will see installing screen.

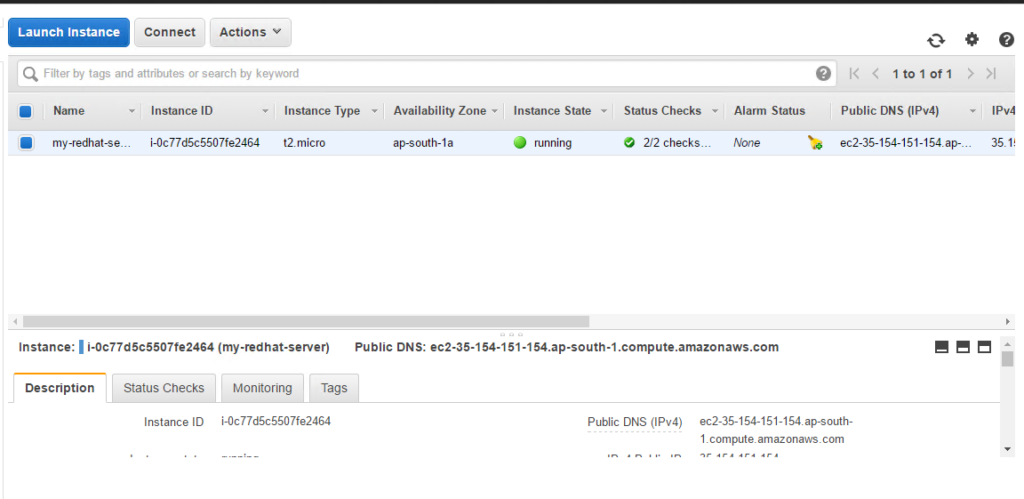
Once complete, click EC2 console link and you will be presented with list of servers under your account.

Step 4.

You can see below the EC2 screen with your server details like instance state, zone, DNS, etc.

Now to connect to this server from your laptop/desktop, you need to use key pair as authentication. Download putty.exe and puttygen.exe from here.

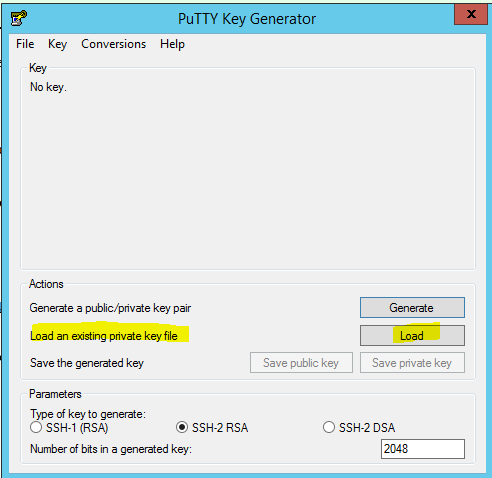
Open puttygen.exe and load your private key which you have downloaded from AWS console in step 2.

Once, successfully loaded you need to click the “Save public key” button and save the key on your desktop/laptop.

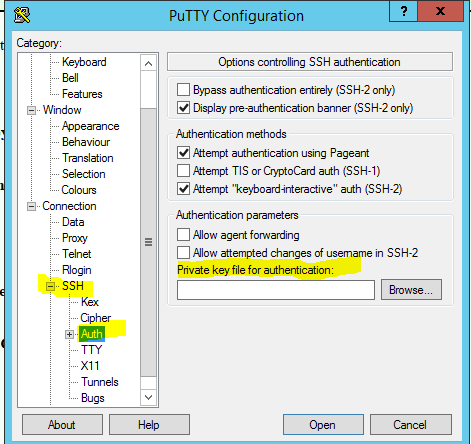
Now open putty.exe. Set your saved key file from puttygen (in the above task) as an SSH authentication. In left-hand side pane, expand SSH then select Auth and on the right-hand side, you will be able to browse your file.

Now your putty.exe is ready to connect with your AWS Linux server. Now head back to EC2 console and copy your server’s public DNS.

Use this it, in putty to connect. And you will be able to connect to the server. Once prompted for username use username from the below table as per your distro (official AMI). You won’t be prompted for a password. Your authentication will be done via key pair you configured in putty settings.

Default ssh usernames for famous Linux in EC2

Linux Distro
Username
Ubuntuubuntu
Debianadmin
Fedorafedora
CentOScentos
RHEL 6.4 & Laterec2-user
RHEL 6.3 & previousroot
SUSEroot
login as: ec2-user
Authenticating with public key "imported-openssh-key"
[ec2-user@ip-172-31-23-115 ~] $ sudo su -
[root@ip-172-31-23-115 ~] # id 
uid=0(root) gid=0(root) groups=0(root) context=unconfined_u:unconfined_r:unconfined_t:s0-s0:c0.c1023  

Once logged in, use sudo su - command and you will be in root account! That’s it, you have an EC2 Linux server with root account in few minutes!

You can install any distro listed above in these instances. Make sure you are not expiring your free usage according to AWS free tier policy otherwise you will be billed on your card. Practice, learn, improve! Have a happy shell!!