Category Archives: User management

How to create an Amazon Cognito User pool for ALB authentication

A step by step procedure to create an Amazon Cognito user pool. All available options are explained.

Amazon Cognito user pool!

One of the best features of AWS application load Balancers (ALB) is authentication! You can offload authentication to ALB that leverages Amazon Cognito in the backend. Amazon Cognito offers identity management through user pools or federated identities. This article will walk you through creating a user pool in Amazon Cognito that is used for ALB authentication. Without further delay, let’s get into it.

  • Login to Amazon Cognito console
  • Click on Manage User Pools
  • On the User pools page, click on Create a user pool button on top right hand corner of the page.
  • That should start user pool creation wizard. Lets go through it one by one –
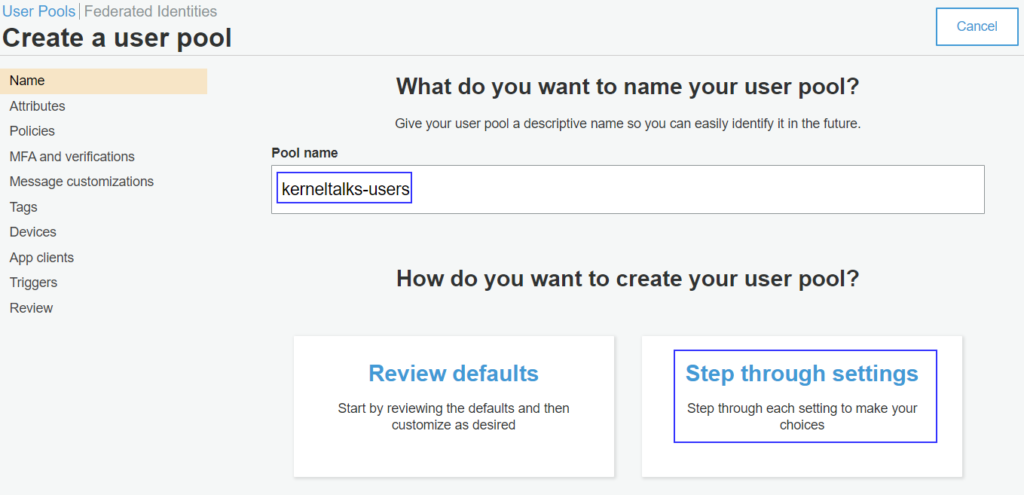
Name

Enter the Pool name and click on the Step through settings button.
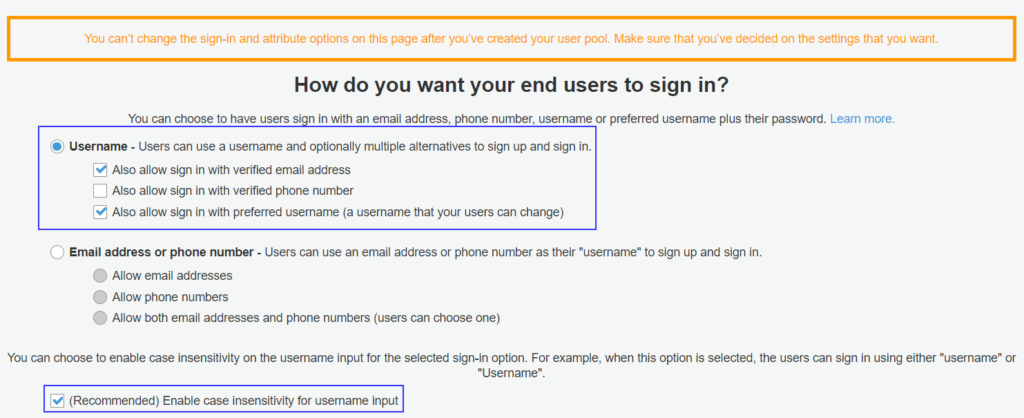
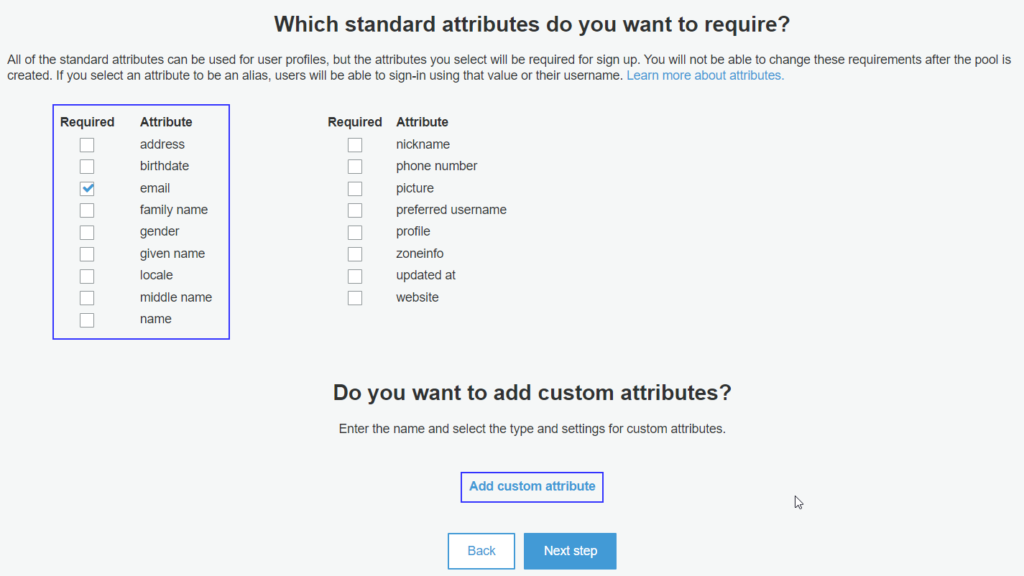
User pool creation wizard

Attributes

Settings on this page can not be edited later so choose wisely!

The first thing you need to choose is the end user’s sign-in method. They should use a username or email address/phone number to signup/sign in. I am choosing a username and also, allowing them to use email addresses while logging in later once they sign up. I am also selecting case sensitive usernames because that makes more sense.

via CognitoChoose the way end-user sign in

The next section of attributes, let you choose through the list of attributes you want the end user to provide when they sign up in Cognito. You can also choose to add a custom attribute here if one is not listed in the standard list.
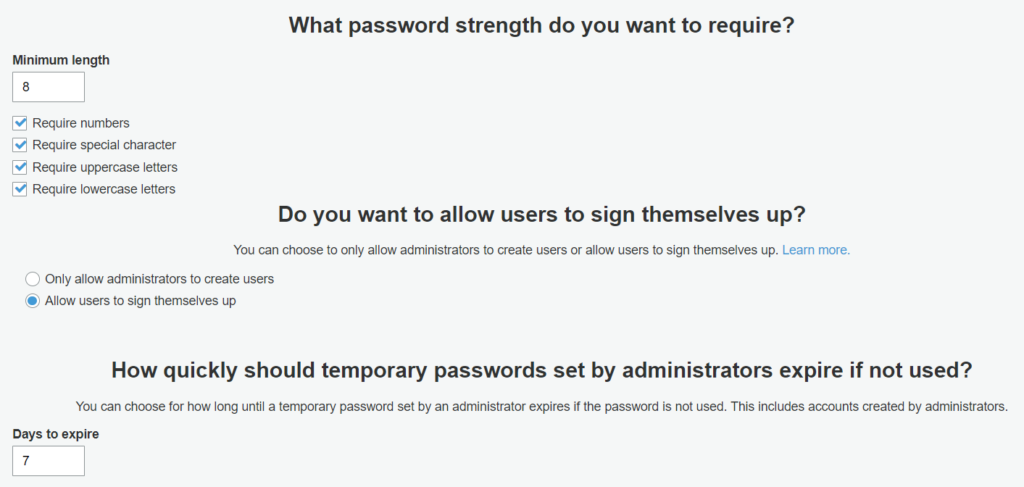
Set end-user attributes

Policies

End-user password policies and controls are defined in this section. All the fields are pretty self-explanatory.

Cognito user pool password policies and account control

MFA and verifications

An extra layer of account security can be defined here. MFA and related configurations. Please note that if you are enabling MFA for end-users then you should be enabling phone number attributes in earlier settings and text messages (verification and subsequent messaging) will incur extra charges. Amazon pretty much explained each option here.

Cognito MFA settings

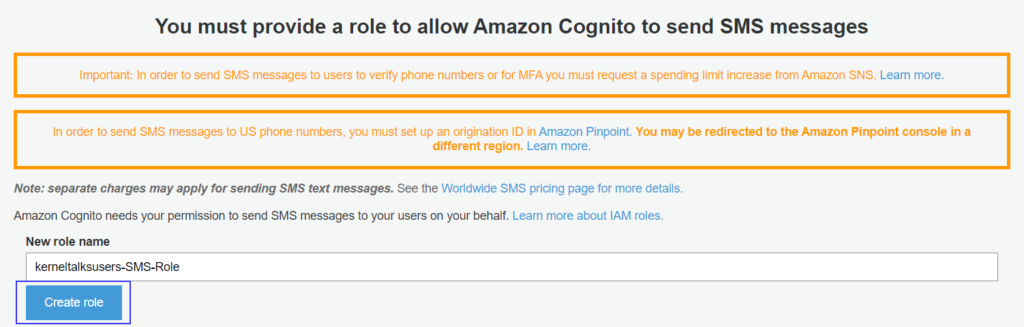
If you are opting for adding and managing phone number attributes then you need to create a role that provides access to Cognito for sending text messages on your behalf.

SMS access related settings

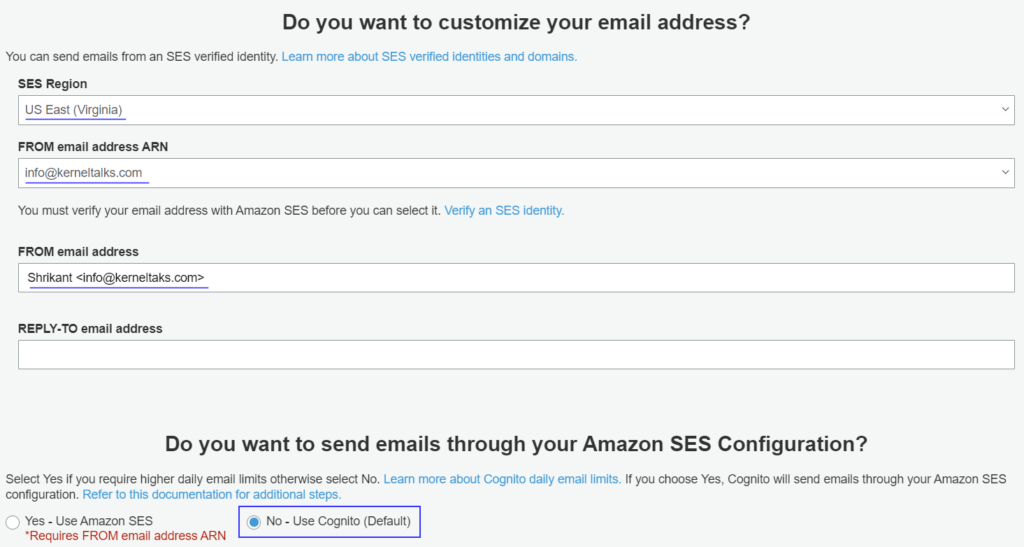
Messages customizations

In this section, you should be customizing the email or SMS messages being sent out by Amazon Cognito on your behalf. It’s a place if you want to have company branding in the communications! Make sure you have a verified email address in Amazon SES to set it as From email address.

Cognito messages customizations

In the later part of the page, you can configure how you want verification to be done using codes or clickable links. Also, you can customize the text of the message here.
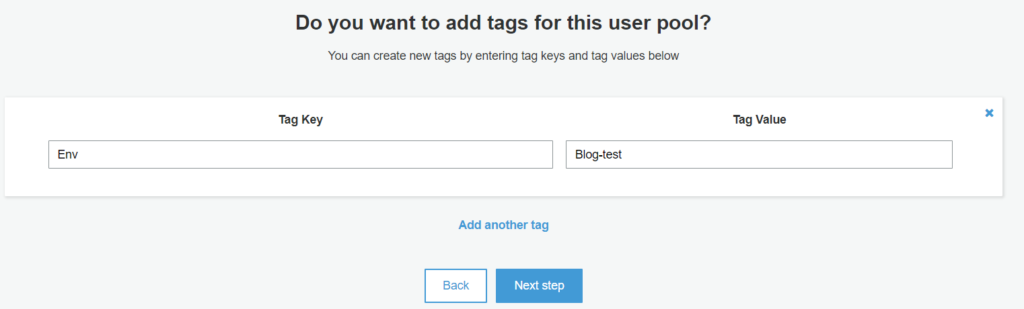
Tags

A place that is crucial but mostly ignored by everyone! Tagging for the user pool.
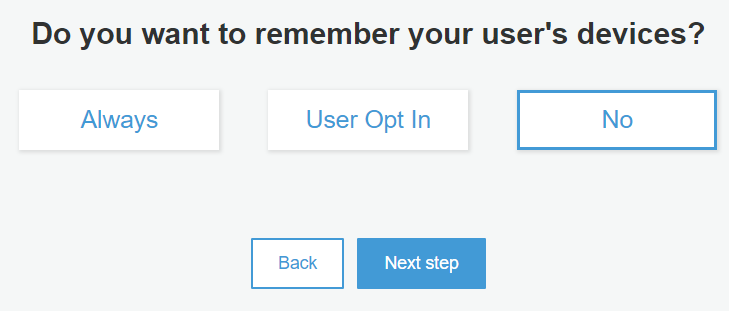
Amazon Cognito user pool tags

Devices

Choose if Cognito should remember the user’s device. This will enhance the user experience. But, to use this feature you should have MFA enabled for end-users. Since we did not opt for it, we will simply say No and move forward.
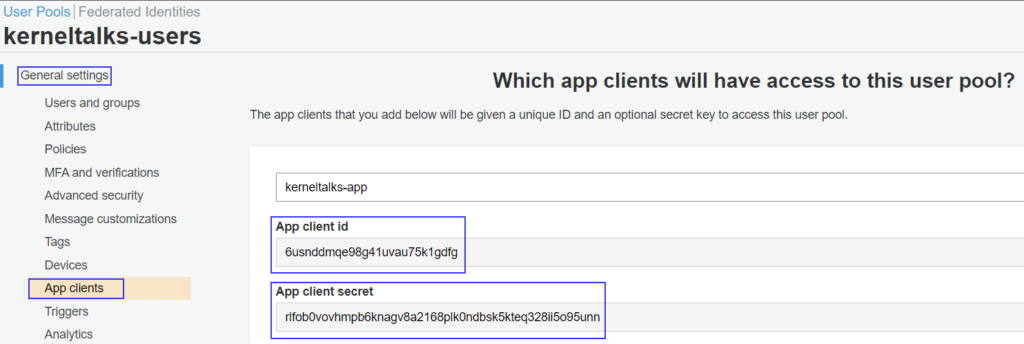
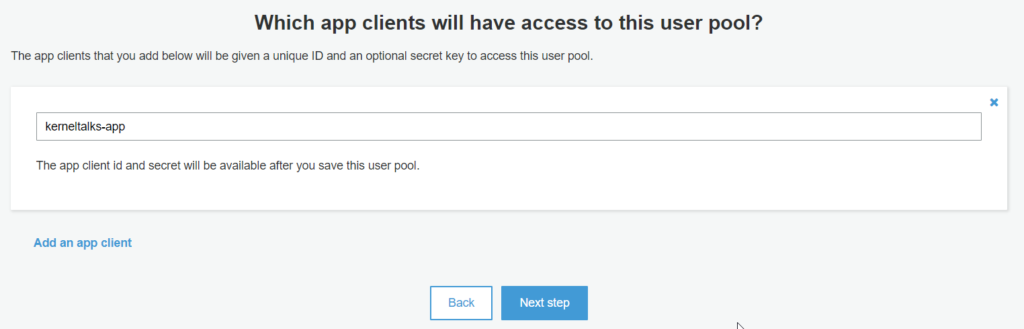
Remember user device

App clients

In this section, you should create an app client which will access this user pool. On the creation of the app client, you will receive the app ID and secret key that you can configure in your applications to access this user pool.

Click on Add an app client

Cognito app client settings
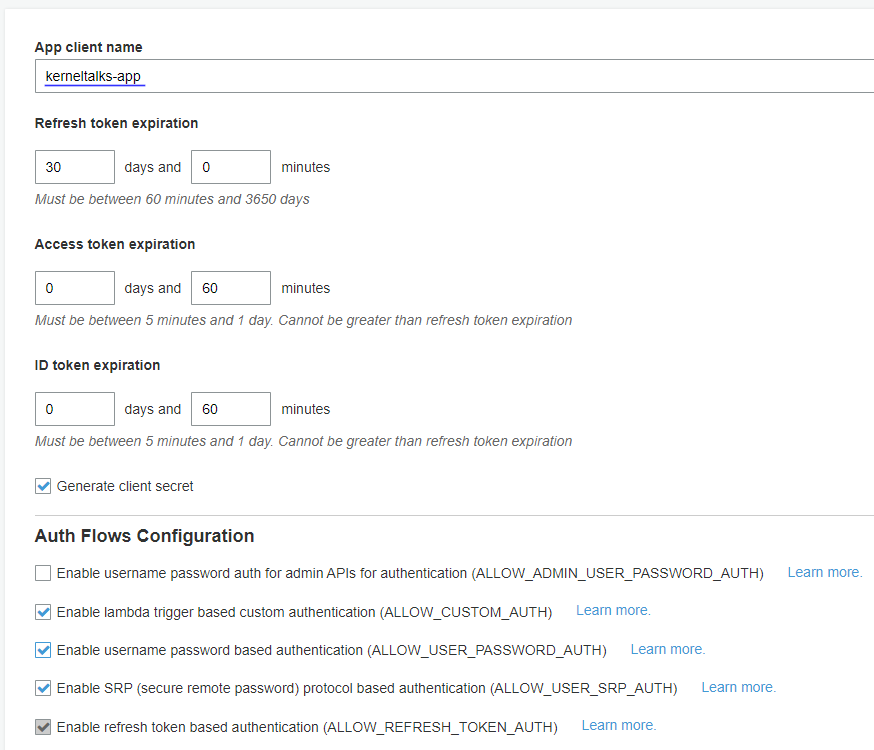
  • App client name: Add unique name
  • Refresh token expiration: Refresh tokens are used to retrieve new ID and access token. Control their expiration here. Read more about refresh tokens
  • Access token expiration: Used for autorizing the API operation. Control expiration here. Read more about access tokens
  • ID token expiration: It used to claim the authenticated user’s identity. Define its expiration limits here. Read more about ID tokens.
  • Auth Flows Configuration: Enable depends on your integration requirements. I selected ALLOW_USER_PASSWORD_AUTH and left others untouched.
Cognito app client security settings
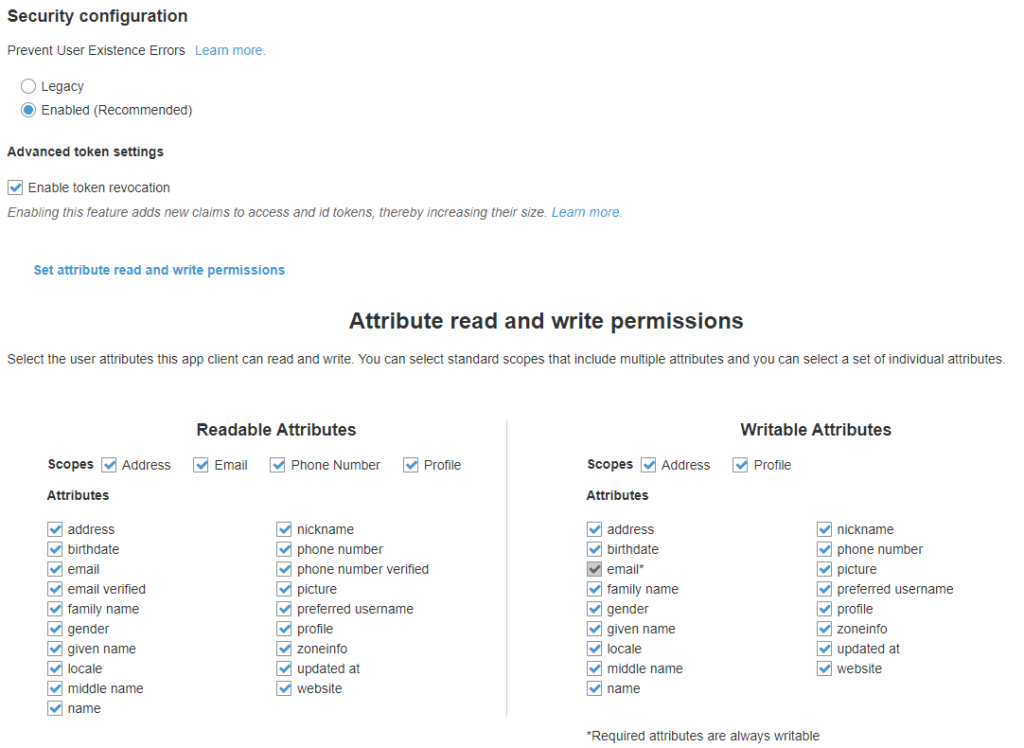
  • Security Configuration: It allows to send back generic error. Select recommened unless you have any other reason not to!
  • Advanced token settings: Enable or disable token revocations.
  • Attributes read and write permissions: Select list of attributes which this app client can read or write.

Click on Create app client. It will be created along with the user pool when you completes the whole wizard.

Click on the Next step to move forward in the user pool creation wizard.
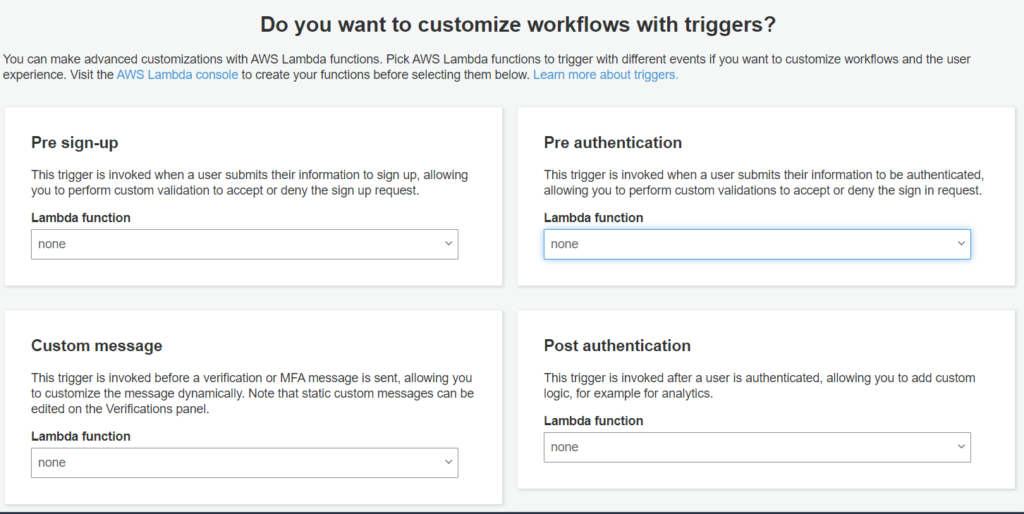
Cognito app client

Triggers

On this page, you can configure lambda functions to be triggered on specific actions or workflow. You need to create Lambda functions in advance to select here from the dropdown. List of triggers available here –

  1. Pre sign up
  2. Pre authentication
  3. Custom message
  4. Post authentication
  5. Post confirmation
  6. Define Auth Challenge
  7. Create auth challlenge
  8. Verify authc challenge response
  9. User migration
  10. Pre token generation

All triggers are listed with descriptions for easy understanding of when they will be activated and execute related Lambda functions. For the simplicity of this article, we are not adding any.

Cognito Lambda triggers

Review

Review all the details you supplied throughout the wizard. You can make edits if necessary and then lastly click on Create pool

User pool created!

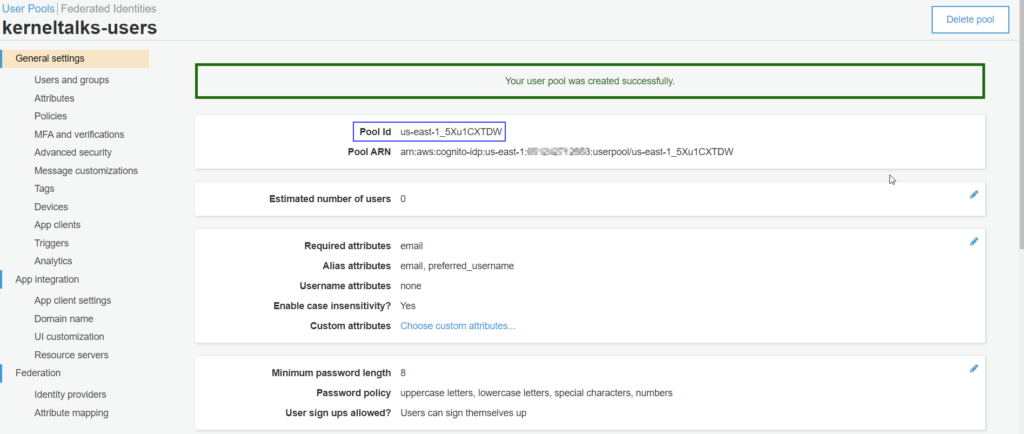
You should be greeted with a success message and the user pool management page. You can note the user pool ID generated for this user pool.

Amazon app clients settings

Now, that you created a user pool and app client for it. Let’s look at some of the settings those needs to be checked or changed to make sure your app client is ready to be consumed.

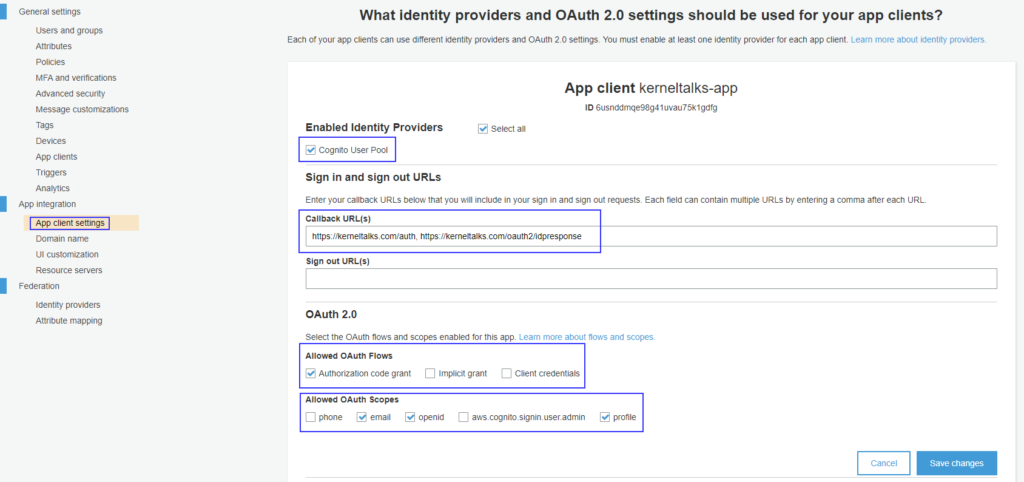
Configure Amazon Cognito app client’s IDP settings

Navigate to App integration > App client settings on the left sidebar menu on the user pool page.

  • Enable Cognito user pool under Enabled identity providers.
  • You should be having Callback URLs handy to fill in here. Those are URLs where app will be navigated once successful authentication happens. Your application developers should be able to help you with these details.
  • Sign out URLs are those where user will be redirected once its signed out from IDP session
  • OAuth 2.0 settings should be discussed with developer and configured as the app requirement
app client IDP settings

What is Amazon Cognito domain and how to configure it?

It’s a domain prefix with FQDN https://<prefix>.auth.<region>.amazoncognito.com where,

  • prefix : unique identifier of your choice
  • region: AWS region where user pool is hosted.

This domain is used to host sign-up and sign-in pages by Amazon Cognito. You can edit those pages for your company branding as well as explained in the next step.

Navigate to App integration > Domain name on the left sidebar menu on the user pool page.

Amazon Cognito Domain

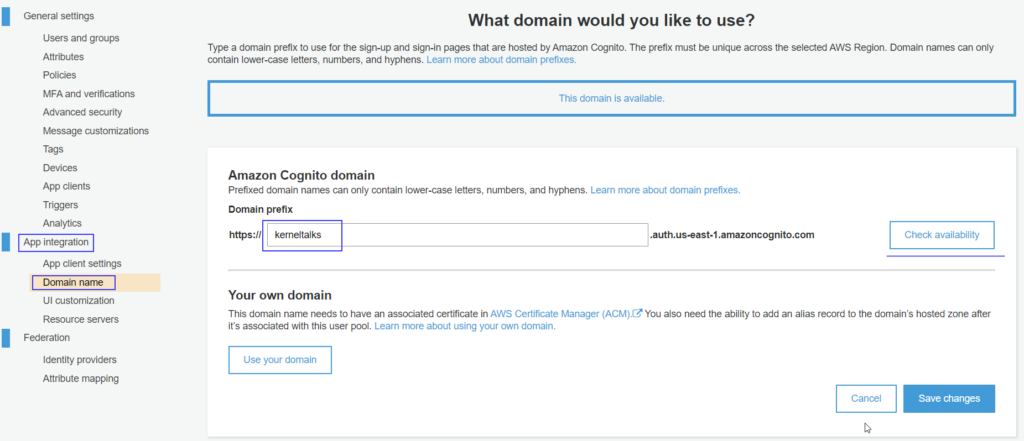
Enter the prefix in the given text box and click Check availability. It will make sure you chose a unique prefix. Click on Save changes

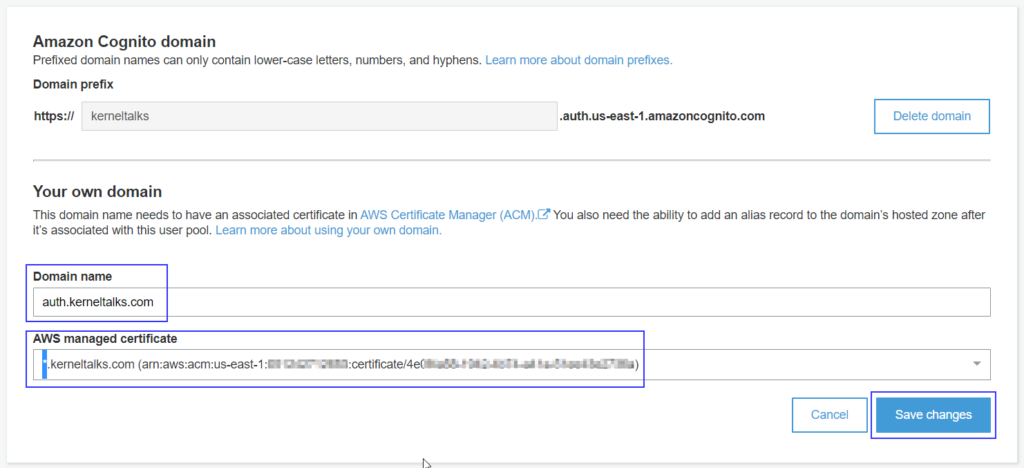
You can opt to choose your own domain as well. You need to have an associated SSL certificate in ACM and permission to add the ALIAS record in the DNS hosted zone.

Custom domain in Aamzon Cognito

Once done, Cognito will create Amazon Cloudfront distribution for that domain in the backend and supply you with the alias target value to be configured in the hosted zone.

Amazon Cognito custom domain alias

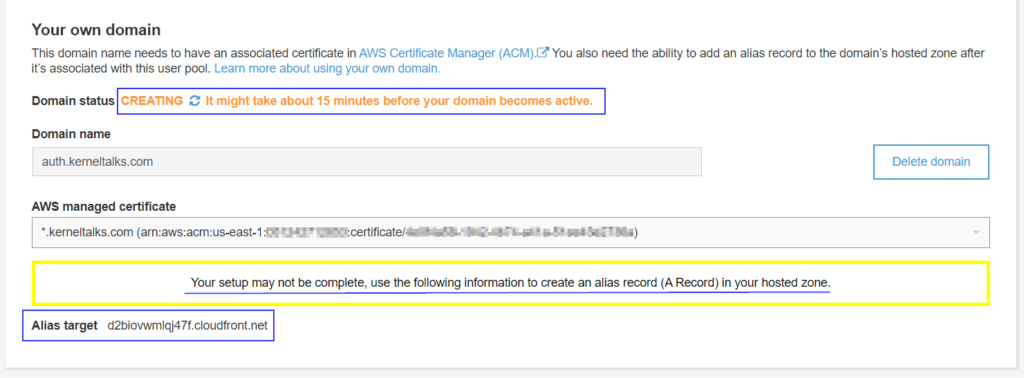
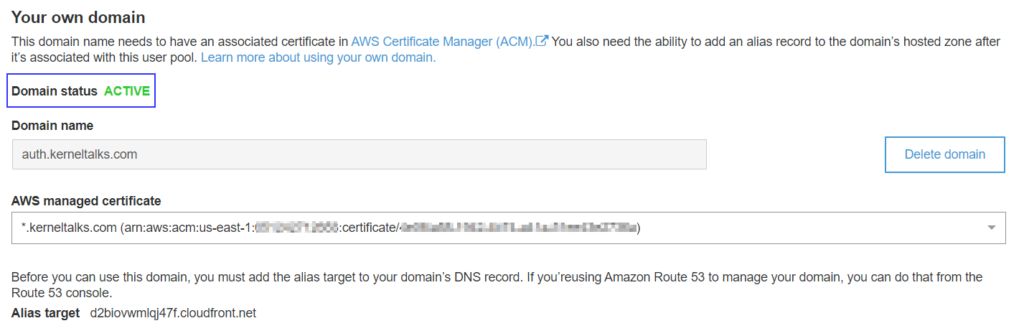
Add ALIAS record (CNAME for non-Route53) for Domain name and Alias target mentioned above. Once done and CloudFront distribution is created, your domain status will be set to ACTIVE.

Cognito custom domain set

How to change login UI of Amazon Cognito?

Navigate to App integration > App client settings on the left sidebar menu on the user pool page.

On the last part of the page, you can find Hosted UI settings. There you will be able to play around with CSS, logo files to create a new custom login page.

Make sure you have Amazon Cognito domain name defined and at least one OAuth scope defined (above step)

How to retrieve Amazon app client secret?

Navigate to General settings > App clients on the left sidebar menu on the user pool page. And there you can retrieve app client secret.

Cognito app client secret

Understanding /etc/shadow file

Article to understand fields, formats of /etc/shadow file. Learn each field in detail and how it can be modified.

/etc/shadow file in Linux

We have written about /etc/passwd file in the past. In this article, we will see /etc/shadow file, its format, its content, its importance for the Linux system. /etc/shadow file (henceforth referred to as shadow file in this article) is one of the crucial files on system and counterpart of /etc/passwd file.

Unlike the password file, the shadow file is not world-readable. It can be read by the root user only. Shadow file permissions are 400 i.e. -r-------- and ownership is root:root. This means it can be only read and by root users only. The reason for such security is password related information that is being stored in this file.

Typical /etc/shadow file looks like :

# cat /etc/shadow
root:$1$UFnkhP.mzcMyajdD9OEY1P80:17413:0:99999:7:::
bin:*:15069:0:99999:7:::
daemon:*:15069:0:99999:7:::
adm:*:15069:0:99999:7:::
testuser:$1$FrWa$ZCMQ5zpEG61e/wI45N8Zw.:17413:0:33:7:::

Since its normal text file, commands like cat, more will work without any issue on it.

/etc/shadow file has different fields separated by a colon. There are a total of 8 fields in the shadow file. They are –

  1. Username
  2. Encrypted password
  3. Last password change
  4. Min days
  5. Max days
  6. Warn days
  7. Inactive days
  8. Expiry

Lets walk through all these fields one by one.

Username

Username is the user’s login name. Its created on the system whenever the user is created using useradd command.

Encrypted password

Its user’s password in encrypted format.

Last password change

Its number of days since 1 Jan 1970, that password was last changed. For example in the above sample testuser’s last password change value is 17413 days. Means count 17413 days since 1 Jan 1970 which comes to 4 Sept 2017! That means testuser last changed his password on 4 Sept 2017.

You can easily add/subtract dates using scripts or online tools.

Min days

Its minimum number of days between two password changes of that account. That means the user can not change his password again unless min days have passed after his last password change. This field can be tweaked using chage command. This is set to 7 days generally but can be 1 too depends on your organization’s security norms.

Max days

Its maximum number of days for which the user password is valid. Once this period exhausted, the user is forced to change his/her password. This value can be altered using chage command. It is generally set to 30 days but value differs as per your security demands.

Warn days

Its number of days before password expiry, the user will start seeing a warning about his password expiration after login. Generally it is set to 7 but it’s up to you or your organization to decide this value as per organizational security policies.

Inactive days

A number of days after password expiry, the account will be disabled. This means if the user doesn’t log in to the system after his/her password expiry (so he doesn’t change the password) then after these many days account will be disabled. Once the account is disabled, the system admin needs to unlock it.

Expiry

Its number of days since 1 Jan 1970, the account is disabled.  Calculations we already saw in the ‘last password change’ section.

Except for the first 2 fields, the rest of all fields are related to password aging/password policies.

Linux user management (useradd, userdel, usermod)

Learn how to create, delete, and modify a user in Linux (useradd, userdel, usermod). Basic user management which is must know for every Linux/Unix administrator.

Anyone accessing system locally or remotely has to has a user session on the server hence can be termed as a user. In this post, we will be seeing user management which is almost similar for all Linux, Unix systems. There are three commands useradd, userdel and usermod which are used to manage users on Linux systems.

Interesting related articles –

Command: useradd

Command to add a new user to the system. This command can be as short as just one argument of userid. When running with just userid as an argument then it takes all default values for creating that user as defined in /etc/default/useradd file. Or else a number of options can be specified which defines parameters of this new user while creation.

# cat /etc/default/useradd
# useradd defaults file
GROUP=100
HOME=/home
INACTIVE=-1
EXPIRE=
SHELL=/bin/bash
SKEL=/etc/skel
CREATE_MAIL_SPOOL=yes

The command supports the below options :

  • -b <base_dir> If the home directory is not specified this one is mandatory.
  • -c <comment> Any text like a description of the account
  • -d <home_dir> Home directory
  • -e <expire_date> Account expiry date in YYYY-MM-DD
  • -f <inactive> No of days after which acc will be disabled after password expiry
  • -g <gid> group id
  • -u <uid> User id
  • -G <groups> Secondary groups
  • -k <skel_dir> Files within skel_dir will be copied to home_dir of the user after creation
  • -K <key=value> To override default parameters in /etc/login.defs
  • -m Create the home directory if it doesn’t exist.
  • -o Allow non-unique UID
  • -p Encrypted password (not normal text one). It can be obtained from the crypt command.
  • -r Create a system account. This won’t have password aging and UID from system UID range
  • -s shell
# useradd -c "Test user" -d /home/test -m -e 2016-12-05 -f 7 -g 100 -u 956 -o -s /bin/bash testuser1
# cat /etc/passwd |grep testuser1
testuser1:x:956:100:Test user:/home/test:/bin/bash
# useradd testuser2
# cat /etc/passwd |grep testuser2
testuser2:x:54326:54329::/home/testuser2:/bin/bash

See the above example with and without using options. Also, check the below list, it shows where you can verify the account-related particular parameter which you specified in useradd command.

  • home_dir Check using ls -lrt
  • uid, gid In /etc/passwd and /etc/group
  • comment, shell In /etc/passwd file
  • groups In /etc/group file
  • skel_dir files Check-in home_dir
  • expire_date, inactive Check-in chage -l username output.
  • Encrypted password In /etc/shadow file

Command: userdel

As the name suggests its a command to delete users. It has only two options –

  • -r Remove user’s home_dir & mail spool
  • -f Removes user even if he/she logged in. Removes home_dir, mail spool & group of the same name even these are being shared by another user. Dangerous!

If none of the options used and command just ran with userid argument. It will only remove the user from the system keeping its home_dir, mail spool and a group of the same name (if any) intact on the server.

#  ll /home |grep testuser
drwx------   4 testuser   testuser  4096 Nov 23 10:43 testuser
# userdel testuser
#  ll /home |grep testuser
drwx------   4      54326    54329  4096 Nov 23 10:43 testuser
# userdel -r testuser
#  ll /home |grep testuser
#

See above example which shows without using -r option keeps home directory intact.

Command: usermod

This command used to modify user parameters which we saw in useradd command. All parameter options with useradd command compatible with this command. Apart from those options, it supports below ones –

  • -l <new_login> Change login name to different. You have to manually rename home_dir
  • -L Lock account. Basically it puts ! in front of encrypted password in passwd or shadow file.
  • -U Unlock account. It removes!
  • -m <new_home> Moves home_dir to new_dir. -d is mandatory to use with it.
# useradd usr1# cat /etc/passwd |grep usr1
usr1:x:54326:54330::/home/usr1:/bin/bash
# usermod -l usr2 usr1
# cat /etc/passwd |grep usr2
usr2:x:54326:54330::/home/usr1:/bin/bash
# cat /etc/shadow |grep usr2
usr2:$6$nEjQiroT$Fjda8KiOIbnELAffHmluJFRC8jjIRWuxEWBePK1gun/ELZRi3glZdKVtPaaZ4tcQLIK2KPZTxdpB3tJvDj3/J1:17128:1:90:7:::
# usermod -L usr2
# cat /etc/shadow |grep usr2
usr2:!$6$nEjQiroT$Fjda8KiOIbnELAffHmluJFRC8jjIRWuxEWBePK1gun/ELZRi3glZdKVtPaaZ4tcQLIK2KPZTxdpB3tJvDj3/J1:17128:1:90:7:::
# usermod -U usr2
# cat /etc/shadow |grep usr2
usr2:$6$nEjQiroT$Fjda8KiOIbnELAffHmluJFRC8jjIRWuxEWBePK1gun/ELZRi3glZdKVtPaaZ4tcQLIK2KPZTxdpB3tJvDj3/J1:17128:1:90:7:::

See the above examples of usermod command showing locking, unlocking user and changing user names.

These three commands take almost most of the user management tasks in Linux Unix systems. Password management is another topic which does not fall in user management. We will see it on some other day.

Understanding /etc/group file

/etc/group is the key file in any Linux Unix system for user management. Learn fields, formats within /etc/group file. Understand the meaning of each field and how it can be set.

In this post, we are going to see the format, the content of /etc/group file. /etc/group (will be called as group file henceforth in this post) is the popular file after /etc/passwd, when it comes to user in any Linux or Unix based system. Every administrator should be familiar with this file. Rather whenever one starts working on Linux Unix based system this file should be covered during his/her basis learning itself.

The group file is a human-readable file that contains information about user groups on the system. Typical /etc/group file looks like below :

# cat /etc/group
root:x:0:root
bin:x:1:root,bin,daemon
daemon:x:2:root,bin,daemon
sys:x:3:root,bin,adm
adm:x:4:root,adm,daemon
tty:x:5:

Since its normal text file, commands like cat, more will work without any issue on it.

If you observe the above file, it has values separated by colons :. Each row is one entry. One entry is for one group. For every group (row) there are 4 fields defined separated by a colon. Those four fields are :

  1. Group name
  2. encrypted password for the group
  3. group id
  4. group members

Let’s see one by one :

Group name

Its a group name by which group is being identified for admins/humans. This name is used in all group management/user management related commands. New group name entry gets added in this file when groupadd command is used.

Encrypted password for the group

Its password in an encrypted format. In the above example, you see x instead of encrypted password since /etc/shadow file is generated on the system. The encrypted password is found in /etc/gshadow file in such a case.

Group ID

Its numeric id assigned to the group. Normally kernel identifies group by this field. This ID also features in /etc/passwd file in the 4th field. More information on GID can be found here. Group id gets generated automatically when a group is created using groupadd command.

Group Members

This is a list of user names separated by commas which are member of this group. File or directory permissions assigned to the group will be inherited to all these group members.

Understanding /etc/passwd file

/etc/passwd is the key file in any Linux Unix system. Learn fields, formats within /etc/passwd file. Understand the meaning of each field and how it can be set.

In this post, we are going to see the format, the content of /etc/passwd file. /etc/passwd (will be called as password file henceforth in this post) is a popular and most accessed file when it comes to user in any Linux or Unix based system. Every administrator should be familiar with this file. Rather whenever one starts working on Linux Unix based system this file should be covered during his/her basis learning itself.

The password file is a human-readable file that contains information about users on the system including their encrypted passwords. Some systems don’t have encrypted passwords in this file if /etc/shadow file is generated. Typical /etc/passwd file looks like below :

# cat /etc/passwd
root:x:0:0:ROOT account:/root:/bin/bash
bin:x:1:1:bin:/bin:/sbin/nologin
daemon:x:2:2:daemon:/sbin:/sbin/nologin
adm:x:3:4:adm:/var/adm:/sbin/nologin
lp:x:4:7:lp:/var/spool/lpd:/sbin/nologin
sync:x:5:0:sync:/sbin:/bin/sync
shutdown:x:6:0:shutdown:/sbin:/sbin/shutdown
halt:x:7:0:halt:/sbin:/sbin/halt
mail:x:8:12:mail:/var/spool/mail:/sbin/nologin
uucp:x:10:14:uucp:/var/spool/uucp:/sbin/nologin
operator:x:11:0:operator:/root:/sbin/nologin
myuser:x:513:520:Test User:/home/myuser:/bin/bash
----- output truncated -----

Since its normal text file, commands like cat, more will work without any issue on it.

By default /etc/passwd file permission is 644 i.e. -rw-r--r-- and ownership root:root. Means file is world-readable and only root users can edit it. However, it is not recommended it manually.

If you observe the above file, it has values separated by colons :. Each row is one entry. One entry is for one user. For every user (row) there are 7 fields defined separated by a colon. Those seven fields are :

  1. Username
  2. Encrypted password
  3. UID
  4. GID
  5. Comment
  6. Home directory
  7. Shell

Let’s see one by one :

Username

Its user name being used by the user to login. This field gets populated when new users are created on a system using useradd command.

Encrypted Password

Its password in an encrypted format. In the above example, you see x instead of encrypted password since /etc/shadow file is generated on the system. The encrypted password is found in /etc/shadow file in such case.

# cat /etc/shadow
root:$6$FCGlEAUb$nRMJdwjadnw7.OL6L2oxeMQzM445gv0NK1AfjpjSMyth5JHXolCQnhA0:17075:0:99999:7:::

For example, see the above output where the encrypted password for root account can be seen in the second field.

UID

Its user id. Its unique number assigned to every account on the system. More information on UID can be found here. This can be set using -u argument in useradd, usermod command. If you want to assign the same UID to some new user which is being used to the old user already then you need to specify -o in command but this is not recommended.

GID

Its group id. Its unique number of groups of which account is member of. GID is created on the system with groupadd command. More information on GID can be found here. This can be set using -g argument in useradd, usermod command.

Comment

This field is introduced to have some descriptions against the account. This is purely for humans to identify/understand what related account is or to whom it belongs to. In the above example, the “ROOT account” is the description defined for the root users. This can be the name of the person or name of application etc. This can be set using -c argument in useradd, usermod command.

Home Directory

Its a directory where normally user lands into when he/she login. The home directory is where the user’s history file, profile, etc basic account stuff resides. Every user is recommended to have a unique directory. In the above example /root is defined as the home directory for the root account. This can be set using -d argument in useradd, usermod command. If the directory does not exist on server then -m can be accompany -d option so that the directory will be created automatically.

Shell

This is a shell that will be spawn when the user successfully logs in. In the above example /bin/bash is shell defined for the root account. This can be set using -s argument in useradd, usermod command.