

Learn how to configure a proxy in Linux flavors like RHEL, SUSE, OEL, CentOS, Ubuntu, etc.


One of the basic tasks after building a new system in your environment is to set up a proxy to enable internet access on the server. In this tutorial, we will walk you through step by step how to configure internet proxy in major Linux flavors like RHEL, SUSE, OEL, Centos, Ubuntu, etc. Without further delay lets jump in.
How to setup proxy in Linux using shell variables
Typically you can set up internet proxy details using shell variable http_proxy. The syntax is below –
root@kerneltalks # export http_proxy=http://username:password@proxy-servername:port/
For example, let’s consider below proxy server details which we need to configure.
- Proxy server: kerneltalks-proxy.com
- Port: 8081
- Username: shrikant
- Password: @Fnr5*r$9Lp
Above proxy uses authentication so we can define it as –
root@kerneltalks # export http_proxy=http://shrikant:@Fnr5*r$9Lp@kerneltalks-proxy.com:8081/
If you do not have authentication at proxy then it can be defined as :
root@kerneltalks # export http_proxy=http://kerneltalks-proxy.com:8081/
The above proxy configuration is for the current user only. To configure a proxy for all users on the system, just add above command entry into /etc/profile file on your system and it will be applicable/available to all users on the system.
You can configure no_proxy hosts using the below command. no_proxy hosts are those destinations that you want to reach directly bypassing proxy for them.
root@kerneltalks # export no_proxy="kerenltalks.com,10.10.2.3"
How to setup proxy persistently using shell variable
It’s pretty much the same as above. The only thing is we are going to save this variable in /etc/environment. So every time anyone logs into the system, this proxy variable loaded into his/her login environment automatically.
echo "http_proxy=http://proxy-servername:port" >>/etc/environment
How to setup proxy using yast in SUSE Linux
yast is configuration manager native to SUSE Linux which gives nice text-based GUI in PuTTY terminal! If you are used to it, you can configure proxy from yast as well.
Navigate to Network Services -> Proxy

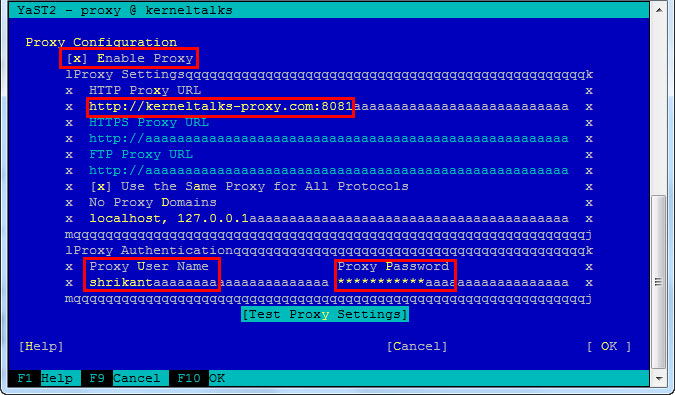
Check Enable Proxy using tab. It will allow you to fill in details below like server details, authentication, etc. Fill in details and you can test the configuration by selecting Test Proxy Settings. After successful testing select OK.
You can even mention hostnames, IPs under No Proxy Domainsso that they can be connected bypassing the proxy. This is very much helpful when you have internet and local network repos configured under zypper. By adding FQDN / IPof local patching server under No Proxy Domain you can reach a local patching server while the proxy is enabled.
You will be presented with the notice “It is recommended to relogin to make new proxy settings effective.” Re-login and test internet access.
How to setup proxy in RHEL using GUI
In RHEL, navigate to Application -> System Tools -> Settings -> Network

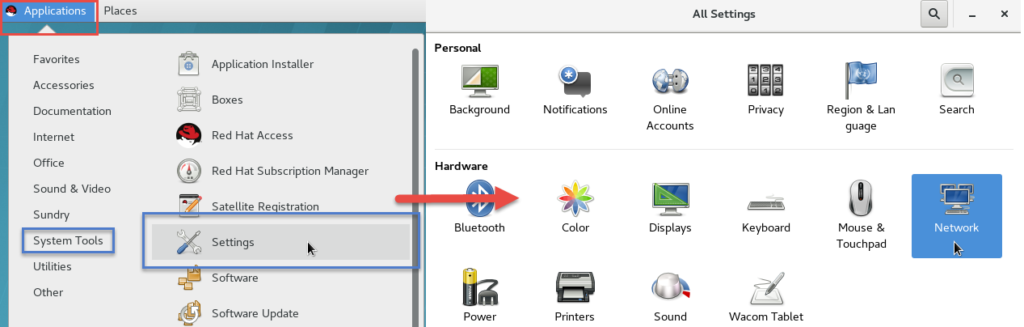
Select the Network Proxy and then Manual method.

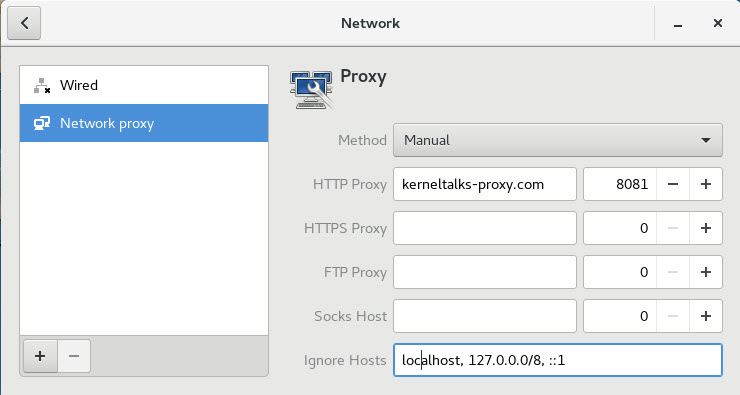
Here fill in proxy server details along with port and you are good to go. Add hostnames or IPs in Ignore Hosts so that they can be connected bypassing the proxy. This is helpful when you have repo from the local server and internet configured under yum. By entering local patching server FQDN/ IP in Ignore Hostsyou can use local patching server in YUM while the proxy is enabled server-wide.
How to ignore proxy for local patching server in Linux
As I mentioned a couple of times above, here is a particular case you may face in your system. You have a repo manager like zypper is configured with repo from the internet and also from a local patching server (with FQDN). It’s the same as ‘No proxy for‘ or ‘Bypass proxy server for local addresses‘ setting in Windows.
Now when you enable proxy, internet repo works (via proxy) and local patching server repo won’t work. Since it tries to reach a local patching server over the internet and couldn’t do it (via proxy). If you disable proxy, your local patching repo will work and internet repo won’t.
In such a case, you need a local repo to bypass proxy and internet repo should go through the proxy. Here you can define local server FQDN/IP in Ignore Hosts or No Proxy Domains as I explained earlier.
From CLI, you can edit file /etc/sysconfig/proxy add entry in below line –
## Type:        string(localhost)
## Default:     localhost
#
# Example: NO_PROXY="www.me.de, do.main, localhost"
#
NO_PROXY="localhost, 127.0.0.1, patchingsvr.kt.com"
Here entry patchingsvr.kt.com makes proxy bypass for this local server. The above sample file is from SUSE Linux.