

An article explaining step by step procedure to add EBS disk on AWS Linux server with screenshots.

Nowadays most of the servers run on cloud platforms like Amazon Web Services (AWS), Azure, etc. So daily administrative tasks on Linux servers from AWS console is one of the common things in sysadmin’s task list. In this article, we will walk you through one such task i.e. adding a new disk to the AWS Linux server.
Adding a disk to the EC2 Linux server has two portions. The first portion is to be done on AWS EC2 console which is creating new volume to be attached to the server. And attaching it to EC2 instance on AWS console. The second portion is to be done on the Linux server which is to identify newly added disk at the kernel level and prepare it for use.
Creating & attaching EBS volume
In this step, we will learn how to create EBS volume in the AWS console and how to attach EBS volume to AWS EC2 instance.
Login to your EC2 console and navigate to Volumes which is under ELASTIC BLOCK STORAGE menu on the left-hand sidebar. You will be presented with the current list of volumes in your AWS account like below –


Now, click Create Volume button and you will be presented with the below screen.

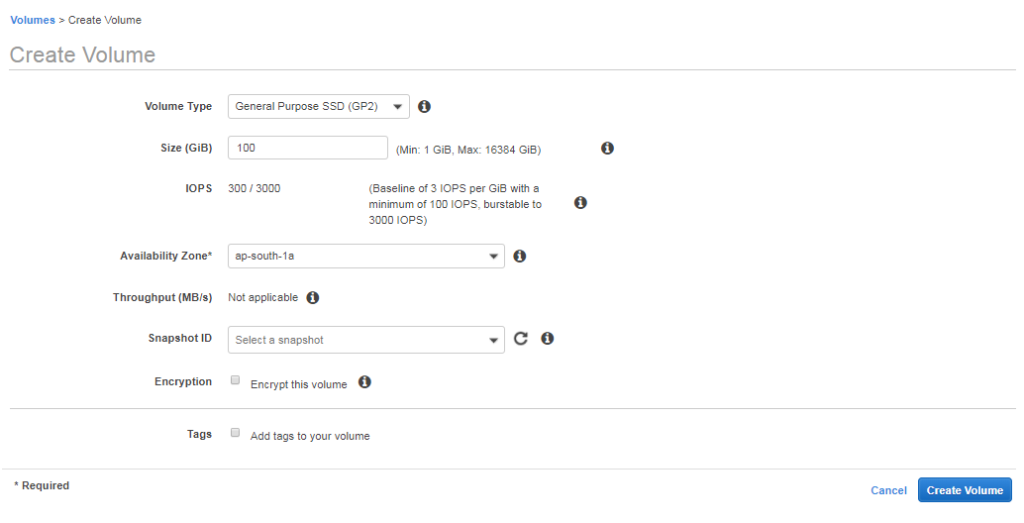
Here you need to choose several parameters of your volume –
- Volume Type. This decides your volume performance and obv billing.
- Size. In GB. Min and Max available sizes differ according to your volume type choice.
- IOPS. Performance parameters. Changes according to your volume type choice
- Availability Zone. Make sure you select same AZ as your EC2 instance
- Throughput. Performance parameter. Only available for ST1 & SC1 volume type.
- Snapshot ID. Select snapshot if you want to create the new volume from existing snapshot backup. For fresh blank volume leave it blank.
- Encryption. Checkmark if you want the volume to be encrypted. An extra layer of security.
- Tags. Add tags for management, reporting, billing purposes.
After selecting proper parameters as per your requirement, click Create Volume button. You will be presented with ‘Volume created successfully’ dialogue if everything goes well along with the volume ID of your newly created volume. Click Close and you will be back of the volume list.
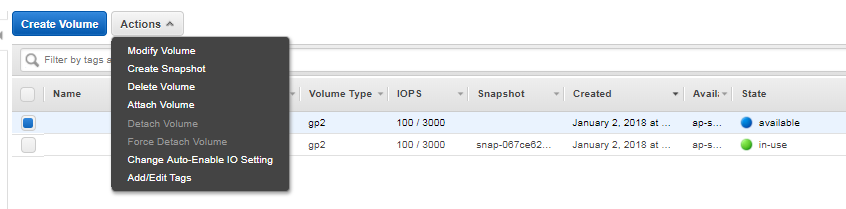
Now check volume ID to identify your newly created volume in this list. It will be marked with an ‘Available’ state. Select that volume and select Attach volume from Actions menu.

Now you will be presented with an instance selection menu. Here you need to choose an instance to which this volume is to be attached. Remember only instances in the same AZ of the volume are

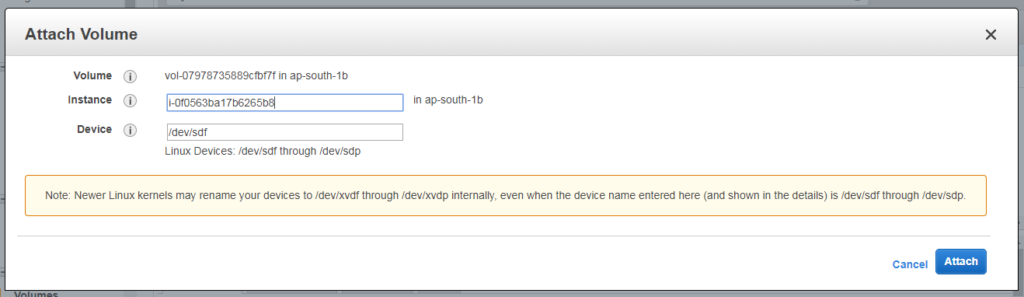
Once you select the instance you can see the device name which will be reflected at the kernel level in your instance under Device field. Here its /dev/sdf.
Check out the note being displayed here. It says : Note: Newer Linux kernels may rename your devices to /dev/xvdf through /dev/xvdp internally, even when the device name entered here (and shown in the details) is /dev/sdf through /dev/sdp.
It says newer Linux kernels may interpret your device name as /dev/xvdf than /dev/sdf. This means this volume will be either /dev/sdf (on the old kernel) or /dev/xvdf on the new kernel.
That’s it. Once attached you can see volume state is changed from Available to in-use
Identifying volume on Linux instance
Now head back to your Linux server. Log in and check new volume in fdisk -l output.
root@kerneltalks # fdisk -l
WARNING: fdisk GPT support is currently new, and therefore in an experimental ph                                                                                        ase. Use at your own discretion.

Disk /dev/xvda: 10.7 GB, 10737418240 bytes, 20971520 sectors
Units = sectors of 1 * 512 = 512 bytes
Sector size (logical/physical): 512 bytes / 512 bytes
I/O size (minimum/optimal): 512 bytes / 512 bytes
Disk label type: gpt
Disk identifier: 25D08425-708A-47D2-B907-1F0A3F769A90


#         Start          End    Size  Type            Name
 1         2048         4095      1M  BIOS boot parti
 2         4096     20971486     10G  Microsoft basic

Disk /dev/xvdf: 10.7 GB, 10737418240 bytes, 20971520 sectors
Units = sectors of 1 * 512 = 512 bytes
Sector size (logical/physical): 512 bytes / 512 bytes
I/O size (minimum/optimal): 512 bytes / 512 bytes
As AWS mentioned new device name will be reflected as /dev/xvdf in the kernel, you can see /dev/xvdf in the above output.
Now you need to partition this disk using LVM (using pvcreate) or fdisk so that you can use it for creating mount points!