
A list of tools/configurations to make sysadmin life easy on Windows workstation!

This article is intended for the sysadmins who use Windows workstations for their job and yet would love to have Linux experience on it. Moreover, if they are interacting with AWS CLI, GIT, etc. CLI based tools on daily basis then its best suited for them. I list all the tools and their respective configurations you must have in your arsenal to make your journey peaceful, less frustrating and avoid non-Linux workstation issues. I expect the audience to be comfortable with Linux.
Without further a due let’s get started.
Windows Subsystem for Linux
First of all, let’s get Linux on the Windows 🙂 WSL is a Windows feature available from Windows 10 (WSL Install steps). Install the latest (at the time of this article draft) Ubuntu 20.04 LTS from Microsoft Store. Post-installation you can run it just like other Windows apps. For the first login, you will be prompted to set a username and password. This user is configured to switch to root using sudo.
Now, you have a Linux subsystem running on your Windows! Let’s move on to configure it to ease up daily activities.
Install necessary packages using apt-get. I am listing here frequently useful for your quick reference –
gitdos2unixjqkubectl(Instructions). kubectl autocompletion (instructions)awscli(Instructions)unzip
I even configured WSL normal user to perform passwordless sudo into root at the login to save the hassle of typing command and password to switch into root. I love to work at root # prompt!
Avoid sound beeps from Linux terminal
With WSL, one thing you might like to avoid is workstation speaker beeps/bells due to the Linux terminal prompt of vi editors. Here is how you can avoid them :
# echo set bell-style none >>/etc/inputrc # Stops prompt bells
# echo set visualbell >> ~/.vimrc # Stops vi bells
Setting up Git on WSL
Personal Authentication Token (PAT) or SSH keys can be leveraged for configuring Git on WSL. I prefer to use SSH keys so listing steps here –
- Create and add SSH keys to GitHub account. Steps here.
- Authorize the organizations for the Public key you are uploading to Git by visiting Key settings on Git.
- Add ssh-agent service startup and key identity addition at login under user/shell profile. Dirty way to do it on bash is adding below lines in ~/.bashrc file.
eval "$(ssh-agent -s)"
ssh-add /root/.ssh/git_id_rsa
- Add alias to your Git folder on Windows drive so that you can navigate to it quickly when running all Git commands like
repo clone. It can be done by adding below command to your user/shell profiles. You can choose alias (gitdir) of your owne choice and the destinationcd <path>too.
alias gitdir='cd /mnt/c/Users/<username>/Downloads/Github'
Setting up prompt to show current Git branch
It’s easy. You need to tweak your prompt PS1 with git branch command output!
The git branch output looks like this –
# git branch
* master
With help of sed you can take out branch name from it. Obviously, you also want to redirect error (on non-git directory command will fail). And add brackets around branch name to have the same look like gitbash prompt. That sums up to below code –
# git branch 2> /dev/null | sed -e '/^[^*]/d' -e 's/* \(.*\)/(\1)/'
(master)
Add this to a function and call this function in your PS1! Ta da. Sample prompt with colours from Ubuntu. Don’t forget to set this into shell profile (e.g. ~/.bashrc) so that it will be loaded on your login.
git_branch() {
  git branch 2> /dev/null | sed -e '/^[^*]/d' -e 's/* \(.*\)/(\1)/'
}
export PS1="\[\e]0;\u@\h: \w\a\]${debian_chroot:+($debian_chroot)}\[\033[01;32m\]\u@\h\[\033[00m\]:\[\033[01;34m\]\w\[\033[00m\] \[\033[00;32m\]\$(git_branch)\[\033[00m\]# "
Code platform
Oh yes, even sysadmins code for their automation stuff and with IaC being hot in the market it’s essential for sysadmins to code as well. Since we discussed this article is intended for Windows users, Microsoft Visual Code is an undefeated entry here! Its superb code editing tool with numerous plugins makes you comfortable to code.
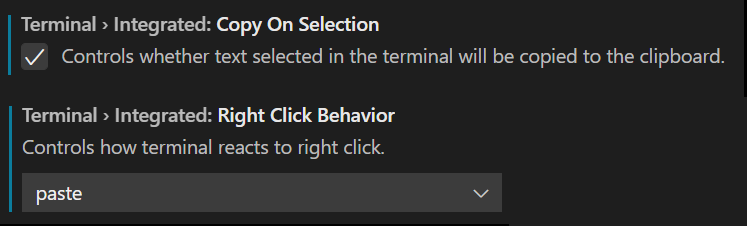
Tweaking Visual code for PuTTY like experience
PuTTY is the preferred tool for SSHing in Linux world. The beauty of PuTTY lies in its copy-paste capabilities. The same capabilities can be configured on MS Visual code terminal.
Head to the terminal settings by entering the command Terminal: configure Terminal Settings in the command palette (ctrl + shift + p). On the setting screen set below options –

Setting up VS Code to launch from WSL
Since we already configured Git on WSL, it makes sense to directly run code . command in WSL from Git Directory and have VS code started on the Windows workstation. For that, you just need to add the alias of the code.exe file with an absolute path on Windows to code command!
If you have installed VS code with default config then the below command in your user/shell profile should do the trick.
alias code='/mnt/c/Users/<username>/AppData/Local/Programs/Microsoft\ VS\ Code/code.exe'
Code linters
There are two ways you can have your code linted locally before you commit it on Git.
- Install respective code linter binaries/packages on WSL. Its Linux!
- Install code linters on VS code if appropriate plugin is available.
Running docker on WSL without installing Docker Desktop for Windows
With WSL version 2, one can run docker on WSL without installing the docker desktop for windows. The Docker installation remains the same inside WSL just like any other Linux installation.
Once installed make sure you are running on WSL version 2. If not upgrade to WSL 2.
Convert the current WSL distro to make use of WSL 2 using the command in PowerShell –
> wsl --set-version <distro-name> 2
## Example wsl --set-version Ubuntu-20.04 2
Now, launch WSL and start the docker by incoming /usr/bin/dockerd binary! You can set an alias to dockerd & start it quickly in the background.
You can also set up cron so that it will start at boot. Note: It did not work for me in WSL
@reboot /usr/bin/dockerd &
Or, you can add the below code in your login profile like .bashrc file so that docker will run at your login.
ps -ef |grep -iq dockerd
if [ $? == 0 ]; then
:
else
/usr/bin/dockerd &
fi
If you have more tips please let us know in the comments below!
Kubernetes tools
Install a text-based UI tool for managing the K8s clusters. Its K9s. Simple installation with standalone binary can be done using the below commands –
# wget -qO- https://github.com/derailed/k9s/releases/download/v0.25.18/k9s_Linux_x86_64.tar.gz | tar zxvf -  -C /tmp/
# mv /tmp/k9s /usr/local/bin
You need to set the context from CLI first and then run k9s command.