

Step by step procedure to add a new client in SUSE Manager.

In this article, we will walk you through step by step procedure to register a client in SUSE Manager. The complete process can be split into 5 parts as below where first 4 are pre-requisite –
- Create custom channels
- Create Activation Keys
- Create bootstrap scripts
- Create bootstrap repo
- Register client
If you already have an established SUSE Manager in your infra then the first 4 steps must have been already completed and configured. Let’s go one by one now –
Create custom channels
We already covered it in another article here.
Create Activation Keys
For this step, we will use dev channel we created in the previous step. So we will create Activation Key (AK) for channel year-1-dev-SLE-Product-SLES15-Pool for x86_64
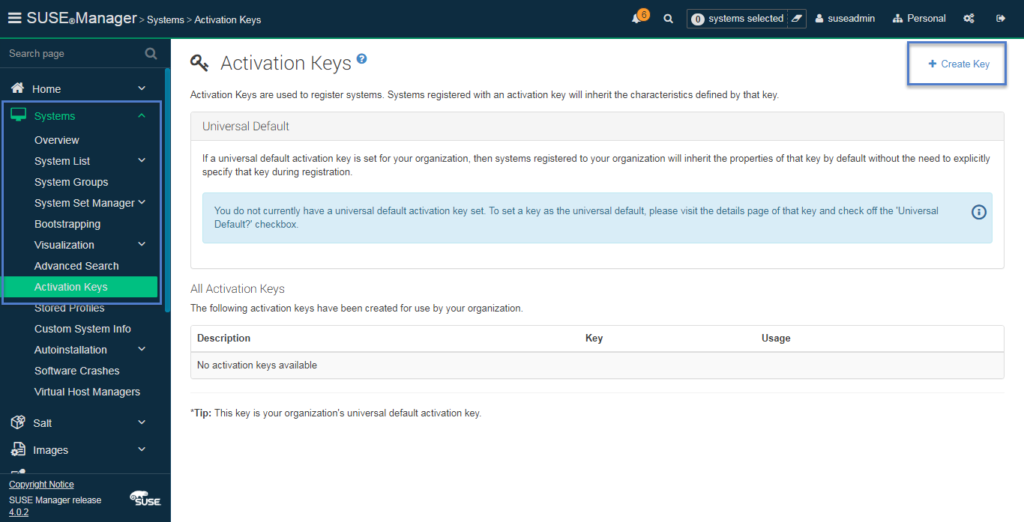
Navigate to Systems > Activation Keys
Hit Create Key button

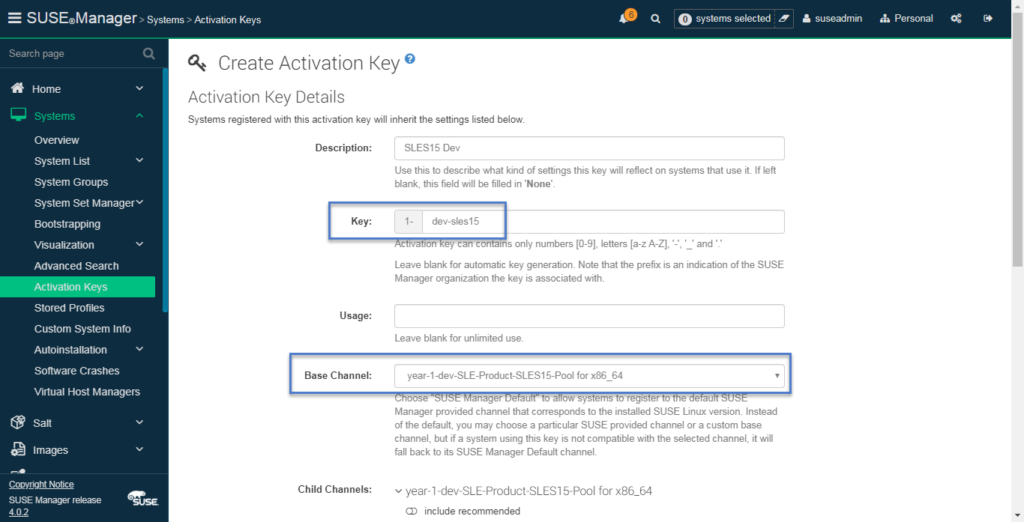
I next screen there are 3 important fields you need to fill in –
- Key : which starts with 1-. Rest you need to fill in some standard format so that its easier for you to identify later. We used
1-dev-sles15here - Base Channel: You need to select the proper custom channels from the drop-down menu. Here custom channels created by Content Lifecycle Management and SUSE product channels will be listed. Choose wisely.
- Child channels: Select child channels from your main base custom channel.
Leave rest to default. Every option has help text as well which will help you to understand it and its pretty simple. Finally, click Create Activation Key button at the bottom of the page.
Your key will be created and can be checked at the Activation Keys home menu we visited in the first step.
Create bootstrap scripts
Don’t worry you don’t have to script the code on your own. SUSE Manager got you covered. You just need to edit Activation Key in the ready-made script.
Navigate to Admin > Manager Configuration > Bootstrap Script
Here you can see the location of bootstrap script located in your SUSE Manager along with few options like a proxy (mainly) which can be tweaked. Make sure to hit Update button at bottom of the page to generate a script on the mentioned location for the first time before you use it.
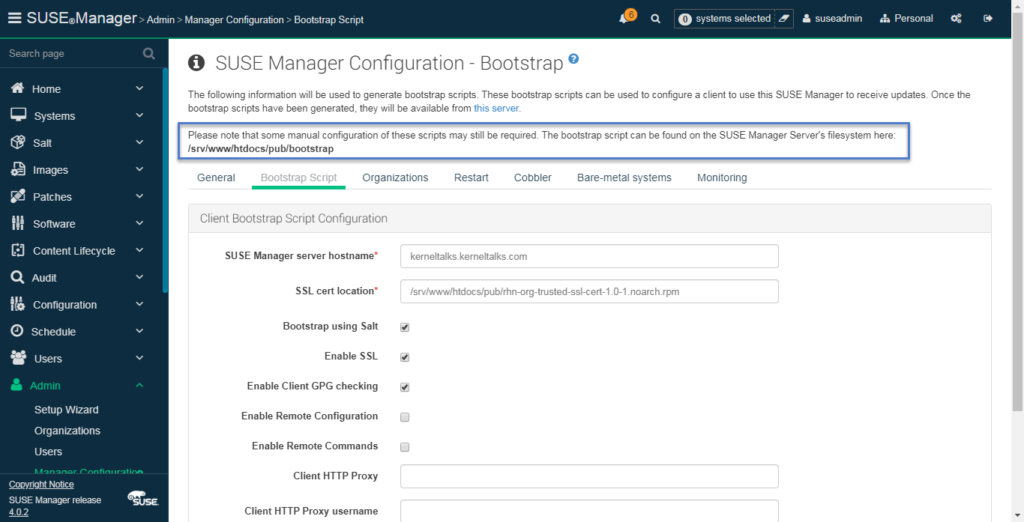
As you can see the bootstrap script is located in /srv/www/htdocs/pub/bootstrap on SUSE Manager. Log in to the SUSE Manager server using putty and make a copy of the script.
kerneltalks:~ # cp /srv/www/htdocs/pub/bootstrap/bootstrap.sh dev_sles15_bootstrap.sh
kerneltalks:~ # vi dev_sles15_bootstrap.sh
And in the copy edit below parameter to your Activation key.
ACTIVATION_KEYS=1-dev-sles15
That’s it. Your bootstrap script is ready to register client under dev channel.
Create bootstrap repo
Now, you need to create a bootstrap repo as well. This repo will be added to the client temporarily to fetch all SUSE Manager registration-related packages and their dependent packages so that registration can be initiated on the client. All this happens in the background when you run the bootstrap script on the client.
To create bootstrap repo run below command on SUSE Manager. Make sure all SUSE product repos are synced completely before running this command –
kerneltalks:~ # mgr-create-bootstrap-repo -c SLE-15-x86_64 --with-custom-channel
Make sure you edit command and choose OS distribution as per your channel you are selecting. We are working on dev SLES15 channel here so I chose SLE-15-x86_64 product in command.
You can see it copies all packages and their dependencies to the new repo for new clients. Sample output :
#  mgr-create-bootstrap-repo  -c SLE-15-x86_64 --with-custom-channel
Creating bootstrap repo for SLE-15-x86_64

copy 'libgudev-1_0-0-232-1.33.x86_64'
copy 'libnewt0_52-0.52.20-5.35.x86_64'
copy 'libslang2-2.3.1a-3.13.x86_64'
copy 'newt-0.52.20-5.35.x86_64'
copy 'python3-asn1crypto-0.24.0-1.20.noarch'
copy 'python3-cffi-1.11.2-4.3.1.x86_64'
copy 'python3-cryptography-2.1.4-4.6.1.x86_64'
copy 'python-dmidecode-3.12.2-1.24.x86_64'
copy 'python3-dmidecode-3.12.2-1.24.x86_64'
copy 'python3-idna-2.6-1.20.noarch'
copy 'python3-libxml2-python-2.9.7-3.12.1.x86_64'
copy 'python3-netifaces-0.10.6-1.31.x86_64'
copy 'python3-newt-0.52.20-5.35.x86_64'
copy 'python3-pyasn1-0.4.2-1.20.noarch'
copy 'python3-pycparser-2.17-1.24.noarch'
copy 'python3-pyOpenSSL-17.5.0-3.6.1.noarch'
copy 'python3-pyudev-0.21.0-3.22.noarch'
copy 'python3-rpm-4.14.1-10.16.1.x86_64'
copy 'python3-packaging-16.8-1.23.noarch'
copy 'python3-setuptools-38.4.1-1.18.noarch'
copy 'python3-appdirs-1.4.3-1.21.noarch'
copy 'python3-pyparsing-2.2.0-1.28.noarch'
copy 'hwdata-0.320-3.8.1.noarch'
copy 'python3-hwdata-2.3.5-1.21.noarch'
copy 'python3-rhnlib-4.0.11-3.10.1.noarch'
copy 'spacewalk-check-4.0.10-3.11.1.noarch'
copy 'spacewalk-client-setup-4.0.10-3.11.1.noarch'
copy 'spacewalk-client-tools-4.0.10-3.11.1.noarch'
copy 'python3-spacewalk-check-4.0.10-3.11.1.noarch'
copy 'python3-spacewalk-client-setup-4.0.10-3.11.1.noarch'
copy 'python3-spacewalk-client-tools-4.0.10-3.11.1.noarch'
copy 'python3-spacewalk-usix-4.0.9-3.3.16.noarch'
copy 'mgr-daemon-4.0.8-1.11.1.noarch'
copy 'suseRegisterInfo-4.0.4-3.3.16.noarch'
copy 'python3-suseRegisterInfo-4.0.4-3.3.16.noarch'
copy 'zypp-plugin-spacewalk-1.0.5-3.6.9.noarch'
copy 'python3-zypp-plugin-0.6.3-2.18.noarch'
copy 'python3-zypp-plugin-spacewalk-1.0.5-3.6.9.noarch'
copy 'libpgm-5_2-0-5.2.122-3.15.x86_64'
copy 'libsodium23-1.0.16-2.20.x86_64'
copy 'libzmq5-4.2.3-3.8.1.x86_64'
copy 'python3-Babel-2.5.1-1.26.noarch'
copy 'python3-certifi-2018.1.18-1.18.noarch'
copy 'python3-chardet-3.0.4-3.23.noarch'
copy 'python3-Jinja2-2.10.1-3.5.1.noarch'
copy 'python3-MarkupSafe-1.0-1.29.x86_64'
copy 'python3-msgpack-0.5.4-2.9.x86_64'
copy 'python3-psutil-5.4.3-1.19.x86_64'
copy 'python3-py-1.5.2-1.24.noarch'
copy 'python3-pycrypto-2.6.1-1.28.x86_64'
copy 'python3-pytz-2017.3-1.20.noarch'
copy 'python3-PyYAML-3.12-1.32.x86_64'
copy 'python3-pyzmq-17.0.0-1.25.x86_64'
copy 'python3-requests-2.18.4-1.35.noarch'
copy 'python3-simplejson-3.13.2-1.21.x86_64'
copy 'python3-six-1.11.0-2.21.noarch'
copy 'python3-tornado-4.5.3-1.26.x86_64'
copy 'python3-urllib3-1.22-6.7.1.noarch'
copy 'timezone-2019c-3.23.1.x86_64'
copy 'salt-2019.2.0-5.52.1.x86_64'
copy 'python3-salt-2019.2.0-5.52.1.x86_64'
copy 'salt-minion-2019.2.0-5.52.1.x86_64'
copy 'libunwind-1.2.1-2.13.x86_64'
Directory walk started
Directory walk done - 75 packages
Temporary output repo path: /srv/www/htdocs/pub/repositories/sle/15/0/bootstrap/.repodata/
Preparing sqlite DBs
Pool started (with 5 workers)
Pool finished
Register client to SUSE Manager
And we came to the last step for which we have been sweating on all the above pre-requisite!
Its a very simple one command step to be executed on the client machine. The client can be registered from the SUSE Manager console itself as well. We will see both steps here.
Before that one point to note – If your system is VM built from template or clone or if it’s a clone system in any way then you should run below commands on client systems to assign unique system Id and then proceed with registration.
# rm /etc/machine-id; rm /var/lib/dbus/machine-id; rm /etc/salt/minion_id
# dbus-uuidgen --ensure; systemd-machine-id-setup
# service salt-minion stop
# rm -rf /etc/salt
# rm -rf /var/cache/salt
These commands will also wipe out any previous salt registration details if any from the clone procedure.
Register client to SUSE Manager from client putty login
Login to client machine which you want to register with SUSE Manager with the root account. Run command :
curl -Sks https://<suse-manager>/pub/bootstrap/<bootstrap-script>.sh | /bin/bash
Where –
<suse-manager>is SUSE Manager IP or hostname<bootstrap-script>is bootstrap script name you prepared in the earlier step
As per our setup below is a command –
k-client # curl -Sks https://kerneltalks/pub/bootstrap/dev-sles15_bootstrap.sh | /bin/bash
It will do all the work for you and once the script finishes the execution you should see the client’s key is pending for approval in the SUSE Manager console. Unless you approve it, the client won’t be registered to SUSE Manager. Script has a long output so I am not mentioning it here.
To approve client key navigate to SUSE Manager > Salt > Keys
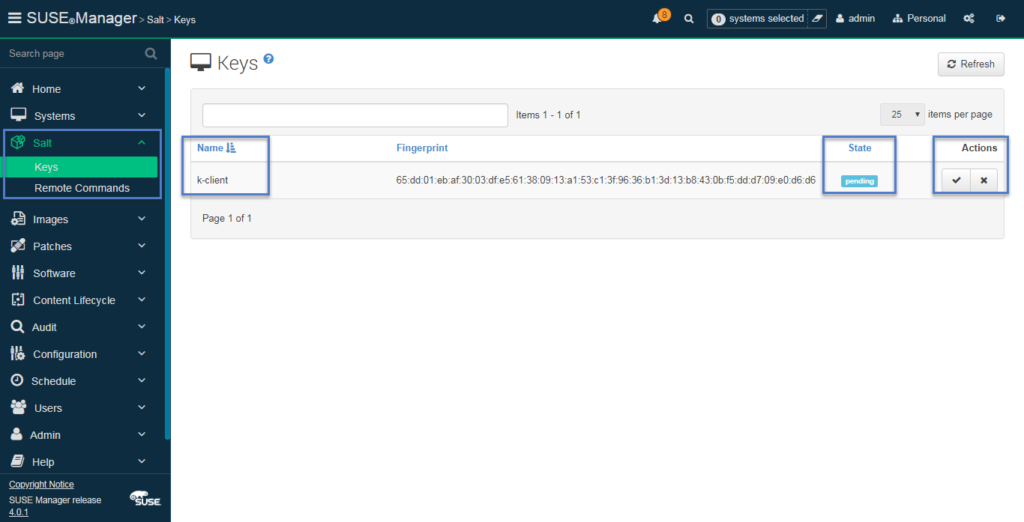
Click the tick button and your client is registered! It will be shown as accepted in Salt then. You can view it under SUSE Manager > Systems > Overview

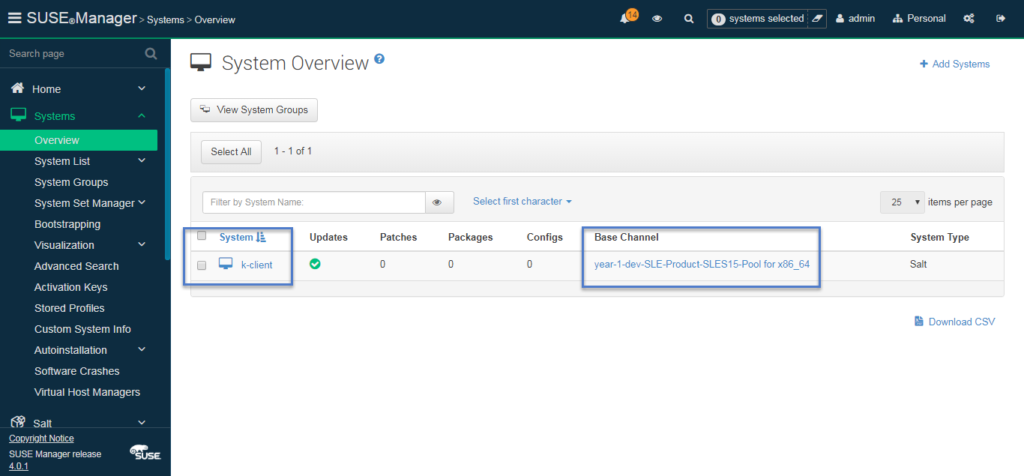
You can system is registered in SUSE Manager under dev channel!
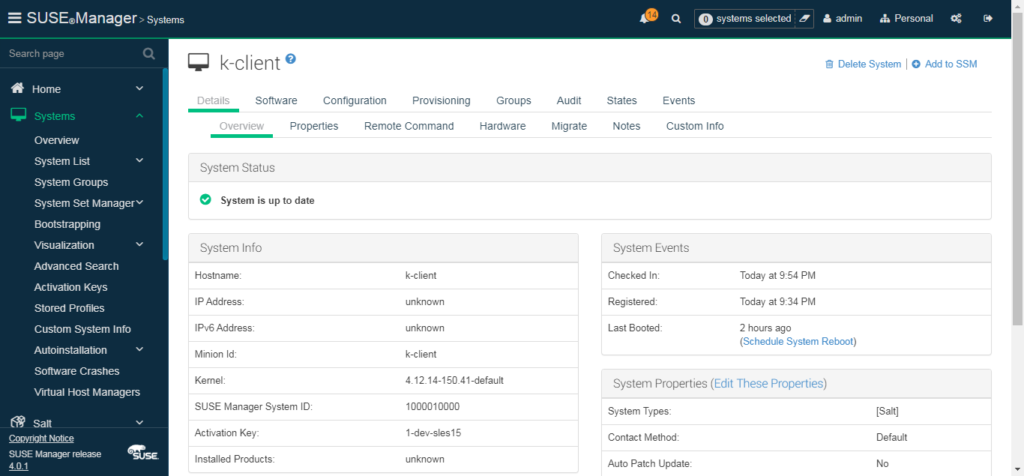
To view more details about the system, click on hostname and you will see client details along with a tabbed menu bar which will help you manage that client from the SUSE Manager console.
Register client to SUSE Manager from the console itself
You can provide SSH login to the SUSE Manager console and it will do all the above steps which you need to do manually by logging into the client using putty.
Navigate to SUSE Manager > Systems > Bootstrapping
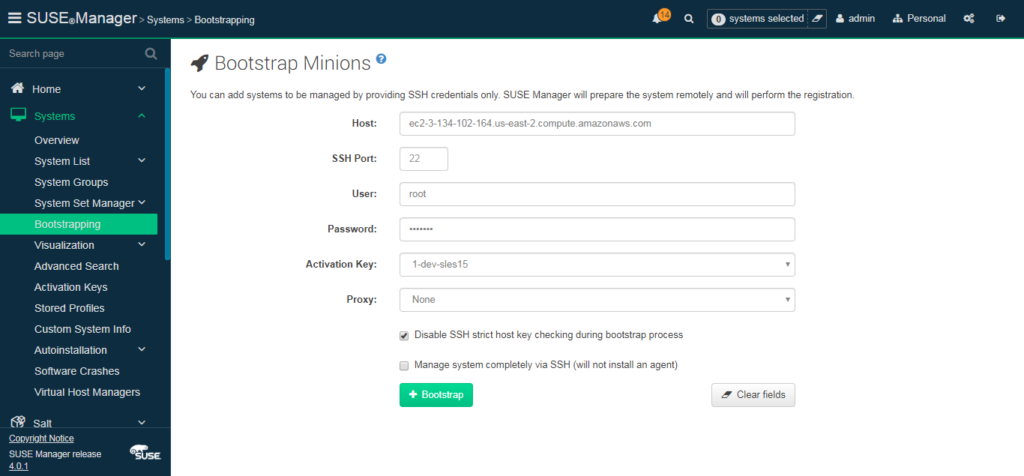
Fill in details and hit Bootstrap button. It will start connecting system via SSH in backend and execute stuff. On console you will be shown message Your system is bootstrapping: waiting for a response..
Once completed, your system is registered and you can view it in system overview as explained above. You need not accept key in this case since SUSE Manager auto approves this salt request.
Issue on SUSE clients
You may face issues on some SUSE clients where even after bootstrap completes properly salt-minion process wont start and hence you can not register server with SUSE Manager.
You might see below error in such case :
root@kerneltalks # systemctl status salt-minion
● salt-minion.service - The Salt Minion
   Loaded: loaded (/usr/lib/systemd/system/salt-minion.service; enabled; vendor preset: disabled)
   Active: activating (auto-restart) (Result: exit-code) since Tue 2020-07-21 18:19:14 IST; 3s ago
  Process: 3708 ExecStart=/usr/bin/salt-minion (code=exited, status=1/FAILURE)
 Main PID: 3708 (code=exited, status=1/FAILURE)

Jul 21 18:19:14 kerneltalks systemd[1]: salt-minion.service: Unit entered failed state.
Jul 21 18:19:14 kernelatalks systemd[1]: salt-minion.service: Failed with result 'exit-code'.
And you can check /var/log/messges for below error messages :
2020-07-21T18:32:04.575062+02:00 kerneltalks salt-minion[6530]: /usr/lib/python2.7/site-packages/salt/scripts.py:198: DeprecationWarning: Python 2.7 will reach the end of its life on January 1st, 2020. Please upgrade your Python as Python 2.7 won't be maintained after that date.  Salt will drop support for Python 2.7 in the Sodium release or later.
2020-07-21T18:32:04.778852+02:00 kerneltalks salt-minion[6530]: Process Process-1:
2020-07-21T18:32:04.779245+02:00 kerneltalks salt-minion[6530]: Traceback (most recent call last):
2020-07-21T18:32:04.779495+02:00 kerneltalks salt-minion[6530]:   File "/usr/lib64/python2.7/multiprocessing/process.py", line 258, in _bootstrap
2020-07-21T18:32:04.779891+02:00 kerneltalks salt-minion[6530]:     self.run()
2020-07-21T18:32:04.780163+02:00 kerneltalks salt-minion[6530]:   File "/usr/lib64/python2.7/multiprocessing/process.py", line 114, in run
2020-07-21T18:32:04.780408+02:00 kerneltalks salt-minion[6530]:     self._target(*self._args, **self._kwargs)
2020-07-21T18:32:04.780642+02:00 kerneltalks salt-minion[6530]:   File "/usr/lib/python2.7/site-packages/salt/scripts.py", line 157, in minion_process
2020-07-21T18:32:04.781024+02:00 kerneltalks salt-minion[6530]:     minion.start()
2020-07-21T18:32:04.781263+02:00 kerneltalks salt-minion[6530]:   File "/usr/lib/python2.7/site-packages/salt/cli/daemons.py", line 343, in start
2020-07-21T18:32:04.781684+02:00 kerneltalks salt-minion[6530]:     super(Minion, self).start()
2020-07-21T18:32:04.781923+02:00 kerneltalks salt-minion[6530]:   File "/usr/lib/python2.7/site-packages/salt/utils/parsers.py", line 1064, in start
2020-07-21T18:32:04.782900+02:00 kerneltalks salt-minion[6530]:     self.prepare()
2020-07-21T18:32:04.783141+02:00 kerneltalks salt-minion[6530]:   File "/usr/lib/python2.7/site-packages/salt/cli/daemons.py", line 311, in prepare
2020-07-21T18:32:04.783385+02:00 kerneltalks salt-minion[6530]:     import salt.minion
2020-07-21T18:32:04.783613+02:00 kerneltalks salt-minion[6530]:   File "/usr/lib/python2.7/site-packages/salt/minion.py", line 69, in <module>
2020-07-21T18:32:04.784700+02:00 kerneltalks salt-minion[6530]:     import salt.client
2020-07-21T18:32:04.784942+02:00 kerneltalks salt-minion[6530]:   File "/usr/lib/python2.7/site-packages/salt/client/__init__.py", line 40, in <module>
2020-07-21T18:32:04.785631+02:00 kerneltalks salt-minion[6530]:     import salt.utils.minions
2020-07-21T18:32:04.785870+02:00 kerneltalks salt-minion[6530]:   File "/usr/lib/python2.7/site-packages/salt/utils/minions.py", line 24, in <module>
2020-07-21T18:32:04.786399+02:00 kerneltalks salt-minion[6530]:     import salt.auth.ldap
2020-07-21T18:32:04.786634+02:00 kerneltalks salt-minion[6530]:   File "/usr/lib/python2.7/site-packages/salt/auth/ldap.py", line 21, in <module>
2020-07-21T18:32:04.787043+02:00 kerneltalks salt-minion[6530]:     from jinja2 import Environment
2020-07-21T18:32:04.787300+02:00 kerneltalks salt-minion[6530]: ImportError: No module named jinja2
2020-07-21T18:32:04.818391+02:00 kerneltalks systemd[1]: salt-minion.service: Main process exited, code=exited, status=1/FAILURE
2020-07-21T18:32:04.818897+02:00 kerneltalks systemd[1]: salt-minion.service: Unit entered failed state.
2020-07-21T18:32:04.819261+02:00 kerneltalks systemd[1]: salt-minion.service: Failed with result 'exit-code'.
In this case, you should be able to run the salt-minion process manually by exporting the python path. Check the salt-minion binary to make sure which python is being used for this process in case your system has multiple versions installed.
root@kerneltalks # head -1 /usr/bin/salt-minion
root@kerneltalks # export PATH=$PATH:/usr/lib64/python2.6/site-packages/
root@kerneltalks # export PYTHONPATH=/usr/lib64/python2.6/site-packages/
root@kerneltalks # salt-minion start &
Once salt-minion is running you will be able to register a client to SUSE Manager. After registration update python by zypper up python* and then your salt-minion process will run using systemctl properly.
Issue of RHEL/OEL clients
I observed a peculiar problem where patch update tasks are sitting idle in a pending state for a long time and not being picked up by the client.
It shows in SUSE Manager GUI that –
This action will be executed after 1/10/20 10:28:00 AM IST
This action's status is: Queued.
This action has not yet been picked up.
and it sits there and does nothing.
The solution is to run rhn_check -vvvv on the client machine for which the job is stuck on SUSE Manager. It will be checked, picked up and executed!