Monthly Archives: December 2016

How to install SSL certificate on Apache running on Linux

Learn how to install an SSL certificate on the Apache webserver running on the Linux machine. Steps include installation, configuration, and verification.

Before we start will SSL certificate steps lets run through below pre-requisite:

  1. You have an Apache webserver running on your Linux machine.
  2. You have generated a CSR file and submitted it to the certificate vendor. Read here: steps to generate CSR.
  3. You have received an SSL certificate file from the vendor.

SSL certificate you received from the certificate vendor should be a filename.crt file. This file can be opened with a text editor and looks like below :

-----BEGIN CERTIFICATE-----
OVowgZYxCzAJBgNVBAYTAk1ZMREwDwYDVQQIDAhTZWxhbmdv
cjEWMBQGA1UEBwwNUGV0YWxpbmcgSmF5YTEdMBsGA1UECgwUTEFGQVJHRSBBU0lB
IFNkbiBCaGQxFTATBgNVBAsMDExhZmFyZ2UgQXNpYTEmMCQGA1UEAwwdY3VzdG9t
ZXJwb3J0YWwubGFmYXJnZS5jb20ubXkwggEiMA0GCSqGSIb3DQEBAQUAA4IBDwAw
ggEKAoIBAQC5MP8NYcSJugZWWcRSKvtFFXaHNDHl9zTocAfKfxmFJyoHATRXPu1A
dRJKE3sKYxW+uEMdfsdpGKaXOv8y+72PEay/V/s3Wiyyv1SEpU1CqPbVkjTRBdmx
A7Xso9tkrBQUIf6ICn+HBZesJ+l2WOWs1xNL/XLx7MEaDKGnhnnxyCF1U7R6J8Bh
QGMHQzdDyXWjIRxyQIJ2VmFB7eJ0OJZUXpWZXTxyZjjQZr22Tr+xN+gu9LjavPxO
lVyDqXJG+V1ouFfk5zG6hXFnQeYzCAGVTpCRss/JW1fBCyTzJj+SEqPDzYj8hwww
RSJlFuGVYmybNW1SCUFxXRoDFjRh04yxAgMBAAGjggJ5MIICdTAoBgNVHREEITAf
gh1jdXN0b21lcnBvcnRhbC5sYWZhcmdlLmNvbS5teTAJBgNVHRMEAjAAMA4GA1Ud
DwEB/wQEAwIFoDBhBgNVHSAEWjBYMFYGBmeBDAECAjBMMCMGCCsGAQUFBwIBFhdo
dHRwczovL2Quc3ltY2IuY29tL2NwczAlBggrBgEFBQcCAjAZDBdodHRwczovL2Qu
c3ltY2IuY29tL3JwYTArBgNVHR8EJDAiMCCgHqAchhpodHRwOi8vc3Muc3ltY2Iu
Y29tL3NzLmNybDAdBgNVHSUEFjAUBggrBgEFBQcDAQYIKwYBBQUHAwIwHwYDVR0j
BBgwFoAUX2DPYZBV34RDFIpgKrL1evRDGO8wVwYIKwYBBQUHAQEESzBJMB8GCCsG
AQUFBzABhhNodHRwOi8vc3Muc3ltY2QuY29tMCYGCCsGAQUFBzAChhpodHRwOi8v
c3Muc3ltY2IuY29tL3NzLmNydDCCAQMGCisGAQQB1nkCBAIEgfQEgfEA7wB2AN3r
HSt6DU+mIIuBrYFocH4ujp0B1VyIjT0RxM227L7MAAABVirLn4IAAAQDAEcwRQIg
MiUcoABrkMnSdbc9U4zKUvKijKOsocUbhfeAAbCYFUYCIQCOfhqeLIgADRcxOW+h
HEazFjqFdwIAluchDlXLss3jvFxHpI0Tyg00NIR7kJivaP3
scDCpInpcg/xKTzM8aewc1cmkDM8hm9j2VZ0yQgcc+rd8ZHQibb0M4WAPDel/tFO
5YodvCGJtkLIItei20qtkqZ4fMuW5A
-----END CERTIFICATE-----

Installation :

Using FTP, sftp, etc, copy SSL certificate, intermediate certificate file (if any), and private key file (generated during CSR file generation step above) on Linux machine running Apache webserver. It is advisable to copy these files within the Apache installation directory and furthermore in separate directories if you want to maintain old files archives. For example, if the Apache installation directory is /etc/httpd then you can create a directory /etc/httpd/ssl_certs and keep new/old certificates in it. Same for keys you can create /etc/httpd/ssl_keys and keep new/old key files in it.

Normally certificate and key files should be readable to the owner and group to which Apache users belong.

Configuration :

Login to your Linux machine and navigate to your Apache installation directory where the configuration file resides. Most of the time it’s installed in /etc/httpd/ directory. If you are not where your Apache in installed, identify appropriate Apache instance in ps -ef output (in case multiple Apache instances running on the same machine). To check the Apache configuration file location use below command :

# /usr/sbin/httpd -V
Server version: Apache/2.2.17 (Unix)
Server built:   Oct 19 2010 16:27:47
Server's Module Magic Number: 20051115:25
Server loaded:  APR 1.3.12, APR-Util 1.3.9
Compiled using: APR 1.3.12, APR-Util 1.3.9
Architecture:   64-bit
Server MPM:     Prefork
  threaded:     no
    forked:     yes (variable process count)
Server compiled with....
 -D APACHE_MPM_DIR="server/mpm/prefork"
 -D APR_HAS_SENDFILE
 -D APR_HAS_MMAP
 -D APR_HAVE_IPV6 (IPv4-mapped addresses enabled)
 -D APR_USE_SYSVSEM_SERIALIZE
 -D APR_USE_PTHREAD_SERIALIZE
 -D SINGLE_LISTEN_UNSERIALIZED_ACCEPT
 -D APR_HAS_OTHER_CHILD
 -D AP_HAVE_RELIABLE_PIPED_LOGS
 -D DYNAMIC_MODULE_LIMIT=128
 -D HTTPD_ROOT="/etc/httpd"
 -D SUEXEC_BIN="/usr/sbin/suexec"
 -D DEFAULT_PIDLOG="logs/httpd.pid"
 -D DEFAULT_SCOREBOARD="logs/apache_runtime_status"
 -D DEFAULT_LOCKFILE="logs/accept.lock"
 -D DEFAULT_ERRORLOG="logs/error_log"
 -D AP_TYPES_CONFIG_FILE="conf/mime.types"
 -D SERVER_CONFIG_FILE="conf/httpd.conf"

See the last line of above output which will show configuration file (i.e. httpd.conf) location. This is a relative path. The complete absolute path of the config file can be obtained by observing HTTPD_ROOT value in the above output. So complete path for config file will be HTTPD_ROOT/SERVER_CONFIG_FILE i.e. /etc/httpd/conf/httpd.conf in this case.

Once you are able to trace the configuration file, you need to edit this file with a text editor like vi and mention the SSL certificate path.  You need to define below three paths. If parameters are already in the file then just edit their paths.

SSLCertificateFile /<path to SSL cert>/filename.crt  
SSLCertificateKeyFile /<path to provate key>/private.key  
SSLCertificateChainFile /<path to intermediate cert>/intermediate.crt

These paths are the ones where you copied SSL cert, intermediate cert, and private key in the above step. Save and verify changes.

Final step :

You are done with configuration now but Apache instance doesn’t know these changes. You need to restart the Apache instance to take these new changes in action. You can restart Apache with below command :

# /usr/sbin/apachectl -f /<path of conf file>/httpd.conf -k stop
# /usr/sbin/apachectl -f /<path of conf file>/httpd.conf -k start

Verify if Apache is up and running using ps -ef command. If you don’t see Apache instance running then check error.log for troubleshooting. This log file is located under the Apache installation directory under the logs directory. The path can be identified from DEFAULT ERROR_LOG value in the above httpd -V output.

Verification :

Once Apache is up and running with this new configuration, verify if you installed your certificate correctly or not by visiting this online free tool by Symantec.

Also, you can visit your website/link which is being served by Apache in a fresh browser session and check certificate details by clicking the lock icon in the browser bar. Then clicking details on coming dropdown.
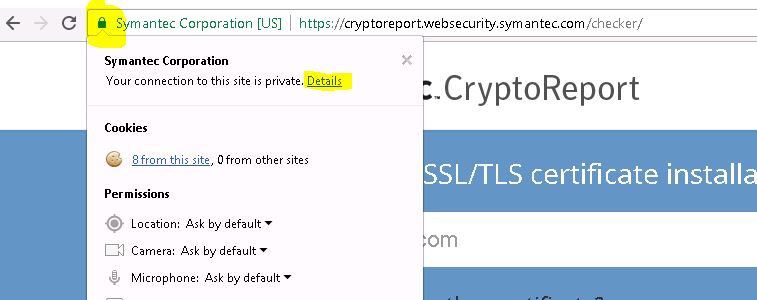
You will be presented with below screen, Click on view certificate to view certificate details.

This will show you below certificate details which include purpose, issue date, expiry date, organization, issuer, etc.

Understanding /etc/fstab file

/etc/fstab is a key file for file systems in any Linux Unix system. Learn fields, formats within /etc/fstab file. Understand the meaning of each field and how it can be set.

/etc/fstab is one of the key files in running a Linux or UNIX system. File system mounting can be controlled using this file. This is one of the files being used at boot to validate and mount file systems on the machine.  This file is human-readable and can be edited with a text editor like vi.

This file contains 6 parameters per row. Each row represents one file system details. They are as below :

  1. Volume
  2. Mount point
  3. File system type
  4. Options
  5. Dump
  6. Pass

Let’s see one by one –

1. Volume

This is a disk or logical volume which is the source to be mounted on the mount point specified in the second field. See the below example of fstab from the Linux system.

# cat /etc/fstab


# /etc/fstab
# Created by anaconda on Thu Dec  5 15:47:52 2013
#
# Accessible filesystems, by reference, are maintained under '/dev/disk'
# See man pages fstab(5), findfs(8), mount(8) and/or blkid(8) for more info
#
/dev/mapper/vg_00-lv_root /                       ext4    defaults        1 1
UUID=f2918ad9-f5ce-485d-81ae-e874f57f6f57 /boot                   ext4    defaults        1 2
/dev/mapper/vg_00-lv_home /home                   ext4    defaults        1 2
/dev/mapper/vg_00-lv_tmp /tmp                    ext4    defaults        1 2
/dev/mapper/vg_00-lv_usr /usr                    ext4    defaults        1 2
/dev/mapper/vg_00-lv_var /var                    ext4    defaults        1 2
/dev/mapper/vg_00-lv_swap swap                    swap    defaults        0 0
tmpfs                   /dev/shm                tmpfs   defaults        0 0
devpts                  /dev/pts                devpts  gid=5,mode=620  0 0
sysfs                   /sys                    sysfs   defaults        0 0
proc                    /proc                   proc    defaults        0 0
/dev/sdb                /app                    ext3    defaults        1 2
10.10.2.3:/my_share     /tmp/nfs_share          nfs      defaults       0 0

In the above example, you can see volume is specified by UUID or logical volume name or disk name or IP:/directory.

/boot entry is specified by UUID. UUID is a universally unique ID assigned to each disk when it’s formatted in the system. The disk can be identified by UUID or disk name in the kernel.  Since its unique number, it’s ideal to use UUID in fstab for important file systems!

/var, /tmp, etc entries are defined using volume as a logical volume name. They are logical volumes part of the volume group vg00. See LVM legends to get familiarize with naming conventions.

/dev/shm is defined by tmpfs volume. Its a temporary file system volume created and identified by the kernel on the root disk. devpts, sysfsare part of such system-defined file systems.

Second Last entry,  you can see disk sdb is also defined as a volume for /app entry.

Lastly, the NFS share is mounted on /tmp/nfs_share directory. There IP address of the NFS server and its exported share volume name combination is defined as a volume.

This is the first argument to be supplied in mount command while mounting any filesystem.

Normally HPUX uses LVM as a partition manager hence only logical volumes are found as a volume entry in fstab. See below the example of fstab from the HPUX system.

$ cat /etc/fstab

# System /etc/fstab file.  Static information about the file systems
# See fstab(4) and sam(1M) for further details on configuring devices.
/dev/vg00/lvol3 / vxfs delaylog 0 1
/dev/vg00/lvol1 /stand vxfs tranflush 0 1
/dev/vg00/lvol4 /home vxfs delaylog 0 2
/dev/vg00/lvol5 /opt vxfs delaylog 0 2
/dev/vg00/lvol6 /tmp vxfs delaylog 0 2
/dev/vg00/lvol7 /usr vxfs delaylog 0 2
/dev/vg00/lvol8 /var vxfs delaylog 0 2
/dev/vg00/lvol10 /var/adm/sw vxfs delaylog 0 2
/dev/vg00/lvol11 /admin vxfs delaylog 0 2
10.10.2.3:/my_share /tmp/nfs_share nfs defaults 0 0

2. Mount point

Its second field in an entry of fstab. This is the name of the directory on which volume should be mounted. It should always be an absolute path (i.e. starts with/and has all directory hierarchy till last expected directory) in this field.

Directories like /var, /boot, /tmp, /stand, /usr, /home, /proc, /sys are (and should be) reserved for system mount points. In HPUX even logical volume numbers of root VG are reserved for system mount points like lvol1 should always be /stand. 2 for swap, 3 for root, etc.

This is the second argument to be supplied to mount command when mounting any file system.

3. File system type

This is FS type to be considered while mounting the given volume on the specified mount point. Different file system types have different functions and advantages to offer. You need to specify the same FS type which was used at the time of formatting respective volume. ext3, ext4 (Linux FS), vxfs (veritas FS), NFS (Network FS), swap (SWAP FS) are a few types.

This can be supplied to mount command with -F option.

4. Options

Those are file system options that will enhance the user experience of the mount point. They also impact on the performance of the file system and impact in recovery in case of failures. Value defaults in the above example instructs mount command to use parameters defined inbuilt. They can be seen in the man page :

defaults
              Use default options: rw, suid, dev, exec, auto, nouser, async, and relatime.

All available options can be summarized as below :

Option
Description
sync All I/O to the filesystem should be done synchronously.
async All I/O to the filesystem should be done asynchronously.
atime inode access time is controlled by kernel defaults.
noatime Do not update inode access times on this filesystem
auto Mount it when -a used (mount -a)
noauto Dont ‘auto’
dev Interpret character or block special devices on the filesystem
nodev Dont ‘dev’
diratime Update directory inode access times on this filesystem.
nodiratime Dont ‘diratime’
dirsync All directory updates within the filesystem should be done synchronously.
exec Permit execution of binaries
noexecDont ‘exec’
group Allow normal group users to mount
mand Allow mandatory locks on this filesystem.
relatime Update inode access times relative to modify or change time.
norealtime Dont ‘realtime’
delaylog Affect how vxfs maintains journals which impacts performance and ability to recover the file system
nomand Dont ‘mand’
suid Allow set-user-identifier or set-group-identifier bits to take effect.
nosuid Dont ‘suid’
remount Attempt to remount an already-mounted filesystem.
rw Read write mode
ro
Read only mode
owner Allow non-root user to mount if he is owner of device
user Allow an ordinary user to mount the filesystem.
nouser Dont ‘user’
largefiles Allow file size more than 2TB
transflush Performance related

These options can be supplied to mount command using -o.

5. Dump

This is an old fashioned backup option in case the server goes down. If this is set to 1 then FS dump will happen when the system goes down due to some issue. Setting this 0 will nullify this option.

6. Pass

This tells kernel about file system check priority or sequence. fsck is a facility that checks the file system for its consistency. During boot, if fsck is invoked then it looks for this file. If set to 0, fsck will be skipped for that mount point. If set to 1 then that mount points will be first in sequence to be fscked.