Troubleshooting guide to reclaim space on disk after deleting files in Linux.
Space is not released after deleting files in Linux? Read this troubleshooting guide
One of the common issues Linux Unix system users face is disk space is not being released even after files are deleted. Sysadmins face some issues when they try to recover disk space by deleting high sized files in a mount point and then they found disk utilization stays the same even after deleting huge files. Sometimes, application users are moving/deleting large log files and still won’t be able to reclaim space on the mount point.
In this troubleshooting guide, I will walk you through steps that will help you to reclaim space on disk after deleting files. Here we will learn how to remove deleted open files in Linux. Most of the time files are deleted manually but processes using those files keep them open and hence space is not reclaimed. df also shows incorrect space utilization.
Process stop/start/restart
To resolve this issue, you need to gracefully or forcefully end processes using those deleted files. First, get a list of such deleted files that are still marked open by processes. Use lsof (list open files) command with +L1 switch for this or you can directly grep for deleted in lsof output without switch
Now, in above output check the PID 777and stop that process. If you can not stop it you can kill the process. In the case of application processes, you can refer application guides on how to stop, start, restart its processes. The restarting process helps in releasing the lock on that file which process made to hold it as open. Once the related process is stopped/restarted you can see space will be released and you can observe reduced utilization in df command output.
Clear from proc filesystem
Another way is to vacate the space used by file by de-allocating that space from /proc filesystem. As you are aware, every process in Linux has its allocations in /proc filesystem i.e. process filesystem. Make sure that the process/application has no impact if you are flushing files (which are held open by an app) from /proc filesystem.
You can find file allocation at /proc/<pid>/fd/<fd_number> location. Where PID and fd_number you can get from lsof output we saw above. If you check the type of this file then it’s a symbolic link to your deleted file.
root@kerneltalks # file /proc/777/fd/7
/proc/777/fd/7: broken symbolic link to `/tmp/ffiJEo5nz (deleted)
So, in our case we can do it using –
root@kerneltalks # > /proc/777/fd/7
That’s it! Flushing it will regain your lost space by those files which you already deleted.
An article explaining step by step procedure to add EBS disk on AWS Linux server with screenshots.
EBS disk addition on AWS instance
Nowadays most of the servers run on cloud platforms like Amazon Web Services (AWS), Azure, etc. So daily administrative tasks on Linux servers from AWS console is one of the common things in sysadmin’s task list. In this article, we will walk you through one such task i.e. adding a new disk to the AWS Linux server.
Adding a disk to the EC2 Linux server has two portions. The first portion is to be done on AWS EC2 console which is creating new volume to be attached to the server. And attaching it to EC2 instance on AWS console. The second portion is to be done on the Linux server which is to identify newly added disk at the kernel level and prepare it for use.
Creating & attaching EBS volume
In this step, we will learn how to create EBS volume in the AWS console and how to attach EBS volume to AWS EC2 instance.
Login to your EC2 console and navigate to Volumes which is under ELASTIC BLOCK STORAGE menu on the left-hand sidebar. You will be presented with the current list of volumes in your AWS account like below –
Create volume in AWS
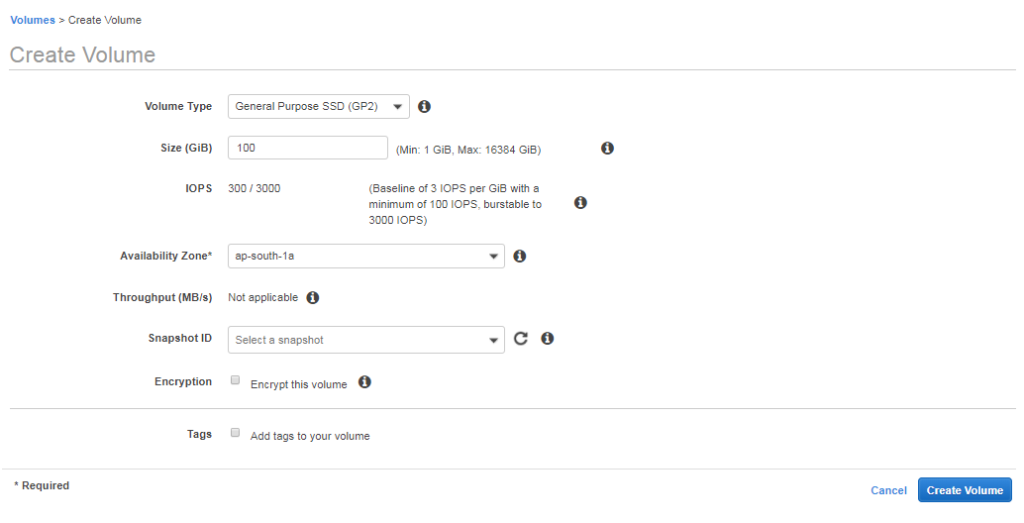
Now, click Create Volume button and you will be presented with the below screen.
Volume creation in AWS
Here you need to choose several parameters of your volume –
Volume Type. This decides your volume performance and obv billing.
Size. In GB. Min and Max available sizes differ according to your volume type choice.
IOPS. Performance parameters. Changes according to your volume type choice
Availability Zone. Make sure you select same AZ as your EC2 instance
Throughput. Performance parameter. Only available for ST1 & SC1 volume type.
Snapshot ID. Select snapshot if you want to create the new volume from existing snapshot backup. For fresh blank volume leave it blank.
Encryption. Checkmark if you want the volume to be encrypted. An extra layer of security.
Tags. Add tags for management, reporting, billing purposes.
After selecting proper parameters as per your requirement, click Create Volume button. You will be presented with ‘Volume created successfully’ dialogue if everything goes well along with the volume ID of your newly created volume. Click Close and you will be back of the volume list.
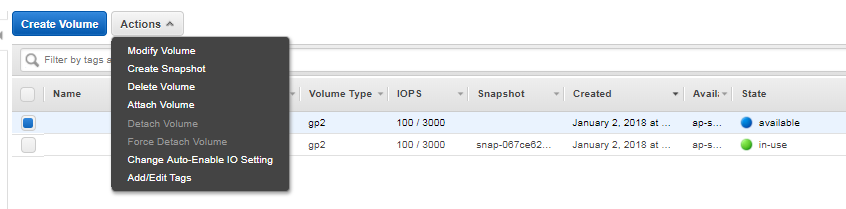
Now check volume ID to identify your newly created volume in this list. It will be marked with an ‘Available’ state. Select that volume and select Attach volume from Actions menu.
Attach volume menu
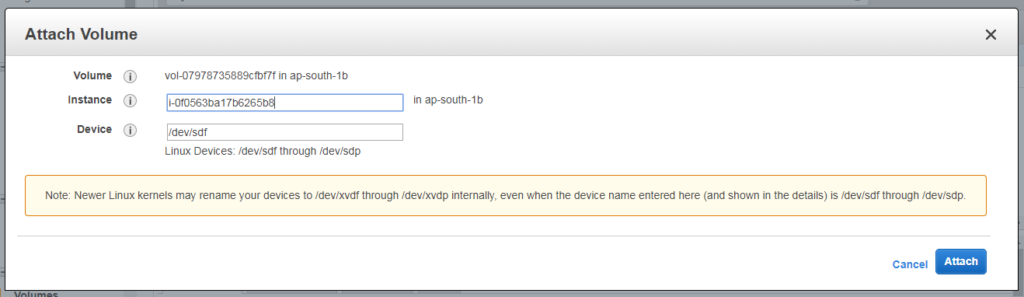
Now you will be presented with an instance selection menu. Here you need to choose an instance to which this volume is to be attached. Remember only instances in the same AZ of the volume are
Attach volume instance selection
Once you select the instance you can see the device name which will be reflected at the kernel level in your instance under Device field. Here its /dev/sdf.
Check out the note being displayed here. It says : Note: Newer Linux kernels may rename your devices to /dev/xvdf through /dev/xvdp internally, even when the device name entered here (and shown in the details) is /dev/sdf through /dev/sdp.
It says newer Linux kernels may interpret your device name as /dev/xvdf than /dev/sdf. This means this volume will be either /dev/sdf (on the old kernel) or /dev/xvdf on the new kernel.
That’s it. Once attached you can see volume state is changed from Available to in-use
Identifying volume on Linux instance
Now head back to your Linux server. Log in and check new volume in fdisk -l output.
root@kerneltalks # fdisk -l
WARNING: fdisk GPT support is currently new, and therefore in an experimental ph                                                                                        ase. Use at your own discretion.

Disk /dev/xvda: 10.7 GB, 10737418240 bytes, 20971520 sectors
Units = sectors of 1 * 512 = 512 bytes
Sector size (logical/physical): 512 bytes / 512 bytes
I/O size (minimum/optimal): 512 bytes / 512 bytes
Disk label type: gpt
Disk identifier: 25D08425-708A-47D2-B907-1F0A3F769A90


#         Start          End    Size  Type            Name
 1         2048         4095      1M  BIOS boot parti
 2         4096     20971486     10G  Microsoft basic

Disk /dev/xvdf: 10.7 GB, 10737418240 bytes, 20971520 sectors
Units = sectors of 1 * 512 = 512 bytes
Sector size (logical/physical): 512 bytes / 512 bytes
I/O size (minimum/optimal): 512 bytes / 512 bytes
As AWS mentioned new device name will be reflected as /dev/xvdf in the kernel, you can see /dev/xvdf in the above output.
Now you need to partition this disk using LVM (using pvcreate) or fdisk so that you can use it for creating mount points!
Learn xfs file system commands to create, grow, repair xfs file system along with command examples.
Learn xfs commands with examples
In our other article, we walked you through what is xfs, features of xfs, etc. In this article, we will see some frequently used xfs administrative commands. We will see how to create xfs filesystem, how to grow xfs filesystem, how to repair the xfs file system, and check xfs filesystem along with command examples.
Create XFS filesystem
mkfs.xfs command is used to create xfs filesystem. Without any special switches, command output looks like one below –
Note: Once the XFS filesystem is created it can not be reduced. It can only be extended to a bigger size.
Resize XFS file system
In XFS, you can only extend the file system and can not reduce it. To grow XFS file system use xfs_growfs. You need to specify a new size of mount point along with -D switch. -D takes argument number as file system blocks. If you don’t supply -D switch, xfs_growfs will grow the filesystem to the maximum available limit on that device.
In the above output, observe the last line. Since I supplied a new size smaller than the existing size, xfs_growfs didn’t change the filesystem. This shows you can not reduce the XFS file system. You can only extend it.
Now, I supplied new size 1 GB extra and it successfully grew the file system.
1 GB blocks calculation :
The current filesystem has bsize=4096 i.e. block size of 4MB. We need 1 GB i.e. 256 blocks. So add 256 in a current number of blocks i.e. 2883584 which gives you 2883840. So I used 2883840 as an argument to -D switch.
Repair XFS file system
File system consistency check and repair of XFS can be performed using xfs_repair command. You can run the command with -n switch so that it will not modify anything on the filesystem. It will only scans and reports which modifications to be done. If you are running it without -n switch, it will modify the file system wherever necessary to make it clean.
Please note that you need to un-mount the XFS filesystem before you can run checks on it. Otherwise, you will see the below error.
root@kerneltalks # xfs_repair -n /dev/xvdf
xfs_repair: /dev/xvdf contains a mounted filesystem
xfs_repair: /dev/xvdf contains a mounted and writable filesystem

fatal error -- couldn't initialize XFS library
Once successfully un-mounting file system you can run command on it.
root@kerneltalks # xfs_repair -n /dev/xvdf
Phase 1 - find and verify superblock...
Phase 2 - using internal log
        - zero log...
        - scan filesystem freespace and inode maps...
        - found root inode chunk
Phase 3 - for each AG...
        - scan (but don't clear) agi unlinked lists...
        - process known inodes and perform inode discovery...
        - agno = 0
        - agno = 1
        - agno = 2
        - agno = 3
        - agno = 4
        - process newly discovered inodes...
Phase 4 - check for duplicate blocks...
        - setting up duplicate extent list...
        - check for inodes claiming duplicate blocks...
        - agno = 0
        - agno = 1
        - agno = 2
        - agno = 3
        - agno = 4
No modify flag set, skipping phase 5
Phase 6 - check inode connectivity...
        - traversing filesystem ...
        - traversal finished ...
        - moving disconnected inodes to lost+found ...
Phase 7 - verify link counts...
No modify flag set, skipping filesystem flush and exiting.
In the above output you can observe, in each phase command shows possible modification which can be done to make the file system healthy. If you want the command to do that modification during the scan then run the command without any switch.
root@kerneltalks # xfs_repair /dev/xvdf
Phase 1 - find and verify superblock...
Phase 2 - using internal log
        - zero log...
        - scan filesystem freespace and inode maps...
        - found root inode chunk
Phase 3 - for each AG...
        - scan and clear agi unlinked lists...
        - process known inodes and perform inode discovery...
        - agno = 0
        - agno = 1
        - agno = 2
        - agno = 3
        - agno = 4
        - process newly discovered inodes...
Phase 4 - check for duplicate blocks...
        - setting up duplicate extent list...
        - check for inodes claiming duplicate blocks...
        - agno = 0
        - agno = 1
        - agno = 2
        - agno = 3
        - agno = 4
Phase 5 - rebuild AG headers and trees...
        - reset superblock...
Phase 6 - check inode connectivity...
        - resetting contents of realtime bitmap and summary inodes
        - traversing filesystem ...
        - traversal finished ...
        - moving disconnected inodes to lost+found ...
Phase 7 - verify and correct link counts...
done
In the above output, you can observer xfs_repair command is executing possible filesystem modification as well to make it healthy.
Check XFS version and details
Checking the xfs file system requires it to un-mount. Run xfs_db command on its device path and once you entered xfs_db prompt, run version command.
xfs_db command normally used for examining the XFS file system. version command used to enable features in the file system. Without any argument, the current version and feature bits are printed
To view details of the XFS file system like block size and number of blocks which helps you in calculating new block number for growing XFS file system, use xfs_info without any switch.