

Quick lab setup for learning Ansible using containers on Oracle Virtualbox Linux VM.


In this article, we will be setting up our lab using Docker containers for testing Ansible. We are using Oracle Virtualbox so that you can spin up VM with a readymade OVA file in a minute. This will save efforts to install the OS from scratch. Secondly, we will be spinning up a couple of containers which can be used as ansible clients. Since we need to test ansible for running a few remote commands/modules, it’s best to have containers working as clients rather than spinning complete Linux VMs as a client. This will save a lot of resource requirements as well and you can run this ansible lab on your desktop/laptop as well for practicing ansible.
Without further delay lets dive into setting up a lab on desktop/laptop for learning Ansible. Roughly it’s divided into below sections –
- Download Oracle Virtualbox and OVA file
- Install Oracle Virtualbox and spin VM from OVA file
- Run containers to work as ansible clients
- Test connectivity via passwordless SSH access from Ansible worker to clients
Step 1. Download Oracle Virtualbox & OEL7 with Docker readymade OVA file
Goto VirtualBox downloads and download Virtualbox for your OS.
Goto Oracle Downloads and download Oracle Linux 7 with Docker 1.12 Hands-On Lab Appliance file. This will help us to spin up VM in Oracle VirtualBox without much hassle.
Step 2. Install Oracle Virtualbox and start VM from OVA file
Install Oracle Virtualbox. Its a pretty standard setup procedure so I am not getting into it. Once you download above OVA file, open it in Oracle VirtualBox and it will open up the Import Virtual Appliance menu like below-

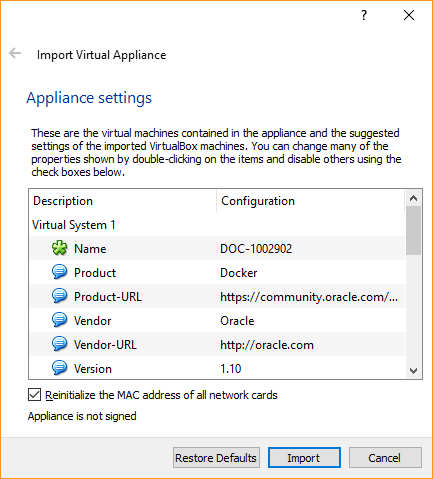
Click Import. Agree to the software license agreement shown and it will start Importing OVA as a VM. After finishing import, you will see VM named DOC-1002902 i.e. same name as OVA file is created in your Oracle VirtualBox.
Start that VM and login with the user. Credentials details are mentioned in the documentation link on the download page of OVA file.
Step 3. Running containers
For running containers, you need to set up Docker Engine first on VM. All steps are listed in the same documentation I mentioned above where you looked at your first login credentials. Also, you can follow our Docker installation guide if you want.
Then create key pair on your VM i.e. Ansible worker/server so that public key can be used within a container for passwordless SSH. We will be using Ansible user as ansible-usr in our setup, so you can see this user henceforth here. Read how to configure Ansible default user.
[root@ansible-srv .ssh]# ssh-keygen -t rsa
Generating public/private rsa key pair.
Enter file in which to save the key (/root/.ssh/id_rsa):
Enter passphrase (empty for no passphrase):
Enter same passphrase again:
Your identification has been saved in /root/.ssh/id_rsa.
Your public key has been saved in /root/.ssh/id_rsa.pub.
The key fingerprint is:
98:42:9a:82:79:ac:74:7f:f9:31:71:2a:ec:bb:af:ee root@ansible-srv.kerneltalks.com
The key's randomart image is:
+--[ RSA 2048]----+
|                 |
|                 |
|    .            |
|.o +   o         |
|+.=.. o S. .     |
|.+. ... . +      |
|.    . = +       |
|      o o o      |
|      oE=o       |
+-----------------+
Now we have key pair ready move on to containers.
Once your Docker Engine is installed and started, create custom Docker Image using Dockerfile mentioned below which we will use to spin up multiple containers (ansible clients). Below Dockerfile is taken from link and modified a bit for setting passwordless SSH. This Dockerfile answers the question how to configure passwordless SSH for containers!
FROM ubuntu:16.04

RUN apt-get update && apt-get install -y openssh-server
RUN mkdir /var/run/sshd
RUN echo 'root:password' | chpasswd
RUN sed -i 's/PermitRootLogin prohibit-password/PermitRootLogin yes/' /etc/ssh/sshd_config

# SSH login fix. Otherwise user is kicked off after login
RUN sed 's@session\s*required\s*pam_loginuid.so@session optional pam_loginuid.so@g' -i /etc/pam.d/sshd

ENV NOTVISIBLE "in users profile"
RUN echo "export VISIBLE=now" >> /etc/profile
RUN useradd -m -d /home/ansible-usr ansible-usr
RUN mkdir /home/ansible-usr/.ssh
COPY .ssh/id_rsa.pub /home/ansible-usr/.ssh/authorized_keys
RUN chown -R ansible-usr:ansible-usr /home/ansible-usr/.ssh
RUN chmod 700 /home/ansible-usr/.ssh
RUN chmod 640 /home/ansible-usr/.ssh/authorized_keys
EXPOSE 22
CMD ["/usr/sbin/sshd", "-D"]
Keep above file as Dockerfile in /root and then run below command while you are in /root. If you are in some other directory then make sure you use relative path in COPY command in above Dockerfile.
[root@ansible-srv ~]# docker build -t eg_sshd .
This command will create a custom Docker Image named eg_sshd. Now you are ready to spin up containers using this custom docker image.
We will start containers in below format –
- Webserver
- k-web1
- k-web2
- Middleware
- k-app1
- k-app2
- Database
- k-db1
So in total 5 containers spread across different groups with different hostname so that we can use them for testing different configs/actions in ansible.
I am listing command for the first container only. Repeat them for rest 4 servers.
[root@ansible-srv ~]# docker run -d -P --hostname=k-web1 --name k-web1 eg_sshd
e70d825904b8c130582c0c52481b6e9ff33b18e0ba8ab47f12976a568587087b
It is working!
Now, spin up all 5 containers. Verify all containers are running and note down their ports.
[root@ansible-srv ~]# docker container ls -a
CONTAINER ID        IMAGE               COMMAND               CREATED              STATUS              PORTS                   NAMES
2da32a4706fb        eg_sshd             "/usr/sbin/sshd -D"   5 seconds ago        Up 3 seconds        0.0.0.0:32778->22/tcp   k-db1
75e2a4bb812f        eg_sshd             "/usr/sbin/sshd -D"   39 seconds ago       Up 33 seconds       0.0.0.0:32776->22/tcp   k-app2
40970c69348f        eg_sshd             "/usr/sbin/sshd -D"   50 seconds ago       Up 47 seconds       0.0.0.0:32775->22/tcp   k-app1
4b733ce710e4        eg_sshd             "/usr/sbin/sshd -D"   About a minute ago   Up About a minute   0.0.0.0:32774->22/tcp   k-web2
e70d825904b8        eg_sshd             "/usr/sbin/sshd -D"   4 minutes ago        Up 4 minutes        0.0.0.0:32773->22/tcp   k-web1
Step 4. Passwordless SSH connectivity between Ansible server and clients
This is an important step for the smooth & hassle-free functioning of Ansible. You need to create ansible user on Ansible server & clients. Then configure passwordless SSH (using keys) for that user.
Now you need to get the IP addresses of your containers. You can inspect the container and extract that information –
[root@ansible-srv ~]# docker inspect k-web1 |grep IPAddress
            "SecondaryIPAddresses": null,
            "IPAddress": "172.17.0.2",
                    "IPAddress": "172.17.0.2",
Now we have an IP address, let’s test the passwordless connectivity –
[root@ansible-srv ~]# ssh ansible-usr@172.17.0.2
Welcome to Ubuntu 16.04.6 LTS (GNU/Linux 4.1.12-37.5.1.el7uek.x86_64 x86_64)

 * Documentation:  https://help.ubuntu.com
 * Management:     https://landscape.canonical.com
 * Support:        https://ubuntu.com/advantage

Last login: Wed Jan 15 18:57:38 2020 from 172.17.0.1
$ hostname
k-web1
$ exit
Connection to 172.17.0.2 closed.
It’s working! Go ahead and test it for rest all, so that the client’s authenticity will be added and RSA fingerprints will be saved to the known host list. Now we have all 5 client containers running and passwordless SSH is setup between ansible server and clients for user ansible-usr
Now you have full lab setup ready on your desktop/laptop within Oracle Virtualbox for learning Ansible! Lab setup has a VM running in Oracle Virtualbox which is you mail Ansible server/worker and it has 5 containers running within acting as Ansible clients. This setup fulfills the pre-requisite of the configuration of passwordless SSH for Ansible.