Yearly Archives: 2016

How to install SSL certificate on Apache running on Linux

Learn how to install an SSL certificate on the Apache webserver running on the Linux machine. Steps include installation, configuration, and verification.

Before we start will SSL certificate steps lets run through below pre-requisite:

  1. You have an Apache webserver running on your Linux machine.
  2. You have generated a CSR file and submitted it to the certificate vendor. Read here: steps to generate CSR.
  3. You have received an SSL certificate file from the vendor.

SSL certificate you received from the certificate vendor should be a filename.crt file. This file can be opened with a text editor and looks like below :

-----BEGIN CERTIFICATE-----
OVowgZYxCzAJBgNVBAYTAk1ZMREwDwYDVQQIDAhTZWxhbmdv
cjEWMBQGA1UEBwwNUGV0YWxpbmcgSmF5YTEdMBsGA1UECgwUTEFGQVJHRSBBU0lB
IFNkbiBCaGQxFTATBgNVBAsMDExhZmFyZ2UgQXNpYTEmMCQGA1UEAwwdY3VzdG9t
ZXJwb3J0YWwubGFmYXJnZS5jb20ubXkwggEiMA0GCSqGSIb3DQEBAQUAA4IBDwAw
ggEKAoIBAQC5MP8NYcSJugZWWcRSKvtFFXaHNDHl9zTocAfKfxmFJyoHATRXPu1A
dRJKE3sKYxW+uEMdfsdpGKaXOv8y+72PEay/V/s3Wiyyv1SEpU1CqPbVkjTRBdmx
A7Xso9tkrBQUIf6ICn+HBZesJ+l2WOWs1xNL/XLx7MEaDKGnhnnxyCF1U7R6J8Bh
QGMHQzdDyXWjIRxyQIJ2VmFB7eJ0OJZUXpWZXTxyZjjQZr22Tr+xN+gu9LjavPxO
lVyDqXJG+V1ouFfk5zG6hXFnQeYzCAGVTpCRss/JW1fBCyTzJj+SEqPDzYj8hwww
RSJlFuGVYmybNW1SCUFxXRoDFjRh04yxAgMBAAGjggJ5MIICdTAoBgNVHREEITAf
gh1jdXN0b21lcnBvcnRhbC5sYWZhcmdlLmNvbS5teTAJBgNVHRMEAjAAMA4GA1Ud
DwEB/wQEAwIFoDBhBgNVHSAEWjBYMFYGBmeBDAECAjBMMCMGCCsGAQUFBwIBFhdo
dHRwczovL2Quc3ltY2IuY29tL2NwczAlBggrBgEFBQcCAjAZDBdodHRwczovL2Qu
c3ltY2IuY29tL3JwYTArBgNVHR8EJDAiMCCgHqAchhpodHRwOi8vc3Muc3ltY2Iu
Y29tL3NzLmNybDAdBgNVHSUEFjAUBggrBgEFBQcDAQYIKwYBBQUHAwIwHwYDVR0j
BBgwFoAUX2DPYZBV34RDFIpgKrL1evRDGO8wVwYIKwYBBQUHAQEESzBJMB8GCCsG
AQUFBzABhhNodHRwOi8vc3Muc3ltY2QuY29tMCYGCCsGAQUFBzAChhpodHRwOi8v
c3Muc3ltY2IuY29tL3NzLmNydDCCAQMGCisGAQQB1nkCBAIEgfQEgfEA7wB2AN3r
HSt6DU+mIIuBrYFocH4ujp0B1VyIjT0RxM227L7MAAABVirLn4IAAAQDAEcwRQIg
MiUcoABrkMnSdbc9U4zKUvKijKOsocUbhfeAAbCYFUYCIQCOfhqeLIgADRcxOW+h
HEazFjqFdwIAluchDlXLss3jvFxHpI0Tyg00NIR7kJivaP3
scDCpInpcg/xKTzM8aewc1cmkDM8hm9j2VZ0yQgcc+rd8ZHQibb0M4WAPDel/tFO
5YodvCGJtkLIItei20qtkqZ4fMuW5A
-----END CERTIFICATE-----

Installation :

Using FTP, sftp, etc, copy SSL certificate, intermediate certificate file (if any), and private key file (generated during CSR file generation step above) on Linux machine running Apache webserver. It is advisable to copy these files within the Apache installation directory and furthermore in separate directories if you want to maintain old files archives. For example, if the Apache installation directory is /etc/httpd then you can create a directory /etc/httpd/ssl_certs and keep new/old certificates in it. Same for keys you can create /etc/httpd/ssl_keys and keep new/old key files in it.

Normally certificate and key files should be readable to the owner and group to which Apache users belong.

Configuration :

Login to your Linux machine and navigate to your Apache installation directory where the configuration file resides. Most of the time it’s installed in /etc/httpd/ directory. If you are not where your Apache in installed, identify appropriate Apache instance in ps -ef output (in case multiple Apache instances running on the same machine). To check the Apache configuration file location use below command :

# /usr/sbin/httpd -V
Server version: Apache/2.2.17 (Unix)
Server built:   Oct 19 2010 16:27:47
Server's Module Magic Number: 20051115:25
Server loaded:  APR 1.3.12, APR-Util 1.3.9
Compiled using: APR 1.3.12, APR-Util 1.3.9
Architecture:   64-bit
Server MPM:     Prefork
  threaded:     no
    forked:     yes (variable process count)
Server compiled with....
 -D APACHE_MPM_DIR="server/mpm/prefork"
 -D APR_HAS_SENDFILE
 -D APR_HAS_MMAP
 -D APR_HAVE_IPV6 (IPv4-mapped addresses enabled)
 -D APR_USE_SYSVSEM_SERIALIZE
 -D APR_USE_PTHREAD_SERIALIZE
 -D SINGLE_LISTEN_UNSERIALIZED_ACCEPT
 -D APR_HAS_OTHER_CHILD
 -D AP_HAVE_RELIABLE_PIPED_LOGS
 -D DYNAMIC_MODULE_LIMIT=128
 -D HTTPD_ROOT="/etc/httpd"
 -D SUEXEC_BIN="/usr/sbin/suexec"
 -D DEFAULT_PIDLOG="logs/httpd.pid"
 -D DEFAULT_SCOREBOARD="logs/apache_runtime_status"
 -D DEFAULT_LOCKFILE="logs/accept.lock"
 -D DEFAULT_ERRORLOG="logs/error_log"
 -D AP_TYPES_CONFIG_FILE="conf/mime.types"
 -D SERVER_CONFIG_FILE="conf/httpd.conf"

See the last line of above output which will show configuration file (i.e. httpd.conf) location. This is a relative path. The complete absolute path of the config file can be obtained by observing HTTPD_ROOT value in the above output. So complete path for config file will be HTTPD_ROOT/SERVER_CONFIG_FILE i.e. /etc/httpd/conf/httpd.conf in this case.

Once you are able to trace the configuration file, you need to edit this file with a text editor like vi and mention the SSL certificate path.  You need to define below three paths. If parameters are already in the file then just edit their paths.

SSLCertificateFile /<path to SSL cert>/filename.crt  
SSLCertificateKeyFile /<path to provate key>/private.key  
SSLCertificateChainFile /<path to intermediate cert>/intermediate.crt

These paths are the ones where you copied SSL cert, intermediate cert, and private key in the above step. Save and verify changes.

Final step :

You are done with configuration now but Apache instance doesn’t know these changes. You need to restart the Apache instance to take these new changes in action. You can restart Apache with below command :

# /usr/sbin/apachectl -f /<path of conf file>/httpd.conf -k stop
# /usr/sbin/apachectl -f /<path of conf file>/httpd.conf -k start

Verify if Apache is up and running using ps -ef command. If you don’t see Apache instance running then check error.log for troubleshooting. This log file is located under the Apache installation directory under the logs directory. The path can be identified from DEFAULT ERROR_LOG value in the above httpd -V output.

Verification :

Once Apache is up and running with this new configuration, verify if you installed your certificate correctly or not by visiting this online free tool by Symantec.

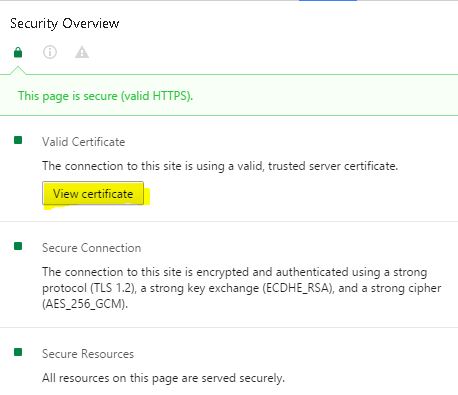
Also, you can visit your website/link which is being served by Apache in a fresh browser session and check certificate details by clicking the lock icon in the browser bar. Then clicking details on coming dropdown.

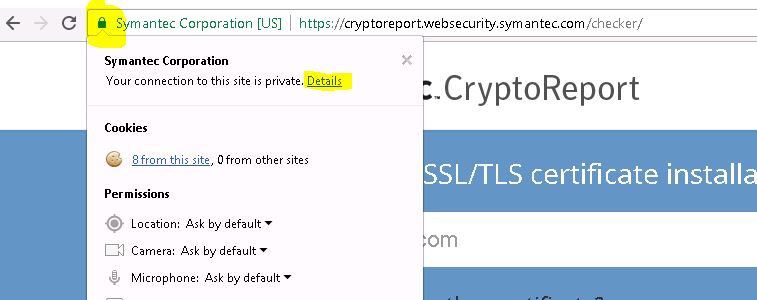
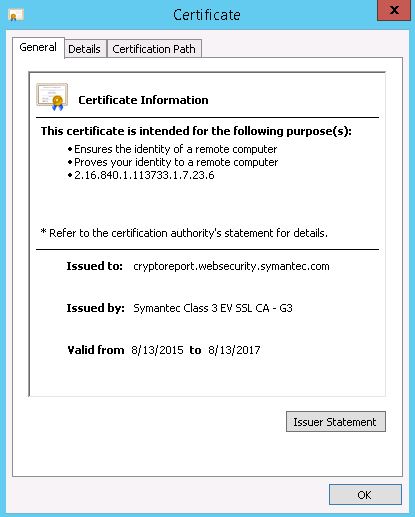
You will be presented with below screen, Click on view certificate to view certificate details.

This will show you below certificate details which include purpose, issue date, expiry date, organization, issuer, etc.

Understanding /etc/fstab file

/etc/fstab is a key file for file systems in any Linux Unix system. Learn fields, formats within /etc/fstab file. Understand the meaning of each field and how it can be set.

/etc/fstab is one of the key files in running a Linux or UNIX system. File system mounting can be controlled using this file. This is one of the files being used at boot to validate and mount file systems on the machine.  This file is human-readable and can be edited with a text editor like vi.

This file contains 6 parameters per row. Each row represents one file system details. They are as below :

  1. Volume
  2. Mount point
  3. File system type
  4. Options
  5. Dump
  6. Pass

Let’s see one by one –

1. Volume

This is a disk or logical volume which is the source to be mounted on the mount point specified in the second field. See the below example of fstab from the Linux system.

# cat /etc/fstab


# /etc/fstab
# Created by anaconda on Thu Dec  5 15:47:52 2013
#
# Accessible filesystems, by reference, are maintained under '/dev/disk'
# See man pages fstab(5), findfs(8), mount(8) and/or blkid(8) for more info
#
/dev/mapper/vg_00-lv_root /                       ext4    defaults        1 1
UUID=f2918ad9-f5ce-485d-81ae-e874f57f6f57 /boot                   ext4    defaults        1 2
/dev/mapper/vg_00-lv_home /home                   ext4    defaults        1 2
/dev/mapper/vg_00-lv_tmp /tmp                    ext4    defaults        1 2
/dev/mapper/vg_00-lv_usr /usr                    ext4    defaults        1 2
/dev/mapper/vg_00-lv_var /var                    ext4    defaults        1 2
/dev/mapper/vg_00-lv_swap swap                    swap    defaults        0 0
tmpfs                   /dev/shm                tmpfs   defaults        0 0
devpts                  /dev/pts                devpts  gid=5,mode=620  0 0
sysfs                   /sys                    sysfs   defaults        0 0
proc                    /proc                   proc    defaults        0 0
/dev/sdb                /app                    ext3    defaults        1 2
10.10.2.3:/my_share     /tmp/nfs_share          nfs      defaults       0 0

In the above example, you can see volume is specified by UUID or logical volume name or disk name or IP:/directory.

/boot entry is specified by UUID. UUID is a universally unique ID assigned to each disk when it’s formatted in the system. The disk can be identified by UUID or disk name in the kernel.  Since its unique number, it’s ideal to use UUID in fstab for important file systems!

/var, /tmp, etc entries are defined using volume as a logical volume name. They are logical volumes part of the volume group vg00. See LVM legends to get familiarize with naming conventions.

/dev/shm is defined by tmpfs volume. Its a temporary file system volume created and identified by the kernel on the root disk. devpts, sysfsare part of such system-defined file systems.

Second Last entry,  you can see disk sdb is also defined as a volume for /app entry.

Lastly, the NFS share is mounted on /tmp/nfs_share directory. There IP address of the NFS server and its exported share volume name combination is defined as a volume.

This is the first argument to be supplied in mount command while mounting any filesystem.

Normally HPUX uses LVM as a partition manager hence only logical volumes are found as a volume entry in fstab. See below the example of fstab from the HPUX system.

$ cat /etc/fstab

# System /etc/fstab file.  Static information about the file systems
# See fstab(4) and sam(1M) for further details on configuring devices.
/dev/vg00/lvol3 / vxfs delaylog 0 1
/dev/vg00/lvol1 /stand vxfs tranflush 0 1
/dev/vg00/lvol4 /home vxfs delaylog 0 2
/dev/vg00/lvol5 /opt vxfs delaylog 0 2
/dev/vg00/lvol6 /tmp vxfs delaylog 0 2
/dev/vg00/lvol7 /usr vxfs delaylog 0 2
/dev/vg00/lvol8 /var vxfs delaylog 0 2
/dev/vg00/lvol10 /var/adm/sw vxfs delaylog 0 2
/dev/vg00/lvol11 /admin vxfs delaylog 0 2
10.10.2.3:/my_share /tmp/nfs_share nfs defaults 0 0

2. Mount point

Its second field in an entry of fstab. This is the name of the directory on which volume should be mounted. It should always be an absolute path (i.e. starts with/and has all directory hierarchy till last expected directory) in this field.

Directories like /var, /boot, /tmp, /stand, /usr, /home, /proc, /sys are (and should be) reserved for system mount points. In HPUX even logical volume numbers of root VG are reserved for system mount points like lvol1 should always be /stand. 2 for swap, 3 for root, etc.

This is the second argument to be supplied to mount command when mounting any file system.

3. File system type

This is FS type to be considered while mounting the given volume on the specified mount point. Different file system types have different functions and advantages to offer. You need to specify the same FS type which was used at the time of formatting respective volume. ext3, ext4 (Linux FS), vxfs (veritas FS), NFS (Network FS), swap (SWAP FS) are a few types.

This can be supplied to mount command with -F option.

4. Options

Those are file system options that will enhance the user experience of the mount point. They also impact on the performance of the file system and impact in recovery in case of failures. Value defaults in the above example instructs mount command to use parameters defined inbuilt. They can be seen in the man page :

defaults
              Use default options: rw, suid, dev, exec, auto, nouser, async, and relatime.

All available options can be summarized as below :

Option
Description
sync All I/O to the filesystem should be done synchronously.
async All I/O to the filesystem should be done asynchronously.
atime inode access time is controlled by kernel defaults.
noatime Do not update inode access times on this filesystem
auto Mount it when -a used (mount -a)
noauto Dont ‘auto’
dev Interpret character or block special devices on the filesystem
nodev Dont ‘dev’
diratime Update directory inode access times on this filesystem.
nodiratime Dont ‘diratime’
dirsync All directory updates within the filesystem should be done synchronously.
exec Permit execution of binaries
noexecDont ‘exec’
group Allow normal group users to mount
mand Allow mandatory locks on this filesystem.
relatime Update inode access times relative to modify or change time.
norealtime Dont ‘realtime’
delaylog Affect how vxfs maintains journals which impacts performance and ability to recover the file system
nomand Dont ‘mand’
suid Allow set-user-identifier or set-group-identifier bits to take effect.
nosuid Dont ‘suid’
remount Attempt to remount an already-mounted filesystem.
rw Read write mode
ro
Read only mode
owner Allow non-root user to mount if he is owner of device
user Allow an ordinary user to mount the filesystem.
nouser Dont ‘user’
largefiles Allow file size more than 2TB
transflush Performance related

These options can be supplied to mount command using -o.

5. Dump

This is an old fashioned backup option in case the server goes down. If this is set to 1 then FS dump will happen when the system goes down due to some issue. Setting this 0 will nullify this option.

6. Pass

This tells kernel about file system check priority or sequence. fsck is a facility that checks the file system for its consistency. During boot, if fsck is invoked then it looks for this file. If set to 0, fsck will be skipped for that mount point. If set to 1 then that mount points will be first in sequence to be fscked.

Host to guest disk mapping in HP iVM

Learn how to identify virtual machine disk on the physical host machine in HP iVM. Disk mapping makes it easy to carry out disk related activities.

In HP integrity virtual machines, disk names on the host machines and virtual machines are always different for the same disk. Whenever we are presenting disk (storage LUN or local disk) from host to guest, it will be discovered as a different name on guests than a host. So it becomes necessary to know both names of the same disk for any disk-related activities.

Let see how we can map these two names. There are two methods to do this.

  1. Using xD command
  2. With hpvmdevinfo command

Using xD command

xD command used to read raw data on disk. Since the physical disk is the same on both servers only identification at kernel level differs, we will get the same raw data from both servers. We will use xD command to get PVID of disks from the host and guest. Whenever there is a match of PVID in both outputs, consider the disk is the same.

See below example where xD command is used with host and guest disks.

------ On guest -----
vm:root-/>xd -An -j8200 -N16 -tx /dev/disk/disk76
70608a28 4ec7a7ff 70608a28 4ec7a942
vm:root-/>xd -An -j8200 -N16 -tx /dev/disk/disk72
70608a28 4ec7a7ef 70608a28 4ec7a942
vm:root-/>xd -An -j8200 -N16 -tx /dev/disk/disk74
70608a28 4ec7a7f6 70608a28 4ec7a942

----- On host -----
host:root-/>xd -An -j8200 -N16 -tx /dev/disk/disk532
70608a28 4ec7a7ff 70608a28 4ec7a942
host:root-/>xd -An -j8200 -N16 -tx /dev/disk/disk538
70608a28 4ec7a7f6 70608a28 4ec7a942
host:root-/>xd -An -j8200 -N16 -tx /dev/disk/disk526
70608a28 4ec7a7ef 70608a28 4ec7a942

Now, if you observe outputs (2nd field), guest disk disk76 has the same value as host disk disk532. That means its the same disk! So on host diusk532 is the same as disk76 on the guest. Same with disk538-disk74 & disk 523-disk72.

This is a bit of a tedious job to observe outputs and find a match if you have a huge number of disks. Also, if you are interested in only one VM’s data then its time consuming since you have to match all disks of the host with that VM’s disks. In that case we have hpvmdevinfo command which directly prints out mapping table for you.

With hpvmdevinfo command

This command comes with an HP iVM setup and shows device mappings from host to guest in tabular format. Since this command can be run against a particular VM, it’s pretty fast to get disk mapping than the previous method.

# hpvmdevinfo -P virtual_svr_2
Virtual Machine Name Device Type Bus,Device,Target Backing Store Type Host Device Name Virtual Machine Device Name
==================== =========== ================= ================== ================ ===========================
virtual_svr_2           disk            [0,1,0]          disk         /dev/rdisk/disk336 /dev/rdisk/disk4
virtual_svr_2           disk            [0,1,1]          disk         /dev/rdisk/disk332 /dev/rdisk/disk5
virtual_svr_2           disk            [0,1,3]          disk         /dev/rdisk/disk675 /dev/rdisk/disk9

You need to run this command by supplying VM name with -P option and you will be presented with device list, its ctd and disk mapping between host-guest servers.

In the above example, see the last two columns where the first one shows disk name on the host machine and last one shows guest/virtual machine. Pretty straight forward and fast!

NFS configuration in Linux and HPUX

Learn how to configure the network file system (NFS) in Linux and HPUX servers. Howto export NFS, start/stop NFS services, and control access on it.

NFS configurations

The network file system is one of the essential things in today’s IT infrastructure. One server’s file system can be exported as NFS over network and control access over it. Other servers can mount these exported mount points locally as an NFS mount. This enables the same file system making available to many systems thus many users. Let’s see NFS configurations in Linux and HPUX.

NFS Configuration file in Linux

We assume the NFS daemon is installed on a server and running in the background. If not check package installation steps and how to start service on Linux. One can check if NFS is running on the server with service or ps -ef command. For NFS server i.e. server exporting directory should have portmap service running.

Make sure you have TCP and UDP port 2049, 111 on firewalls between client and server. It can be in OS firewall, iptables, network firewalls, or security groups in the cloud.

root@kerneltalks # ps -ef |grep -i nfs
root      1904     2  0  2015 ?        00:00:08 [nfsd4]
root      1905     2  0  2015 ?        00:00:00 [nfsd4_callbacks]
root      1906     2  0  2015 ?        00:01:33 [nfsd]
root      1907     2  0  2015 ?        00:01:32 [nfsd]
root      1908     2  0  2015 ?        00:01:33 [nfsd]
root      1909     2  0  2015 ?        00:01:37 [nfsd]
root      1910     2  0  2015 ?        00:01:24 [nfsd]

root@kerneltalks # service nfs status
rpc.svcgssd is stopped
rpc.mountd (pid 1897) is running...
nfsd (pid 1913 1912 1911 1910 1909 1908 1907 1906) is running...
rpc.rquotad (pid 1892) is running...

root@kerneltalks # rpcinfo -p localhost
   program vers proto   port  service
    100000    4   tcp    111  portmapper
    100000    3   tcp    111  portmapper
    100000    2   tcp    111  portmapper
    100000    4   udp    111  portmapper
    100000    3   udp    111  portmapper
    100000    2   udp    111  portmapper
----- output clipped -----

/etc/exports is the configuration file which has all exported volume details along with their respective permissions. /etc/exports follows the format as below :

<export> <host> (options)

where –

  • export is filesystem/directory to be exported
  • the host is hostname/IP to which export is accessible where wile cards are acceptable
  • options are permissions which are ro, rw, sync, async.

Refer below chart which can be used to decide your entry in this file.

NFS config file parameters

Parameter
Example
/my_share server3 (rw, sync) Export /my_share directory for server3 with read write access in sync mode
/my_share * (ro, sync) Export /my_share for any host with read only permission and sync mdoe
/my_share 10.10.2.3 (rw,async) Export /my_share for IP 10.10.2.3 with rw in async.
/my_share server2 (ro, sync) server3 (rw, sync) Exporting to two diff servers with diff permissions
root@kerneltalks # cat /etc/exports
/my_share       10.10.15.2(rw,sync)
/new_share       10.10.1.40(rw,sync)

/etc/exports file can be edited using vi editor or using /usr/sbin/exportfs command.

How to start-stop NFS service in Linux

Once you made the changes in the file you need to restart NFS daemon to take all these changes in effect. This can be done using the service NFS restart command. If your NFS is already running and you just need to take a new configuration in action you can reload config using service NFS reload. To stop NFS you can run service nfs stop command.

root@kerneltalks # service nfs status
rpc.svcgssd is stopped
rpc.mountd (pid 1897) is running...
nfsd (pid 1913 1912 1911 1910 1909 1908 1907 1906) is running...
rpc.rquotad (pid 1892) is running...

How to re-export NFS shares after editing the configuration file

In running the NFS environment, where multiple clients already mounted NFS shares from the NFS server and you need to edit NFS share configuration. You can edit the NFS configuration file and re-export NFS shares using exportfs command.

Make sure only additions happened to config file while reloading config otherwise it may affect already connected NFS shares.

root@kerneltalks # exportfs -ra

How to mount NFS share

At the destination, where export needs to be mounted should have NFS daemon running too. Mounting a share is a very easy two-step procedure.

  1. Create a directory to mount the share
  2. mount share using the mount command.

To make this permanent i.e. mounting share at boot time, make an entry to /etc/fstab like below so that manually mounting after the reboot of server can be avoided.

10.10.2.3:/my_share /tmp/nfs_share nfs defaults 0 0

NFS configuration in HPUX

This part is the same as Linux. In some versions, you need to edit /etc/dfs/dfstab file. This file takes share commands as a per line entry. It can be filled like below :

share -F nfs -o root=server2:server3 /my_share

Above line indicates exporting /my_share directory for server2 and server3 with root account access.

Also, we need to specify NFS_SERVER=1 parameter in /etc/rc.config.d/nfsconf on the NFS server. By default, it is set to 0 i.e. server acts as NFS client. Along with this NFS_CORE and START_MOUNTD needs to be marked to value 1 as well.

How to start-stop NFS service in HPUX

We have covered it here: NFS server start/stop on HPUX

For reloading config file in HPUX, you can run shareall command.

Mounting share

This part is the same as Linux

Errors seen in Linux

If you did not prepare client properly then you might see below error :

mount: wrong fs type, bad option, bad superblock on 10.10.2.3:/mys_hare,
       missing codepage or helper program, or other error
       (for several filesystems (e.g. nfs, cifs) you might
       need a /sbin/mount.<type> helper program)

       In some cases useful info is found in syslog - try
       dmesg | tail or so.

Install nfs-utils, nfs-common packages and you should be able to mount NFS filesystem without any issues.

Howto get CPU details in HPUX

Learn how to extract CPU, core, socket details in HPUX. Get familiar with hardware related commands like print_manifest, machinfo, cstm, ioscan.

There are many times when one has to check CPU details of the server which are like the number of cores, sockets, etc. This detail is useful in capacity planning, troubleshooting, performance analysis, etc. There are many ways to get these details as below –

  • ioscan command
  • cstm tool
  • print_manifest report
  • machinfo command
  • MP console
  • top command
  • SAR output

Before going into these methods make sure you check if logical CPUs are enabled on server or not. If yes then you need to take that into consideration while calculating the number of CPUs.

Let’s see the above methods one by one.

ioscan command

This is a well-known command to every HPUX server administrator. To scan or list hardware on the system, we use this command. Filtering processors out of this command give you details about CPU. This is helpful to get the only number of processors on the system.

# ioscan -kfnC processor
Class       I  H/W Path  Driver    S/W State H/W Type  Description
===================================================================
processor   0  128       processor CLAIMED   PROCESSOR Processor
processor   1  129       processor CLAIMED   PROCESSOR Processor
processor   2  136       processor CLAIMED   PROCESSOR Processor
processor   3  137       processor CLAIMED   PROCESSOR Processor
processor   4  144       processor CLAIMED   PROCESSOR Processor
processor   5  145       processor CLAIMED   PROCESSOR Processor
processor   6  152       processor CLAIMED   PROCESSOR Processor
processor   7  153       processor CLAIMED   PROCESSOR Processor

# ioscan -kfnC processor | grep processor|wc -l
8

cstm tool

CSTM is another famous tool native to HPUX used to deal with hardware. This will give you in-depth details about each processor on the system. Type /usr/sbin/cstm and you will be on CSTM shell. Here type is below command :

cstm>selclass qualifier cpu;infolog
-- Converting multiple raw log files to text. --
Preparing the Information Tool Log for each selected device...

.... server1  :  10.10.11.1 ....

-- Information Tool Log for CPU on path 128 --

Log creation time: Wed Jul 20 11:09:00 2016

Hardware path: 128


Product ID:                CPU          Module Type:              0
Hardware Model:            0x894        Software Model:           0x4
Hardware Revision:         0            Software Revision:        0
Hardware ID:               0            Software ID:              3848593997
Boot ID:                   0x2          Software Option:          0x91
Processor Number:          0            Path:                     128
Hard Physical Address:     0xfffffffffe780000     Soft Physical Address:    0

Slot Number:               0            Software Capability:      0x100000f0
PDC Firmware Revision:     46.34        IODC Revision:            0
Instruction Cache [Kbyte]: 768          Processor Speed:          N/A
Processor State:           CPU Present Configured
Monarch:                   Yes          Active:                   Yes
Data Cache        [Kbyte]: 768
Instruction TLB   [entry]: 240          Processor Chip Revisions: 3.2
Data TLB Size     [entry]: 240          2nd Level Cache Size:[KB] 65536
Serial Number:             44549e6cf43f0605


-----------------  Processor 0 HPMC Information - PDC Version: 46.34  ------

   * * * No valid timestamp * * *
       No HPMC chassis codes logged


General Registers 0 - 31
00-03  0000000000000000  0000000000000000  0000000000000000  0000000000000000
04-07  0000000000000000  0000000000000000  0000000000000000  0000000000000000
08-11  0000000000000000  0000000000000000  0000000000000000  0000000000000000
12-15  0000000000000000  0000000000000000  0000000000000000  0000000000000000
16-19  0000000000000000  0000000000000000  0000000000000000  0000000000000000
20-23  0000000000000000  0000000000000000  0000000000000000  0000000000000000
24-27  0000000000000000  0000000000000000  0000000000000000  0000000000000000
28-31  0000000000000000  0000000000000000  0000000000000000  0000000000000000


Control Registers 0 - 31
00-03  0000000000000000  0000000000000000  0000000000000000  0000000000000000
04-07  0000000000000000  0000000000000000  0000000000000000  0000000000000000
08-11  0000000000000000  0000000000000000  0000000000000000  0000000000000000
12-15  0000000000000000  0000000000000000  0000000000000000  0000000000000000
16-19  0000000000000000  0000000000000000  0000000000000000  0000000000000000
20-23  0000000000000000  0000000000000000  0000000000000000  0000000000000000
24-27  0000000000000000  0000000000000000  0000000000000000  0000000000000000
28-31  0000000000000000  0000000000000000  0000000000000000  0000000000000000


Space Registers 0 - 7
00-03  0000000000000000  0000000000000000  0000000000000000  0000000000000000
04-07  0000000000000000  0000000000000000  0000000000000000  0000000000000000


IIA Space (back entry)       = 0x0000000000000000
IIA Offset (back entry)      = 0x0000000000000000
Check Type                   = 0x00000000
Cpu State                    = 0x00000000
Cache Check                  = 0x00000000
TLB Check                    = 0x00000000
Bus Check                    = 0x00000000
Assists Check                = 0x00000000

Assist State                 = 0x00000000
Path Info                    = 0x00000000
System Responder Address     = 0x0000000000000000
System Requestor Address     = 0x0000000000000000


Floating Point Registers 0 - 31
00-03  0000000000000000  0000000000000000  0000000000000000  0000000000000000
04-07  0000000000000000  0000000000000000  0000000000000000  0000000000000000
08-11  0000000000000000  0000000000000000  0000000000000000  0000000000000000
12-15  0000000000000000  0000000000000000  0000000000000000  0000000000000000
16-19  0000000000000000  0000000000000000  0000000000000000  0000000000000000
20-23  0000000000000000  0000000000000000  0000000000000000  0000000000000000
24-27  0000000000000000  0000000000000000  0000000000000000  0000000000000000
28-31  0000000000000000  0000000000000000  0000000000000000  0000000000000000


PIM Revision                 = 0x0000000000000000
CPU ID                       = 0x0000000000000000
CPU Revision                 = 0x0000000000000000
Cpu Serial Number            = 0x0000000000000000
Check Summary                = 0x0000000000000000
SAL Timestamp                = 0x0000000000000000
System Firmware Rev.         = 0x0000000000000000
PDC Relocation Address       = 0x0000000000000000
Available Memory             = 0x0000000000000000
CPU Diagnose Register 2      = 0x0000000000000000
MIB_STAT                     = 0x0000000000000000
MIB_LOG1                     = 0x0000000000000000
MIB_LOG2                     = 0x0000000000000000
MIB_ECC_DATA                 = 0x0000000000000000
ICache Info                  = 0x0000000000000000
DCache Info                  = 0x0000000000000000
Sharedcache Info1            = 0x0000000000000000
Sharedcache Info2            = 0x0000000000000000
MIB_RSLOG1                   = 0x0000000000000000
MIB_RSLOG2                   = 0x0000000000000000
MIB_RQLOG                    = 0x0000000000000000
MIB_REQLOGa                  = 0x0000000000000000
MIB_REQLOGb                  = 0x0000000000000000

Reserved                     = 0x0000000000000000
Cache Repair Detail          = 0x0000000000000000

PIM Detail Text:


--------------  Memory Error Log Information  --------------

   No errors logged for this bus

------------  I/O Module Error Log Information  ------------

  No IO subsystem errors recorded

FRU INFORMATION

        Module              Revision
        ------              --------
        PA 8900 CPU Module  3.2
        PA 8900 CPU Module  3.2
        PA 8900 CPU Module  3.2
        PA 8900 CPU Module  3.2
        PA 8900 CPU Module  3.2
        PA 8900 CPU Module  3.2
        PA 8900 CPU Module  3.2
        PA 8900 CPU Module  3.2

Board Info!
  Format Version  : 0x1                   Language Code : 0x0
  Mfg Date        :                       Mfg Name      : JABIL
  Product Name    : augustus baseboard
  Serial Number   : 52JAPE4822000149
  Part Number     : A6961-60401
  Fru File Tp/Len : 0x1  Fru File :
  Revision        : A  Eng Date Code : 4728
  Artwork Rev     : A5  Fru Info :


=-+-=-+-=-+-=-+-=-+-=-+-=-+-=-+-=-+-=-+-=-+-=-+-=-+-=-+-=-+-=-+-=-+-=-+-=-+-=

----- output clipped -----

I showed only one processor details above.

print_manifest report

This command comes bundled with the Ignite Ux package. If you have ignite installed on your server you will be able to run this command. This command shows a number of the processor along with its speed.

# print_manifest

NOTE: Could not read the /etc/resolv.conf file.

System Information

    Your Hewlett-Packard computer has software installed and
    configured as follows.

    The system was created September 24, 2008, 02:30:54 EDT.
    It was created with Ignite-UX revision C.6.10.97.

-------------------------------------------------------------
NOTE: You should retain this information for future reference.
-------------------------------------------------------------


System Hardware

    Model:              9000/800/rp4440
    Main Memory:        24574 MB
    Processors:         8
    Processor(0) Speed: 999 MHz
    Processor(1) Speed: 999 MHz
    Processor(2) Speed: 999 MHz
    Processor(3) Speed: 999 MHz
    Processor(4) Speed: 999 MHz
    Processor(5) Speed: 999 MHz
    Processor(6) Speed: 999 MHz
    Processor(7) Speed: 999 MHz
    OS mode:            64 bit
    LAN hardware ID:    0x001A4B08AF2E
----- output clipped -----

machinfo command

This command is available from HPUX 11.21 and above on RX models. This command gives you processor numbers, speed, sockets, and core details.

# machinfo
CPU info:
  4 Intel(R) Itanium 2 9000 series processors (1.6 GHz, 12 MB)
          533 MT/s bus, CPU version C2
          6 logical processors

MP console

Login to MP console and enter the command menu by typing cm. Then ss is the command which shows processor status. This shows you processor sockets. So if you are seeing 8 CPU in top command and below output in MP then its 4 processor sockets housing 4 duel-core processors.

[server12] MP:CM> ss

SS

System Processor Status:

   Monarch Processor: 0

   Processor Module 0: Installed and Configured
   Processor Module 1: Installed and Configured
   Processor Module 2: Installed and Configured
   Processor Module 3: Installed and Configured

top command

This is the simplest way to check the number of CPU on HPUX as well as any Linux system. The top output shows your list of the processor at top of the page.

# top
System: server1                                      Fri Nov 25 14:29:06 2016
Load averages: 0.15, 0.11, 0.11
386 processes: 362 sleeping, 24 running
Cpu states:
CPU   LOAD   USER   NICE    SYS   IDLE  BLOCK  SWAIT   INTR   SSYS
 0    0.13  23.8%   0.0%   0.0%  76.2%   0.0%   0.0%   0.0%   0.0%
 1    0.18  25.7%   0.0%   7.9%  66.3%   0.0%   0.0%   0.0%   0.0%
 2    0.16  14.9%   0.0%   2.0%  83.2%   0.0%   0.0%   0.0%   0.0%
 3    0.13   3.0%   0.0%   5.0%  92.1%   0.0%   0.0%   0.0%   0.0%
 4    0.13  23.8%   0.0%   4.0%  72.3%   0.0%   0.0%   0.0%   0.0%
 5    0.15  17.8%   0.0%   4.0%  78.2%   0.0%   0.0%   0.0%   0.0%
 6    0.15  11.9%   0.0%   4.0%  84.2%   0.0%   0.0%   0.0%   0.0%
 7    0.16  20.8%   0.0%   5.0%  74.3%   0.0%   0.0%   0.0%   0.0%
---   ----  -----  -----  -----  -----  -----  -----  -----  -----
avg   0.15  17.8%   0.0%   4.0%  78.2%   0.0%   0.0%   0.0%   0.0%

You can see CPU is numbered from 0 to 8 i.e. total of 8 CPU active.

sar output

Even sar output can be used to determine the number of CPU in the system. Use just one iteration for output for one second. sar will show one row for each cpu value.

Read our SAR tutorials

Counting the number of rows can help us figure out CPU count.

# sar -Mu 1 1

HP-UX apcrss78 B.11.11 U 9000/800    11/25/16

14:41:14     cpu    %usr    %sys    %wio   %idle
14:41:15       0       0       0       0      99
               1       0       1       0      98
               2       0       0       0      99
               3       0       0       0      99
               4       0       0       0      99
               5       0       0       0      99
               6      24       1       0      75
               7       0       1       0      98
          system       3       1       0      96

# sar -Mu 1 1 | awk 'END {print NR-5}'
8

See first command actual output. We are stripping off extra 5 lines which are for total, headers to get exact count using awk. in second command. Even first output shows CPU numbering like top in first column!

How to rename volume group

Learn how to rename the volume group in Linux or Unix. Understand what happens in the background when you change the volume group name of existing VG.

A volume group can be renamed with easy vgrename command Linux. But first, we will see how it can be done without vgrename command so that step by step you will understand what actually happens in the background while VG name changes.

We have seen how to create VG in the past and how to export/import VG. We are going to use these commands to rename VG. Below steps needs to be followed –

  1. Stop all user/app access to all mount points within VG using fuser
  2. Un-mount all LV using umount
  3. Deactivate VG using vgchange
  4. Export VG using vgexport
  5. Create a new name folder and group file using mknod
  6. Import VG with a new name in command options using vgimport
  7. Activate VG using vgchange
  8. Mount all LV using mount
  9. Edit related entries in /etc/fstab with a new name

See below output for the above-mentioned steps (HPUX console).

# fuser -cku /data
/data:   223412c(user1)
# umount /data
# vgchange -a n /dev/vg01
Volume group "/dev/vg01" has been successfully changed.
# vgexport -v -m /tmp/vg01.map vg01
Beginning the export process on Volume Group "/dev/vg01". 
/dev/dsk/c0t1d0 vgexport:Volume Group “/dev/vg01” has been successfully removed.
# mkdir /dev/testvg
# mknod /dev/testvg/group c major 0xminor
# vgimport -v -m /tmp/vg01.map /dev/testvg list_of_disk
vgimport: Volume group “/dev/testvg” has been successfully created.
Warning: A backup of this volume group may not exist on this machine.
Please remember to take a backup using the vgcfgbackup command after activating the volume group
# vgchange -a y testvg
Volume group “/dev/testvg” has been successfully changed.
# mount /dev/testvg/lvol1 /data

In the above step by step process, you can see how VG changes its name. We are changing its VG related file and directory and then we import it using old configuration but the new name.

In Linux, we have one command which does all this stuff in the background for you. vgrename is a command which used to rename VG in Linux. You have to supply the old VG name and required a new name.

# vgrename /dev/vg01 /dev/testvg
Volume group "/dev/vg01" successfully renamed to "/dev/testvg"
OR
# vgrename vg01 testvg
Volume group "vg01" successfully renamed to "testvg"

Keep in mind, this command also requires de-activated VG to work. So this is not an online process. It supports the below options :

  • -f Forcefully rename
  • -v Verbose mode

LVM cheatsheet

List of all LVM command of HPUX tutorials we have seen before on KernelTalks. LVM commands related to physical volume, volume group, and logical volume.

What is LVM?

LVM is a Logical Volume Manager.

LVM is a volume manager in Unix-Linux systems. It used to manage your disks. LVM enables raw disks to be used as a data store, file system defined mount points. LVM helps to manage your disk volumes efficiently for performance and data integrity. VxVM i.e. Veritas Volume Manager is another volume manager that is as popular as LVM.

Previously we have seen a series of LVM command tutorials on KernelTalks. Here is a summary of it along in the form of LVM cheatsheet for your quick reference.

Physical Volume Commands

Command
Description
Example
pvcreate Create physical volume Tutorial link
pvdisplay Display physical volume details Tutorial link
pvchange Activate, de-activate physical volume Tutorial link
pvmove Move data from one PV to another Tutorial link

Volume Group Commands

Command
Description
Example
vgcreate Create volume group Tutorial Link
vgdisplay Display volume group details Tutorial Link
vgscan Rebuild /etc/lvmtab file Tutorial Link
vgextend Add new PV to VG Tutorial Link
vgreduce Remove PV from VG Tutorial Link
vgexport Export VG from system Tutorial Link
vgimport Import VG into system Tutorial Link
vgcfgbackup Backup VG configurations Tutorial Link
vgcfgrestore Restore VG configurations Tutorial Link
vgchange Change details of VG Tutorial Link
vgremove Remove VG from system Tutorial Link
vgsync Sync stale PE in VG Tutorial Link

Logical Volume Commands

Command
Description
Example
lvcreate Create logical volume Tutorial Link
lvdisplay Display logical volume details Tutorial Link
lvremove Remove logical volume Tutorial Link
lvextend Increase size of logical volume Tutorial Link
lvreduce Decrease size of logical volume Tutorial Link
lvchange Change details of logical volume Tutorial Link
lvsync Sync stale LE of logical volume Tutorial Link
lvlnboot Set LV as root, boot, swap or dump volume Tutorial Link

Linux user management (useradd, userdel, usermod)

Learn how to create, delete, and modify a user in Linux (useradd, userdel, usermod). Basic user management which is must know for every Linux/Unix administrator.

Anyone accessing system locally or remotely has to has a user session on the server hence can be termed as a user. In this post, we will be seeing user management which is almost similar for all Linux, Unix systems. There are three commands useradd, userdel and usermod which are used to manage users on Linux systems.

Interesting related articles –

Command: useradd

Command to add a new user to the system. This command can be as short as just one argument of userid. When running with just userid as an argument then it takes all default values for creating that user as defined in /etc/default/useradd file. Or else a number of options can be specified which defines parameters of this new user while creation.

# cat /etc/default/useradd
# useradd defaults file
GROUP=100
HOME=/home
INACTIVE=-1
EXPIRE=
SHELL=/bin/bash
SKEL=/etc/skel
CREATE_MAIL_SPOOL=yes

The command supports the below options :

  • -b <base_dir> If the home directory is not specified this one is mandatory.
  • -c <comment> Any text like a description of the account
  • -d <home_dir> Home directory
  • -e <expire_date> Account expiry date in YYYY-MM-DD
  • -f <inactive> No of days after which acc will be disabled after password expiry
  • -g <gid> group id
  • -u <uid> User id
  • -G <groups> Secondary groups
  • -k <skel_dir> Files within skel_dir will be copied to home_dir of the user after creation
  • -K <key=value> To override default parameters in /etc/login.defs
  • -m Create the home directory if it doesn’t exist.
  • -o Allow non-unique UID
  • -p Encrypted password (not normal text one). It can be obtained from the crypt command.
  • -r Create a system account. This won’t have password aging and UID from system UID range
  • -s shell
# useradd -c "Test user" -d /home/test -m -e 2016-12-05 -f 7 -g 100 -u 956 -o -s /bin/bash testuser1
# cat /etc/passwd |grep testuser1
testuser1:x:956:100:Test user:/home/test:/bin/bash
# useradd testuser2
# cat /etc/passwd |grep testuser2
testuser2:x:54326:54329::/home/testuser2:/bin/bash

See the above example with and without using options. Also, check the below list, it shows where you can verify the account-related particular parameter which you specified in useradd command.

  • home_dir Check using ls -lrt
  • uid, gid In /etc/passwd and /etc/group
  • comment, shell In /etc/passwd file
  • groups In /etc/group file
  • skel_dir files Check-in home_dir
  • expire_date, inactive Check-in chage -l username output.
  • Encrypted password In /etc/shadow file

Command: userdel

As the name suggests its a command to delete users. It has only two options –

  • -r Remove user’s home_dir & mail spool
  • -f Removes user even if he/she logged in. Removes home_dir, mail spool & group of the same name even these are being shared by another user. Dangerous!

If none of the options used and command just ran with userid argument. It will only remove the user from the system keeping its home_dir, mail spool and a group of the same name (if any) intact on the server.

#  ll /home |grep testuser
drwx------   4 testuser   testuser  4096 Nov 23 10:43 testuser
# userdel testuser
#  ll /home |grep testuser
drwx------   4      54326    54329  4096 Nov 23 10:43 testuser
# userdel -r testuser
#  ll /home |grep testuser
#

See above example which shows without using -r option keeps home directory intact.

Command: usermod

This command used to modify user parameters which we saw in useradd command. All parameter options with useradd command compatible with this command. Apart from those options, it supports below ones –

  • -l <new_login> Change login name to different. You have to manually rename home_dir
  • -L Lock account. Basically it puts ! in front of encrypted password in passwd or shadow file.
  • -U Unlock account. It removes!
  • -m <new_home> Moves home_dir to new_dir. -d is mandatory to use with it.
# useradd usr1# cat /etc/passwd |grep usr1
usr1:x:54326:54330::/home/usr1:/bin/bash
# usermod -l usr2 usr1
# cat /etc/passwd |grep usr2
usr2:x:54326:54330::/home/usr1:/bin/bash
# cat /etc/shadow |grep usr2
usr2:$6$nEjQiroT$Fjda8KiOIbnELAffHmluJFRC8jjIRWuxEWBePK1gun/ELZRi3glZdKVtPaaZ4tcQLIK2KPZTxdpB3tJvDj3/J1:17128:1:90:7:::
# usermod -L usr2
# cat /etc/shadow |grep usr2
usr2:!$6$nEjQiroT$Fjda8KiOIbnELAffHmluJFRC8jjIRWuxEWBePK1gun/ELZRi3glZdKVtPaaZ4tcQLIK2KPZTxdpB3tJvDj3/J1:17128:1:90:7:::
# usermod -U usr2
# cat /etc/shadow |grep usr2
usr2:$6$nEjQiroT$Fjda8KiOIbnELAffHmluJFRC8jjIRWuxEWBePK1gun/ELZRi3glZdKVtPaaZ4tcQLIK2KPZTxdpB3tJvDj3/J1:17128:1:90:7:::

See the above examples of usermod command showing locking, unlocking user and changing user names.

These three commands take almost most of the user management tasks in Linux Unix systems. Password management is another topic which does not fall in user management. We will see it on some other day.

Linux scheduler: Cron, At jobs

Learn everything about Linux/Unix schedulers i.e. cron and at. Know how to schedule cronjobs and at jobs, their configuration files, log files.

Unix or Linux comes with native in-build job scheduler i.e. cron and at. Out of which cron used to schedule tasks to repeat over some period while at used to execute the job at a specific time one time.

Cron

Cron enables administrators/users to execute a particular script or command at a given time of choice repetitively. It’s a daemon that runs in the background whenever system clock configured time it executes respective script or command. It can be checked if running with ps/service command.

# ps -ef |grep -i cron
root      2390     1  0 Mar17 ?        00:01:24 crond
root      8129  8072  0 09:50 pts/0    00:00:00 grep -i cron
# service crond status
crond (pid  2390) is running...

Configurations

Cron saves commands/scripts and related schedules in a file called crontab. Normally crontab can be found in path /var/spool/cron and file with a username (root user crontab file can be seen in the below example). These are plain text files that can be viewed using cat, more commands and can be edited using a text editor.

# pwd
/var/spool/cron
# ll
total 4
-rw------- 1 root root 99 Jul 31  2015 root
# cat root
00 8 * * 1 /scripts/log_collection.sh

But, it’s not advisable to edit crontab file with a text editor, you need to use crontab -e <username> command to edit it so that syntax can be verified before saving. This command opens a crontab file in a native text editor only.

Cron access can be given a user basis. The administrator can enable or disable cron access to a particular user. There are two files cron.allow, cron.deny; either one of which will exist on the server. These are files with usernames only. No special file format/syntax follows within. If both files are missing then the only superuser is allowed to use cron.

If cron.allow exists on the server then only users specified in this file are allowed to use cron, rest all are denied. And if it exists and empty then all are denied.

If cron.deny exists then only users specified in it are not allowed to use cron, rest all are allowed. And if it exists and empty then all are allowed.

Syntax

Let’s see the syntax for the crontab file and commands.

A crontab file has 6 fields separated by space to be filled in. Those are as below :

where,

  • Minute: Timestamp in 24 hrs format
  • Hours: Timestamp in 24 hrs format
  • Day of month: Date in dd format
  • Month: Month number in mm format or Jan, Feb format.
  • Day of week: Numeric/text day of the week. 0 or 7 being Sunday or Sun, Mon, etc.

These fields also support a series of values or multiple values example 1,2,3 or 1-4. When multiple time values defined then the event will happen whenever the clock hits one of the values.

Default cron definitions i.e. path or shell used to execute commands/scripts in crontabs etc are defined in /etc/crontab file. See example below :

# cat /etc/crontab
SHELL=/bin/bash
PATH=/sbin:/bin:/usr/sbin:/usr/bin
MAILTO=root
HOME=/

# For details see man 4 crontabs

# Example of job definition:
# .---------------- minute (0 - 59)
# |  .------------- hour (0 - 23)
# |  |  .---------- day of month (1 - 31)
# |  |  |  .------- month (1 - 12) OR jan,feb,mar,apr ...
# |  |  |  |  .---- day of week (0 - 6) (Sunday=0 or 7) OR sun,mon,tue,wed,thu,fri,sat
# |  |  |  |  |
# *  *  *  *  * user-name command to be executed

Crontab commands

We have a crontab command with several options to play around configurations.

  • -u Specify user
  • -l to view specified user’s crontab
  • -e to edit specified user’s crontab
  • -r to remove specified user’s crontab
  • -i Interactive removal. Should be used with -r

If a new crontab is being set then the system will show using empty crontab for the user!

# crontab -u testuser -e
no crontab for testuser - using an empty one
crontab: installing new crontab
# crontab -u testuser-l
00 8 * * 1 echo test
# crontab -u testuser -i -r
crontab: really delete testuser's crontab? y
# crontab -u testuser -l
no crontab for testuser

Cron logs

All activities by cron daemon are logged in logfile /var/log/cron. It includes crontab alterations and cron daemon executions. Let’s look at the file

# tail /var/log/cron
Nov 21 10:25:36 oratest02 crontab[29364]: (root) BEGIN EDIT (testuser)
Nov 21 10:25:48 oratest02 crontab[29364]: (root) REPLACE (testuser)
Nov 21 10:25:48 oratest02 crontab[29364]: (root) END EDIT (testuser)
Nov 21 10:26:52 oratest02 crontab[30139]: (root) LIST (testuser)
Nov 21 10:27:46 oratest02 crontab[30695]: (root) DELETE (testuser)
Nov 21 10:27:53 oratest02 crontab[30697]: (root) LIST (testuser)
Nov 21 10:30:01 oratest02 CROND[31983]: (root) CMD (/usr/lib64/sa/sa1 1 1)
Nov 22 10:40:01 oratest02 CROND[6166]: (root) CMD (/usr/lib64/sa/sa1 1 1)

In the above example, you can see, crontab alteration is being logged with what actions took place. Those logs are against the crontab field where first braces show the user who did alterations and last braces show which user’s crontab was altered. In the last two, you can see cron commands being executed by cron daemon according to schedule hence logged against CROND. This file is very helpful in troubleshooting issues related to cron executions.

at

At enables administrators/users to execute a particular script or command at a given time of choice only once. It can also be termed as one-time task scheduling.  Same as crond, a daemon for at is atd which runs in background. This can be checked using ps or service commands.

# ps -ef |grep -i atd
root      2403     1  0 Mar17 ?        00:00:00 /usr/sbin/atd
root     13568  8072  0 10:51 pts/0    00:00:00 grep -i atd
# service atd status
atd (pid  2403) is running...

Configurations

at stores submitted jobs in files located at /var/spool/at where file names are system generated and unlike crontabs these files can not be read.

# pwd
/var/spool/at
# ll
total 12
-rwx------  1 root   root 2994 Nov 22 10:57 a000010178544d
-rwx------  1 root   root 2989 Nov 22 11:00 a000020178548c
drwx------. 2 daemon daemon  4096 Jan 30  2012 spool

at access also can be given a user basis. It also has at.allow and at.deny files and those works same as cron.allow and cron.deny files we saw earlier in this post.

Syntax

at command should be supplied with the time you prefer to execute the command. Once given in proper format, it will present you with a prompt. This prompt takes command inputs that need to be executed at a given time. Once finished entering commands/ scripts one can simply press ctrl+d to exit out of at prompt and save the job. Observe a new file that is being generated at the above-mentioned path once you submit the job. at commands takes numerous types of time formats like noon, midnight, now + 2 hours, now + 20 minutes, tomorrow, next Monday, etc. If you enter the wrong format it will return the “garbled time” error message.

# at +2 hours
syntax error. Last token seen: +
Garbled time
# at now + 2 hour
at> echo hello
at> <EOT>
job 2 at 2016-11-22 13:00

To view currently queued jobs in at scheduler run atq or at -l command. It shows the output with numbering in the first column. The second field is about a time when the execution will happen and the last field is the username.

# atq
2       2016-11-22 13:00 a root
1       2016-11-22 11:57 a root

# at -l
2       2016-11-22 13:00 a root
1       2016-11-22 11:57 a root

To remove a particular job from queue atrm command is used. It should be supplied with serial number of the job. In the below example, we removed job number 2. You can see its vanished from the queue. The same can be achieved using at -r command instead of atrm.

# atrm 1

# at -l
2       2016-11-22 13:00 a root

at logs:

at daemon is very much regressive in terms of logging. Normally it does not log anything anywhere about its job queue alterations or job executions. Only fatal errors related to daemon are logged in Syslog only. Even if we turn debugging on, it logs information which is merely informative to look at.