What is Docker? Introduction guide to Docker for beginners.
Docker introduction
Docker! It’s a kind of hot cake right now in the IT industry. Docker is a thing now! If you are into system administration, IT operations, developments, or DevOps then at some point in time you may have or will come across work Docker and you wonder what is docker? Why is docker so famous? So, in this small introduction guide to Docker, we will explain to you about Docker.
Read all docker or containerization related articles here from KernelTalk’s archives.
What is Docker?
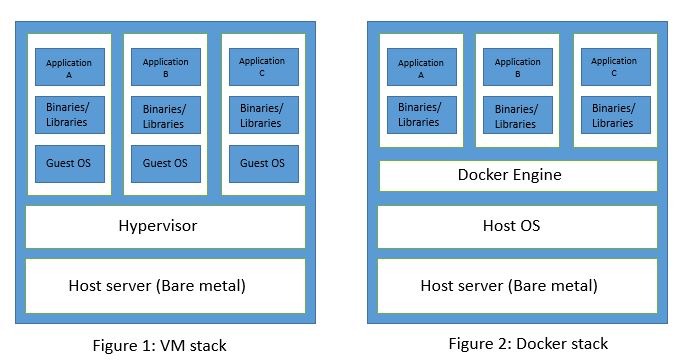
Docker is another layer of virtualization where virtualization happens at the operating system level. It’s a software container platform and currently leading this sector globally. You must be familiar with VMware which is virtualization at bare metal level but docker takes one step forward and virtualize things at OS level and hence removing all hardware management, capacity planning, resource management, etc. VMware runs a number of virtual machines (VMs) on single server hardware (refer Figure 1) whereas Docker runs a number of containers on a single Operating System (refer Figure 2). So in simple terms, Docker containers are just processes sharing a host operating system to perform their tasks.
Lets quickly run through the difference between VM and Docker containers. I tabulated the difference for a quick read.
Virtual machine v/s Docker container
Virtual Machine
Docker container
Its a mini version of physical machine
Its just a process
Runs on hypervisor virtualization
Runs on Linux. (HyperV needed if you run on Windows/MAC)
Has its own guest OS
No OS
Can be used only after guest OS boot finishes
Immediately ready to use when launched
Slow
Fast
Uses hardware resources of Host
Uses only OS resources like binaries/libraries of Host
Resource management needed
No resource management
It runs as long as admin/guest OS doesnt power it off
It runs as long as command runs which container executed at startup.
VM stops when you shutdown guest OS
Once the command exits, container stops
Docker engine mainly runs on Linux. So if you are running Docker on Windows or MAC then it’s actually running tiny Linux VM in the background on your Windows or MAC and on top of it, it’s running its own engine to provide you Docker functionalities on non-Linux platform.
Since Docker engine runs containers it also termed as containerization!
Why use Docker?
Docker containers are portable. They can be stored as an image which can be copied to any other machine and can be launched there. This ensures even if host OS parameters, version changes containers still functions the same across the different OS.
Containers use the host operating system, they don’t have their own OS to boot when containers are launched. It means they are almost available for use immediately as there is not booting of OS of anything that sort which takes time to prepare the container for use. Docker containers are fast to use!
They use resources from host OS, there is no resource management like adding/removing CPU, memory, storage, etc tasks on containers!
There are lots of functionality, flexibility being added to Docker every month. Its fast-evolving virtualization concept and gives you more ease of managing IT infra.
What are Docker variants available to use?
Docker Editions
At present, there are two editions available. CE and EE. CE stands for Community Edition and EE stands for Enterprise Edition. Let’s see the difference between Docker CE and Docker EE.
Docker CE
Docker EE
Community Edition
Enterprise Edition
It’s free
It’s paid
Primarily for development use
Use this edition for Production environment
Do it yourself. No support
Support subscription from Docker
For personal use
For enterprise/big/production use
Docker releases
Docker also releases in two forms. Stable and Edge. Let’s see the difference between Docker stable release and Docker edge release.
I believe that should be enough for an introductory article on Docker. If you have any questions/feedback, please leave us to comment below or reach us using the contact form.
Learn how to install Docker in Linux. Docker is the next step of virtualization which does Operating system level virtualization also known as containerization.
Install docker in Linux
In this article, we will walk you through the procedure to install Docker in any Linux distro like RHEL, SUSE, OEL, CentOS, Debian, Fedora, Ubuntu, etc. Sometimes your package manager like YUM or apt-get may offer package docker* to install docker on your server but it’s always good to get a fresh Docker setup. Since Docker is changing fast and it’s always advisable to install the latest version of Docker which might not be available with your package manager.
Read all docker or containerization related articles here from KernelTalk’s archives.
Install docker using package
If your package manager has a Docker package available to install then it’s an easy way to get Docker on your system.
Before going got Docker installation you should install below packages on your system to use the full flexible functionality of Docker. These packages are not dependencies but its good to have them pre-installed so that all Docker functions/drivers you can use.
For CenOs, Redhat etc YUM based systems – yum-utilsdevice-mapper-persistent-datalvm2
For Debian, Ubuntu etc apt based systems – apt-transport-httpsca-certificatescurlsoftware-properties-common
But you may not be getting the latest version of Docker in this case. You can install a package simply using yum or apt-get command. Below sample output for your reference from the OpenSuse server.
root@kerneltalks # zypper in docker
Building repository 'openSUSE-13.2-Update' cache .................................................................................................................[done]
Retrieving repository 'openSUSE-13.2-Update-Non-Oss' metadata ....................................................................................................[done]
Building repository 'openSUSE-13.2-Update-Non-Oss' cache .........................................................................................................[done]
Loading repository data...
Reading installed packages...
Resolving package dependencies...

The following NEW package is going to be installed:
  docker

1 new package to install.
Overall download size: 6.2 MiB. Already cached: 0 B  After the operation, additional 22.9 MiB will be used.
Continue? [y/n/? shows all options] (y): y
Retrieving package docker-1.9.1-56.1.x86_64                                                                                        (1/1),   6.2 MiB ( 22.9 MiB unpacked)
Retrieving: docker-1.9.1-56.1.x86_64.rpm .............................................................................................................[done (2.5 MiB/s)]
Checking for file conflicts: .....................................................................................................................................[done]
(1/1) Installing: docker-1.9.1-56.1 ..............................................................................................................................[done]
Additional rpm output:
creating group docker...
Updating /etc/sysconfig/docker...
Install docker using the script
In the below procedure, we will be using the script from Docker’s official website which will scan your system for details and automatically fetch the latest and compatible docker version for your system and installs it. We will be fetching script from this docker URL and using it to install the latest Docker on the list of Linux distros.
Fetch the latest script from docker official website using curl. If you read this script, SUPPORT_MAP variable shows the list of Linux distros this script support. If you are running any other Linux version than listed here then this method won’t be useful for you.
root@kerneltalks # curl -fsSL get.docker.com -o get-docker.sh
root@kerneltalks # ls -lrt
-rw-r--r--. 1 root root 13847 May 30 18:59 get-docker.sh
Now we have latest get-docker.sh script from docker official website on our server. Now, you just have to run the script and it will do the rest!
# sh get-docker.sh
# Executing docker install script, commit: 36b78b2
+ sh -c 'yum install -y -q yum-utils'
Package yum-utils-1.1.31-45.el7.noarch already installed and latest version
+ sh -c 'yum-config-manager --add-repo https://download.docker.com/linux/centos/docker-ce.repo'
Loaded plugins: fastestmirror
adding repo from: https://download.docker.com/linux/centos/docker-ce.repo
grabbing file https://download.docker.com/linux/centos/docker-ce.repo to /etc/yum.repos.d/docker-ce.repo
repo saved to /etc/yum.repos.d/docker-ce.repo
+ '[' edge '!=' stable ']'
+ sh -c 'yum-config-manager --enable docker-ce-edge'
Loaded plugins: fastestmirror
========================================================================= repo: docker-ce-edge =========================================================================
[docker-ce-edge]
async = True
bandwidth = 0
base_persistdir = /var/lib/yum/repos/x86_64/7
baseurl = https://download.docker.com/linux/centos/7/x86_64/edge
cache = 0
cachedir = /var/cache/yum/x86_64/7/docker-ce-edge
check_config_file_age = True
compare_providers_priority = 80
cost = 1000
deltarpm_metadata_percentage = 100
deltarpm_percentage =
enabled = 1
enablegroups = True
exclude =
failovermethod = priority
ftp_disable_epsv = False
gpgcadir = /var/lib/yum/repos/x86_64/7/docker-ce-edge/gpgcadir
gpgcakey =
gpgcheck = True
gpgdir = /var/lib/yum/repos/x86_64/7/docker-ce-edge/gpgdir
gpgkey = https://download.docker.com/linux/centos/gpg
hdrdir = /var/cache/yum/x86_64/7/docker-ce-edge/headers
http_caching = all
includepkgs =
ip_resolve =
keepalive = True
keepcache = False
mddownloadpolicy = sqlite
mdpolicy = group:small
mediaid =
metadata_expire = 21600
metadata_expire_filter = read-only:present
metalink =
minrate = 0
mirrorlist =
mirrorlist_expire = 86400
name = Docker CE Edge - x86_64
old_base_cache_dir =
password =
persistdir = /var/lib/yum/repos/x86_64/7/docker-ce-edge
pkgdir = /var/cache/yum/x86_64/7/docker-ce-edge/packages
proxy = False
proxy_dict =
proxy_password =
proxy_username =
repo_gpgcheck = False
retries = 10
skip_if_unavailable = False
ssl_check_cert_permissions = True
sslcacert =
sslclientcert =
sslclientkey =
sslverify = True
throttle = 0
timeout = 30.0
ui_id = docker-ce-edge/x86_64
ui_repoid_vars = releasever,
   basearch
username =

+ sh -c 'yum makecache'
Loaded plugins: fastestmirror
base                                                                                                                                             | 3.6 kB  00:00:00
docker-ce-edge                                                                                                                                   | 2.9 kB  00:00:00
docker-ce-stable                                                                                                                                 | 2.9 kB  00:00:00
epel/x86_64/metalink                                                                                                                             |  21 kB  00:00:00
extras                                                                                                                                           | 3.4 kB  00:00:00
updates                                                                                                                                          | 3.4 kB  00:00:00
(1/15): docker-ce-stable/x86_64/filelists_db                                                                                                     | 7.7 kB  00:00:03
(2/15): base/7/x86_64/other_db                                                                                                                   | 2.5 MB  00:00:04
(3/15): docker-ce-edge/x86_64/filelists_db                                                                                                       | 9.6 kB  00:00:04
(4/15): docker-ce-edge/x86_64/other_db                                                                                                           |  62 kB  00:00:04
(5/15): docker-ce-stable/x86_64/other_db                                                                                                         |  66 kB  00:00:00
(6/15): base/7/x86_64/filelists_db                                                                                                               | 6.9 MB  00:00:05
(7/15): epel/x86_64/filelists_db                                                                                                                 |  10 MB  00:00:01
(8/15): epel/x86_64/prestodelta                                                                                                                  | 2.8 kB  00:00:00
(9/15): epel/x86_64/other_db                                                                                                                     | 3.1 MB  00:00:01
(10/15): extras/7/x86_64/prestodelta                                                                                                             |  48 kB  00:00:02
(11/15): extras/7/x86_64/other_db                                                                                                                |  95 kB  00:00:02
(12/15): extras/7/x86_64/filelists_db                                                                                                            | 519 kB  00:00:02
(13/15): updates/7/x86_64/filelists_db                                                                                                           | 1.3 MB  00:00:02
(14/15): updates/7/x86_64/prestodelta                                                                                                            | 231 kB  00:00:00
(15/15): updates/7/x86_64/other_db                                                                                                               | 228 kB  00:00:00
Loading mirror speeds from cached hostfile
 * base: mirror.genesisadaptive.com
 * epel: s3-mirror-us-east-1.fedoraproject.org
 * extras: mirror.math.princeton.edu
 * updates: mirror.metrocast.net
Metadata Cache Created
+ sh -c 'yum install -y -q docker-ce'
If you would like to use Docker as a non-root user, you should now consider
adding your user to the "docker" group with something like:

  sudo usermod -aG docker your-user

Remember that you will have to log out and back in for this to take effect!

WARNING: Adding a user to the "docker" group will grant the ability to run
         containers which can be used to obtain root privileges on the
         docker host.
         Refer to https://docs.docker.com/engine/security/security/#docker-daemon-attack-surface
         for more information.
If you observe the above output then you will get to know that script will detect your OS and will download, configure, and use supported repo to install Docker on your machine. It also notifies you to add non-root user to group docker so that he/she can run docker commands with root privileges.
You can download and run the script this in a single command as well like below –
If you are running the script on un-supported Linux version (which is not mentioned in SUPPORT_MAP list) then you will see below error.
root@kerneltalks # sh get-docker.sh
Executing docker install script, commit: 36b78b2

Either your platform is not easily detectable or is not supported by this
installer script.
Please visit the following URL for more detailed installation instructions:

https://docs.docker.com/engine/installation/
If you are on RHEL, SLES (basically Enterprise Linux editions) then only Docker EE i.e. Enterprise Edition (paid) is supported on them. You will need to purchase appropriate subscriptions to use them. You will see below message –
# sh get-docker.sh
# Executing docker install script, commit: 36b78b2


  WARNING: rhel is now only supported by Docker EE
           Check https://store.docker.com for information on Docker EE
Install with help from docker store
If both above methods are not suitable for you then you can always opt for the last method. Head to Docker online store. Goto Docker CE i.e. Community Edition (the free one) and choose your Linux distro. Currently, they have listed AWS, Azure, Fedora, CentOS, Ubuntu & Debian. Click on your choice, head to Resources tab, and click Detailed installation instructions. You will be redirected to appropriate documents on Docker documents which have detailed step by step commands to perform a clean install of Docker on Linux of your choice! Or you can always head to this home page of installation and choose your host.
Check if Docker is installed
Finally, you have to check if Docker is installed on the system. To check if docker is installed, simply run the command docker version
root@kerneltalks # docker version
Client:
 Version:      18.05.0-ce
 API version:  1.37
 Go version:   go1.9.5
 Git commit:   f150324
 Built:        Wed May  9 22:14:54 2018
 OS/Arch:      linux/amd64
 Experimental: false
 Orchestrator: swarm
Cannot connect to the Docker daemon at unix:///var/run/docker.sock. Is the docker daemon running?
The last line in the above output shows that the Docker service is not yet running on the server. You can start the service and then the output will show your Docker server details as well.
root@kerneltalks # service docker start
root@kerneltalks # docker version
Client:
 Version:      18.05.0-ce
 API version:  1.37
 Go version:   go1.9.5
 Git commit:   f150324
 Built:        Wed May  9 22:14:54 2018
 OS/Arch:      linux/amd64
 Experimental: false
 Orchestrator: swarm

Server:
 Engine:
  Version:      18.05.0-ce
  API version:  1.37 (minimum version 1.12)
  Go version:   go1.9.5
  Git commit:   f150324
  Built:        Wed May  9 22:18:36 2018
  OS/Arch:      linux/amd64
  Experimental: false
So, now you have successfully installed Docker on your machine and started the Docker server. You are yet to create containers in it!
Setting up docker for non-root user
For non-root user to use Docker, you need to add the user into a group called docker. This group is automatically gets created when you install Docker.
root@kerneltalks # usermod -aG <user> docker
Run above command to add non-root user in docker group and then that user will be able to run all docker commands without root privileges.
Also, you need to make sure that docker services start automatically when the server reboots. Since system control systemctl is becoming standard on all latest Linux versions, below command will suit on nearly major Linux distros
root@kerneltalks # systemctl enable docker
This command will enable docker to run with system boot and hence no root intervention needed when the system reboots. Non-root users will continue to use docker even after a reboot.
Try Docker without installing!
If you want to try Docker without installing it on your machine then just head to Play with Docker website and you will be able to spin up machines having Docker in it. You can try Docker commands in it from your web browser!
The only limitation they have is your session will be auto closed after 4 hours. You have a clock ticking in your browser window set to 4 hours once you log in.
Learn how to setup commands or scripts to execute at shutdown and boot in Suse Linux
Execute a command at shutdown and boot in Suse Linux
In this article, we will walk you through the procedure to schedule scripts at shutdown and boot in Suse Linux. Many times, we have a requirement to start certain applications or services or script after server boots. Sometimes you want to stop application or service or run the script before the server shuts down. This can be done automatically by defining commands or scripts in certain files in Suse Linux.
Application auto start-stop along with OS reboot
Let’s walk through steps to configure the custom applications to auto-start and stop along with Linux reboot. Create a file with a custom name (e.g autoapp) in /etc/init.d as below –
#!/bin/sh
### BEGIN INIT INFO
# Provides: auto_app
# Required-Start: $network $syslog $remote_fs $time
# X-UnitedLinux-Should-Start:
# Required-Stop:
# Default-Start: 3 5
# Default-Stop: 0 1 2 6
# Short-Description: Start and stop app with reboot
# Description: Start and stop custom application with reboot
### END INIT INFO#
case "$1" in
"start")

        su - appuser -c "/app/start/command -options"
        echo "Application started"
        ;;
"stop")
        su - appuser -c "/app/stop/command -options"
        ;;
*)
        echo "Usage: $0 { start|stop }"
        exit 1
        ;;
esac
exit 0
Make sure you copy all the above text including INIT block at the beginning of the file. Edit appuser and app commands under start and stop blocks.
Set executable permission on this file.
The next step is to identify this file as a service using chkconfig. Use filename as a service name in the below command.
root@kerneltalks # chkconfig --add autoapp
Now enable it to be handeled by systemctl
root@kerneltalks # systemctl enable autoapp
And you are done. Try to start and stop the application using systemctl command to make sure your configuration is working fine. To rule out any permission issues, script entries typo, etc.
If systemctl is properly starting and stopping application as expected then you are all set. Final test you can do by rebooting your server and then verifying if the application was down while the server was shut and did it came up along with server boot.
Run script or command after server boot
In Suse Linux, you have to define commands or scripts in /etc/init.d/after.local to run them after server boots. I am running SLES 12 SP3 and my /etc/init.d/after.locallooks likes below –
root@kerneltalks # cat  /etc/init.d/after.local
#! /bin/sh
#
# Copyright (c) 2010 SuSE LINUX Products GmbH, Germany.  All rights reserved.
#
# Author: Werner Fink, 2010
#
# /etc/init.d/after.local
#
# script with local commands to be executed from init after all scripts
# of a runlevel have been executed.
#
# Here you should add things, that should happen directly after
# runlevel has been reached.
#
I added below command at end of this file.
echo "I love KernelTalks"
Then to test it, I rebooted the machine. After reboot, since command output is printed to console I need to check logs to confirm if the command executed successfully.
You can check logs of after local service as below :
# systemctl status after-local -l
● after-local.service - /etc/init.d/after.local Compatibility
   Loaded: loaded (/usr/lib/systemd/system/after-local.service; static; vendor preset: disabled)
   Active: active (exited) since Thu 2018-05-24 03:52:14 UTC; 7min ago
  Process: 2860 ExecStart=/etc/init.d/after.local (code=exited, status=0/SUCCESS)
 Main PID: 2860 (code=exited, status=0/SUCCESS)

May 24 03:52:14 kerneltalks systemd[1]: Started /etc/init.d/after.local Compatibility.
May 24 03:52:15 kerneltalks after.local[2860]: I love KernelTalks
If you observe the above output, the last line shows the output of our command which we configured in /etc/init.d/after.local! Alternatively, you can check syslog/var/log/messages file as well to check the same logs.
So it was a successful run.
Run script or command before server shutdown
To run a script or command before server initiate shutdown, you need to specify them in /etc/init.d/halt.local. Typical vanilla /etc/init.d/halt.local looks like below –
root@kerneltalks #  cat /etc/init.d/halt.local
#! /bin/sh
#
# Copyright (c) 2002 SuSE Linux AG Nuernberg, Germany.  All rights reserved.
#
# Author: Werner Fink, 1998
#         Burchard Steinbild, 1998
#
# /etc/init.d/halt.local
#
# script with local commands to be executed from init on system shutdown
#
# Here you should add things, that should happen directly before shuting
# down.
#
I added below command at end of this file.
echo "I love KernelTalks"
To make sure, this file is picked up for execution before the shutdown halt.local service should be running. Check if service is running and if not then start it.
# systemctl enable halt.local
halt.local.service is not a native service, redirecting to systemd-sysv-install
Executing /usr/lib/systemd/systemd-sysv-install enable halt.local
# systemctl start halt.local
# systemctl status halt.local
● halt.local.service
   Loaded: loaded (/etc/init.d/halt.local; bad; vendor preset: disabled)
   Active: active (exited) since Thu 2018-05-24 04:20:18 UTC; 11s ago
     Docs: man:systemd-sysv-generator(8)
  Process: 3074 ExecStart=/etc/init.d/halt.local start (code=exited, status=0/SUCCESS)

May 24 04:20:18 kerneltalks systemd[1]: Starting halt.local.service...
Then to test it, I shut down the machine. After boot, check logs to confirm if a command was run when the system was shut down.
# cat /var/log/messages |grep halt
2018-05-24T04:21:12.657033+00:00 kerneltalks systemd[1]: Starting halt.local.service...
2018-05-24T04:21:12.657066+00:00 kerneltalks halt.local[832]: I Love KernelTalks
2018-05-24T04:21:12.657080+00:00 kerneltalks systemd[1]: Started halt.local.service.

# systemctl status halt.local -l
● halt.local.service
   Loaded: loaded (/etc/init.d/halt.local; bad; vendor preset: disabled)
   Active: active (exited) since Thu 2018-05-24 04:21:12 UTC; 1min 18s ago
     Docs: man:systemd-sysv-generator(8)
  Process: 832 ExecStart=/etc/init.d/halt.local start (code=exited, status=0/SUCCESS)
    Tasks: 0 (limit: 512)

May 24 04:21:12 kerneltalks systemd[1]: Starting halt.local.service...
May 24 04:21:12 kerneltalks halt.local[832]: I Love KernelTalks
May 24 04:21:12 kerneltalks systemd[1]: Started halt.local.service.
That’s it. You can see our echo message is printed in logs which indicates commands successfully ran before shutdown.
In this way, you can configure your application start-stop commands in Suse Linux to start and stop application after boot and before the shutdown of the server. Also, you can schedule scripts to execute before shutdown and after boot of the Suse Linux server.
Learn why ps output shows UID instead of username.
PS reads UID instead of username in output
One of our reader asked me:
I see userid in place of the username in ps -ef command output, please explain.
In this article, we will see why ps output shows UID instead of username sometimes. In some recent Linux distributions like RHEL 7, it shows cropped username ending with + sign. Let’s see the reason behind ps doesn’t show username.
where the first column is username who owns that particular process. Sometimes you see output like below –
kernelt+  1354  1335  0 17:50 pts/0    00:00:00 top
OR
1001  1354  1335  0 17:50 pts/0    00:00:00 top
where username in ps output is numeric or cropped username ending with +
This is because ps -ef output restricts username up to 8 characters. If your username is longer than 8 characters then it will display UID or cropped version of it. Here we have kerneltalks user on our server.