Short post to explain how to redirect port in Linux using iptables.
Port redirection using iptables
In this short tutorial, we will walk you through the process to redirect port using iptables. How to check port redirection in Linux and how to save iptables rules.
If you have an interface name other than eth0 then you need to edit your command accordingly. You can even add your source and destinations as well in same command using --src and --dst options. Without them, it’s assumed to any source and any destination.
How to check port redirection in iptable
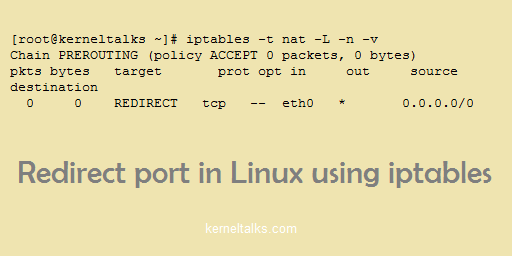
Verify port redirect rule in iptables using below command –
You can see port 80 is being redirected to port 8080 on the server. Note here target is REDIRECT. Do not get confused with port redirection with port forwarding.
How to save iptables rules
To save iptables rules and make them persistent over reboots use below command –
Quick article to demonstrate how to configure port forwarding in Linux using iptables.
Port forwarding using iptables
In this article, we will walk you through port forwarding using iptables in Linux. First of all, you need to check if port forwarding is enabled or not on your server. For better understanding, we will be using eth0 as a reference interface and all our command executions will be related to eth0 in this article.
How to check if port forwarding is enabled in Linux
Either you can use sysctl to check if forwarding is enabled or not. Use below command to check –
Again here process FS with zero values confirms port forwarding is disabled on our system. Now we need to first enable port forwarding on our system then we will configure port forwarding rules in iptables.
How to enable port forwarding in Linux
As we checked above, using the same methods you can enable port forwarding in Linux. But its recommended using sysctl command rather than replacing 0 by 1 in proc files.
Enable port forwarding in Linux using sysctl command –
Change interface, IP and ports as per your requirement. The first command tells us to redirect packets coming to port 80 to IP 172.31.40.29 on port 8080. Now packet also needs to go through FORWARD chain so we are allowing in in the second command.
Now rules have been applied. You need to verify them.
Learn about Docker DNS. How docker container DNS works? How to change nameserver in Docker container to use external DNS?
Docker DNS
Docker container has inbuilt DNS which automatically resolves IP to container names in user-defined networks. But what if you want to use external DNS into the container for some project need. Or how to use external DNS in all the containers run on my host? In this article, we will walk you through the below points :
Docker native DNS
Nameservers in Docker
How to use external DNS in the container while starting it
How to use external DNS in all the containers on a docker host
Docker native DNS
In a user-defined docker network, DNS resolution to container names happens automatically. You don’t have to do anything if your containers are using your defined docker network they can find each other with hostname automatically.
We have 2 Nginx containers running using my newly created docker network named kerneltalks. Both Nginx containers are installed with ping utility.
$ docker container ls
CONTAINER ID        IMAGE               COMMAND                  CREATED             STATUS              PORTS               NAMES
1b1bb99559ac        nginx               "nginx -g 'daemon of…"   27 minutes ago      Up 27 minutes       80/tcp              nginx2
239c662d3945        nginx               "nginx -g 'daemon of…"   27 minutes ago      Up 27 minutes       80/tcp              nginx1

$ docker network inspect kerneltalks
"Containers": {
"1b1bb99559ac21e29ae671c23d46f2338336203c96874ac592431f60a2e6a5de": {
"Name": "nginx2",
"EndpointID": "4141f56fe878275e322b9283476508d1135e813d12ea2b7d87a5c3d0db527f79",
"MacAddress": "02:42:ac:13:00:05",
"IPv4Address": "172.19.0.5/16",
"IPv6Address": ""
},
"239c662d3945031413e4c69b99e3ddde57832004bd6193bdbc30bd5e6ca6f4e2": {
"Name": "nginx1",
"EndpointID": "376da79e6746cc80d178f4363085e521a9d45c65df08248b77c1bc744b495ae4",
"MacAddress": "02:42:ac:13:00:04",
"IPv4Address": "172.19.0.4/16",
"IPv6Address": ""
},
And they can ping each other without any extra DNS efforts. Since user-defined networks have inbuilt DNS which resolves IP addresses from container names.
$ docker exec -it nginx1 ping nginx2
PING nginx2 (172.19.0.5) 56(84) bytes of data.
64 bytes from nginx2.kerneltalks (172.19.0.5): icmp_seq=1 ttl=64 time=0.151 ms
64 bytes from nginx2.kerneltalks (172.19.0.5): icmp_seq=2 ttl=64 time=0.053 ms

$ docker exec -it nginx2 ping nginx1
PING nginx1 (172.19.0.4) 56(84) bytes of data.
64 bytes from nginx1.kerneltalks (172.19.0.4): icmp_seq=1 ttl=64 time=0.088 ms
64 bytes from nginx1.kerneltalks (172.19.0.4): icmp_seq=2 ttl=64 time=0.054 ms
But in default docker bridge network (which installs with docker daemon) automatic DNS resolution is disabled to maintain container isolation. You can add container inter-comm just by using --link option while running container (when on default bridge network)
--link is a legacy feature and may be removed in upcoming features. So it is always advisable to use user-customized networks rather than using default docker networks.
DNS nameservers in Docker
Docker is coded in a smart way. When you run a new container on the docker host without any DNS related option in command, it simply copies host’s /etc/resolv.conf into container. While copying it filter’s out all localhost IP addresses from the file. That’s pretty obvious since that won’t be reachable from container network so no point in keeping them. During this filtering, if no nameserver left to add in container’s /etc/resolv.conf the file then Docker daemon smartly adds Google’s public nameservers 8.8.8.8 and 8.8.4.4 in to file and use it within the container.
Also, host and container /etc/resolv.conf always be in sync. Docker daemon takes help from the file change notifier and makes necessary changes in the container’s resolve file when there are changes made in the host’s file! The only catch is these changes will be done only if the container is not running. So to pick up changes you need to stop and start the container again. All stopped containers will be updated immediately after the host’s file changes.
How to use external DNS in container while starting it
If you want to use external DNS in the container other than docker native or other than what’s in host’s resolv.conf file, then you need to use --dns switch in docker container run command.
In the above example, we chose to have nameserver 10.2.12.2 in the container we run. And you can see /etc/resolv.conf inside the container saves this new nameserver in it. Make a note that whenever you are using --dns switch it will wipe out all existing nameserver entries within the container and keeps only the one you supply.
This is a way if you want to use custom DNS in a single container. But what if you want to use this custom DNS to all containers which will run on your docker host then you need to define it in the config file. We are going to see this in the next point.
How to use external DNS in all the containers on docker host
You need to define the external DNS IP in docker daemon configuration file /etc/docker/daemon.json as below –
{
    "dns": ["10.2.12.2", "3.4.5.6"]
}
Once changes saved in the file you need to restart docker daemon to pick up these new changes.
root@kerneltalks # systemctl docker restart
and it’s done! Now any container you run fresh on your docker host will have these two DNS nameservers by default in it.
Learn the configuration of iptables policies in Linux. Know how to add, delete, save Linux native firewall rules in iptables.
Configuring iptables policies in Linux
In our last article about iptables, we have seen the basics of iptables, iptables chains, and chain policy strategy. In this article we will walk through how to define iptables policies.
Defining iptables policies means allowing or blocking connections based on their direction of travel (incoming, outgoing or forward), IP address, range of IP addresses, and ports. Rules are scanned in order for all connections until iptables gets a match. Hence you need to decide and accordingly define rule numerically so that it gets match first or later than other rules.
In newer versions like RHEL7, the firewall is still powered by iptables only the management part is being handled by a new daemon called firewalld.
iptables is the command you need to use to define policies. With below switches –
-A: To append rule in an existing chain
-s: Source
-p: Protocol
–dport: service port
-j : action to be taken
Lets start with examples with commands.
Block/Allow single IP address
To block or allow a single IP address follow below command where we are adding a rule -A to input chain (INPUT) for blocking (-j REJECT).
In the above command we are blocking incoming connections from IP 172.31.1.122. If you see the output of rules listing, you can see our rule is defined properly in iptables. Since we didn’t mention protocol, all protocols are rejected in the rule.
Here chain can be any of the three: input (incoming connection), output (outgoing connection), or forward (forwarding connection). Also, action can be accepted, reject, or drop.
Block/Allow single IP address range
Same as single IP address, whole address range can be defined in rule too. The above command can be used only instead of IP address you need to define range there.
I have shown two different notation types to define the IP address range/subnet. But if you observe while displaying rules iptables shows you in /X notation only.
Again action and chain can be any of the three of their types as explained in the previous part.
Block/Allow specific port
Now, if you want to allow/block specific port then you need to specify protocol and port as shown below :
Here in this example we blocked the telnet port using TCP protocol from specified source IP. You can choose the chain and action of your choice depending on which rule you want to configure.
Saving iptables policies
All the configuration done above is not permanent and will be washed away when iptable services restarted or server reboots. To make all these configured rules permanent you need to write these rules. This can be done by supplying save argument to iptables service (not command!)
# /sbin/service iptables save
iptables: Saving firewall rules to /etc/sysconfig/iptables:[  OK  ]
You can also use iptables-save command.
If you open up /etc/sysconfig/iptables file you will see all your rules saved there.
# cat /etc/sysconfig/iptables
# Generated by iptables-save v1.4.7 on Tue Jun 13 01:06:01 2017
*filter
:INPUT ACCEPT [32:2576]
:FORWARD ACCEPT [0:0]
:OUTPUT ACCEPT [48:6358]
-A INPUT -s 172.31.1.122/32 -j REJECT --reject-with icmp-port-unreachable
-A INPUT -s 172.31.0.0/22 -j REJECT --reject-with icmp-port-unreachable
-A INPUT -s 172.31.0.0/23 -j REJECT --reject-with icmp-port-unreachable
-A INPUT -s 172.31.1.122/32 -p tcp -m tcp --dport 23 -j DROP
COMMIT
# Completed on Tue Jun 13 01:06:01 2017
Deleting rule in iptables
We have seen how to add a rule, how to delete the existing rules. You can use the same commands used above only change is to add -D switch instead of -A!
# iptables -D INPUT -s 172.31.1.122 -j REJECT
The above command will remove the very first rule we added in iptables in this post.
Also, if you haven’t saved your iptables you can flush all currently configured rules by using -F.
Beginner’s tutorial to understand iptables – Linux firewall. This article explains about iptable basics, different types of chains, and chain policy defining strategy.
iptables – Linux firewall
Linux firewall: iptables! plays a very important role in securing your Linux system. System hardening or locking down cannot be completed without configuring iptables. Here we are discussing the basics of iptables. This article can be referred to by beginners as an iptables guide. In this article we will walkthrough :
What is iptables
iptables chains
Chain policy defining strategy
We discussed how to set iptables rules, how to save iptables settings in this article. Let’s start with iptables basics.
What is iptables
iptables is a Linux native firewall and almost comes pre-installed with all distributions. If by any chance its not on your system you can install an iptables package to get it. As its a firewall, it has got policies termed as ‘chain policies’ which are used to determine whether to allow or block incoming or outgoing connection to or from Linux machine. Different chains used to control the different types of connections defined by its travel direction and policies are defined on each chain type.
In newer versions like RHEL7, the firewall is still powered by iptables only the management part is being handled by a new daemon called firewalld.
As there are policies you can define, one default policy also exists for all chains. If the connection in question does not match with any of the defined policy chains then iptable applies default policy action to that connection. By default (generally) ALLOW rule is configured in defaults under iptables.
iptable chains
As we saw earlier iptables rely on chains to determine the action to be taken in connection, let’s understand what are chains. Chains are connection types defined by their travel direction/behavior. There are three types of chains: Input, Output, Forward.
Input chain :
This chain is used to control incoming connections to the Linux machine. For example, if the user tries to connect the server via ssh (port 22) then the input chain will be checked for IP or user and port if those are allowed. If yes then only the user will be connected to the server otherwise not.
Output chain :
Yes, this chain controls outgoing connections from the Linux machine. If any application or user tries to connect to outside server/IP then the output chain decides if the app/user can connect to destination IP/port or not.
Both chains are stateful. Meaning only said the connection is allowed and a response is not. Means you have to exclusively define input and output chain if your connection needs both way communication (from source to destination and back)
Forward chain :
In most of the systems, it’s not used. If your system is being used as a pass-through or for natting or for forwarding traffic then only this chain is used. When connections/packets are to be forwarded to next hop then this chain is used.
You can view the status of all these chains using the command :
# iptables -L -v
Chain INPUT (policy ACCEPT 8928 packets, 13M bytes)
 pkts bytes target     prot opt in     out     source               destination

Chain FORWARD (policy ACCEPT 0 packets, 0 bytes)
 pkts bytes target     prot opt in     out     source               destination

Chain OUTPUT (policy ACCEPT 2201 packets, 677K bytes)
 pkts bytes target     prot opt in     out     source               destination
In above output, you can see all three chains details, how many packets were transferred, how much data transferred and default action policy.
Chain policy defining strategy
There are three policies can be defined for chains.
ACCEPT: Allow connection
REJECT: Block connection and send back error message informing source that destination blocked it
DROP: Block connection only (behave like connection never questioned). The source is unaware of being blocked at the destination.
By default, all chains configured with ACCEPT policy for all connections. When configuring policies manually you have to pick either way from below two :
Configure default as REJECT/DROP and exclusively configure each chain and its policy of ALLOW for required IP/subnet/ports.
Configure default as ACCEPT and exclusively configure each chain and its policy of REJECT for required IP/subnet/ports.
You will go with number two unless your system has highly sensitive, important data and should be locked out of the outer world. Obviously, its environment criticality and number of IP/subnet/ports to be allowed/denied makes it easier to select a strategy.
In next article we discussed how to define these chain policies in detail.
Learn networking basics in the Linux server. What is the network route, how to check routes, how to define static and default routes in the Linux system?
Network routes in Linux
Network routes on Linux servers are the paths or gateways packets should follow to reach their destinations. Routes can be configured on interface level and system level. The default route is also known as default gateway is the IP where the packet should discover their path if the current network or interface (from which packet originated on the server) does not know the path for destination IP. This article is about discussing network routes in Linux. It will cover how to define the network route for the network interface, where and how to define the default route or default gateway in Linux etc.
How to check current routes on system?
Current routes on system can be viewed using below commands.
# ip route
default via 172.31.0.1 dev eth0
172.31.0.0/20 dev eth0  proto kernel  scope link  src 172.31.4.137
# routel
         target            gateway          source    proto    scope    dev tbl
        default         172.31.0.1                                     eth0
    172.31.0.0/ 20                    172.31.4.137   kernel     link   eth0
      127.0.0.0          broadcast       127.0.0.1   kernel     link     lo local
     127.0.0.0/ 8            local       127.0.0.1   kernel     host     lo local
----- output clipped -----
You can observe 172.31.0.1 is defined as default gateway on above system.
How to configure static route in Linux?
In RHEL: You need to edit below parameters in the config file /etc/sysconfig/network-scripts/route-ethX.
This article explains what is network bonding in Linux. Quick 4 step guide helps you to set up network bonding in your server in minutes.
Network bonding or network teaming is binding two physical NIC (Network Interface Card) together to create once virtual NIC. This virtual NIC serves the purpose of redundancy, fault tolerance, and load balancing.
For an application running on system its a one NIC they are talking to but on bare metal, their requests are being served by two physical cards. Hence in case, one physical card is failed or unplugged, another one still serves beneath virtual NIC, and applications don’t even know about failure. It’s the same as Auto Port Aggregation (APA) in HPUX.
As of now with RHEL7, there are 7 types of NIC bond available :
Bond 0: Load balancing (round-robin)
Bond 1: Active backup
Bond 2: Balance XOR
Bond 3: Broadcast
Bond 4: 802.3ad
Bond 5: Balance TLB
Bond 6: Balance ALB
We will see in detail about these types in another post. More commonly used are type 0 and type 1 bond. Let’s see step by step procedure to configure a network bond in Linux.
For this tutorial, we will consider two ethernet cards eth1 and eth2 to configure bond. It is assumed that both are configured/connected to the same network VLAN.
Step 1:
Configure both eths with master bond0 and slave as themselves. For that, open NIC configuration file located in /etc/sysconfig/network-scripts/ifcfg-eth1 & ifcfg-eth2 in vi and edit entries as highlighted below :
Under bonding options, we choose mode 1. If you choose to select any other mode out of 7 mentioned above, you need to specify here against mode=
Step 3:
Make sure the bonding module is loaded into the kernel. Add append lines in /etc/modprobe.conf file.
alias bond0 bonding
options bond0 mode=balance-alb miimon=100
Execute module with below command.
# modprobe bonding
Step 4:
That’s it. You are done with configuration. You need to restart networking service and you are good to go. Make sure your network manager service is not running.
# service network restart

Shutting down interface bond0:                             [  OK  ]
Shutting down loopback interface:                          [  OK  ]
Bringing up loopback interface:                            [  OK  ]
Bringing up interface bond0:                               [  OK  ]
You can confirm your bond0 is up with the mentioned IP in ip addr command output. Bonding mode can be verified with below command :
# cat /proc/net/bonding/bond0

Bonding Mode: load balancing (round-robin)
MII Status: up
MII Polling Interval (ms): 100
Up Delay (ms): 100
Down Delay (ms): 100

Slave Interface: eth0
MII Status: up
Link Failure Count: 0
Permanent HW addr: 00:0c:29:b6:be:32

Slave Interface: eth1
MII Status: up
Link Failure Count: 0
Permanent HW addr: 00:0c:29:b6:be:56
Even ifconfig command output will show you bond0 is up with the mentioned IP address.