List of all Linux ISO download links. The latest and old releases of various Linux distro can be downloaded using links listed on this page.
Linux download links
Many times I come across questions from people or readers that where I can download RHEL iso? Where to download Ubuntu Linux? etc. Actually these download links are very easy to get from Google but still I thought of publishing them all in one place.
In this post, I will list all possible Linux download websites. Please note that all Linux distro’s server copy is taken into consideration for choosing download links.
Red Hat Enterprise Linux RHEL latest release download link. Old releases download link. You have to create a developer account here to get your ISO copy.
The list will go on since Linux is open source and there are many distros floating around the internet! Report broken links and any additions in the comments below.
Listing new features in RHEL7. These 7 new features making RHEL7 stand out from its predecessor.
New features in RHEL7
Its been a while RHEL7 is launched and nicely accommodated in Linux world by now. What’s new in RHEL7? What is the difference between RHEL7 and its precedence versions? these kinds of questions are flowing through interviews these days. So thought of jotting them down. In this post I will quickly walk through some new key features launched in RHEL7 by Red Hat.
What’s new in RHEL7?
RHEL7 officially released in June 2014 with codename Maipo. It took time for the market to absorb this new release since there are many new features launched in this release. Red Hat launched many new ways, commands to do traditional stuff. We are going to see them now –
The default file system is XFS. RHEL6 was launched with EXT4 as the default file system. XFS is a highly scalable, high-performance file system. XFS supports metadata journaling, which helps in quicker crash recovery. This means file system checks will take very little time. The XFS file system can be defragmented and extended while mounted. This makes it more admin friendly in a production environment since it avoids downtime of file systems for activities. Supports only 64 bit systems.
Introduction of systemctl. A new way to manage services on RHEL7 is systemctl. Older service and chkconfigcommand is being replaced with systemctl.
Run levels being called as targets. In RHEL7 run levels are called targets. Default target (run-level) is defined in /etc/systemd/system/default.target.
Fast boot. RHEL7 boots faster than its predecessors. This is achieved by simultaneously starting services that are not dependent on each other. In older versions, services used to start one after another. So if one service stuck or delays to start it subsequently delays the following process and boot time. This hurdle is removed in RHEL7 allowing it to boot much faster.
New system service manager: systemd. The former init process is no more PID 1 or first process. Systemd is introduced which controls standard base init scripts.
Bigger filesystem limits. RHEL7 now supports filesystem size up to 500TB. This limit is also the same for an individual file. This is due to the XFS file system on a 64-bit machine. RHEL6 supports the 16TB filesystem.
New firewall identity. Former firewall iptables now replaces by firewalld (Firewall Dynamic). iptables still exist in the system and you can disable firewalld and use iptables.
These are key differences in the new RHEL7 release. apart from this there are many new things added in RHEL7. The whole list is compiled by Red Hat here.
Let us know your suggestions/feedback in comments section below!
Learn how to unmount NFS when the server is gone. Dead NFS mounts can be un-mounted using forceful and lazy umount command.
Unmount NFS share when server is gone
This article will help you to un-mount NFS share from the client when the NFS server is gone or offline or un-available or decommissioned. We have seen how to configure the NFS server and how to handle NFS stale file error. But what if your NFS server is gone and its shares are still mounted on clients. Normally, before shutting down the NFS server, all clients should be notified and advised to unmount NFS shares they are using from this server.
But, in case if any of the clients have still NFS mounted when the server goes down, then the client should forcefully un-mount it. Normal mount operation won’t be effective in such cases. When the NFS server is down, you observe below things on the client who has NFS share still mounted.
df command hangs since it tries to fetch NFS information but the NFS server is not responding.
Tools, utilities who use/check mount point information like Ignite backup shows below error.
NFS server xyz not responding still trying
fuser command hangs when running for the NFS mount point.
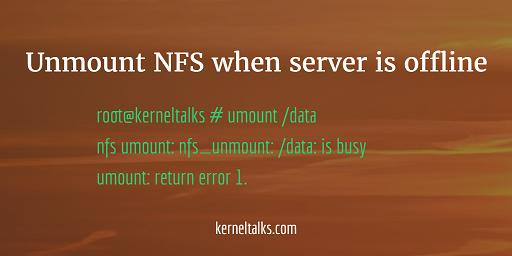
umount (normal) command fails with the below error.
In this case, you need to use forceful (-f switch) and lazy umount (-l switch) to un-mount this dead NFS mount point. Lazy un-mount detach the said mount point from file system tree and cleans its all references once it’s not busy anymore.
Lazy un-mount is available in most Linux distributions. If not, you should be fine with only forceful un-mount too. In HPUX lazy un-mount is not available.
root@kerneltalks # umount -f -l /data
Conclusion
You can identify dead NFS share by df, fuser commands that appear to hang, failing to umount command. Such a dead NFS mount point can be un-mounted using forceful and lazy umount command.
Learn how to replay the Linux session recorded by script command. Visual Linux session recording along with timing information plays past session recording in real-time.
Replay Linux session like video!
In our last article we learned how to record Linux sessions using the‘script’ command. In this article we will walk through steps to replay recorded sessions by script command. Normally, script command saves recording in the plain text log file which can be viewed using cat, more, less, or vi commands. That would be only plain text having commands and their outputs in the order you executed them while recording.
If you want to view your recorded output as it is being played on the terminal you can do it using scriptreplay command. It will play your output just as you are typing it on the terminal! scriptreplay needs time logs as well to play recorded sessions. This time logs can be generated using –timing switch with the script command. Let’s walk through these steps.
How to record Linux session with timing
We will use script command with --timing switch followed by filename in which all timing logs will be saved.
[root@kerneltalks ~]#  script --timing=time.log capture.txt
Script started, file is capture.txt
[root@kerneltalks ~]# date
Thu Jul 27 02:42:46 EDT 2017
[root@kerneltalks ~]# hostname
kerneltalks
[root@kerneltalks ~]# echo "I love kerneltalks"
I love kerneltalks
[root@kerneltalks ~]# exit
exit
Script done, file is capture.txt
here we are saving timing information in time.log file and session recording in capture.txt file. Both are plain text files and can be viewed. If you look at time.log file :
It has two columns of data in it. The first column denotes the number of seconds elapsed after the last display action. The second column is the number of characters printed on the screen.
That’s it. You have recorded your Linux session along with timing logs. This recording (capture.txt) can be replayed using scriptreplay command since its timing information is available.
How to replay recorded Linux session
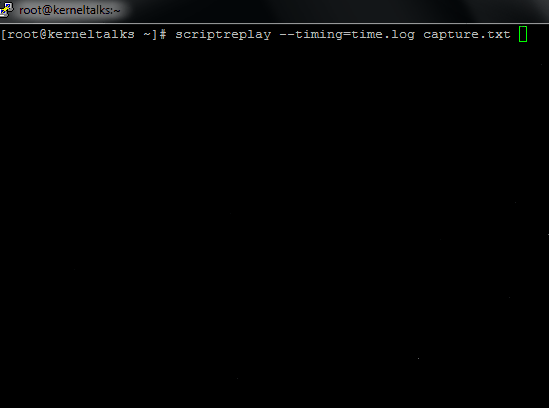
Now both logs timing and recording need to feed scriptreplay command to let the show begin! The format and switch would be the same. Command used to replay session will be :
# scriptreplay --timing=time.log capture.txt
To see it in action, I captured it in the GIF file below. See how to actually replay as if the user is typing in the terminal as it was at the time of recording!
‘scriptreplay’ command in action
It replays exactly with the same time difference between two commands as you did at the time of recording! It’s like watching what the user has done in his session in real-time. It’s more of a visual record of Linux session while script was textual records.
Learn how to record Linux sessions using script command. This will help to keep a record of your commands and their outputs printed on the terminal at the time of execution.
Record your Linux session using ‘script’ command
In our last article we saw how to save PuTTY session output in a file on your desktop. In this article we will learn how to record session output in a file on the Linux server itself. And yes, it’s recording. It can be replayed later at any time and view commands being run and output being shown as it was done in real-time at the time of recording.
There are two utilities used for this task. script command used to record session and scriptreply is used to replay the recorded session from the file. In this article we will see Linux session recording using script command. scriptreply command is covered in this article.
script command takes a filename as an argument without any switch. It will write your commands along with their outputs in this file. Remember only commands ran after script command will be recorded and till you stop recording by hitting cntl+d key combination or typing exit. Make sure you have proper file permissions on the log file you are asking script to write into. Also, make sure you have enough space for recording since if your outputs are pretty lengthy then logfile gonna grow big.
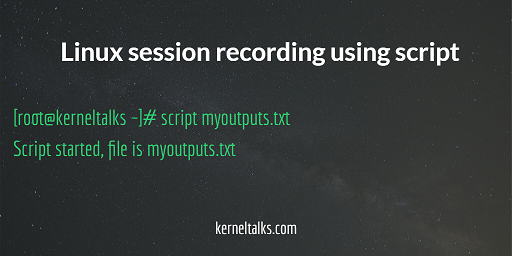
Let’s start with an example. Here we are recording output in myoutputs.txt file. Command will be script myoutputs.txt:
[root@kerneltalks ~]# script myoutputs.txt
Script started, file is myoutputs.txt
[root@kerneltalks ~]# date
Thu Jul 27 01:31:39 EDT 2017
[root@kerneltalks ~]# hostname
kerneltalks
[root@kerneltalks ~]# w
 01:31:46 up 1 min,  2 users,  load average: 0.49, 0.21, 0.08
USER     TTY      FROM             LOGIN@   IDLE   JCPU   PCPU WHAT
ec2-user pts/0    59.184.148.123   01:31    2.00s  0.00s  0.19s sshd: ec2-user [priv]
root     pts/1                     01:31    2.00s  0.01s  0.01s w
[root@kerneltalks ~]# exit
Script done, file is myoutputs.txt
Now, observe above output.
After script command execution, it notifies you (Script started, file is myoutputs.txt) that it has started recording your session and log file where it is recording.
Then I punched in few commands for testing like date, hostname, w.
I stopped recording by hitting the cntl+d key combination (exit command works too). script stopped and informed (Script is done, the file is myoutputs.txt) it has stopped recording.
Lets look at logfile myoutputs.txt
# cat myoutputs.txt
     Script started on Thu 27 Jul 2017 01:31:35 AM EDT
     [root@kerneltalks ~]# date
     Thu Jul 27 01:31:39 EDT 2017
     [root@kerneltalks ~]# hostname
     kerneltalks
     [root@kerneltalks ~]# w
      01:31:46 up 1 min,  2 users,  load average: 0.49, 0.21, 0.08
     USER     TTY      FROM             LOGIN@   IDLE   JCPU   PCPU WHAT
     ec2-user pts/0    59.184.148.123   01:31    2.00s  0.00s  0.19s sshd: ec2-user [priv]
     root     pts/1                     01:31    2.00s  0.01s  0.01s w
     [root@kerneltalks ~]# exit

     Script done on Thu 27 Jul 2017 01:31:51 AM EDT
Voila! All commands (including shell prompt PS), their outputs are there in the logfile. Notice that it also added timestamps at the top and bottom of the logfile indicating when the recording was started and stopped.
How to append script command recording in same logfile
Every time script command runs, it empties its logfile and adds content to it. If you want to append your recording to previously recorded file then you need to use -a (append) switch with it. This will keep data in a log file as it is and add new data to the bottom of the file.
[root@kerneltalks ~]# script -a myoutputs.txt
Script started, file is myoutputs.txt
[root@kerneltalks ~]# echo " I love kerneltalks.com"
 I love kerneltalks.com
[root@kerneltalks ~]# exit
exit
Script done, file is myoutputs.txt
I used -a switch in the above example to append new recording in the same file we created earlier. Tested one echo command. Let’s check the logfile.
[root@kerneltalks ~]# cat myoutputs.txt
     Script started on Thu 27 Jul 2017 01:31:35 AM EDT
     [root@kerneltalks ~]# date
     Thu Jul 27 01:31:39 EDT 2017
     [root@kerneltalks ~]# hostname
     kerneltalks
     [root@kerneltalks ~]# w
      01:31:46 up 1 min,  2 users,  load average: 0.49, 0.21, 0.08
     USER     TTY      FROM             LOGIN@   IDLE   JCPU   PCPU WHAT
     ec2-user pts/0    59.184.148.123   01:31    2.00s  0.00s  0.19s sshd: ec2-user [priv]
     root     pts/1                     01:31    2.00s  0.01s  0.01s w
     [root@kerneltalks ~]# exit

     Script done on Thu 27 Jul 2017 01:31:51 AM EDT
     Script started on Thu 27 Jul 2017 01:41:13 AM EDT
     [root@kerneltalks ~]# echo " I love kerneltalks.com"
      I love kerneltalks.com
     [root@kerneltalks ~]# exit
     exit

     Script done on Thu 27 Jul 2017 01:41:24 AM EDT
You can see there are two recordings in the same log file. You can distinguish them by their start and stop time (highlighted in output)
Conclusion :
script command can be used to log commands and their outputs on the Linux server itself. This command can be used in user profiles to monitor user activity on a server provided logfile mount point has huge free space to accommodate data generated by users.
Happy Sysadmin Day 2017! System Administrator Appreciation Day is always last Friday of July month yearly. This year it’s 18th annual.
Happy Sysadmin Day 2017!!
First of all,
Happy Sysadmin Day to all our readers
Yes, its 28 July 2017! System Administrator Appreciation Day 2017!
Sysadmin day is normally last Friday of July month. This year its 18th annual Sysadmin day.
Sysadmin! He/she is the one who keeps your digital world running from behind the scenes. Anything digital you use right from your computer to your ATM card machines, sysadmin is behind them to keep them running healthy. Sysadmin never gets any appreciation he deserves. He works 365 days of year-round the clock even in graveyard shifts. His clock always ticks to make services available all the time. When systems are down everyone else is at ease, the only sysadmin is the one who gets all the heat and overworked to get systems back up. You can not imagine the digital world without sysadmin!
What is sysadmin day
It is a day dedicated to the appreciating system administrator. They are the real hero keeping your digital world running! So why not dedicate one day to appreciate the work they do for you! Appreciate their hard work, their holiday sacrifices, their tolerance when they take heat during downtime, their extra workloads keeping your digital infra up to date. Let’s appreciate at least one sysadmin today by greeting them, gifting them, exchanging little talk with them & expressing thankfulness!!
There are few ways you can appreciate your sysadmin listed here on sysadminday.com. Those are really worth considering.
Cheers!!
Thank you readers (mostly all of you are sysadmins!) for stopping by! Enjoy your day! And yes, for my Linux buddies – Have a happy shell!
Out tweet about this post was liked by the Founder of Sysadmin day! Ted Kekatos@tedkekatos
Learn how to save PuTTY output in logfile locally on the desktop. Important settings to be done on PuTTY client before you start your sysadmin work!
Save PuTTY session output in file on desktop
PuTTY is one of the widely used SSH, telnet client to connect Linux Unix servers. Its open-source software and can be downloaded here. This article is intended to beginners who just stepped into the command-line world of *nix. Experienced sysadmins already knew what this article is all about!
Most of the beginners are not familiar with PuTTY settings and they just use default ones. This leaves them into two troubles :
If the command output is too long, it scrolls up the PuTTY screen and the output beginning is not visible.
After closing the PuTTY session, the user won’t have a trace of what he did in his session.
To avoid them we need to tweak few settings in PuTTY and set them in default ones. So that next time you fire up PuTTY client, it starts with tweaked settings as default and makes your life easy!
How to increase PuTTY scroll length
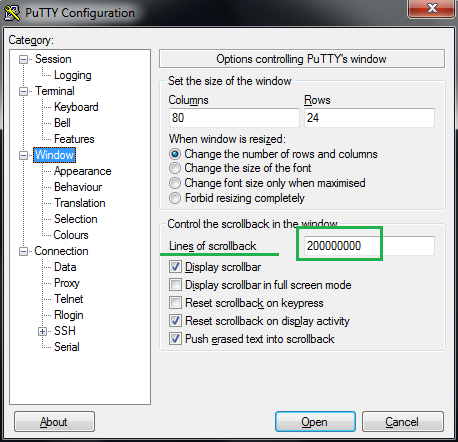
Many times your output is long enough to scroll beyond PuTTY screen buffer and you won’t be able to get to the beginning of the output. To avoid this you need to increase the screen buffer size in settings. Let’s see how to do it. Open PuTTY and select ‘Window‘ on left side pane as below :
Putty scrollback size
You will be presented with settings page on the right which has a field where you can set ‘Lines of scrollback‘. Enter the number of your choice here (big enough). That’s it. Now PuTTY will be having a scroll buffer of the number of lines you specified. Never lost your output beyond scroll!
How to save PuTTY session output on local storage
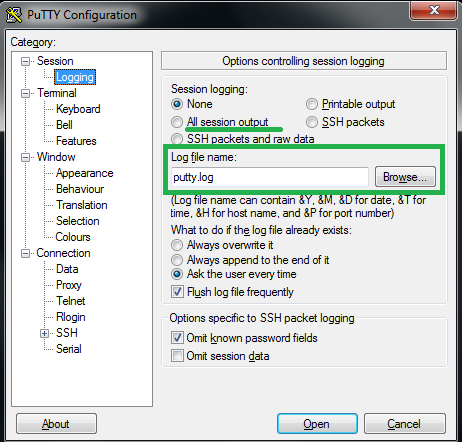
The next challenge is users don’t get any logs saved by default in PuTTY. So in case you want to a checklist of commands you ran and their outputs, it’s not possible to check (once you close your session). Here session logging comes to rescue. Let’s see how to set it. Open PuTTY and select ‘Logging‘ under ‘Session‘ on the left pane.
Save putty session logs
You will present with logging settings on right. Session logging is off by default. You need to check bullet box next to ‘All session output‘ to log all session output in file. Provide log file name using browse button (specify where to save logs on your system). You can use parameters like &Y, &M (meanings listed below option), so that every time you start a new session, new logfile have unique name. This will avoid overwriting existing file with same name.
PuTTY also offers you to set options what to do when it finds file name already existing on specified path. You can choose to overwrite, append or ask user.
Now whatever commands you type and outputs you see in your session will be saved as it is in a file on your computer as well. These log files can be opened in notepad/Wordpad to view later. Be sure you don’t leave your session running with commands like a top (which continuously changes data on the screen for infinite time). Because this will fill up your logfiles fast and you may end up filling your local hard disk!
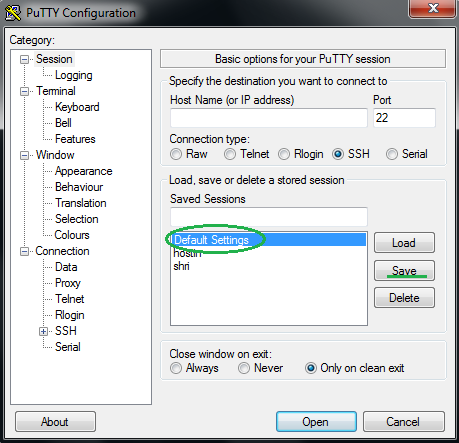
Save customized settings in PuTTY as default settings
Now you learned these two settings which are very much important to set but you don’t want to set it everything you fire up PuTTY client. You can save them as default settings!
Open PuTTY and do the above changes. Now, click and select ‘Session‘ on left pane which will bring you back to the client home screen.
PuTTY default setting
Now click and select ‘Default Settings‘ as shown above and click ‘Save‘. That’s it! Your customized settings are now saved as default settings. Now whenever you start PuTTY client it will start with your customized settings.
Have any tips regarding PuTTY client? Share with us in the comments section below!
Learn how to rsync to EC2 with the help of SSH protocol authenticated using a private key file. The process can be used for Rsync from and between EC2.
Rsync to EC2 Linux instance
We learned about Rsync in our last post. We learned how Rsync helps in a data backup or mirroring by using less bandwidth, time on the second run. Since it syncs only changes in later executions after the first fresh copy operation. Now many traditional data centers are moving to cloud services like AWS. Rsync can be useful to sync data from your local server to AWS hosted EC2 instance (if the data size is not huge).
In this article we will learn about how to rsync to EC2 server in AWS. Since you know EC2 Linux instances don’t use a conventional used id-password combination for authentication, Key pairs need to be used in Rsync for authentication EC2. For the Rsync setup, your EC2 instance must be launched with public-private key pair and you should have a private key file with you.
Get started
To start with making sure your EC2 instance is launched with a key pair.
Upload private key file on the source server (from where you are going to Rsync to EC2)
Make sure key file set with 400 permission
Get public IP or public DNS name of EC2 server from AWS EC2 console web page
Confirm you are able to connect from source to EC2. (verify AWS security groups and firewall settings)
Execute Rsync to EC2
We have testfile.tar for testing copy and private key file (mykey.pem) ready on the source server.
[root@kerneltalks ~]# rsync -avz -e "ssh -i /root/mykey.pem" testfile.tar ec2-user@ec2-13-126-114-120.ap-south-1.compute.amazonaws.com:/tmp/
sending incremental file list
testfile.tar

sent 8520069 bytes  received 31 bytes  3408040.00 bytes/sec
total size is 39198720  speedup is 4.60
Where –
-a: Archive mode preserves permission and ownership
-v: verbose mode
-z: compress
-e: Choose remote shell of execution
ssh -i keyfile: Use the private key for authentication on destination using ssh protocol
source (testfile.tar)
Destination: Public DNS name of EC2 instance
That’s it! Your file is copied over to EC2. This can be done vice versa as well. You can sync files from the EC2 server to the local server as well. Just switch source-destination paths and you are all set to go.
Rsync between two EC2 servers
Rsync can be executed between two EC2 servers i.e. from one EC2 server to another. The same above command can be used. If you are doing it for EC2 instances within the same region then the Internal DNS name can be used in a command.
Conclusion :
Rsync is possible from, to, and between EC2 servers. Key file authenticated SSH protocol should be used in the Rsync command to achieve this.
Small tutorial to learn how to transfer data between two EC2 Linux instances on AWS. Explains the use of key authentication in the SCP command.
Copy data between two EC2 Linux instances
EC2 instance in AWS is a server instance that uses key-based authentication for login. Now, beginners or first time EC2 users wonder how to copy files from one EC2 server to another? or how to transfer data between two EC2 instances? You can achieve it using key files in scp command.
Few pre-requisites are :
Source and destination EC2 instances should be in the same region (can be in different availability zones)
followed by destination in userid@hostname/ip:/path/ format.
You have to use the Private IP of the destination EC2 instance. You can get this from your AWS EC2 console web page. Here kerneltalks2 has private IP 172.31.24.59. You can use hostname if you make an entry in /etc/hosts file. Remember different Linux distros on AWS have different login id to be used.
# scp -i /root/mykey.pem testfile.tar ec2-user@172.31.29.79:/tmp
The authenticity of host '172.31.29.79 (172.31.29.79)' can't be established.
RSA key fingerprint is 66:c4:ce:37:c6:e6:a1:6c:2f:f9:9b:f2:f5:05:e3:38.
Are you sure you want to continue connecting (yes/no)? yes
Warning: Permanently added '172.31.29.79' (RSA) to the list of known hosts.
testfile.tar                                                                                                               100%   37MB  37.4MB/s   00:00
In the above output, you can see kerneltalks2 authenticated using key file and file transfer was completed.
[root@kerneltalks2 ~]# ls /tmp/testfile.tar
-rw-r--r--. 1 root root 39198720 Dec 19  2016 testfile.tar
Rsync is another good way to copy data between two EC2 instances. You can learn about it in our other article: Rsync for EC2 on AWS.
Conclusion :
Files and directories can be transferred between two ec2 instances using the same Linux scp command. Only the authentication part is to be done using a key file with -i switch.
Rsync command used to copy and sync files, directories locally or remotely. Learn rsync with different examples and options.
Rsync command! Data backup with copy and sync!
Rsync i.e. Remote Sync is the command used for copying and synchronizing files or directories locally or remotely on Linux Unix based systems. In this article we will learn how to use rsync command. different switches of it and examples.
As you know Rsync not only copies but also synchronizes files and directories, it is best for mirroring data between two machines and data backups. Rsync is an efficient way than any other copy command since it takes bandwidth and time only for the first time of data copy. In consecutive sync cycles, it only transfers data which is changed. This requires less bandwidth and time, but you still have updated data at the destination! Hence it is best for remote data mirrors and backups.
Lets see Rsync command with different uses and their examples.
Rsync command should be available on your system in plain vanilla installation. If not, install the ‘rsync’ package. Basically without any switch you can run the command with just source and destination path. The path can be local or remote.
# rsync testfile /tmp/
This is a very basic simple example of rsync command. It won’t show any output and copy/sync data from source file ‘testfile‘ to destination file under /tmp directory.
Rsync command with verbose mode
-v switch can be used for verbose mode. Information like byte sent, bytes received, transfer speed, the total size of the source is displayed on the console when command run.
# rsync -v testfile /tmp/directory9/
created directory /tmp/directory9
testfile

sent 79 bytes  received 31 bytes  220.00 bytes/sec
total size is 7  speedup is 0.06
If you watch closely, Rsync will create a destination directory if it does not exist!
Rsync command to copy directories
-r (recursive copy) the switch helps in copying directories recursively to destination.
# rsync -rv testdir /tmp/
sending incremental file list
testdir/
testdir/test2
testdir/test4
testdir/test1/
testdir/test3/

sent 194 bytes  received 62 bytes  512.00 bytes/sec
total size is 0  speedup is 0.00
In the above example we used verbose mode as well. Directory testdir has two files named test2, test4. It also has directories named test1, test3. All these 4 entities copy over to destination as you see their listing in output.
Preserve permissions and ownership while rsync copy
-a (archive mode) the switch used to instruct rsync to preserve file directory permissions and ownership at the destination.
# ll test1
-rw-r--r--. 1 root root 0 Jul 23 22:40 test1

# rsync -av test1 /tmp
sending incremental file list
test1

sent 69 bytes  received 31 bytes  200.00 bytes/sec
total size is 0  speedup is 0.00

# ll /tmp/test1
-rw-r--r--. 1 root root 0 Jul 23 22:40 /tmp/test1
You can observe source and destination permissions and ownership is preserved after using -a switch with rsync.
Rsync with compression
One of the important factors while copying data is bandwidth. Bandwidth utilization can be reduced with compressed data. Compressed data transfer is more speedy, takes less time and bandwidth. Rsync allows us to compress data during transfer using -z switch.
# rsync -azv test1 /tmp
sending incremental file list
test1

sent 66 bytes  received 31 bytes  194.00 bytes/sec
total size is 0  speedup is 0.00
If you observe we synced the same file test1 from previous example output (obviously after removing /tmp/test1). Without compression it sent 69 bytes and now with compression 66 bytes! I know, 3 bytes is no big difference but these are empty test files. Compression makes a big difference with a bunch of huge files.
Rsync to copy from local to remote
For copying file/directory from local to remote, specify the destination as remote in notation username@hostname_or_IP:/path/
# rsync -azv test1 root@10.10.1.23:/tmp/
root@10.10.1.23's password:
sending incremental file list
test1

sent 66 bytes  received 31 bytes  21323.00 bytes/sec
total size is 0  speedup is 0.00
Rsync to copy from remote to local
It will work like the above example only you have to reverse source and destination.
# rsync -azv root@10.10.1.23:/tmp/ test1
root@10.10.1.23's password:
sending incremental file list
test1

sent 66 bytes  received 31 bytes  21123.00 bytes/sec
total size is 0  speedup is 0.00
I am transferring empty file here hence you see total size as zero.
Limiting bandwidth use in Rsync
Another important aspect of network file copy is to limit the bandwidth of transfer so that it won’t take whole available bandwidth, choke network, and degrade the network performance for other services/devices using it. Rsync has the ability to limit bandwidth with --bwlimit switch. The switch should be supplied to specify a maximum transfer rate in kilobytes per second.
# rsync -razv --bwlimit=100 httpd-2.4.25 /tmp/
sending incremental file list
httpd-2.4.25/srclib/apr/build/
httpd-2.4.25/srclib/apr/build/ltmain.sh
-----output clipped------

sent 1214030 bytes  received 10136 bytes  97933.28 bytes/sec
total size is 83112573  speedup is 67.89
You can see speed limited to 97kbps (97933 bytes/sec) as per our specification 100kbps in command switch --bwlimit.
Show progress while transferring in Rsync
If you have a list of file directories with big size then its good to see the progress of each transfer so that you are assured that transfer is in progress and not hung. Specify --progress switch so that transfer details shown for each file transfer in output.
In the above output you can see after each file copied, transfer speed details, the duration is flashed on the screen.
Apart from above all switches, there is the whole list of switch which can be used with Rsync command. All of them can be found under the Rsync man page on your terminal. I am listing a few important one below for your quick reference.
-h: Output numbers will be shown in a human-readable format
--include: Include files. Wild cards can be used
--exclude: Exclude from the copy. Wild cards can be used
-q: Quiet mode. Suppress non-error messages
--backup: Make a backup
-l: Copy links as well
-H: Preserve hard links
-t: Preserve modification times
--dry-run: Perform dry run. No changes actually made.
--delete-after: Delete files after transfer
Let us know if you want additions of examples of any specific switch in the below comments. I will add them accordingly.