

Step by step procedure to add disk in Linux machine

In this article, we will walk you through steps to add a new disk in the Linux machine. Adding a raw disk to the Linux machine may vary depending upon the type of server you have but once the disk is presented to the machine, the procedure of getting it to mount points is almost the same.
Objective: Add a new 10GB disk to the server and create a 5GB mount point out of it using LVM and newly created volume group.
Adding raw disk to Linux machine
If you are using the AWS EC2 Linux server, you may follow these steps to add raw disk. If you are on VMware Linux VM you will have a different set of steps to follow to add disk. If you are running a physical rack-mount/blade server then adding disk will be a physical task.
Now once the disk is attached to the Linux machine physically/virtually, it will be identified by the kernel and then our rally starts.
Identifying newly added disk in Linux
After the attachment of the raw disk, you need to ask the kernel to scan a new disk. Mostly it’s done now automatically by the kernel in new versions.
First thing is to identify the newly added disk and its name in the kernel. There are numerous ways to achieve this. I will list a few –
- You can observer
lsblkoutput before and after adding/scanning disk to get a new disk name. - Check newly created disk files in
/devfilesystem. Match timestamp of file and disk addition time. - Observer
fdisk -loutput before and after adding/scanning disk to get a new disk name.
For our example, I am using the AWS EC2 server and I added 5GB disk to my server. here is my lsblk output –
[root@kerneltalks ~]# lsblk
NAME    MAJ:MIN RM SIZE RO TYPE MOUNTPOINT
xvda    202:0    0  10G  0 disk
├─xvda1 202:1    0   1M  0 part
└─xvda2 202:2    0  10G  0 part /
xvdf    202:80   0  10G  0 disk
You can see xvdf is our newly added disk. Full path for disk is /dev/xvdf.
Add new disk in LVM
We are using LVM here since its widely used and flexible volume manager on the Linux platform. Make sure you have lvm or lvm2 package installed on your system. If not, install lvm/lvm2 package.
Now, we are going to add this RAW disk in Logical Volume Manager and create 10GB of mount point out of it. List of commands you need to follow are –
If you are willing to add a disk to the existing mount point and use its space to extend mount point then vgcreate should be replaced by vgextend.
Sample outputs from my session –
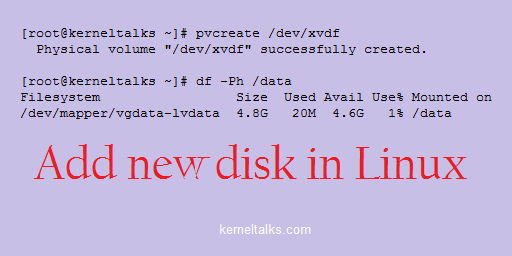
[root@kerneltalks ~]# pvcreate /dev/xvdf
  Physical volume "/dev/xvdf" successfully created.
[root@kerneltalks ~]# vgcreate vgdata /dev/xvdf
  Volume group "vgdata" successfully created
[root@kerneltalks ~]# lvcreate -L 5G -n lvdata vgdata
  Logical volume "lvdata" created.
Now, you have a logical volume created. You need to format it with the filesystem on your choice and mount it. We are choosing ext4 filesystem here and formatting using mkfs.ext4 .
[root@kerneltalks ~]# mkfs.ext4 /dev/vgdata/lvdata
mke2fs 1.42.9 (28-Dec-2013)
Filesystem label=
OS type: Linux
Block size=4096 (log=2)
Fragment size=4096 (log=2)
Stride=0 blocks, Stripe width=0 blocks
327680 inodes, 1310720 blocks
65536 blocks (5.00%) reserved for the super user
First data block=0
Maximum filesystem blocks=1342177280
40 block groups
32768 blocks per group, 32768 fragments per group
8192 inodes per group
Superblock backups stored on blocks:
        32768, 98304, 163840, 229376, 294912, 819200, 884736

Allocating group tables: done
Writing inode tables: done
Creating journal (32768 blocks): done
Writing superblocks and filesystem accounting information: done
Mounting volume from new disk on mount point
Lets mount the logical volume of 5GB which we created and formatted on /data mount point using mount command.
[root@kerneltalks ~]# mount /dev/vgdata/lvdata /data
[root@kerneltalks ~]# df -Ph /data
Filesystem                 Size  Used Avail Use% Mounted on
/dev/mapper/vgdata-lvdata  4.8G   20M  4.6G   1% /data
Verify your mount point with df command as above and you are all done! You can always add an entry in /etc/fstab to make this mount persistent over reboots.
You have attached a 10GB disk to the Linux machine and created a 5GB mount point out of it!