Yearly Archives: 2020

Creating first AWS Lambda function

A quick article explaining all available options for creating a new AWS Lambda function and how to run it.

Learning AWS Lambda!

AWS Lambda is a compute service offered by AWS. It is treated as a serverless compute since the end-user did not have to worry about providing and maintaining the back-end infrastructure. Without further delay, let’s move ahead with creating the first AWS Lambda function.

  • Login to AWS Lambda console.
  • Click on the Create function button.
  • You should see wizard as below –
Lambda function wizard

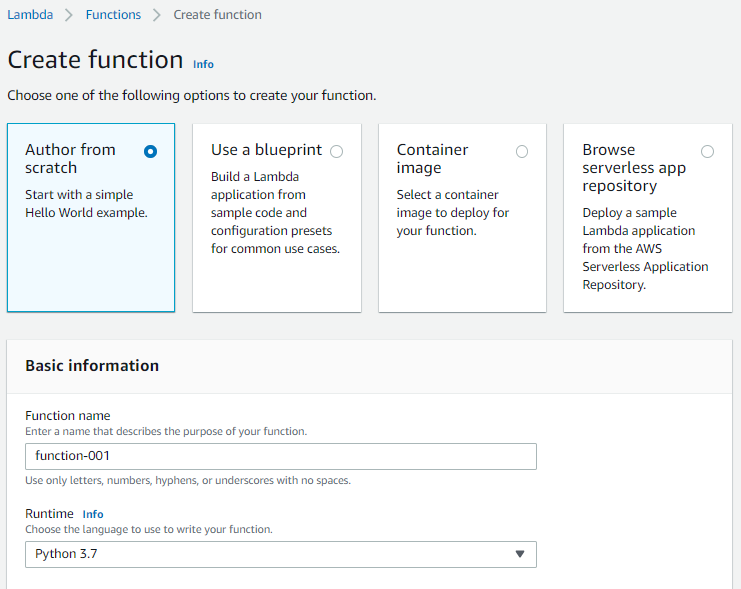
There are 4 ways you can choose to create AWS Lambda function –

  1. Author from scratch: Select the programming language of your choice and start writing the function code
  2. Use a blueprint: Use readymade function pre-written for you by AWS.
  3. Container image: Use a docker container image to deploy function
  4. Browse serverless app repository: Use complete application pre-written in Lambda.
  • Basic information
    • Function name: For identification purpose
    • Runtime: Function’s coding lanuage. Select a supported language from the dropdown.
    • Permissions: Arrange the Lambda function IAM role to access AWS resources on your behalf.
AWS Lambda roles

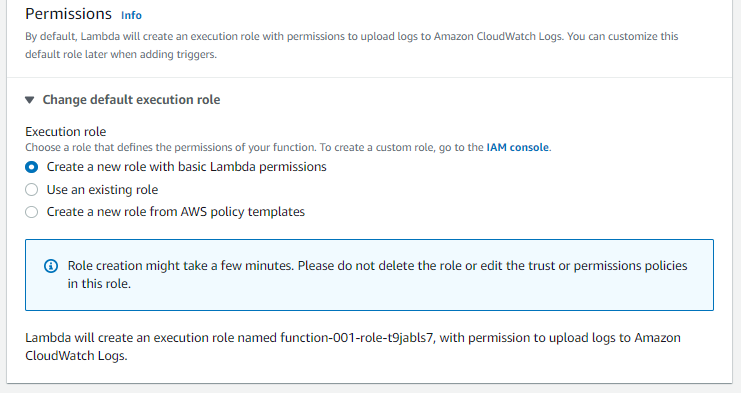
You can either use an existing role or let the wizard create a default permission role. If your code requires special permissions, it’s recommended to create a new role using policy templates to ensure that function has sufficient privileges to access AWS resources.
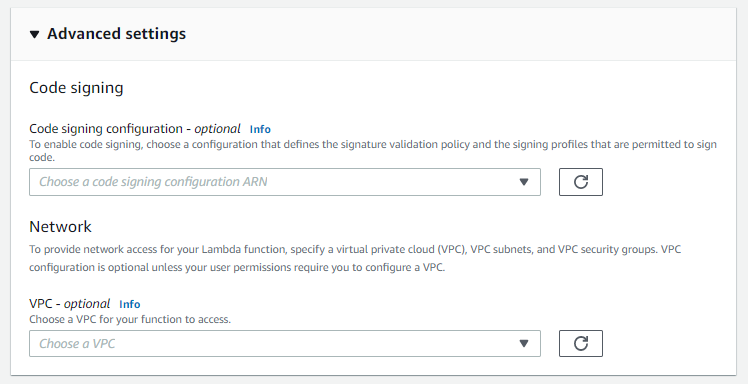
Advanced settings
  • Advanced settings
    • Code signing: To ensure the integrity of the code and its source.
    • Network: If function expected to have network access, then select VPC here and hence in turns select subnet, security group which will be applicable to function when it runs.

Click the Create function button.

Function created!

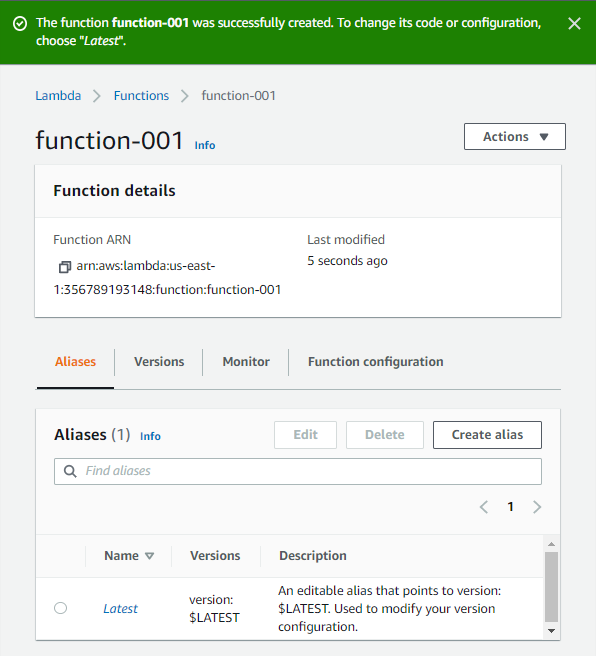
AWS Lambda function should be created. Click on the Latest alias to edit your code and test it.

Edit lambda code

In latest alias, there are 5 tabs you can navigate.

  1. Overview: Overall details.
  2. Code: Edit code and code-related configurations.
  3. Test: Invoke test event for the Lambda function
  4. Monitor: Monitoring aspects in context to Cloudwatch
  5. Latest configuration: Various Lambda function related configurations.

Lets have a look at all these tabs one by one.

  • Overview
    • General configuration: Shows description, last modified, and Function ARN.
    • Function visualization: Visual representation of a function.
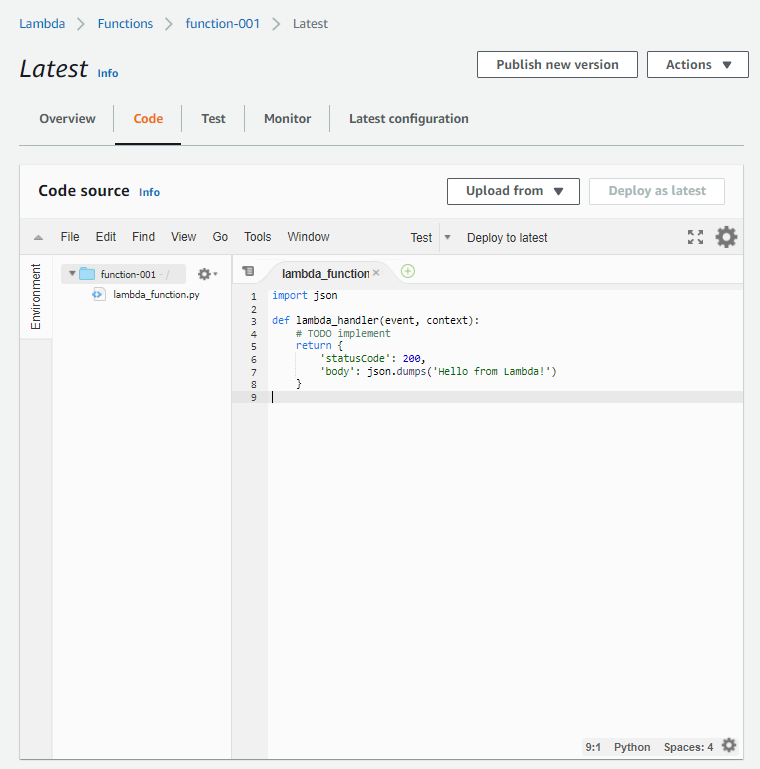
  • Code
    • Code Source: In browser code editor. You can upload the code in a zip file or reference it from the S3 location.
    • Runtime settings: Edit the code language.
    • Code signing details: Edit code signing for code integrity.
    • Layers: Edit or add layers to function.
  • Test
    • Test event: Create, format, or invoke test event.
  • Monitor
    • View CloudWatch metrics or CloudWatch logs insights.
  • Latest configuration
    • This is the biggest section of all. It has 5 subsections
      1. General
      2. Environment
      3. Triggers
      4. Permissions
      5. Destinations

Lets go through each section one by one:

  • General
    • Basic settings: Edit below configurations
      • Description
      • Memory (MB): Memory allocated to function. CPU will be allocated in proportion to memory.
      • Timeout: Max execution time. Limit: 15 mins.
      • Execution role: IAM role being used by the function.
    • Asynchronous invocations:
      • Maximum age of event: To keep the unprocessed event in the queue.
      • Retry attempt: Maximum number of retries after the function returns an error.
      • Dead letter queue: SQS queue for sending unprocessed events for asynchronous invocations.
    • Monitoring tools
      • Amazon CloudWatch: By default enabled for AWS Lambda
      • AWS X-ray: For analysis and debug purposes.
      • CloudWatch Lambda insights: Enhanced monitoring.
    • VPC
      • Edit VPC, subnet, security group for Lambda function if function required networking.
    • State machines
      • Step functions to orchestrate Lambda function.
    • Database proxy
      • Manage database connections if the function requires DB connectivity.
    • Filesystem
      • Make EFS available to Function.
  • Environment
    • Environment variables: Set of key-value pairs to use as environment variables in function during execution.
  • Triggers
    • Add triggers to invoke the lambda function.
  • Permissions
    • IAM permissions via role or resource-based policies
  • Destinations
    • Configure destination for invocation records once function executes.

Since its a test function, I move ahead with all the defaults. Once everything is configured you are ready to test the fuction.

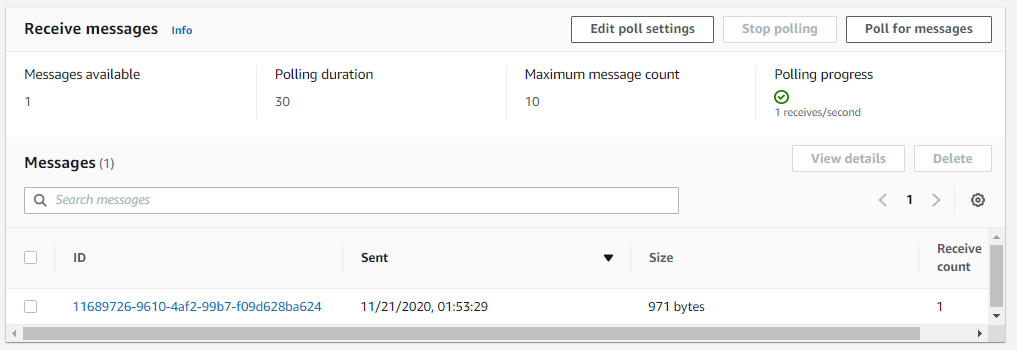
Click on the Test tab and then click the Invoke button to invoke the Lambda function test event.

Invoking test event

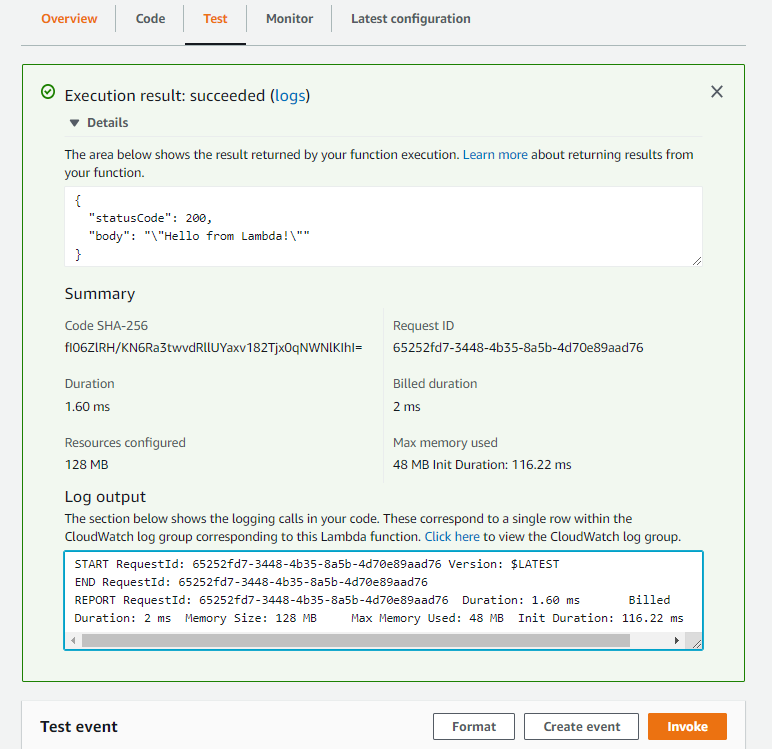
Test invokation results presented on same screen. The important details to look for are –

  • Returned results by function
  • Duration: Actual execution time
  • Billed Duration: Billed execution time. Rounded to nearest 1ms.
  • Max memory used

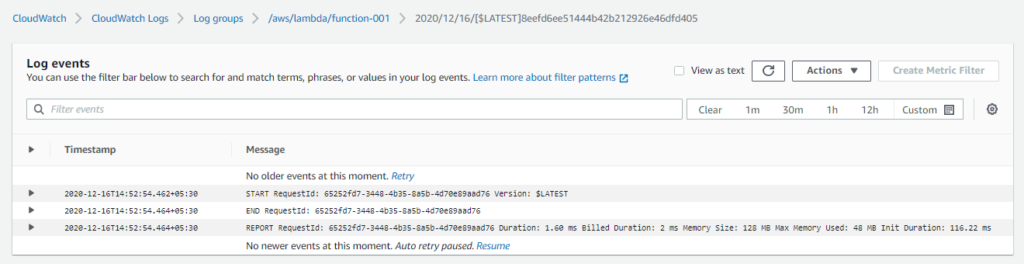
The log output at the end can also be viewed in CloudWatch log group.

CloudWatch log group for Lambda

The bill amount is calculated using the amount of memory allocated and billed duration.

So that’s how you configure and execute simple basic Lambda functions for understanding the foundation of AWS Lambda!

Replication in Amazon S3

An article to overview SRR and CRR in Amazon S3. Why, when, and how to use it.

Replication in amazon S3.

Amazon S3 is a Simple Storage Service offered by AWS. It’s object storage with virtually unlimited in size. S3 also offered the feature of replication to replicate objects from one bucket to another bucket. The bucket is a placeholder for arranging objects in S3. It can be visualized as a root folder in the file structure.

What is replication in Amazon S3?

Replication is a process of copying objects and their metadata from a source bucket to a destination bucket in an asynchronous way in the same or different region.

Why S3 replication is needed?

There are couple of use cases where S3 replication can prove helpful –

  1. Compliance: Some customers need to keep a copy of data in a particular territory for compliance purposes. In such cases, S3 replication can be set to copy data into the destined region.
  2. Data copy under different regions and accounts: S3 data replication enables users to copy data in different regions and under different accounts.
  3. Latency requirement: Keeping a copy in a region close to consumers helps to achieve low latency in accessing data stored in S3.
  4. Objects aggregation: Data from different buckets can be aggregated into a single bucket using replication.
  5. Storage class requirement: S3 replication can directly put objects in Glacier 9diff storage class) in the destination bucket.

Types of S3 replications

  • Same-Region Replication (SRR)
    • Source and destination buckets lie within the same region.
    • Used in case data compliance requires the same copy of data to be maintained in different accounts.
    • Log aggregation can be achieved using SRR by setting up SRR from different log buckets to the same destination bucket.
  • Cross-Region Replication (CRR)
    • Source and destination bucket lies in different regions.
    • Used in case data compliance requires the same copy of data to be maintained in different regions.
    • Useful in latency requirements.

Requirements and limitations of Amazon S3 replication

  • Versioning must be enabled at source and destination buckets.
  • Existing files are not replicated. Only new uploaded objects (after enabling replication) are replicated.
  • Delete markers created by lifecycle rules are not replicated.
  • You can’t replicate objects which are encrypted using SSE-C.
  • Can set up across accounts.
  • It’s one-way replication, not bidirectional. It means source bucket to destination and not vice versa.
  • Lifecycle policy events are not replicated.
  • Amazon S3 should have access to read/write on both buckets by assuming your identity.
  • The destination bucket can not be configured with requestor pays mode.

How to configure S3 replication?

Let’s dive into the practical aspects of it. We will be configuring replication between 2 buckets hosted in different regions under the same account for this exercise. Read here how to create an S3 bucket. Below are 2 buckets in consideration –

Source and destination bucket
  • Log in to the S3 console.
  • Click on Buckets in the left navigation panel.
  • On the buckets page, click on the bucket name you want to create replication (source bucket).
Creating replication rule for source bucket
  • Click on the Management tab under bucket details.
  • And scroll down to the Replication rules section.
  • Click on the Create replication rule button.

Make sure you have versioning enabled on both source and destination buckets, or else you will see a warning like the one below –

Bucker versioning warning

In replication rule configuration wizard –

Replication rule wizard
  • Replication rule configuration
    • Replication rule name: Name
    • Status: Enable/disable the rule on creation
    • Priority: In the case of multiple replication rules, the object follows priority.
Source and destination configurations
  • Source bucket
    • Source bucket name: Prepopulated.
    • Source region: Region of source bucket. Prepopulated.
    • Choose a rule scope: Replication can be limited to selected objects by using a prefix filter. Or apply it for all objects in the bucket.
  • Destination
    • Bucket name: Choose bucket from the same account or a different account here as a destination.
    • Destination Region: Region of destination bucket.
Few other configs
  • IAM role
    • Select the IAM role to be used by S3 for performing the copy operation. Make sure you have carefully added proper permissions to it. I choose to create new for this exercise.
  • Encryption
    • If data is encrypted using AWS KMS, it can be replicated.
  • Destination storage class
    • Change the storage class of replicated objects or keep it the same as the source.
Additional options
  • Additional replication options
    • RTC: Premium service with guaranteed 15 mins ETA for replication of new objects
    • Replication metrics and notifications: Cloudwatch for replication!
    • Delete marker replication: Enable to replicate S3 delete operation created delete markers. Remember lifecycle rule created delete markers can not be replicated.

Click the Save button. Replication rule should be created and you should be presented with rule details like below –

Replication rule details

You can even see the IAM role created by AWS while creating a rule since we opt to create one.

Now, it’s time for the test. I had one file already in the source bucket, and it’s not replicated after creating the rule since it’s only applied to new objects uploaded to the source bucket after rule creation.

Source bucket objects

File1.text was existing before rule creation and File2.txt uploaded after rule creation. So the destination bucket should be having File2.txt replicated from the source bucket.

Destination bucket objects

And its there! So replication rule worked perfectly!

How to check if object is replicated?

To verify if the object is replicated or not. Click on the object and check its replication status.

Replication status as REPLICA

For replicated object replication status should show it as REPLICA. Whereas, for source object i.e., who uploaded to source object and then got replicated status is COMPLETED

Replication status as COMPLETED

And it would be blank for non-replicated objects. Since File1.txt was uploaded before replication rule creation, the rule was not applied to it.

No replication status

And hence we see its replication status as - i.e., no replication rules applied to this object.

How to create a user with programmatic access in AWS

A quick post with step by step procedure to create a new IAM user in AWS with programmatic access. Also, learn how to re-generate access keys.

IAM user creation!
  • Login to AWS IAM console
  • On the left navigation panel, click on the Users link.
  • On the right-hand side Users page click on the Add user button.
  • Add user screen should come up –
IAM Add user wizard.

Fill in details –

  • User name: User id
  • Access type:
    • Programmatic access: No access to AWS console. Use of keys for authentication. Console access can be enabled later.
    • AWS management console access: Access to AWS console Use of userid/password authentication. Programmatic access can be enabled later.
  • Click on the Next: Permissions button.
Setting user permissions
  • Set permissions
    • Add user to group
      • An efficient way to manage user permissions by making them members of the group. Apply policies/permissions to the group!
    • Copy permission from an existing user
      • If you want to have user same permission as another existing user in the same account.
    • Attach existing policies directly
      • Attach permission policy to user either AWS managed policy from the list given or by writing your own policy by clicking Create policy button.

For this exercise, I will choose an easy way by marking AWS managed Administrator access policy to users.

  • Set permission boundary
    • Define the maximum permissions this user can have. User’s permissions can not breach the boundary defined here. Again you can create your own or use AWS managed policy here.

Click on Next: Tags button

User tags

Add user tags for identification purpose and click on Next: Review button.

Review

Review all the configurations and click on Create user button.

IAM user created

User should be created and you should be seeing above screen.

From this screen, you can copy or download the keys required for AWS programmatic access.

Click on the Download .csv button to download the key pair. Or click on Show link under the Secret access key and then copy/save both the Access key ID and Secret access key. Once you navigate away from this page, you will not be able to retrieve the secret access key from anywhere. You need to recreate the pair for this user then.

You have successfully created an IAM user with programmatic access to AWS. You have access keys with you!

How to re-create IAM secret access keys?

As I mentioned above, if you lose the secret access key there is no way to retrieve it unless you saved it somewhere. But in such unfortunate incidents, you can re-create them using an AWS root account.

  • Login to AWS IAM console using the root account
  • On the left navigation panel, click on the Users link.
  • On the right-hand side users page, click on the user name whose keys needs to be regenerated
  • On users, summary page click on the Security credentials tab
Access keys in IAM console

It’s good practice to keep only one key pair active at a time so click on the Make inactive link for the existing key. You can keep it unless there is such a requirement. Click the Deactivate button on the pop-up. You can even delete this key 9if it does not have any dependency) by clicking a small x next to it.

Click on Create access key button to generate new key pair.

Create new access keys

New key pair will be generated and you will have a chance to download/copy save the secret access key again!

How to create an Amazon SQS queue and test with Amazon SNS?

The step by step procedure to create an Amazon SQS queue and later test it with Amazon SNS.

Testing Amazon SQS queue!

What is an Amazon SQS?

Amazon SQS (Simple Queue Service) is the very first AWS service. It’s a message queueing service that helps with decoupling the architecture. It’s widely used in microservices designs. It’s a poll based service. So basically, it receives messages from some source, maintains messages in the queue for consumers to poll for it, consume it, and delete it after processing.

Using SQS, one need not keep consumer compute/infrastructure up and running all the time. SQS takes care of buffering and queueing messages, and consumers can poll them once a while, processes them, and exists/shuts them till the next poll. It also holds messages if consumers are not available or busy and scales accordingly, so you don’t lose any messages.

Amazon SQS offers two types on queue and their differences are as below –

Standard QueueFIFO Queue
Default SQS queueFirst in first out queue
Messages order is not preservedPreserved messages order which is first in first out
message can be processed twiceEach messages processed exactly once
It can scale indefinitelyIt can processes 3000 messages per seconds only
Best fit for scaling and high throughput requirementBest fit where order is important and duplicates cant be tolerated
No naming restrictionsQueue name must ends with .fifo suffix.

Lets dive into creating our first SQS queue.

How to create Amazon SQS queue?

  • Log in to an Amazon SQS dashboard
  • Click on the Create queue button on the introduction page.
  • Create a queue wizard should open up –
Create queue screen
  • Details
    • Choose the type of queue
      • Standard
      • FIFO
    • Name: Enter the queue name. For the FIFO queue, the name should have a .fifo suffix.
SQS queue configuration
  • Configuration
    • Visibility timeout: Time for which message won’t be visible to other consumers when picked up by consumer for processing. Range 0 secs to 12 hours
    • Messages retention period: Duration for which messages live in the queue if not deleted by any consumers. Range 1 min to 14 days
    • Delivery delay: Time for which message won’t be visible to consumers to pick once the queue receives it. Range 0 sec to 15 min. 0 means the message will be available immediately for processing once received by the queue.
    • Maximum message size: Message size. Range 1KB to 256KB
    • Receive message wait time: Max time for polling to wait for messages to be available. 0 means short polling (increases empty responses), and 20 means long polling—range 0 to 20 secs.
SQS queue access policy
  • Access policy
    • Basic
      • Simple bullet selections for access to send and receive messages to/from the queue. JSON will be generated accordingly.
    • Advanced
      • Use your own JSON to define policies
SQS optional settings

Three optional configurations for SQS queue.

  • Encryption: Server-side encryption offered by AWS.
  • Dead-letter queue: Home for undeliverable messages.
  • Tags: For identification purposes.

Click on Create queue button.

SQS should create a queue and present you with queue details.

SQS queue created!

You can click on the Send and receive messages button to manually send, receive, and delete messages in this queue.

Send message to SQS queue manually

Enter the message body and click on the Send message button. The message will be sent to the SQS queue.

If you scroll down on the same screen, you can click the Poll for messages button and receive the messages from the SQS queue you sent in the earlier step.

Receive message from SQS queue manually

Click on message ID to view message details. Under the message body tab, you can see the message body.

Message details

Once messages are processed (i.e., read in our case), you can delete messages from the queue by choosing a message and clicking the Delete button.

Sending messages to SQS queue from SNS

We walked through sending and receiving messages manually to and from the SQS queue. Now we will do it using SNS. SNS is a Simple notification Service offered by AWS. SNS topics are the channels where you publish messages for recipients. It’s a push-based service.

I already created an SNS topic named sns-topic-001 to which the SQS queue will be subscribed.

On an SQS queue details page click on the Subscribe to Amazon SNS topic button.

Subscribing SQS to SNS Topic

You should be able to select the existing SNS topic from the drop-down on the next page.

Choosing SNS topic for subscription

Click Save button.

  • Login to the SNS dashboard
  • Click on the Topic you created
  • In the Topic details screen, click on the Publish message button.
  • Make sure you see the SQS queue under Subscriptions.
SNS Topic details

Fill in message details like Subject and body and click the Publish message button.

Publish message to SNS Topic

Now the message is published to the SNS topic. We have an SQS queue that is subscribed to SNS Topic. That means this published message should appear in the SQS queue.

Lets go back to SQS queue and check for it.

SNs message received in SQS

You should see 1 message available to receive in SQS. And when you click the Poll for messages button, you will see that message in the messages details section below.

If you check message body you will see all SNS formatted message details.

Message details

In this way, you can check the SQS queue’s functionality by sending and receiving messages manually or using SNS Topic. You can even receive messages automatically using the Lambda function and then publish it to another SNS Topic, which can mail it to you for testing! We might cover this in another article. But this is it for now!

Know different Load Balancers in AWS

A quick post about different types of load balancers in AWS and the difference between them.

Elastic Load Balancers in AWS!

AWS offers a load balancing feature under EC2 compute service. It offers basically 4 types of load balancers :

  1. Application Load Balancer
  2. Network Load Balancer
  3. Gateway Load Balancer
  4. Classic Load Balancer

We will quickly go through them one by one and finally compare them with each other.

Application Load Balancer

  • It’s a Layer 7 load balancer. Operates at the application layer.
  • Aimed to handle HTTP and HTTPS traffic
  • It is capable of routing based on path patterns.
  • SSL can be offloaded to it. Supports SNI.
  • Even authentications can be offloaded to it.
  • Targets can be EC2, Lambda, and IP addresses.
  • Step by step ALB creation

Network Load Balancer

  • It’s a layer 4 Load Balancer. Operates at the transport layer.
  • Aimed to handle TCP, UDP, and TLS traffic
  • Uninterrupted end to end encryption till target
  • Ultra-low latency load balancers capable of handling millions of requests per second.

Gateway Load Balancer

  • It’s a Layer 3 Load Balancer. Operates at the network layer.
  • Aimed to handle virtual appliances traffic on GENEVE protocol.
  • Scale virtual appliances like Firewalls, IDP, etc. using this LB

Classic Load Balancer

  • It’s a combination of ALB and NLB offered by AWS formerly (with reduced features).
  • New deployments should not be using it.
  • Its existence is only for compatibility for old EC2-Classics running customers.

Lets compare all 4 Elastic Load Balancers side by side –

ALBNLBGLBCLB
OSI model layer7437 and 4
Protocol supportedHTTP, HTTPSTCP, UDP, TLSGENEVEHTTP, HTTPS, TCP
Supports static IP for ELBNo, only DNS nameYesNoNo, only DNS name
SSL offloadingYesYes (TLS termination)NoYes
SNI supportYesYesNoNo
Authentication offloadingYesNoNoNo
End to end encryptionNo if using SSL offloadingYesNoYes
Sticky sessionsYesYesYesYes
Path patternsYes
Cross zone load balancingEnabled by defaultYesYesDisabled. Enable it manually
Type of registered targetsInstance, Lambda, IPInstance, IPInstance, IPInstance,IP
Use casesWebsites, web applicationsApplication requiring low latency load balancingLoad balancing or scaling virtual appliances for IDP, firewall etc.Web applications.

I mentioned the commonly used features comparison above. Amazon published a very good comparison of all load balancers on this page.

Creating Application Load Balancer in AWS

A step by step procedure to create an application load balancer for a web application.

Application Load Balancer creation in AWS!

This article will walk you through the steps to create an application load balancer and then testing. ELB can be used in Amazon ECS as well, but for this exercise, we will be using the below architecture, which is running webservers on EC2, not in containers. Its a subset of our custom VPC

ALB design

We have 2 EC2 instances running Apache webserver in 2 different public subnets. Application Load Balancer will receive traffic from the internet and forward it to the back-end EC2 instances.

Lets dive into ALB creation procedure –

  • Log in to the EC2 dashboard.
  • On the left navigation panel, click Load Balancers under the Load Balancing section.
  • On the load balancer page, click on the Create Load Balancer button.
  • You should be seeing load balancer creation wizard –
Choosing load balancer

Here you need to select type of load balancer to create:

  1. Application load balancer: For load-balancing HTTP, HTTPS web traffic.
  2. Network load balancer: For load balancing TCP, TLS, UDP network traffic.
  3. Gateway load balancer: For load balancing virtual appliances traffic over GENEVE.
  4. Classic load balancer: Old ELB tech.

Click on the Create button under the Application load balancer to proceed. Load balancer configuration wizard should open up.

ALB basic config

Fill in details –

  • Name: Name for ALB.
  • Scheme: Choose internet-facing since we are configuring the web load balancer.
  • IP address type: Select the addressing type.
  • Listeners: Choose HTTP with port 80. If your application is on HTTPS, then select accordingly.
ALB AZ config
  • VPC: Select VPC under which ALB will be deployed.
  • Availability zones: Select minimum 2 for HA. If you are creating internet-facing ALB, then subnets should have a route to the internet gateway, i.e., public subnets. You can select only one subnet per AZ.
  • AWS Global accelerator: For performance. This is part of integrated service and can be modified later as well.
  • Tags: Tagging.
  • Click on the Next: Configure Security Settings button at the end.

Since HTTP was selected in the basic configuration, a security notice should appear.

HTTP notice

Click again on the Next: Configure Security Settings button in the end to proceed.

ALB SG

Create new or select an existing security group for ALB. We are selecting here existing SG, which allows HTTP traffic.

Click on Next: Configure Routing button.

ALB routing

In the routing section, we are configuring the destination for ALB. Here, ALB will come to know where it needs to direct traffic once it receives the traffic. As per our design, we are going to direct traffic to 2 EC2 instances.

  • Target group
    • Target Group: Create new or use existing. It’s a collection of resources acting as targets for ALB.
    • Name: for identification.
    • Target type: In our case, its instance.
    • Protocol: HTTP or HTTPs
    • Port: Depends on your web application listening port. I am using the default web server listening on port 80
    • Protocol version: Again depends on the web application.
  • Health checks
    • Protocol: To be used by ALB to perform health checks on the target type.
    • Path: ALB will reach out to this path using the mentioned protocol to determine health or target.
  • Advanced health check settings
    • Port: Communication port for a health check.
    • Healthy threshold: Number of consecutive successful health check before marking any unhealthy target as healthy. Range 2-10.
    • Unhealthy threshold: Number of consecutive failed health checks to mark a target as unhealthy. Range 2-10.
    • Timeout: If no response is received within this timeframe, mark the health check as failed. Range (2-120 secs)
    • Interval: Time between health checks (5-300 secs)
    • Success codes: HTTP code to be received back for marking health check as a success.

Click on Next: Register Targets button.

Registering targets

As you can see, we have 2 EC2 instances running in different zones that are available to register as a target for ALB. Meanwhile, also verify that both instances are serving the webpage properly.

Verifying webservers

Both our webservers are serving different webpages (to test on ALB later). We verified it by using the public Ip of the EC2 instances.

Now, select instances serving web traffic and click on the Add to registered button.

Target registered

Both targets should be registered and list under the registered target list. Verify and then click the Next: Review button.

ALB config review

Review all configurations and click on Create button.

ALB creation completed!

You should be seeing success message like one above.

Click the Close button, and it will take you to the load balancers page. In here, newly created application load balancers should be listed, and mostly it’s in provisioning state. After a couple of minutes, it should go into an Active state once at least one target passes the health check.

ALB details

Once ALB is active, grab the DNS name from the ALB details screen and load it in the browser. It should populate the webpages from either of the EC2 targets.

Testing ALB

The above small GIF shows the same ALB DNS loads web page from different backend targets. I created distinct web pages to identify the difference and functionality of ALB. In the real world, it should be serving the same page as any of the backend targets.

That’s it! We created an Application load balancer that serves the webpage from different backend servers!

Assorted list of resources to ease your AWS tasks

Assorted list of resources to help you with your work in AWS!

Swiss knife for AWS tasks!

In this post, I will quickly run down the assorted list of different software, tools, or online resources that will help you with your AWS journey. So without further delay, let’s jump into it.

AWS Native tools

AWS console related

AWS architecting

  • AWS Architecture Icons: List of supported drawing and diagramming tools and download links for Icons assets and toolkits. It’s very much helpful in designing presentable diagrams with updated, latest AWS icons. Every architecture’s must-have resource!
  • Draw.io: Create architecture diagrams with draw.io
  • Visual subnet calculator: Easy way to slice up your CIDR block into the required number of subnets.
  • CIDR Range Visualizer: An interactive CIDR IP addressing visualizer webpage!
  • AWS EC2 instances info: Single place to look at all EC2 instances, filters, costing, etc.

CLI lovers

Infrastructure coding

  • Visual Studio Code: Most favoured and loved software for all coding you do on your computer. Supports almost all languages and clouds. Allows you to connect to your cloud and run your code from the software window itself.
  • cfn-lint plugin: Cloudformation Linter plugin for Microsoft Visual Studio Code.
  • InfraCost: cloud cost estimates on the terraform pull requests!

The list can grow on and on. I just collected a few of them here to start with. Let me know your additions in the comments down below!

The Container configurations in Amazon ECS

A quick post on advanced container configurations in Amazon ECS.

ECS container advanced configurations.

Container definitions are part of Task Definitions in Amazon ECS. It’s the configuration where you can customize the container’s infrastructure aspects. In this article, we will walk you through advanced configurations of containers.

In our last article about Task Definitions, we walked you through standard container configurations. Now, we will check all the parameters available in Advanced container definitions.

Read more about Amazon ECS –

The first advanced configuration is health check:

Container healthcheck
  • Healthcheck
    • Command: It will be run within containers to determine if the container is healthy. Since I am spinning up a webserver I used the curl command. It depends on what kind of container is and how you can determine its health.
    • Interval: Duration of two consecutive health checks. (Range: 5-300, default: 30)
    • Timeout: Duration to wait to check health check once it’s executed. (Range: 2-60, default: 5)
    • Start period: Grace period for the container to recover before it can be marked unhealthy after max health check retries. (Range: 0-300)
    • Retries: Max number of failed health checks to mark containers as unhealthy and terminate. (Range: 1-10, default: 3)
Container environment
  • Environment
    • CPU Units: 1 CPU core of ECS instances = 1024 CPU units. These are units of CPUs allocated for the container.
    • GPUs: Number of GPU units reserved for containers. 1 GPU = 1 unit. ECS instances must be GPU supported.
    • Essential: If this is checked, the task will be marked as failed on the failing of this container. If unchecked, the task will continue to run even if this container is failed.
    • Entry Point: Its Dockerfile ENTRYPOINT command.
    • Command: It’s the same as CMD option in Dockerfile.
    • Working directory: WORKDIR from Dockerfile.
    • Environment Files: Source container environments saved in S3.
    • Environment variables: Key-value pairs of variables to be used by the container.
Container timeout and network settings
  • Container timeouts
    • Start timeout: Duration to wait for the container to resolve all dependencies to become fully operational
    • Stop timeout: Duration to wait for the container to exit normally or kill it after this timeout.
  • Network settings
    • Disable networking: No communication outside of the container. The container will be assigned with a loopback address.
    • Links: To communicate with other containers.
    • Hostname: Hostname for the container.
    • DNS servers: To be used by the container
    • DNS search domains: To be used by containers.
    • Extra hosts: Any entry not resolvable by the above two options can be added here.
Container storage and logging
  • Storage and logging
    • Read only root file system: RO for root FS in the container. If mounted it will be able to write on data volumes.
    • Mount points: Data volumes to be mounted inside the container
    • Volumes from: Data volumes from other containers
    • Log configuration: Loggings container logs in AWS CloudWatch
Rest of the configs
  • Security
    • Privileged: Container gets elevated privileges on container instances
    • User: To be used inside the container
    • Docker security options: SELinux and AppArmor security settings to be passed to the container
  • Resource Limits
    • Ulimits: Those are Linux kernel ulimit values.
      • CORE: Limites the core file size (KB)
      • CPU: Max CPU time (MIN)
      • FSIZE: Maximum filesize (KB)
      • LOCKS: Max file locks user can hold
      • MEMLOCK: Max locked-in-memory space (KB)
      • MSGQUEUE: Max memory used by POSIX messages queue (bytes)
  • Docker labels
    • Key value pairs: Tags

Once I run the Task containing the above container definition, it ran successfully. All the custom configurations can be seen in the AWS console. under Task details.

Container details under running task in Amazon ECS

Alternatively, we can log into the ECS instance and then a container to verify stuff.

Checking container on ECS instance

First verify if the container is running.

[ec2-user@ip-10-0-0-122 ~]$ docker container ls
CONTAINER ID        IMAGE                            COMMAND                  CREATED              STATUS                                 PORTS                   NAMES
2c2267e6ce85        nginx:latest                     "/docker-entrypoint.…"   About a minute ago   Up About a minute (health: starting)   0.0.0.0:32768->80/tcp   ecs-webserver-nginx-8-nginx-d28beae194c4eada5b00
9bb8f8b0b6ea        amazon/amazon-ecs-agent:latest   "/agent"                 2 minutes ago        Up 2 minutes (healthy)

Log in to container and verify if custom configurations are applied.

[ec2-user@ip-10-0-0-122 ~]$ docker exec -it 2c2267e6ce85 /bin/bash
root@kt-web-container:/usr/share/nginx/html# cat /etc/resolv.conf
search kerneltalks.com
nameserver 1.1.1.1
nameserver 8.8.8.8
options timeout:2 attempts:5
root@kt-web-container:/usr/share/nginx/html# cat /etc/hosts
127.0.0.1       localhost
::1     localhost ip6-localhost ip6-loopback
fe00::0 ip6-localnet
ff00::0 ip6-mcastprefix
ff02::1 ip6-allnodes
ff02::2 ip6-allrouters
10.2.3.4        xyz.com
172.17.0.2      kt-web-container
root@kt-web-container:/usr/share/nginx/html#

You can see container hostname is set, DNS nameservers are set, extra IP-hostname pair has been added to /etc/hosts, logged in user is the root and working directory is set to /usr/share/nginx/html! Everything is accommodated.

Last thing to verify if the container is sending logs to the CloudWatch service. Click on the link View Logs in CloudWatch under container details on the Tasks page. (can be seen in the above screenshot)

ECS container logs in CloudWatch

And logs are being populated in CloudWatch!

That’s all! All advanced container configuration which one can configure under Amazon ECS Task Definition.