A quick post for working on AWS using Visual Studio Code and terraform.

Install Terraform
Download the latest terraform software and install it on your machine. For windows, keep terraform.exe downloaded from this page in C:\Windows\System32 and that should be enough.
Install Visual Studio Code
Download Microsoft Visual Studio Code software from their website. Install and launch Visual Studio Code. It supports many code languages. But many of them are not supported on install. One needs to add extensions from the extension marketplace to make it available in VSC.
Install Terraform Visual Studio Code extension
The official Visual Studio Code extension for Terraform is HashiCorp Terraform. You can visit this link and click on the Install button on the webpage, which in turn opens up VSC and install the extension or follow the below procedure.
- Launch Visual Studio Code
- Click on the Extensions shortcut on the left navigation panel.
- Search terraform in extensions marketplace
- Select HashiCorp Terraform from search results
- Click the Install button.
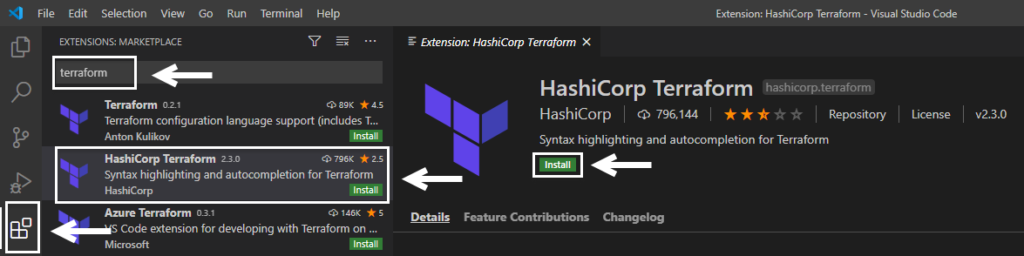
Once installed it will be available to use.
Login to AWS account for terraform
It’s programmatic access you will be configuring to AWS. So for that, you should create Access keys through the IAM AWS console. Once you are ready with a valid AWS account with programmatic access enabled and downloaded its access keys, head back to VSC.
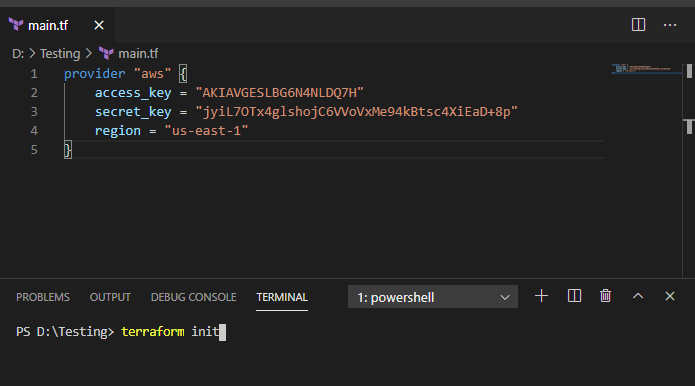
Create a new file main.tf with the below code for login. Make sure you use your own key values in there :
provider "aws" {
    access_key = "AKIAVGESLBG6N4NLDQ7H"
    secret_key = "jyiL7OTx4glshojC6VVoVxMe94kBtsc4XiEaD+8p"
    region = "us-east-1"
}
and in terminal below, run terraform init command.
Although hard coding credentials like this is not recommended, you can define them as environment variables or other methods supported by terraform.
This should initialize Terraform to use with AWS. It will download the AWS plugin for Terraform. Sample output –
PS D:\Testing> terraform init

Initializing the backend...

Initializing provider plugins...
- Finding latest version of hashicorp/aws...
- Installing hashicorp/aws v3.17.0...
- Installed hashicorp/aws v3.17.0 (signed by HashiCorp)

The following providers do not have any version constraints in configuration,
so the latest version was installed.

To prevent automatic upgrades to new major versions that may contain breaking
changes, we recommend adding version constraints in a required_providers block
in your configuration, with the constraint strings suggested below.

* hashicorp/aws: version = "~> 3.17.0"

Terraform has been successfully initialized!

You may now begin working with Terraform. Try running "terraform plan" to see
any changes that are required for your infrastructure. All Terraform commands
should now work.

If you ever set or change modules or backend configuration for Terraform,
rerun this command to reinitialize your working directory. If you forget, other
commands will detect it and remind you to do so if necessary.
The next step is scanning existing AWS infra to give an account to make the terraform aware of it. Execute the terraform plan command. This command now will use the access keys defined in the file, login to AWS, and check the existing infra.
PS D:\Testing> terraform plan
Refreshing Terraform state in-memory prior to plan...
The refreshed state will be used to calculate this plan, but will not be
persisted to local or remote state storage.


------------------------------------------------------------------------

No changes. Infrastructure is up-to-date.

This means that Terraform did not detect any differences between your
configuration and real physical resources that exist. As a result, no
actions need to be performed.
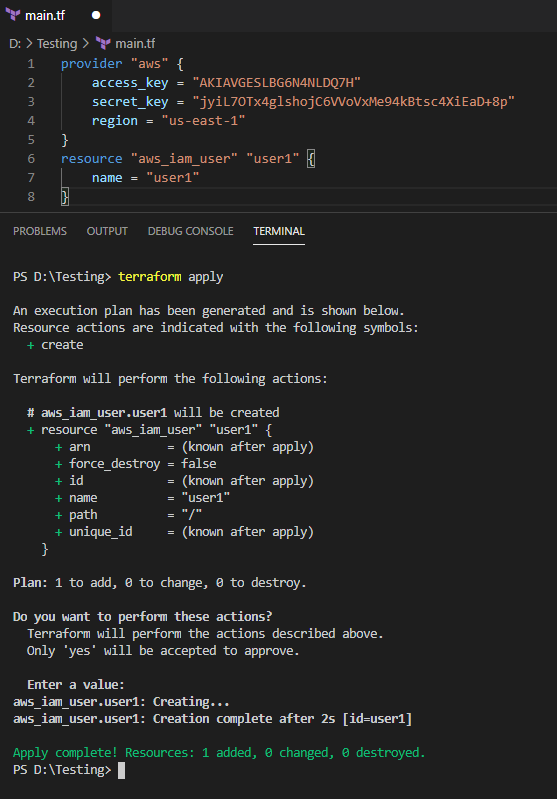
Creating sample user in AWS using terraform from Visual Studio Code
Now to test a small command, let’s define a user in the file. If that user existing in your AWS account, you should see the same output as above. If not, terraform should show that a new user needs to be created to match the file’s requirements.
Ensure the user you are using in terraform has permissions to create resources in AWS you are planning to.
Add below code in file, save and run terrafrom plan again.
resource "aws_iam_user" "user1" {
    name = "user1"
}
PS D:\Testing> terraform plan
Refreshing Terraform state in-memory prior to plan...
The refreshed state will be used to calculate this plan, but will not be
persisted to local or remote state storage.


------------------------------------------------------------------------

An execution plan has been generated and is shown below.
Resource actions are indicated with the following symbols:
  + create

Terraform will perform the following actions:

  # aws_iam_user.user1 will be created
  + resource "aws_iam_user" "user1" {
      + arn           = (known after apply)
      + force_destroy = false
      + id            = (known after apply)
      + name          = "user1"
      + path          = "/"
      + unique_id     = (known after apply)
    }

Plan: 1 to add, 0 to change, 0 to destroy.

------------------------------------------------------------------------

Note: You didn't specify an "-out" parameter to save this plan, so Terraform
can't guarantee that exactly these actions will be performed if
"terraform apply" is subsequently run.
As you can see, since testuser is not existing in AWS infra, it’s prompting to create one! To apply the changes, run the terraform apply command, and it will execute the operation.
Finally, to verify the user created run terrafrom show command.

Finally, to delete all resources being created by terraform, you can run terrafrom destroy command.
PS D:\Testing> terraform destroy
aws_iam_user.user1: Refreshing state... [id=user1]

An execution plan has been generated and is shown below.
Resource actions are indicated with the following symbols:
  - destroy

Terraform will perform the following actions:

  # aws_iam_user.user1 will be destroyed
  - resource "aws_iam_user" "user1" {
      - arn           = "arn:aws:iam::xxxxxxxxxxxx:user/user1" -> null
      - force_destroy = false -> null
      - id            = "user1" -> null
      - name          = "user1" -> null
      - path          = "/" -> null
      - tags          = {} -> null
      - unique_id     = "AIDAVGESLBG6PGBXZBT35" -> null
    }

Plan: 0 to add, 0 to change, 1 to destroy.

Do you really want to destroy all resources?
  Terraform will destroy all your managed infrastructure, as shown above.
  There is no undo. Only 'yes' will be accepted to confirm.

  Enter a value:
aws_iam_user.user1: Destroying... [id=user1]
aws_iam_user.user1: Destruction complete after 2s

Destroy complete! Resources: 1 destroyed.
It should ask confirmation and then proceed with deleting resources.
Share Your Comments & Feedback: