Category Archives: Config

File permissions in Linux

Learn Linux Unix: File permissions & ownership

Basic Linux and Unix fundamentals of file permissions and ownership. Learn what are they and how to set/edit them in different ways.

One of the basic fundamentals while learning Linux or Unix is file permissions and their ownership. One should be clear about what is file ownership is and what its permissions mean. in *nix world, everything is treated as file devices and directories too. Each file has its own owners and permissions. Permission data decides who can do which operations on that file.

Ownership :

Each file has two ownership details attached with it: Owner and group.

The owner is the user (listed in /etc/passwd) who owns that file. He must have created that file or previous owner of file/superuser made him the owner of that file. Owning a file means all owner level permissions are applicable to that user for that particular file.

A group is a group (listed in /etc/group) who has rights on that file. Group-level permissions are applicable to that group. This detail introduced so that a large number of people’s access can be managed for that file with only one set of permissions.

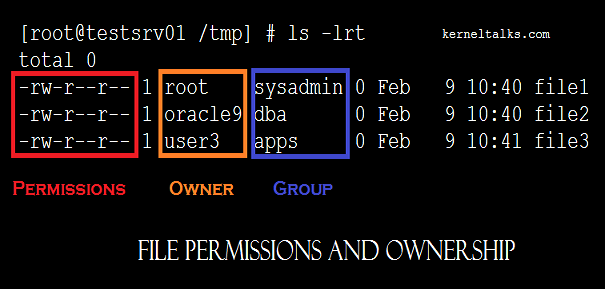
Files owner details can be seen in ls -lrt output  under 3rd and 4th column as below :

# ls -lrt
total 0
-rw-r--r-- 1 root    sysadmin 0 Feb  9 10:40 file1
-rw-r--r-- 1 oracle9 dba      0 Feb  9 10:40 file2
-rw-r--r-- 1 user3   apps     0 Feb  9 10:40 file3

In above example,

root, oracle9, and user3 are owners.
sysadmin, dba, and apps are groups.

Sometimes you see numbers instead of the owner or group. Those are orphaned files whose owner or group does not exist on the system.

How to change file ownership :

To change file ownership you have to use change owner (chown) command. The command should be supplied with a new owner and group along with a file name whose ownership needs to be changed.

# ls -lrt
-rw-r--r-- 1 user2 dba 0 Feb  9 10:40 file1
# chown root:sysadmin file1
# ls -lrt
-rw-r--r-- 1 root sysadmin 0 Feb  9 10:40 file1

Observe the example above how it changed owners. To run successful chown command, you must be the current owner of that file or you must be a superuser.

Permissions :

Permissions control how and who access the file and perform operations on it. There are 3 permissions parameters defined in *nix world: read, write, and execute. It has number representation as well.

  • Read permission denoted by 4 or r
  • Write permission denoted by 2 or w
  • Execute permission denoted by 1 or x

If you see, the above example again, the output’s first column is permission details. That is 10 character field which can be decoded as :

  1. File bit
  2. Read bit for owner
  3. Write bit for owner
  4. Execute bit for owner
  5. Read bit for the group
  6. Write a group for group
  7. Execute bit for the group
  8. Read bit for others
  9. Write bit for others
  10. Execute bit for others

File bit denotes the type of file. There are various values you can see here. Few are as below :

  • d : directory
  • - : file
  • l : Symbolic link
  • b : block device file

The rest are 3 sets of 3 bit each for the owner, group, and others. Others mean any user id which is not the owner or part of the specified group. For example -rw-r--r-- means its a file, which can be read & write by the owner and can only be read by group members, others. -rwxrwxrwx means read, write, and execute permissions to all!

Whenever a file is created, its default permissions are decided by umask value defined in the system.

How to change file permissions :

To change file permission, you need to use chmod command. You have the liberty to specify only one set of permissions (for user or group or others) or all three sets, use of character, or number representation of permissions and owners.

Below are few examples :

# chmod 744 file1      <<Set rwx to owner & read for group, owners
# chmod o+x file1      <<Adds execute permission for others
# chmod u+x,g+x file1  <<Adds execute permission for owner and group
# chmod u-x file1      <<Removes execute permission for owner

How to change directory permissions recursively 

Recursively means changing permission of all the files and directories upto depth 1 in directory. To change directory permission recursively you need to use switch -R along with chmod command followed by directory.

For example :

root@kerneltalks # chmod -R 755 /tmp/testdata
root@kerneltalks # ls -lrt /tmp/testdata
total 0
-rwxr-xr-x 1 root    sysadmin 0 Feb  9 10:40 file1
-rwxr-xr-x 1 oracle9 dba      0 Feb  9 10:40 file2
-rwxr-xr-x 1 user3   apps     0 Feb  9 10:40 file3

As you can see in the above output after changing permission recursively, all files within /tmp/testdata directory changed permissions to 755.

6 ways to check Linux kernel version

Learn how to check the Linux kernel version using the command line. Helpful commands to check your kernel versions, releases, codenames, etc.

This post aims at checking your Linux kernel version using commands. We will be discussing different ways to fetch this data from your system. Below is a list of commands which can be used to get Linux kernel version details.

You can use below 7 ways to gather info about your distribution like kernel version in CentOS, RHEL, SUSE, OEL, Ubuntu, Debian Linux. All the below outputs are from my test machine running CentOS 7.

1. By reading version process file.

This gives you running kernel version.

[root@kerneltalks1 ~]# cat /proc/version
Linux version 3.10.0-693.5.2.el7.x86_64 (builder@kbuilder.dev.centos.org) (gcc version 4.8.5 20150623 (Red Hat 4.8.5-16) (GCC) ) #1 SMP Fri Oct 20 20:32:50 UTC 2017

3.10.0-693.5.2.el7.x86_64 is your current kernel distribution version.

2. By reading Distro release file in /etc

Almost all distributions of Linux come with a release file in /etc which contains the kernel version, release details in it. Its a text file hence cat can be used to read its content.

# cat /etc/enterprise-release OR /etc/oracle-release   ---For OEL
Enterprise Linux Enterprise Linux Server release 5.8 (Carthage)

[root@kerneltalks1 ~]# cat /etc/redhat-release         ---For RHEL/OEL
CentOS Linux release 7.4.1708 (Core)

OR simple use wildcard so that you can list the release file of any distro. All distro keeps diff filenames so using wildcard will be wise. In some distro, you will see /etc/os-release or /etc/system-release files as well. All these files will be covered when using wild cards.

[root@kerneltalks1 ~]# cat /etc/*release
CentOS Linux release 7.4.1708 (Core)
NAME="CentOS Linux"
VERSION="7 (Core)"
ID="centos"
ID_LIKE="rhel fedora"
VERSION_ID="7"
PRETTY_NAME="CentOS Linux 7 (Core)"
ANSI_COLOR="0;31"
CPE_NAME="cpe:/o:centos:centos:7"
HOME_URL="https://www.centos.org/"
BUG_REPORT_URL="https://bugs.centos.org/"

CENTOS_MANTISBT_PROJECT="CentOS-7"
CENTOS_MANTISBT_PROJECT_VERSION="7"
REDHAT_SUPPORT_PRODUCT="centos"
REDHAT_SUPPORT_PRODUCT_VERSION="7"

CentOS Linux release 7.4.1708 (Core)

3. By listing release package

This command works for RPM-based systems like RHEL, SUSE, OEL, CentOS, etc. Search and grep for release which will show you release package. This package name convention includes release number in it.

[root@kerneltalks1 ~]# rpm -qa |grep -i release
centos-release-7-4.1708.el7.centos.x86_64

4. Using uname command

This command works on all flavors of Linux. You can use it on RHEL, SUSE, OEL, Debian, Ubuntu, etc.

[root@kerneltalks1 ~]# uname -r
3.10.0-693.5.2.el7.x86_64

This value indicates your current kernel version.

5. Using lsb_release command

lsb_release command is provided by redhat-lsb package. You need to install redhat-lsb package in order to use this command on RHEL, CentOS or Fedora systems.

[root@kerneltalks1 ~]# lsb_release -a
LSB Version:    :core-4.1-amd64:core-4.1-noarch:cxx-4.1-amd64:cxx-4.1-noarch:desktop-4.1-amd64:desktop-4.1-noarch:languages-4.1-amd64:languages-4.1-noarch:printing-4.1-amd64:printing-4.1-noarch
Distributor ID: CentOS
Description:    CentOS Linux release 7.4.1708 (Core)
Release:        7.4.1708
Codename:       Core

6. Using hostnamectl command

In newer kernels, hostnamectl command is introduced. Using this command without any argument will show you all details about your kernel. You can use it to set your hostname as well.

[root@kerneltalks1 ~]# hostnamectl
   Static hostname: kerneltalks1
         Icon name: computer-vm
           Chassis: vm
        Machine ID: 49688f1b932a41e790254b993d419ccc
           Boot ID: 4777133835544d599a46a53ae4b584e3
    Virtualization: xen
  Operating System: CentOS Linux 7 (Core)
       CPE OS Name: cpe:/o:centos:centos:7
            Kernel: Linux 3.10.0-693.5.2.el7.x86_64
      Architecture: x86-64

FTP server configuration steps in RHEL 6

Step by step configuration guide for setting up the FTP server in RHEL6. FTP server is useful for small scale file sharing between cross-OS platforms.

FTP (file transfer protocol) is one of the famous methods to get centralized file storage on a low scale. FTP server implementation mainly is done to enable users to upload files in a centralized location. Many vendors have their FTP servers running where sysadmins upload logs when any case investigation is in progress with the vendor. This is almost a common thing in the life of sysadmin working in Corporate infrastructure.

In this post, we are going to see step by step configuring the FTP server in the RHEL server. Setting up FTP server can be staged in below parts :

  1. Installing necessary packages
  2. Starting up services
  3. Setting up users
  4. Testing

1. Installing necessary packages :

We need to have a very secure ftp, rpcbind and xinetd services installed on the server. You can check them if they are installed using the below command :

# rpm -qa | grep -i vsftpd
vsftpd-2.2.2-21.el6.x86_64

# rpm -qa | grep -i xinetd
xinetd-2.3.14-40.el6.x86_64

# rpm -qa | grep -i rpcbind
rpcbind-0.2.0-12.el6.x86_64

If they are not installed, install them with below command (Make sure you have YUM configured on your server.):

#  yum install vsftpd rpcbind xinetd y
Loaded plugins: amazon-id, rhui-lb, security
Setting up Install Process
No package y available.
Resolving Dependencies
--> Running transaction check
---> Package rpcbind.x86_64 0:0.2.0-11.el6 will be updated
---> Package rpcbind.x86_64 0:0.2.0-12.el6 will be an update
---> Package vsftpd.x86_64 0:2.2.2-21.el6 will be installed
---> Package xinetd.x86_64 2:2.3.14-40.el6 will be installed
--> Finished Dependency Resolution

Dependencies Resolved

=================================================================================================================================================================================
 Package                           Arch                             Version                                     Repository                                                  Size
=================================================================================================================================================================================
Installing:
 vsftpd                            x86_64                           2.2.2-21.el6                                rhui-REGION-rhel-server-releases                           155 k
 xinetd                            x86_64                           2:2.3.14-40.el6                             rhui-REGION-rhel-server-releases                           122 k
Updating:
 rpcbind                           x86_64                           0.2.0-12.el6                                rhui-REGION-rhel-server-releases                            51 k

Transaction Summary
=================================================================================================================================================================================
Install       2 Package(s)
Upgrade       1 Package(s)

Total download size: 328 k
Is this ok [y/N]: y
Downloading Packages:
(1/3): rpcbind-0.2.0-12.el6.x86_64.rpm                                                                                                                    |  51 kB     00:00
(2/3): vsftpd-2.2.2-21.el6.x86_64.rpm                                                                                                                     | 155 kB     00:00
(3/3): xinetd-2.3.14-40.el6.x86_64.rpm                                                                                                                    | 122 kB     00:00
---------------------------------------------------------------------------------------------------------------------------------------------------------------------------------
Total                                                                                                                                            1.1 MB/s | 328 kB     00:00
Running rpm_check_debug
Running Transaction Test
Transaction Test Succeeded
Running Transaction
  Installing : 2:xinetd-2.3.14-40.el6.x86_64                                                                                                                                 1/4
  Installing : vsftpd-2.2.2-21.el6.x86_64                                                                                                                                    2/4
  Updating   : rpcbind-0.2.0-12.el6.x86_64                                                                                                                                   3/4
  Cleanup    : rpcbind-0.2.0-11.el6.x86_64                                                                                                                                   4/4
  Verifying  : rpcbind-0.2.0-12.el6.x86_64                                                                                                                                   1/4
  Verifying  : vsftpd-2.2.2-21.el6.x86_64                                                                                                                                    2/4
  Verifying  : 2:xinetd-2.3.14-40.el6.x86_64                                                                                                                                 3/4
  Verifying  : rpcbind-0.2.0-11.el6.x86_64                                                                                                                                   4/4

Installed:
  vsftpd.x86_64 0:2.2.2-21.el6                                                           xinetd.x86_64 2:2.3.14-40.el6

Updated:
  rpcbind.x86_64 0:0.2.0-12.el6

Complete!

Once installed, make them start at every boot with chkconfig configurations.

2. Starting up service :

After installation is over, stop iptables firewall and turn SELinux into permissive mode, to ensure FTP functions well.

# service  iptables  stop
ip6tables: Setting chains to policy ACCEPT: filter         [  OK  ]
ip6tables: Flushing firewall rules:                        [  OK  ]
ip6tables: Unloading modules:                              [  OK  ]
# setenforce 0

Now start services one by one and check if they are running.

# service vsftpd start
Starting vsftpd for vsftpd:    [ OK ]
# service xinetd start
Starting xinetd:               [ OK ]
# service rpcbind status
rpcbind (pid 4855) is running...

3. Setting up users:

Users which are listed in file /etc/vsftpd/ftpusers are not allowed to access FTP server. Hence if you want to disable FTP access of any user, you need to put that username in this file. For security reasons, the root account is by default exist in this file i.e. not allowed to FTP.

# cat  /etc/vsftpd/ftpusers
# Users that are not allowed to login via ftp
root
bin
daemon
adm
lp
sync
shutdown

For testing, create a new user on the system. Login to the server from a new terminal with this new user. Create some test files in its home directory.

Bonus tip: You can even edit the welcome banner message the user sees after logging into FTP server. Edit “ftpd_banner=Welcome to blah FTP service.” line under /etc/vsftpd/vsftpd.conf file.

4. Testing:

Now, access the FTP server from a windows machine using the command prompt. Once successfully logged in using the above-created test user, you will be able to see the file created in the above step and even you will be able to download it!

C:/> ftp 10.10.15.2
Connected to 10.10.15.2.
220 (vsFTPd 2.2.2)
User (10.10.15.2:(none)): testuser
Password:
230 Login successful.
ftp>
ftp>dir
200 PORT command successful. Consider using PASV.
-rw-rw-r--      1   501   502     42 Jan 18 12:08  file1
226 Directory send OK.
ftp: 63 bytes received in 0.00Seconds 63000.00Kbytes/sec.

You can run get, put FTP commands, and verify full functionality! You have successfully configured a secure FTP server on Linux!

4 steps guide for SMTP configuration in HPUX

Learn how to configure SMTP in HPUX machines. Know configuration file locations, parameters in config files, and testing commands.

SMTP is the short name for the Simple Mail Transfer Protocol. SMTP is an Internet standard for electronic mail (e-mail) transmission. We have already seen the SMTP configuration in Linux. In this post, we will be seeing SMTP in HPUX.

Pre-requisite

  • Hostname and IP address of SMTP server should be known (e.g. we will use mailserver.xyz.com 10.10.2.5)
  • The client should be able to reach the SMTP server over the network

Configurations

Step 1.

Add SMTP server entry in /etc/hosts file using vi editor or concatenate using echo command below.

# echo "10.10.2.5   mailserver.xyz.com" >> /etc/hosts

# cat /etc/hosts |grep -i mail
10.10.2.5   mailserver.xyz.com

Step 2.

Update daemon configuration file /etc/rc.config.d/mailservs to start the SMTP services with server startup. Edit the file with vi editors and update below entry:

SENDMAIL_SERVER=1

Add the SMTP server detail into SMTP configuration file /etc/mail/sendmail.cf. Edit below two entities

DMxyz.com
Dj<hostname>.com <<Add clients hostname
 DSmailserver.xyz.com
#C{E}root <<hash this entry

Step 3.

Now restart the SMTP daemon to take up this new configuration:

# /sbin/init.d/sendmail stop
Shutting down sendmail          [Done]
Shutting down sm-client         [Done]

# /sbin/init.d/sendmail start
Starting sendmail               [Done]
Starting sm-client              [Done]

Now check if sendmail is running using below command:

# ps -ef |grep -i sendmail
    root  1185     1  0  Nov 11  ?        61:33 sendmail: accepting connections on port 25
    root 21945 21815  0 03:18:28 pts/0     0:00 grep -i sendmail

Step 4.

Send a test mail and verify it.

# echo test | /usr/sbin/sendmail -v info@xyz.com
info@xyz.com... Connecting to mailserver.xyz.com via relay...
220 mailserver.xyz.com  ESMTP Postfix
>>> EHLO xyz.com
250-mailserver.xyz.com 
250-PIPELINING
250-SIZE 25600000
250-VRFY
250-ETRN
250-ENHANCEDSTATUSCODES
250-8BITMIME
250 DSN
>>> MAIL From:<root@xyz.com> SIZE=5
250 2.1.0 Ok
>>> RCPT To:<info@xyz.com>
250 2.1.5 Ok
>>> DATA
354 End data with <CR><LF>.<CR><LF>
>>> .
250 2.0.0 Ok: queued as 715C48203C
info@xyz.com... Sent (2.0.0 Ok: queued as 715C48203C)
Closing connection to mailserver.xyz.com
>>> QUIT
221 2.0.0 Bye

If you don’t receive an email, check logs under /var/adm/syslog/mail.log for troubleshooting.

5 steps guide for SMTP configuration in Linux

Learn how to configure SMTP in Linux machines. Know configuration file locations, parameters in config files, and testing commands.

Simple Mail Transfer Protocol. SMTP is one of the important services in any production system. Nowadays, mail notifications became important to monitor systems in real-time. Hence, it becomes essential to know how to configure mail utilities on servers. To enable any mail program on the system, SMTP is a basic component. It’s a very easy and quick procedure to setup SMTP on servers.

Pre-requisite :

  • Hostname and IP address of SMTP server should be known (e.g. we will use mailserver.xyz.com 10.10.2.5)
  • The client should be able to reach SMTP server over a network

Configurations :

Its 5 steps procedure to setup SMTP client on Linux.

Step 1.

Add SMTP server entry in /etc/hosts file using vi editor or concatenate using echo command below.

# echo "10.10.2.5   mailserver.xyz.com" >> /etc/hosts
# cat /etc/hosts |grep -i mail
10.10.2.5   mailserver.xyz.com
Step 2.

We need to edit the macro configuration file /etc/mail/sendmail.mc. Search and edit below parameters in this file :

  • define(`SMART_HOST',`mailserver.xyz.com'): Smart relay server name
  • define(`confDOMAIN_NAME',`xyz.com')dnl: Valid domain name
  • FEATURE(always_add_domain)dnlalways masquerades email address
  • FEATURE(`allmasquerade')dnl: rewrite both from/to relative to the local machine.
  • MASQUERADE_DOMAIN(`xyz.com.')dnl: Domain for masquerading emails
  • MASQUERADE_AS(`xyz.com')dnl: All mails masquerades as came from the defined domain
Step 3.

Once the above changes are done, you need to compile the mc file so that all these changes of the macro (mc) file will be transferred to the config ( cf) file using m4 utility.

# m4 /etc/mail/sendmail.mc > /etc/mail/sendmail.cf
Step 4.

Edit below parameters in /etc/mail/submit.cf so that mails will be submitted to defined domain.

D{MTAHost} mailserver.xyz.com 
Djxyz.com: Define this in case of sendmail won’t able to determine your domain.
DSmailserver.xyz.com: Smart relay host

Step 5.

Finally, restart mail services to take up this new configurations :

# service sendmail restart
# service postfix restart

You are done! Send a test email with the below command and check if you receive it.

# echo test |sendmail -v info@xyz.com
[<-] 220 mailserver.xyz.com ESMTP Postfix
[->] HELO testsrv2
[<-] 250 mailserver.xyz.com
[->] MAIL FROM:<root@xyz.com>
[<-] 250 2.1.0 Ok
[->] RCPT TO:<info@xyz.com>
[<-] 250 2.1.5 Ok
[->] DATA
[<-] 354 End data with <CR><LF>.<CR><LF>
[->] Received: by testsrv2 (sSMTP sendmail emulation); Fri, 23 Dec 2016 02:29:07 +0800
[->] From: "root" <root@xyz.com>
[->] Date: Fri, 23 Dec 2016 02:29:07 +0800
[->] test
[->]
[->] .
[<-] 250 2.0.0 Ok: queued as 19F75822B8
[->] QUIT
[<-] 221 2.0.0 Bye

If you don’t receive an email, check logs under /var/log/maillog for troubleshooting.

How to configure NTP client in Linux

Learn how to configure NTP (Network Time Protocol) on Linux machines to sync time with the NTP server over the network. Also, learn how to manually sync time on NTP.

Nowadays NTP (Network Time Protocol) is one of the essential things in any IT infrastructure. Apart from production even development or test environments also backed with NTP to ensure smooth operations.  Let’s see what is NTP and how to configure it in the Linux machine.

What is NTP

NTP is the protocol used to sync the time of machines with the NTP server (can be an appliance or another Linux machine) over the network. It aims at keeping all the machines clock in sync so that there will be no delays between any two machines in a network. This is very crucial in production environments running finance data. Network time protocol runs on UDP port 123. This should be open between the time server and client in both directions.

What is NTP server

NTP server can be another machine with NTP server-side configuration running or it can be a dedicated NTP appliance. NTP appliance is a small rackmount server looking device that has an antenna attached to it. An antenna can be extended to building rooftops to ensure better signal receiving. These appliances receive signals and hence synchronize their own time with satellites in space. Now their own system time will be set a benchmark to sync other machines with it over the network. The appliance comes with its own configuration which can be done on front display buttons or by connecting to its console. Each vendor has a different set of configs and different methods to set them.

Configure NTP client 

Let’s assume we already have NTP appliance name ntpappliance1.xyz.com with IP 10.10.1.2 in our infra. Now we will see step by step configuring Linux server to sync time with this appliance over the network.

1. Make sure you have ntp package installed. If not install it using steps defined here.

# rpm -q ntp
ntp-4.2.6p5-1.el6.x86_64

2. Edit /etc/ntp.conf file to add appliance or NTP server name into it. Add IP/hostname in the end of the file. If you are supplying hostname here then make a sure relevant entry is present in /etc/hosts file. I have shown both entries in the below example IP and hostname.

# cat /etc/ntp.conf

------- output clipped ------
# Enable writing of statistics records.
#statistics clockstats cryptostats loopstats peerstats
#server 2.sg.pool.ntp.org

server ntpappliance1.xyz.com prefer
server 10.10.1.3

In the above output, 3-time servers are defined and the one with prefer option will always have a preference while syncing time. If it’s not reachable then any one of the remaining servers is chosen by the daemon to sync time with.

3. That’s it! Start your ntp daemon and make sure it’s running.

# /etc/init.d/ntpd start
OR
# service ntpd start
# service ntpd status
ntpd (pid  2261) is running...

4. Check time sync status using command :

# ntpq -p
     remote              refid       st t when poll reach   delay   offset  jitter
==================================================================================
+ntpappliance2.xyz.com 10.10.1.3      3 u   40   64  377  180.764    0.719   0.458
*ntpappliance1.xyz.com 10.10.1.2      3 u   50   64  377  180.851   -0.272   0.149

Here different fields are :

  • remote : Remote time server hostname/IP
  • refid : Association ID
  • st : stratum
  • t : u: unicast, b: broadcast, l: local
  • when : sec/min/hr since last received packet
  • poll : poll interval (log2 s)
  • reach : reach shift register (octal)
  • delay : roundtrip delay
  • offset : offset from server time
  • jitter : Jitter (noise)

Also, the very first value displayed is state i.e. + and * sign. These values can be :

  • + mean Good connectivity and preferred remote server
  • * means currently selected time server for sync
  • - means do not use to sync due to out of tolerance (cluster algorithm)
  • x means do not use to sync due to out of tolerance (intersection algorithm)
  • # means good connectivity but not used to sync yet.

Manually sync time with the server

NTP daemon runs in background and sync time according to polling configuration. But if you want to manually sync time right away with time server then you can do it with below command :

# ntpdate -u ntpappliance2.xyz.com
10 Dec 13:20:05 ntpdate[30337]: adjust time server 10.10.1.3 offset -0.000437 sec

It will update time with a given time server (as an argument in command) right away.

If you are having issues with timeserver connectivity then first troubleshoot at OS and firewall level. You can also view your syslog and grep for the NTP keyword and you will see all NTP related messages logged in Syslog which may help you in troubleshooting.

Understanding /etc/hosts file

/etc/hosts is a key file for name resolution in any Linux Unix system. Learn fields, formats within /etc/hosts file. Understand the meaning of each field and how it can be set.

This is also one of the important files in the Linux-Unix system like /etc/passwd or /etc/fstab. The name resolution in the Lx-Ux system is being handled by this file. Whenever kernel needs to resolve some hostname to IP, it will search for it in /etc/hosts file. If DNS is configured on the system then it will go for it and then this file doesn’t play much of role in name resolution. Basically this file is a static IP lookup table on the server.

It’s a text file that can be viewed using cat, more, less, etc commands. One can edit this file using text editors like vi. Sample /etc/hosts file is shown below :

# cat /etc/hosts
127.0.0.1   localhost localhost.localdomain localhost4 
::1         localhost localhost.localdomain localhost6
10.10.1.64  server34 #This server

# Test servers 
10.10.1.12 test01
10.10.1.121 test02

# NTP server
10.10.1.85 ntpsvr1.kerneltalks.com  ntpsrv1
10.10.1.86 ntpsvr2.kerneltalks.com     #standby server

The format being followed is <IP> <FQDN> <alias> where both fields are separated by space or tab and one IP per line. Comments can be added with lines starting with the # symbol. Comments can be added on the same line of IP entry too. Any text following the # symbol will be ignored until the end of the line. These lines will be ignored by the kernel/shell/program when it reads this file. Those are just comments added for the understanding of the user (human). Like in the above example NTP server and standby server both are comments.

The hostname can contain only alphanumeric characters, minus sign - and period . It should always start with the alphabet and ends with an alphanumeric character.

There is also the 3rd field in each row which is optional. This field is for aliases. These are short names, alternate names, etc for the same IP. In the above example, ntpsrv1 is an alias to IP 10.10.1.85

You will see a couple of entries in all /etc/hosts file on your environment. Most of them are loopback address i.e. 127.0.0.1 which will be pointing to localhost and another is that server’s own IP & hostname entry.

Build Syslog server in Linux for centralized log management

Step by step guide to configure Syslog Server in a Linux environment. Learn how to enable remote Syslog logging in Linux for centralized log management.

In many It infrastructure environments, clients choose to have one centralized Syslog server in which all logs from remote systems can be collected. It then easier to filter, monitor, verify a report in a single location rather than querying all systems in infra. In this post, we will be seeing how to configure Linux machine to act as a Syslog server.

In the configuration, there are two parts. First server-side configuration to be done on the Linux machine which will act as Syslog server. Secondly, client-side configuration to be done on a remote system that will be sending logs to the Syslog server.

Server side configurations:

A machine which will be acting as Syslog server should have below pre-requisites done :

  1. syslog daemon i.e. syslogd should be up and running
  2. portmap and xinetd services should be running
  3. Targeted client machine’s IP range should be able to reach the Syslog server over network.
# service syslog status
syslogd (pid  3774) is running...
klogd (pid  3777) is running...
# service portmap  status
portmap (pid 3891) is running...
# service xinetd  status
xinetd (pid  4410) is running...

Once you make sure all related services are running, proceed to edit syslogd configuration file i.e. /etc/syslog.conf. You need to add -r option in the configuration file which will enable daemon to receive logs from remote machines.

# cat /etc/sysconfig/syslog

# Options to syslogd
# -m 0 disables 'MARK' messages.
# -r enables logging from remote machines
# -x disables DNS lookups on messages recieved with -r
# See syslogd(8) for more details
SYSLOGD_OPTIONS="-m 0"
# Options to klogd
# -2 prints all kernel oops messages twice; once for klogd to decode, and
#    once for processing with 'ksymoops'
# -x disables all klogd processing of oops messages entirely
# See klogd(8) for more details
KLOGD_OPTIONS="-x"
#
SYSLOG_UMASK=077
# set this to a umask value to use for all log files as in umask(1).
# By default, all permissions are removed for "group" and "other".

Here you can see a row with parameter SYSLOGD_OPTIONS="-m 0". This needs to be added with -r option like  SYSLOGD_OPTIONS="-r -m 0"

Edit the conf file with a text editor like vi and add -r option as stated above. To take up these new changes restart Syslog service.

# service syslog restart
Shutting down kernel logger:          [  OK  ]
Shutting down system logger:          [  OK  ]
Starting system logger:               [  OK  ]
Starting kernel logger:               [  OK  ]

Now your server Syslog daemon is ready to accept logs from remote machines. All messages from remote machines and Syslog server’s own Syslog will be logged in /var/log/messages on Syslog server. Its own messages will be having “localhost” in 2nd field after the date and remote machine logs will be having IP/hostname instead of localhost in the 2nd field.

It should look like below once it starts populating remote machine’s logs too. First entry beings its own and second one being remote server’s log.

Nov 10 12:34:44 localhost syslogd 1.4.1: restart (remote reception).
Nov 10 12:34:44 server3  snmpd[4380]: Connection from UDP: [10.100.49.125]:55234

Client side configurations:

In client machine, you need to edit Syslog configuration file /etc/syslog.conf. Here you need to instruct Syslog daemon to send logs to remote Syslog server.

Open /etc/syslog.conf configuration file and append user.* @[ server IP] to end of it. In which server IP is your Syslog server IP. If you have mentioned Syslog server IP in /etc/hosts of client machine then you can give hostname in above entry instead of IP.

user.* defines the type of log messages to be sent to the Syslog server. If you want to log all messages to the Syslog server you can use *.* or you can choose the type of logs defined in this config file itself. Read the below file and you will get to know different types. Defining *.* is not advisable since it will be flooding logs on the Syslog server and its storage might get full if you have many machines sending logs to the server at a time.

This should look like below. Check last line of file :

# cat /etc/syslog.conf

# Log all kernel messages to the console.
# Logging much else clutters up the screen.
#kern.*                                                 /dev/console

# Log anything (except mail) of level info or higher.
# Don't log private authentication messages!
*.info;mail.none;authpriv.none;cron.none                /var/log/messages

# The authpriv file has restricted access.
authpriv.*                                              /var/log/secure

# Log all the mail messages in one place.
mail.*                                                  -/var/log/maillog


# Log cron stuff
cron.*                                                  /var/log/cron

# Everybody gets emergency messages
*.emerg                                                 *

# Save news errors of level crit and higher in a special file.
uucp,news.crit                                          /var/log/spooler

# Save boot messages also to boot.log
local7.*                                                /var/log/boot.log

user.*          @10.12.2.5

After editing conf file, restart syslog daemon to get this new config in action.

You can send test log to check if your setup is working using below command :

# logger -p user.info “Test log message”

This will send a user.info type messages to Syslog locally. It will be logged to local /var/log/messages and also gets forwarded to the Syslog server on the mentioned IP. You should see below entries :

On local i.e. client 
# tail -1 /var/log/messages
Dec  7 01:27:09 localhost root: “Test log message”

On syslog server 
# tail -1 /var/log/messages
Dec  7 01:27:09 server3 root: “Test log message”

This will confirm your Syslog server is accepting remote logs perfectly and the machine you configured as the client is sending logs to the server too!

Understanding /etc/fstab file

/etc/fstab is a key file for file systems in any Linux Unix system. Learn fields, formats within /etc/fstab file. Understand the meaning of each field and how it can be set.

/etc/fstab is one of the key files in running a Linux or UNIX system. File system mounting can be controlled using this file. This is one of the files being used at boot to validate and mount file systems on the machine.  This file is human-readable and can be edited with a text editor like vi.

This file contains 6 parameters per row. Each row represents one file system details. They are as below :

  1. Volume
  2. Mount point
  3. File system type
  4. Options
  5. Dump
  6. Pass

Let’s see one by one –

1. Volume

This is a disk or logical volume which is the source to be mounted on the mount point specified in the second field. See the below example of fstab from the Linux system.

# cat /etc/fstab


# /etc/fstab
# Created by anaconda on Thu Dec  5 15:47:52 2013
#
# Accessible filesystems, by reference, are maintained under '/dev/disk'
# See man pages fstab(5), findfs(8), mount(8) and/or blkid(8) for more info
#
/dev/mapper/vg_00-lv_root /                       ext4    defaults        1 1
UUID=f2918ad9-f5ce-485d-81ae-e874f57f6f57 /boot                   ext4    defaults        1 2
/dev/mapper/vg_00-lv_home /home                   ext4    defaults        1 2
/dev/mapper/vg_00-lv_tmp /tmp                    ext4    defaults        1 2
/dev/mapper/vg_00-lv_usr /usr                    ext4    defaults        1 2
/dev/mapper/vg_00-lv_var /var                    ext4    defaults        1 2
/dev/mapper/vg_00-lv_swap swap                    swap    defaults        0 0
tmpfs                   /dev/shm                tmpfs   defaults        0 0
devpts                  /dev/pts                devpts  gid=5,mode=620  0 0
sysfs                   /sys                    sysfs   defaults        0 0
proc                    /proc                   proc    defaults        0 0
/dev/sdb                /app                    ext3    defaults        1 2
10.10.2.3:/my_share     /tmp/nfs_share          nfs      defaults       0 0

In the above example, you can see volume is specified by UUID or logical volume name or disk name or IP:/directory.

/boot entry is specified by UUID. UUID is a universally unique ID assigned to each disk when it’s formatted in the system. The disk can be identified by UUID or disk name in the kernel.  Since its unique number, it’s ideal to use UUID in fstab for important file systems!

/var, /tmp, etc entries are defined using volume as a logical volume name. They are logical volumes part of the volume group vg00. See LVM legends to get familiarize with naming conventions.

/dev/shm is defined by tmpfs volume. Its a temporary file system volume created and identified by the kernel on the root disk. devpts, sysfsare part of such system-defined file systems.

Second Last entry,  you can see disk sdb is also defined as a volume for /app entry.

Lastly, the NFS share is mounted on /tmp/nfs_share directory. There IP address of the NFS server and its exported share volume name combination is defined as a volume.

This is the first argument to be supplied in mount command while mounting any filesystem.

Normally HPUX uses LVM as a partition manager hence only logical volumes are found as a volume entry in fstab. See below the example of fstab from the HPUX system.

$ cat /etc/fstab

# System /etc/fstab file.  Static information about the file systems
# See fstab(4) and sam(1M) for further details on configuring devices.
/dev/vg00/lvol3 / vxfs delaylog 0 1
/dev/vg00/lvol1 /stand vxfs tranflush 0 1
/dev/vg00/lvol4 /home vxfs delaylog 0 2
/dev/vg00/lvol5 /opt vxfs delaylog 0 2
/dev/vg00/lvol6 /tmp vxfs delaylog 0 2
/dev/vg00/lvol7 /usr vxfs delaylog 0 2
/dev/vg00/lvol8 /var vxfs delaylog 0 2
/dev/vg00/lvol10 /var/adm/sw vxfs delaylog 0 2
/dev/vg00/lvol11 /admin vxfs delaylog 0 2
10.10.2.3:/my_share /tmp/nfs_share nfs defaults 0 0

2. Mount point

Its second field in an entry of fstab. This is the name of the directory on which volume should be mounted. It should always be an absolute path (i.e. starts with/and has all directory hierarchy till last expected directory) in this field.

Directories like /var, /boot, /tmp, /stand, /usr, /home, /proc, /sys are (and should be) reserved for system mount points. In HPUX even logical volume numbers of root VG are reserved for system mount points like lvol1 should always be /stand. 2 for swap, 3 for root, etc.

This is the second argument to be supplied to mount command when mounting any file system.

3. File system type

This is FS type to be considered while mounting the given volume on the specified mount point. Different file system types have different functions and advantages to offer. You need to specify the same FS type which was used at the time of formatting respective volume. ext3, ext4 (Linux FS), vxfs (veritas FS), NFS (Network FS), swap (SWAP FS) are a few types.

This can be supplied to mount command with -F option.

4. Options

Those are file system options that will enhance the user experience of the mount point. They also impact on the performance of the file system and impact in recovery in case of failures. Value defaults in the above example instructs mount command to use parameters defined inbuilt. They can be seen in the man page :

defaults
              Use default options: rw, suid, dev, exec, auto, nouser, async, and relatime.

All available options can be summarized as below :

Option
Description
sync All I/O to the filesystem should be done synchronously.
async All I/O to the filesystem should be done asynchronously.
atime inode access time is controlled by kernel defaults.
noatime Do not update inode access times on this filesystem
auto Mount it when -a used (mount -a)
noauto Dont ‘auto’
dev Interpret character or block special devices on the filesystem
nodev Dont ‘dev’
diratime Update directory inode access times on this filesystem.
nodiratime Dont ‘diratime’
dirsync All directory updates within the filesystem should be done synchronously.
exec Permit execution of binaries
noexecDont ‘exec’
group Allow normal group users to mount
mand Allow mandatory locks on this filesystem.
relatime Update inode access times relative to modify or change time.
norealtime Dont ‘realtime’
delaylog Affect how vxfs maintains journals which impacts performance and ability to recover the file system
nomand Dont ‘mand’
suid Allow set-user-identifier or set-group-identifier bits to take effect.
nosuid Dont ‘suid’
remount Attempt to remount an already-mounted filesystem.
rw Read write mode
ro
Read only mode
owner Allow non-root user to mount if he is owner of device
user Allow an ordinary user to mount the filesystem.
nouser Dont ‘user’
largefiles Allow file size more than 2TB
transflush Performance related

These options can be supplied to mount command using -o.

5. Dump

This is an old fashioned backup option in case the server goes down. If this is set to 1 then FS dump will happen when the system goes down due to some issue. Setting this 0 will nullify this option.

6. Pass

This tells kernel about file system check priority or sequence. fsck is a facility that checks the file system for its consistency. During boot, if fsck is invoked then it looks for this file. If set to 0, fsck will be skipped for that mount point. If set to 1 then that mount points will be first in sequence to be fscked.