Step by step rundown to troubleshoot AWS cross-account assume role issues.
Cross-account Assume role
AWS cross-account role access is one of the most common use cases in cloud environments and is always a headache to troubleshoot if one is not familiar enough with IAM. In this article, we will walk you through step by step procedure to drill down into the root cause of why AWS cross-account IAM role access is not working.
Typically, you will be seeing error messages like –
An error occurred (AccessDeniedException) when calling the xxx operation: User: arn:x....x is not authorized to perform xxx:xxx on resource arn:x....x because no resource-based policy allows the xxx:xxx action.
Let’s formalise the legends for a better understanding of the below steps:
account1 is the account from which role assume request is initiated
account2 is the account in which target role2 exists and IAM entity from account1 is trying to assume it.
IAM entity from account1 can be IAM user or role.
Consider below steps/points that will help you troubleshoot cross-account access issues.
account1 IAM entity (user/role)should have permission sts:AssumeRole defined in IAM policy attached to it. If it has some condition attached to it, those conditions must be satisfied in the assume call.
account2‘s IAM role role2 should have trust policy defined. This trust policy should trusts (principal field) the account1 or account1‘s IAM entity (user/role) which is initiating the assume call.
If trust policy is having condition defined (condition field), then assume call should be satisfying those conditions.
account2‘s IAM role must have permissions properly defined that account1’s IAM entity want to use in account2.
Or you can go through the below flow chart and drill down to the root cause of your problem!
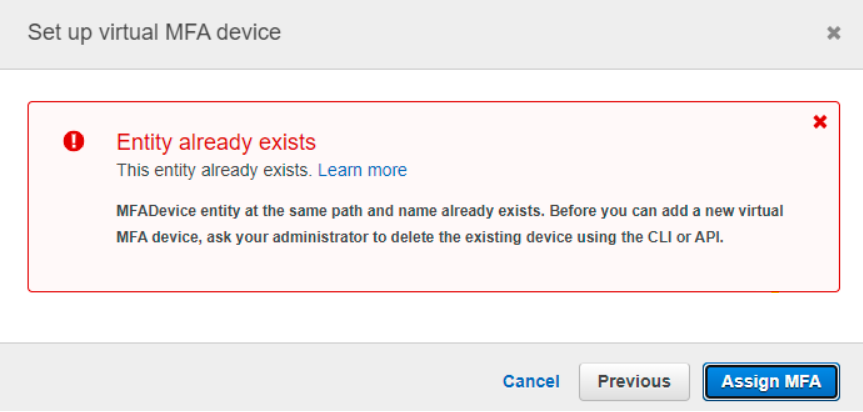
The user is not able to register an MFA device. When a user tries to assign a new MFA, IAM throws an error –
This entity already exists. MFADevice entity at the same path and name already exists. Before you can add a new virtual MFA device, ask your administrator to delete the existing device using the CLI or API.
MFA assignment error
Whereas if you as admin or even user check the AWS console it shows Assigned MFA device as Not assigned for that user.
Resolution
As an administrator, you need to delete the MFA device (yes even if says not assigned) using AWS CLI. The performer needs to have IAM permission iam:DeleteVirtualMFADevice on to the given resource to update the IAM user’s MFA.
Run below command from AWS CLI –
# aws iam delete-virtual-mfa-device --serial-number arn:aws:iam::<AWS account number>:mfa/<username>
where –
AWS account number is account number where user exists
username is IAM username of that user
This should clear out the error message and the user should be able to register a new MFA device.
A quick rundown on how to hunt AWS resources that needs tagging
Scan AWS resources to tag
Tags are the most important and equally negligible AWS entity! As AWS spread grows in an organization they start to realize the importance of tags and then comes the projects for tagging existing resources!
At this stage, the first question on the table is how to search for AWS resources that need tagging? or How can we search non-tagged AWS resources?
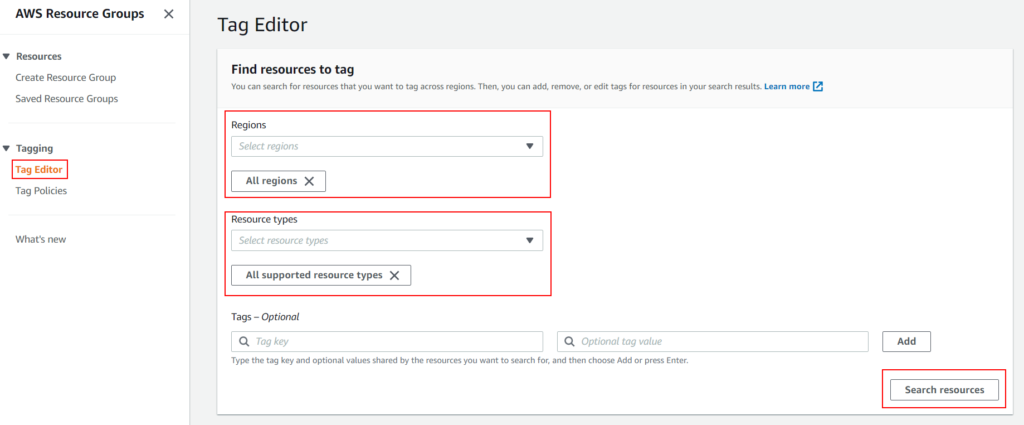
It’s a very short process that can be summarised in a single picture!
On left hand side menu, select Tag Editor under Tagging.
Now you should have seelction on right hand side.
Select perticular region or All regions from Regions drop down.
Select specific resource or All supported resource types from Resource types drop down.
Tags – Optional: You can specify key, value details to search for specific tags. Since we are searching for resources that are not tagged lets keep it blank.
Finally, click on Search resources button and you are done!
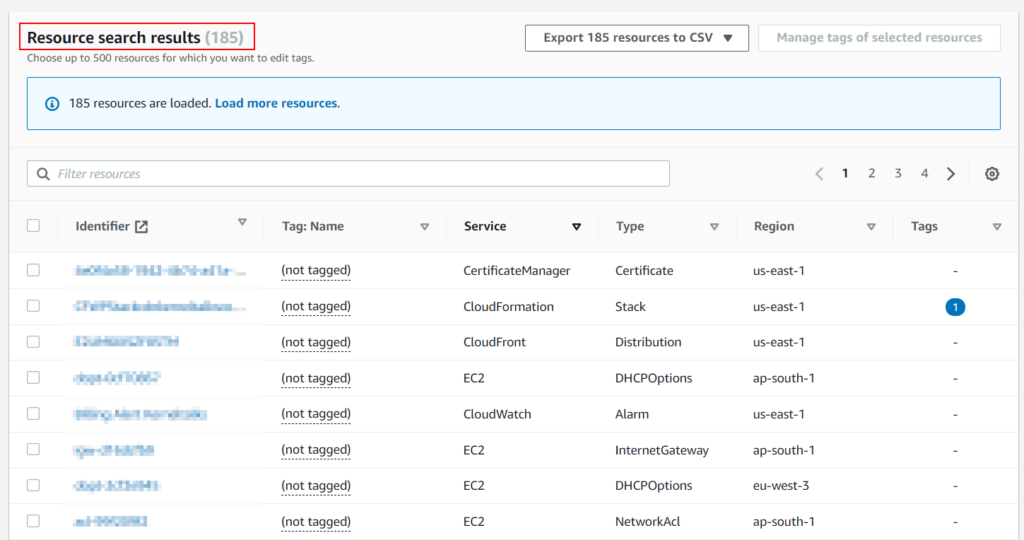
You should be presented with list of AWS resources in specified regions that needs to be tagged like below.
List of AWS resources to tag
You can export the list to CSV as well for further data analytics.
A quick post on how to forward SSH key in Putty on Windows.
PuTTY SSH agent forwarding
Let’s start with some basics about SSH key/agent forwarding. Then we will dive into how to configure it in putty.
What is SSH key/agent forwarding?
Traditionally we used to have password-based authentication for Linux servers. In this age of cloud, all the Linux servers deployed in the cloud come with default key-based authentication Authentication is done using pair of keys: Private key (with user) and Public key (stored on server). So every time you connect to the server you need to supply your private key for authentication.
If you are using some jump server or bastion host for connecting servers then you need to store your private key on that server (jump/bastion). So that it can be used for authentication when connecting to servers. This leaves a security risk of the private key being exposed/accessed by other users of jump/bastion host.
In such a scenario, SSH agent forwarding should be used. SSH agent forwarding allows you to forward the SSH key remotely. That means you can authenticate without storing the key on the jump/bastion host! Putty takes care of using the key stored on your local computer and forward it so that it can be used for remote authentications.
How to configure SSH agent forwarding in Putty?
It can be done by using utility pagent.exe which comes with PuTTY. pagent.exe is an SSH authentication agent for PuTTY. It can be downloaded for free from PuTTY website along with the PuTTY executable.
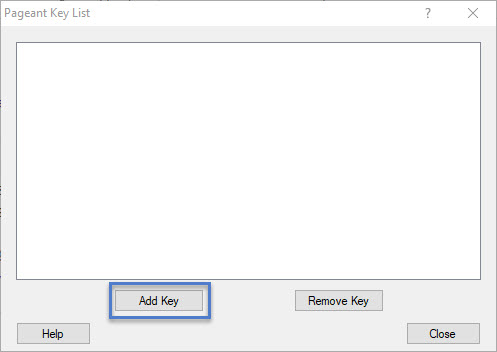
Now Open pagent.exe. It will start in the background. You can click on pagent icon in the taskbar and bring it to the foreground. You should see the below screen –
pagent list of keys
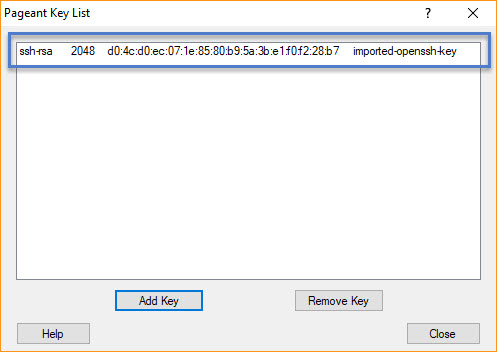
Click on the Add Key button. Browse your PPK key stored on the local computer and click Open. Key will be added to the database and you should see it in the key list as below –
Imported key
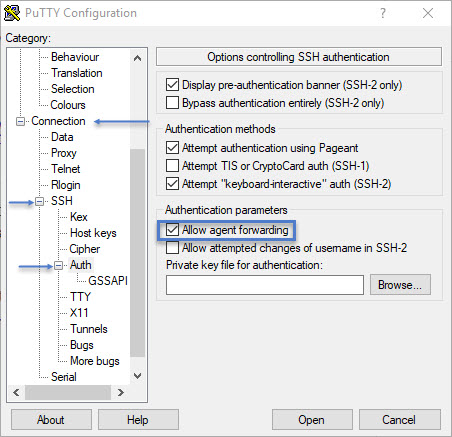
Now click the Close button. Make sure pagent is running in the background. And open PuTTY. In the left panel of the category, goto Connection > SSH > Auth and select the checkbox next to Allow agent forwarding
PuTTY agent forwarding
Now you are ready to connect to your jump/bastion host. And from there to the remote Linux machines. You will not be prompted for key since it’s already added to pagent and PuTTY is making sure to forward it for further connections!
Below is my test where I connected my instance in a private subnet without supplying the SSH key in command.
Login using SSh agent forwarding!
That’s all! You can add a number of keys in pagent and use them without leaving a key footprint on intermediate servers!
Steps to configure SFTP on Linux server with access restricted to the specific directory only. Also, how to deny SSH login and only allow SFTP login to the user.
SFTP with restricted directory access
In this article, we will walk you through the procedure to configure SFTP on your server and restrict SFTP user access to a specific directory.
The whole process is listed below stepwise. If you have SFTP configured already or users created already you can skip those steps.
Add SFTP user to the system
Prepare SFTP directory
Configure SFTP on SSH service layer
Allow user for SFTP only and deny SSH access
Verify access
In below example, we will create user sftp_user1, allow his SFTP access, deny him ssh access and restrict his SFTP access to the directory /sftp_uploads/user1
Add SFTP user to the system
It’s a simple useradd stuff. For easy management of SFTP users, add the SFTP group as well on your system.
Keep in mind that you should have a base directory that will be owned by root i.e. ChrootDirectory. And then under it, you can create your restricted directory where SFTP user is to be restricted. So once SFTP user is logged in he is jailed into ChrootDirectory and he can not move beyond it.
Set ownership and permissions for the SFTP directory. I kept them exclusively for owner i.e. sftp_user1 only.
SFTP is a sub-service offered by SSH daemon. To enable it, add below lines in SSH configuration file /etc/ssh/sshd_config
If your SSH config file already has /usr/libexec/openssh/sftp-server enabled as SFTP subsystem then hash it out.
Subsystem sftp internal-sftp
Match Group sftp_group  #OR Match User sftp_user1
ChrootDirectory /sftp_uploads
ForceCommand internal-sftp
X11Forwarding no
AllowTcpForwarding no
Here line-wise –
Tells SSH daemon to run the internal sftp subsystem.
Match users with the primary group sftp_group or match only specified user i.e. sftp_user1
When they try to login restrict their working directory under the base /sftp_upload
Only allow them to use sftp service and deny ssh login
Disable all X11 forward for those users so they cant access GUI apps
Disable TCP forwarding as well for them
Restart SSH daemon to pick up these new configurations. You can restart with HUP if you don’t want the existing SSH connection to be impacted.
sftp_user1 should able to connect using the sftp protocol
sftp_user1 should not be allowed to log in using SSH
When logged in using sftp, sftp_user1 should be restricted to /sftp_uploads/user1 directory only.
Let’s test all three points –
[root@kerneltalks ~]# sftp sftp_user1@192.168.0.106
sftp_user1@192.168.0.106's password:
Connected to 192.168.0.106.
sftp>
So the first point is validated.
[root@kerneltalks ~]# ssh sftp_user1@192.168.0.106
sftp_user1@192.168.0.106's password:
Could not chdir to home directory /home/sftp_user1: No such file or directory
This service allows sftp connections only.
Connection to 192.168.0.106 closed.
There! The second point validated.
[root@kerneltalks ~]# sftp sftp_user1@192.168.0.106
sftp_user1@192.168.0.106's password:
Connected to 192.168.0.106.
sftp> ls
user1
sftp> pwd
Remote working directory: /user1
And the third point as well. You can see the SFTP user’s working directory is restricted to /usr1 which is /sftp_uploads/user1 on the SFTP server. Since we jailed him using ChrootDirectoy /sftp_uploads, he is inside it and can not see beyond. Hence /user1 is PWD for SFTP users.
A quick post explaining how you can move out /tmp directory from / to new mount point on the new disk
Create /tmp as a new mount point
One of the headaches for sysadmin is getting a file system full. It can have many reasons from blaming application, and un-adequate capacity planning to an un-organized file system structure. We are going to look at the file system aspect of it.
Server with a single disk approach i.e. root disk is formatted as one partition and mounted as / is common these days. But, there are servers on-prem that still follow the slicing of disks and mounting different root FS on their approach. So if your server is one of them and for some reason, your /tmp directory is part of / and not separate mount point then this article is for you.
In this article, we will walk you through step by step procedure to mount /tmp on another disk as a separate mount point. We are going to separate out /tmp directory from / file system as /tmp mount point. We are taking an example with LVM but the procedure remains the same if you want to mount /tmp on another partition. Only replace LVM parts i.e. VG, and LV stuff with an equivalent partition creation procedure.
Make sure you have a valid backup of the server before proceeding.
How to move /tmp as new mount point with downtime
/tmp is used by many processes on the server to open up temp files during execution. So this directory is always in use and rebooting in single-user mode to perform a such activity is the safest and clean way. You can check processes using /tmp by lsof command.
The complete procedure can be done in the below order –
Prepare a new disk for /tmp
Create LV on new disk (pvcreate, lvcreate)
pvcreate /dev/sdb
vgcreate vg_tmp /dev/sdb
lvcreate -l 100%FREE -n lv_tmp vg_tmp
Format LV with the filesystem of your choice
mkfs.ext4 /dev/vg_tmp/lv_tmp
Mount it on a temporary mount
mount /dev/vg_tmp/lv_tmp /mnt
Copy data from /tmp directory to the new disk
cp -pr /tmp/* /mnt
ls -lrt /mnt
ls -lrt /tmp
Reboot server into single-user mode
Prepare new /tmp mount point
Delete/move existing /tmp directory depending on space availability in /
Quick post about how to remove the products channels in Suse Manager
Delete channels in Suse Manager
There is a way you can add products and their channels in the Suse Manager server using the command line and webpage GUI. But once added it’s not easy to get them removed from the web console. Web console does not provide a direct option to remove product channels from Suse Manager. Also, the command used for adding channel i.e.. mgr-sync also does not support any option to remove channels.
So many of first time Suse Manager administrators stumble upon roadblock on how to remove product channels which are no more needed.
So let’s get started on the process to remove product channels (using command spacewalk-remove-channel) you might have added by mistake on Suse Manager or which are no longer needed and eating up your disk space.
First, you need to list out all the channels on your Suse Manager using mgr-sync list command –
root@kerneltalks # mgr-sync list channels
Available Channels:


Status:
  - [I] - channel is installed
  - [ ] - channel is not installed, but is available
  - [U] - channel is unavailable

[ ] RHEL6-Pool for x86_64 RHEL6 Base x86_64 [rhel6-pool-x86_64]
[I] SLE-Product-HPC-15-Pool for x86_64 SUSE Linux Enterprise High Performance Computing 15 x86_64 [sle-product-hpc-15-pool-x86_64]
    [ ] SLE-Module-Basesystem15-Debuginfo-Pool for x86_64 Basesystem Module 15 x86_64 [sle-module-basesystem15-debuginfo-pool-x86_64-hpc]
    [ ] SLE-Module-Basesystem15-Debuginfo-Updates for x86_64 Basesystem Module 15 x86_64 [sle-module-basesystem15-debuginfo-updates-x86_64-hpc]
    [I] SLE-Module-Basesystem15-Pool for x86_64 Basesystem Module 15 x86_64 [sle-module-basesystem15-pool-x86_64-hpc]
    [I] SLE-Module-Basesystem15-Updates for x86_64 Basesystem Module 15 x86_64 [sle-module-basesystem15-updates-x86_64-hpc]
...
Here let’s consider we need to remove channel sle-product-hpc-15-pool-x86_64. So first you need to remove all the child channels from this base product channel & then you will be able to remove the base channel. If you try to remove parent channel directly without removing child channels you will hit below error –
Repeat the process and remove all child channels one by one. You can use shell loops to get it done quicker. Finally, remove your parent channel, and you are done.
Article explaining how to convert java keystore jks into PEM formatted certificate or key file for Apache configuration
JKS to KEY
Scenario: I have a key file (*.jks) and CSR file generated in using keytool command i.e. in java. I wanted to convert this jks file to *.key file so that it can be used in Apache webserver configuration.
To use this key file in Apache configuration you need to strip off a header. Delete all parts till -----BEGIN PRIVATE KEY----- and save the file. Now you are good to use this *.key file in Apache SSL configuration.
How to export certificate from JKS file
As an addon to this post, I will walk you through how to export a certificate from java Keystore to PEM format. This is again two-step exercise as below –
Export certificate in binary
You read from the Keystore file certificate associated with alias and export it to a binary file. I used alias as server while creating this jks file hence options are –
-export : To export data. This is same as exportcert in newer versions
-alias : Enter same alias you used while creating this java key file
-file : Destination binary file in which you will export
-keystore : Your jks key file
[root@kerneltalks ~]# keytool -export -alias server -file kerneltalks.com.der -keystore kerneltalks.com.jks
Enter keystore password:
Certificate stored in file <kerneltalks.com.der>

Warning:
The JKS keystore uses a proprietary format. It is recommended to migrate to PKCS12 which is an industry standard format using "keytool -importkeystore -srckeystore kerneltalks.com.jks -destkeystore kerneltalks.com.jks -deststoretype pkcs12".
Convert exported certificate data to PEM format
Now we will convert certificate binary to PEM format using below command where –
-in : Input binary means exported file in last command
In this short tutorial, we will walk you through how to get UUID of the filesystem so that it can be used in /etc/fstab.
UUID entry in /etc/fstab
First of all, keep in mind you need to format your logical volume to get UUID registered in the kernel for it. Logical volume without filesystem on it won’t be having UUID attached to it. If you are using partitioning volume manager then disk partitions will have PARTUUID (partition UUID) even if you don’t format them. But it’s not useful in /etc/fstab since fstab deals with formatted partitions.
How to find UUID for logical volume
For this tutorial consider below setup –
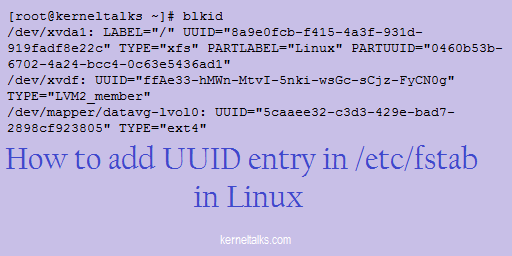
[root@kerneltalks ~]# lsblk
NAME           MAJ:MIN RM  SIZE RO TYPE MOUNTPOINT
xvda           202:0    0    8G  0 disk
└─xvda1        202:1    0    8G  0 part /
xvdf           202:80   0    1G  0 disk
└─datavg-lvol0 253:0    0 1020M  0 lvm
We have one logical volume named lvol0 in the volume group datavg and now we need to find UUID for it. Use command blkid and grep for your logical volume name to get your desired output –
We are mounting it on /data directory with default mount options and no fschecks. Add this entry to fstab and run mount -a and mount point established!
[root@kerneltalks ~]# df -Ph /data1
Filesystem                Size  Used Avail Use% Mounted on
/dev/mapper/datavg-lvol0  988M  2.6M  919M   1% /data
How to find UUID for disk partition
Consider below setup for finding UUID for disk partition.
[root@kerneltalks ~]# lsblk
NAME    MAJ:MIN RM  SIZE RO TYPE MOUNTPOINT
xvda    202:0    0    8G  0 disk
└─xvda1 202:1    0    8G  0 part /
xvdf    202:80   0    1G  0 disk
└─xvdf1 202:81   0 1023M  0 part
Here we have one non-root disk /dev/xvdf with one full partition /dev/xvdf1 on it. And it’s not yet formatted with any filesystem. Now if you run blkid command you will find PARTUUID for this partition.
You can compare this output with earlier one and you can see after formatting with ext4 you get UUID which can be used in /etc/fstab as explained earlier in this post.
Learn how to install sar utility in SUSE Linux. Also, it lists commands to enable sar to collect monitoring data in the background.
sar command in SUSE Linux
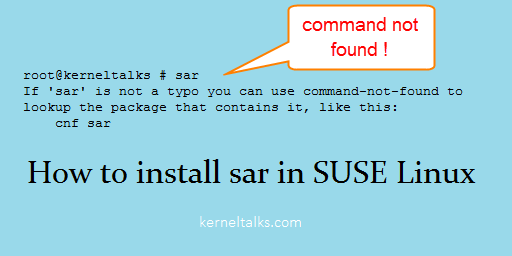
sar is a monitoring utility mostly native to Linux. But with SUSE Linux you can not find sarpre-installed. There you will see an error like one below :
root@kerneltalks # sar
If 'sar' is not a typo you can use command-not-found to lookup the package that contains it, like this:
    cnf sar
To make sar available on SUSE, you need to install package named sysstat. If you have zypper repo configured then you can directly run below command :
root@kerneltalks # zypper in sysstat
Refreshing service 'SUSE_Linux_Enterprise_Server_12_SP3_x86_64'.
Loading repository data...
Reading installed packages...
Resolving package dependencies...

The following NEW package is going to be installed:
  sysstat

1 new package to install.
Overall download size: 358.7 KiB. Already cached: 0 B. After the operation,
additional 1.3 MiB will be used.
Continue? [y/n/...? shows all options] (y): y
Retrieving package sysstat-12.0.2-10.15.1.x86_64
                                           (1/1), 358.7 KiB (  1.3 MiB unpacked)
Retrieving: sysstat-12.0.2-10.15.1.x86_64.rpm ..............[done (160.0 KiB/s)]
Checking for file conflicts: .............................................[done]
(1/1) Installing: sysstat-12.0.2-10.15.1.x86_64 ..........................[done]
If zypper repo is not configured you can download appropriate rpm for your kernel version and install using rpm command. We used SUSE12SP3 here for a demonstration.
Once done you need to start sysstat service so that it will start collecting monitoring data in the background. Also, enable this service at boot so that after reboot it starts itself and keeps on collecting data in the background.
root@kerneltalks # systemctl enable sysstat
Created symlink from /etc/systemd/system/multi-user.target.wants/sysstat.service to /usr/lib/systemd/system/sysstat.service.

root@kerneltalks # systemctl start sysstat
That’s it. You have installed sar on SUSE Linux and started collecting monitoring data.