Category Archives: Howto

How to run your script with system boot in HPUX

A how-to guide for a running script or starting your custom coded daemon/service at system boot. Use the RC script directory to load custom daemons at boot.

There are many daemons and system services which starts with system boot. You might be wondering how to add your own script or customized daemon or service in boot sequence so that when the system is booted its there already running.

In this article, we will be seeing how to run your script with system boot in HPUX. First, we will create a small script that will be taking the start, stop arguments to call your original script/daemon/service. Then we will keep this script inside an appropriate run level RC directory so that it will be executed when the system enters that run level.

Let’s assume you have /usr/sbin/my_agentd to start at boot. You can create an additional script /sbin/init.d/my_agent which can take the start, stop options like below :

# cat /sbin/init.d/my_agent

choice=$1
case $choice in
"start")
        cd /usr/sbin
        ./my_agentd <other option if any>
        ;;
"stop")
        ps -ef|grep -i my_agentd|grep -v grep|awk '{print $2}'|xargs kill -9
        ;;
esac

The above script will take the start and stop as arguments. It will execute your agent binary when supplied with start argument and kills your running agent if supplied with a stop option. It is advisable to keep this script in /sbin/init.d directory since there lives all start, stop scripts of daemons or services.

Make sure you give proper executable permissions to this newly crafted script file.

# chmod 555 /sbin/init.d/my_agent

Now the last step is to have this script executed with run-level 3 (multi-user mode). To accomplish this, create a link for this file in /sbin/rc3.d directory.

/sbin/rc3.d directory contains all run level 3 related startup scripts. Keeping yours in it makes sure that it will start with run level 3.

# cd /sbin/rc3.d
# ln -s /sbin/init.d/my_agent S99my_agent

You are all set!

Now, whenever your system enters run level 3. It will try to execute S99my_agent file with the start argument. Which in turn calls /sbin/init.d/my_agent since its a link. When /sbin/init.d/my_agent (our coded script) gets start an argument, it calls /usr/sbin/my_agentd which is your customized daemon/service/script.

Step by step procedure to take ignite tape backup in HPUX

A stepwise how-to guide for Ignite tape backup. Includes media check commands, backup log analysis, and troubleshooting steps.

Ignite is an OS backup solution for HPUX. This tool is developed by HP and available under the brand name Ignite-UX. It’s used to take system backup like a ghost image in the case of Windows. Complete OS can be restored using an ignite backup solution in case of any system failure. Ignite offers a network backup solution and tape backup solution. During network backup, OS backup is stored on ignite server over the network, and in event of restoring it’s restored over the network only (System should be booted with PXE boot). In tape backup, OS backed up in locally connected tape drive and restoration happens by booting system through bootable tape.

One needs to install this utility since it’s not native to HPUX. You can check if it’s installed or not using below command :

# /usr/sbin/swlist -l product |grep -i ignite
  Ignite-UX             C.7.12.519     HP-UX System Installation Services

If not installed, you need to purchase it and install on your HPUX machine.

In this post we will see how to take ignite tape backup along with its logs, troubleshooting and media check commands.

Media check :

Before starting your backup on tape you need to check if tape drive and media are functioning properly. After connecting your tape drive to the system and powering it on, you can identify it using ioscan -fnCtape & insf -e command. Its device name should be something like /dev/rmt/0mn . Once you identify device name for the tape you can check its status wit mt command:

# mt -t /dev/rmt/0mn status
Drive:  HP Ultrium 2-SCSI
Format:
Status: [41114200] BOT online compression immediate-report-mode
File:   0
Block:  0

Once you are able to get the status of media means tape drive is functioning properly and correctly identified in the kernel. Now you can go ahead with the backup procedure.

Taking ignite tape backup :

Ignite tape backup can be run using the command make_tape_recovery. This binary resides in /opt/ignite/bin. This command supports a list of options but we are seeing here most used ones :

  • -A: Checks disks/volume group and adds files in backup which are specified for backup inclusion
  • -v: Verbose mode
  • -I: Cause the system recovery process to be interactive when booting from the tape.
  • -x : Extra options (include=file|dir, exclude=file|dir,  inc_entire=VG or Disk) define inclusion/exclusion of file/dir/vg/disk
  • -a: tape drive address
  • -d: Description which will be displayed for archive
  • -i: Interactive execution

Since ignite is aimed at OS backup, normally we take VG00 i.e. root volume group’s backup only in Ignite tape backup. Let’s see one example :

# /opt/ignite/bin/make_tape_recovery -AvI -x inc_entire=vg00 -a /dev/rmt/0mn -x exclude=/data

=======  12/27/16 03:00:00 EDT  Started /opt/ignite/bin/make_tape_recovery.
         (Tue Dec 27 03:00:00 EDT 2016)
         @(#) Ignite-UX Revision B.4.4.12
         @(#) net_recovery (opt) $Revision: 10.611 $


       * Testing pax for needed patch
       * Passed pax tests.

----- output clipped -----

In the above example, we have started to ignite backup with all VG00 included (-x inc_entire=vg00), excluding /data mount point which is part of vg00 (-x exclude=/data), on tape drive at 0mn (-a /dev/rmt/0mn) with the interactive boot menu in the backup (-I). Verbose mode (-v) starts printing all outputs on the terminal screen as shown above.

It takes normally half an hour or more to complete backup depending on the size of your files included in the backup. If your terminal timeout is short value then you can put this command in the background (with below command) so that it won’t get killed when your terminal timed out and disconnect.

# /opt/ignite/bin/make_tape_recovery -AvI -x inc_entire=vg00 -a /dev/rmt/0mn -x exclude=/data >/dev/null 2>&1

Don’t worry all outputs are being logged to a log file so that you can analyze it later. Last few lines of output are as below which

declares backups has been completed successfully.

----- output clipped -----
       /var/tmp/ign_configure/make_sys_image.log
       /var/spool/cron/tmp/croutFNOa01327
       /var/spool/cron/tmp/croutBNOa01327
       /var/spool/cron/tmp/croutGNOa01327

       * Cleaning up old configuration file directories


=======  12/27/16 03:12:19 EDT make_tape_recovery completed successfully.

You can even schedule an Ignite backup in crontab on a monthly, weekly, or daily basis depending on your requirement.

Log files :

Your latest run output is saved under /var/opt/ignite/recovery/latest/recovery.log. All other run’s details are saved under  /var/opt/ignite/recovery directory. Whenever command runs it links the latest directory to the current run’s directory. See the below output to get an idea.

# ll /var/opt/ignite/recovery
total 14240
drwxr-xr-x   2 root       root          8192 Nov 27 03:12 2016-11-27,03:00
drwxr-xr-x   2 root       root          8192 Dec 27 03:12 2016-12-27,03:00
lrwxr-xr-x   1 root       sys             16 Dec 27 03:00 latest -> 2016-12-27,03:00
----- output clipped -----

If ignite fails then recovery.log is the first place to look for a reason for failure.

Troubleshooting :

This part is really hard to cover since there can be numerous reasons why Ignite fails. But let me cover few common reason here –

  1. Tape media is faulty (check EMS logs, Syslog)
    • Solution: media replacement
  2. The tape drive is faulty (check ioscan status, EMs, Syslog) 
    • Solution: hardware replacement
  3. One or more VG exist in /etc/lvmtab but not active on the system (verify /etc/lvmtab with bdf)
    • Solution: Remove inactive VG from lvmtab or made them active on the system
  4. One or more LVOLs  exist in /etc/lvmtab but not active on the system  (verify /etc/lvmtab with bdf)
    • Solution: Remove inactive lvol from lvmtab or mount them on system
  5. ERROR:   /opt/ignite/bin/save_config failed : One of the system attached disk/lun is faulty.
    • Solution: check hardware and replace it.

How to install patch/software in HPUX

A how-to guide for the installation of patch or software on the HPUX operating environment. This includes steps to install, configure, and verify.

This post is a how-to guide that has steps to install, configure, and verify patch or software on HPUX operating system. Before we begin the patching process, one needs to finalize the downtime window for patching with the concerned team.  Also, if individual patches are planned to install then patch ID needs to be known to download from the HP portal. HP Passport ID required to sign-in on the HP portal.

Also read: HPUX patch naming conventions

HPUX patching enables a system with new features, enhancements and removes bugs if any. HP releases patch bundles for HPUX every 6 months i.e twice in a year. These bundles can be downloaded and applied to the system. Also, individual patches can be downloaded. For individual patches, one should know the patch ID first.

Prerequisite :

  • Log in to the HP portal and download required patches. HP provides the facility to download your required patch along with its all dependencies so you need not to again search for dependencies separately.  When prompted for download, select the gzip bundle format.
  • Upload the patch on the server using FTP. Unzip patch file which will have create_depot script inside. When executed,  this script will create $PWD/depot directory which includes all patches to be installed. Make sure depot is created properly using:
# /usr/sbin/swlist  -s /tmp/PACPTHP_00001.depot

# Initializing...
# Contacting target "testsrv2"...
#
# Target:  testsrv2:/tmp/PACPTHP_00001.depot
#

#
# No Bundle(s) on testsrv2:/tmp/PACPTHP_00001.depot
# Product(s):
#

  HPOvLcore     6.00.000       HP Software Core Functionality
  HPOvLcore     6.00.000       HP Software Core Functionality
  HPOvPerf      4.70.000       HP OpenView Performance
  HPOvPerf      4.70.000       HP OpenView Performance
  • A server backup is an important thing to be done before any activity. Take ignite backup over network or tape. Also collect nickel, sysinfo outputs from the server. Ensure the downtime window and other related ITIL processes are completed and approved.

Installation & configuration :

Before starting activity make sure all applications on the server are brought down by respective parties. Once confirmed, proceed with patch installation. Install the patch using the command:

# /usr/sbin/swinstall -s /tmp/PACPTHP_00001.depot

NOTE:    The interactive UI was invoked, since no software was
         specified.

Starting the terminal version of swinstall...

To move around in swinstall:

- use the "Tab" key to move between screen elements
- use the arrow keys to move within screen elements
- use "Ctrl-F" for context-sensitive help anywhere in swinstall

On screens with a menubar at the top like this:

        ------------------------------------------------------
       |File View Options Actions                         Help|
       | ---- ---- ------- ------------------------------- ---|

- use "Tab" to move from the list to the menubar
- use the arrow keys to move around
- use "Return" to pull down a menu or select a menu item
- use "Tab" to move from the menubar to the list without selecting a menu item
- use the spacebar to select an item in the list

On any screen, press "CTRL-K" for more information on how to use the keyboard.

This will start the text-based GUI. You can navigate in this GUI menu using, arrow keys and SPACE key. Select the all listed patches using arrow key and space bar to highlight them.

Once marked, select Install option from the Actions menu.

This will take time to install and configure the patch in the system depending upon the size of the depot. This configuration happens in the background with this command execution only.

If the required system will be rebooted post-installation. To check if the patch needs a reboot after install, you can run above swinstall command with -p preview option. Which will just check dependencies, depot health, and show you report. This report includes if a reboot is required or not. Even while downloading the patch from the HP portal, you can view its details which also includes information about reboot requirements.

Verification :

Once the installation is complete, or after reboot, check if all installed patches are configured in the kernel or not using the command :

# swlist -l fileset -a state | grep –v –e “#” –e “configured”

The output of the above command should be blank. If there are any file sets left in an unconfigured/installed state then the above command’s output will reveal it. So, if the output is not blank, you need to configure these unconfigured/installed state file sets manually. To configure all patches again use below command:

# /usr/sbin/swconfig \ *

=======  12/27/16 10:17:15 SST  BEGIN swconfig SESSION
         (non-interactive) (jobid=testsrv2-0396)

       * Session started for user "root@testsrv2".

       * Beginning Selection
       * Target connection succeeded for "testsrv2:/".

----- output clipped -----
 * Selection succeeded.


       * Beginning Analysis
       * Session selections have been saved in the file
         "/home/user3/.sw/sessions/swconfig.last".
       * "testsrv2:/":  2831 filesets have already been configured.
       * Analysis succeeded.


       * Beginning Execution
       * "testsrv2:/":  2831 software objects were determined to be
         skipped in the analysis phase.
       * Execution succeeded.


NOTE:    More information may be found in the agent logfile using the
         command "swjob -a log testsrv2-0396 @ testsrv2:/".

=======  12/27/16 10:17:59 SST  END swconfig SESSION (non-interactive)
         (jobid=testsrv2-0396)

This command will try to configure the remaining patches. After completion of this command, once again verify your installation.

4 steps guide for SMTP configuration in HPUX

Learn how to configure SMTP in HPUX machines. Know configuration file locations, parameters in config files, and testing commands.

SMTP is the short name for the Simple Mail Transfer Protocol. SMTP is an Internet standard for electronic mail (e-mail) transmission. We have already seen the SMTP configuration in Linux. In this post, we will be seeing SMTP in HPUX.

Pre-requisite

  • Hostname and IP address of SMTP server should be known (e.g. we will use mailserver.xyz.com 10.10.2.5)
  • The client should be able to reach the SMTP server over the network

Configurations

Step 1.

Add SMTP server entry in /etc/hosts file using vi editor or concatenate using echo command below.

# echo "10.10.2.5   mailserver.xyz.com" >> /etc/hosts

# cat /etc/hosts |grep -i mail
10.10.2.5   mailserver.xyz.com

Step 2.

Update daemon configuration file /etc/rc.config.d/mailservs to start the SMTP services with server startup. Edit the file with vi editors and update below entry:

SENDMAIL_SERVER=1

Add the SMTP server detail into SMTP configuration file /etc/mail/sendmail.cf. Edit below two entities

DMxyz.com
Dj<hostname>.com <<Add clients hostname
 DSmailserver.xyz.com
#C{E}root <<hash this entry

Step 3.

Now restart the SMTP daemon to take up this new configuration:

# /sbin/init.d/sendmail stop
Shutting down sendmail          [Done]
Shutting down sm-client         [Done]

# /sbin/init.d/sendmail start
Starting sendmail               [Done]
Starting sm-client              [Done]

Now check if sendmail is running using below command:

# ps -ef |grep -i sendmail
    root  1185     1  0  Nov 11  ?        61:33 sendmail: accepting connections on port 25
    root 21945 21815  0 03:18:28 pts/0     0:00 grep -i sendmail

Step 4.

Send a test mail and verify it.

# echo test | /usr/sbin/sendmail -v info@xyz.com
info@xyz.com... Connecting to mailserver.xyz.com via relay...
220 mailserver.xyz.com  ESMTP Postfix
>>> EHLO xyz.com
250-mailserver.xyz.com 
250-PIPELINING
250-SIZE 25600000
250-VRFY
250-ETRN
250-ENHANCEDSTATUSCODES
250-8BITMIME
250 DSN
>>> MAIL From:<root@xyz.com> SIZE=5
250 2.1.0 Ok
>>> RCPT To:<info@xyz.com>
250 2.1.5 Ok
>>> DATA
354 End data with <CR><LF>.<CR><LF>
>>> .
250 2.0.0 Ok: queued as 715C48203C
info@xyz.com... Sent (2.0.0 Ok: queued as 715C48203C)
Closing connection to mailserver.xyz.com
>>> QUIT
221 2.0.0 Bye

If you don’t receive an email, check logs under /var/adm/syslog/mail.log for troubleshooting.

5 steps guide for SMTP configuration in Linux

Learn how to configure SMTP in Linux machines. Know configuration file locations, parameters in config files, and testing commands.

Simple Mail Transfer Protocol. SMTP is one of the important services in any production system. Nowadays, mail notifications became important to monitor systems in real-time. Hence, it becomes essential to know how to configure mail utilities on servers. To enable any mail program on the system, SMTP is a basic component. It’s a very easy and quick procedure to setup SMTP on servers.

Pre-requisite :

  • Hostname and IP address of SMTP server should be known (e.g. we will use mailserver.xyz.com 10.10.2.5)
  • The client should be able to reach SMTP server over a network

Configurations :

Its 5 steps procedure to setup SMTP client on Linux.

Step 1.

Add SMTP server entry in /etc/hosts file using vi editor or concatenate using echo command below.

# echo "10.10.2.5   mailserver.xyz.com" >> /etc/hosts
# cat /etc/hosts |grep -i mail
10.10.2.5   mailserver.xyz.com
Step 2.

We need to edit the macro configuration file /etc/mail/sendmail.mc. Search and edit below parameters in this file :

  • define(`SMART_HOST',`mailserver.xyz.com'): Smart relay server name
  • define(`confDOMAIN_NAME',`xyz.com')dnl: Valid domain name
  • FEATURE(always_add_domain)dnlalways masquerades email address
  • FEATURE(`allmasquerade')dnl: rewrite both from/to relative to the local machine.
  • MASQUERADE_DOMAIN(`xyz.com.')dnl: Domain for masquerading emails
  • MASQUERADE_AS(`xyz.com')dnl: All mails masquerades as came from the defined domain
Step 3.

Once the above changes are done, you need to compile the mc file so that all these changes of the macro (mc) file will be transferred to the config ( cf) file using m4 utility.

# m4 /etc/mail/sendmail.mc > /etc/mail/sendmail.cf
Step 4.

Edit below parameters in /etc/mail/submit.cf so that mails will be submitted to defined domain.

D{MTAHost} mailserver.xyz.com 
Djxyz.com: Define this in case of sendmail won’t able to determine your domain.
DSmailserver.xyz.com: Smart relay host

Step 5.

Finally, restart mail services to take up this new configurations :

# service sendmail restart
# service postfix restart

You are done! Send a test email with the below command and check if you receive it.

# echo test |sendmail -v info@xyz.com
[<-] 220 mailserver.xyz.com ESMTP Postfix
[->] HELO testsrv2
[<-] 250 mailserver.xyz.com
[->] MAIL FROM:<root@xyz.com>
[<-] 250 2.1.0 Ok
[->] RCPT TO:<info@xyz.com>
[<-] 250 2.1.5 Ok
[->] DATA
[<-] 354 End data with <CR><LF>.<CR><LF>
[->] Received: by testsrv2 (sSMTP sendmail emulation); Fri, 23 Dec 2016 02:29:07 +0800
[->] From: "root" <root@xyz.com>
[->] Date: Fri, 23 Dec 2016 02:29:07 +0800
[->] test
[->]
[->] .
[<-] 250 2.0.0 Ok: queued as 19F75822B8
[->] QUIT
[<-] 221 2.0.0 Bye

If you don’t receive an email, check logs under /var/log/maillog for troubleshooting.

How to save top command output in file

A how-to guide to save top command output in a simple text file. A useful tip to share real-time, dynamic command output in a static log file.

TOP is the first command that came to mind whenever someone asks about system resource utilization monitoring. CPU, memory utilization can be easily tracked in this tool. This tool is available to almost every UNIX and Linux flavor.

The top command outputs in a real-time updating ASCII window. Data within this ASCII GUI screen updates every 2 seconds in real-time. So all bits in it change every time and its difficult to share its output to anyone who doesn’t have access to the system. Also, if you want to collect the current output and save for future use then that’s also not possible due to updating data.

For such a situation where you want to save data being shown in the output window, top command gives you options of iterations and output files. You can define how many iterations you need and the time difference between them. It works like iterations and intervals in SAR command. Use the below options to save the output in a file.

  • -b: batch operation mode
  • -n: number of iterations
  • -d: Delay i.e. intervals between iterations (not needed for single iteration)
  • -f file: Output file in which command saves data (supports in few versions only)

We are using a batch operation mode of the top. By defining, iterations you ask top command to stop execution after that many counts. Normally it runs continuously with a delay of 2 sec. This makes it easy to capture the output in a file using -o option. If -o is not supported then you can simply redirect output to file using redirection operator.

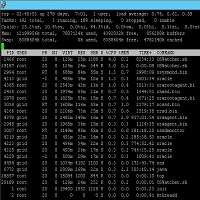
# top -n 1 -b >/tmp/top_output.txt
# cat  /tmp/top_output.txt
top - 02:58:22 up 278 days,  7:19,  1 user,  load average: 0.56, 0.52, 0.56
Tasks: 189 total,   1 running, 188 sleeping,   0 stopped,   0 zombie
Cpu(s): 10.8%us,  4.9%sy,  0.0%ni, 84.0%id,  0.2%wa,  0.0%hi,  0.0%si,  0.0%st
Mem:  12199956k total,  7774572k used,  4425384k free,   856212k buffers
Swap:  8388604k total,        0k used,  8388604k free,  4787268k cached

  PID USER      PR  NI  VIRT  RES  SHR S %CPU %MEM    TIME+  COMMAND
 2994 root      RT   0  688m  84m  55m S  7.9  0.7   2998:17 osysmond.bin
 4227 grid      20   0  501m  29m  17m S  2.0  0.3 458:12.36 oracle
 4229 grid      -2   0  500m  29m  17m S  2.0  0.3   1009:43 oracle
 4251 grid      20   0  485m  27m  25m S  2.0  0.2 112:07.76 oracle
 4266 root      20   0 2206m  73m  25m S  2.0  0.6   2519:45 crsd.bin
    1 root      20   0 19400 1552 1228 S  0.0  0.0   0:03.23 init
    2 root      20   0     0    0    0 S  0.0  0.0   0:00.41 kthreadd
    3 root      20   0     0    0    0 S  0.0  0.0  56:25.42 ksoftirqd/0
----- output clipped -----

In the above example, I ran the top command with a single iteration only. Since its single iteration, I didn’t use a delay option. Also -o option was not supported so I redirected output to a file. You can see the content of the file is the top command output screen!

If you use more than 1 iteration lets say 2. Then there will 2 top output screens concatenated one after another in a log file. So it will be like you have a snapshot of all values for a given period of time for future reference. See example below:

# top -n 2 -d 4 -b >/tmp/top_out.txt
# cat /tmp/top_out.txt
top - 03:07:39 up 278 days,  7:28,  1 user,  load average: 0.43, 0.51, 0.54
Tasks: 191 total,   1 running, 190 sleeping,   0 stopped,   0 zombie
Cpu(s): 10.8%us,  4.9%sy,  0.0%ni, 84.0%id,  0.2%wa,  0.0%hi,  0.0%si,  0.0%st
Mem:  12199956k total,  7762352k used,  4437604k free,   856212k buffers
Swap:  8388604k total,        0k used,  8388604k free,  4774904k cached

  PID USER      PR  NI  VIRT  RES  SHR S %CPU %MEM    TIME+  COMMAND
 4213 grid      -2   0  485m  14m  12m S  2.0  0.1   5601:55 oracle
    1 root      20   0 19400 1552 1228 S  0.0  0.0   0:03.23 init
    2 root      20   0     0    0    0 S  0.0  0.0   0:00.41 kthreadd
    3 root      20   0     0    0    0 S  0.0  0.0  56:25.58 ksoftirqd/0
    6 root      RT   0     0    0    0 S  0.0  0.0 399995:22 migration/0
    7 root      RT   0     0    0    0 S  0.0  0.0   1:17.98 watchdog/0
    8 root      RT   0     0    0    0 S  0.0  0.0 399911:47 migration/1
   10 root      20   0     0    0    0 S  0.0  0.0  31:40.41 ksoftirqd/1
   11 root      20   0     0    0    0 S  0.0  0.0  19:42.29 kworker/0:1
  
----- output clipped -----

top - 03:07:44 up 278 days,  7:28,  1 user,  load average: 0.48, 0.51, 0.55
Tasks: 193 total,   4 running, 189 sleeping,   0 stopped,   0 zombie
Cpu(s): 24.5%us, 10.1%sy,  0.0%ni, 65.1%id,  0.2%wa,  0.0%hi,  0.0%si,  0.0%st
Mem:  12199956k total,  7803692k used,  4396264k free,   856212k buffers
Swap:  8388604k total,        0k used,  8388604k free,  4774968k cached

  PID USER      PR  NI  VIRT  RES  SHR S %CPU %MEM    TIME+  COMMAND
 2466 root      20   0  129m  25m 1288 S  6.6  0.2   8235:08 OSWatcher.sh
15104 root      20   0  129m  24m  344 R  1.8  0.2   0:00.09 OSWatcher.sh
 4213 grid      -2   0  485m  14m  12m S  1.4  0.1   5601:55 oracle
 2994 root      RT   0  688m  84m  55m S  1.0  0.7   2998:22 osysmond.bin
 3038 grid      RT   0 1608m 116m  53m S  0.8  1.0   2379:27 ocssd.bin
 4385 root      20   0 2543m  42m  13m S  0.8  0.4   3013:44 orarootagent.bi
----- output clipped -----

You can even put up a cron to save the output of top commands to some log file. But this is not recommended since it will pile up logfile in no time and hence fill mount point rapidly. Anyway, we have in-depth utilization data being collected by OS which can be viewed using SAR utility.

-f option which is available in HPUX native top utility has few limitations. It stores only the first 16 lines of output to file and it supports only one iteration. 16 lines limitations make logfile quite short and it shows mainly header values CPU, memory, etc. Most of the processes related to data get lost. See example below :

$ top -f /tmp/test
$ cat /tmp/test
System: testsrv3 Wed Dec 21 03:18:19 2016
Load averages: 0.03, 0.04, 0.04
246 processes: 168 sleeping, 78 running
Cpu states:
CPU   LOAD   USER   NICE    SYS   IDLE  BLOCK  SWAIT   INTR   SSYS
 0    0.04   0.0%   0.0%   0.2%  99.8%   0.0%   0.0%   0.0%   0.0%
14    0.03   0.0%   0.0%   0.0% 100.0%   0.0%   0.0%   0.0%   0.0%
15    0.03   0.0%   0.0%   0.2%  99.8%   0.0%   0.0%   0.0%   0.0%
16    0.04   0.0%   0.0%   0.4%  99.6%   0.0%   0.0%   0.0%   0.0%
17    0.02   0.2%   0.0%   0.4%  99.4%   0.0%   0.0%   0.0%   0.0%
18    0.04   0.0%   0.0%   0.0% 100.0%   0.0%   0.0%   0.0%   0.0%
---   ----  -----  -----  -----  -----  -----  -----  -----  -----
avg   0.03   0.0%   0.0%   0.2%  99.8%   0.0%   0.0%   0.0%   0.0%

System Page Size: 4Kbytes
Memory: 1679640K (1411160K) real, 3170312K (2643480K) virtual, 30532328K free  P
CPU TTY  PID USERNAME PRI NI   SIZE    RES STATE    TIME %WCPU  %CPU COMMAND

How to get directory size in Linux

Learn how to get directory total size in Linux without calculating each and every file’s size within. A very handy command to troubleshoot mount point utilization.

Many times we need to check specific directory size to hunt down the culprit of mount point utilization. There are scenarios where mount points keep getting full and we need to investigate which file or directory is hogging most of the space.

Collectively to check the highest file or directories, I already briefed on post Highest size files in the mount point. Let’s see how we can get directory’s collective size in one go.

We will be using disk usage command du and below of its options :

  • -s: Display the only summary of each element
  • -h: Human readable format for size i.e. KB, MB, GB
  • -c: Produce grand total i.e.  display the total size
# du -sch /dump1/test/mydir
13G     /dump1/test/mydir
13G     total

Here, the specified directory is 13GB. It’s a size of /dump1/test/mydir directory not of /dmp1.

If you want to check the size of every object beneath the specified directory then you can skip -s i.e. summery option from the command.

# du -ch /tmp
4.0K    /tmp/hsperfdata_oracle11
4.0K    /tmp/orbit-root

----- output clipped -----

4.0K    /tmp/keyring-VPiB3D
16K     /tmp/lost+found
652K    /tmp
652K    total

In the above output, you can see each and every object’s size is given and finally at the end total is given which is the final size of the specified directory!

Let me know if you have any queries/questions/feedback in the comments. Also, drop us a message on our contact form.

File encryption / password protect file in HPUX

Learn how to password protect files in HPUX. This is helpful to encrypt some public readable files using a password and decrypt them whenever needed.

It’s pretty obvious that you can control file access using permissions but sometimes you may want to protect file lying in a public directory like with password of your choice. Or sometimes you may want even root shouldn’t read your files 😉

In that case, you can use crypt command to encrypt your file with a password of your choice. This command is available in HPUX, Solaris. I couldn’t found it in Linux though. crypt command is basically used to encrypt or decrypt files. So basically you will be encrypting your file with the key of your choice and whenever you want to read it back, you need to decrypt it by supplying password/key you chose at the time of encryption.

Locking / encrypting file with key

Let’s take a myfile.txt sample file for encryption. You need to supply this file as an input to crypt command and define the output file (see example below).

# cat myfile.txt
This is test file for crypt.

# crypt < myfile.txt > myfile.crypt
Enter key:

# cat myfile.crypt
3▒▒▒x▒▒X▒n▒d▒6▒▒=▒▒q▒j

Now, crypt command will ask you for a key. Its a password you can set of your choice. Note that, it won’t ask you to retype key. Once executed you can new output file created (with the name given in command). This file is encrypted and can’t be read using cat, more etc commands!

That’s it! your file in encrypted. Now you can safely delete your original file myfile.txt and keep an encrypted copy on the machine.

Unlocking / decrypting file with key

Now, to retrieve file content back i.e. decryption of file you can run the same command. Only input and output file names will be exchanging their positions. Now, the encrypted filename will be your input file and the original filename will be the output file name.

# rm myfile.txt
# crypt < myfile.crypt > myfile.txt
Enter key:
# ll myfile.txt
-rw-------   1 root       users           29 Dec 12 11:51 myfile.txt
# cat myfile.txt
This is test file for crypt.

crypt command checks input file and get to know its encrypted one. So it uses key supplied by user to decrypt it into output file specified in command. You get your file back as it was!

Howto get CPU details in HPUX

Learn how to extract CPU, core, socket details in HPUX. Get familiar with hardware related commands like print_manifest, machinfo, cstm, ioscan.

There are many times when one has to check CPU details of the server which are like the number of cores, sockets, etc. This detail is useful in capacity planning, troubleshooting, performance analysis, etc. There are many ways to get these details as below –

  • ioscan command
  • cstm tool
  • print_manifest report
  • machinfo command
  • MP console
  • top command
  • SAR output

Before going into these methods make sure you check if logical CPUs are enabled on server or not. If yes then you need to take that into consideration while calculating the number of CPUs.

Let’s see the above methods one by one.

ioscan command

This is a well-known command to every HPUX server administrator. To scan or list hardware on the system, we use this command. Filtering processors out of this command give you details about CPU. This is helpful to get the only number of processors on the system.

# ioscan -kfnC processor
Class       I  H/W Path  Driver    S/W State H/W Type  Description
===================================================================
processor   0  128       processor CLAIMED   PROCESSOR Processor
processor   1  129       processor CLAIMED   PROCESSOR Processor
processor   2  136       processor CLAIMED   PROCESSOR Processor
processor   3  137       processor CLAIMED   PROCESSOR Processor
processor   4  144       processor CLAIMED   PROCESSOR Processor
processor   5  145       processor CLAIMED   PROCESSOR Processor
processor   6  152       processor CLAIMED   PROCESSOR Processor
processor   7  153       processor CLAIMED   PROCESSOR Processor

# ioscan -kfnC processor | grep processor|wc -l
8

cstm tool

CSTM is another famous tool native to HPUX used to deal with hardware. This will give you in-depth details about each processor on the system. Type /usr/sbin/cstm and you will be on CSTM shell. Here type is below command :

cstm>selclass qualifier cpu;infolog
-- Converting multiple raw log files to text. --
Preparing the Information Tool Log for each selected device...

.... server1  :  10.10.11.1 ....

-- Information Tool Log for CPU on path 128 --

Log creation time: Wed Jul 20 11:09:00 2016

Hardware path: 128


Product ID:                CPU          Module Type:              0
Hardware Model:            0x894        Software Model:           0x4
Hardware Revision:         0            Software Revision:        0
Hardware ID:               0            Software ID:              3848593997
Boot ID:                   0x2          Software Option:          0x91
Processor Number:          0            Path:                     128
Hard Physical Address:     0xfffffffffe780000     Soft Physical Address:    0

Slot Number:               0            Software Capability:      0x100000f0
PDC Firmware Revision:     46.34        IODC Revision:            0
Instruction Cache [Kbyte]: 768          Processor Speed:          N/A
Processor State:           CPU Present Configured
Monarch:                   Yes          Active:                   Yes
Data Cache        [Kbyte]: 768
Instruction TLB   [entry]: 240          Processor Chip Revisions: 3.2
Data TLB Size     [entry]: 240          2nd Level Cache Size:[KB] 65536
Serial Number:             44549e6cf43f0605


-----------------  Processor 0 HPMC Information - PDC Version: 46.34  ------

   * * * No valid timestamp * * *
       No HPMC chassis codes logged


General Registers 0 - 31
00-03  0000000000000000  0000000000000000  0000000000000000  0000000000000000
04-07  0000000000000000  0000000000000000  0000000000000000  0000000000000000
08-11  0000000000000000  0000000000000000  0000000000000000  0000000000000000
12-15  0000000000000000  0000000000000000  0000000000000000  0000000000000000
16-19  0000000000000000  0000000000000000  0000000000000000  0000000000000000
20-23  0000000000000000  0000000000000000  0000000000000000  0000000000000000
24-27  0000000000000000  0000000000000000  0000000000000000  0000000000000000
28-31  0000000000000000  0000000000000000  0000000000000000  0000000000000000


Control Registers 0 - 31
00-03  0000000000000000  0000000000000000  0000000000000000  0000000000000000
04-07  0000000000000000  0000000000000000  0000000000000000  0000000000000000
08-11  0000000000000000  0000000000000000  0000000000000000  0000000000000000
12-15  0000000000000000  0000000000000000  0000000000000000  0000000000000000
16-19  0000000000000000  0000000000000000  0000000000000000  0000000000000000
20-23  0000000000000000  0000000000000000  0000000000000000  0000000000000000
24-27  0000000000000000  0000000000000000  0000000000000000  0000000000000000
28-31  0000000000000000  0000000000000000  0000000000000000  0000000000000000


Space Registers 0 - 7
00-03  0000000000000000  0000000000000000  0000000000000000  0000000000000000
04-07  0000000000000000  0000000000000000  0000000000000000  0000000000000000


IIA Space (back entry)       = 0x0000000000000000
IIA Offset (back entry)      = 0x0000000000000000
Check Type                   = 0x00000000
Cpu State                    = 0x00000000
Cache Check                  = 0x00000000
TLB Check                    = 0x00000000
Bus Check                    = 0x00000000
Assists Check                = 0x00000000

Assist State                 = 0x00000000
Path Info                    = 0x00000000
System Responder Address     = 0x0000000000000000
System Requestor Address     = 0x0000000000000000


Floating Point Registers 0 - 31
00-03  0000000000000000  0000000000000000  0000000000000000  0000000000000000
04-07  0000000000000000  0000000000000000  0000000000000000  0000000000000000
08-11  0000000000000000  0000000000000000  0000000000000000  0000000000000000
12-15  0000000000000000  0000000000000000  0000000000000000  0000000000000000
16-19  0000000000000000  0000000000000000  0000000000000000  0000000000000000
20-23  0000000000000000  0000000000000000  0000000000000000  0000000000000000
24-27  0000000000000000  0000000000000000  0000000000000000  0000000000000000
28-31  0000000000000000  0000000000000000  0000000000000000  0000000000000000


PIM Revision                 = 0x0000000000000000
CPU ID                       = 0x0000000000000000
CPU Revision                 = 0x0000000000000000
Cpu Serial Number            = 0x0000000000000000
Check Summary                = 0x0000000000000000
SAL Timestamp                = 0x0000000000000000
System Firmware Rev.         = 0x0000000000000000
PDC Relocation Address       = 0x0000000000000000
Available Memory             = 0x0000000000000000
CPU Diagnose Register 2      = 0x0000000000000000
MIB_STAT                     = 0x0000000000000000
MIB_LOG1                     = 0x0000000000000000
MIB_LOG2                     = 0x0000000000000000
MIB_ECC_DATA                 = 0x0000000000000000
ICache Info                  = 0x0000000000000000
DCache Info                  = 0x0000000000000000
Sharedcache Info1            = 0x0000000000000000
Sharedcache Info2            = 0x0000000000000000
MIB_RSLOG1                   = 0x0000000000000000
MIB_RSLOG2                   = 0x0000000000000000
MIB_RQLOG                    = 0x0000000000000000
MIB_REQLOGa                  = 0x0000000000000000
MIB_REQLOGb                  = 0x0000000000000000

Reserved                     = 0x0000000000000000
Cache Repair Detail          = 0x0000000000000000

PIM Detail Text:


--------------  Memory Error Log Information  --------------

   No errors logged for this bus

------------  I/O Module Error Log Information  ------------

  No IO subsystem errors recorded

FRU INFORMATION

        Module              Revision
        ------              --------
        PA 8900 CPU Module  3.2
        PA 8900 CPU Module  3.2
        PA 8900 CPU Module  3.2
        PA 8900 CPU Module  3.2
        PA 8900 CPU Module  3.2
        PA 8900 CPU Module  3.2
        PA 8900 CPU Module  3.2
        PA 8900 CPU Module  3.2

Board Info!
  Format Version  : 0x1                   Language Code : 0x0
  Mfg Date        :                       Mfg Name      : JABIL
  Product Name    : augustus baseboard
  Serial Number   : 52JAPE4822000149
  Part Number     : A6961-60401
  Fru File Tp/Len : 0x1  Fru File :
  Revision        : A  Eng Date Code : 4728
  Artwork Rev     : A5  Fru Info :


=-+-=-+-=-+-=-+-=-+-=-+-=-+-=-+-=-+-=-+-=-+-=-+-=-+-=-+-=-+-=-+-=-+-=-+-=-+-=

----- output clipped -----

I showed only one processor details above.

print_manifest report

This command comes bundled with the Ignite Ux package. If you have ignite installed on your server you will be able to run this command. This command shows a number of the processor along with its speed.

# print_manifest

NOTE: Could not read the /etc/resolv.conf file.

System Information

    Your Hewlett-Packard computer has software installed and
    configured as follows.

    The system was created September 24, 2008, 02:30:54 EDT.
    It was created with Ignite-UX revision C.6.10.97.

-------------------------------------------------------------
NOTE: You should retain this information for future reference.
-------------------------------------------------------------


System Hardware

    Model:              9000/800/rp4440
    Main Memory:        24574 MB
    Processors:         8
    Processor(0) Speed: 999 MHz
    Processor(1) Speed: 999 MHz
    Processor(2) Speed: 999 MHz
    Processor(3) Speed: 999 MHz
    Processor(4) Speed: 999 MHz
    Processor(5) Speed: 999 MHz
    Processor(6) Speed: 999 MHz
    Processor(7) Speed: 999 MHz
    OS mode:            64 bit
    LAN hardware ID:    0x001A4B08AF2E
----- output clipped -----

machinfo command

This command is available from HPUX 11.21 and above on RX models. This command gives you processor numbers, speed, sockets, and core details.

# machinfo
CPU info:
  4 Intel(R) Itanium 2 9000 series processors (1.6 GHz, 12 MB)
          533 MT/s bus, CPU version C2
          6 logical processors

MP console

Login to MP console and enter the command menu by typing cm. Then ss is the command which shows processor status. This shows you processor sockets. So if you are seeing 8 CPU in top command and below output in MP then its 4 processor sockets housing 4 duel-core processors.

[server12] MP:CM> ss

SS

System Processor Status:

   Monarch Processor: 0

   Processor Module 0: Installed and Configured
   Processor Module 1: Installed and Configured
   Processor Module 2: Installed and Configured
   Processor Module 3: Installed and Configured

top command

This is the simplest way to check the number of CPU on HPUX as well as any Linux system. The top output shows your list of the processor at top of the page.

# top
System: server1                                      Fri Nov 25 14:29:06 2016
Load averages: 0.15, 0.11, 0.11
386 processes: 362 sleeping, 24 running
Cpu states:
CPU   LOAD   USER   NICE    SYS   IDLE  BLOCK  SWAIT   INTR   SSYS
 0    0.13  23.8%   0.0%   0.0%  76.2%   0.0%   0.0%   0.0%   0.0%
 1    0.18  25.7%   0.0%   7.9%  66.3%   0.0%   0.0%   0.0%   0.0%
 2    0.16  14.9%   0.0%   2.0%  83.2%   0.0%   0.0%   0.0%   0.0%
 3    0.13   3.0%   0.0%   5.0%  92.1%   0.0%   0.0%   0.0%   0.0%
 4    0.13  23.8%   0.0%   4.0%  72.3%   0.0%   0.0%   0.0%   0.0%
 5    0.15  17.8%   0.0%   4.0%  78.2%   0.0%   0.0%   0.0%   0.0%
 6    0.15  11.9%   0.0%   4.0%  84.2%   0.0%   0.0%   0.0%   0.0%
 7    0.16  20.8%   0.0%   5.0%  74.3%   0.0%   0.0%   0.0%   0.0%
---   ----  -----  -----  -----  -----  -----  -----  -----  -----
avg   0.15  17.8%   0.0%   4.0%  78.2%   0.0%   0.0%   0.0%   0.0%

You can see CPU is numbered from 0 to 8 i.e. total of 8 CPU active.

sar output

Even sar output can be used to determine the number of CPU in the system. Use just one iteration for output for one second. sar will show one row for each cpu value.

Read our SAR tutorials

Counting the number of rows can help us figure out CPU count.

# sar -Mu 1 1

HP-UX apcrss78 B.11.11 U 9000/800    11/25/16

14:41:14     cpu    %usr    %sys    %wio   %idle
14:41:15       0       0       0       0      99
               1       0       1       0      98
               2       0       0       0      99
               3       0       0       0      99
               4       0       0       0      99
               5       0       0       0      99
               6      24       1       0      75
               7       0       1       0      98
          system       3       1       0      96

# sar -Mu 1 1 | awk 'END {print NR-5}'
8

See first command actual output. We are stripping off extra 5 lines which are for total, headers to get exact count using awk. in second command. Even first output shows CPU numbering like top in first column!

Root disk mirroring in itanium HPUX

Step by step root disk mirroring guide for HPUX running on Itanium hardware. Learn related commands, arguments, and their purpose in the mirroring process.

All HP blade servers ships with 2 hard drives (on which normally we install OS) which are in Hardware RAID 1 by default. Which means they are in a mirror serving high redundancy to the server. If one disk fails, the server continues to work from the second disk. But in case of vPars, IVM, and blades where hardware raid is broke manually, we need to do software mirrors for OS disks. This is called root mirroring i.e. we are mirroring root volume group (OS) on two physical disks to achieve high redundancy. Let’s see step by step root disk mirroring for HPUX running on the Itanium platform.

Step 1

Create a partition file that will be used to write on disk to define partitions on the physical disk.

# echo "3
EFI 400MB
HPUX 100%
HPSP 500MB">/tmp/partitionfile

Here we are defining 3 partitions (1st line). EFI partition with 400MB size which will house EFI shell. HPSP i.e. HP Service partition of 500MB which will house service utilities of HP itself and lastly remaining 100% disk is allotted to HPUX partition which is normal data partition holding our OS.

Step 2

Identify disk on the server which is to be mirrored with current root disk. This can be done using ioscan -fnCdiskinsf -e -C disk command. Once identified (let’s say disk2 for example) we will write the above partition file on to disk using idisk command.

# echo yes | idisk -wf /tmp/partitionfile /dev/rdisk/disk2
idisk version: 1.43
********************** WARNING ***********************
If you continue you may destroy all data on this disk.
Do you wish to continue(yes/no)? yes

EFI Primary Header:
        Signature                 = EFI PART
        Revision                  = 0x10000
        HeaderSize                = 0x5c
        HeaderCRC32               = 0x5ca983b2
        MyLbaLo                   = 0x1
        AlternateLbaLo            = 0x3fffff
        FirstUsableLbaLo          = 0x40
        LastUsableLbaLo           = 0x3fffaf
        Disk GUID                 = f7ar7b9c-8f6t-11dc-8000-d6245b60e588
        PartitionEntryLbaLo       = 0x2
        NumberOfPartitionEntries  = 0xc
        SizeOfPartitionEntry      = 0x80
        PartitionEntryArrayCRC32  = 0x4ec7aafc

  Primary Partition Table (in 512 byte blocks):
    Partition 1 (EFI):
        Partition Type GUID       = c12a7328-f81f-11d2-ba4b-00a0c93ec93b
        Unique Partition GUID     = f7cb52cc-8f2d-11dc-8000-d6217b60e588
        Starting Lba              = 0x40
        Ending Lba                = 0xf9fff
    Partition 2 (HP-UX):
        Partition Type GUID       = 75894c1e-3aeb-11d3-b7c1-7b03a0000000
        Unique Partition GUID     = f7cb52f4-8f2d-11dc-8000-d6217b60e588
        Starting Lba              = 0xfa000
        Ending Lba                = 0x337fff
    Partition 3 (HPSP):
        Partition Type GUID       = e2a4t728-32r53-11d6-a623-7b03a0000000
        Unique Partition GUID     = f7cb5312-8f2d-11dc-8000-d6217b60e588
        Starting Lba              = 0x338000
        Ending Lba                = 0x3fffbf

EFI Alternate Header:
        Signature                 = EFI PART
        Revision                  = 0x10000
        HeaderSize                = 0x5c
        HeaderCRC32               = 0xfcc1ebde
        MyLbaLo                   = 0x3fffff
        AlternateLbaLo            = 0x1
        FirstUsableLbaLo          = 0x40
        LastUsableLbaLo           = 0x3fffbf
        Disk GUID                 = f7cb4b9c-8f2d-11dc-8000-d6217b60e588
        PartitionEntryLbaLo       = 0x3fffdf
        NumberOfPartitionEntries  = 0xc
        SizeOfPartitionEntry      = 0x80
        PartitionEntryArrayCRC32  = 0x4ec7aafc

  Alternate Partition Table (in 512 byte blocks):
    Partition 1 (EFI):
        Partition Type GUID       = c12a7328-f81f-11d2-ba4b-00a0c93ec93b
        Unique Partition GUID     = f7cb52cc-8f2d-11dc-8000-d6217b60e588
        Starting Lba              = 0x40
        Ending Lba                = 0xf9fff
    Partition 2 (HP-UX):
        Partition Type GUID       = 75894c1e-3aeb-11d3-b7c1-7b03a0000000
        Unique Partition GUID     = f7cb52f4-8f2d-11dc-8000-d6217b60e588
        Starting Lba              = 0xfa000
        Ending Lba                = 0x337fff
    Partition 3 (HPSP):
        Partition Type GUID       = e2a4t728-32r53-11d6-a623-7b03a0000000
        Unique Partition GUID     = f7cb5312-8f2d-11dc-8000-d6217b60e588
        Starting Lba              = 0x338000
        Ending Lba                = 0x3fffbf

Legacy MBR (MBR Signatures in little endian):
   MBR Signature = 0xd44acbf7

Protective MBR

Step 3

Make the disk bootable with mkboot and write boot instructions on it. Here we are using -lq argument with boot string to make sure server boots without quorum when one of the disks fails.

# mkboot -e -l /dev/rdisk/disk2
# mkboot -a "boot vmunix -lq" /dev/rdisk/disk2

Verify if boot string is properly written on first partition i.e. EFI partition of the disk

# efi_cp -d /dev/rdisk/disk2_p1 -u /EFI/HPUX/AUTO /tmp/x
# cat /tmp/x
boot hpux -lq

Step 4

Now we are taking this disk into OS LVM and mirror. Create PV on this disk. Make sure you use -B argument to understand LVM that its bootable PV.

# pvcreate -B -f /dev/rdisk/disk2_p2
Physical volume "/dev/rdisk/disk2_p2" has been successfully created.

Step 5

Extend current root VG vg00 to accommodate this new disk.

# vgextend vg00 /dev/disk/disk2_p2
Volume group "vg00" has been successfully extended.
Volume Group configuration for /dev/vg00 has been saved in /etc/lvmconf/vg00.conf

Step 6

Mirror all logical volumes on current boot disk on the new disk using mirror copies -m as 1 in an argument in lvextend command.

# lvextend -m 1 /dev/vg00/lvol1 /dev/disk/disk2_p2
The newly allocated mirrors are now being synchronized. This operation will
take some time. Please wait ....
Logical volume "/dev/vg00/lvol1" has been successfully extended.
Volume Group configuration for /dev/vg00 has been saved in /etc/lvmconf/vg00.conf

This task can be easied with for a loop. Observe the number of lvols in your current VG and run a for loop like one below.

# for i in 1 2 3 4 5 6 7 8 9 10
do
lvextend -m 1 /dev/vg00/lvol$i /dev/disk/disk2_p2
done

Step 7

The second last step is to set boot, swap, dump, and root volumes on the new disk.

# lvlnboot -r /dev/vg00/lvol3
Volume Group configuration for /dev/vg00 has been saved in /etc/lvmconf/vg00.conf

# lvlnboot -b /dev/vg00/lvol1
Volume Group configuration for /dev/vg00 has been saved in /etc/lvmconf/vg00.conf

# lvlnboot -s /dev/vg00/lvol2
Volume Group configuration for /dev/vg00 has been saved in /etc/lvmconf/vg00.conf

# lvlnboot -d /dev/vg00/lvol2
Volume Group configuration for /dev/vg00 has been saved in /etc/lvmconf/vg00.conf

Verify it

# lvlnboot -v
Boot Definitions for Volume Group /dev/vg00:
Physical Volumes belonging in Root Volume Group:
        /dev/disk/disk1_p2 -- Boot Disk
        /dev/disk/disk2_p2 -- Boot Disk
Boot: lvol1     on:     /dev/disk/disk1_p2
                        /dev/disk/disk2_p2
Root: lvol3     on:     /dev/disk/disk1_p2
                        /dev/disk/disk2_p2
Swap: lvol2     on:     /dev/disk/disk1_p2
                        /dev/disk/disk2_p2
Dump: lvol2     on:     /dev/disk/disk1_p2, 0

Step 8

Add a new disk name in /stand/bootconf file. Here l means the disk is managed by lvm.

# echo "l /dev/disk/disk2_p2" >> /stand/bootconf

Lastly, set a new disk’s hardware path as an alternative boot path, and you are done. Hardware path of the new disk can be obtained from ioscan output.

# setboot -a 2/0/0/2/0.6.0

Verify it

# /usr/sbin/setboot
Primary bootpath : 2/0/0/3/0.0x6.0x0 (/dev/rdisk/disk1)
HA Alternate bootpath :
Alternate bootpath : 2/0/0/2/0.0x6.0x0 (/dev/rdisk/disk2)

Autoboot is ON (enabled)
Hyperthreading : OFF
               : OFF (next boot)

Your root mirror on new disk completed!!

You can reboot the system and try to boot from alternate disk from EFI to test.