This post details my side project—a one-page resume website that I constructed without incurring any expenses.
What is one-page resume website?
A one-page resume website serves as a digital manifestation of your resume, offering a modern alternative to the traditional paper-based format. While PDF resumes remain effective for email sharing, the dynamic nature of resume websites provides an excellent digital representation of your profile. Particularly advantageous in fields like digital, marketing, and art, a resume website becomes an ideal platform to showcase portfolios, offering a level of presentation that is challenging to achieve with traditional paper or PDF formats.
I created my one-page resume website as a side project. And when it’s budget-friendly, why not!
The one-page resume website is static, meaning its content doesn’t change frequently. Being a single-page site eliminates the need for a content management system, making a basic HTML website the ideal choice – especially if you’re not into web design and don’t have a substantial budget or time commitment.
Since web design isn’t my expertise, I opted for an HTML template as a foundation. If you know HTML, customizing the template with your data is a straightforward task, and your site is ready to be hosted.
I chose a free HTML template, so there’s zero investment made. It’s essential to respect the personal use terms specified by the template providers and include a link back to them on your website.
The backend
Given that it’s a one-page static HTML website, it makes sense to minimize hosting expenses (in terms of money and time). Amazon S3 website hosting seems to be the optimal choice. Uploading files to an S3 bucket, configuring a few settings, and your website is live! You can find the complete procedure here.
Since it’s a single HTML page, my website’s size is a mere 4MB, resulting in negligible (I would say zero) S3 storage charges.
Amazon S3 website hosting provides an AWS-branded HTTP endpoint. If you desire a custom domain or HTTPS protocol, integrating CloudFront with S3 is the solution.
I utilized a subdomain on my existing registered domain and set up a CNAME entry for it against CloudFront’s DNS.
If you don’t have a domain, expect a registration investment of around ~$13 per year. In my case, it was zero. Additionally, CloudFront bills based on the number of requests, so your costs will depend on your website’s traffic. Considering the nature of a personal resume website, significant traffic, and associated costs are negligible.
For HTTPS, you can create a free SSL certificate in Amazon Certificate Manager and use it with the CloudFront distribution.
The result
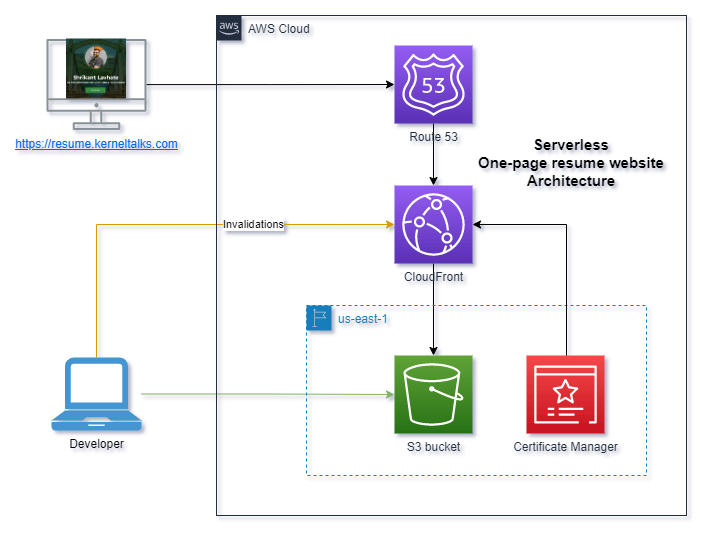
The outcome is a serverless, responsive, compact, HTML-based, secure, static, one-page resume website, leveraging the top-tier CDN, Amazon CloudFront, all achieved with no upfront investment!
Architecture
You could make it more secure by adding a WAF (Web Application Firewall) on top of CloudFront though. Since it was a zero dollar project, WAF was not included in the design at that time.
In this article, we’ll discuss the scalability aspects of AWS PrivateLink. We’ll examine how the expansion of the service consumer VPC count impacts AWS PrivateLink implementation and its management. Additionally, we will delve into key considerations for designing a scalable solution using AWS PrivateLink.
Scale with AWS PrivateLink
AWS PrivateLink Primer
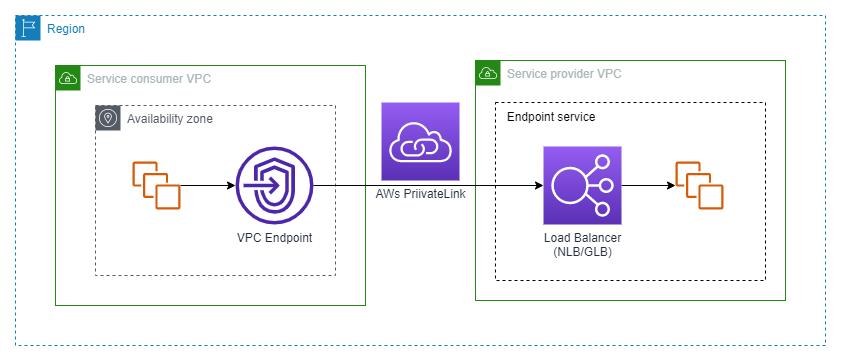
AWS PrivateLink provides a method for making your service accessible to other VPCs through a secure, private network connection over the AWS backbone network. This ensures that your data remains within the AWS network, thereby improving security and lowering data transfer expenses compared to when utilizing the public internet. The basic architecture of AWS PrivateLink is depicted as follows –
AWS PrivateLink architecture
To set up the connection, you must establish an Endpoint Service within the service provider VPC, using a network/gateway load balancer. In the service consumer VPC, you should create a VPC endpoint that links to this Endpoint Service. The endpoint policies facilitate access control by specifying which principles are permitted to connect to the Endpoint Service. Please refer to this AWS documentation for more details.
Scalability aspect
Now, let’s discuss the scalability aspect concerning AWS PrivateLink. When we talk about scalability, we’re referring to the expansion of the number of VPCs acting as service consumers. In scenarios where you have critical or shared services hosted within the service provider VPC and made accessible through AWS PrivateLink for consumption by services located in different VPCs, it’s clear that the count of consumer VPCs will keep increasing. Therefore, it becomes essential to take scalability considerations into account.
Various VPC endpoints situated in different consumer VPCs can establish connections with a single endpoint service located in the service provider VPC. Hence, you can think of a high-level architecture as below –
Multiple VPC endpoints to one endpoint service
Furthermore, it’s important to note that AWS PrivateLink can enable communication to endpoints located in different AWS Regions through the use of Inter-Region VPC Peering.
I recommend reading this AWS blog, which outlines an architecture involving PrivateLink and Transit Gateway. This approach has the potential to significantly decrease the number of VPC endpoints, streamline the deployment of VPC endpoints, and offer cost optimization benefits, especially when implementing solutions at scale.
Scaling considerations
While it’s possible to configure many-to-one connectivity using AWS PrivateLink, there are several important factors to keep in mind when considering this type of scaling:
Cost and management: As you introduce new consumer VPCs to AWS PrivateLink, you’ll also be adding new VPC endpoints to your infrastructure, which can add to your billing and infrastructure management overhead.
AWS PrivateLink quotas: Be sure to take into account AWS PrivateLink quotas, as these define the limits for various aspects of your PrivateLink setup.
Network throughput: VPC endpoints support a maximum throughput of 100Gbps. This is an important consideration for applications that have high network demands when exposed through AWS PrivateLink.
IP requirements: AWS PrivateLink consumes a certain number of IP addresses for Load Balancers and endpoints from your VPC’s IP address pool. Ensure that your VPCs can accommodate these IP requirements without causing IP address exhaustion.
Transit Gateway as an alternative?
Let’s look at Transit Gateway if it can be an alternative in a continually expanding VPC environment.
If unidirectional traffic is your primary requirement, AWS PrivateLink is the choice.
For a cost-efficient solution, AWS PrivateLink is certainly more economical than Transit Gateway.
It’s worth noting that Transit Gateway is not suitable when dealing with VPCs that have overlapping CIDRs.
In a nutshell, Transit Gateway becomes a viable alternative only when you are designing a highly scalable solution involving a significantly huge number of participating VPCs with non-overlapping CIDRs, and your solution prioritizes simplicity and reduced management overhead over cost considerations.
In this guide, we’ll take you through the fundamental concepts of Lambda Function URLs. We’ll discuss their definition, explore their applications, and address security considerations, providing a comprehensive overview.
What is the Lambda Function URL?
It’s a dedicated, unique, and static URL for your Lambda function, enabling remote invocation of the backend Lambda function over the network call. This straightforward and budget-friendly method simplifies Lambda function invocation, bypassing the need for managing complex front-end infrastructure like API Gateway, Load Balancers, or CloudFront. However, this comes at the expense of advanced features provided by these services.
It follows the format:
https://<url-id>.lambda-url.<region>.on.aws
Why to use Lambda Fuction URL?
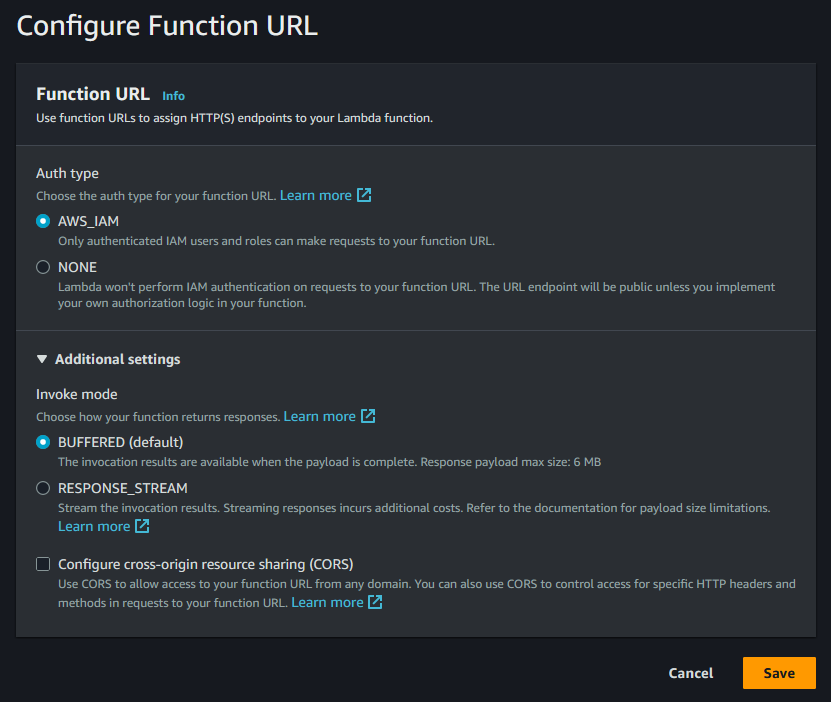
Creating them is quite straightforward and simple. The AuthType (security) is the only configuration you need to provide. CORS config is optional.
They come at no additional cost.
Once configured, they require minimal maintenance.
For straightforward use cases, they can replace the need for designing, managing, and incurring the costs of front-end infrastructure, such as API Gateway.
They are most appropriate for development scenarios where you can prioritize other aspects of applications/architecture over the complexity of Lambda invocation methods.
When to use Lambda Function URLs?
Lambda Function URLs serve a valuable role in accelerating the testing and development of the application, by prioritizing Lambda invocations in the application’s progress, while the method of invocation takes a backseat.
In production, they’re practical when your design doesn’t necessitate the advanced features provided by alternative invocation methods like API Gateway or Load Balancers, etc.
These URLs are also beneficial when dealing with a limited number of Lambdas, offering a simple, cost-effective, and maintenance-free approach to invocations.
How to secure Lambda Function URLs?
You can manage access to Lambda Function URLs by specifying the AuthType, which offers two configurable options:
AWS_IAM: This allows you to define AWS entities (users or roles) that are granted access to the function URL. You need to ensure a proper resource policy is in place allowing intended entities access to Action: lambda:InvokeFunctionUrl
NONE: Provides public, unauthenticated access. Use this option cautiously, as it allows unrestricted access. When you choose this option, Lambda automatically creates a resource-based policy with Principal: * and Action: lambda:InvokeFunctionUrl and attaches to function.
It’s important to remember that Lambda’s resource-based policy is always enforced in conjunction with the selected AuthType. Please read this AWS documentation for more details.
The Lambda resource policy can be configured at Lambda > Configuration > Permissions > Resource-based policy statements.
In this article, we will compare three different ways to cross-VPC communication: VPC peering, AWS PrivateLink, and Transit Gateway. We’ll also discuss when to use each one and help you choose the best option. It’s important to note that we won’t dive deep into each implementation; instead, we’ll focus on their advantages, limitations, and ideal usage scenarios.
Peering or PrivateLink or Transit Gateway!
When operating Cloud Native applications, maintaining private and secure communication between applications is crucial. These applications may be distributed across various VPCs, whether within the same account or across different accounts. In such scenarios, we establish cross-VPC communication through the use of VPC peering, AWS PrivateLink, or Transit Gateway.
Let’s look at them one by one.
VPC Peering
It is a networking connection between two VPCs where network traffic can be routed across two VPCs. Read more about VPC peering here. Let’s look at the pros and cons of the VPC peering –
Advantages
Relatively straightforward to configure. It’s an invite-accept configuration.
Create network connectivity between two VPCs, resulting in a scalable network connection solution, enabling all resources in one VPC to communicate with resources in the other.
A simple, secure, and budget-friendly option.
VPC Peering comes at no additional cost; you are only billed for data transfer costs. The data transfer cost for VPC peering within the same Availability Zone (AZ) is completely free.
Limitations
Peering VPCs with overlapping CIDRs is not possible.
Peering is non-transitive.
Ideal usage
Individual VPC-to-VPC connections.
A situation that demands full network connectivity with other VPC.
A use case where a simple and cost-effective solution is expected.
This approach is not well-suited for handling a large number of VPCs. In such cases, Transit Gateway is the preferred solution. Since mesh networking between a large number of VPCs using peering adds complexity to the architecture.
AWS PrivateLink
It’s an AWS service that enables you to access AWS services over a private network connection, rather than over the public internet. Read more about AWS PrivateLink here.
Advantages
A selective sharing of services between VPCs. Unlike VPC peering, where all VPC network access is unrestricted, AWS PrivateLink permits only specific services to be accessible across VPC.
This is a secure solution for private connectivity of services across VPCs or on-premises.
Limitation
It’s a connectivity option between your VPC and AWS services, not between VPCs. For VPC-to-VPC connectivity, consider VPC peering or Transit Gateway.
The setup process is complex.
It necessitates the creation of Network Load Balancers (NLB), Application Load Balancers (ALB), and Gateway endpoints, which introduces additional costs and management overhead.
Enabling PrivateLink for existing services requires design adjustments, including the incorporation of the above components into the current architecture.
Ideal usage
It can be valuable in hybrid cloud configurations to make services accessible privately between VPCs and on-premises environments.
It’s beneficial for accessing AWS’s public services like Amazon DynamoDB and Amazon S3 through AWS’s backbone network, ensuring secure, fast, and reliable connectivity while potentially reducing network costs.
It’s applicable for creating isolation by selectively exposing specific services to particular VPCs.
Transit Gateway
AWS Transit Gateway is a service that makes network routing easier for your Amazon Virtual Private Clouds (VPCs), on-premises networks, and VPN connections. It helps to simplify and centralize network routing. Read more about Transit Gateway here.
Advantages
A concrete method to link numerous VPCs, network devices, VPN connections, or an AWS Direct Connect gateway, featuring transitive routing for the simplification of network design.
Multicast support facilitates effortless distribution of content and data to various endpoints.
Efficiently manage and control large-scale networking via a single, unified service.
Limitations
The design becomes more complex and expensive when expanding globally through inter-region Transit Gateway peering.
VPCs cannot achieve direct internet access as it lack Internet Gateway (IGW) attachment support.
It is well-suited for hub-and-spoke architectures, designs that involve a significant number of VPCs, transitive routing needs, and global or multi-region network designs.
It is designed for scalability and is particularly suitable for continuously expanding environments.
It’s valuable for efficiently managing network connectivity among a large number of diverse participants.
Which one should I use?
As we’ve discussed, each of these three networking approaches has its specific areas of focus tailored to particular use cases. Consequently, the choice depends entirely on your unique requirements.
VPC Peering is an excellent choice when you need to connect a limited number of VPCs with minimal cost implications and management overhead.
AWS PrivateLink is the right option when you intend to selectively expose services to other VPCs, although it involves additional costs, extra networking components, and the associated management overhead.
Transit Gateway can serve as an alternative to VPC Peering as you scale to a larger number of VPCs, simplifying network management at the expense of some additional costs. It’s also well-suited for connecting various network entities with anticipated scalability.
In this article, I will guide you through the process of overprovisioning the EKS cluster, through a detailed step-by-step approach. Furthermore, in the later section, we will explore methods for testing the functionality of overprovisioning.
Ensure your setup adheres to the below prerequisites. It should be; unless you are running ancient infrastructure 🙂
Ensure you are running Kubernetes 1.14 or later since pod priority and preemption are first introduced in 1.14 version.
Verify Cluster Autoscaler’s default priority cutoff is set to -10. It is the default since version 1.12.
The manifests provided in this article are with bare minimum specifications. You need to modify them depending on your requirements like the use of non-default namespace, custom labels or annotations, etc. The method of deploying these manifests varies. The simple way is with kubectl apply -f manifest.yaml or the complex way is via Helm charts or ArgoCD apps, etc.
Defining the PriorityClass
In Kubernetes, we can set a custom priority for pods using something called PriorityClass. In order to configure overprovisioning, you need to use a PriorityClass lower than zero because the default pod priority is zero. It allows you to set the lower priority for pause pods and ensures that these pods are preempted when the time comes. To deploy this custom PriorityClass on your cluster, use the following simple manifest:
apiVersion: scheduling.k8s.io/v1
description: This priority class is for overprovisioning pods only.
globalDefault: false
kind: PriorityClass
metadata:
  name: overprovisioning
value: -1
Define Autoscaler strategy
A ConfigMap is utilized to define the autoscaler policy for overprovisioning deployment. The process of calculation is explained here. Please refer to the below manifest:
Next is RBAC configuration, with the three components: ServiceAccount, ClusterRole, and ClusterRoleBinding. These components give autoscaler deployment the necessary access to adjust the size of the pause pod deployment based on the required scaling. Please refer to the manifest:
Creating pause pods is an easy task. You can use a custom image to set up a healthy pod that acts as a placeholder in the cluster. The size of this pod, CPU, and memory configurations, can be adjusted based on your needs. Make sure to calculate the appropriate size to effectively block cluster resources using pause pods.
Proceed with the deployment of the autoscaler. The objective of these pods is to supervise the replica count of the above pause pod deployment, based on the linear strategy employed by the autoscaler. This mechanism allows for the expansion or reduction of replicas and the efficient allocation of cluster resources through the utilization of pause pods. Execute the deployment by employing the provided manifest below:
You now have an overprovisioning mechanism that allows you to allocate more resources than necessary to your cluster. To verify if it’s working correctly, you can perform the below test.
Testing the functionality
To prevent the need for scaling the entire cluster, please execute the tests on a single node within the cluster by employing Pod Affinity. Identify the node with running pause pods and direct the creation of new pods to this specific node through pod affinity specs. Do not define any PodPriority in this test deployment, Kubernetes will automatically assign a Priority of 0 to this deployment. Meanwhile, our pause pods are configured with a priority of -1, indicating lower priority compared to regular workload pods or these test pods. Upon creating this deployment, it should trigger the eviction of the pods on the designated node to prioritize the new test pods with a higher priority.
The pause pods should be terminated, and the new test pods should swiftly transition into a running state on this designated node. The terminated pause pods will be subsequently re-initiated as pending by their respective replica set and will search for a place on another node to run.
This article talks about the fundamental concepts of overprovisioning within a Kubernetes Cluster. We will explore the definition of overprovisioning, its necessity, and how to calculate various aspects related to it. So, without further delay, let’s dive right in.
Overprovisioning basics!
Need of Overprovisioning
It’s a methodology for preparing your cluster for future demands from hosted applications to prevent potential bottlenecks.
Let’s consider a scenario in which the Kubernetes-hosted application needs to increase the number of pods (horizontal scaling) beyond the cluster’s available resources. As a result, additionally spawned pods end up in a pending state because there are not enough resources on the cluster to schedule them. Even if you are using the Elastic Kubernetes Service (EKS) Cluster Autoscaler (referred to as CA), there is a minimum 10-second delay for CA to recognize the need for more capacity and communicate this requirement to the Auto Scaling Group (ASG). Furthermore, there is an additional delay as the ASG scales out, launches a new EC2 instance, goes through the boot-up process, executes necessary bootstrap scripts, and is marked as READY by Kubernetes in the cluster. This entire process typically takes a minute or two, during which time application pods remain in a pending state.
To avoid these delays and ensure immediate capacity availability for unscheduled pods, overprovisioning can be employed. This is accomplished through the use of pause pods.
After being evicted, these pause pods are automatically re-created by their respective replica set and initially start in a pending state. At this point, the Cluster Autoscaler (CA) intervenes, as explained earlier, to provide the additional capacity required. Since pause pods do not serve any specific applications, it is acceptable for them to remain in a pending state for a certain period. Once the new capacity becomes available, these pause pods consume it, effectively reserving it for future requirements.
How does scale-in work with Pause pods?
Now that we’ve grasped how pause pods assist in scenarios requiring cluster scale-out, the next question arises: could these pause pods potentially hold onto resources unnecessarily and block your cluster’s scale-in actions? Here’s the scenario: when the Cluster Autoscaler (CA) identifies nodes with light utilization (perhaps containing only pause pods), it proceeds to evict these low-priority pause pods as part of the node termination process (a scale-in action). Subsequently, these evicted pods are re-created in a pending state. However, during this period, the node count has decreased by one, and the cluster-proportional-autoscaler (HPA) recalculates the new required number of pause pods. This number is typically lower, resulting in the termination of the newly pending pause pods.
Pause pod calculations
Pause pod deployment should be configured with the cluster-proportional-autoscaler i.e. HPA. Set it to use Linear mode by defining the below configuration in the respective ConfigMap as follows:
coresPerReplica: One pause pod per core, meaning one pause pod for each core.
nodesPerReplica: One pause pod per node, signifying one pause pod for each node.
min: At least one pause pod.
max: A maximum of 50 pause pods.
When both coresPerReplica and nodesPerReplica are used, the system calculates both values and selects the greater of the two. Let’s calculate for a cluster with 4 nodes, each using the m7g.xlarge instance type, which has 4 cores per node:
4 nodes, meaning 4 pause pods (one per node).
16 cores, which equates to 16 pause pods (one per core).
So, in this case, the cluster-proportional-autoscaler will spawn a total of 16 pause pods for the cluster.
Now, let’s explore the process of calculating the CPU request configuration for Pause pods and, as a result, determine the overprovisioned capacity of the cluster.
Let’s consider, each individual pause pod is set to request 200 milliCPU (mCPU); from the cluster’s computing resources point of view, it amounts to 20% of a single CPU core’s capacity. Given that we are using one pause pod per CPU core, this effectively results in overprovisioning 20% of the entire cluster’s computational resources.
Depending on the criticality and frequency of spikes in the applications running on the cluster, you can assess the overprovisioning capacity and compute the corresponding configurations for the pause pods.
Here are some pointers that can help you define GitHub usage guidelines.
GitHub Do’s
It is recommended to create a new GitHub repository for each new project.
To ensure proper code management, a CODEOWNERS file should be included in the repository to indicate the list of individuals/GitHub teams responsible for approving the code changes. Additionally, a README.md file should be added to provide information about the repository and its code.
A .gitignore file should also be included to prevent unwanted files from being committed.
Regularly committing and pushing changes to the remote branch will prevent loss of work and ensure that the branch name is reserved.
A consistent branching strategy should be used, with new bugs or features branching off the master branch.
Before creating a pull request, it is essential to review thoroughly, lint your code and perform tests to ensure it is error-free and does not contain any unnecessary code.
Make use of PR templates to endure the contributor submits all the necessary information for PR review.
When creating pull requests, it is important to include detailed commit messages and mention any relevant Ticket IDs or information about testing or proof of concepts. This will help reviewers understand the changes and the reliability of the code.
It is always necessary to create a pull request when merging changes from one branch to another, and the master branch should be protected to prevent direct editing. Pull request standards should be followed to merge code even in repositories without protection.
During the PR review process, when changes to the code are requested, do not delete the branch, instead, ensure the new changes are made in the same branch and aligned with the original pull request so that the history is visible to future reviewers.
Having multiple people review a pull request is recommended, although it is not required.
For large projects, using git-submodule can be beneficial. Keep your branches up to date with development branches and consult with peers to ensure consistency in your project.
Be cautious when merging code on repositories integrated with automation, as it can automatically alter related resources. Ensure you understand the potential impacts of your code commits.
After each release, it is best practice to merge changes from the release branch to the master.
Regularly maintain your repositories by deleting branches that are no longer needed after merging a feature or bug fix.
Consider using Git Hooks for automation where appropriate.
Access to repositories is controlled using GitHub teams, regularly check that only the intended teams and users have access.
Do not share your GitHub credentials with new team members. They should only have access to the codebase after they have secured their credentials through the established process.
The organization should implement the policy of protecting the master branch in GitHub. Even if you encounter an unprotected repository, do not commit directly to the master/main branch. Instead, please take action to have it protected as soon as possible.
Do not delay progress by regularly not pushing changes made on local branches to remote branches.
Avoid working on outdated master branches. Always use the most recent version by taking a fresh pull.
Never include sensitive information, such as application secrets or proprietary data, in public repositories. Implement secret scanning in PR checks via GitHub actions. e.g. Trufflehog
Avoid committing large files in the repository, as GitHub has a default upload limit of 100MB. Consult with peers/higher to determine the best strategy for a specific project. Git LFS is another option to consider.
Avoid creating one pull request that addresses multiple issues or environments.
Before resetting a branch, make sure to commit or stash your changes to avoid losing them.
Be cautious when using force push, as it may override remote files and should only be used by those who are experienced with it.
Do not alter or delete the public history.
Avoid manually copying code from GitHub private repositories. Instead, use the Fork functionality to duplicate the code safely.
Avoid using public GitHub actions on repositories without going through defined procedures and approvals.
This article will walk you through step-by-step procedures to secure AWS CLI credentials using the aws-vault tool.
aws-vault configuration in WSL
Why aws-vault?
Configuring the AWS CLI saves the AWS access key and secret key in plain text format under ~/.aws/credentials file. This is a security concern since the location is known, anybody can scan/look for the keys, and credentials can be compromised.
Hence, to store AWS keys more securely, we need some tool/software to keep the keys in encrypted format rather than plain text. We are discussing the aws-vault open-source tool widely used to secure AWS keys.
We will use the pass as a secure backend for aws-vault while configuring it in WSL as the pass is a native Linux password manager. The list of compatible secure backends for aws-vault can be found here.
Installpass utility in WSL. You can leverage package manager depending on your Linux flavour.
# apt install pass
The next step is to generate the gpg key. You will be prompted to enter a password for the key in this process. This password is necessary to unlock password storage for fetching the passwords within.
$ gpg --generate-key
...
GnuPG needs to construct a user ID to identify your key.

Real name: shrikant
Email address: info@kerneltalks.com
You selected this USER-ID:
    "shrikant <info@kerneltalks.com>"

Change (N)ame, (E)mail, or (O)kay/(Q)uit? O
...

pub   rsa3072 2022-09-25 [SC] [expires: 2024-09-24]
      110577AFEE906D84224719BCD0F123xxxxxxxxxx
uid                      shrikant <info@kerneltalks.com>
sub   rsa3072 2022-09-25 [E] [expires: 2024-09-24]
Initiate the new password storage along with gpg key encryption. Use gpg key created in the previous step in the below command –
$ pass init -p aws-vault 110577AFEE906D84224719BCD0F123xxxxxxxxxx
mkdir: created directory '/root/.password-store/aws-vault'
Password store initialized for 110577AFEE906D84224719BCD0F123xxxxxxxxxx (aws-vault)
Now, the pass backend is ready to use with aws-vault.
Install aws-vault. Simply grab the latest release from here. Move and rename it to one of the binary directories and assign execute permission.
You have pass configured and aws-vault installed. Your system is ready to save the AWS credentials in aws-vault.
By default, aws-vault considers keyctl backend. Export the below variables for configuring it with pass backend. It’s good to export them in the login profile of WSL so that they will be exported for all your future shell sessions.
Add your AWS credentials in aws-vault with the below command –
# aws-vault add my-aws-account
Enter Access Key ID: XXXXXXXXXXXXX
Enter Secret Access Key:
Added credentials to profile "my-aws-account" in vault
my-aws-account is an account alias/name for identification purposes only.
Verify if aws-vault saved the credentials in pass password storage.
$ pass show
Password Store
└── aws-vault
    └── my-aws-account
At this point, you have successfully secured your AWS credentials, and you can safely remove ~/.aws/credentials file. If you have more than one AWS account configured in the credentials file, add all of them into aws-vault before deleting it.
pass saves the password storage in ~/.password-store in encrypted format.
Here: my-aws-account is the AWS profile name. aws-vault also reads the ~/.aws/config file to figure out AWS profiles configured on the machine.
You can authenticate properly with credentials stored securely in the encrypted form! aws-vault also handles the IAM role and MFA prompts defined in AWS profiles.
Error troubleshooting
gpg: decryption failed: No secret key
pass password storage is locked and needs to be unlocked. Run pass show <password-name> , and it should prompt for the gpg key password.
$ pass show my-aws-account
┌───────────────────────────────────────────────────────────────┐
│ Please enter the passphrase to unlock the OpenPGP secret key: │
│ "shrikant <info@kerneltalks.com>"                             │
│ 3072-bit RSA key, ID 0DB81DDFxxxxxxxx,                        │
│ created 2022-09-25 (main key ID D0F123Bxxxxxxxxx).            │
│                                                               │
│                                                               │
│ Passphrase: _________________________________________________ │
│                                                               │
│         <OK>                                   <Cancel>       │
└───────────────────────────────────────────────────────────────┘
Now, try the aws-vault command, and it should work fine.
aws-vault: error: Specified keyring backend not available, try --help
Ensure you have exported both parameters mentioned in the above configuration steps so that aws-vault will use the pass backend.
aws-vault: error: exec: Failed to get credentials for kerneltalks-test: operation error STS: GetSessionToken, https response error StatusCode: 403, RequestID: e514d0e5-b8b6-4144-8616-05061eeed00c, api error SignatureDoesNotMatch: The request signature we calculated does not match the signature you provided. Check your AWS Secret Access Key and signing method. Consult the service documentation for details.
It points to the wrong access/secret key combination added to the secure vault. Delete the respective key from the vault and re-add it. If you lost your secret key, then re-create new pair from the AWS console and add it to the key-vault.
$ aws-vault remove kerneltalks-test
Delete credentials for profile "kerneltalks-test"? (y|N) y
Deleted credentials.
$aws-vault add kerneltalks-test
Enter Access Key ID: xxxxxxxxxx
Enter Secret Access Key:
Added credentials to profile "kerneltalks-test" in vault
aws-vault: error: rotate: Error creating a new access key: operation error IAM: CreateAccessKey, https response error StatusCode: 403, RequestID: 2392xxxx-x452-4bd4-80c3-452403baxxxx, api error InvalidClientTokenId: The security token included in the request is invalid
If the profile is enabled with MFA and you are trying to run some IAM modification, then you should encounter the above error. Use --no-session flag with the command. Read in-depth regarding the no-session flag here.
Ever wondered what is PDB i.e. Pod Disruption Budget in the Kubernetes world? Then this small post is just for you!
PDB foundation!
PDB i.e. Pod Disruption Budget is a method to make sure the minimum number of Pods are always available for a certain application in the Kubernetes cluster. That is a kind of one-liner for explaining PDB 🙂 Let’s dive deeper and understand what is PDB. What does PDB offer? Should I define PDB for my applications? etc.
What is Pod Disruption Budget?
The Replicaset in Kubernetes helps us to keep multiple replicas of the same Pod to handle the load or add an extra layer of availability in containerized applications. But, those replicas are tossed during cluster maintenance or scaling actions if you don’t tell the control plane (Kubernetes master/ Kubernetes API server) how they should be terminated.
The PDB is a way to let control plane how the Pods in a certain Replicaset should be terminated. The PDB is a Kubernetes kind that should be associated with the Deployment kind.
How PDB is defined?
It’s a very small kind and offers only three fields to configure:
spec.selector: Defines the Pods to which PDB will be applied
spec.minAvailable: An absolute number or percentage. It’s the number of Pods that should always remain in a running state during evictions.
spec.maxUnavailable: An absolute number or percentage. It’s the maximum number of Pods that can be unavailable during evictions.
You can only specify either spec.minAvailable or spec.maxUnavailable
A sample Kubernetes manifest for PDB looks like this –
apiVersion: policy/v1
kind: PodDisruptionBudget
metadata:
  name: sample-pdb
  namespace: <namespace> #optional
  Annotations:           #optional
    key: value
  labels:                #optional
    key: value
spec:
  minAvailable: 1
  selector:
    matchLabels:
      app: web
Here –
metadata: The PDB name, the namespace in which PDB lives, annotations and labels that are applied to the PDB itself.
spec: It’s a PDB config we discussed above.
How does PDB work?
Let’s look at how this configuration takes into effect. For better understanding, we will consider a simple application that has 5 replicas.
Case 1: PDB is configured with minAvailable to be 3.
This means we are telling the control plane that it can evict at most (5 running – 3 minavailable) 2 Pods at a time. That means we are allowing 2 disruptions at a time. This value is also called disruptionsAllowed . So, in a situation where the control plane needs to move all the 5 Pods, it will evict 2 Pods first then once those 2 evicted Pods, respawns on the new node and goes into the Running state, it will evict the next 2 and lastly 1. In a process, it makes sure that there are always 3 Pods in the Running state.
Case 2: PDB is configured with maxUnavailable to be 2
It’s the same effect as above! Basically, you are telling the control plane at any given point of time 2 Pods can be evicted meaning 5-2 = 3 Pods should be running!
The Allowed Disruptions is calculated on the fly. It always considers the Pods in Running state only. Continuing with the above example, if out of 5 Pods, 2 Pods are not in a Running state (for maybe some reason) then disruptionsAllowed is calculated as 3-3=0. This means only 3 Pods are in the Running state and all 3 should not be evicted since PDB says it wants a minimum of 3 Pods in the Running state all the time.
In a nutshell: disruptionsAllowed = Number of RUNNING Pods – minAvailable value
How to check Pod Disruption Budget?
One can use the below command to check the PDB –
$ kubectl get poddisruptionbudgets -n <namespace>
Then, kubectl describe can be used to get the details of each PDB fetched in the output of the previous command.
Should I define PDB for my applications?
Yes, you should! It’s a good practice to calculate and properly define the PDB to make your application resilient to Cluster maintenance/scaling activities.
The minimum number is to have minAvailable as 1 and replicas 2. Or make sure that minAvailable is always less than the replica count. The wrongly configured PDB will not allow Pod evictions and may disturb the cluster activities. Obviously, cluster admins can force their way in but then it means downtime in your applications.
You can also implement cluster constraints for PDB so that new applications won’t be allowed to deploy unless they have PDB manifest as well in the code.
GitHub action code for automated CloudFormation template linting on PR
Cloudformation Template Linting
GitHub is a popular version control software used widely by companies. And it is the best place to manage your AWS IaC i.e. CloudFormation templates! With the ever-growing AWS infrastructure and hence the template versions, it’s always a good practice to have your CloudFormation templates linted for any syntax errors. It saves a lot of time as you know the errors beforehand and not at the time of deployment on AWS! It will be more time saving if it just gets linted when someone raises the pull request (PR) so that the code owner, as well as the developer, knows the code modifications in PR are linted and sane to be approved.
cfn-linter is the best CloudFormation linter available. It can be implemented via GitHub actions for automated lint actions on PR submission. I will walk you through the process of setting it up.
Understanding the flow
First of all, you need to get the list of modified files in the PR so that you can run a linter against it. It can be managed by using readymade available actions or using git commands. There are a couple of actions like tj-actions, Get all changed files, etc.
Once we got the list, we need to filter out files that are potentially not CloudFormation templates. You don’t want to feed non-template files to linter as that would result in failure. I did this using grep and also allowed the shell to continue even if grep exists with a non-zero exit code. This will prevent GitHub action from failing if there are no template files modified in the given PR.
Lastly, lint all templates one by one using cfn-lint. I am ignoring the warning using -i W flag to avoid failing GitHub actions due to warnings.
Code
All these points are summarised in below GitHub Action code –
name: Lint CloudFormation Templates
on:
    pull_request:
      branches:
        - main
jobs:
  cloudformation-linter:
    runs-on: ubuntu-latest
    steps:
      - name: Checkout
        uses: actions/checkout@v2
      - name: Setup Cloud Formation Linter with Latest Version
        uses: scottbrenner/cfn-lint-action@v2
      - name: Fetch changed file list
        uses: tj-actions/changed-files@v17.2
        id: changed-files
      - name: Run Linter
        shell: bash
        run: |
          > list
          for file in ${{ steps.changed-files.outputs.all_changed_files }}; do
            echo $file >> list
          done
          set +e
          cat list | grep -e json -e yaml -e yml | grep -v .github > lint_list
          set -e
          if [ -s lint_list ]; then
          for i in `cat lint_list`
          do
          echo "Linting template: $i"
          cfn-lint -t $i -i W
          done
          else
          echo "No Cloudformation template detected in commit!"
          exit 0
          fi
You need to place this file with the name of your choice under <repo>/.github/workflows the directory. If you have some different master branch naming conventions or different strategies on when code should be listed, then make necessary changes in on: section.
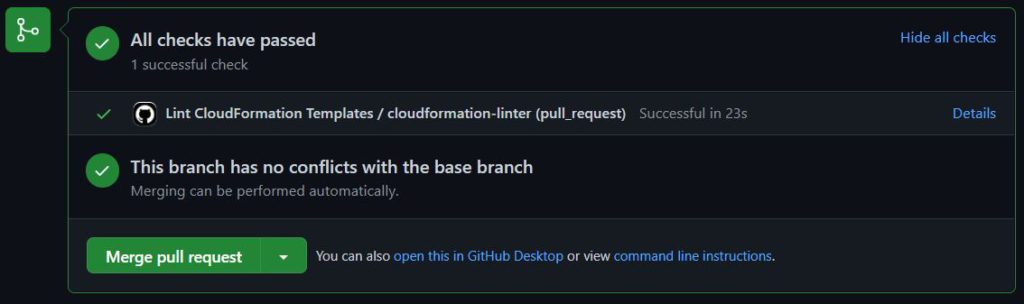
GitHub Action
Once the action config is in place, PR submission will see automated checked in it.
Linter github action
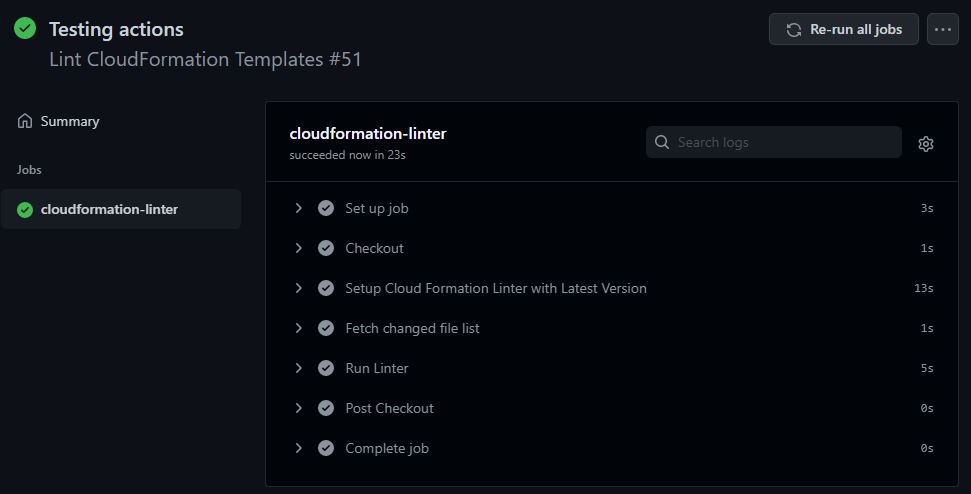
If you click on Details, you will see the details about the action.
GitHub actions details
Your CloudFormation templates are being linted when PR is raised!