A quick rundown on how to hunt AWS resources that needs tagging
Scan AWS resources to tag
Tags are the most important and equally negligible AWS entity! As AWS spread grows in an organization they start to realize the importance of tags and then comes the projects for tagging existing resources!
At this stage, the first question on the table is how to search for AWS resources that need tagging? or How can we search non-tagged AWS resources?
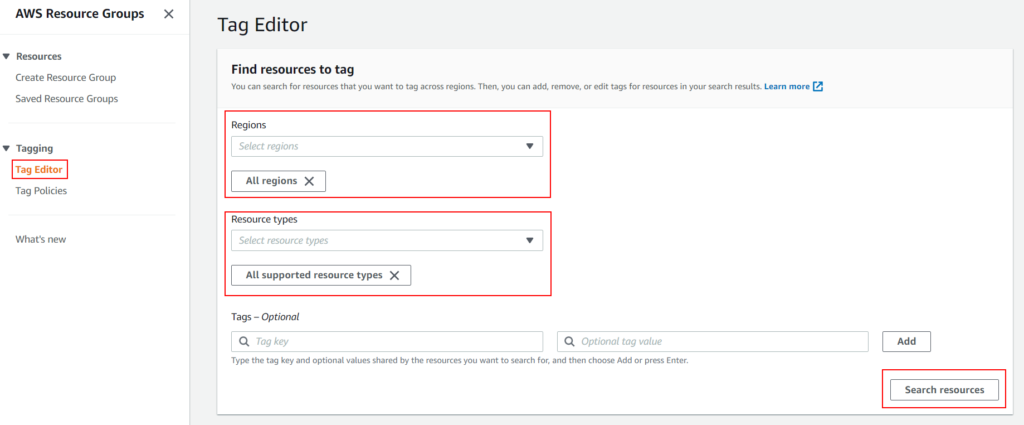
It’s a very short process that can be summarised in a single picture!
On left hand side menu, select Tag Editor under Tagging.
Now you should have seelction on right hand side.
Select perticular region or All regions from Regions drop down.
Select specific resource or All supported resource types from Resource types drop down.
Tags – Optional: You can specify key, value details to search for specific tags. Since we are searching for resources that are not tagged lets keep it blank.
Finally, click on Search resources button and you are done!
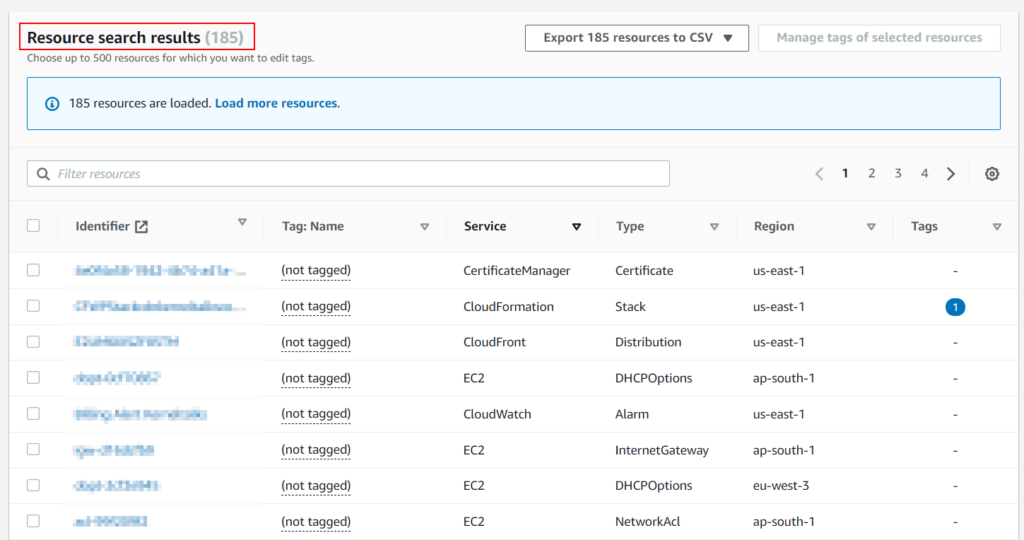
You should be presented with list of AWS resources in specified regions that needs to be tagged like below.
List of AWS resources to tag
You can export the list to CSV as well for further data analytics.
A quick article on how to configure ALB Auth via Amazon Cognito for ConsoleMe webapp
Securing ConsoleMe with ALB Auth
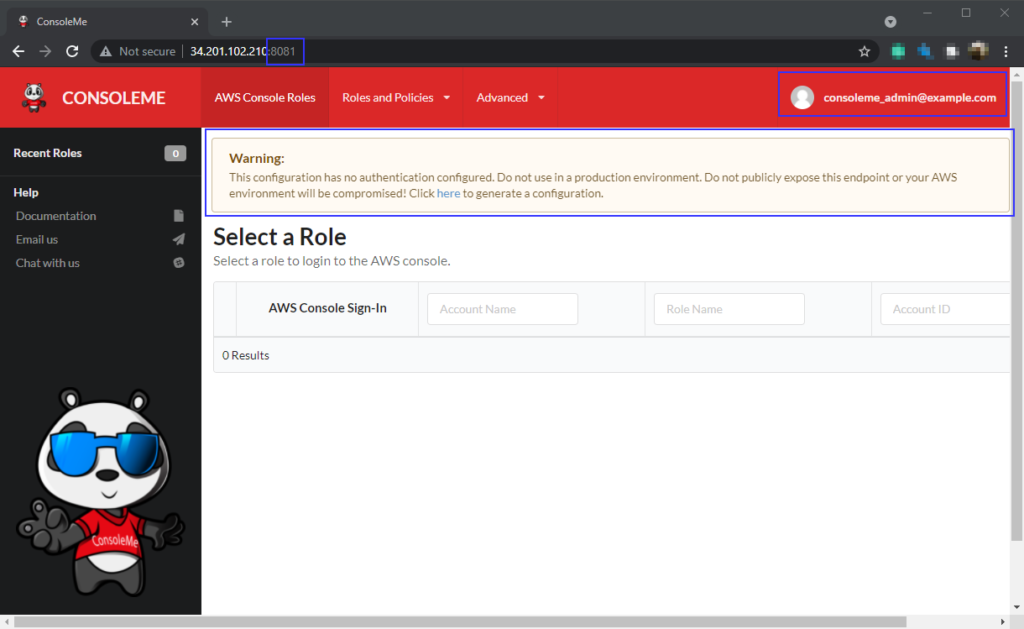
In our last article, we looked at Netflix’s IAM management tool ConsoleMe. We installed it on the Ubuntu Linux machine with the Local install method, and we got it up and running with the default example configuration. In this article, we will walk you through the process of configuring ALB authentication for the ConsoleMe webapp.
With the default example configuration, ConsoleMe webapp opens up without any authentication. However, since ConsoleMe will manage your AWS account’s IAM, it’s not safe to keep your keys to kingdom open on the internet without any authentication mechanism in place. Hence, we will be protecting it with the ALB auth method.
ConsoleMe supports webapp authentication via –
ALB Auth (Recommended)
Google groups
OIDC/OAuth2
SAML
Headers
As recommended by ConsoleMe, we will move ahead with ALB Auth.
Let’s get into it.
Pre-requisites
ConsoleMe is up and running
ALB is configured to listen on HTTPS with target group configured on 8081 port with ConsoleMe instance as target
Above mentioned setup is working correctly and you are able to open up ConsoleMe webapp using ALB DNS name/DNS ALIAS you configured for ALB.
Before you proceed, you need to make few configuration changes in the Amazon Cognito user pool if you have followed the above link to create it.
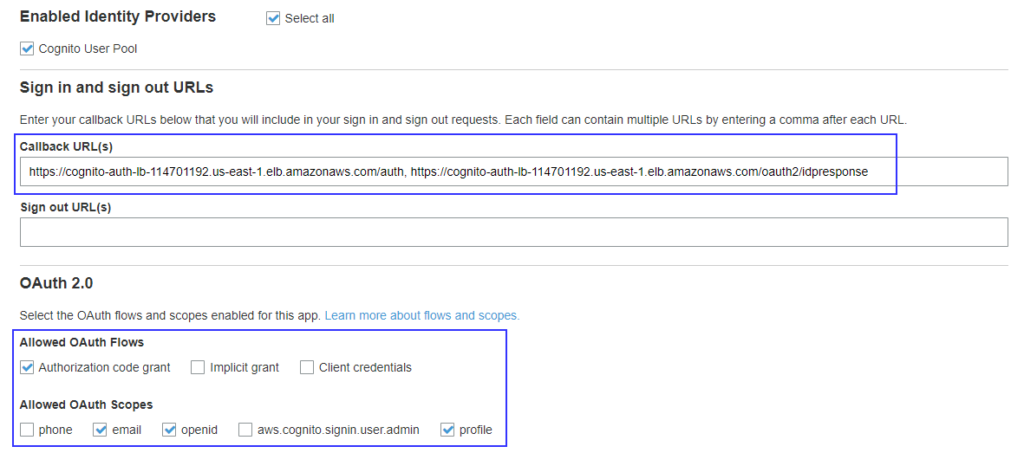
Edit/ make sure you have the below configurations in the Cognito user pool’s App client settings :
Callback URLs are set to http://DNS-NAME/auth, http://DNS-NAME/oauth2/idpresponse. Where DNS-NAME is DNS name of ALB or the ALIAS defined for DNS name.
Enable Authorization code grant
Allowed Oauth scope has email, openid and profile enabled.
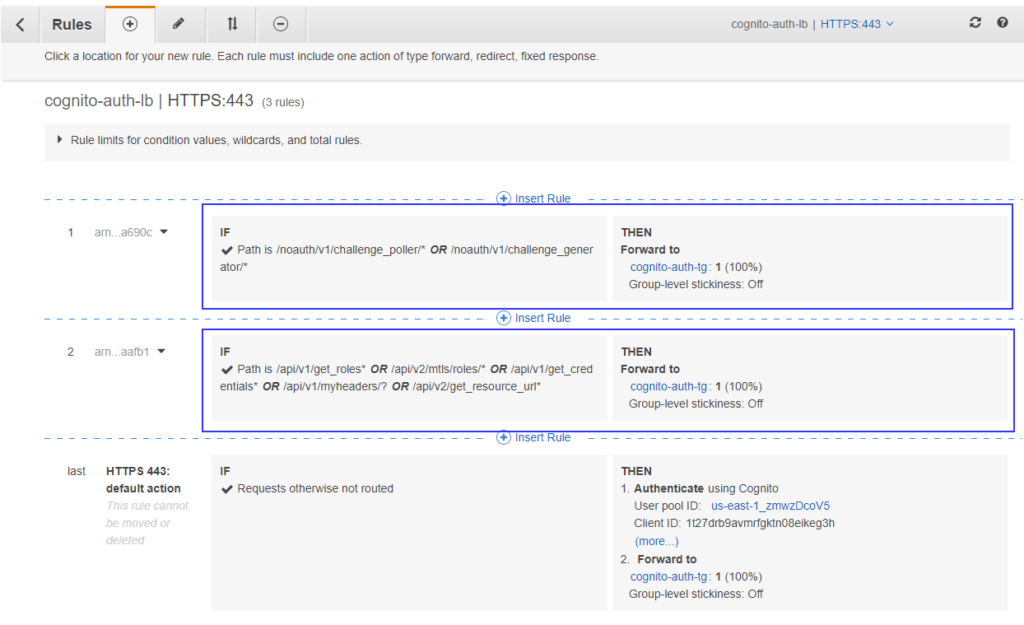
Apart from the steps in the above link, you need to add extra rules in the HTTPS listener that forwards below path patterns directly to the target group bypassing Cognito authentication.
/api/v1/get_roles*
/api/v2/mtls/roles/*
/api/v1/get_credentials*
/api/v1/myheaders/?
/api/v2/get_resource_url*
/noauth/v1/challenge_poller/*
/noauth/v1/challenge_generator/*
ConsoleMe leverages these path patterns to perform CLI actions and authentication.
After adding them, your listener should look like –
CLI path rules
Now, the final step is to do the custom configuration on the ConsoleMe part. As you are aware from the ConsoleMe installation that it runs the default example configuration. We should override that open configuration with the one that supports ALB Auth. Copy the sample configuration file from GitHub here.
Save this file as in the installation directory. We installed ConsoleMe in /consoleme directory, so it should be saved as /consoleme/consoleme.yaml
Edit below parameters in the configuration file –
application_admin: Email that will receive the approval requests
metadata_url: Replace region and Cognito pool id.
is_example_config: false
ses: Edit if you are using SES
aws: with relevent details
Restart application
systemctl restart consolme
OR
python consoleme/__main__.py
Now, your application is reading the newly created configuration file. Next, open up ALB’s DNS/ ALIAS DNS, and you will be prompted to log in from Cognito. We discussed this part in an earlier article on Cognito authentication.
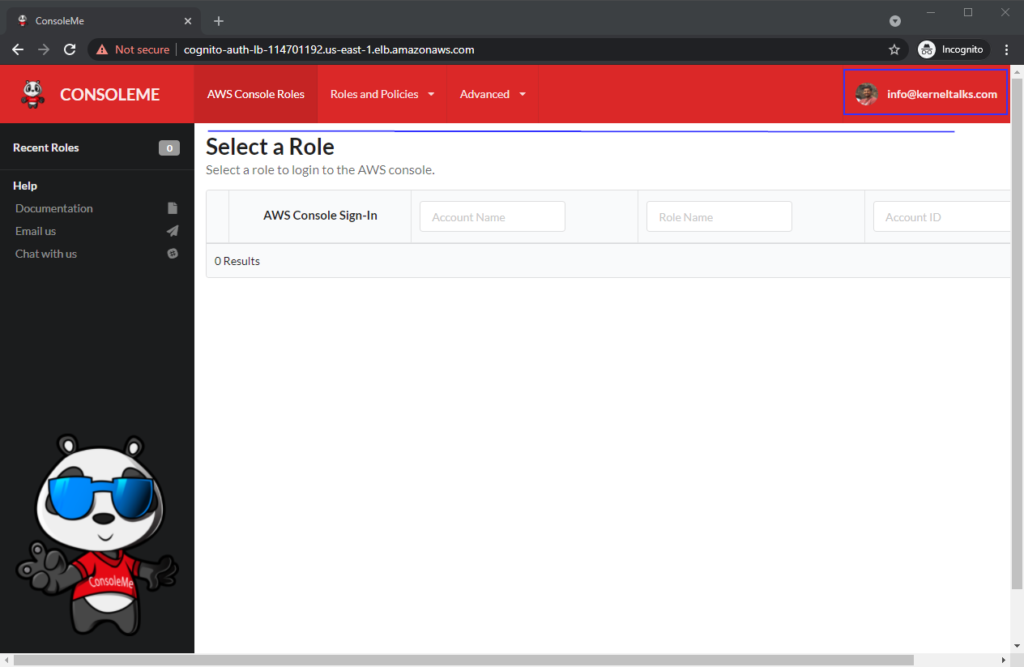
Once you are successfully authenticated, you should see the ConsoleMe console with custom config!
Notice that the example configuration notice is vanished now. Also, you can see Cognito user ID’s email as a logged-in user in ConsoleMe!
We successfully enabled ALB Auth for securing ConsoleMe webapp!
A step by step guide to install ConsoleMe on Ubuntu Linux machine
ConsoleMe Ubuntu Local Install
ConsoleMe is an open-source web service published by Netflix. It is designed to make life easy for end-users and cloud administrators. Using ConsoleMe, cloud administrators can manage IAM permissions/credentials for IAM roles, S3 buckets, SQS queues, and SNS topics across multiple AWS accounts from a single interface. It also provides CLI called weep for AWS credentials management. That’s a fair introduction if you are not aware of the tool. Next, let’s get into the installation part.
ConsoleMe offers docker and local installs. We will walk you through local install in this article.
Pre-requisite:
A machine running Ubuntu 19.04+ with root access. I used Ubuntu 20.04 LTS x86.
Active and working package manager subscription to install packages
AWS access keys for above user if you are not using roles. I used keys (steps below)
Installation
We are installing ConsoleMe in /consoleme directory. If you want to install in another location, make the necessary changes in the commands below. Let me give you a list of commands you need to run as root –
Here, the first few commands are installing all the dependencies and related software/tools. Then, we are cloning the GitHub repo of the tool in /consoleme and lastly, we are running two containers.
These are Redis and dynamodb containers that ConsoleMe leverages for caching and aggregating the AWS accounts information. You can make use of AWS Redis and dynamodb table services, but for now, we will run these containers locally so that ConsoleMe will talk to them rather than AWS services.
I am avoiding putting up console outputs for frequently used commands like package installations etc., here.
Make sure both containers are up and running before proceeding to the next step –
root@kerneltalks:/consoleme# docker ps
CONTAINER ID   IMAGE                             COMMAND                  CREATED          STATUS         PORTS                              NAMES
5333cdee2202   cnadiminti/dynamodb-local         "java -jar DynamoDBL…"   10 seconds ago   Up 4 seconds   8000/tcp, 0.0.0.0:8005->8005/tcp   consoleme-dynamodb
19ac354c3d70   redis:alpine                      "docker-entrypoint.s…"   10 seconds ago   Up 4 seconds   0.0.0.0:6379->6379/tcp             consoleme-redis
4cf931d38652   aaronshaf/dynamodb-admin:latest   "node bin/dynamodb-a…"   10 seconds ago   Up 4 seconds   0.0.0.0:8001->8001/tcp             consoleme-dynamodb-admin
Now, you need to prepare the machine to talk with AWS for fetching account details in the upcoming install steps. Ensure that you have set up account and permissions perfectly in IAM (mentioned in the pre-requisite above) to avoid any issues. You can do that by configuring AWS profile –
root@kerneltalks:/consoleme# aws configure
AWS Access Key ID [None]: AKIAQX3STVKIYRO36XEC
AWS Secret Access Key [None]: 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
Default region name [None]:
Default output format [None]:
Lastly, create a new python environment and run the final install step. This will take a while to complete since at the end of make install command, it also fetches and caches the AWS account details in the local Redis cache –
python3 -m venv env
. env/bin/activate
make install
After successful installation, you should be able to start the application.
Running ConsoleMe
On a current shell, you can run the ConsoleMe with the command. If you are in another shell, activate the python environment again –
But, it will exit out when you terminate the command or shell. It’s safe to run it in the background or, even better, run it as a Linux service. For running ConsoleMe as a service, create below two files –
Now that your console service is running, you should load its GUI on a web browser. The service listens on the 8081 port, so you need to navigate the server address with port 8081. Make sure the security group is allowing 8081 traffic if you are installing on EC2.
At this point, ConsoleMe is running with the default open example configuration. It’s very well highlighted on the web app as a warning. It would be best if you were editing this configuration to make your ConsoleMe more secure. ConsoleMe recommends Application Load Balancer authentication for securing your web app GUI. Refer to our next article on how to secure the ConsoleMe web app using ALB authentication.
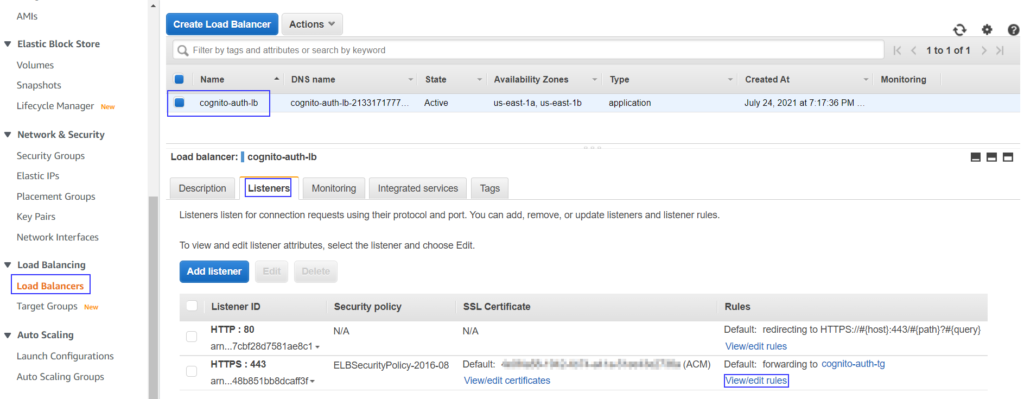
Navigate to the Load Balancing > Load Balancers in left sidebar menu
On Load balancers page, select the Application load balancer that needs to be configured
Click on Listeners tab in below details pane.
Click on View/Edit rules against HTTPS 443 listner
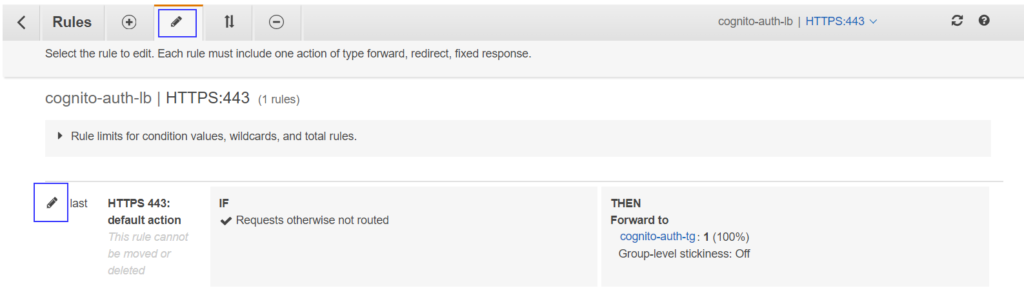
You should see the editor window where you need to click on pen icons to open up the rule editor.
Edit 443 rule
Now, click on + Add action button. Select Authenticate from the drop-down. The rule will be listed in the editor where you need to select from dropdowns-
Cognito user pool
Client ID
Once you select Cognito user pool it will accordingly populate values for Client ID in that pool. Choose respectively. Keep other options untouched unless you have other requirements.
New Authenticate action will be prioritized to rule 1 and existing Forward to action will be getting down to number 2. Your rule windows should look like this –
Adding Cognito authenticate action in ALB listener rule
Click on Update to save the rule.
If you are facing any issue to populate User pool ID and seeing Too many requests error in console then you can opt to re-create ALB with this configuration using AWS CLI or CloudFormation. Because using AWS CLI, you can not edit the default rule. If you have ALB created from the Cloudformation template already then you just need to tweak your template and add the below code for the ALB listener resource.
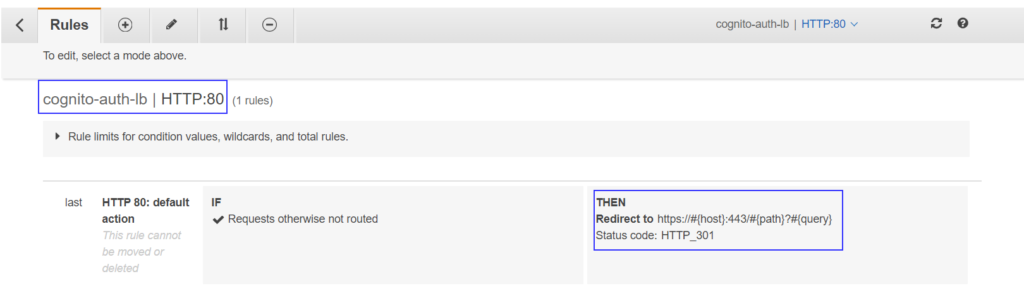
Make sure your HTTP listener rule (port 80) is set to redirect to HTTPS.
ALB HTTP redirect rule
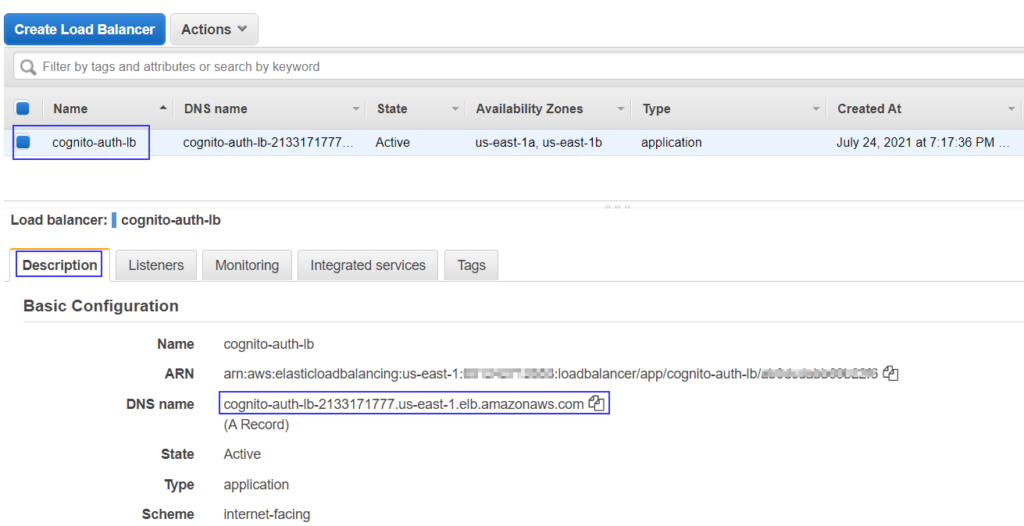
Now ALB is ready to authenticate users before their requests are forwarded to target group targets. Grab the ALB DNS from the load balancers page. If you are having CNAME/ALIAS entry for ALB then you should be using the custom DNS you have defined.
Navigate to the Load Balancing > Load Balancers in left sidebar menu
On Load balancers page, select the Application load balancer that needs to be configured
Click on Description tab in below details pane.
Copy DNS name
Getting the Application load balancer DNS name
Paste DNS name in the browser and you should be redirected to the authentication page from Amazon Cognito. You can customise this page along with its domain as we explained in our earlier article on the Amazon Cognito user pool.
Amazon Cognito authentication in action!
Notice that we configured a custom domain for Amazon Cognito hence our request is served with a custom domain auth.kerneltalks.com. If you observe the URL carefully, you can see Client ID, Callback URL, etc. details configured in Amazon Cognito when we created the user pool.
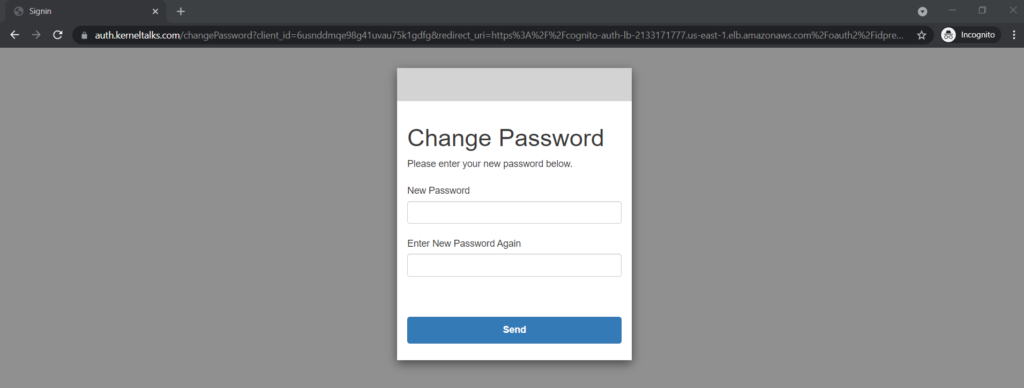
For any Cognito user, the default behaviour is to force change password on the first login which we observed here –
Cognito force change password on first login
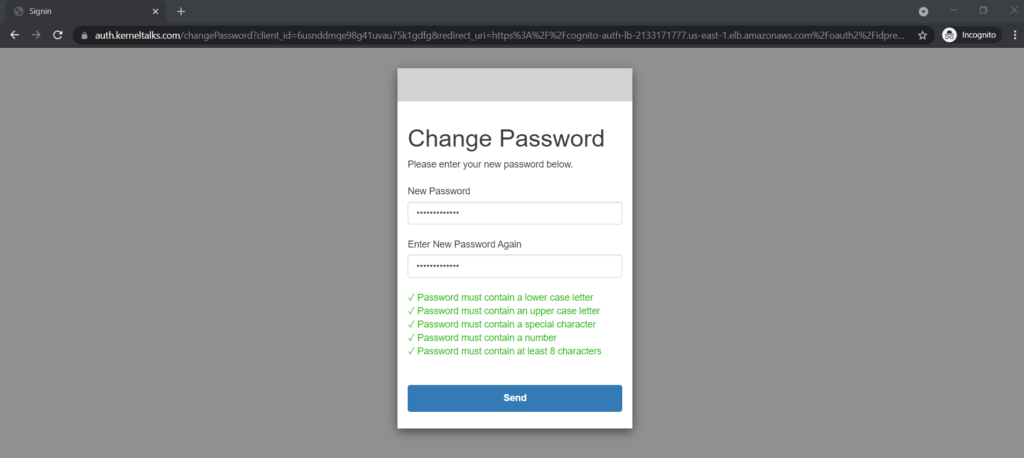
During change password, you can even see password policy applied while creating the Amazon Cognito user pool is being checked –
Cognito user pool password policy in action
For testing purposes, if you want to bypass all the above password change procedures then you can set the password from AWS CLI using the below command –
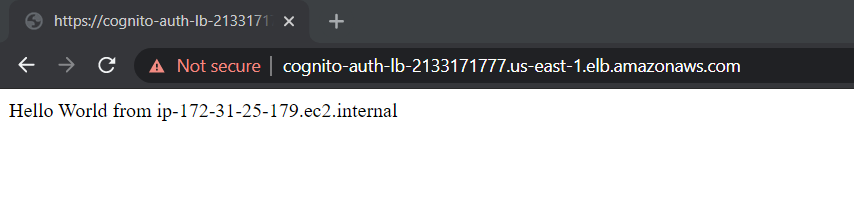
Once the password is changed successfully, you will be redirected to the Callback URL configured in Amazon Cognito. We configured it to the ALB DNS name. So we redirected to it and backend EC2 target served us a sample webserver page!
Thus we configured Amazon Cognito authentication on the Application Load balancer and secured our targets!
A step by step procedure to create an Amazon Cognito user pool. All available options are explained.
Amazon Cognito user pool!
One of the best features of AWS application load Balancers (ALB) is authentication! You can offload authentication to ALB that leverages Amazon Cognito in the backend. Amazon Cognito offers identity management through user pools or federated identities. This article will walk you through creating a user pool in Amazon Cognito that is used for ALB authentication. Without further delay, let’s get into it.
On the User pools page, click on Create a user pool button on top right hand corner of the page.
That should start user pool creation wizard. Lets go through it one by one –
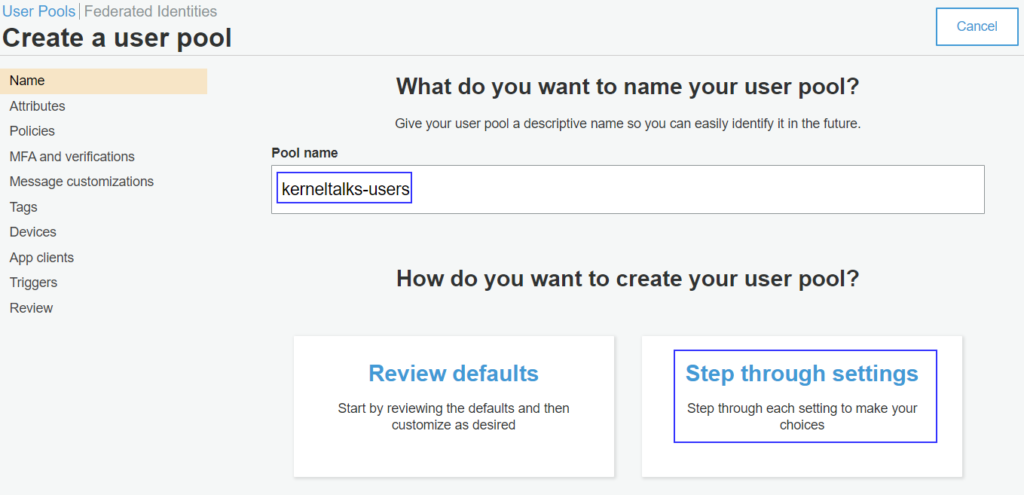
Name
Enter the Pool name and click on the Step through settings button.
User pool creation wizard
Attributes
Settings on this page can not be edited later so choose wisely!
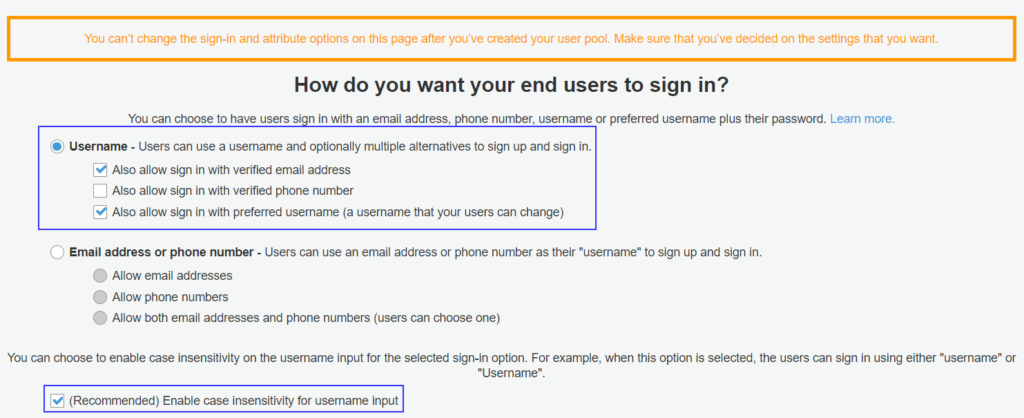
The first thing you need to choose is the end user’s sign-in method. They should use a username or email address/phone number to signup/sign in. I am choosing a username and also, allowing them to use email addresses while logging in later once they sign up. I am also selecting case sensitive usernames because that makes more sense.
via CognitoChoose the way end-user sign in
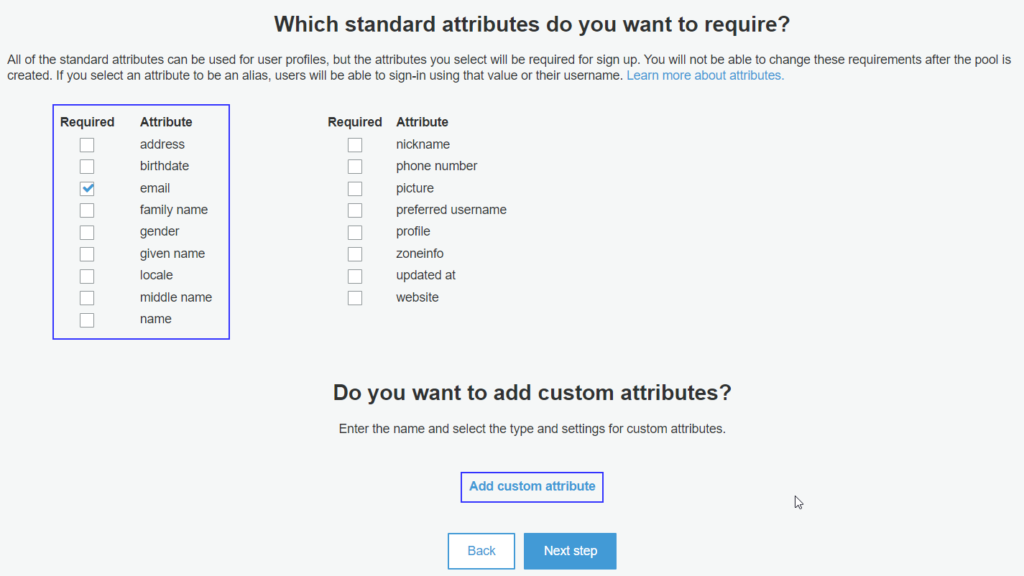
The next section of attributes, let you choose through the list of attributes you want the end user to provide when they sign up in Cognito. You can also choose to add a custom attribute here if one is not listed in the standard list.
Set end-user attributes
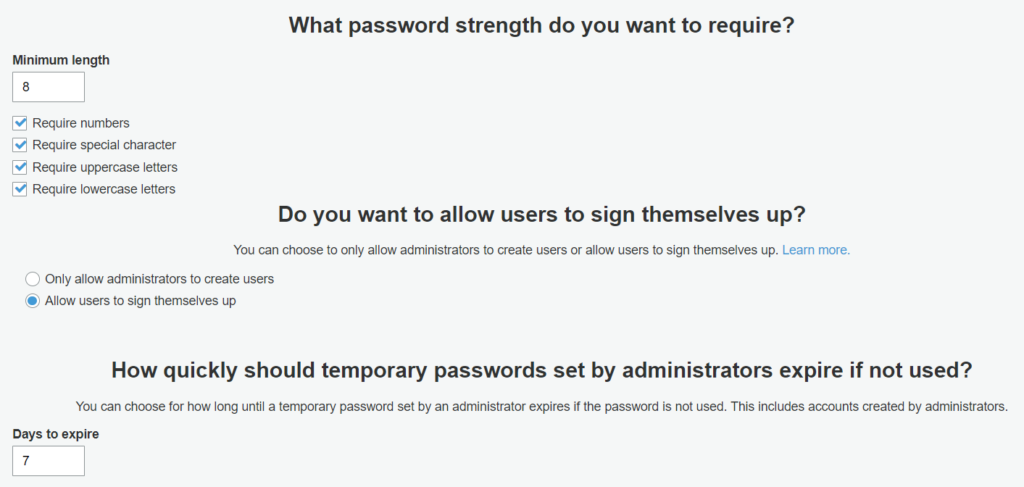
Policies
End-user password policies and controls are defined in this section. All the fields are pretty self-explanatory.
Cognito user pool password policies and account control
MFA and verifications
An extra layer of account security can be defined here. MFA and related configurations. Please note that if you are enabling MFA for end-users then you should be enabling phone number attributes in earlier settings and text messages (verification and subsequent messaging) will incur extra charges. Amazon pretty much explained each option here.
Cognito MFA settings
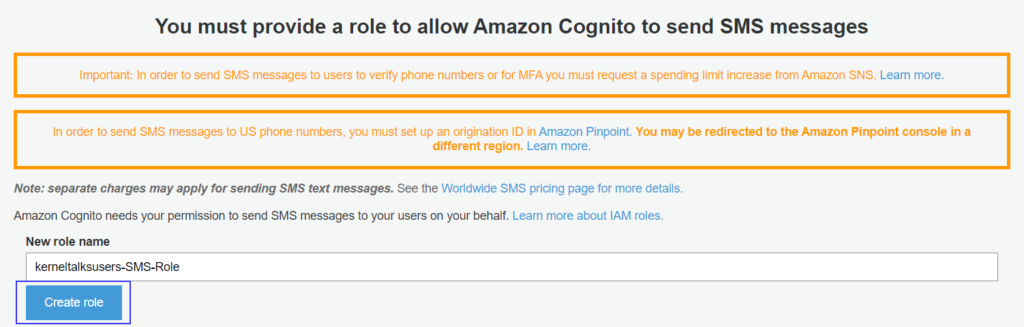
If you are opting for adding and managing phone number attributes then you need to create a role that provides access to Cognito for sending text messages on your behalf.
SMS access related settings
Messages customizations
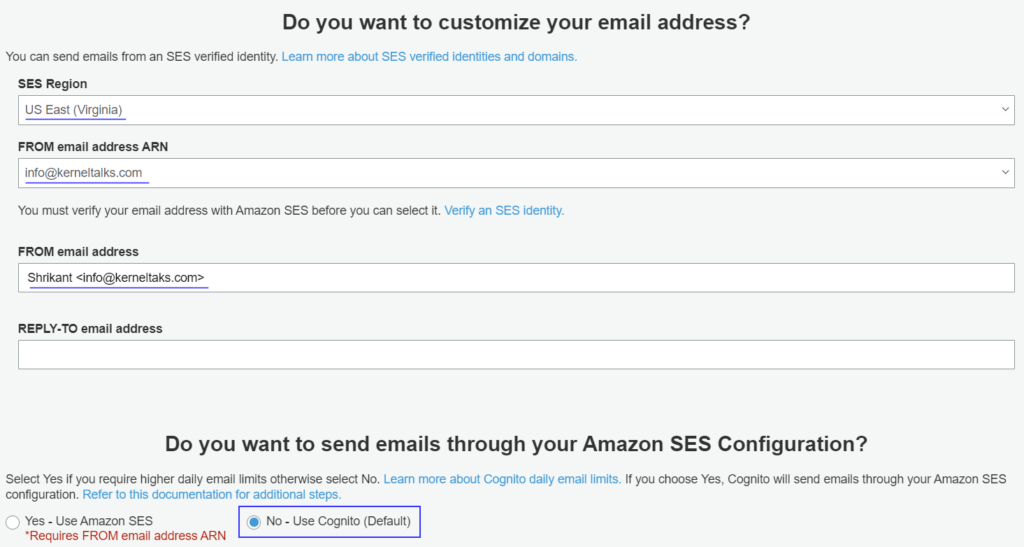
In this section, you should be customizing the email or SMS messages being sent out by Amazon Cognito on your behalf. It’s a place if you want to have company branding in the communications! Make sure you have a verified email address in Amazon SES to set it as From email address.
Cognito messages customizations
In the later part of the page, you can configure how you want verification to be done using codes or clickable links. Also, you can customize the text of the message here.
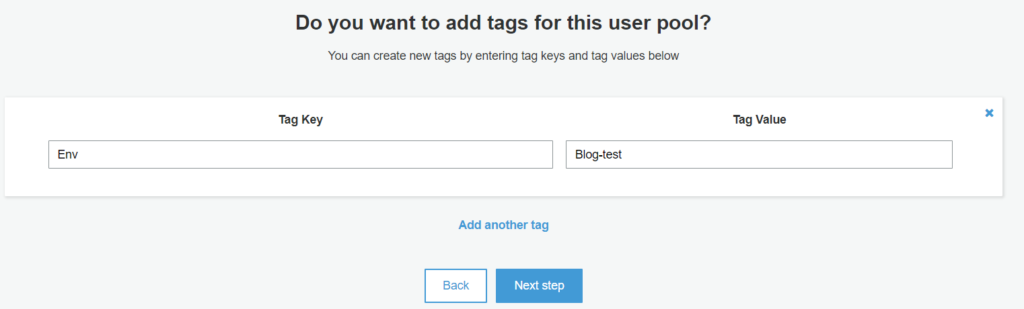
Tags
A place that is crucial but mostly ignored by everyone! Tagging for the user pool.
Amazon Cognito user pool tags
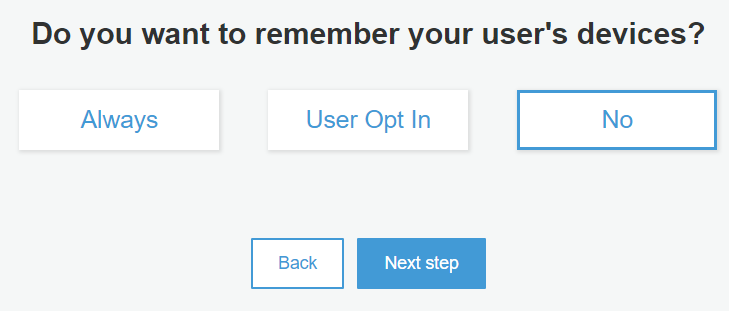
Devices
Choose if Cognito should remember the user’s device. This will enhance the user experience. But, to use this feature you should have MFA enabled for end-users. Since we did not opt for it, we will simply say No and move forward.
Remember user device
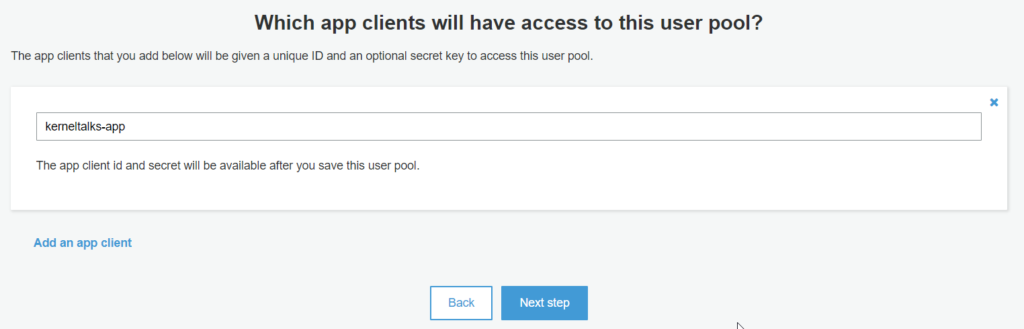
App clients
In this section, you should create an app client which will access this user pool. On the creation of the app client, you will receive the app ID and secret key that you can configure in your applications to access this user pool.
Click on Add an app client
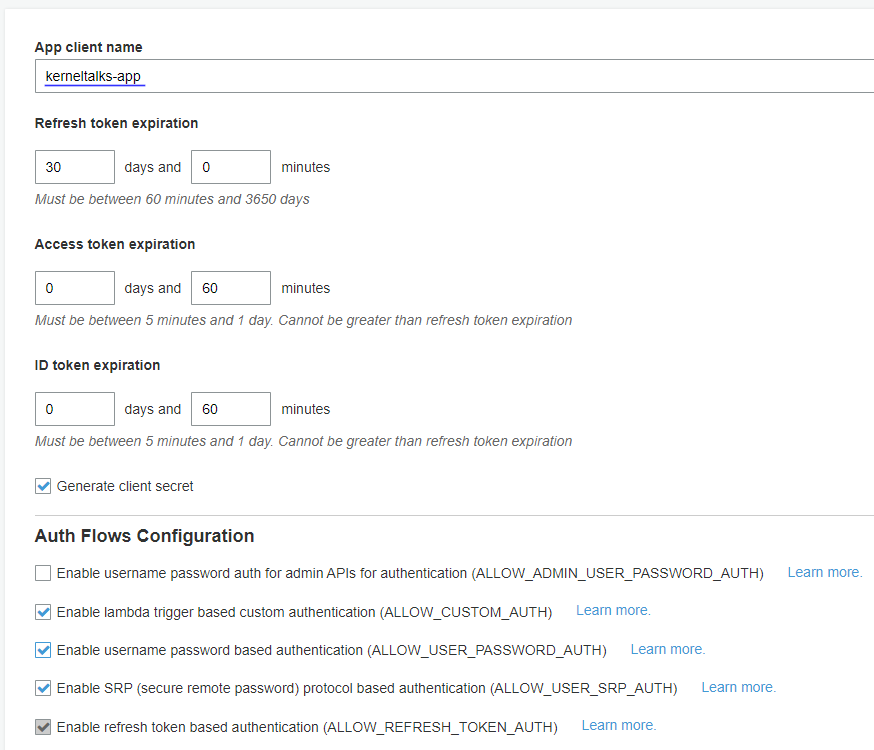
Cognito app client settings
App client name: Add unique name
Refresh token expiration: Refresh tokens are used to retrieve new ID and access token. Control their expiration here. Read more about refresh tokens
Access token expiration: Used for autorizing the API operation. Control expiration here. Read more about access tokens
ID token expiration: It used to claim the authenticated user’s identity. Define its expiration limits here. Read more about ID tokens.
Auth Flows Configuration: Enable depends on your integration requirements. I selected ALLOW_USER_PASSWORD_AUTH and left others untouched.
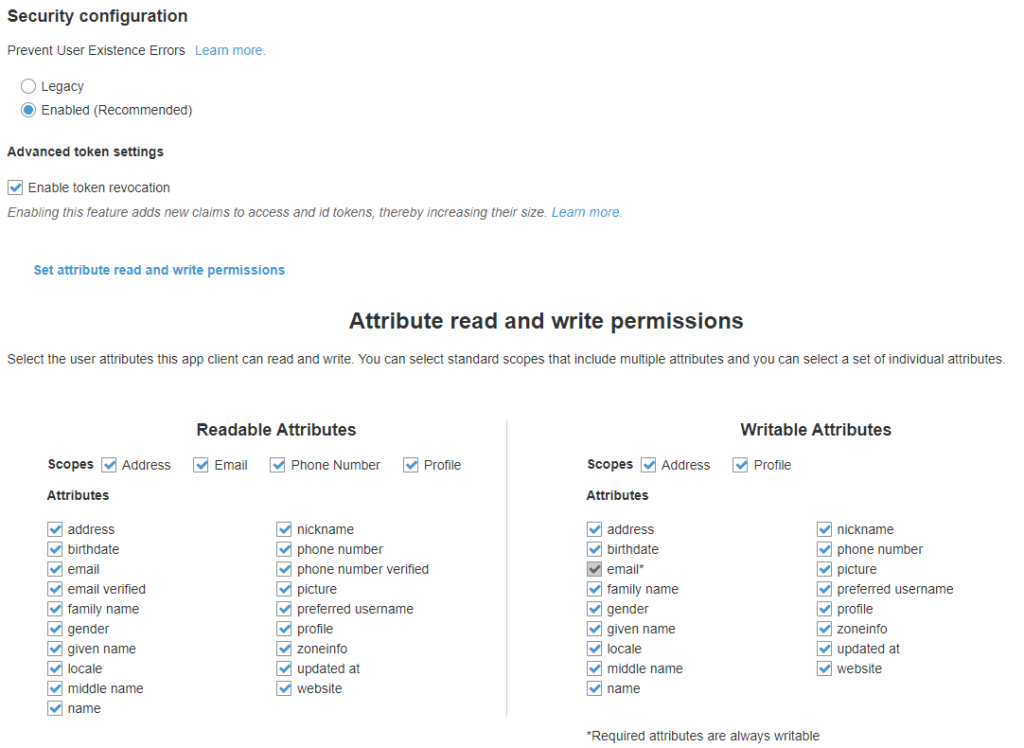
Cognito app client security settings
Security Configuration: It allows to send back generic error. Select recommened unless you have any other reason not to!
Advanced token settings: Enable or disable token revocations.
Attributes read and write permissions: Select list of attributes which this app client can read or write.
Click on Create app client. It will be created along with the user pool when you completes the whole wizard.
Click on the Next step to move forward in the user pool creation wizard.
Cognito app client
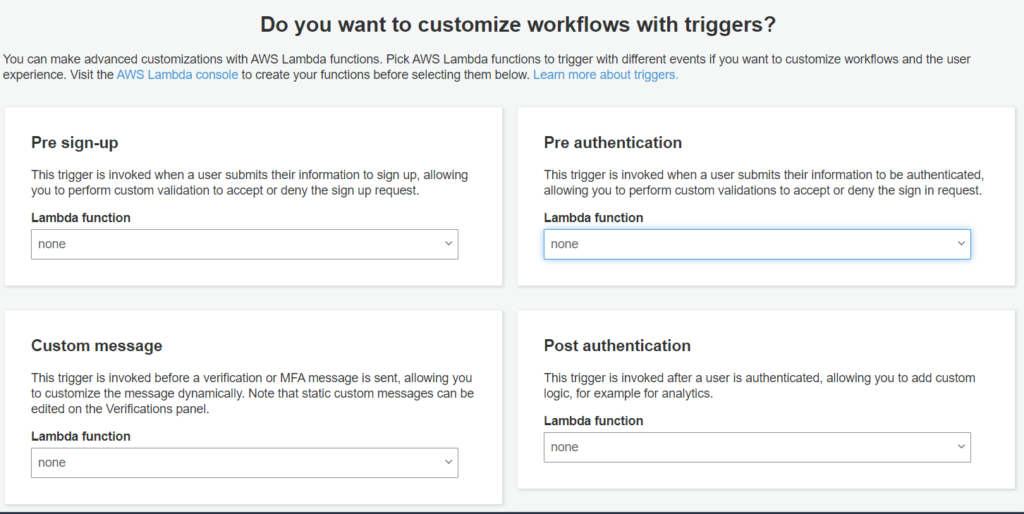
Triggers
On this page, you can configure lambda functions to be triggered on specific actions or workflow. You need to create Lambda functions in advance to select here from the dropdown. List of triggers available here –
Pre sign up
Pre authentication
Custom message
Post authentication
Post confirmation
Define Auth Challenge
Create auth challlenge
Verify authc challenge response
User migration
Pre token generation
All triggers are listed with descriptions for easy understanding of when they will be activated and execute related Lambda functions. For the simplicity of this article, we are not adding any.
Cognito Lambda triggers
Review
Review all the details you supplied throughout the wizard. You can make edits if necessary and then lastly click on Create pool
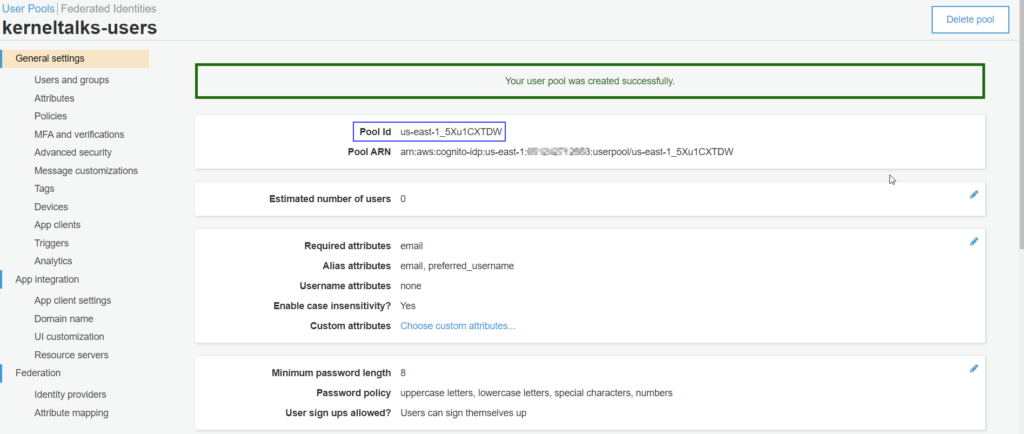
User pool created!
You should be greeted with a success message and the user pool management page. You can note the user pool ID generated for this user pool.
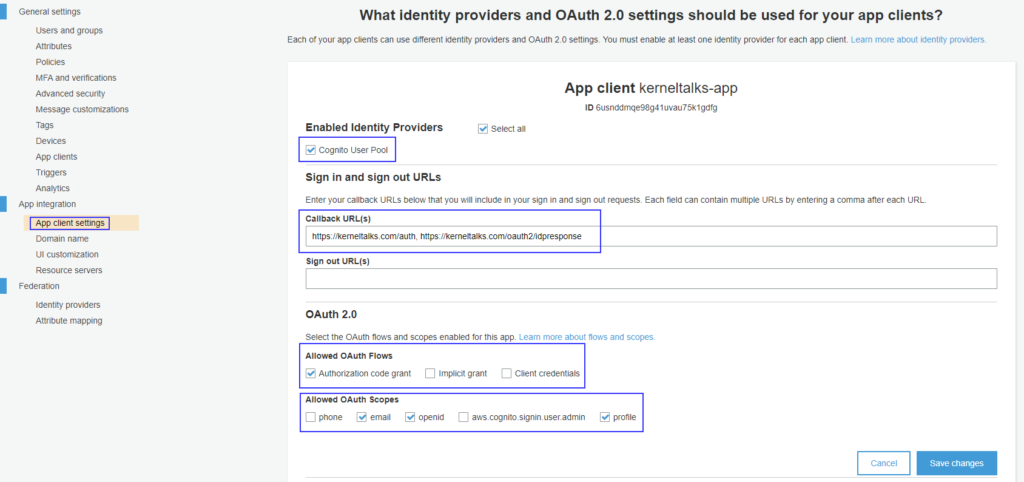
Amazon app clients settings
Now, that you created a user pool and app client for it. Let’s look at some of the settings those needs to be checked or changed to make sure your app client is ready to be consumed.
Navigate to App integration > App client settings on the left sidebar menu on the user pool page.
Enable Cognito user pool under Enabled identity providers.
You should be having Callback URLs handy to fill in here. Those are URLs where app will be navigated once successful authentication happens. Your application developers should be able to help you with these details.
Sign out URLs are those where user will be redirected once its signed out from IDP session
OAuth 2.0 settings should be discussed with developer and configured as the app requirement
app client IDP settings
What is Amazon Cognito domain and how to configure it?
It’s a domain prefix with FQDN https://<prefix>.auth.<region>.amazoncognito.com where,
prefix : unique identifier of your choice
region: AWS region where user pool is hosted.
This domain is used to host sign-up and sign-in pages by Amazon Cognito. You can edit those pages for your company branding as well as explained in the next step.
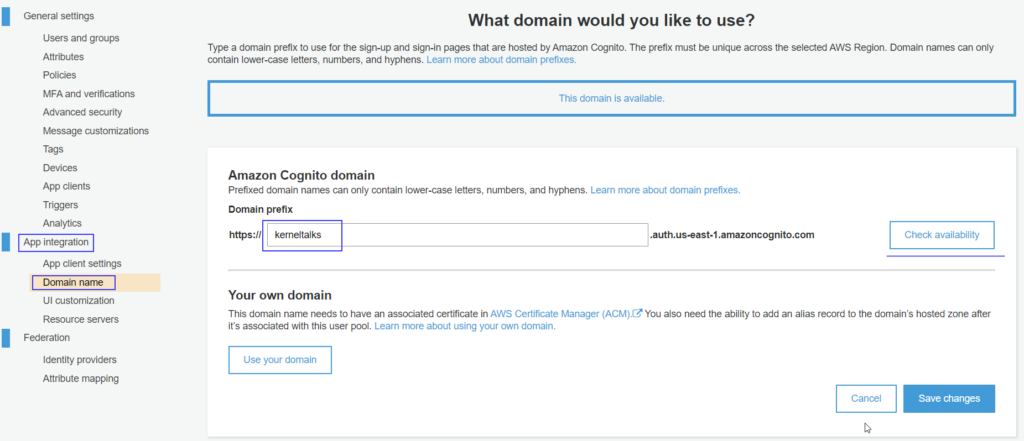
Navigate to App integration > Domain name on the left sidebar menu on the user pool page.
Amazon Cognito Domain
Enter the prefix in the given text box and click Check availability. It will make sure you chose a unique prefix. Click on Save changes
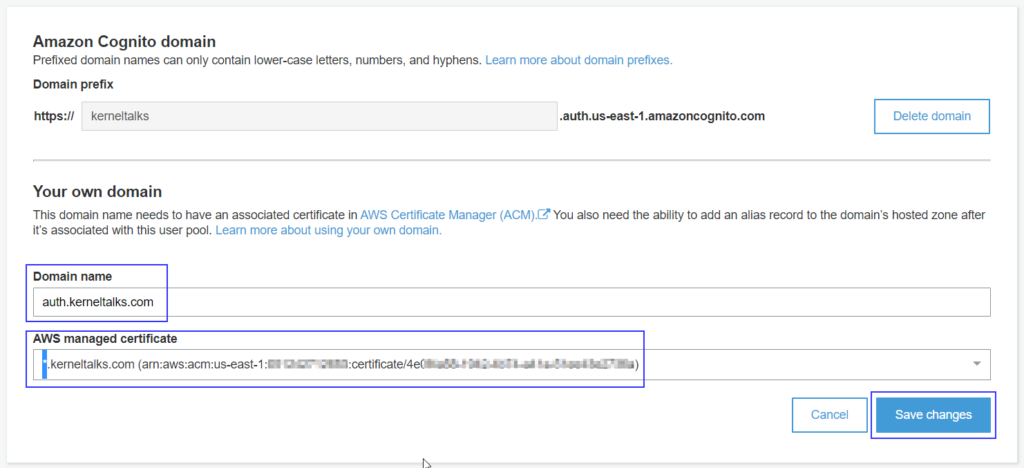
You can opt to choose your own domain as well. You need to have an associated SSL certificate in ACM and permission to add the ALIAS record in the DNS hosted zone.
Custom domain in Aamzon Cognito
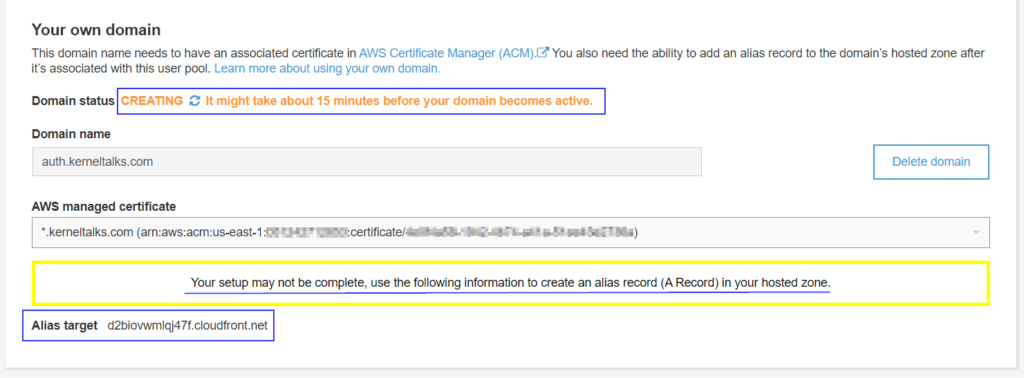
Once done, Cognito will create Amazon Cloudfront distribution for that domain in the backend and supply you with the alias target value to be configured in the hosted zone.
Amazon Cognito custom domain alias
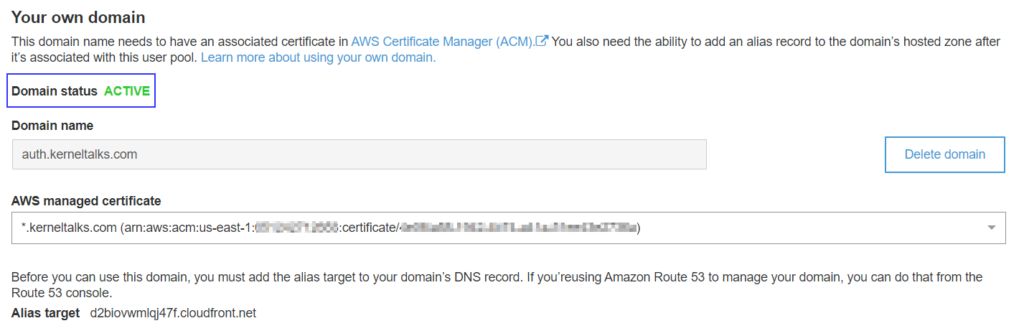
Add ALIAS record (CNAME for non-Route53) for Domain name and Alias target mentioned above. Once done and CloudFront distribution is created, your domain status will be set to ACTIVE.
Cognito custom domain set
How to change login UI of Amazon Cognito?
Navigate to App integration > App client settings on the left sidebar menu on the user pool page.
On the last part of the page, you can find Hosted UI settings. There you will be able to play around with CSS, logo files to create a new custom login page.
Make sure you have Amazon Cognito domain name defined and at least one OAuth scope defined (above step)
How to retrieve Amazon app client secret?
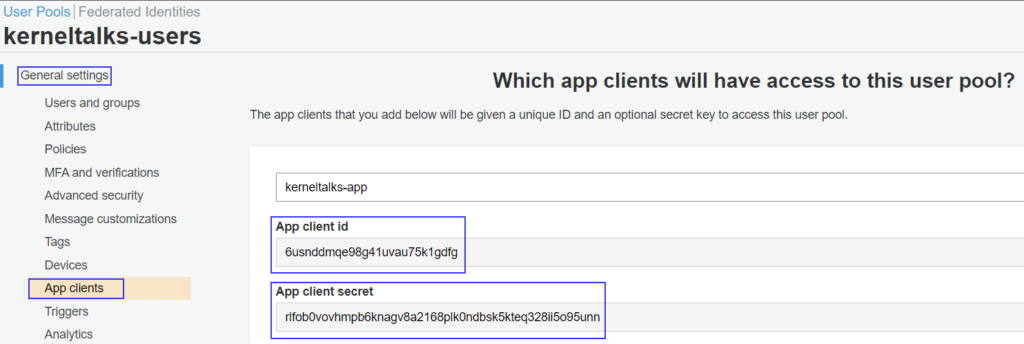
Navigate to General settings > App clients on the left sidebar menu on the user pool page. And there you can retrieve app client secret.
A quick post listing step by step procedure to connect RDS database configured with IAM authentication.
RDS with IAM authentication
We are considering RDS running MySQL and configured with AWS IAM authentication option throughout this post. However, if you are using a different database engine, consider editing commands/arguments whenever necessary.
Basically, we will be creating a local database user that leverages AWS IAM for authentication. Then EC2 will be configured with an IAM role or aws configure that has appropriate policies defined. And lastly, the user will generate an authentication token and log into the RDS database.
Why should we use IAM authentications for RDS?
Here is a list of reasons that are helpful to understand the benefits of the IAM authentications option for RDS.
IAM tokens used to log into the RDS database are valid for 15 minutes only. So they are more secure than permanent username/password pairs, and administrators don’t need to enforce/manage password reset policies.
IAM tokens are generated by making API calls to the AWS IAM service whenever needed. As a result, storing tokens is useless, and even if someone does, that does not pose a security threat due to its short life.
Applications can use EC2 instance profiles for generating tokens, so there is no need to store authentication information anywhere for applications to consume.
What you need?
You should be equipped with below inventory before hand –
RDS instance up and running configured with IAM DB authentication.
EC2 instance configured with AWS CLI (make sure SG allows the connectivity between EC2 and RDS on database port)
Master user login to RDS datatase
Access to AWS IAM service.
Creating user on database for the RDS access
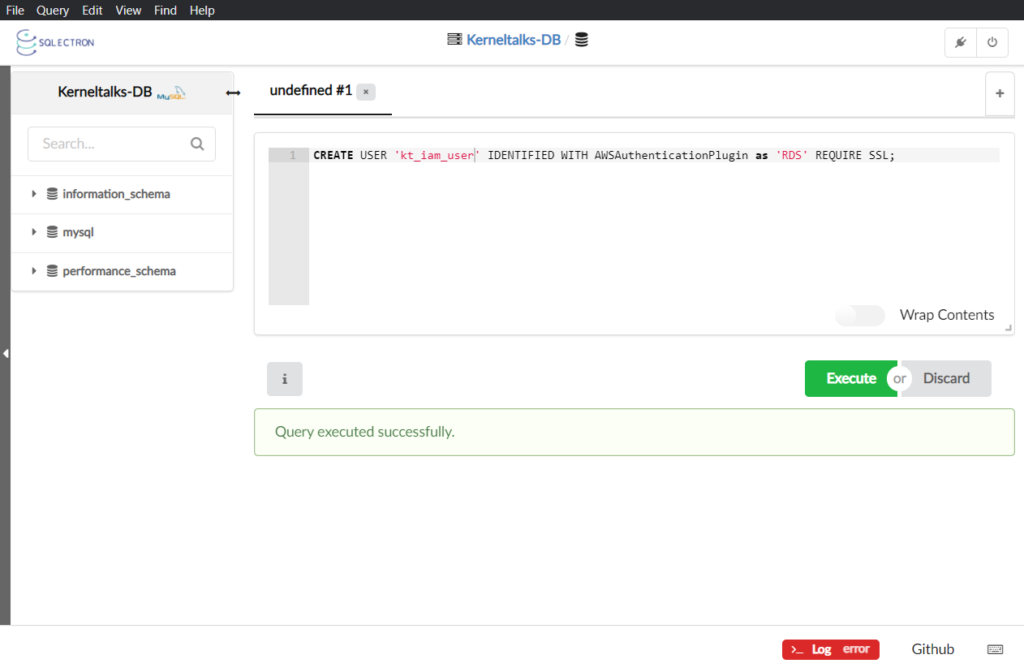
For this step, you need to log in to the RDS database with the master user and create a new user. If you are on windows, you can use a lightweight tool like Sqlectron, or if you are already on EC2, you can use CLI as well –
Create DB user
For SQL CLI :
[root@kerneltalks ~]# mysql -h kerneltalks-rds.cn8uwrapea4b.us-east-1.rds.amazonaws.com -P 3306 -u admin -p
Enter password:
Welcome to the MariaDB monitor.  Commands end with ; or \g.
Your MySQL connection id is 26
Server version: 8.0.20 Source distribution

Copyright (c) 2000, 2018, Oracle, MariaDB Corporation Ab and others.

Type 'help;' or '\h' for help. Type '\c' to clear the current input statement.

MySQL [(none)]> CREATE USER 'kt_iam_user' IDENTIFIED WITH AWSAuthenticationPlugin as 'RDS' REQUIRE SSL;
Query OK, 0 rows affected (0.01 sec)
Make necessary changes to username and RDS endpoint!
If you intend to use the EC2 instance profile, create an IAM role for AWS service EC2 and attach the IAM policy to it.
If you intend to use only IAM users, then make sure you configure your CLI with aws configure command by supplying access key ID and secret access key.
Download the SSL root certificate available for all regions from S3 bucket. This certificate required while making RDS connection since we enforced SSL on the database user. This ensures data is encrypted in flight.
It’s time for you to generate an IAM token and connect to RDS. We will save the token in the Shell variable for easy management and pass that shell variable token into RDS connect command. If the downloaded certificate is not in the PWD then use the absolute path for the pem file.
[root@kerneltalks ~]# token=`aws rds generate-db-auth-token --hostname kerneltalks-rds.cn8uwrapea4b.us-east-1.rds.amazonaws.com  --port 3306 --region us-east-1 --usernam
e kt_iam_user`
[root@kerneltalks ~]# mysql -h kerneltalks-rds.cn8uwrapea4b.us-east-1.rds.amazonaws.com -P 3306 --ssl-ca=rds-ca-2019-root.pem -u kt_iam_user --password=$token --protocol
=tcp
Welcome to the MariaDB monitor.  Commands end with ; or \g.
Your MySQL connection id is 59
Server version: 8.0.20 Source distribution

Copyright (c) 2000, 2018, Oracle, MariaDB Corporation Ab and others.

Type 'help;' or '\h' for help. Type '\c' to clear the current input statement.

MySQL [(none)]>
And you are connected!
Here we have used IAM token as password to connect to RDS database! Make a note that, these generated tokens are good only for 15 minutes. If you are using connect command after 15 minutes you need to generate the token again.
For your understanding, lets see how authentication flows under the hood –
User runs the token generation command with database name, port, region and username for which token to be generated.
RDS sends back API token with 15 min lifespan. It requires your EC2 Instance role/IAM user to have rds connect permission. We covered this by defining IAM policy.
The user attempt to connect to RDS using the token acquired in the previous step.
A secure connection establishes, and the user logs in only if
The root certificate is valid
IAM permissions are in place and valid for db:connect
Supplied username has RDS authentication set in the database
The supplied token is generated for the same username, and currently, it’s not expired.
A user granted access and logs in. SQL prompt will be presented.
A quick article for AWS beginners on connecting the AWS RDS database from Windows.
A step by step RDS database login procedure using the lightweight SQL client. This article is intended for AWS beginners who wanted to learn about RDS service with a little bit of database hands-on. Being said that, there is always a question for the non-DB guys; “How did I connect with this RDS database?”. So here we will walk you through step by step procedure for doing that.
For connecting to RDS database you should have –
RDS database up and running
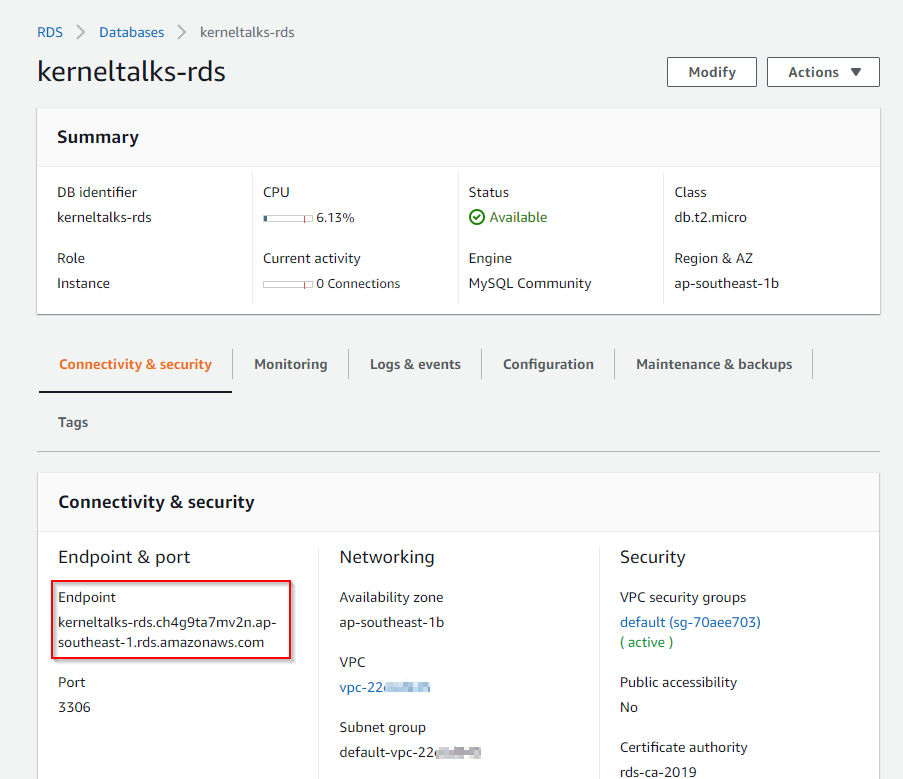
RDS database endpoint
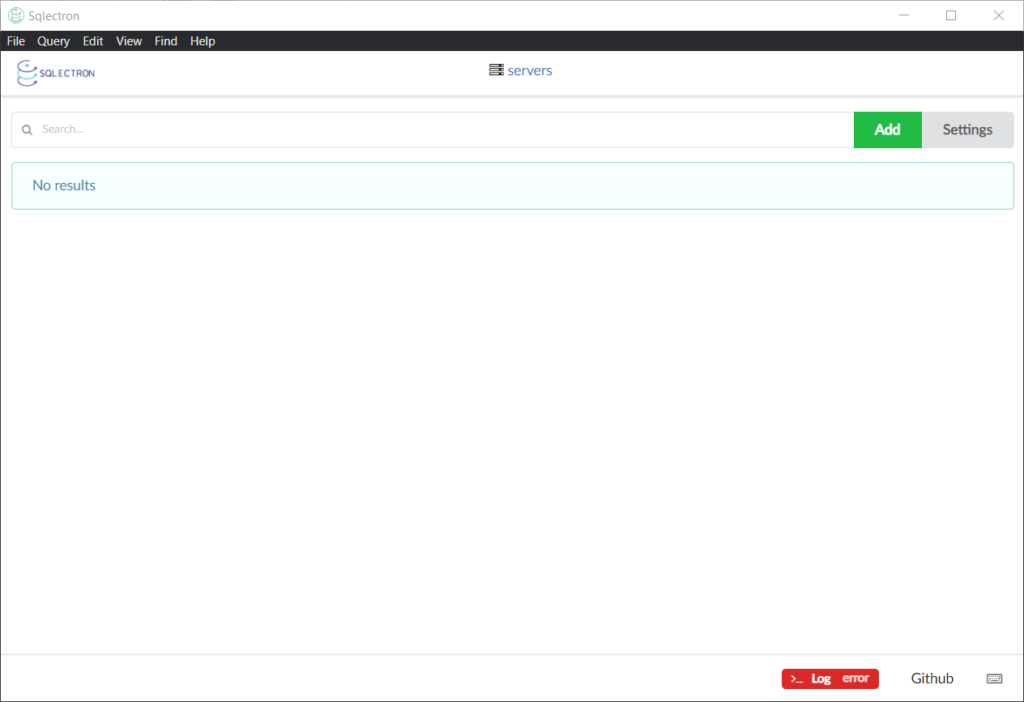
A SQL client
Connectivity between your machine and RDS database
Throughout this article, I am considering the MySQL database on RDS. If you are using a different database engine on RDS, then the connection port may vary. Also, we are considering ‘Password authentication’ of authentications options here –
Password authentication: RDS configured with this option has users managed at the database level.
AWS IAM database authentication: RDS configured with this option authenticates users by leveraging AWS IAM service. As a result, users are managed outside the database.
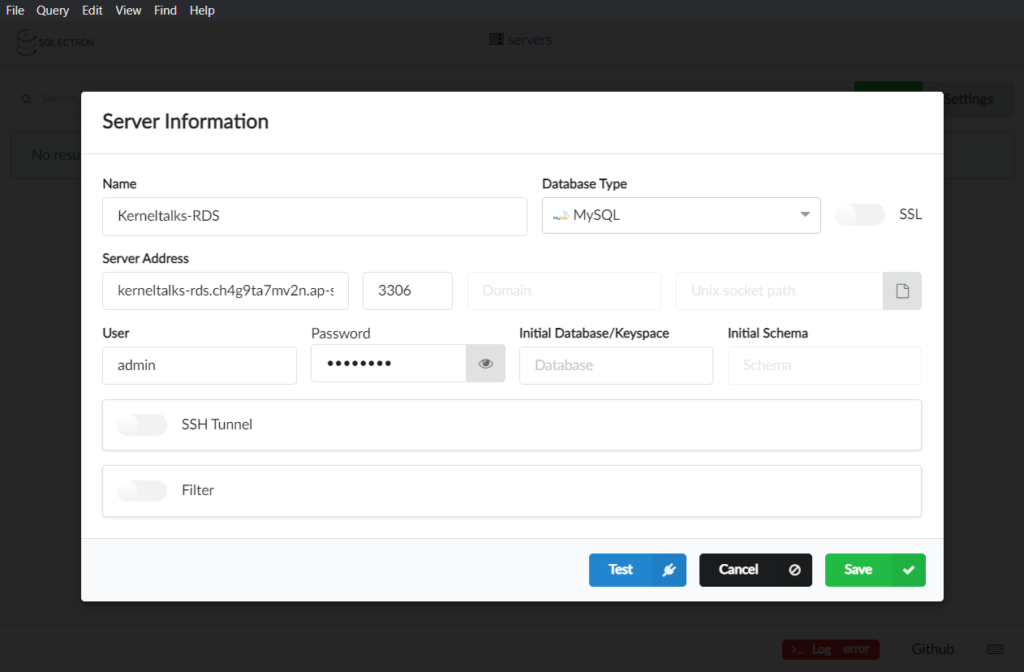
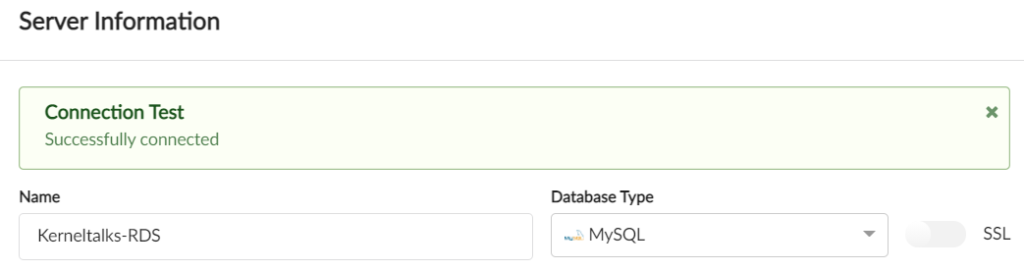
Click on Add button to enter RDS connection details. We are testing RDS with ‘Password authentication’ here hence user and password needs to be supplied.
RDS connection details in SQL Client
Click on Test to verify the connectivity.
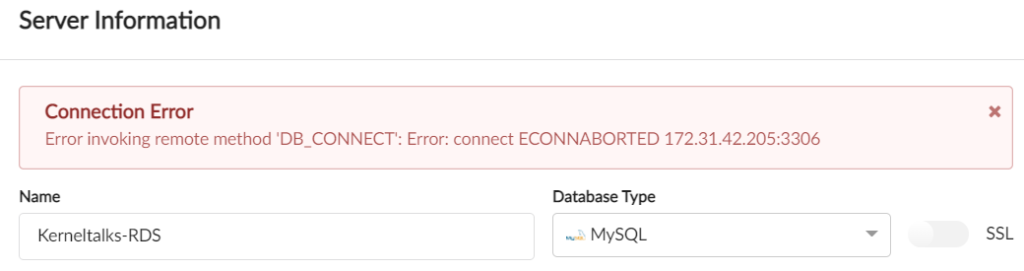
If you encounter the below error, try to connect from a machine with direct connectivity to RDS. You can analyse RDS security groups to determine allowed subnets.
DB_CONNECT Error
Verify below things –
There are no firewall rules between your machine and RDS blocking the port 3306 traffic.
RDS database is publicly accessible. (Obv. It applies to testing POC databases). If not, you can configure RDS to be publicly accessible.
If you don’t want your RDS to be publicly accessible, you need to connect RDS from the allowed subnets. That means your machine needs to be in the same VPC as RDS (e.g. Windows EC2 in the same VPC)
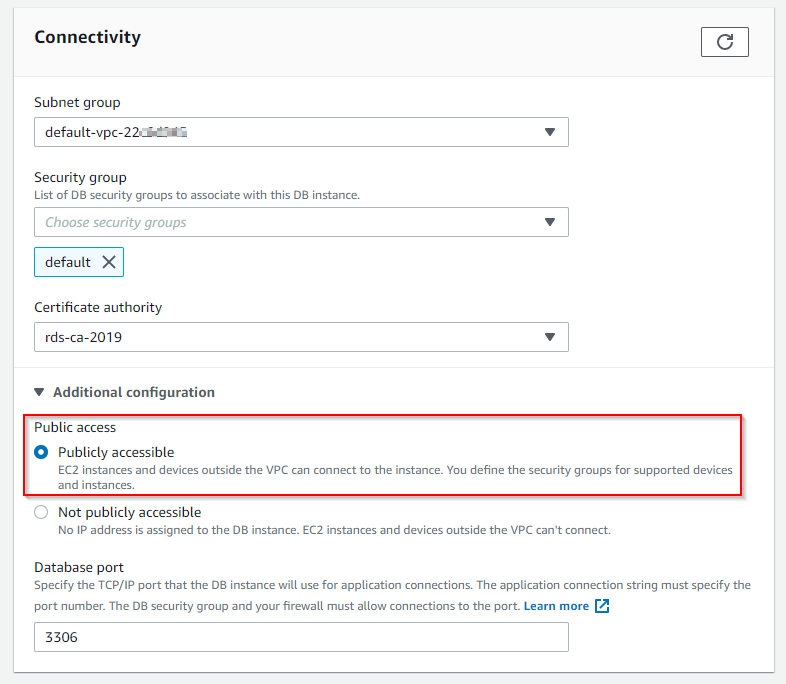
How to make RDS publicly accessible
Not recommended for production RDS instances or RDS carrying sensitive data.
Navigate to RDS console and respective database
Select Modify from the action menu for that particular database
Goto Connectivity section and expand Additional configuration
Here choose the radio button against Publicly accessible and Apply the changes
RDS Public Access
RDS connection using ‘Password authentication’ via SQL client
Once you sort out RDS connectivity issues, go back to the SQL client and try Test again. Now you should be able to succeed.
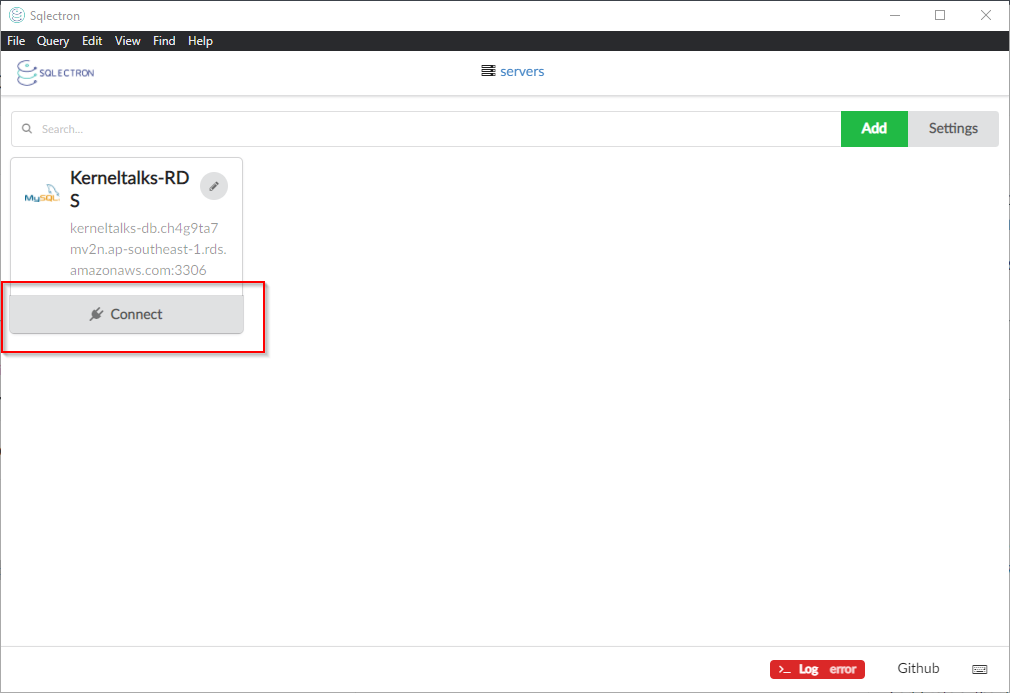
Now, click on Save to save this configuration in SQL client. And then hit Connect to connect to your RDS database.
Connect RDS using Client
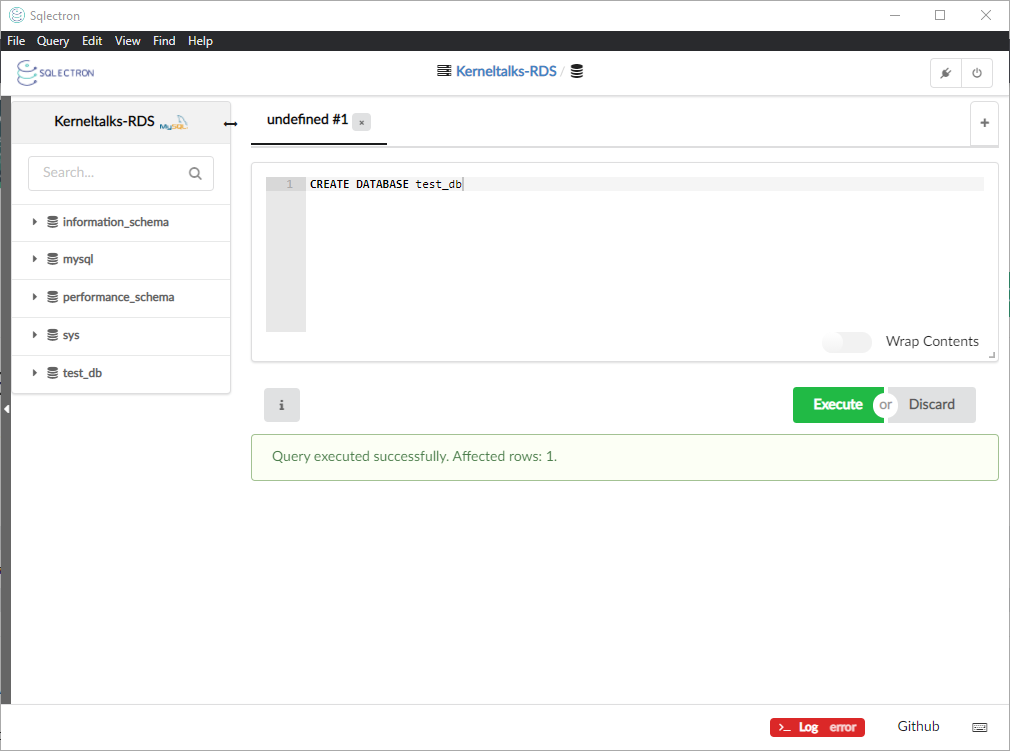
After connecting, you can see schema on the left-hand side and a command box on the right-hand side to execute commands on the database.
Running SQL commands on RDS
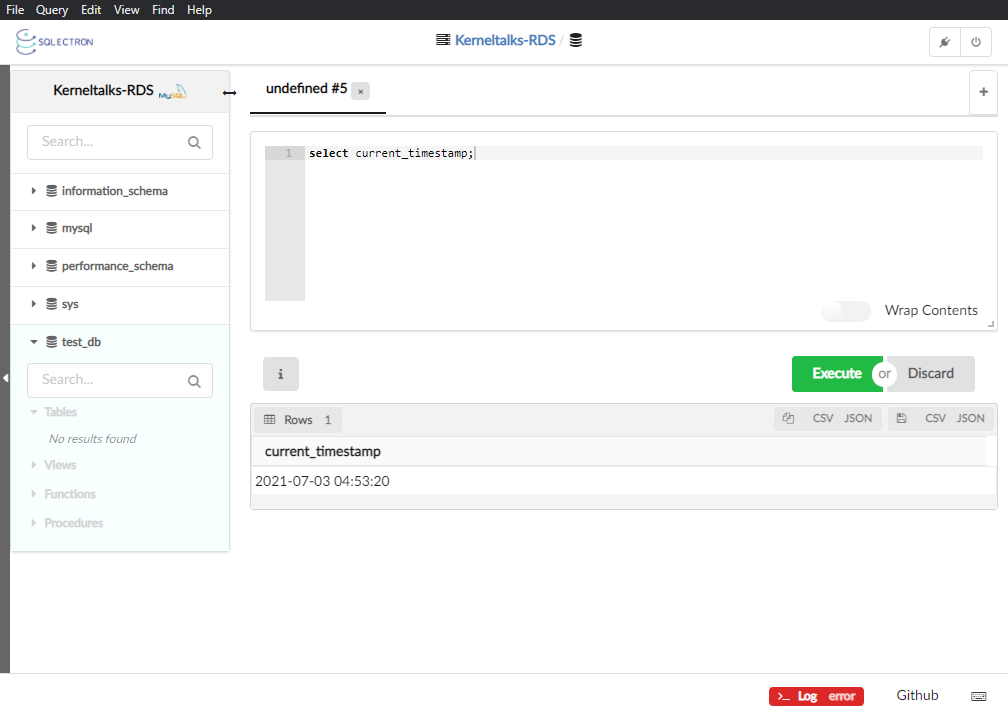
Command outputs or messages will be shown in the blank space below the command text area. You will be able to download outputs in JSON, CSV format or even copy them directly.
Running SQL commands with Sqlectron!
That’s all! You can use this light weight SQL client to get started with RDS immediately.
A quick article that helps you preparing for Hashicorp Certified Terraform Associate Exam
Terraform Associate exam!
In this quick post, I would like to share some of the resources that help you clear the terraform associate exam. Feel free to add resources you know in the comments section, which may help fellow readers.
The terraform associate exam is designed to test the candidate’s readiness towards IaC, i.e. Infrastructure as code. IaC concepts, terraform CLI hands-on (a lot of it) and knowledge on terraform’s paid offerings through Cloud or Enterprise should get you through this exam. It’s a practitioner level exam, so it shouldn’t be hard to beat if you have IaC and cloud background.
You must have researched already about the exam on its official page, but here are quick facts for your reference.
I suggest you have good hands-on with terraform CLI before taking this exam. It will help you cover the majority of topics, and you don’t have to learn them during preparation. That leaves you with minimal topics to prepare for actual certification.
Hashicorp’s study guide is the best resource to follow along for preparation. Let me quickly list down a couple of topics you should not miss during preparation –
IaC concepts
Traditional infra provisioning v/s IaC
Terraform basic workflow
Write, plan and apply.
Different types of blocks in terraform code
Terraform CLI commands (a huge list of them!)
Terraform Modules, functions, state files
At least go through all functions once.
Lots of hands-on to understand how modules works
State management (a big topic!)
Debugging and variables
Different ways to handle variables
Debugging levels, ways to set them, logging in files
Detailed understanding of Terraform cloud and enterprise
Free and paid offerings in each type
Sentinal, workspaces, remote runs etc. understanding
Clustering, OS availability in each type
Resources for preparation
Assorted list of online resources you can leverage to follow along your preparation journey.
Here is a list of practice tests you can take online before going in for an actual exam. It will test the understanding of your topic and concretes your decision for exam booking.
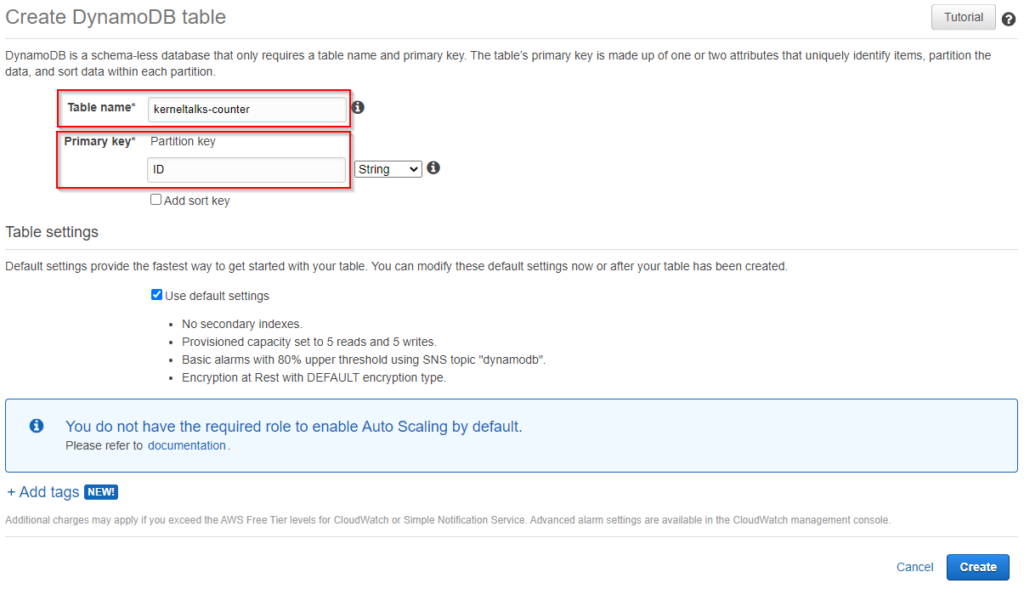
A step by step procedure to create and update atomic counter in AWS DynamoDB table.
Creating counter in DDB!
First of all, we will see what is atomic counter and why do we need it. We will also check why DybamoDB is chosen in this use case.
What is atomic counter?
Often it would help if you tracked some numerical like website visits, which are incremental in nature. Such counters need to be stored in a centralized place, and the update should be atomic. Atomic means one request executes without interfering with another request. i.e. concurrent updates do not clash with each other and so no data lost in the process. Since everyone is leveraging temporary infrastructure like EC2 getting replaced by Auto Scaling groups or containers, storing such counter locally is not a good idea. So to get central storage, DDB is the best choice since it’s an ultra-fast, single-digit milliseconds latency, NoSQL database. Perfect for the atomic operation of scaling infra/traffic.
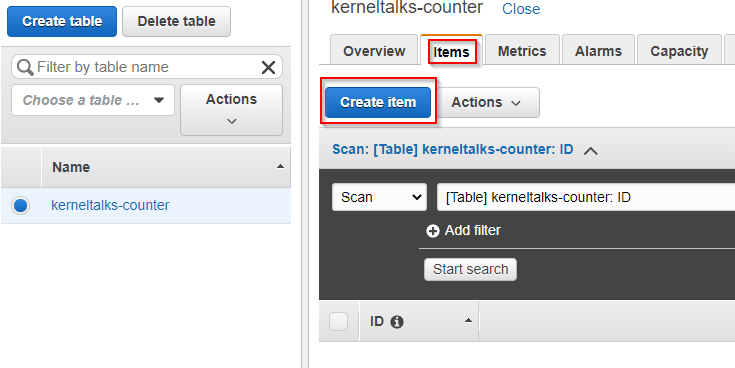
Now let’s get into the process of creating this counter and updating it.
Now you can use below AWS CLI command below to update the counter! Every time you run the command, it will update the counter by 1. You can code it in your application at the appropriate place to run this command/API call to update the counter.
A quick post on how to add Capacity Providers in ECS clusters.
In our last article, we walked you through the basics of Capacity Providers. In this article, let’s create them to test their functionalities. You can create Capacity Providers and add them to the running ECS cluster without touching anything in the cluster.
Creating EC2 type Capacity Providers
Steps:
Make sure you are running EC2 backed ECS Cluster.
Create new ASG using same launch template/configuration as existing ASG
Create Capacity Provider
Update cluster with newly created Capacity Provider.
For creating EC2 type Capacity Providers, you should use the new ASG. AWS does not recommend re-using the same ASG which is configured in ECS Cluster. You can use the same Launch template or Launch configuration and create a new ASG to be used by Capacity Providers. It makes it easy for Capacity Providers to keep track of EC2 instances instantiated by them.
While creating new ASG make sure –
Desired and minimum capacity is set to zero.
Maximum capacity is set to a non-zero number.
Enable instance scale-in protection. So that scale in action does not terminate EC2s running tasks.
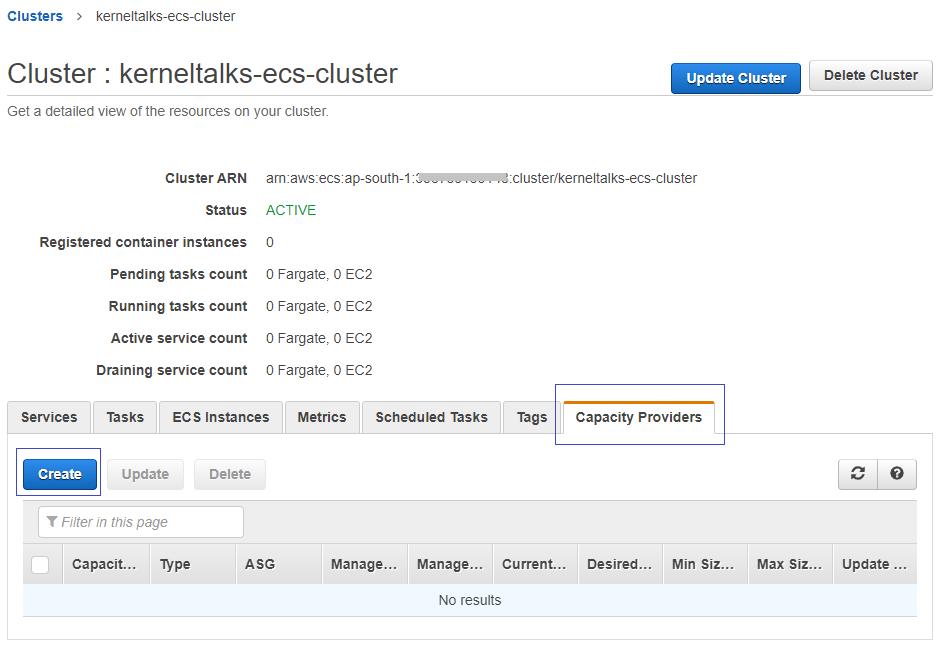
Once ASG is ready, head back to the ECS cluster dashboard and click on Cluster name. On a cluster detail page, you should see a tab named Capacity Providers. Click on it and then click on Create button.
Creating Capacity Providers!
You should be presented with the Capacity Provider configuration page. Here you can specify –
Capacity provider name: Identifier
Auto Scaling group: Select newly created ASG from the dropdown.
Managed scaling: Enabled so that capacity providers can manage both scales in and scale-out.
Target capacity %: It defines how much capacity you want to be used for the task’s compute requirements. I chose 100% that means I don’t want the capacity providers to maintain any spare capacity for upcoming tasks. For example, if you specify 70%, then the capacity provider maintains 30% capacity spare so that any new upcoming tasks can directly be placed here and don’t need to wait in a PROVISIONING state for long. For optimum billing experience, 100% should be good enough.
Managed termination protection: Enabled. It prevents ASG from terminating any instance running at least one task on it during scale-in action. Your ASG should have instance scale-in protection enabled for it.
EC2 capacity provider settings
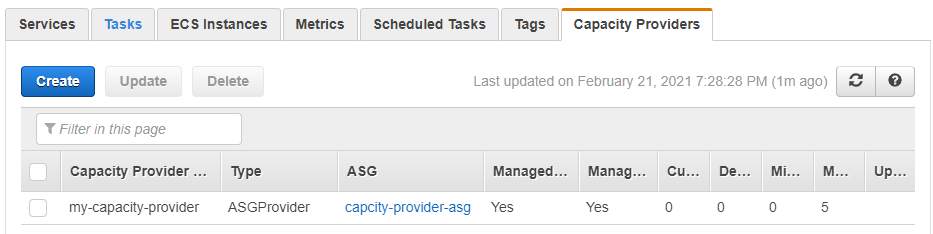
Click on Create button to create your capacity provider. You should be able to see the capacity provider on the cluster details page now.
Capacity provider information
Now, it’s time to add this capacity provider to the ECS cluster.
You can create multiple capacity providers with different ASGs so that you can leverage different instance types. And they all should be listed here as well. For the sake of this article, I am moving ahead with a single capacity provider.
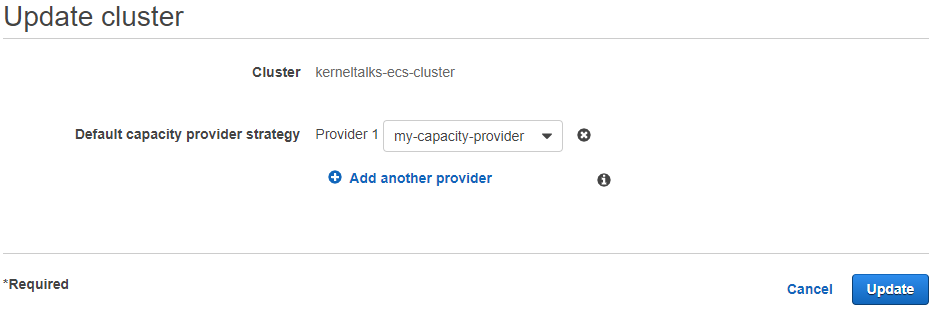
Click on the Update cluster button on the Cluster details page. On the update page, capacity providers can be added/removed to the cluster.
Adding capacity provider to ECS cluster
Select a capacity provider from the dropdown and click on the Update button. If you have multiple capacity providers, then add them by clicking Add, another provider.
When adding more than one capacity provider, you need to specify Base and Weight values for each capacity provider.
You should see the above message confirming capacity provider addition is successful!
Creating FARGATE capacity providers
Well, you cant create them technically! FARGATE capacity providers are readily available in FARGATE clusters. You need to associate them with the cluster.
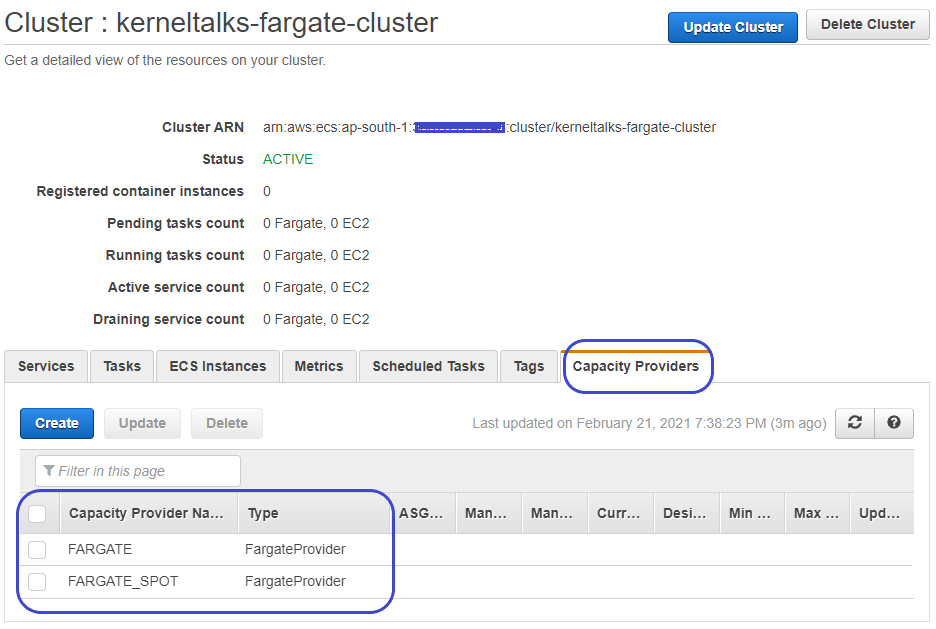
When you create an ECS cluster backed by FARGATE, you can see FARGATE and FARGE_SPOT types of capacity providers already available in the cluster.
FARGATE capacity providers
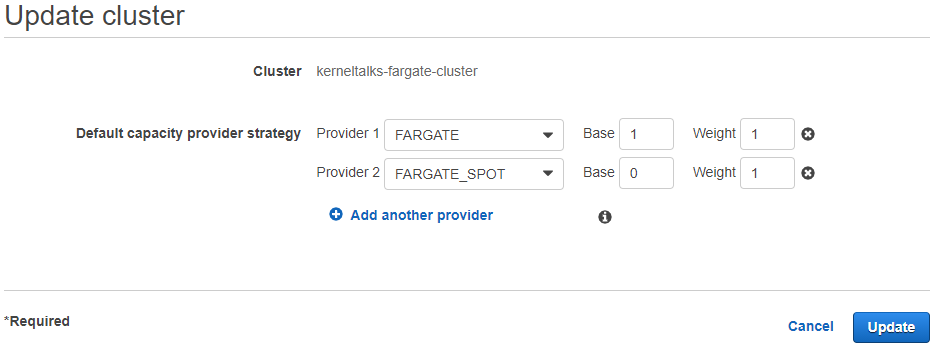
You can add them to the cluster by the same Update cluster process explained above.
Adding FARGATE capacity provider to cluster
Adding FARGATE capacity providers to existing cluster
If you have an existing FARGATE ECS Cluster, you need to use AWS CLI or API calls to update it with the FARGATE capacity providers.
You need to use the put-cluster-capacity-providers switch—more details on AWS documentation here. Since I don’t have any existing FARGATE cluster, I can not demonstrate it here.
Now, your cluster is updated with capacity providers and ready to run tasks on a complete auto-scaled ECS cluster!