How to install Ansible and how to run a simple command using Ansible.
Ansible installation
In this article, we will walk you through step by step procedure to install Ansible and then run the first ping command on its clients.
We will be using our lab setup built using containers for this exercise. In our all articles related to Ansible, we are referring Ansible server as Ansible control machine i.e. where Ansible software is installed and running. Ansible clients are machines who are being managed using this Ansible.
Pre-requisite
Ansible control machine requirements
It should be a Linux machine. Ansible can bot be installed on Windows OS. and secondly it should have Python installed.
It’s preferred to have passwordless SSH setup between Ansible control machine and managed machine for smooth executions but not mandatory.
Ansible managed machine requirement
It should have libselinux-python installed if SELinux is enabled which is obviously most of the time.
A Python interpreter should be installed.
Ansible installation
Installation of Ansible is an easy task. Its a package so install it like you install any other package in your Linux. Make sure you have subscribed to the proper repo which has an Ansible engine available to install.
I enabled EPEL repo on my Oracle Linux running in Virtual box and installed it using –
[root@ansible-srv ~]# yum install ansible
Once the installation is done, you need to add your client list in file /etc/ansible/hosts. Our setup files look like below :
Here, we defined the Ansible default user in the inventory file itself. Since we do not have DNS and using containers in our setup, I defined hostname and IP as mentioned above.
Running first Ansible command
As I explained earlier in the Lab setup article, I configured passwordless SSH from the Ansible control machine to the managed node.
Let’s run our first ansible command i.e. ping one hosts. Command syntax is – ansible -m <module> <target>
Here in the second line you see the command stdout i.e. output. and return code rc i.e. exit code of the command is 0 confirming command execution was successful.
List of Symantec Endpoint Protection 14 antivirus client commands in Linux and few errors along with their possible solutions
SEP Linux client commands
In this article, we will walk you through few SEP 14 antivirus agent commands which will help you troubleshoot your issues related to it and then we will give solutions to some frequently seen errors.
Symantec Endpoint Protection 14 Linux client commands
How to restart SEP 14 Linux client processes
Stop SEP 14 Linux client using single command below –
[root@kerneltalks tmp]# /opt/Symantec/symantec_antivirus/uninstall.sh
Are you sure to remove SEP for Linux from your machine?
WARNING: After SEP for Linux is removed, your machine will not be protected.
Do you want to remove SEP for Linux? Y[es]|N[o]: N
Y
Starting to uninstall Symantec Endpoint Protection for Linux
Begin removing GUI component
GUI component removed successfully
Begin removing Auto-Protect component
symcfgd is running
rtvscand is not running
smcd is not running
Auto-Protect component removed successfully
Begin removing virus protection component
smcd is running
rtvscand is running
symcfgd is running
Virus protection component removed successfully
Uninstallation completed
The log file for uninstallation of Symantec Endpoint Protection for Linux is under: /root/sepfl-uninstall.log
All the below commands are of binary sav which is located in /opt/Symantec/symantec_antivirus
Display auto-protect module state
[root@kerneltalks symantec_antivirus]# ./sav info -a
Enabled
Display virus definition status
[root@kerneltalks symantec_antivirus]# ./sav info -d
11/24/2019 rev. 2
Check if the client is Self-managed or being managed from the SEPM server. The output is server hostname or IP who is managing the client.
This means your client is not able to communicate with the SEPM server. Make sure there is no firewall ( internal to OS like iptables or external ) is blocking the traffic. Also, you have proper proxy configurations in place. If its internal server make sure you excluded it from proxy as no_proxy hosts.
Best way to troubleshoot LiveUpdate issues is to go through the log file /opt/Symantec/LiveUpdate/Logs/lux.log. It has a descriptive message about the error which helps to quickly drill down to the problem.
[root@kerneltalks symantec_antivirus]# ./sav liveupdate -u
sep::lux::Cseplux: Failed to run session, error code: 0x80010830
Live update session failed. Please enable debug logging for more information
Unable to perform update
Or error logged in lux.log file as below –
Result Message: FAIL - failed to select server
Status Message: Server was not selected
The client is unable to reach the LiveUpdate server or LiveUpdate Administrator i.e. LUA. Again same troubleshooting steps as above.
Steps to configure SFTP on Linux server with access restricted to the specific directory only. Also, how to deny SSH login and only allow SFTP login to the user.
SFTP with restricted directory access
In this article, we will walk you through the procedure to configure SFTP on your server and restrict SFTP user access to a specific directory.
The whole process is listed below stepwise. If you have SFTP configured already or users created already you can skip those steps.
Add SFTP user to the system
Prepare SFTP directory
Configure SFTP on SSH service layer
Allow user for SFTP only and deny SSH access
Verify access
In below example, we will create user sftp_user1, allow his SFTP access, deny him ssh access and restrict his SFTP access to the directory /sftp_uploads/user1
Add SFTP user to the system
It’s a simple useradd stuff. For easy management of SFTP users, add the SFTP group as well on your system.
Keep in mind that you should have a base directory that will be owned by root i.e. ChrootDirectory. And then under it, you can create your restricted directory where SFTP user is to be restricted. So once SFTP user is logged in he is jailed into ChrootDirectory and he can not move beyond it.
Set ownership and permissions for the SFTP directory. I kept them exclusively for owner i.e. sftp_user1 only.
SFTP is a sub-service offered by SSH daemon. To enable it, add below lines in SSH configuration file /etc/ssh/sshd_config
If your SSH config file already has /usr/libexec/openssh/sftp-server enabled as SFTP subsystem then hash it out.
Subsystem sftp internal-sftp
Match Group sftp_group  #OR Match User sftp_user1
ChrootDirectory /sftp_uploads
ForceCommand internal-sftp
X11Forwarding no
AllowTcpForwarding no
Here line-wise –
Tells SSH daemon to run the internal sftp subsystem.
Match users with the primary group sftp_group or match only specified user i.e. sftp_user1
When they try to login restrict their working directory under the base /sftp_upload
Only allow them to use sftp service and deny ssh login
Disable all X11 forward for those users so they cant access GUI apps
Disable TCP forwarding as well for them
Restart SSH daemon to pick up these new configurations. You can restart with HUP if you don’t want the existing SSH connection to be impacted.
sftp_user1 should able to connect using the sftp protocol
sftp_user1 should not be allowed to log in using SSH
When logged in using sftp, sftp_user1 should be restricted to /sftp_uploads/user1 directory only.
Let’s test all three points –
[root@kerneltalks ~]# sftp sftp_user1@192.168.0.106
sftp_user1@192.168.0.106's password:
Connected to 192.168.0.106.
sftp>
So the first point is validated.
[root@kerneltalks ~]# ssh sftp_user1@192.168.0.106
sftp_user1@192.168.0.106's password:
Could not chdir to home directory /home/sftp_user1: No such file or directory
This service allows sftp connections only.
Connection to 192.168.0.106 closed.
There! The second point validated.
[root@kerneltalks ~]# sftp sftp_user1@192.168.0.106
sftp_user1@192.168.0.106's password:
Connected to 192.168.0.106.
sftp> ls
user1
sftp> pwd
Remote working directory: /user1
And the third point as well. You can see the SFTP user’s working directory is restricted to /usr1 which is /sftp_uploads/user1 on the SFTP server. Since we jailed him using ChrootDirectoy /sftp_uploads, he is inside it and can not see beyond. Hence /user1 is PWD for SFTP users.
A quick post explaining how you can move out /tmp directory from / to new mount point on the new disk
Create /tmp as a new mount point
One of the headaches for sysadmin is getting a file system full. It can have many reasons from blaming application, and un-adequate capacity planning to an un-organized file system structure. We are going to look at the file system aspect of it.
Server with a single disk approach i.e. root disk is formatted as one partition and mounted as / is common these days. But, there are servers on-prem that still follow the slicing of disks and mounting different root FS on their approach. So if your server is one of them and for some reason, your /tmp directory is part of / and not separate mount point then this article is for you.
In this article, we will walk you through step by step procedure to mount /tmp on another disk as a separate mount point. We are going to separate out /tmp directory from / file system as /tmp mount point. We are taking an example with LVM but the procedure remains the same if you want to mount /tmp on another partition. Only replace LVM parts i.e. VG, and LV stuff with an equivalent partition creation procedure.
Make sure you have a valid backup of the server before proceeding.
How to move /tmp as new mount point with downtime
/tmp is used by many processes on the server to open up temp files during execution. So this directory is always in use and rebooting in single-user mode to perform a such activity is the safest and clean way. You can check processes using /tmp by lsof command.
The complete procedure can be done in the below order –
Prepare a new disk for /tmp
Create LV on new disk (pvcreate, lvcreate)
pvcreate /dev/sdb
vgcreate vg_tmp /dev/sdb
lvcreate -l 100%FREE -n lv_tmp vg_tmp
Format LV with the filesystem of your choice
mkfs.ext4 /dev/vg_tmp/lv_tmp
Mount it on a temporary mount
mount /dev/vg_tmp/lv_tmp /mnt
Copy data from /tmp directory to the new disk
cp -pr /tmp/* /mnt
ls -lrt /mnt
ls -lrt /tmp
Reboot server into single-user mode
Prepare new /tmp mount point
Delete/move existing /tmp directory depending on space availability in /
A quick post to explain the default Ansible user and where it can be changed.
Ansible user configuration
Ansible by default manages its clients over SSH protocol. So its obvious question is what is the default user Ansible uses to connect or execute the command on its clients? Followed by – how to change Ansible default user? We will answer this question in this article.
If you are running default configurations and you did not define Ansible user anywhere then user running ansible command (the current user) will be used to communicate with the client over SSH.
Define Ansible user in the configuration file
Ansible default user can be defined in Ansible configuration file /etc/ansible/ansible.cfg in a below section by un-commenting remote_user line and replacing the root with the user of your choice –
# default user to use for playbooks if user is not specified
# (/usr/bin/ansible will use current user as default)
#remote_user = root
Here it clearly states that if default user is not defined in configuration file then the current logged in user (on control machine i.e. Ansible server) will be used to execute commands on Ansible clients.
Define Ansible user in Inventory
Another place you can define this Ansible user is inventory i.e. client host list file. Default hosts file Ansible uses is /etc/ansible/hosts. You can add below snippet in this file to define Ansible user for your tasks or playbook.
[all:vars]
ansible_user=ansible-usr
where ansible-usr is the user you want Ansible to use while connecting to clients over SSH. Replace ansible-usr with the user of your choice.
Quick lab setup for learning Ansible using containers on Oracle Virtualbox Linux VM.
Setting up LAb for learning Ansible
In this article, we will be setting up our lab using Docker containers for testing Ansible. We are using Oracle Virtualbox so that you can spin up VM with a readymade OVA file in a minute. This will save efforts to install the OS from scratch. Secondly, we will be spinning up a couple of containers which can be used as ansible clients. Since we need to test ansible for running a few remote commands/modules, it’s best to have containers working as clients rather than spinning complete Linux VMs as a client. This will save a lot of resource requirements as well and you can run this ansible lab on your desktop/laptop as well for practicing ansible.
Without further delay lets dive into setting up a lab on desktop/laptop for learning Ansible. Roughly it’s divided into below sections –
Download Oracle Virtualbox and OVA file
Install Oracle Virtualbox and spin VM from OVA file
Run containers to work as ansible clients
Test connectivity via passwordless SSH access from Ansible worker to clients
Step 1. Download Oracle Virtualbox & OEL7 with Docker readymade OVA file
Goto Oracle Downloads and download Oracle Linux 7 with Docker 1.12 Hands-On Lab Appliance file. This will help us to spin up VM in Oracle VirtualBox without much hassle.
Step 2. Install Oracle Virtualbox and start VM from OVA file
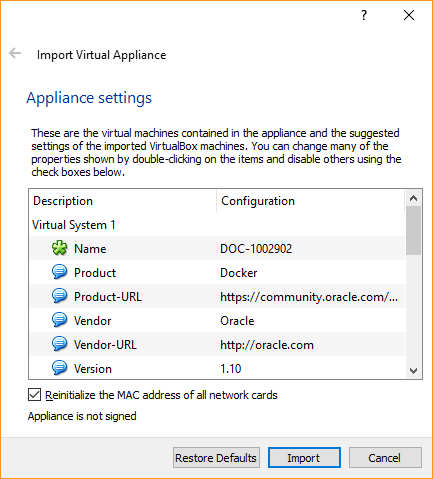
Install Oracle Virtualbox. Its a pretty standard setup procedure so I am not getting into it. Once you download above OVA file, open it in Oracle VirtualBox and it will open up the Import Virtual Appliance menu like below-
Import Virtual Appliance menu
Click Import. Agree to the software license agreement shown and it will start Importing OVA as a VM. After finishing import, you will see VM named DOC-1002902 i.e. same name as OVA file is created in your Oracle VirtualBox.
Start that VM and login with the user. Credentials details are mentioned in the documentation link on the download page of OVA file.
Step 3. Running containers
For running containers, you need to set up Docker Engine first on VM. All steps are listed in the same documentation I mentioned above where you looked at your first login credentials. Also, you can follow our Docker installation guide if you want.
Then create key pair on your VM i.e. Ansible worker/server so that public key can be used within a container for passwordless SSH. We will be using Ansible user as ansible-usr in our setup, so you can see this user henceforth here. Read how to configure Ansible default user.
[root@ansible-srv .ssh]# ssh-keygen -t rsa
Generating public/private rsa key pair.
Enter file in which to save the key (/root/.ssh/id_rsa):
Enter passphrase (empty for no passphrase):
Enter same passphrase again:
Your identification has been saved in /root/.ssh/id_rsa.
Your public key has been saved in /root/.ssh/id_rsa.pub.
The key fingerprint is:
98:42:9a:82:79:ac:74:7f:f9:31:71:2a:ec:bb:af:ee root@ansible-srv.kerneltalks.com
The key's randomart image is:
+--[ RSA 2048]----+
|                 |
|                 |
|    .            |
|.o +   o         |
|+.=.. o S. .     |
|.+. ... . +      |
|.    . = +       |
|      o o o      |
|      oE=o       |
+-----------------+
Now we have key pair ready move on to containers.
Once your Docker Engine is installed and started, create custom Docker Image using Dockerfile mentioned below which we will use to spin up multiple containers (ansible clients). Below Dockerfile is taken from link and modified a bit for setting passwordless SSH. This Dockerfile answers the question how to configure passwordless SSH for containers!
FROM ubuntu:16.04

RUN apt-get update && apt-get install -y openssh-server
RUN mkdir /var/run/sshd
RUN echo 'root:password' | chpasswd
RUN sed -i 's/PermitRootLogin prohibit-password/PermitRootLogin yes/' /etc/ssh/sshd_config

# SSH login fix. Otherwise user is kicked off after login
RUN sed 's@session\s*required\s*pam_loginuid.so@session optional pam_loginuid.so@g' -i /etc/pam.d/sshd

ENV NOTVISIBLE "in users profile"
RUN echo "export VISIBLE=now" >> /etc/profile
RUN useradd -m -d /home/ansible-usr ansible-usr
RUN mkdir /home/ansible-usr/.ssh
COPY .ssh/id_rsa.pub /home/ansible-usr/.ssh/authorized_keys
RUN chown -R ansible-usr:ansible-usr /home/ansible-usr/.ssh
RUN chmod 700 /home/ansible-usr/.ssh
RUN chmod 640 /home/ansible-usr/.ssh/authorized_keys
EXPOSE 22
CMD ["/usr/sbin/sshd", "-D"]
Keep above file as Dockerfile in /root and then run below command while you are in /root. If you are in some other directory then make sure you use relative path in COPY command in above Dockerfile.
[root@ansible-srv ~]# docker build -t eg_sshd .
This command will create a custom Docker Image named eg_sshd. Now you are ready to spin up containers using this custom docker image.
We will start containers in below format –
Webserver
k-web1
k-web2
Middleware
k-app1
k-app2
Database
k-db1
So in total 5 containers spread across different groups with different hostname so that we can use them for testing different configs/actions in ansible.
I am listing command for the first container only. Repeat them for rest 4 servers.
Now, spin up all 5 containers. Verify all containers are running and note down their ports.
[root@ansible-srv ~]# docker container ls -a
CONTAINER ID        IMAGE               COMMAND               CREATED              STATUS              PORTS                   NAMES
2da32a4706fb        eg_sshd             "/usr/sbin/sshd -D"   5 seconds ago        Up 3 seconds        0.0.0.0:32778->22/tcp   k-db1
75e2a4bb812f        eg_sshd             "/usr/sbin/sshd -D"   39 seconds ago       Up 33 seconds       0.0.0.0:32776->22/tcp   k-app2
40970c69348f        eg_sshd             "/usr/sbin/sshd -D"   50 seconds ago       Up 47 seconds       0.0.0.0:32775->22/tcp   k-app1
4b733ce710e4        eg_sshd             "/usr/sbin/sshd -D"   About a minute ago   Up About a minute   0.0.0.0:32774->22/tcp   k-web2
e70d825904b8        eg_sshd             "/usr/sbin/sshd -D"   4 minutes ago        Up 4 minutes        0.0.0.0:32773->22/tcp   k-web1
Step 4. Passwordless SSH connectivity between Ansible server and clients
This is an important step for the smooth & hassle-free functioning of Ansible. You need to create ansible user on Ansible server & clients. Then configure passwordless SSH (using keys) for that user.
Now you need to get the IP addresses of your containers. You can inspect the container and extract that information –
Now we have an IP address, let’s test the passwordless connectivity –
[root@ansible-srv ~]# ssh ansible-usr@172.17.0.2
Welcome to Ubuntu 16.04.6 LTS (GNU/Linux 4.1.12-37.5.1.el7uek.x86_64 x86_64)

 * Documentation:  https://help.ubuntu.com
 * Management:     https://landscape.canonical.com
 * Support:        https://ubuntu.com/advantage

Last login: Wed Jan 15 18:57:38 2020 from 172.17.0.1
$ hostname
k-web1
$ exit
Connection to 172.17.0.2 closed.
It’s working! Go ahead and test it for rest all, so that the client’s authenticity will be added and RSA fingerprints will be saved to the known host list. Now we have all 5 client containers running and passwordless SSH is setup between ansible server and clients for user ansible-usr
Now you have full lab setup ready on your desktop/laptop within Oracle Virtualbox for learning Ansible! Lab setup has a VM running in Oracle Virtualbox which is you mail Ansible server/worker and it has 5 containers running within acting as Ansible clients. This setup fulfills the pre-requisite of the configuration of passwordless SSH for Ansible.
Suse Manager 4 configuration. It includes all steps to set up your SUSE Manager right from scratch till your first login in the SUSE Manager web UI.
Adding product channel in SUSE Manager. Procedure to add SUSE product channels in SUSE Manager so that you can sync packages on your SUSE Manager server.
Oracle Public repo in SUSE Manager. Complete process to add Oracle Public repo in SUSE Manager so you can sync packages from public repo to SUSE Manager.
Remove product channels. Procedure to remove product channels from SUSE Manager from the command line.
A quick post on a couple of errors and their solutions while working on ELK stack.
ELK stack issues and solutions
ELK stack i.e. ElasticSearch Logstash and Kibana. We will walk you through a couple of errors you may see while working on ELK stack and their solutions.
Error: missing authentication token for REST request
First, thing first how to run cluster curl commands which are spared everywhere on the Elastic documentation portal. They have a copy as a curl command which if you run on your terminal will end up in below error –
You need to use authentication within curl command and you are good to go. It’s good practice to use the only username in command with -u switch so that you won’t reveal your password in command history! Make sure you use the Kibana UI user here.
root@kerneltalks # curl -u kibanaadm -X GET "localhost:9200/_cat/health?v&pretty"
Enter host password for user 'kibanaadm':
epoch      timestamp cluster        status node.total node.data shards  pri relo init unassign pending_tasks max_task_wait_time active_shards_percent
1578644464 08:21:04  test-elk green           1         1   522 522    0    0        0             0                  -                100.0%
Issue: How to remove x-pack after 6.2 upgrades
If you are running ELK stack 6.2 and you are performing upgrade then you need to take care of the x-pack module first. Since x-pack is included within 6.3 and later distributions you don’t need it as a separate module. But due to some reason, while upgrade mew stack won’t be able to remove the existing x-pack module. This will lead to having 2 x-pack modules on system and Kibana restarting continuously because of that with below error –
Error: Multiple plugins found with the id \"xpack_main\":\n - xpack_main at /usr/share/kibana/node_modules/x-pack\n - xpack_main at /usr/share/kibana/plugins/x-pack
Solution:
So, before the upgrade, you need to remove the x-pack plugin from ElasticSearch and Kibana as well. Using below commands –
root@kerneltalks # /usr/share/elasticsearch/bin/elasticsearch-plugin remove x-pack
-> removing [x-pack]...
-> preserving plugin config files [/etc/elasticsearch/x-pack] in case of upgrade; use --purge if not needed

root@kerneltalks # /usr/share/kibana/bin/kibana-plugin remove x-pack
Removing x-pack...
This will make your upgrade go smooth. If you have already upgraded (with RPM) and faced the issue, you may try to downgrade packages rpm -Uvh --oldpackage <package_name> and then try to remove x-pack modules.
Issue: How to set Index replicas to 0 on single node ElasticSearch cluster
On single node ElasticSearch cluster if you are running default configuration then you will run into un-assigned replicas issue. In Kibana UI you can see those Index health as Yellow. Also, your cluster health will be yellow too with a message – Elasticsearch cluster status is yellow. Allocate missing replica shards.
Solution:
You need to mark all indices with a replica count to zero. You can do this in one go using below command –
root@kerneltalks # curl -u kibanaadm -X PUT "localhost:9200/_all/_settings?pretty" -H 'Content-Type: application/json' -d'
{
    "index" : {
        "number_of_replicas" : 0
    }
}
'
Enter host password for user 'kibanaadm':
{
  "acknowledged" : true
}
Where _all can be replaced with a specific index name if you want to do it for a specific index. Use the Kibana UI user in command and you will be asked for the password. Once entered it alters all indices setting and will show you output as above.
You can now check-in Kibana UI and your cluster health along with index health will be Green.
Checklist which will help you in taking Linux infrastructure handover or transition from other support parties
Pointers for Linux infra handover
Handover or transition is an unavoidable step of the project that comes in every sysadmin’s life. Its a process of taking over roles and responsibilities from one operation party to another due to change in support contracts/business etc.
The obvious thing here is to understand the current setup and working procedures so that you can continue it once the previous support party leaves the authority. So we will walk you through the list of points or questions that will help you in Linux infrastructure handover or transition. You can treat this as a questionnaire or checklist for Linux handover.
If you are going to handle servers hosted in public cloud like AWS, Azure then the majority of below pointers are just don’t stand any value 🙂
Hardware
We are considering here remote support so managing hardware is not really in the scope of handover. So only generic knowledge about hardware is enough and no detailed analysis required. If your transition/handover includes taking over hardware management as well then you might need more detailed information than listed below.
Hardware details of proprietary systems like HPUX, AIX, Blade, Rackmount servers for inventory purposes.
Datacenter logical diagram with location of all CI. This will be helpful for locating CI quickly for hardware maintenance.
Vendor details along with SLA, datacenter contacts and OEM contacts for hardware support at datacenter, escalation matrix.
Vendor coordination process for HW support at the datacenter
DR site details and connectivity details between primary and DR site
Server Connectivity
One of the prime requirements whenever to take over any Linux Infra. First thing is to know how you can reach remote Linux servers or even local servers along with their console accesses.
How servers are being accessed from remote locations? Jump server details if any.
VPN access details if any. The process to get new VPN access, etc.
Accounts on Linux servers for logins (LDAP, root, etc if implemented)
How console access is provided for physical servers?
Licensing & contracts
When it comes to supporting Infrastructure, you should be well aware of contracts you have with hardware and software vendors so that you can escalate the things when they require expert’s eyes.
Vendor contract information for OS being used (Redhat, Suse, OEL, etc.) includes start/end date, SLA details, level of support included, products included, escalation matrix, etc.
Software licenses for all tools along with middleware software being used in infrastructure.
Procedure or contacts of the team to renew the above said contracts or licenses.
Risk mitigation plans for old technology
Every company runs a few CI with old technology for sure. So one should take into consideration the up-gradation of these CI while taking handover. Old technology dies over a period of time and becomes difficult day by day to support. Hence its always advisable to identify them as a risk before taking handover and have clarity of its mitigation from ower.
Linux infrastructure future roadmap for servers running old OS (i.e. end of life or end of support)
Discuss migration plans for servers running AIX, HPUX Unix flavours to Linux if they are running out of contracts and support by the vendor in near future.
Ask for a migration plan of servers running non-enterprise Linux flavours like CentOS, Fedora, Oracle Linux, etc.
Same investigation for tools or solutions in Linux infra being used for monitoring, patching, automation, etc.
Linux patching
Quarterly planned activity! Patching is an inseparable part of the Linux lifecycle. Obviously we made a separate section for it. Get whatever details you can gather around this topic from the owner or previous support party.
What are the patching solutions are being used like spacewalk server, SUSE manager server, etc?
If not what is the procedure to obtain new patches? If its from Vendor then check related licenses, portal logins, etc.
What are patching cycles being followed? i.e, Frequency of patching, patching calendar if any,
Patching procedure, downtime approval process, ITSM tool’s role in patching activities, co-ordination process, etc.
Check if any patching automation implemented.
Monitoring
Infrastructure monitoring is a vast topic. Some organizations have dedicated teams for it. So if that’s the case you will require very little to gather regarding this topic.
Details of monitoring tools implemented e.g. tool’s servers, portal logins, licensing and infra management details of that tool, etc.
SOP to configure monitoring for new CI, Alert suppression, etc.
Alert policy, threshold, etc. definition process on that tool
Monitoring tool’s integration with other software like ticketing tool/ITSM
If the tool is being managed by the separate team then contact details, escalation matrix, etc for the same.
Backup solutions
Backup is another major topic for organizations and its mostly handled by the dedicated team considering its importance. Still, it’s better to have ground knowledge about backup solutions implemented in infrastructure.
Details of backup solutions
SOP for backup related activities like adding, updating, deleting new/old CI, policy definitions, etc.
List of activities under the backup stream
Backup recovery testing schedules, DR replication details if applicable
Major backup recurring schedules like weekends so that you can plan your activities accordingly
Security compliance
The audit requirement is to keep your Linux infra security complaint. All Linux servers should be complaint to security policies defined by organization, they should be free from any vulnerabilities and always running on the latest software. Below are a few pointers to consider here –
Solution or tool for running security scans on Linux servers
SOP for the same, along with operating details.
Password policies to be defined on Linux servers.
Hardening checklist for newly built servers
Network infra details
The network is the backbone of any IT infrastructure. Its always run by a dedicated team and hence you are not required to have in-depth knowledge of it. It’s not the scope of your transition. But you should know a few basics to get your day to day sysadmin life going smooth.
SOP for proxy details, how to get ports opened, IP requirements, etc.
Network team contact details, process to get network services, escalation matrix, etc.
How internet connectivity implemented for servers
Understanding network perimeter and zones like DMZ, Public, Private in context to DC.
Documentation repository
When you kick off your support to new infrastructure, document repository is the gold mine for you. So make sure you populate it with all kind of related documents and make it worth.
Location & access details of documentation. It could be a shared drive, file server, on the portal like SharePoint etc.
Includes inventories, SOP documents, Process documents, Audit documents etc.
Versioning and approval process for new/existing documents if any
Reporting
This area is in sysadmin’s bin. Gather all the details regarding this area.
List of all reports currently existed for Linux Infrastructure
What is the report frequency (daily, weekly, monthly)?
Check if reports are automated. If not ask for SOP to generate/pull reports. And then it’s an improvement area for you to automate them.
How and why report analysis is done? This will help you to get expectations from report outputs.
Any further procedure for reports like forwarding to management, signoff from any authority etc.
Report repository if any. This is covered in the documentation repository section as well.
Applications
This area is not actually in scope for Sysadmin but it helps them to work in a process-oriented environment. Also helps to trace down criticality and impact on applications running on servers when underlying CI runs into trouble.
ITSM tool (IT Service Management tool) used for ticketing & asset management & all details related to ITSM tool like access, authorization etc.
Also, ask for a small training session to get familiar with ITSM tools as it’s customized accordingly to organizations operating structure.
Architectural overview of applications running on Linux servers.
Critical applications along with their CI mapping to track down application impact in case of issues with server
Communication and escalation matrices for applications.
Software repository being used. Like software setups, installable, OS ISO images, VM templates etc
Operations
In all the above points, we gathered data which can be used in this phase i.e. actual supporting Linux infrastructure.
List of day to day activities and expected support model
Logistics for operations like phone lines, ODC requirement, IT hardware needed for support etc.
Process for decommissioning old server and commissioning new server process
New CI onboarding process
DR drill activities details
Escalation/Management matrices on owner organization side for all above tech solutions
That’s all I could think of right now. If you have any more pointers let me know in comments, I am happy to add them here.