A quick reference to configure EC2 for Session Manager in AWS

Ok this must be a very basic post for most of you and there is a readily available AWS doc for it, but I am just cutting it short to list down steps for achieving the objective quickly. You should go through the official AWS doc to understand all aspects of it but if you are on the clock then just follow along and get it set up in no time.
Checklist
Before you start, make sure you checked out these minimum configurations to get going.
- Your EC2 is running supported Opertaing System. We are taking example of Linux here so all Linux versions that supports AWS Systems Manager supports session manager.
- SSM agent 2.3+ installed on system. If not, we got it covered here.
- Outbound 443 traffic should be allowed to below 3 endpoints. You must have this already covered since most of the setups has ALL traffic aalowed in outgoing security group rule. –
- ec2messages.
region.amazonaws.com - ssm.
region.amazonaws.com - ssmmessages.
region.amazonaws.com
- ec2messages.
In a nutshell, probably point 2 is the one you need to verify. If you are using AWS managed AMI then you got it covered for that too! But, if you are using custom-built, home-grown AMI then that might not be the case.
SSM agent installation
It’s a pretty basic RPM installation as you would do on any Linux platform. Download package relevant to your Linux version from here. Or global URLs for Linux agents –
Run package installation and service handler commands with root privileges as below –
# systemctl enable amazon-ssm-agent
# systemctl start amazon-ssm-agent
# systemctl status amazon-ssm agent
If you do not have access to EC2 (Key lost or EC2 without keypair) then probably you need to re-launch the EC2. If your EC2 is part of an auto-scaling group (ASG) then it makes sense to add these commands in the user-data script for the launch template and launch a new EC2 from ASG.
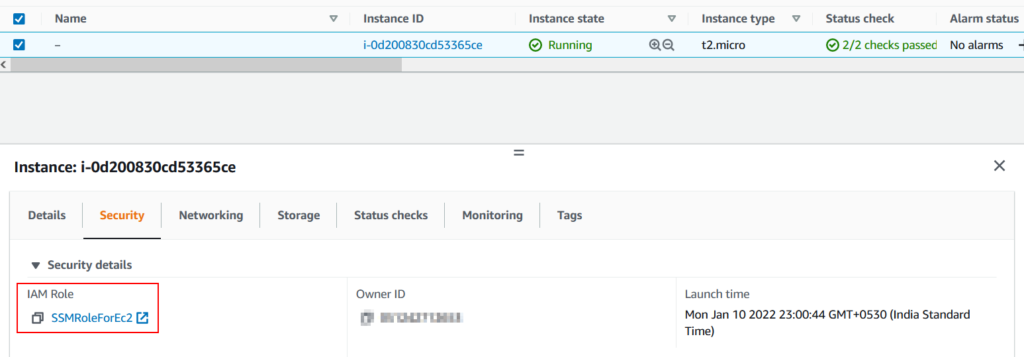
Instance role permissions
Now the agent is up and running. The next step is to authorize the AWS Systems Manager service to perform actions on EC2. This is done via Instance Role. Create the IAM instance role with below IAM policy:
{
    "Version": "2012-10-17",
    "Statement": [
        {
            "Effect": "Allow",
            "Action": [
                "ssm:UpdateInstanceInformation",
                "ssmmessages:CreateControlChannel",
                "ssmmessages:CreateDataChannel",
                "ssmmessages:OpenControlChannel",
                "ssmmessages:OpenDataChannel"
            ],
            "Resource": "*"
        }
    ]
}
You can scope it down to a particular resource if you want. You can even add KMS encryption-related permissions in it if you are planning to encrypt session data using KMS encryption. An example can be found here.
Once done attach the role to EC2. If EC2 is already having a role attached to it then add the above policy to the existing role and you should be good.
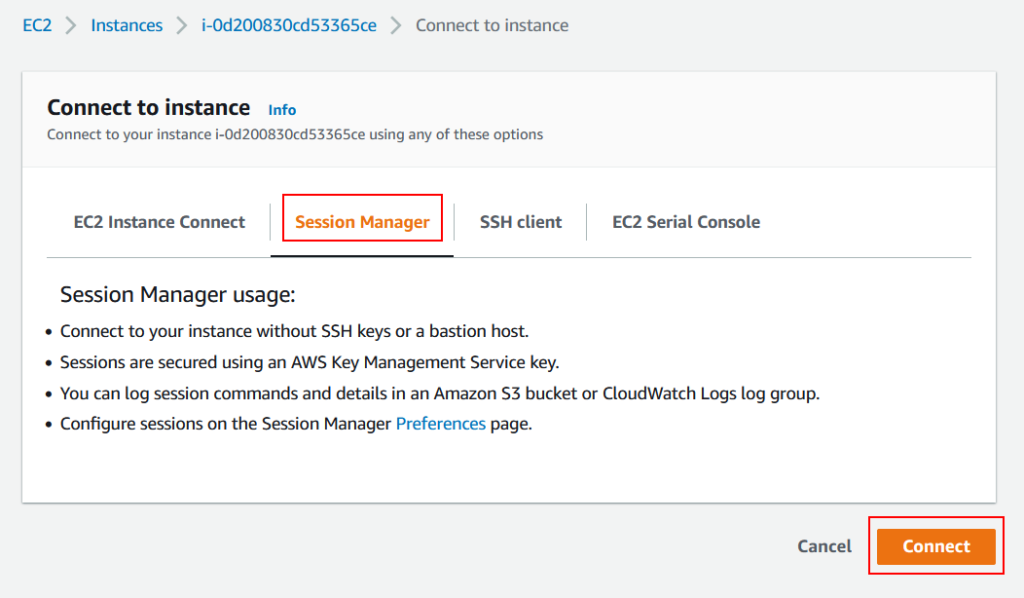
Connecting via Session Manager
Now you are good to test the connection.
- Login to EC2 console.
- Navigate to instances and selct the respective EC2 instance from the list.
- Click on Connect button

- Make sure you are on Serssion Manager tab and click on Connect.
- If you still see error reported on this screen then give it a minute or two. Sometimes it takes some seconds to propagate IAM role permissions.
New browser tab will open and you should be seeing the Linux prompt.

Notice you are logged in with the default user ssm-user. You can switch to root user by using sudo.
There are a couple of benefits to using session manager as standard over Key pairs :
- No need to maintain key files.
- Avoid security threat posed to infra associated with Key file management.
- Access management is easy through IAM.
- Native AWS feature!
- Session can be logged for audit purposes.
Share Your Comments & Feedback: