If you’ve started using Claude Code, you’ve probably hit the same small annoyance more than once: you explain your project, Claude helps, and then in the next session you’re explaining the very same things all over again. Which framework you use. Where the tests live. How you like your commits phrased. It’s like onboarding a new teammate every single morning.

The CLAUDE.md file fixes exactly that. It’s one of the simplest features to set up and one of the highest-leverage, especially once you understand what it’s really doing behind the scenes. This guide walks a first-time user through what it is, how it works, and how to use it well.
What is a CLAUDE.md file?
A CLAUDE.md is a configuration file that gives Claude project-specific context. The key detail — and the reason it matters so much — is that Claude automatically incorporates it into every conversation. You don’t have to attach it, paste it, or remind Claude it exists.
Mechanically, the file becomes part of Claude’s system prompt. In plain terms: every conversation starts with that context already loaded. So instead of re-describing your project each time, you write it down once and Claude simply knows it going forward.
Think of it as a persistent briefing note for your project. Whatever you’d find yourself repeating to a new collaborator is a good candidate for the file.
Where the file lives
You can place a CLAUDE.md in a few different spots depending on how widely you want it to apply:
- Your repository root — the most common choice. Put it here so it applies to the project and can be shared with your team.
- A parent directory — useful for monorepo setups where you want shared context sitting above several projects.
- Your home folder — this applies universally, across all your projects, for instructions you always want in play.
You’re not limited to one. A home-folder file for your personal preferences plus a repo-root file for the project is a natural combination.
There isn’t just one CLAUDE.md — there’s a small hierarchy, each level with a different scope. Here they are, from broadest to most specific:
| Scope | Location | Who it’s for |
|---|---|---|
| Managed policy (org-wide) | macOS: /Library/Application Support/ClaudeCode/CLAUDE.mdLinux/WSL: /etc/claude-code/CLAUDE.mdWindows: C:\Program Files\ClaudeCode\CLAUDE.md | Everyone in your organization |
| User instructions | ~/.claude/CLAUDE.md | Just you, across all your projects |
| Project instructions | ./CLAUDE.md or ./.claude/CLAUDE.md | Your whole team (via source control) |
| Local instructions | ./CLAUDE.local.md (add to .gitignore) | Just you, in this one project |
As a beginner, you’ll care most about the project file (./CLAUDE.md at your repo root) and maybe your personal user file (~/.claude/CLAUDE.md). The managed-policy level is something an IT/DevOps team sets up centrally.
How the levels combine
Here’s the part that trips people up: these files don’t override each other — they’re all concatenated together into context. Claude also walks up the directory tree from wherever you launched it, picking up a CLAUDE.md in each parent folder along the way. Content is ordered from the filesystem root down to your working directory, so the instructions closest to where you’re working are read last.
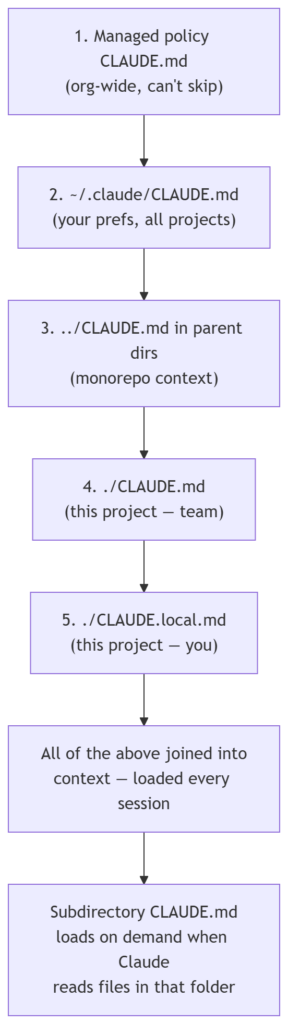
One practical tip from the docs: to confirm which files actually loaded in a session, run /context and look under Memory files.
Getting started with /init
The easiest way to create your first one is to run the /init command inside Claude Code. It analyzes your codebase and generates a starter CLAUDE.md for you.
One honest caveat, straight from the source: /init “captures obvious patterns but may miss nuances specific to your workflow.” So treat what it produces as a first draft, not a finished document. Read it over, correct anything that’s off, and add the details it couldn’t have inferred. The generated file is a starting line, not a finish line.
How to structure your CLAUDE.md
You don’t need every section, but these are the kinds of things worth documenting:
- A project summary and architecture overview — what the project is and how it’s put together.
- Directory structure — the key folders and what lives where.
- Coding standards and conventions — how you want code written.
- Common commands, with examples — the build, run, and lint commands you use often.
- Testing requirements and workflows — how tests are run and what’s expected.
- Tool integration documentation — the tools your project relies on.
- Development environment setup — what someone needs to get running.
The reference material includes a worked example built around a FastAPI project, showing the project structure, standards, and common commands all in one file, along with an example of a custom performance-optimization command. If you work in a different stack, the same shape applies — just fill it with your own project’s details.
Best practices worth adopting early
A few principles will keep your file useful rather than bloated:
- Keep it concise and human-readable. This isn’t a formality. Because the file loads into context every single time, its length has a real cost. Conciseness is part of using Claude well, not just tidiness.
- Start simple and expand based on friction. Don’t try to document everything up front. Add to the file when you notice yourself repeating an instruction or running into a recurring rough edge.
- Split it up if it gets big. If the file grows unwieldy, one option is to break the information into separate markdown files and reference them from inside
CLAUDE.md. - Document what your team actually does — the real workflows you follow, not the idealized version you wish you followed.
- Never put secrets in it. Keep API keys, credentials, and database connection strings out. This matters especially because you’ll often commit the file to version control.
When should you add something to it?
The docs give a nice, concrete rule of thumb. Add to your CLAUDE.md when:
- Claude makes the same mistake a second time.
- A code review catches something Claude should have known about this codebase.
- You type the same correction into chat that you typed last session.
- A new teammate would need that same context to be productive.
Keep it to facts Claude should hold in every session: build commands, conventions, project layout, and “always do X” rules.
Two handy shortcuts: # and /clear
As you work, you can use the # key to quickly add an instruction you find yourself repeating. Over time, these additions accumulate into your CLAUDE.md — a low-effort way to grow the file organically instead of sitting down to write it all at once.
The /clear command is its companion. It resets the context window between distinct tasks while preserving your CLAUDE.md. So you can wipe the slate clean between unrelated jobs without losing the project context you’ve carefully set up.
Sharing with your team
Because a CLAUDE.md at the repo root travels with the project, you can commit it to version control so your team benefits from the same shared context. Everyone’s Claude starts from the same briefing. Just remember the earlier warning — since it’s now in your git history, keep sensitive information out of it.
There’s also room to grow beyond the file itself: you can create custom slash commands as markdown files in a .claude/commands/ directory, which is a natural next step once your CLAUDE.md is settled.
Start simple, expand deliberately
If you take one thing away, let it be this: begin small. Run /init, review what it produces, and let the file grow as your real workflow reveals what’s worth writing down. A short, accurate CLAUDE.md beats a sprawling one that nobody maintains — and it costs you less context on every conversation, too.
For a first-time Claude user, this single file is probably the fastest way to make Claude feel like it genuinely understands your project rather than projects in general. Set it up once, tend it occasionally, and you stop paying the “explain it all again” tax for good.
Share Your Comments & Feedback: