Steps to configure CLI for running kubectl commands on EKS clusters.
kubectl with EKS!
kubectl is the command-line utility used to interact with Kubernetes clusters. AWS EKS is AWS managed Kubernetes service broadly used for running Kubernetes workloads on AWS Cloud. We will be going through steps to set up the kubectl command to run with the AWS EKS cluster. Without further due, let’s get into it.
AWS CLI configuration
Install AWS CLI on your workstation and configure it by running –
# aws configure
AWS Access Key ID [None]: AKIAQX3SNXXXXXUVQ
AWS Secret Access Key [None]: tzS/a1sMDxxxxxxxxxxxxxxxxxxxxxx/D
Default region name [us-west-2]: us-east-1
Default output format [json]: json
# aws eks --region us-east-1 update-kubeconfig --name blog-cluster
Added new context arn:aws:eks:us-east-1:xxxxxxxxxx:cluster/blog-cluster to C:\Users\linux\.kube\config
At this point your kubeconfig point to the cluster of your interest. You can execute kubectl commands and those will be executed against the cluster you mentioned above.
# kubectl get pods --all-namespaces
NAMESPACE     NAME                       READY   STATUS    RESTARTS   AGE
kube-system   coredns-66cb55d4f4-hk9p5   0/1     Pending   0          6m54s
kube-system   coredns-66cb55d4f4-wmtvf   0/1     Pending   0          6m54s
I did not add any nodes yet to my EKS cluster hence you can see pods are in a pending state.
If you have multiple clusters configured in kubeconfig then you must switch context to interested cluster before running kubectl commands. To switch context –
# kubectl config use-context <CONTEXT-NAME>
# kubectl config use-context arn:aws:eks:us-east-1:xxxxxxxxxx:cluster/blog-cluster
Switched to context "arn:aws:eks:us-east-1:xxxxxxxxxx:cluster/blog-cluster".
You can verify all configured contexts by analysing ~/.kube/config file.
Troubleshooting errors
If your IAM user (configured in AWS CLI) is not authorized on the EKS cluster then you will see this error –
# kubectl get pods --all-namespaces
error: You must be logged in to the server (Unauthorized)
Make sure your IAM user is authorised in the EKS cluster. This can be done by adding user details under mapUsers field in the configmap named aws-auth residing in kube-system namespace. You will be able to fetch and edit it with the user who built the cluster in the first place. By default, AWS adds the IAM user as system:masters in config map who built the cluster. You have to configure the same IAM user with kubectl and edit this configmap for adding other IAM users to the cluster.
Learn the zypper command with 12 useful examples along with sample outputs. zypper is used for package and patch management in Suse Linux systems.
zypper command examples
zypper is a package management system powered by ZYpp package manager engine. Suse Linux uses zypper for package management. In this article, we will be sharing 12 useful zypper commands along with examples that are helpful for your day to day sysadmin tasks.
Without any argument zypper command will list you all available switches which can be used. It’s quite handy than referring to the man page which is pretty much in detail.
root@kerneltalks # zypper
  Usage:
        zypper [--global-options] <command> [--command-options] [arguments]
        zypper <subcommand> [--command-options] [arguments]

  Global Options:
        --help, -h              Help.
        --version, -V           Output the version number.
        --promptids             Output a list of zypper's user prompts.
        --config, -c <file>     Use specified config file instead of the default                                                                                        .
        --userdata <string>     User defined transaction id used in history and                                                                                         plugins.
        --quiet, -q             Suppress normal output, print only error
                                messages.
        --verbose, -v           Increase verbosity.
        --color
        --no-color              Whether to use colors in output if tty supports                                                                                         it.
        --no-abbrev, -A         Do not abbreviate text in tables.
        --table-style, -s       Table style (integer).
        --non-interactive, -n   Do not ask anything, use default answers
                                automatically.
        --non-interactive-include-reboot-patches
                                Do not treat patches as interactive, which have
                                the rebootSuggested-flag set.
        --xmlout, -x            Switch to XML output.
        --ignore-unknown, -i    Ignore unknown packages.

        --reposd-dir, -D <dir>  Use alternative repository definition file
                                directory.
        --cache-dir, -C <dir>   Use alternative directory for all caches.
        --raw-cache-dir <dir>   Use alternative raw meta-data cache directory.
        --solv-cache-dir <dir>  Use alternative solv file cache directory.
        --pkg-cache-dir <dir>   Use alternative package cache directory.

     Repository Options:
        --no-gpg-checks         Ignore GPG check failures and continue.
        --gpg-auto-import-keys  Automatically trust and import new repository
                                signing keys.
        --plus-repo, -p <URI>   Use an additional repository.
        --plus-content <tag>    Additionally use disabled repositories providing                                                                                         a specific keyword.
                                Try '--plus-content debug' to enable repos indic                                                                                        ating to provide debug packages.
        --disable-repositories  Do not read meta-data from repositories.
        --no-refresh            Do not refresh the repositories.
        --no-cd                 Ignore CD/DVD repositories.
        --no-remote             Ignore remote repositories.
        --releasever            Set the value of $releasever in all .repo files                                                                                         (default: distribution version)

     Target Options:
        --root, -R <dir>        Operate on a different root directory.
        --disable-system-resolvables
                                Do not read installed packages.

  Commands:
        help, ?                 Print help.
        shell, sh               Accept multiple commands at once.

     Repository Management:
        repos, lr               List all defined repositories.
        addrepo, ar             Add a new repository.
        removerepo, rr          Remove specified repository.
        renamerepo, nr          Rename specified repository.
        modifyrepo, mr          Modify specified repository.
        refresh, ref            Refresh all repositories.
        clean                   Clean local caches.

     Service Management:
        services, ls            List all defined services.
        addservice, as          Add a new service.
        modifyservice, ms       Modify specified service.
        removeservice, rs       Remove specified service.
        refresh-services, refs  Refresh all services.

     Software Management:
        install, in             Install packages.
        remove, rm              Remove packages.
        verify, ve              Verify integrity of package dependencies.
        source-install, si      Install source packages and their build
                                dependencies.
        install-new-recommends, inr
                                Install newly added packages recommended
                                by installed packages.

     Update Management:
        update, up              Update installed packages with newer versions.
        list-updates, lu        List available updates.
        patch                   Install needed patches.
        list-patches, lp        List needed patches.
        dist-upgrade, dup       Perform a distribution upgrade.
        patch-check, pchk       Check for patches.

     Querying:
        search, se              Search for packages matching a pattern.
        info, if                Show full information for specified packages.
        patch-info              Show full information for specified patches.
        pattern-info            Show full information for specified patterns.
        product-info            Show full information for specified products.
        patches, pch            List all available patches.
        packages, pa            List all available packages.
        patterns, pt            List all available patterns.
        products, pd            List all available products.
        what-provides, wp       List packages providing specified capability.

     Package Locks:
        addlock, al             Add a package lock.
        removelock, rl          Remove a package lock.
        locks, ll               List current package locks.
        cleanlocks, cl          Remove unused locks.

     Other Commands:
        versioncmp, vcmp        Compare two version strings.
        targetos, tos           Print the target operating system ID string.
        licenses                Print report about licenses and EULAs of
                                installed packages.
        download                Download rpms specified on the commandline to a                                                                                         local directory.
        source-download         Download source rpms for all installed packages
                                to a local directory.

     Subcommands:
        subcommand              Lists available subcommands.

Type 'zypper help <command>' to get command-specific help.
How to install the package using zypper
zypper takes in or install switch to install the package on your system. It’s the same as yum package installation, supplying package name as an argument, and package manager (zypper here) will resolve all dependencies and install them along with your required package.
# zypper install telnet
Refreshing service 'SMT-http_smt-ec2_susecloud_net'.
Refreshing service 'cloud_update'.
Loading repository data...
Reading installed packages...
Resolving package dependencies...

The following NEW package is going to be installed:
  telnet

1 new package to install.
Overall download size: 51.8 KiB. Already cached: 0 B. After the operation, additional 113.3 KiB will be used.
Continue? [y/n/...? shows all options] (y): y
Retrieving package telnet-1.2-165.63.x86_64                                                                                        (1/1),  51.8 KiB (113.3 KiB unpacked)
Retrieving: telnet-1.2-165.63.x86_64.rpm .........................................................................................................................[done]
Checking for file conflicts: .....................................................................................................................................[done]
(1/1) Installing: telnet-1.2-165.63.x86_64 .......................................................................................................................[done]
Above output for your reference in which we installed telnet package.
For erasing or removing packages in Suse Linux, use zypper with remove or rm switch.
root@kerneltalks # zypper rm telnet
Loading repository data...
Reading installed packages...
Resolving package dependencies...

The following package is going to be REMOVED:
  telnet

1 package to remove.
After the operation, 113.3 KiB will be freed.
Continue? [y/n/...? shows all options] (y): y
(1/1) Removing telnet-1.2-165.63.x86_64 ..........................................................................................................................[done]
We removed previously installed telnet package here.
Check dependencies and verify the integrity of installed packages using zypper
There are times when one can install the package by force ignoring dependencies. zypper gives you the power to scan all installed packages and checks for their dependencies too. If any dependency is missing, it offers you to install/remove it and hence maintain the integrity of your installed packages.
Use verify or ve switch with zypper to check the integrity of installed packages.
root@kerneltalks # zypper ve
Refreshing service 'SMT-http_smt-ec2_susecloud_net'.
Refreshing service 'cloud_update'.
Loading repository data...
Reading installed packages...

Dependencies of all installed packages are satisfied.
In the above output, you can see the last line confirms that all dependencies of installed packages are completed and no action required.
How to download package using zypper in Suse Linux
zypper offers a way to download the package in the local directory without installation. You can use this downloaded package on another system with the same configuration. Packages will be downloaded to /var/cache/zypp/packages/<repo>/<arch>/ directory.
root@kerneltalks # zypper download telnet
Refreshing service 'SMT-http_smt-ec2_susecloud_net'.
Refreshing service 'cloud_update'.
Loading repository data...
Reading installed packages...
Retrieving package telnet-1.2-165.63.x86_64                                                                                        (1/1),  51.8 KiB (113.3 KiB unpacked)
(1/1) /var/cache/zypp/packages/SMT-http_smt-ec2_susecloud_net:SLES12-SP3-Pool/x86_64/telnet-1.2-165.63.x86_64.rpm ................................................[done]

download: Done.

# ls -lrt /var/cache/zypp/packages/SMT-http_smt-ec2_susecloud_net:SLES12-SP3-Pool/x86_64/
total 52
-rw-r--r-- 1 root root 53025 Feb 21 03:17 telnet-1.2-165.63.x86_64.rpm
You can see we have downloaded telnet package locally using zypper
zypper allows you to view all available updates for your installed packages so that you can plan update activity in advance. Use list-updates or lu switch to show you a list of all available updates for installed packages.
root@kerneltalks # zypper lu
Refreshing service 'SMT-http_smt-ec2_susecloud_net'.
Refreshing service 'cloud_update'.
Loading repository data...
Reading installed packages...
S | Repository                        | Name                       | Current Version               | Available Version                  | Arch
--+-----------------------------------+----------------------------+-------------------------------+------------------------------------+-------
v | SLES12-SP3-Updates                | at-spi2-core               | 2.20.2-12.3                   | 2.20.2-14.3.1                      | x86_64
v | SLES12-SP3-Updates                | bash                       | 4.3-82.1                      | 4.3-83.5.2                         | x86_64
v | SLES12-SP3-Updates                | ca-certificates-mozilla    | 2.7-11.1                      | 2.22-12.3.1                        | noarch
v | SLE-Module-Containers12-Updates   | containerd                 | 0.2.5+gitr639_422e31c-20.2    | 0.2.9+gitr706_06b9cb351610-16.8.1  | x86_64
v | SLES12-SP3-Updates                | crash                      | 7.1.8-4.3.1                   | 7.1.8-4.6.2                        | x86_64
v | SLES12-SP3-Updates                | rsync                      | 3.1.0-12.1                    | 3.1.0-13.10.1                      | x86_64
The output is properly formatted for easy reading. Column wise it shows the name of repo where package belongs, package name, installed version, new updated available version & architecture.
List and install patches in Suse linux
Use list-patches or lp switch to display all available patches for your Suse Linux system which needs to be applied.
The output is pretty much nicely organized with respective headers. You can easily figure out and plan your patch update accordingly. We can see out of 37 patches available on our system 18 are security ones and needs to be applied on high priority!
You can install all needed patches by issuing zypper patch command.
How to update package using zypper
To update package using zypper, use update or up switch followed by package name. In the above list updates command, we learned that rsync package update is available on our server. Let update it now –
root@kerneltalks # zypper update rsync
Refreshing service 'SMT-http_smt-ec2_susecloud_net'.
Refreshing service 'cloud_update'.
Loading repository data...
Reading installed packages...
Resolving package dependencies...

The following package is going to be upgraded:
  rsync

1 package to upgrade.
Overall download size: 325.2 KiB. Already cached: 0 B. After the operation, additional 64.0 B will be used.
Continue? [y/n/...? shows all options] (y): y
Retrieving package rsync-3.1.0-13.10.1.x86_64                                                                                      (1/1), 325.2 KiB (625.5 KiB unpacked)
Retrieving: rsync-3.1.0-13.10.1.x86_64.rpm .......................................................................................................................[done]
Checking for file conflicts: .....................................................................................................................................[done]
(1/1) Installing: rsync-3.1.0-13.10.1.x86_64 .....................................................................................................................[done]
Search package using zypper in Suse Linux
If you are not sure about the full package name, no worries. You can search packages in zypper by supplying search string with se or search switch
root@kerneltalks # zypper se lvm
Refreshing service 'SMT-http_smt-ec2_susecloud_net'.
Refreshing service 'cloud_update'.
Loading repository data...
Reading installed packages...

S  | Name          | Summary                      | Type
---+---------------+------------------------------+-----------
   | libLLVM       | Libraries for LLVM           | package
   | libLLVM-32bit | Libraries for LLVM           | package
   | llvm          | Low Level Virtual Machine    | package
   | llvm-devel    | Header Files for LLVM        | package
   | lvm2          | Logical Volume Manager Tools | srcpackage
i+ | lvm2          | Logical Volume Manager Tools | package
   | lvm2-devel    | Development files for LVM2   | package
In the above example, we searched lvm string and came up with the list shown above. You can use Name in zypper install/remove/update commands.
Check installed package information using zypper
You can check installed packages details using zypper. info or if switch will list out information of the installed package. It can also display package details which are not installed. In that case, Installed parameter will reflect No value.
root@kerneltalks # zypper info rsync
Refreshing service 'SMT-http_smt-ec2_susecloud_net'.
Refreshing service 'cloud_update'.
Loading repository data...
Reading installed packages...


Information for package rsync:
------------------------------
Repository     : SLES12-SP3-Updates
Name           : rsync
Version        : 3.1.0-13.10.1
Arch           : x86_64
Vendor         : SUSE LLC <https://www.suse.com/>
Support Level  : Level 3
Installed Size : 625.5 KiB
Installed      : Yes
Status         : up-to-date
Source package : rsync-3.1.0-13.10.1.src
Summary        : Versatile tool for fast incremental file transfer
Description    :
    Rsync is a fast and extraordinarily versatile file  copying  tool. It can copy
    locally, to/from another host over any remote shell, or to/from a remote rsync
    daemon. It offers a large number of options that control every aspect of its
    behavior and permit very flexible specification of the set of files to be
    copied. It is famous for its delta-transfer algorithm, which reduces the amount
    of data sent over the network by sending only the differences between the
    source files and the existing files in the destination. Rsync is widely used
    for backups and mirroring and as an improved copy command for everyday use.
List repositories using zypper
To list repo use lr or repos switch with zypper command. It will list all available repos which include enabled and not-enabled both repos.
root@kerneltalks # zypper lr
Refreshing service 'cloud_update'.
Repository priorities are without effect. All enabled repositories share the same priority.

#  | Alias                                                                                | Name                                                  | Enabled | GPG Check | Refresh
---+--------------------------------------------------------------------------------------+-------------------------------------------------------+---------+-----------+--------
 1 | SMT-http_smt-ec2_susecloud_net:SLE-Module-Adv-Systems-Management12-Debuginfo-Pool    | SLE-Module-Adv-Systems-Management12-Debuginfo-Pool    | No      | ----      | ----
 2 | SMT-http_smt-ec2_susecloud_net:SLE-Module-Adv-Systems-Management12-Debuginfo-Updates | SLE-Module-Adv-Systems-Management12-Debuginfo-Updates | No      | ----      | ----
 3 | SMT-http_smt-ec2_susecloud_net:SLE-Module-Adv-Systems-Management12-Pool              | SLE-Module-Adv-Systems-Management12-Pool              | Yes     | (r ) Yes  | No
 4 | SMT-http_smt-ec2_susecloud_net:SLE-Module-Adv-Systems-Management12-Updates           | SLE-Module-Adv-Systems-Management12-Updates           | Yes     | (r ) Yes  | Yes
 5 | SMT-http_smt-ec2_susecloud_net:SLE-Module-Containers12-Debuginfo-Pool                | SLE-Module-Containers12-Debuginfo-Pool                | No      | ----      | ----
 6 | SMT-http_smt-ec2_susecloud_net:SLE-Module-Containers12-Debuginfo-Updates             | SLE-Module-Containers12-Debuginfo-Updates             | No      | ----      | ----
here you need to check enabled column to check which repos are enabled and which are not.
Beginners guide to learn grep command with these 19 different practical examples.
Learn grep command with examples
grep : one of the widely used Linux / Unix commands which help sysadmins narrowing down their searches! grep stands for Global Regular Expression Print which is used for searching regular expressions within the source stream of data.
grep command syntax is simple.
grep <switch> <string to search> file
where the switch is from the variety of switches available to use with command. string to search is a regular expression that you want to search within source data. The file is a source of data in which you expect grep command to search.
It is also used widely with pipe for searching strings in data outputted by the previous command. In such a scenario, syntax followed is –
command1 | grep <switch> <string to search>
where output of command1 is being searched using grep command.
We are sharing here 19 grep command practical examples which will help beginners to well versed with this command and use it in their daily operations. Without further delay, let’s learn to grep command with below 20 examples. In all below examples, we will be searching string ‘kerneltalks’ in file1 which is as below –
root@kerneltalks # cat file1
This is demo file for kerneltalks.com
Demo file to be used for demonstrating grep commands on KernelTalks blog.
We are using kerneltalks as a search string for grep examples
Filling data with kernelTalks words for demo purpose.
This line does not contain our targeted search string.
Junk data kasdiohn fjad;ioe;ion cslfns;o;nfg
Find out string in file
# grep kerneltalks file1
This is demo file for kerneltalks.com
We are using kerneltalks as a search string for grep examples
Recursive search in the directory
You can use recursive grep in the directory to search for string/pattern in all files within a directory.
# grep -r "kerneltalks" /tmp/data
OR
# grep -R "kerneltalks" /tmp/data
Count pattern match in grep
You can use -c i.e. count switch with grep command to count how many times a pattern is matched in given data.
# grep -c kerneltalks file1
2
Search exact word in the file
Normally, grep returns lines from data that have pattern matching in it. If you want to search exact word in data then use -w switch.
# grep -w kerneltalks file1
This is demo file for kerneltalks.com
We are using kerneltalks as a search string for grep examples
You can combine it with count switch above and can get the number of times the exact word appeared in the file.
Ignore case while searching with grep
To ignore case while finding match use -i switch i.e. case-insensitive match. So when you search for kerneltalks with -i switch it will show the occurrence of kerneltalks, KERNELTALKS, KernelTalks, etc.
# grep -i kerneltalks file1
This is demo file for kerneltalks.com
Demo file to be used for demonstrating grep commands on KernelTalks blog.
We are using kerneltalks as a search string for grep examples
Filling data with kernelTalks words for demo purpose.
Use of wild card with grep
Wild cards or repetition operators can be used with grep command.
# grep kernel* file1
here, * match anything which precedes with string kernel. You can use repetition operators like ?, *, + with grep.
Reverse grep operation
If you want to display data just by omitting the lines containing your targeted string then you can use grep operation in a reverse way i.e. by using -v switch. Some people also call it an inverted match or grep operation.
# grep -v kerneltalks file1
Demo file to be used for demonstrating grep commands on KernelTalks blog.
Filling data with kernelTalks words for demo purpose.
This line does not contain our targeted search string.
Junk data kasdiohn fjad;ioe;ion cslfns;o;nfg
The above command displays all lines within file1 except the ones which contain string kerneltalks.
Display N lines before matching string using grep
Use of -B switch followed by N number argument will let you display N lines before matching string in a file.
# grep -B 2 targeted  file1
We are using kerneltalks as a search string for grep examples
Filling data with kernelTalks words for demo purpose.
This line does not contain our targeted search string.
The above command will display 2 lines above the line which contains string targeted including the line with the string.
Display N lines after matching string using grep
Opposite to above, if you want to display N lines after the match is found, use -A switch with the same above syntax.
# grep -A 2 targeted  file1
This line does not contain our targeted search string.
Junk data kasdiohn fjad;ioe;ion cslfns;o;nfg
Here it will display 2 lines below the line which has string targeted in it including a line with the string.
Display N lines around matching string using grep
Using both -A and -B switches, you can display N lines before and after of matching string line. But, grep comes with inbuild switch -C which will do this for you.
# grep -C 1 targeted  file1
Filling data with kernelTalks words for demo purpose.
This line does not contain our targeted search string.
Junk data kasdiohn fjad;ioe;ion cslfns;o;nfg
The above command will display 1 line above and 1 line after the line which has matching string.
Match multiple pattern with grep
Searching more than one pattern/string is possible with grep. Stack up your strings using -e switch.
# grep -e Junk -e KernelTalks file1
Demo file to be used for demonstrating grep commands on KernelTalks blog.
Junk data kasdiohn fjad;ioe;ion cslfns;o;nfg
It will search for string1 and string2 in file1 and display all lines with either string in them.
List only file names with matching string in them
When you are searching through a bunch of files and only interested in file names within which string is matched then use -l switch.
# grep -l kerneltalks *.log
Here, we are searching string kerneltalks in all files ending with .log. Since -l switch is used, grep will display only file names where string match is found.
Display line number of match with grep
If you want to get the line number where your string found the match, you can use -n switch.
# grep -n kerneltalks file1
1:This is demo file for kerneltalks.com
3:We are using kerneltalks as a search string for grep examples
Display matched string only rather than whole line of match
By default, grep displays the whole line which contains the match of your searched string. To display only matched string rather than the whole line, you need to use -o switch. Obviously, it not useful when you are searching for the whole string or word but it is very useful when you are searching with wild cards.
# grep -o kernel* file1
Coloring up your grep search output
To highlight matched strings in output use –-color switch
# grep --color=always kerneltalks file1 This is demo file for kerneltalks.com We are using kerneltalks as a search string for grep examples
You have three options to used with --color switch. auto, always and never
Grep out blank lines
You can search and count for blank lines with grep.
# grep -e ^$ file1
It’s helpful for removing blank lines from a file and get only data lines. Use reverse grep we saw earlier (-v switch)
# grep -v -e ^$ file1
It will show you only data lines, omitting all blank lines. You can redirect it to a new file and get a clean data file! You can use the same technique to remove hashed entries from the file by using ^# as a search string. This will helps to remove comments from scripts as well.
Invoke Egrep using grep
Egrep is extended grep with additional character support. egrep is derivative from grep utility. You can use it with egrep command or invoke using grep as below :
# grep -E
Fixed grep Fgrep using grep
Fixed grep is used for fast searching direct strings without any meta-characters or regular expressions. As the name suggests, fgrep is fixed grep! Only direct strings to search and it will be a bit fast than normal grep. fgrep is also another derivative from normal grep and used as fgrep separate command. But it can also be invoked using grep with below switch –
# grep -F
Search pattern in zip file
One more derivative of grep is zgrep. IT is used to find and match string in zip files. It uses almost the same switches as grep only difference is you have to source its zip file to search
# zgrep kerneltalks file2.gz
Let us know if you have any other grep command examples in comments below which re really helpful for sysadmin in day to day operations.
Beginners guide to learn dd command along with a list of examples. The article includes outputs for command examples too.
Learn dd command
Beginners guide to learn dd command! In this article, we will learn about dd (Disk Duplication) command and various usage of it along with examples.
dd command mainly used to convert and copy files in Linux and Unix systems. dd command syntax is
dd <options>
It has a very large list of options which can be used as per your requirement. Most of the commonly used options are :
bs=xxx Read and write xxx bytes at a time
count=n Copy only n blocks.
if=FILE Read from FILE
of=FILE Output to FILE
Let me walk you through examples to understand dd command usage.
Backup complete disk using dd
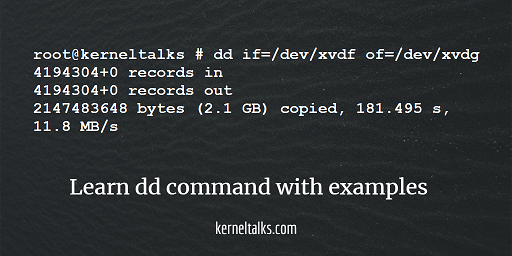
For copying the whole disk to another disk, dd is very helpful. You just need to give it disk to read from and disk to write. Check below example –
root@kerneltalks # dd if=/dev/xvdf of=/dev/xvdg
4194304+0 records in
4194304+0 records out
2147483648 bytes (2.1 GB) copied, 181.495 s, 11.8 MB/s
In the above output, you can see disk /dev/xvdf is copied to /dev/xvdg. Command will show you how much data and what speed it copied.
Identify disk physically using dd
When there are a bunch of disks attached to the server and if you want to trace a particular disk physically, then dd command might be helpful. You have to run dd command to read from disk and write into the void. This will keep the hard disk activity light solid (physical on disk).
root@kerneltalks # dd if=/dev/xvdf of=/dev/null
Normally all other disk blinking activity LED whereas this one will be having its LED solid. Easy to spot the disk then! Be careful with IF and OF. IF you switch their arguments, you will end up wiping out your hard disk clean.
Create image of hard disk using dd
You can create an image of hard disk using dd. It’s the same as what we saw in the first example backup of the disk. Here we will use output file OF as a data file on mount point and not another disk.
root@kerneltalks # dd if=/dev/xvdf of=/xvdf_disk.img
4194304+0 records in
4194304+0 records out
2147483648 bytes (2.1 GB) copied, 32.9723 s, 65.1 MB/s

root@kerneltalks # ls -lh /xvdf_disk.img
-rw-r--r--. 1 root root 2.0G Jan 15 14:36 /xvdf_disk.img
In the above output, we created an image of disk /dev/xvdf into a file located in / named xvdf_disk.img
Compressed image can be created as well using gzip along with dd
root@kerneltalks # dd if=/dev/xvdf |gzip -c >/xvdf_disk.img.gz
4194304+0 records in
4194304+0 records out
2147483648 bytes (2.1 GB) copied, 32.6262 s, 65.8 MB/s
root@kerneltalks # ls -lh /xvdf_disk.img.gz
-rw-r--r--. 1 root root 2.0M Jan 15 14:31 /xvdf_disk.img.gz
You can observe output zipped image is very much less in size.
Restore image of hard disk using dd
Yup, the next question will be how to restore this hard disk image on another disk? The answer is simply to use it as a source and destination as another disk.
root@kerneltalks # dd if=/xvdf_disk.img of=/dev/xvdg
4194304+0 records in
4194304+0 records out
2147483648 bytes (2.1 GB) copied, 175.748 s, 12.2 MB/s
Make sure your disk image and target disk has same size.
Restore compressed hard disk image using dd along with gzip command as below –
root@kerneltalks # gzip -dc /xvdf_disk.img.gz | dd of=/dev/xvdg
4194304+0 records in
4194304+0 records out
2147483648 bytes (2.1 GB) copied, 177.272 s, 12.1 MB/s
Create ISO from CD or DVD using dd
Another popular use of dd command is creating an optical disk image file i.e. ISO file from CD or DVD. You need to first mount CD or DVD on your server then use it as a source device and file on mount point as a destination.
Here, we specified the 4096 block size using bs option. Make sure no other application or user is accessing a CD or DVD when running this command. You can use fuser command to check if someone is accessing it.
The next question will be how to mount ISO file in Linux? Well we have already article on it here 🙂
Creating file of definite size with zero data using dd
Many times sysadmins or developers need files with junk data or zero data for testing. Using dd you can create such files with definite size.
Let’s say you want to create a file of 1GB then you define block size of 1M and count of 1024. So 1M x 1024 = 1024M = 1G.
root@kerneltalks # dd if=/dev/zero of=/testfile bs=1M count=1024
1024+0 records in
1024+0 records out
1073741824 bytes (1.1 GB) copied, 13.0623 s, 82.2 MB/s

root@kerneltalks # ls -lh /testfile
-rw-r--r--. 1 root root 1.0G Jan 15 14:29 /testfile
In the above output, you can see our math worked perfectly. 1G file is created out of our command.
Changing file uppercase to lowercase using dd
All the above examples we have seen so far are of data copy using dd command. Now, this example is of data convert using dd command. Using dd, you can change file data from all uppercase to lowercase and vice versa.
# cat /root/testdata
This is test data file on kerneltalks.com test server.

# dd if=/root/testdata of=/root/testdata_upper conv=ucase
0+1 records in
0+1 records out
55 bytes (55 B) copied, 0.000138394 s, 397 kB/s

# cat /root/testdata_upper
THIS IS TEST DATA FILE ON KERNELTALKS.COM TEST SERVER.
You can see all data in file is converted to uppercase. For changing data from uppercase to lowercase use option conv=lcase
If you another interesting use of dd command, let us know in the comments down below.
Learn xfs file system commands to create, grow, repair xfs file system along with command examples.
Learn xfs commands with examples
In our other article, we walked you through what is xfs, features of xfs, etc. In this article, we will see some frequently used xfs administrative commands. We will see how to create xfs filesystem, how to grow xfs filesystem, how to repair the xfs file system, and check xfs filesystem along with command examples.
Create XFS filesystem
mkfs.xfs command is used to create xfs filesystem. Without any special switches, command output looks like one below –
Note: Once the XFS filesystem is created it can not be reduced. It can only be extended to a bigger size.
Resize XFS file system
In XFS, you can only extend the file system and can not reduce it. To grow XFS file system use xfs_growfs. You need to specify a new size of mount point along with -D switch. -D takes argument number as file system blocks. If you don’t supply -D switch, xfs_growfs will grow the filesystem to the maximum available limit on that device.
In the above output, observe the last line. Since I supplied a new size smaller than the existing size, xfs_growfs didn’t change the filesystem. This shows you can not reduce the XFS file system. You can only extend it.
Now, I supplied new size 1 GB extra and it successfully grew the file system.
1 GB blocks calculation :
The current filesystem has bsize=4096 i.e. block size of 4MB. We need 1 GB i.e. 256 blocks. So add 256 in a current number of blocks i.e. 2883584 which gives you 2883840. So I used 2883840 as an argument to -D switch.
Repair XFS file system
File system consistency check and repair of XFS can be performed using xfs_repair command. You can run the command with -n switch so that it will not modify anything on the filesystem. It will only scans and reports which modifications to be done. If you are running it without -n switch, it will modify the file system wherever necessary to make it clean.
Please note that you need to un-mount the XFS filesystem before you can run checks on it. Otherwise, you will see the below error.
root@kerneltalks # xfs_repair -n /dev/xvdf
xfs_repair: /dev/xvdf contains a mounted filesystem
xfs_repair: /dev/xvdf contains a mounted and writable filesystem

fatal error -- couldn't initialize XFS library
Once successfully un-mounting file system you can run command on it.
root@kerneltalks # xfs_repair -n /dev/xvdf
Phase 1 - find and verify superblock...
Phase 2 - using internal log
        - zero log...
        - scan filesystem freespace and inode maps...
        - found root inode chunk
Phase 3 - for each AG...
        - scan (but don't clear) agi unlinked lists...
        - process known inodes and perform inode discovery...
        - agno = 0
        - agno = 1
        - agno = 2
        - agno = 3
        - agno = 4
        - process newly discovered inodes...
Phase 4 - check for duplicate blocks...
        - setting up duplicate extent list...
        - check for inodes claiming duplicate blocks...
        - agno = 0
        - agno = 1
        - agno = 2
        - agno = 3
        - agno = 4
No modify flag set, skipping phase 5
Phase 6 - check inode connectivity...
        - traversing filesystem ...
        - traversal finished ...
        - moving disconnected inodes to lost+found ...
Phase 7 - verify link counts...
No modify flag set, skipping filesystem flush and exiting.
In the above output you can observe, in each phase command shows possible modification which can be done to make the file system healthy. If you want the command to do that modification during the scan then run the command without any switch.
root@kerneltalks # xfs_repair /dev/xvdf
Phase 1 - find and verify superblock...
Phase 2 - using internal log
        - zero log...
        - scan filesystem freespace and inode maps...
        - found root inode chunk
Phase 3 - for each AG...
        - scan and clear agi unlinked lists...
        - process known inodes and perform inode discovery...
        - agno = 0
        - agno = 1
        - agno = 2
        - agno = 3
        - agno = 4
        - process newly discovered inodes...
Phase 4 - check for duplicate blocks...
        - setting up duplicate extent list...
        - check for inodes claiming duplicate blocks...
        - agno = 0
        - agno = 1
        - agno = 2
        - agno = 3
        - agno = 4
Phase 5 - rebuild AG headers and trees...
        - reset superblock...
Phase 6 - check inode connectivity...
        - resetting contents of realtime bitmap and summary inodes
        - traversing filesystem ...
        - traversal finished ...
        - moving disconnected inodes to lost+found ...
Phase 7 - verify and correct link counts...
done
In the above output, you can observer xfs_repair command is executing possible filesystem modification as well to make it healthy.
Check XFS version and details
Checking the xfs file system requires it to un-mount. Run xfs_db command on its device path and once you entered xfs_db prompt, run version command.
xfs_db command normally used for examining the XFS file system. version command used to enable features in the file system. Without any argument, the current version and feature bits are printed
To view details of the XFS file system like block size and number of blocks which helps you in calculating new block number for growing XFS file system, use xfs_info without any switch.
Learn timezone management using timedatectl command. An article explaining different uses of timedatectl command along with examples.
Learn timedatectl command
In our previous article, we have seen how to change the timezone of the Linux server using files or variables in the system. Few of our readers pushed timedatectl command to achieve this task easily. So I thought of writing a separate article on timedatectl command explaining all its usage.
In this article, we will see how to display server time details, view, list, and change the timezone of the server using timedatectl command. If you want to use date or time in a shell script or as a variable, we explained here how to format the date and time to use it as variable or in scripting.
timedatectl is Time Date Control command! It used to control the date and time of the server in Linux. To check your current system date and time details, run this command without any switch –
root@kerneltalks # timedatectl
      Local time: Wed 2017-11-15 15:58:33 UTC
  Universal time: Wed 2017-11-15 15:58:33 UTC
        RTC time: Wed 2017-11-15 15:58:32
       Time zone: UTC (UTC, +0000)
     NTP enabled: yes
NTP synchronized: yes
 RTC in local TZ: no
      DST active: n/a
Where,
Local time : Your system’s local date and time
Universal time : Current UTC time
RTC time : Current Real-time clock time
Time zone : Your system’s current timezone
NTP enabled : Is NTP is enabled on system or not
NTP synchronized : NTP time synced or not.
RTC in local TZ : Is RTC maintaining in configured system TZ? It is recommended to keep it off.
DST active : Daylight saving time enabled or not
List and change timezone using timedatectl
timedatectl allow you to change the timezone of the system with a list of available timezones. To view, a list of available timezones use the command with list-timezones switch.
You will be presented with a list of available timezones in a paged manner. You can use any of thee timezones to set on your local system. To change timezone of your system use set-timezone switch.
Above command will change server timezone to Australia/Sydney one.
Change date and time using timedatectl
Most of the servers are configured with NTP these days. But if not and/or if you want to change the date and time manually then you can use set-time switch. Time should be supplied with YYYY-MM-DD HH:MM:SS
If NTP is configured then you might see an error Failed to set time: Automatic time synchronization is enabled when attempting to change system time manually.
Enable/Disable RTC and NTP using timedatectl
You can enable or disable RTC (Real Time Clock) and NTP using timedatectl. For RTC use set-local-rtc and for NTP use set-ntp switch. Both arguments accepts 1 (to enable) and 0 (to disable) as values.
Please note that enabling NTP here does not take you through NTP configuration steps. That has to be done separately. This only controls if the system should sync time using configured NTP or not.
Manage date and time of other machine
You can use timedatectl command to manage the date and time of local containers or remote machines. To manage the time of local container use -M switch whereas to connect to the remote host and manage its time use -H switch.
-M switch takes argument as --host=ip/hostname. -H switch takes argument as --machine=container_name.
That’s all switches which are mainly useful in day-to-day operations. There are a few more that can be referred from its man page.
Learn to find command with these 14 examples. Find command examples handpicked to help you in your day-to-day operations.
‘find’ command
One of the most important, used and helpful command in Linux terminal is ‘find’ command. It will search files depending on your search criteria and bring the list for you! It saves you from going to many directories and wasting time looking out your required files.
In this article we will see a list of different find commands to search files. Normally find command syntax is –
# find <path_to_search> -switch <search_criteria>
Where, path_to_search is a directory location where you want to search and search_criteria is a condition that should be matched to search files. Note here that find command will search all sub-directories of given path_to_search recursively.
Let’s see 14 find command examples that are very helpful for you in your day to day operations on Linux servers like RedHat, Ubuntu, CentOS, Debian, etc.
Find file using name
Using –name switch you can specify the name of files to search in a particular location.
root@kerneltalks # find /tmp -name "*.gz"
You can use wild cards as well while specifying your search criteria. In the above example, we searched /tmp directory for all gun-zipped files.
Find only files
To search specific file type -type switch needs to be defined in find command.
root@kerneltalks # find /tmp -type f -name "*log"
For searching only files, we defined -type as f in the above example. The above command will search /tmp for files whose name ends with a log.
Find only directories
For searching only directories define -type as d.
root@kerneltalks # find /tmp -type d -name "box*"
In the above example, find command will search /tmp for only directories whose name starts with a box.
Find files which are modified in last 7 days
Searching files that are modified in the last X days is helpful for log management. When you don’t have utilities like logrotate configured then you will have to search and house keep files with this command.
root@kerneltalks # find /tmp -mtime 7
-mtime is a switch which takes a number of days as an argument. mtime stands for modification time.
You can combine the same switch two times to get a range of days for your search. For example to search files which are modified between last 10 to 20 days you can use :
Another variant of the above search is to find files that are accessed in the last X days. So that decisions can be made for those files who are not accessed for a long period of time and can be zipped/trimmed to save disk space.
root@kerneltalks # find /tmp -atime 7
-atime switch to be used and number of days to be supplied as argument.
You can combine the same switch two times to get a range of days for your search. For example to search files which are accessed between last 10 to 20 days you can use :
Some times housekeeping is done based on file size too. To search file based on its size you can use -size and supply human-readable size formats like 10M, 2G, etc.
root@kerneltalks # find /tmp -size 5M
Above command will search file with 5MB size.
Find files having size greater than
But, exact size search mostly doesn’t yield expected. It’s always good if you search with a file size range. To find files with size greater than X –
root@kerneltalks # find /tmp -size +10M
This command will search /tmp for files whose size is greater than 10MB.
Find files having size lesser than
Same way files can be searched with size less than specified value like –
root@kerneltalks # find /tmp -size -20M
Using above two option we can even define range of size to search file from.
This command will search files whose size is greater than 10MB and less than 20MB!
Find hidden files
As you know in Linux/Unix, hidden files name starts with .
So we can search for hidden files using -name switch explained earlier with the wild card as below –
root@kerneltalks # find /tmp -type f -name .*
We specified wild card asterisk with . means search all files whose name starts with .
Find files with particular permission
Searching files with particular permission is one of the tasks while auditing. This will help you to trace down files that might be having un-necessary extra permissions and can pose a security threat to the system.
-perm (permission) the switch can be used with findcommand followed by permissions.
root@kerneltalks # find / -type f -perm 0777
In above command we are searching all files with 777 permission.
Find world readable files
With the above example, we can search world-readable files i.e. everyone has only read access on that file (444 or -r--r--r-- permission)
root@kerneltalks # find / -type f -perm 444
OR
root@kerneltalks # find / -type f -perm /u=r -perm /g=r -perm /o=r
You can see numeric as well as u-g-o (user, group, others) format can be used with this switch.
Find files owner by particular user
If you are suspecting some user is spamming files on the server, you can directly search files with his ownership using -user switch.
root@kerneltalks # find / -type f -user shrikant
This command will search whole root directory for files which are owned by user ‘shrikant’
Find files owned by particular group
Similarly, files owned by a specific group can be searched using find command with -group switch
root@kerneltalks # find / -type f -group dba
In above example we are searching for files owned by group named ‘dba’
Find empty files or directories
Empty files and directories cleanup is crucial when you are hitting your inode limits. Sometimes deleting sources of soft links, left link files empty on server occupying inode. In such a case we can search them with -empty switch to find command.
root@kerneltalks # find / -type f -empty
root@kerneltalks # find / -type d -empty
Defining file type as file or directory will search respective empty entities.
Beginners guide to ls command. Learn ls command with 12 examples that can be used in your daily Linux tasks.
Learn ‘ls’ command
The very first command anyone types, when they logged into the terminal, is either ls or hostname! Yes, ls is the first command all beginners, newbies learn and use when they introduced to Linux world. It is one of the most used rather smashed commands in terminal 🙂
ls stands for list. This command helps in listing files and directories in Linux or Unix. There are many switches available to use with use to fit your need. We will walk you through 15 different examples of ls commands which can be useful for you in your daily routine.
Normal ls command without any switch
Without any switch ls command shows all files and directories names in a single line separated by space.
root@kerneltalks # ls
directory1  directory2  testfile1  testfile2
Long listing using ls -l
For more detailed information, use long listing. That is using -l switch with ls command.
You can see in the above output, hidden file .account_detail (name starts with .) is listed.
Listing human readable file sizes
In long listing we have seen that file size is displayed in block size. This is not a user-friendly format since you have to convert blocks to conventional byte size. Easy human-readable format like KB, Mb, GB is available with switch -h. Using these file sizes will be displayed in a human-readable format.
Numbers 18, 30, 32, and 43 are respective inodes of those files and directories on right.
Sorting files with time of last modify time
This is one of the most widely used formats of ls command. Switch used are -l (long listing), -r (reverse sort), -t (the sort with modification time). Due to the reverse sort, the latest updated file will be shown at the bottom of the output.
ls command without argument lists all files and directory names. But without long listing (in which directories have their permission string starts with d) you won’t be able to identify directories. So here is a tip. Use -p switch. It will append / to all directory names and you will identify them easily.
root@kerneltalks # ls -p
directory1/  directory2/  testfile1  testfile2
You can see both directories has / appended to their names.
Listing directories recursively
The long listing or normal ls command shows you only directories residing in the current directory (from where you are running the command). To view files inside those directories you need to run ls command recursively i.e using -R switch.
This is it! 12 different examples of ls command which can be helpful to you in your daily Linux learning. Do subscribe to our blog to get the latest post notifications about Linux howto guides. Let us know if you want to cover some beginner’s topics in the comments section below.
Learn to kill the process in Linux using kill, kill, and killall commands. Kill processes using PID or process name.
Kill process in Linux with kill, pkill and killall
Windows users have a task manager where they can monitor running processes and choose to ‘End Task‘ to kill off unwanted/hung/less critical processes to save system resources. Same way, in Linux as well you can kill processes and save on your system resource utilization.
In this article we will walk through steps on how to kill the process in Linux using kill, kill, and killall commands. These three commands used to kill processes in a different manner. To proceed with you should know the concept of PID i.e. Process ID. It is the numeric value you will be used as an argument in kill commands.
What is PID?
PID is the Process ID, it’s a numeric identification of process in the kernel process table. Each process in Linux is identified by PID. PID 1 is always init process in Linux whereas new Linux distributions like RHEL7 has systemd as a PID 1 process. It is the parent of all processes. If any process don’t have a parent or if its parent process is terminated abruptly (zombie process), PID 1 process takes over that child process.
The next question is how to find process id in Linux? It can be obtained using below several commands :
With ps -A command you get a list of all running processes and their PID in the first column of the output. Grep out your desired process from the output. With ps auxcommand you can see more information about processes with PID in the second column of the output. Alternatively, you can use pidof command when you know the exact process name to get its only PID.
Now, you are ready with PID of the process to be killed. Let’s move on to killing it!
How to kill process in Linux?
There are a few limitations you should consider before killing any PID. They are as below –
You can kill the process which is owned by your userid only.
You can not kill system processes.
Only the root user can kill other user’s processes.
Only root can kill system using processes.
After fulfilling all above criteria, you can move ahead to kill PID.
Kill process using kill command
Kill command is used to send specific signals to specified PID. Signal numbers and PID you need to supply to command. The signal used are :
1 : Hung up
9 : Kill
15 : Terminate
Normally 9 signal is used (famous kill -9 command) while 15 is used if 9 doesn’t work. Hung up signal is rarely used. Kill process using command syntex kill -signal PID like –
root@kerneltalks # kill -9 8274
Kill process using pkill
If you want to use the process name instead of PID then you can use the pkill command. But remember to use the correct process name. Even a small typo can lead you to kill off unwanted processes. Syntex is simple, just specify process name to command.
root@kerneltalks # pkill myprocess
Kill process using killall
With the above two commands : kill and pkill, you are killing only a specific process whose PID or name is specified. This leads its child processes to hung or zombie. To avoid this situation, you can kill the process along with all its child processes using killall command.
root@kerneltalks # killall myprocess
Conclusion
As root you can kill any process including system ones on the Linux system. As a normal user you can kill processes owned by you only. Process ID i.e. PID can be obtained using command ps or pidof. This PID or process name can be used to kill the process using kill, pkill and killall commands.
Learn how to replay the Linux session recorded by script command. Visual Linux session recording along with timing information plays past session recording in real-time.
Replay Linux session like video!
In our last article we learned how to record Linux sessions using the‘script’ command. In this article we will walk through steps to replay recorded sessions by script command. Normally, script command saves recording in the plain text log file which can be viewed using cat, more, less, or vi commands. That would be only plain text having commands and their outputs in the order you executed them while recording.
If you want to view your recorded output as it is being played on the terminal you can do it using scriptreplay command. It will play your output just as you are typing it on the terminal! scriptreplay needs time logs as well to play recorded sessions. This time logs can be generated using –timing switch with the script command. Let’s walk through these steps.
How to record Linux session with timing
We will use script command with --timing switch followed by filename in which all timing logs will be saved.
[root@kerneltalks ~]#  script --timing=time.log capture.txt
Script started, file is capture.txt
[root@kerneltalks ~]# date
Thu Jul 27 02:42:46 EDT 2017
[root@kerneltalks ~]# hostname
kerneltalks
[root@kerneltalks ~]# echo "I love kerneltalks"
I love kerneltalks
[root@kerneltalks ~]# exit
exit
Script done, file is capture.txt
here we are saving timing information in time.log file and session recording in capture.txt file. Both are plain text files and can be viewed. If you look at time.log file :
It has two columns of data in it. The first column denotes the number of seconds elapsed after the last display action. The second column is the number of characters printed on the screen.
That’s it. You have recorded your Linux session along with timing logs. This recording (capture.txt) can be replayed using scriptreplay command since its timing information is available.
How to replay recorded Linux session
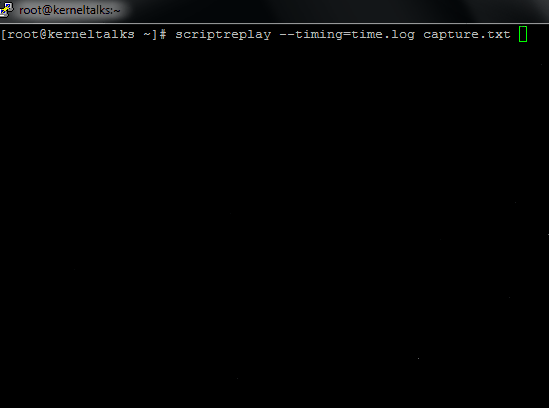
Now both logs timing and recording need to feed scriptreplay command to let the show begin! The format and switch would be the same. Command used to replay session will be :
# scriptreplay --timing=time.log capture.txt
To see it in action, I captured it in the GIF file below. See how to actually replay as if the user is typing in the terminal as it was at the time of recording!
‘scriptreplay’ command in action
It replays exactly with the same time difference between two commands as you did at the time of recording! It’s like watching what the user has done in his session in real-time. It’s more of a visual record of Linux session while script was textual records.