The process to remove the missing disk from LVM configuration.
In this article, we will see how to remove a physical volume from the volume group when the disk is removed from the server. Normally, you need to remove the disk from the volume group first using vgreduce and then remove disk physically. But in some cases where disk went bad or you accidentally remove the disk from the server before you remove from VG, PV status will be shown as unknown in vgdisplay like below.
  --- Physical volumes ---
  PV Name               [unknown]
  PV UUID               fPFkBx-lbnG-R6Zo-3kq5-KOLA-U1ou-LdNIMD
  PV Status             allocatable
  Total PE / Free PE    1535 / 1535
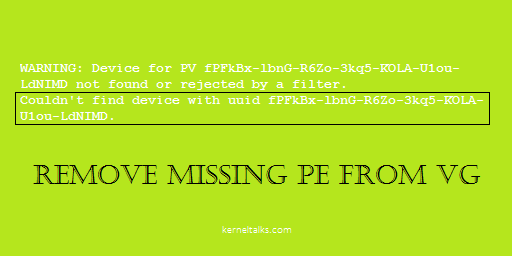
WARNING: Device for PV fPFkBx-lbnG-R6Zo-3kq5-KOLA-U1ou-LdNIMD not found or rejected by a filter.
Couldn't find device with uuid fPFkBx-lbnG-R6Zo-3kq5-KOLA-U1ou-LdNIMD.
This is because the disk was removed from the server or disk is disappeared from the server without being gracefully removed from LVM.
How to remove missing PV from VG
Now to clean VG after PV is deleted or removed you need to use vgreduce command with --removemissing switch-
# vgreduce  --removemissing datavg
  WARNING: Device for PV fPFkBx-lbnG-R6Zo-3kq5-KOLA-U1ou-LdNIMD not found or rejected by a filter.
  Couldn't find device with uuid fPFkBx-lbnG-R6Zo-3kq5-KOLA-U1ou-LdNIMD.
  Wrote out consistent volume group datavg.
It will clean up all missing physical volumes from the volume group and thus making VG consistent. You will see no more missing PV warnings now!
Learn about the XFS filesystem in Linux. An article explaining what is xfs, features, and commands of XFS. Also, how to migrate from EXT to the XFS file system.
Learn XFS filesystem
What is xfs?
XFS is a high-performance file system designed by Silicon Graphics Inc in 1993. It is the default file system in RHEL7. XFS supports parallel IO operations because of its allocation group structure which makes it high performance operating file system. Journaling features helps it in faster data recovery in case of a crash. Lets quickly walk through a few aspects of XFS for your understanding.
Features of XFS
Its 64-bit file system with a max file system size of 8EB.
Supports metadata journaling which helps in faster data recovery in case of a system crash.
It can be extended while mounted and active.
It is internally partitioned into allocation groups. 4 different allocation groups available.
Directory quotas help to limit quota over the directory tree.
Quota journaling avoids quota consistency checks after the crash and hence quicker recovery
Extended attributes associated with each file. Those are additional name/value pairs.
Online de-fragmentation is supported.
It has native backup (xfsdump) & restore (xfsrestore) utilities.
How to upgrade EXT to XFS
The obvious question is how to upgrade from ext4 to xfs? or upgrade from ext3 to xfs etc. We have different ways to upgrade ext file systems but there is no full-proof way to upgrade ext to xfs. You can have below approach to migrate from ext to xfs filesystem –
Create a new xfs file system
Copy over data from old ext file system to xfs using copy or rsync
Remove old ext file system
Commands for XFS file system management
Create xfs file system : mkfs.xfs command.
Mount xfs file system : No extra switch for mount command
Quota management : xfs_quota command
Extending file system : xfs_growfs command
Repair file system : xfs_repair command
Suspend write on file system : xfs_freeze command (-f for suspend, -u for resume)
Bakcup : xfsdump command
Restore : xfsrestore command
Print file system information : xfs_info command
De-fragmentation : xfs_fsr command with no argument
XFS is a high-performance filesystem available in most Linux distro and as a default in some. We will see the difference between ext3, ext4, and xfs in upcoming articles along with the XFS command in detail.
Learn how to upgrade the ext filesystem in Linux like RHEL, Centos, Ubuntu, etc. Steps for upgrading ext2 to ext3, ext3 to ext4, and ext2 to ext4.
Upgrade filesystem from ext2 to ext3 to ext4
In our last article we saw the difference between ext2, ext3, and ext4 file systems in Linux. In this article we will walk through how to upgrade ext2 to ext3 or ext4 on RHEL, CentOS, or Ubuntu.
How to upgrade ext2 to ext3
To upgrade ext2 volume lets first format volume with ext2 filesystem.
# mke2fs /dev/vg01/lvol0
mke2fs 1.42.13 (17-May-2015)
Creating filesystem with 53248 1k blocks and 13328 inodes
Filesystem UUID: b3c39dcf-e00f-414c-8306-46d985674b6e
Superblock backups stored on blocks:
        8193, 24577, 40961

Allocating group tables: done
Writing inode tables: done
Writing superblocks and filesystem accounting information: done
Lets confirm file system type which we just formatted.
# df -T /mydata
Filesystem             Type 1K-blocks  Used Available Use% Mounted on
/dev/mapper/vg01-lvol0 ext2     51559   842     48055   2% /mydata
You can see its ext2 type in above output under second column.
Now to upgrade it to ext3 you need to unmount it, so there is downtime involved. After un-mount use tune2fs command to upgrade and mount it.
# umount /mydata

# tune2fs -j /dev/vg01/lvol0
tune2fs 1.42.13 (17-May-2015)
Creating journal inode: done

# mount /dev/vg01/lvol0 /mydata

#  df -T /mydata
Filesystem             Type 1K-blocks  Used Available Use% Mounted on
/dev/mapper/vg01-lvol0 ext3     47463   859     43942   2% /mydata
Observe above outputs carefully. We did –
Un-mount filesystem
Run tune2fs command with -j switch
Mount file system
ext2 has been upgraded to ext3 which can be confirmed in last output.
Make sure you make changes in /etc/fstab to reflect proper file system type for your related mount point.
How to upgrade ext3 to ext4
To upgrade to ext4 filesystem you need to enable file system features on the file system with tune2fs command. Those are – dir_index (Speed up directory lookups), extents (Stores locations in inodes), uninit_bg (reduce e2fsck time).
After successful setting features of file system you need to run e2fsckto fix file system data structures on disk for new modified features. To run e2fsck you have to unmount the file system.
# tune2fs -O extents,uninit_bg,dir_index /dev/vg01/lvol0
tune2fs 1.42.13 (17-May-2015)

# e2fsck -pf /dev/vg01/lvol0
/dev/vg01/lvol0 is mounted.
e2fsck: Cannot continue, aborting.

# umount /mydata

# e2fsck -pf /dev/vg01/lvol0
/dev/vg01/lvol0: 11/13328 files (0.0% non-contiguous), 6644/53248 blocks

# mount /dev/vg01/lvol0 /mydata

# df -T /mydata
Filesystem             Type 1K-blocks  Used Available Use% Mounted on
/dev/mapper/vg01-lvol0 ext4     47463   859     42878   2% /mydata
In the above output, we tried to run FS check while volume is mounted and it gave us an error. Finally, the file system upgraded to ext4 which can be verified in the last output. Make a note that this is irreversible change and you can not go back to ext3 once you did this upgrade.
There is another way as well to have a file system of ext4 as below –
ext4 file system is backward compatible with ext2 and ext3. This means you can directly mount any ext2 or ext3 filesystem as ext4 without upgrading. You just simply un-mount filesystem and mount it as ext4 by supplying -t switch with mount command.
# umount /mydata

# mount -t ext4 /dev/vg01/lvol0 /mydata

# df -T /mydata
Filesystem             Type 1K-blocks  Used Available Use% Mounted on
/dev/mapper/vg01-lvol0 ext4     47463   859     43942   2% /mydata
In the above output, we un-mount out ext3 mount point and remounted it as ext4! This process is reversible means you can un-mount the ext4 file system and re-mount it as ext3 again.
How to upgrade ext2 to ext4
As we saw above you need to enable file system features to upgrade to ext4. While upgrading from ext2 to ext4 you need to enable has_journal extra features than the above list. Since you know ext2 doesn’t have journaling available.
# umount /mydata

# tune2fs -O extents,uninit_bg,dir_index,has_journal /dev/vg01/lvol0
tune2fs 1.42.13 (17-May-2015)
Creating journal inode: done

# e2fsck -pf /dev/vg01/lvol0
/dev/vg01/lvol0: 11/13328 files (0.0% non-contiguous), 6627/53248 blocks

# mount /dev/vg01/lvol0 /mydata

# df -T /mydata
Filesystem             Type 1K-blocks  Used Available Use% Mounted on
/dev/mapper/vg01-lvol0 ext4     47463   842     42895   2% /mydata
Make a note that this is irreversible change and you can not go back to ext3 once you did this upgrade.
Another method would be directly mounting FS as ext4 as below –
As stated earlier, the ext4 file system is backward compatible with ext2 and ext3, means you can directly mount any ext2 or ext3 filesystem as ext4 without upgrading
# df -T /mydata
Filesystem             Type 1K-blocks  Used Available Use% Mounted on
/dev/mapper/vg01-lvol0 ext2     51559   842     48055   2% /mydata

# umount /mydata

# mount -t ext4 /dev/vg01/lvol0 /mydata

# df -T /mydata
Filesystem             Type 1K-blocks  Used Available Use% Mounted on
/dev/mapper/vg01-lvol0 ext4     51559   842     48055   2% /mydata
Previously ext2 file system is mounted as ext4 in the above output without upgrading!
List of differences between ext2, ext3, and ext 4 Linux file systems. One of the Linux interview questions answered in this article!
Comparison : ext2 vs ext3 vs ext4
This is another Linux interview question. What is the difference between ext2, ext3, and ext4 file systems? Or Explain Linux file system ext2 vs ext3 vs ext4? In this article we will walk through these differences and lastly I will present you all of them in tabular format so that they are easy to quickly read during your preparations.
Let’s see each file system’s features and lastly their comparison with other file systems.
EXT2 file system
It’s a second extended file system that was created to overcome limitations of the EXT file system.
Introduced in 1993 by Remy Card. It was the first commercial-grade filesystem for Linux
Does not supports Journaling
Fit for SD cards & USB drives since it has high performance and low writes (as journaling is not available). USB and SD storage are limited with write cycles hence its best fit for them.
Limits: Individual file size 16GB to 2TB. File system size 2TB to 32TB.
Limits are calculated based on block size used. Block size varies from 1KB to 8KB. For example, If 1KB block size is used max file size can go up to 16GB and for 8KB it’s 2TB. Middle range sizes being 2KB and 4KB which has file size limits of 256GB & 2TB (not mentioned in above limits) respectively. The same applies to the File system size limits defined above.
EXT3 file system
It’s third extended file system was created to overcome limitations of the EXT2 file system.
Introduced in 2001 by Stephen Tweedie. It was the most common filesystem in any Linux distro.
Supports Journaling
Journaling keeps track of file changes which helps in fast recovery and reduce chances of data loss in case of a system crash
Limits: Individual file size 16GB to 2TB. File system size 4TB to 32TB.
Upgrading FS from ext2 to ext3 is an online process without downtime.
EXT4 file system
It’s the fourth extended file system that was created to overcome limitations of the EXT3 file system.
Introduced in 2008 by a team of developers. Its most the latest filesystem in ext family.
Supports Journaling
Lots of new features introduced. Extents, Backward compatibility, Persistent pre-allocation, Delayed allocation, Unlimited number of subdirectories, Journal checksum, Faster FS check, Transparent encryption.
Limits: Individual file size 16GB to 16TB. File system size up to 1EB.
Upgrading FS not needed. Due to backward compatibility, ext2, ext3 can be directly mounted as ext4.
All above points can be formatted in tabular format as below :
Parameter
EXT2
EXT3
EXT4
Introduced year
1993
2001
2008
Developed by
Remy Card
Stephen Tweedie
Team of developers
Journaling
Not available
Available
Available
Individual file size
16GB to 2TB
16GB to 2TB
16GB to 16TB
File system size
2TB to 32TB
4TB to 32TB
up to 1EB
Upgrade
Can be done online to EXT3. Can be mounted as EXT4. No upgrade needed
Understand what is LVM snapshot and why to use it. Learn how to create, mount, unmount, and delete the LVM snapshot.
LVM snapshot How to and when to!
LVM (Logical Volume Manager) is one of the widely used volume managers on Unix and Linux. There were series of LVM articles we published at kerneltalks in the past. You can refer them in below list :
In this article we will be discussing how to take snapshots of the logical volume. Since LVM is widely used, you must know how to take a backup of logical volume on the LVM level. Continue reading this article to know more about LVM snapshots.
What is LVM snapshot?
LVM snapshot is a frozen image of the logical volume. It is an exact copy of LVM volume which has all the data of volume at the time of its creation. LVM copies blocks or chinks from volume to volume so it’s comparatively fast than file-based backup. Backup volume is read-only in LVM and read-write in LVM2 by default.
Why to use LVM snapshot?
LVM snapshots are a quick and fast way to create a data copy. If your volume size is big and you can not tolerate performance issues while doing online data backup or downtime while doing offline data backup then LVM snapshot is the way to go. You can create snapshots and then use your system normally. While the system is serving production, you can take a backup of your backup volume at your leisure without hampering system operations.
Another benefit of using snapshot is your data remain un-changed while the backup is going on. If you take a backup of production/live volume then data on volume may change resulting inconsistency in the backup. But in case of snapshot since no app/user using it or writing data on it, taking backup from a snapshot is consistent and smooth.
How to take LVM snapshot?
LVM snapshots are easy to take. You need to use the same lvcreate command with -s switch (denotes snapshot) and supply the name of the volume to back up in the end. Important things here are to decide the size of the backup volume. If backup volume size is unable to hold data volume then your snapshot becomes unusable and it will be dropped. So make sure you have little extra space in backup volume than your original data volume (per man page 15-20% might be enough).
Lets create LVM snapshot.
# df -h /mydata
Filesystem              Size  Used Avail Use% Mounted on
/dev/mapper/vg01-lvol0   93M  1.6M   87M   2% /mydata

# lvcreate -L 150 -s -n backup /dev/vg01/lvol0
  Rounding up size to full physical extent 152.00 MiB
  Reducing COW size 152.00 MiB down to maximum usable size 104.00 MiB.
  Logical volume "backup" created.
In the above example, we created a snapshot of 100MB logical volume. For snapshot we defined 150MB space to be on the safer side. But command itself reduced it to 104MB optimum value to save on space. We also named this volume as a backup with -n switch.
Once the snapshot is created it can be mounted as any other logical volume. Once mounted it can be used as a normal mount point. Remember, LVM snapshots are read-only and LVM2 snapshots are read-write by default.
# mount /dev/vg01/backup /mybackup

# df -h
Filesystem              Size  Used Avail Use% Mounted on
/dev/mapper/vg01-lvol0  93M  1.6M   87M   2% /mydata
/dev/mapper/vg01-backup 93M  1.6M   87M   2% /mybackup
You can see after mounting backup volume its the exact same copy of the original volume. Original volume mounted on /mydata and backup volume mounted on /mybackup.
Now, you can take a backup of the mounted backup volume leaving original volume un-touched and without impacting its service to the environment.
How to delete LVM snapshot?
LVM snapshot deletion can be done as you delete the logical volume. After backup you may want to delete snapshot then you just need to unmount it and use lvremovecommand.
# umount /mybackup
# lvremove /dev/vg01/backup
Do you really want to remove active logical volume backup? [y/n]: y
  Logical volume "backup" successfully removed
Conclusion
LVM snapshots are special volumes that hold an exact copy of your data volume. It helps in reducing the overhead of read-write on data volume when taking backup. It also helps for consistent backup since no app/user altering data on snapshot volume.
Learn to rescan disk in Linux VM when its backed vdisk in VMware is extended. This method does not require downtime and no data loss.
Re-scan vdisk in Linux
Sometimes we get a disk utilization situations and needs to increase disk space. In the VMware environment, this can be done on the fly at VMware level. VM assigned disk can be increased in size without any downtime. But, you need to take care of increasing space at OS level within VM. In such a scenario we often think, how to increase disk size in Linux when VMware disk size is increased? or how to increase mount point size when vdisk size is increased? or steps for expanding LVM partitions in VMware Linux guest? or how to rescan disk when vdisk expanded? We are going to see steps to achieve this without any downtime.
In our example here, we have one disk /dev/sdd assigned to VM of 1GB. It is part of volume group vg01 and mount point /mydrive is carved out of it. Now, we will increase the size of the disk to 2GB at VMware level and then will add up this space in the mount point /mydrive.
If you re using the whole disk in LVM without any fdisk partitioning, then skip step 1 and step 3.
Step 1:
See below fdisk -l output snippet showing disk /dev/sdd of 1GB size. We have created a single primary partition on it /dev/sdd1 which in turn forms vg01 as stated earlier. Always make sure you have data backup in place of the disk you are working on.
Disk /dev/sdd: 1073 MB, 1073741824 bytes
255 heads, 63 sectors/track, 130 cylinders
Units = cylinders of 16065 * 512 = 8225280 bytes
Sector size (logical/physical): 512 bytes / 512 bytes
I/O size (minimum/optimal): 512 bytes / 512 bytes
Disk identifier: 0x8bd61ee2

    Device Boot      Start         End      Blocks   Id  System
/dev/sdd1               1         130     1044193+  83  Linux LVM

# ll /mydrive
total 24
drwx------. 2 root root 16384 Jun 23 11:00 lost+found
-rw-r--r--. 1 root root 0 Jun 23 11:01 shri
drwxr-xr-x. 3 root root 4096 Jun 23 11:01 .
dr-xr-xr-x. 28 root root 4096 Jun 23 11:04 ..
Step 2:
Now, change disk size at VMware level. We are increasing it by 1 more GB so the final size is 2GB now. At this stage disk need to be re-scanned in Linux so that kernel identifies this size change. Re-scan disk using below command :
echo 1>/sys/class/block/sdd/device/rescan
OR
echo 1>/sys/class/scsi_device/X:X:X:X/device/block/device/rescan
Make sure you use the correct disk name in command (before rescan). You can match your SCSI number (X:X:X:X) with VMware disk using this method.
Note : Sending “– – -” to /sys/class/scsi_host/hostX/scan is scanning SCSI host adapters for new disks on every channel (first -), every target (second -), and every device i.e. disk/lun (third -) i.e. CTD format. This will only help to scan when new devices are attached to the system. It will not help us to re-scan already identified devices.
That’s why we have to send “1” to /sys/class/block/XYZ/device/rescan to respective SCSI block device to refresh device information like the size. So this will be helpful here since our device is already identified by the kernel but we want the kernel to re-read its new size and update itself accordingly.
Now, kernel re-scan disk and fetch its new size. You can see new size is being shown in your fdisk -l output.
Disk /dev/sdd: 2147 MB, 2147483648 bytes
255 heads, 63 sectors/track, 261 cylinders
Units = cylinders of 16065 * 512 = 8225280 bytes
Sector size (logical/physical): 512 bytes / 512 bytes
I/O size (minimum/optimal): 512 bytes / 512 bytes
Disk identifier: 0x8bd61ee2

    Device Boot      Start         End      Blocks   Id  System
/dev/sdd1               1         130     1044193+  83  Linux LVM
Step 3:
At this stage, our kernel know the new size of the disk but our partition (/dev/sdd1) is still of old 1GB size. This left us no choice but to delete this partition and re-create it again with full size. Make a note here your data is safe and make sure your (old & new) partition is marked as Linux LVM using hex code 8e or else your will mess up the whole configuration.
Delete and re-create partition using fdisk console as below:
# fdisk /dev/sdd

Command (m for help): d
Selected partition 1
Command (m for help): n
Command action
   e   extended
   p   primary partition (1-4)
p
Partition number (1-4): 1
First cylinder (1-261, default 1):
Using default value 1
Last cylinder, +cylinders or +size{K,M,G} (1-261, default 261):
Using default value 261
Command (m for help): t
Selected partition 1
Hex code (type L to list codes): 8e

Command (m for help): p

Disk /dev/xvdf: 2147 MB, 2147483648 bytes
255 heads, 63 sectors/track, 261 cylinders
Units = cylinders of 16065 * 512 = 8225280 bytes
Sector size (logical/physical): 512 bytes / 512 bytes
I/O size (minimum/optimal): 512 bytes / 512 bytes
Disk identifier: 0x8bd61ee2

    Device Boot      Start         End      Blocks   Id  System
/dev/sdd1               1         261     2095458+  83  Linux LVM
All fdisk prompt commands are highlighted in the above output. Now you can see the new partition /dev/sdd1 is of 2GB size. But this partition table is not yet written to disk. Use w command at fdisk prompt to write table.
Command (m for help): w
The partition table has been altered!

Calling ioctl() to re-read partition table.

WARNING: Re-reading the partition table failed with error 16: Device or resource busy.
The kernel still uses the old table. The new table will be used at
the next reboot or after you run partprobe(8) or kpartx(8)
Syncing disks.
You may see the warning and error like above. If yes, you can use partprobe -s and you should be good. If you still below error with partprobe then you need to reboot your system (which is sad ).
Warning: WARNING: the kernel failed to re-read the partition table on /dev/sdd (Device or resource busy). As a result, it may not reflect all of your changes until after reboot.
Step 4:
Now rest of the part should be tackled by LVM. You need to resize PV so that LVM identifies this new space. This can be done with pvresize command.
As new PV size is learned by LVM you should see free/extra space available in VG.
# vgdisplay vg01
  --- Volume group ---
  VG Name               vg01
  System ID
  Format                lvm2
  Metadata Areas        1
  Metadata Sequence No  3
  VG Access             read/write
  VG Status             resizable
  MAX LV                0
  Cur LV                1
  Open LV               0
  Max PV                0
  Cur PV                1
  Act PV                1
  VG Size               2.00 GiB
  PE Size               4.00 MiB
  Total PE              511
  Alloc PE / Size       250 / 1000.00 MiB
  Free  PE / Size       261 / 1.02 GiB
  VG UUID               0F8C4o-Jvd4-g2p9-E515-NSps-XsWQ-K2ehoq
Learn how to add swap using LVM, swap file, and parted disk management. Also, learn how to extend existing swap partition on Linux server
Add swap in Linux
We have already seen what is swap in article difference between tmpfs and swap. In this how-to article we will be checking out how to add swap using LVM disk, how to extend swap, how to add swap using file, and how to add swap using the parted disk.
How to add swap in Linux using LVM
If you have LVM disk partitioning in your server then you can go ahead with this method. You need a dedicated logical partition that can be used as a swap. So steps involved are :
Create a new logical volume of the desired size using lvcreate
I gave you the below outputs for reference. In lvcreate command -L should be followed by size in MB.
# lvcreate -L 500 -n myswaplv vg01
  Logical volume "myswaplv" created.

# mkswap /dev/vg01/myswaplv
mkswap: /dev/vg01/myswaplv: warning: don't erase bootbits sectors
        on whole disk. Use -f to force.
Setting up swapspace version 1, size = 511996 KiB
no label, UUID=5339bdde-c734-48d3-94fd-0ab50ef38b4e

# swapon -va

# free
             total       used       free     shared    buffers     cached
Mem:       1018308     186344     831964        152      14616      65784
-/+ buffers/cache:     105944     912364
Swap:       511996          0     511996

# cat /proc/swaps
Filename                                Type            Size    Used    Priority
/dev/dm-0                               partition       511996  0       -1
Warning in mkswap you (may) see is a precautionary warning to make sure you are not using full disk if you meant to use the only partition of it and destroy boot sectors!
You can see free and /proc/swaps shows 500MB of swap which we created. Sometimes if you don’t get your swap activated just by using swapon then try a reboot and it should work. But before reboot makes an entry described hereafter. To make this permanent i.e. at reboot setting lvol to swap again, add below entry in /etc/fstab file.
/dev/vg01/myswaplv swap swap defaults 0 0
How to extend swap
In case you want to extend the existing swap rather than creating a new volume for it then you can still do it on the fly (without reboot). Make sure your swap is not being used and turn it off on volume which you want to extend. Process is as follows –
Turn off swap on volume using swapoff
Extend lvol using lvresize
Define it again as a swap using mkswap
Turn on swap on volume using swapon
Refer below outputs on how commands work and their arguments. Here I extended 500MB swap to 600MB.
# swapoff -v /dev/vg01/myswaplv
swapoff on /dev/vg01/myswaplv

#  cat /proc/swaps
Filename                                Type            Size    Used    Priority

# lvresize /dev/vg01/myswaplv -L 600M
  Size of logical volume vg01/myswaplv changed from 500.00 MiB (125 extents) to 600.00 MiB (150 extents).
  Logical volume myswaplv successfully resized.

# mkswap -L newswap /dev/vg01/myswaplv
mkswap: /dev/vg01/myswaplv: warning: don't erase bootbits sectors
        on whole disk. Use -f to force.
Setting up swapspace version 1, size = 614396 KiB
LABEL=newswap, UUID=dd91713f-5950-4922-b9a5-e4ea0ec4327e

# swapon -va
swapon on /dev/mapper/vg01-myswaplv
swapon: /dev/mapper/vg01-myswaplv: found swap signature: version 1, page-size 4, same byte order
swapon: /dev/mapper/vg01-myswaplv: pagesize=4096, swapsize=629145600, devsize=629145600

# cat /proc/swaps
Filename                                Type            Size    Used    Priority
/dev/dm-0                               partition       614396  0       -1
You can see after swapoff command, swap volume vanished from /proc/swaps. The newly extended swap of 600MB is back visible after swapon.
How to add swap using file
You can opt to have swap on file rather than volume. This method is a bit easy, quick, and avoids all disk management commands. But along with easiness it involves risk since it’s on a simple file rather than a dedicated disk volume.
First you need to create a blank file with the size of your choice. If you want 8MB swap then 8*1024=8192 block numbers should be used in dd command (since block size used is bs=1024). Do your math accordingly and follow the process below :
Create a blank file with dd
Define file with swap using mkswap
Turn on swap on file using swapon
Check swap
Refer below outputs wherein I created 8MB swap on file.
# dd if=/dev/zero of=/myswapfile bs=1024 count=8192
8192+0 records in
8192+0 records out
8388608 bytes (8.4 MB) copied, 0.0144397 s, 581 MB/s

# mkswap /myswapfile
mkswap: /myswapfile: warning: don't erase bootbits sectors
        on whole disk. Use -f to force.
Setting up swapspace version 1, size = 8188 KiB
no label, UUID=40a0f347-ce86-4018-9f4d-7ab76bde02ba

# swapon /myswapfile

# cat /proc/swaps
Filename                                Type            Size    Used    Priority
/myswapfile                             file            8188    0       -1
Outputs are pretty self-explanatory. Only calculating dd block count is tricky which I already explained above.
How to add swap using parted disk
Many systems use parted disk management utility in place of LVM. If you are the one then follow the below process for adding swap.
Create a new swap partition (primary, extended or logical) using parted
Setup swap on it using mkswap
Turn on swap on it using swapon
Check swap
Parted should be invoked with the disk name which has free space. I am using a fresh disk here.
# parted /dev/xvdf
GNU Parted 3.1
Using /dev/xvdf
Welcome to GNU Parted! Type 'help' to view a list of commands.
Now, you can view current partition table using print command.
(parted) print
Error: /dev/xvdf: unrecognised disk label
Model: Xen Virtual Block Device (xvd)
Disk /dev/xvdf: 1074MB
Sector size (logical/physical): 512B/512B
Partition Table: unknown
Disk Flags:

(parted) mklabel msdos
Since I am using a new disk, I get an unrecognized disk label error. I define label using mklabel msdos. Now create new swap partition using the parted console.
(parted) mkpart primary linux-swap 1 1024
(parted) print
Model: Xen Virtual Block Device (xvd)
Disk /dev/xvdf: 1074MB
Sector size (logical/physical): 512B/512B
Partition Table: msdos
Disk Flags:

Number  Start   End     Size    Type     File system  Flags
 1      1049kB  1024MB  1023MB  primary

(parted) quit
Command mkpart is used to create a partition. Followed by partition type (primary, extended or logical), FS type (swap in this case), the start of the partition (1), and end of partition (1024). After the successful execution of the command, verify the partition table using print again.
Once you are ready with partition, you can even confirm it using fdisk -l command.
# fdisk -l /dev/xvdf

Disk /dev/xvdf: 1073 MB, 1073741824 bytes, 2097152 sectors
Units = sectors of 1 * 512 = 512 bytes
Sector size (logical/physical): 512 bytes / 512 bytes
I/O size (minimum/optimal): 512 bytes / 512 bytes
Disk label type: dos
Disk identifier: 0x000e7301

    Device Boot      Start         End      Blocks   Id  System
/dev/xvdf1            2048     2000895      999424   82  Linux swap / Solaris
You can see the new partition /dev/xvdf1 is created and it’s marked as Linux swap file system type too!
Now you have to enable and on swap on it.
# mkswap /dev/xvdf1
Setting up swapspace version 1, size = 999420 KiB
no label, UUID=1c19e97e-b757-48a0-99a9-68e6162d69c3

# swapon /dev/xvdf1

# cat /proc/swaps
Filename                                Type            Size    Used    Priority
/dev/xvdf1                              partition       999420  0       -1
That’s it! You have turned on the swap in a parted disk partition! To make it persistent over reboots you can add below entry in /etc/fstab.
/dev/xvdf1 swap swap defaults 0 0
This concludes the swap in the Linux article. Comment your suggestions, feedback below.
Learn how to mount ISO disk image in Linux. ISO image file mounts using a loop device and iso9660 filesystem type enabling users to access data within as a normal mount point.
Many software distributions come on Compact Disc CD media. Since physical CD is difficult to maintain over the course of years, many people prefer to have an ISO image of discs. Also, it’s feasible to use such ISO file quicker on the server where native disc drive is absent. It’s quick to copy ISO file on the server and mount it rather than searching for a USB disk drive, connecting, identifying it on the server, and then using the disc in it.
In this post, we will be seeing how to mount ISO file in Linux to access data in it. It’s a very short procedure of a couple of commands and ISO file’s data will be available to you like any other data mount point.
Step 1.
First, we need to create a mount point directory on which ISO will be mounted. Preferable it should be under /mnt structure.
# mkdir /mnt/iso
Now, copy ISO to the server using FTP or SCP. Let’s say we have copied test.iso in /tmp directory.
Step 2.
Mount ISO file on /mnt/iso mount point using mount command using the loop device. The loop device is a pseudo-device that accesses the file as a block device. Since mount command deals with block devices and not files, we are using a loop option here.
# mount -o loop /tmp/test.iso /mnt/iso
mount: you must specify the filesystem type
Here you can see an error that we haven’t specified file system to mount. Proceed with specifying the iso9660 file system. iso9660 file system uses for CD/DVD ROM file structures.
# mount -o loop -t iso9660 /tmp/test.iso /mnt/iso
Using the above command with filesystem iso9660 and loop device we successfully mounted ISO file. You can verify it with df command and viewing content of ISO file.
# df -h
Filesystem            Size  Used Avail Use% Mounted on
/tmp/test.iso          82K   82K     0 100% /mnt/iso

# cd /mnt/iso
# ll
total 22
-r-xr-xr-x. 1 root root 12246 Dec 19 13:50 CPU_iowait.xlsx
-r-xr-xr-x. 1 root root  9357 Dec 19 13:53 RAM.xlsx
You can un-mount this ISO with simple unmount command. Unless you unmount it, ISO file will be in use by this mount and throws warnings if you try to work with it.
Learn how to extend the file system or logical volume in LVM under HPUX and Linux without any downtime. Grow your mount point capacity without impacting users.
“Extend file system” is of the common task every Linux Unix sysadmin face in his life. Insufficient capacity planning during deploying systems, un-foreseen grown data, improper data rotation techniques can lead to mount points reaching their capacity limits. A quick solution is to grow those mount point’s total size to get some breathing space till you finalize on final solution about data management.
Extending file system is actually extending related logical volume and then growing FS over it. There are few pre-requisite you should consider before attempting for file system extension.
If not, you must have free disk/LUN which can be added to that VG
In case of old HPUX versions, online JFS must be installed (check using swlist)
How to do it :
Let’s start with the case: We have /data (/dev/vg01/lvol01) mount point of 1024MB in vg01 volume group which needs to be extended by 500MB.
Now, as per the pre-requisite, we should have free PE available in vg01. You can verify it by checking the “free PE” field in vgdisplay output. If it’s a non-zero number then you have some PE available to use. You need to calculate how much free space exists in VG. For that check “PE size” in vgdisplay output, multiply it with the number of PEs, the resulting number is MBs you have free in VG. You can extend your file system by this many MB sizes.
Suppose, you don’t have free PE in vg01 then you need to add a new disk or LUN to system. Once detected, you need to add it vg01 using vgextend command. Once your vg01 is extended with new disk/LUN, you will see free PE in vgdisplay output.
For quick reference –
# vgextend <vg_name> <pv_name>
Now you verified and confirmed, you have 500MB free in VG. Proceed to extend the logical volume of /data mount point i.e. /dev/vg01/lvol01 using lvextend command.
# lvextend -L 1524 /dev/vg01/lvol1
Logical volume "/dev/vg01/lvol1" has been successfully extended.
Volume Group configuration for /dev/vg01 has been saved in /etc/lvmconf/vg01.conf
Existing 1024+500Mb hence 1524 in command.
Now your logical volume is extended to the desired size. Still, you won’t be able to see this space growth in mount point size. You need to extend the file system as well for that.
In HPUX, you can use fsadm command (size to be specified in KB) like below :
# fsadm -b 1560576 /data
In RHEL6 you can use resize2fs command like :
root@kerneltalks # resize2fs /dev/vg01/lvol01
resize2fs 1.43-WIP (20-Jun-2013)
Filesystem at /dev/vg01/lvol01 is mounted on /data; on-line resizing required
old_desc_blocks = 320, new_desc_blocks = 384
The filesystem on /dev/vg01/lvol01 is now 1610612736 blocks long.
Here, it will grow with maximum size of lvol hence size is not specified.
In RHEL7, for XFS filesystem :
# xfs_growfs /data -D size
where size is in system block (depends on your config). If you don’t specify size (-D) then it grows to the maximum available size of lvol. So in our case, we don’t need to specify size. Check all xfs commands here.
Final check :
You are done! Check mount point new size in bdf (HPUX) or df -h (Linux) output. Note that we haven’t stopped access to apps/users to the mount point in question. This means the entire operation was done online without any downtime or impacting users.
Know command to add persistent device names in the existing volume group in HPUX. Also, learn how to match legacy devices with persistent device names.
Newer HPUX like v3 introduced persistent device names (DSF disk special files). These are more convenient and user-friendly names than ctd format (Controller, target, device) names. CTD format are called legacy DSF and newer are persistent.
Persistent DSF takes care of native multipathing. In the case of multipathing, for the same disk, there are different ctd exists and hence different legacy names. But, there will be only one persistent device name per disk no matter how many ctd paths exist for that same disk. You can see this in the device file names mapping below.
For example, the legacy disk file name is /dev/dsk/c0t1d0 whereas persistent disk file name will be /dev/disk/disk1. A system with persistent device names does have legacy names in kernel too. Persistent to legacy names can be mapped using ioscan command like below :
In the above output, you can see the persistent device name on left and its related legacy name is on right. You can see multipathing is being taken care of by persistent device files. Since there is only one persistent name but many legacy device names for the same disk.
Adding persistent devices in VG :
For example, if you have created a volume group on a system with legacy device files. Now, you want to add persistent device files to VG. Then you can do it by using vgextend command with all persistent disk paths. But this method will be hectic since you need to search persistent names for all existing legacy devices in VG and accordingly add them in VG.
HPUX v3 has a special command vgdsf which will do this task for you. You just need to provide VG name and this command will add all persistent devices in VG and removes legacy devices out.
# vgdsf -c /dev/vg01

Converting legacy DSFs to persistent DSFs in VG /dev/vg01
Persistent DSF /dev/disk/disk3 added to VG /dev/vg01
Persistent DSF /dev/disk/disk4 added to VG /dev/vg01
Legacy DSF /dev/dsk/c2t0d1 removed from VG /dev/vg01
Legacy DSF /dev/dsk/c2t0d2 removed from VG /dev/vg01
Legacy DSF /dev/dsk/c3t0d1 removed from VG /dev/vg01
Legacy DSF /dev/dsk/c3t0d2 removed from VG /dev/vg01
In the above output you can see first it adds persistent dsf to VG and then removes legacy dsf from VG. You can verify if VG contains only persistent devices using vgdisplay command or examining /etc/lvmtab file.