Category Archives: Linux

Linux user management (useradd, userdel, usermod)

Learn how to create, delete, and modify a user in Linux (useradd, userdel, usermod). Basic user management which is must know for every Linux/Unix administrator.

Anyone accessing system locally or remotely has to has a user session on the server hence can be termed as a user. In this post, we will be seeing user management which is almost similar for all Linux, Unix systems. There are three commands useradd, userdel and usermod which are used to manage users on Linux systems.

Interesting related articles –

Command: useradd

Command to add a new user to the system. This command can be as short as just one argument of userid. When running with just userid as an argument then it takes all default values for creating that user as defined in /etc/default/useradd file. Or else a number of options can be specified which defines parameters of this new user while creation.

# cat /etc/default/useradd
# useradd defaults file
GROUP=100
HOME=/home
INACTIVE=-1
EXPIRE=
SHELL=/bin/bash
SKEL=/etc/skel
CREATE_MAIL_SPOOL=yes

The command supports the below options :

  • -b <base_dir> If the home directory is not specified this one is mandatory.
  • -c <comment> Any text like a description of the account
  • -d <home_dir> Home directory
  • -e <expire_date> Account expiry date in YYYY-MM-DD
  • -f <inactive> No of days after which acc will be disabled after password expiry
  • -g <gid> group id
  • -u <uid> User id
  • -G <groups> Secondary groups
  • -k <skel_dir> Files within skel_dir will be copied to home_dir of the user after creation
  • -K <key=value> To override default parameters in /etc/login.defs
  • -m Create the home directory if it doesn’t exist.
  • -o Allow non-unique UID
  • -p Encrypted password (not normal text one). It can be obtained from the crypt command.
  • -r Create a system account. This won’t have password aging and UID from system UID range
  • -s shell
# useradd -c "Test user" -d /home/test -m -e 2016-12-05 -f 7 -g 100 -u 956 -o -s /bin/bash testuser1
# cat /etc/passwd |grep testuser1
testuser1:x:956:100:Test user:/home/test:/bin/bash
# useradd testuser2
# cat /etc/passwd |grep testuser2
testuser2:x:54326:54329::/home/testuser2:/bin/bash

See the above example with and without using options. Also, check the below list, it shows where you can verify the account-related particular parameter which you specified in useradd command.

  • home_dir Check using ls -lrt
  • uid, gid In /etc/passwd and /etc/group
  • comment, shell In /etc/passwd file
  • groups In /etc/group file
  • skel_dir files Check-in home_dir
  • expire_date, inactive Check-in chage -l username output.
  • Encrypted password In /etc/shadow file

Command: userdel

As the name suggests its a command to delete users. It has only two options –

  • -r Remove user’s home_dir & mail spool
  • -f Removes user even if he/she logged in. Removes home_dir, mail spool & group of the same name even these are being shared by another user. Dangerous!

If none of the options used and command just ran with userid argument. It will only remove the user from the system keeping its home_dir, mail spool and a group of the same name (if any) intact on the server.

#  ll /home |grep testuser
drwx------   4 testuser   testuser  4096 Nov 23 10:43 testuser
# userdel testuser
#  ll /home |grep testuser
drwx------   4      54326    54329  4096 Nov 23 10:43 testuser
# userdel -r testuser
#  ll /home |grep testuser
#

See above example which shows without using -r option keeps home directory intact.

Command: usermod

This command used to modify user parameters which we saw in useradd command. All parameter options with useradd command compatible with this command. Apart from those options, it supports below ones –

  • -l <new_login> Change login name to different. You have to manually rename home_dir
  • -L Lock account. Basically it puts ! in front of encrypted password in passwd or shadow file.
  • -U Unlock account. It removes!
  • -m <new_home> Moves home_dir to new_dir. -d is mandatory to use with it.
# useradd usr1# cat /etc/passwd |grep usr1
usr1:x:54326:54330::/home/usr1:/bin/bash
# usermod -l usr2 usr1
# cat /etc/passwd |grep usr2
usr2:x:54326:54330::/home/usr1:/bin/bash
# cat /etc/shadow |grep usr2
usr2:$6$nEjQiroT$Fjda8KiOIbnELAffHmluJFRC8jjIRWuxEWBePK1gun/ELZRi3glZdKVtPaaZ4tcQLIK2KPZTxdpB3tJvDj3/J1:17128:1:90:7:::
# usermod -L usr2
# cat /etc/shadow |grep usr2
usr2:!$6$nEjQiroT$Fjda8KiOIbnELAffHmluJFRC8jjIRWuxEWBePK1gun/ELZRi3glZdKVtPaaZ4tcQLIK2KPZTxdpB3tJvDj3/J1:17128:1:90:7:::
# usermod -U usr2
# cat /etc/shadow |grep usr2
usr2:$6$nEjQiroT$Fjda8KiOIbnELAffHmluJFRC8jjIRWuxEWBePK1gun/ELZRi3glZdKVtPaaZ4tcQLIK2KPZTxdpB3tJvDj3/J1:17128:1:90:7:::

See the above examples of usermod command showing locking, unlocking user and changing user names.

These three commands take almost most of the user management tasks in Linux Unix systems. Password management is another topic which does not fall in user management. We will see it on some other day.

Linux scheduler: Cron, At jobs

Learn everything about Linux/Unix schedulers i.e. cron and at. Know how to schedule cronjobs and at jobs, their configuration files, log files.

Unix or Linux comes with native in-build job scheduler i.e. cron and at. Out of which cron used to schedule tasks to repeat over some period while at used to execute the job at a specific time one time.

Cron

Cron enables administrators/users to execute a particular script or command at a given time of choice repetitively. It’s a daemon that runs in the background whenever system clock configured time it executes respective script or command. It can be checked if running with ps/service command.

# ps -ef |grep -i cron
root      2390     1  0 Mar17 ?        00:01:24 crond
root      8129  8072  0 09:50 pts/0    00:00:00 grep -i cron
# service crond status
crond (pid  2390) is running...

Configurations

Cron saves commands/scripts and related schedules in a file called crontab. Normally crontab can be found in path /var/spool/cron and file with a username (root user crontab file can be seen in the below example). These are plain text files that can be viewed using cat, more commands and can be edited using a text editor.

# pwd
/var/spool/cron
# ll
total 4
-rw------- 1 root root 99 Jul 31  2015 root
# cat root
00 8 * * 1 /scripts/log_collection.sh

But, it’s not advisable to edit crontab file with a text editor, you need to use crontab -e <username> command to edit it so that syntax can be verified before saving. This command opens a crontab file in a native text editor only.

Cron access can be given a user basis. The administrator can enable or disable cron access to a particular user. There are two files cron.allow, cron.deny; either one of which will exist on the server. These are files with usernames only. No special file format/syntax follows within. If both files are missing then the only superuser is allowed to use cron.

If cron.allow exists on the server then only users specified in this file are allowed to use cron, rest all are denied. And if it exists and empty then all are denied.

If cron.deny exists then only users specified in it are not allowed to use cron, rest all are allowed. And if it exists and empty then all are allowed.

Syntax

Let’s see the syntax for the crontab file and commands.

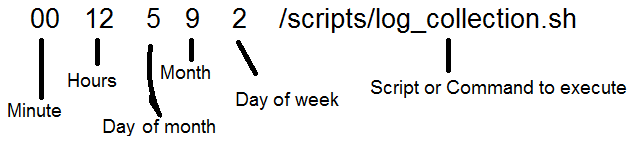
A crontab file has 6 fields separated by space to be filled in. Those are as below :

where,

  • Minute: Timestamp in 24 hrs format
  • Hours: Timestamp in 24 hrs format
  • Day of month: Date in dd format
  • Month: Month number in mm format or Jan, Feb format.
  • Day of week: Numeric/text day of the week. 0 or 7 being Sunday or Sun, Mon, etc.

These fields also support a series of values or multiple values example 1,2,3 or 1-4. When multiple time values defined then the event will happen whenever the clock hits one of the values.

Default cron definitions i.e. path or shell used to execute commands/scripts in crontabs etc are defined in /etc/crontab file. See example below :

# cat /etc/crontab
SHELL=/bin/bash
PATH=/sbin:/bin:/usr/sbin:/usr/bin
MAILTO=root
HOME=/

# For details see man 4 crontabs

# Example of job definition:
# .---------------- minute (0 - 59)
# |  .------------- hour (0 - 23)
# |  |  .---------- day of month (1 - 31)
# |  |  |  .------- month (1 - 12) OR jan,feb,mar,apr ...
# |  |  |  |  .---- day of week (0 - 6) (Sunday=0 or 7) OR sun,mon,tue,wed,thu,fri,sat
# |  |  |  |  |
# *  *  *  *  * user-name command to be executed

Crontab commands

We have a crontab command with several options to play around configurations.

  • -u Specify user
  • -l to view specified user’s crontab
  • -e to edit specified user’s crontab
  • -r to remove specified user’s crontab
  • -i Interactive removal. Should be used with -r

If a new crontab is being set then the system will show using empty crontab for the user!

# crontab -u testuser -e
no crontab for testuser - using an empty one
crontab: installing new crontab
# crontab -u testuser-l
00 8 * * 1 echo test
# crontab -u testuser -i -r
crontab: really delete testuser's crontab? y
# crontab -u testuser -l
no crontab for testuser

Cron logs

All activities by cron daemon are logged in logfile /var/log/cron. It includes crontab alterations and cron daemon executions. Let’s look at the file

# tail /var/log/cron
Nov 21 10:25:36 oratest02 crontab[29364]: (root) BEGIN EDIT (testuser)
Nov 21 10:25:48 oratest02 crontab[29364]: (root) REPLACE (testuser)
Nov 21 10:25:48 oratest02 crontab[29364]: (root) END EDIT (testuser)
Nov 21 10:26:52 oratest02 crontab[30139]: (root) LIST (testuser)
Nov 21 10:27:46 oratest02 crontab[30695]: (root) DELETE (testuser)
Nov 21 10:27:53 oratest02 crontab[30697]: (root) LIST (testuser)
Nov 21 10:30:01 oratest02 CROND[31983]: (root) CMD (/usr/lib64/sa/sa1 1 1)
Nov 22 10:40:01 oratest02 CROND[6166]: (root) CMD (/usr/lib64/sa/sa1 1 1)

In the above example, you can see, crontab alteration is being logged with what actions took place. Those logs are against the crontab field where first braces show the user who did alterations and last braces show which user’s crontab was altered. In the last two, you can see cron commands being executed by cron daemon according to schedule hence logged against CROND. This file is very helpful in troubleshooting issues related to cron executions.

at

At enables administrators/users to execute a particular script or command at a given time of choice only once. It can also be termed as one-time task scheduling.  Same as crond, a daemon for at is atd which runs in background. This can be checked using ps or service commands.

# ps -ef |grep -i atd
root      2403     1  0 Mar17 ?        00:00:00 /usr/sbin/atd
root     13568  8072  0 10:51 pts/0    00:00:00 grep -i atd
# service atd status
atd (pid  2403) is running...

Configurations

at stores submitted jobs in files located at /var/spool/at where file names are system generated and unlike crontabs these files can not be read.

# pwd
/var/spool/at
# ll
total 12
-rwx------  1 root   root 2994 Nov 22 10:57 a000010178544d
-rwx------  1 root   root 2989 Nov 22 11:00 a000020178548c
drwx------. 2 daemon daemon  4096 Jan 30  2012 spool

at access also can be given a user basis. It also has at.allow and at.deny files and those works same as cron.allow and cron.deny files we saw earlier in this post.

Syntax

at command should be supplied with the time you prefer to execute the command. Once given in proper format, it will present you with a prompt. This prompt takes command inputs that need to be executed at a given time. Once finished entering commands/ scripts one can simply press ctrl+d to exit out of at prompt and save the job. Observe a new file that is being generated at the above-mentioned path once you submit the job. at commands takes numerous types of time formats like noon, midnight, now + 2 hours, now + 20 minutes, tomorrow, next Monday, etc. If you enter the wrong format it will return the “garbled time” error message.

# at +2 hours
syntax error. Last token seen: +
Garbled time
# at now + 2 hour
at> echo hello
at> <EOT>
job 2 at 2016-11-22 13:00

To view currently queued jobs in at scheduler run atq or at -l command. It shows the output with numbering in the first column. The second field is about a time when the execution will happen and the last field is the username.

# atq
2       2016-11-22 13:00 a root
1       2016-11-22 11:57 a root

# at -l
2       2016-11-22 13:00 a root
1       2016-11-22 11:57 a root

To remove a particular job from queue atrm command is used. It should be supplied with serial number of the job. In the below example, we removed job number 2. You can see its vanished from the queue. The same can be achieved using at -r command instead of atrm.

# atrm 1

# at -l
2       2016-11-22 13:00 a root

at logs:

at daemon is very much regressive in terms of logging. Normally it does not log anything anywhere about its job queue alterations or job executions. Only fatal errors related to daemon are logged in Syslog only. Even if we turn debugging on, it logs information which is merely informative to look at.

LVM commands tutorial : Part 1 : Physical Volume (pvchange, pvmove)

Series of the tutorial to learn LVM commands. In this part of the tutorial, learn different tasks on physical volume  (pvchange, pvmove).

This is the second post on the LVM tutorial. Rest posts from this series can be found on the below links.

This is the last post for part 1 which is dedicated to physical volume. In the last post, we saw pvcreate and pvdisplay. This post we will be checking out pvchange and pvmove commands.

Command: pvchange

pvchange used for changing attributes of physical volume. There are 6 options switch which can be used with this command. Let’s see them one by one.

-a

This switch used for the availability attribute of PV. This should be accompanied with y or n argument. y making PV available and n making it unavailable. You can see the example below with n argument which turns PV unavailable which can be verified in pvdisplay output.

# pvchange -a n /dev/disk/disk3
Physical volume "/dev/disk/disk3" has been successfully changed.

# pvdisplay /dev/disk/disk3
--- Physical volumes ---
PV Name                     /dev/disk/disk3
VG Name                     /dev/vg01
PV Status                   unavailable
Allocatable                 yes
VGDA                        2
Cur LV                      2
PE Size (Mbytes)            8
----- output truncated -----
-S

This switch enables or disables auto-switching. It also has a y or n argument. If activated it makes the current access path to switch on the better available path. If deactivated, path switching happens only if the current access path goes to an unavailable state (due to hardware, cable failure). This applies to disks with multi-paths only.

-t

It’s a timeout value. This switch should be supplied with a number of seconds. This value determines if IO timeout happens and the problem can be declared for IO on particular PV. Useful in clustering.

# pvchange -t 90 /dev/disk/disk3
Physical volume "/dev/disk/disk3" has been successfully changed.
-x

It enables or disables the extensibility of PV. This switch has y and n arguments that enable admin to add/restrict physical extents to PV. Refer to LVM legends to have a better understanding.

-s

Immediately begin accessing the associated physical volume.

-z

Defines PV is spare or regular. This option has significance in mirroring only.

Command: pvmove

As name suggests, it used to move data (in LVM term PE) from one PV to another PV. Command essential moves PEs and hence data within from source to destination PV. If destination PV is not specified then all available PV’s in the current volume group are considered for move operation. Command decides himself best-suited PV for move operation so that allocation policies can be met correctly.

Also if the command is supplied with a list of PV names then the first PV is always considered as source and rest all PVs are considered as a destination.

# pvmove /dev/disk/disk1 /dev/disk/disk2 /dev/disk/disk3

In above example PEs will be moved from disk 1 to disk2 & disk3.

You can also move data for particular lvol to new PV.

# pvmove -n /dev/vg01/lvol2 /dev/disk/disk1 /dev/disk/disk2
Transferring logical extents of logical volume "/dev/vg01/lvol2"...
Physical volume "/dev/disk/disk1" has been successfully moved.
Volume Group configuration for /dev/vg01 has been saved in /etc/lvmconf/vg01.conf

# /usr/sbin/lvdisplay -v /dev/vg01/lvol2

----- output clipped -----

   --- Distribution of logical volume ---
   PV Name                 LE on PV  PE on PV
   /dev/disk/disk2         1557      1557

   --- Logical extents ---
   LE    PV1                     PE1   Status 1
   00000 /dev/disk/disk2         00000 current
   00001 /dev/disk/disk2         00001 current
   00002 /dev/disk/disk2         00002 current
   00003 /dev/disk/disk2         00003 current

In above example PE belonging to lvol2 will be moved from disk1 to disk2. PE distribution can be confirmed via lvdisplay output.

This marks end of part 1 : Physical volume. If you have any questions, please drop in the comments below.

LVM commands tutorial : Part 1 : Physical Volume (pvcreate, pvdisplay)

Series of the tutorial to learn LVM commands. In this part of the tutorial, learn how to create physical volume and how to view its details (pvcreate, pvdisplay)

We are starting this tutorial series for LVM (Logical Volume Manager) which is a widely used volume manager in HPUX and some Linux flavors too. This tutorial will be split into 4 parts :

Let’s dive into the first part i.e. physical volume.

A physical volume is a raw disk presented to the operating system. It can be a local disk, LUN from remote storage, disk from local disk array, etc. All storage disks from these types are formatted as physical volumes under LVM so that those can be used in definite file systems.

Command: pvcreate

Lets start with the first command to create physical volume. Before using this command you need to confirm your new raw disk on OS. You can use ioscan -fnCdisk command or confirm by checking into /dev/rdsk (or /dev/rdisk) directory.

Note : /dev/rdsk/cXdXtX is legacy naming conventions (HPUX 1111,11.21,10.x) whereas /dec/rdisk/diskX is persistent naming convention (11.21, 11.31).

Now that you identified new disk presented to server lets say /dev/rdisk/disk3 for example, you can run pvcreate command to create physical volume out of it.

# /usr/sbin/pvcreate /dev/rdisk/disk3
Physical volume "/dev/rdisk/disk3" has been successfully created.

The command outputs success message confirming PV has been created. Note here that you should use character device file i.e. with /dev/rdisk/diskX.

If by mistake you put in wrong disk name or disk is already being used in LVM on the same server then the command will fail. If you presented disk which was used earlier on another server and now you want to use it here with data loss then -f option can be used to forcefully create PV by destroying any data present on the disk. Note here that -f option do not ask any confirmation before deleting data.

There are other options can be used with this command which are:

  • -B to make it bootable disk. Used during root disk mirroring
  • -b, -d related to bad blocks
  • -s to specify effective size. Normally everyone uses full disk so this options doesn’t matter much
  • -t driver related

Normally these options are not used when we are aiming at PV for mount point usage only. Hence we are not going drill down these options.

Command: pvdisplay

Now, PV has been created one can see its details with pvdisplay command.

# /usr/sbin/pvdisplay /dev/disk/disk3
--- Physical volumes ---
PV Name                     /dev/disk/disk3
VG Name                     
PV Status                   available
Allocatable                 yes
VGDA                        2
Cur LV                      0
PE Size (Mbytes)            32
Total PE                    1557
Free PE                     1557
Allocated PE                0
Stale PE                    0
IO Timeout (Seconds)        default
Autoswitch                  On
Proactive Polling           On

Here many fields are self-explanatory. Refer LVM legends to have a better understanding.  From this output, you can also calculate disk size. Total PE x PE size = Disk size (available to use i.e. after formatting space loss)

If you want to drill down PE details i.e. which PE is serving which LV then -v option can be used. This is helpful when the disk has bad sectors. Below is the output in which PV is part of the volume group already.

# /usr/sbin/pvdisplay -v /dev/disk/disk3
--- Physical volumes ---
PV Name                     /dev/disk/disk3
VG Name                     /dev/vg01
PV Status                   available
Allocatable                 yes
VGDA                        2
Cur LV                      1
PE Size (Mbytes)            32
Total PE                    1557
Free PE                     0
Allocated PE                1557
Stale PE                    0
IO Timeout (Seconds)        default
Autoswitch                  On
Proactive Polling           On

   --- Distribution of physical volume ---
   LV Name                 LE of LV  PE for LV
   /dev/vg01/lvol1         1557      1557

   --- Physical extents ---
   PE    Status   LV                      LE
   00000 current  /dev/vg01/lvol1         00000
   00001 current  /dev/vg01/lvol1         00001
   00002 current  /dev/vg01/lvol1         00002
   00003 current  /dev/vg01/lvol1         00003
   00004 current  /dev/vg01/lvol1         00004
   00005 current  /dev/vg01/lvol1         00005
   00006 current  /dev/vg01/lvol1         00006
   00007 current  /dev/vg01/lvol1         00007
   00008 current  /dev/vg01/lvol1         00008
   00009 current  /dev/vg01/lvol1         00009
   00010 current  /dev/vg01/lvol1         00010
   00011 current  /dev/vg01/lvol1         00011
   00012 current  /dev/vg01/lvol1         00012
----- output truncated -----

Here you can see how PV is distributed among different LV. and furthermore, it gives you table mapping of PE to LE! There are numerous options can be used with this command but normally -v is used commonly.

There are two more commands used for PV operations: pvchange, pvmove. We covered theme commands in the next post.

Basics of LVM legends

Get acquainted with LVM (Logical Volume Manager) terms. Learn what is physical volume, logical volume, physical extent, volume group, and logical extent.

LVM (logical volume manager) legends

PV is a Physical Volume

Any single disk / LUN on the system is identified as PV. It can be raw or formatted with a file system. Raw PV is referred to as /dev/rdsk/c0t0d1 (legacy) or /dev/rdisk/disk1 (agile) whereas formatted one is referred to as  /dev/dsk/c0t0d1 (legacy) or /dev/disk/disk1 (agile). Check PV name in below output as a formatted device.

# vgdisplay -v vg00

--- Volume groups ---
VG Name                     /dev/vg00
VG Write Access             read/write
VG Status                   available
Max LV                      255
Cur LV                      13
Open LV                     13
Max PV                      16
Cur PV                      1
Act PV                      1
Max PE per PV               4355
VGDA                        2
PE Size (Mbytes)            32
Total PE                    4345
Alloc PE                    4303
Free PE                     42
Total PVG                   0
Total Spare PVs             0
Total Spare PVs in use      0

   --- Logical volumes ---
   LV Name                     /dev/vg00/lvol1
   LV Status                   available/syncd
   LV Size (Mbytes)            1024
   Current LE                  32
   Allocated PE                32
   Used PV                     1

   --- Physical volumes ---
   PV Name                     /dev/dsk/c3t0d0s2
   PV Status                   available
   Total PE                    4345
   Free PE                     42
   Autoswitch                  On
   Proactive Polling           On
Physical volume naming conventions :

/dev/rdsk/cxtxdx – Legacy character device file
/dev/rdsk/cxtxdxs2 – Legacy character device file, partition 2
/dev/dsk/cxtxdx – The legacy block device file
/dev/dsk/cxtxdxs2 – Legacy block device file, partition 2
/dev/rdisk/diskx – The persistent character device file
/dev/rdisk/diskx_p2 – Persistent character device file, partition 2
/dev/disk/diskx – The persistent block device file
/dev/disk/diskx_p2 – Persistent block device file, partition 2

PE is Physical Extent

Its smallest chunk of PV can be used as a block under the file system. PV is consists of the number of PEs. We always use PV names while using LVM commands. In the above example, PE size is set to 32MB & a total of 4345 PEs are available on disk.

Read our LVM tutorials: LVM cheat sheet.

VG is Volume Group

One or more PV come together to form a Volume Group. This grouping enables to slice down combined
storage capacity of disks to our choice of small volumes. In the above example, vg00 is volume group made up of single PV & it’s sliced down to 8 LV (only one shown in above example)

LV is the Logical Volume

Its a slice of volume group using some capacity of PV to form a smaller volume. Its basically used as a mount point /swap like drives (C:, D:) in Windows. We can see one LV in above example and its details.
LE is Logical Extent.
Same as PE, LE is the smallest chunk of LV.

Below tables gives you an idea about some numbers related to them:

LVs per VG range: 1-255, default: 255
PVs per VG range: 1-255, default: 16
PEs per VG   range : 1-66535 default : 1016

with the above table, as max PE size is 64MB and 66,535 PEs max per VG, one can create a max of 64×66353=4TB of the file system.

Get list of desired LUN id from powermt output

Small script to get LUN id from powermt output when supplied with a list of disks. It’s a tedious job to extract LUN id from the output when you have a list of disks to wok upon.

Requirement :

You have a list of disk names from OS end and you need to get their respective LUN ids from powermt output.

This requires manual work of searching each disk name in output and then copying its respective LUN id. Typically these three lines you are interested in powermt output.

Pseudo name=emcpoweraa
Symmetrix ID=000549754319
Logical device ID=03C4

If you have a list of disks to search its a tedious task. Because you have to search each and every disk name in the output.

Solution :

Get the output of powermt command in a file

# powermt display dev=all > powermt.old

Get all disk names in one file e.g. test.txt
Run a for loop which will get LUN id of each disk described in the file. In this loop, we are taking each disk and searching it in the above file. Then we are extracting 2 below lines from disk name (since 2nd line below disk name contains LUN id). And then extracting LUN id from it with some data filtering.

# for i in `cat test`
do
cat powermt.old |grep -A 2 $i|grep Logical|awk '{print $3}'|cut -d= -f2
done

You will be presented with the list of LUN ids for respective disks in the test.txt file! You can even echo disk name before LUN id by inserting echo $i just above cat command in the above code.

Vice versa:

Get disk names by giving LUN ids in text.txt file. Its same logic, the only difference is we will be extracting above 2 lines rather than below ones. Rest all procedure remains the same.

# for i in `cat test`
do
cat powermt.old |grep -B 2 $i|grep Pseudo|awk '{print $2}'|cut -d= -f2
done

Highest size files in mount point

Search for the highest sized file in the mount point. Useful while dealing with full mount points and cleaning up files to free up space.


There are many instances in the life of sysadmin when his system starts throwing filesystem full events and its headache to search culprit. Here we are going to see a command to search and display files with high utilization in a mount point. This is very useful to dig down and target exactly huge/big files rather than wasting time on trimming/deleting small files.

For example, if you are facing /tmp is full. Below is the command to search for large files in the given mount point. Here we are using du i.e. disk usage command then sorting the output list in reverse order so that the highest size files come to the top. Then getting top 10 to display as a result.

# du -a /tmp | sort -nr  | head -n 10
3396448 /tmp
1801984 /tmp/Acasrro411704
994848  /tmp/software.depot
81088   /tmp/PACPTHP_00001.depot
77088   /tmp/OraInstall2008-03-19_09-39-20AM
76912   /tmp/OraInstall2008-03-19_10-15-28AM
76848   /tmp/OraInstall2008-03-19_09-39-20AM/jre/1.4.2
76848   /tmp/OraInstall2008-03-19_09-39-20AM/jre
76656   /tmp/OraInstall2008-03-19_10-15-28AM/jre/1.4.2
76656   /tmp/OraInstall2008-03-19_10-15-28AM/jre

Replace /tmp with a mount point of your choice while running it in your system.

There are also different ways you can trace the highest size hogger on a mount point. Below are few

To find the large file size above 5000

# find /var -xdev -size +5000
/var/opt/perf/datafiles/logglob
/var/opt/perf/datafiles/logproc
/var/opt/perf/datafiles/logdev
/var/opt/perf/datafiles/logtran
/var/opt/OV/log/SPISvcDisc/DBSPI_ORACLE_UNIX_discovery.trc
/var/opt/OV/log/osspi/osspi.log
----- output truncated -----


Top 10 large directories in the mount point 

# du -kx /var | sort -rn -k1 | head -n 10
6726048	/var
3962830	/var/opt
3471340	/var/opt/OV
2494362	/var/adm
2465390	/var/opt/OV/tmp
1512210	/var/opt/OV/tmp/OpC
1438642	/var/adm/openv/logs
1438642	/var/adm/openv
921030	/var/adm/sa
822672	/var/adm/openv/logs/bpdbm

Top 10 large files in the mount point

# find /var -type f -xdev -print | xargs -e ll | sort -rn -k5 | head -n 10
-rw-rw----   1 root       bin        1463238440 Nov  1 14:45 /var/opt/OV/tmp/OpC/msgagtdf
-rw-rw-r--   1 root       bin        944541567 Nov  1 14:52 /var/opt/OV/tmp/sqlnet.log
-rw-rw-rw-   1 oracle92   dba        307369984 Mar  5  2014 /var/opt/omni/tmp/rcvcat21945.exp
-rw-------   1 root       mail       187848937 Nov  1 14:01 /var/tmp/dead.letter
-rw-rw----   1 root       bin        84680704 Feb 16  2013 /var/opt/OV/tmp/OpC/msgagtdf-11975.gc
-rw-r--r--   1 root       bin        80937879 Nov  1 14:54 /var/opt/OV/log/osspi/osspi.log
-rwxrwxrwx   1 root       users      58566204 Nov  1 14:55 /var/adm/rrdtool/apcrss32.rrd
-rw-rw-r--   1 root       bin        55159884 May 25  2009 /var/opt/OV/installation/temp/bbc/fx/upload/DeplM22799
-rw-rw-r--   1 root       bin        55159884 May 18  2009 /var/opt/OV/installation/temp/bbc/fx/upload/DeplM22011
-rw-rw-r--   1 root       bin        55159884 Jun 30  2010 /var/opt/OV/installation/temp/bbc/fx/upload/DeplM10143