A quick post on how to resolve an issue with Gitbash that prevents MFA prompts while using AWS CLI.
MFA GitBsah issue.
Problem
GitBash under the hood uses winpty emulator for providing a bash experience on windows. Winpty does not work well with AWS CLI especially when dealing with MFA prompts. Hence you need to replace this with bash.exe and you should be good.
Procedure
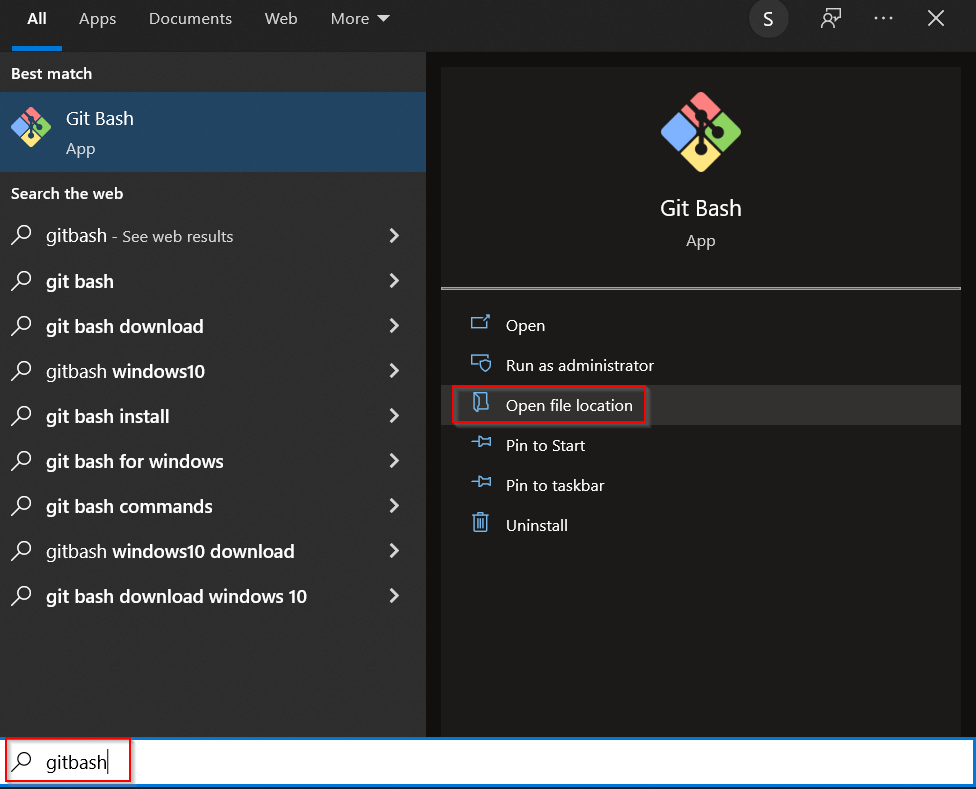
Go to the Windows start menu and search for Git Bash. Click on Open file location.
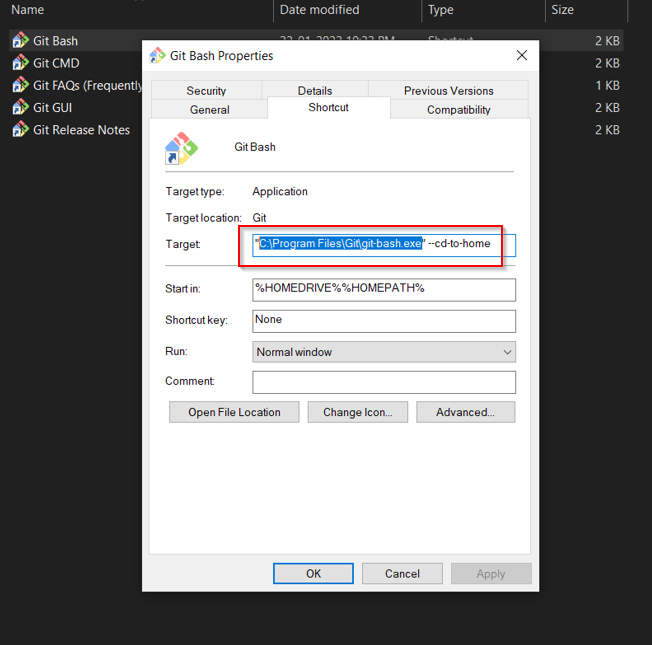
Right click on the shortcut and select Properties
Under properties change the target from “C:\Program Files\Git\git-bash.exe” to “C:\Program Files\Git\bin\bash.exe“
Learn how to format date and time to use in a shell script or as a variable along with different format examples.
Date formats
There are many times you need to use date in your shell script e.g. to name log file, to pass it as a variable, etc. So we need a different format of dates that can be used as a string or variable in our scripts. In this article, let’s see how to use date in shell script and what all different types of formats you can use.
Check timedatectl command to easily manage date & time in Linux
How to use date in shell script?
You can use the date by inserting shell execution within the command. For example, if you want to create a log file by inserting the current date in it, you can do it by following way –
root@kerneltalks # echo test > /tmp/`date +%d`.txt
root@kerneltalks # ls -lrt
-rw-r--r--. 1 root  root     5 Sep 10 09:10 10.txt
Basically you need to pass format identifier with +% to date command to get your desired format of the output. There is a different identifier date command supply.
You can even save specific date format to some variable like –
These format identifiers are from date command man page :
%a     locale’s abbreviated weekday name (e.g., Sun)
%A     locale’s full weekday name (e.g., Sunday)
%b     locale’s abbreviated month name (e.g., Jan)
%B     locale’s full month name (e.g., January)
%c     locale’s date and time (e.g., Thu Mar  3 23:05:25 2005)
%C     century; like %Y, except omit last two digits (e.g., 20)
%d     day of month (e.g, 01)
%D     date; same as %m/%d/%y
%e     day of month, space padded; same as %_d
%F     full date; same as %Y-%m-%d
%g     last two digits of year of ISO week number (see %G)
%G     year of ISO week number (see %V); normally useful only with %V
%h     same as %b
%H     hour (00..23)
%I     hour (01..12)
%j     day of year (001..366)
%k     hour ( 0..23)
%l     hour ( 1..12)
%m     month (01..12)
%M     minute (00..59)
%N     nanoseconds (000000000..999999999)
%p     locale’s equivalent of either AM or PM; blank if not known
%P     like %p, but lower case
%r     locale’s 12-hour clock time (e.g., 11:11:04 PM)
%R     24-hour hour and minute; same as %H:%M
%s     seconds since 1970-01-01 00:00:00 UTC
%S     second (00..60)
%T     time; same as %H:%M:%S
%u     day of week (1..7); 1 is Monday
%U     week number of year, with Sunday as first day of week (00..53)
%V     ISO week number, with Monday as first day of week (01..53)
%w     day of week (0..6); 0 is Sunday
%W     week number of year, with Monday as first day of week (00..53)
%x     locale’s date representation (e.g., 12/31/99)
%X     locale’s time representation (e.g., 23:13:48)
%y     last two digits of year (00..99)
%Y     year
%z     +hhmm numeric timezone (e.g., -0400)
%:z    +hh:mm numeric timezone (e.g., -04:00)
%::z   +hh:mm:ss numeric time zone (e.g., -04:00:00)
%Z     alphabetic time zone abbreviation (e.g., EDT)
Using combinations of above you can get your desired date format as output to use in shell script! You can even use %n for new-line and %t for adding a tab in outputs that are mostly not needed since you will be using it as a single string.
Different date format examples
For your convenience and ready to use, I listed below combinations for different date formats.
root@kerneltalks # date +%d_%b_%Y
10_Sep_2018

root@kerneltalks # date +%D
09/10/18

root@kerneltalks # date +%F-%T
2018-09-10-11:09:51

root@kerneltalks # echo today is  `date +%A`
today is Monday

root@kerneltalks # echo Its `date +%d` of `date +%B" "%Y` and time is `date +%r`
Its 10 of September 2018 and time is 11:13:42 AM
Learn how to change UID or GID safely in Linux. Also, know how to switch UID between two users and GID between two groups without impacting files ownership they own.
How to change UID or GID safely in Linux
In this article, we will walk you through to change UID or GID of existing users or groups without affecting file ownership owned by them. Later, we also explained how to switch GID between two groups and how to switch UID between two users on the system without affecting file ownership owned by them.
Let’s start with changing UID or GID on the system.
Current scenario :
User shrikant with UID 1001 Group sysadmin with GID 2001
Expected scenario :
User shrikant with UID 3001 Group sysadmin with GID 4001
Changing GID and UID is simple using usermod or groupmod command, but you have to keep in mind that after changing UID or GID you need to change ownership of all files owned by them manually since file ownership is known to the kernel by GID and UID, not by username.
Now, search and change all file’s ownership owned by this user or group with for loop
root@kerneltalks # for i in `find / -user 1001`; do chown 3001 $i; done
root@kerneltalks # for i in `find / -group 2001`; do chgrp 4001 $i; done
OR
root@kerneltalks # find / -user 1001 -exec chown -h shrikant {} \;
root@kerneltalks # find / -group 2001 -exec chgrp -h sysadmin {} \;
That’s it. You have safely changed UID and GID on your system without affecting any file ownership owned by them!
How to switch GID of two groups
Current scenario :
Group sysadmin with GID 1111 Group oracle with GID 2222
Expected scenario :
Group sysadmin with GID 2222 Group oracle with GID 1111
In the above situation, we need to use one intermediate GID which is currently not in use on your system. Check /etc/group file and select one GID XXXX which is not present in a file. In our example, we take 9999 as intermediate GID.
Now, the process is simple –
Change sysadmin GID to 9999
Find and change the group of all files owned by GID 1111 to sysadmin
Change oracle GID to 1111
Find and change the group of all files owned by GID 2222 to oracle
Change sysadmin GID to 2222
Find and change the group of all files owned by GID 9999 to sysadmin
Learn 8 different ways to generate a random password in Linux using Linux native commands or third-party utilities.
Different ways to generate password in Linux
In this article, we will walk you through various different ways to generate a random password in the Linux terminal. Few of them are using native Linux commands and others are using third-party tools or utilities which can easily be installed on the Linux machine. Here we are looking at native commands like,openssldd, md5sum, tr, urandom and third-party tools like mkpasswd, randpw, pwgen, spw, gpg, xkcdpass, diceware, revelation, keepaasx, passwordmaker.
These are actually ways to get some random alphanumeric string which can be utilized as a password. Random passwords can be used for new users so that there will be uniqueness no matter how large your user base is. Without any further delay, let’s jump into those 15 different ways to generate the random password in Linux.
Generate password using mkpasswd utility
mkpasswd comes with the install of expect package on RHEL based systems. On Debian based systems mkpasswd comes with package whois. Trying to install mkpasswd package will result in error –
No package mkpasswd available. on RHEL system and E: Unable to locate package mkpasswd in Debian based.
So install their parent packages as mentioned above and you are good to go.
Run mkpasswd to get passwords
root@kerneltalks# mkpasswd << on RHEL
zt*hGW65c

root@kerneltalks# mkpasswd teststring << on Ubuntu
XnlrKxYOJ3vik
Command behaves differently on different systems so work accordingly. There are many switches that can be used to control length etc parameters. You can explore them from man pages.
Generate password using OpenSSL
OpenSSL comes in build with almost all the Linux distributions. We can use its random function to get alphanumeric string generated which can be used as a password.
Here, we are using base64 encoding with random function and last digit for the argument to base64 encoding.
Generate password using urandom
The device file /dev/urandom is another source of getting random characters. We are using tr function and trimming output to get the random string to use as a password.
We can even use /dev/urandom device along with dd command to get a string of random characters.
root@kerneltalks# dd if=/dev/urandom bs=1 count=15|base64 -w 0
15+0 records in
15+0 records out
15 bytes (15 B) copied, 5.5484e-05 s, 270 kB/s
QMsbe2XbrqAc2NmXp8D0
We need to pass output through base64 encoding to make it human-readable. You can play with count value to get the desired length. For much cleaner output, redirect std2 to /dev/null. The clean command is –
Another way to get an array of random characters which can be used as the password is to calculate MD5 checksum! s you know checksum value indeed looks like random characters grouped together we can use it as the password. Make sure you use the source as something variable so that you get different checksum every time you run command. For example date ! date command always yields changing the output.
root@kerneltalks # date |md5sum
4d8ce5c42073c7e9ca4aeffd3d157102  -
Here we passed date command output to md5sum and get the checksum hash! You can use cut command to get the desired length of the output.
Generate password using pwgen
pwgen package comes with repositories like EPEL. pwgen is more focused on generating passwords that are pronounceable but not a dictionary word or not in plain English. You may not find it in standard distribution repo. Install the package and run pwgen command. Boom!
You will be presented with the list of passwords at your terminal! What else you want? Ok. You still want to explore, pwgen comes with many custom options that can be referred for man page.
Generate password using gpg tool
GPG is an OpenPGP encryption and signing tool. Mostly gpg tool comes pre-installed (at least it is on my RHEL7). But if not you can look for gpg or gpg2 package and install it.
Use below command to generate password from gpg tool.
Here we are passing generate random byte sequence switch (--gen-random) of quality 1 (first argument) with a count of 12 (second argument). Switch --armor ensures output is base64 encoded.
Generate password using xkcdpass
Famous geek humor website xkcd, published a very interesting post about memorable but still complex passwords. You can view it here. So xkcdpass tool took inspiration from this post and did its work! It’s a python package and available on python’s official website here
All installation and usage instructions are mentioned on that page. Here is install steps and outputs from my test RHEL server for your reference.
You can use these words as input to other commands like md5sum to get the random password (like below) or you can even use the Nth letter of each word to form your password!
Or even you can use all those words together as such a long password which is easy to remember for a user and very hard to crack using the computer program.
Learn how to create login banners in Linux to display a different warning or information message to the user who is about to log in or after he logs in.
Login banner messages in Linux
Whenever you log in to some production systems of the firm, you get to see some login messages, warnings, or info about the server you are about to log in or already logged in like below. Those are the login banners.
Login welcome messages in Linux
In this article we will walk you through how to configure them.
There are two types of banners you can configure.
Banner message to display before user logs in (configure in the file of your choice eg. /etc/login.warn)
Banner message to display after the user successfully logged in (configure in /etc/motd)
How to display message when user connects to system before login
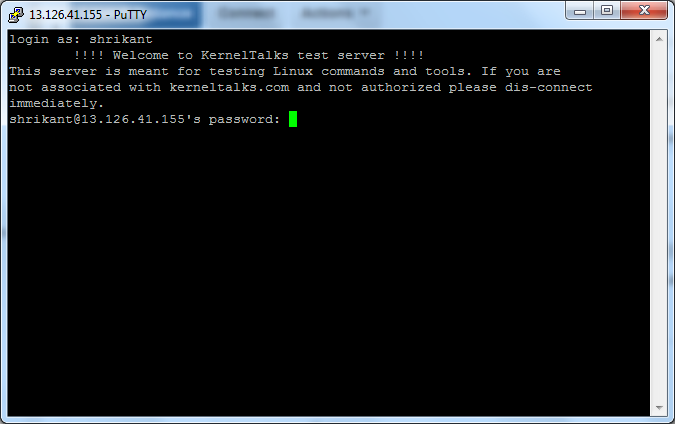
This message will be displayed to the user when he connects to the server and before he logged in. This means when he enter the username, this message will be displayed before the password prompt.
You can use any filename and enter your message within. Here we used /etc/login.warn file and put our messages inside.
# cat /etc/login.warn
        !!!! Welcome to KernelTalks test server !!!!
This server is meant for testing Linux commands and tools. If you are
not associated with kerneltalks.com and not authorized please dis-connect
immediately.
Now, you need to supply this file and path to sshd daemon so that it can fetch this banner for each user login request. For that open /etc/sshd/sshd_config file and search for the line #Banner none
Here you have to edit the file and write your filename and remove the hash mark. It should look like : Banner /etc/login.warn
Save the file and restart sshd daemon. To avoid disconnecting existing connected users, use the HUP signal to restart sshd.
That’s it! Open new sessions and try login. You will be greeted with the message you configured in the above steps.
Login banner in Linux
You can see the message is displayed before the user enters his password and log in to the system.
How to display message after user logs in
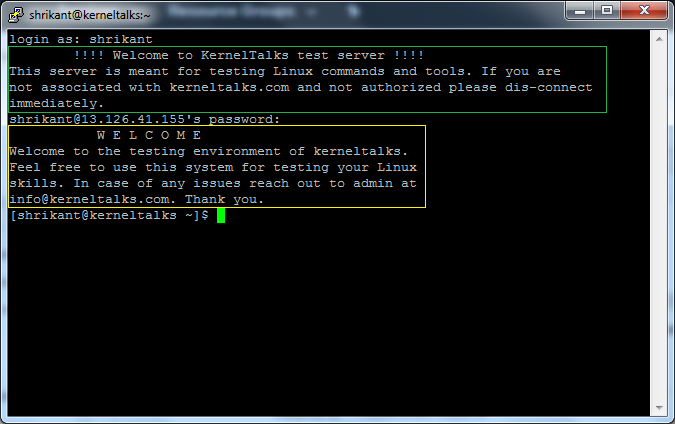
Message user sees after he logs into the system successfully is Message Of The Day & is controlled by /etc/motd file. Edit this file and enter the message you want to greet the user with once he successfully logged in.
root@kerneltalks # cat /etc/motd
           W E L C O M E
Welcome to the testing environment of kerneltalks.
Feel free to use this system for testing your Linux
skills. In case of any issues reach out to admin at
info@kerneltalks.com. Thank you.
You don’t need to restart sshd daemon to take this change effect. As soon as you save the file, its content will be read and displayed by sshd daemon from the very next login request it serves.
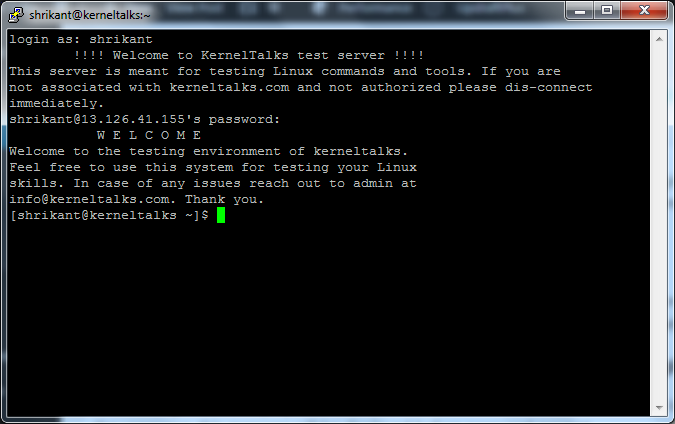
Message Of The Day
You can see in the above screenshot: Yellow box is MOTD controlled by /etc/motd and the green box is what we saw earlier login banner.
You can use tools like cowsay, banner, figlet, lolcat to create fancy, eye-catching messages to display at login. This method works on almost all Linux distros like RedHat, Centos, Ubuntu, Fedora, etc.
Learn how to use speedtest CLI tool to test internet speed in the Linux terminal. It also includes a one-liner python command to get speed details right away.
Internet speed check in Linux
Most of us check the internet bandwidth speed whenever we connect to a new network or wifi. So why not our servers! Here is a tutorial that will walk you through to test internet speed in the Linux terminal.
Every one of us generally uses Speedtest by Ookla to check internet speed. It’s a pretty simple process for a desktop. Go to their website and just click the GO button. It will scan your location and speed test with the nearest server. If you are on mobile, they have their app for you. But if you are on the terminal with command-line interface things are little different. Let’s see how to check internet speed from the Linux terminal.
If you want to speed check only once and don’t want to download the tool on the server, jump here and see one-liner command.
Step 1 : Download speedtest cli tool
First of all, you have to download speedtest CLI tool from the GitHub repository. Nowadays, it also included in many well known Linux repositories as well. If it’s there then you can directly install that package on your Linux distro.
Let’s proceed with the Github download and install process. Install the git package depending on your distro. Then clone Github repo of speedtest like below:
It will be cloned to your present working directory. A new directory named speedtest-cli will be created. You can see the below files in it.
[root@kerneltalks ~]# cd speedtest-cli
[root@kerneltalks speedtest-cli]# ll
total 96
-rw-r--r--. 1 root root  1671 Oct  7 16:55 CONTRIBUTING.md
-rw-r--r--. 1 root root 11358 Oct  7 16:55 LICENSE
-rw-r--r--. 1 root root    35 Oct  7 16:55 MANIFEST.in
-rw-r--r--. 1 root root  5215 Oct  7 16:55 README.rst
-rw-r--r--. 1 root root    20 Oct  7 16:55 setup.cfg
-rw-r--r--. 1 root root  3196 Oct  7 16:55 setup.py
-rw-r--r--. 1 root root  2385 Oct  7 16:55 speedtest-cli.1
-rw-r--r--. 1 root root  1200 Oct  7 16:55 speedtest_cli.py
-rwxr-xr-x. 1 root root 47228 Oct  7 16:55 speedtest.py
-rw-r--r--. 1 root root   333 Oct  7 16:55 tox.ini
The python script speedtest.py is the one we will be using to check internet speed.
You can link this script for a command in /usr/bin so that all users on the server can use it. Or you can even create command alias for it and it will be easy for all users to use it.
Step 2 : Run python script
Now, run a python script without any argument and it will search the nearest server and test your internet speed.
[root@kerneltalks speedtest-cli]# python speedtest.py
Retrieving speedtest.net configuration...
Testing from Amazon (35.154.184.126)...
Retrieving speedtest.net server list...
Selecting best server based on ping...
Hosted by Spectra (Mumbai) [1.15 km]: 8.174 ms
Testing download speed................................................................................
Download: 548.13 Mbit/s
Testing upload speed................................................................................................
Upload: 323.95 Mbit/s
You can see here, the first column is a server identifier followed by the name of the company hosting that server, location, and finally its distance from your location.
To test the internet speed using specific server use --server switch and server identifier from the previous output as an argument.
[root@kerneltalks speedtest-cli]# python speedtest.py --server 2827
Retrieving speedtest.net configuration...
Testing from Amazon (35.154.184.126)...
Retrieving speedtest.net server list...
Selecting best server based on ping...
Hosted by Bharti Airtel Ltd (Mumbai) [1.15 km]: 13.234 ms
Testing download speed................................................................................
Download: 93.47 Mbit/s
Testing upload speed................................................................................................
Upload: 69.25 Mbit/s
To get the share link of your speed test, use –share switch. It will give you the URL of your test hosted on speedtest website. You can share this URL.
[root@kerneltalks speedtest-cli]# python speedtest.py --share
Retrieving speedtest.net configuration...
Testing from Amazon (35.154.184.126)...
Retrieving speedtest.net server list...
Selecting best server based on ping...
Hosted by Spectra (Mumbai) [1.15 km]: 7.471 ms
Testing download speed................................................................................
Download: 621.00 Mbit/s
Testing upload speed................................................................................................
Upload: 367.37 Mbit/s
Share results: http://www.speedtest.net/result/6687428141.png
Observe the last line which includes the URL of your test result. If I download that image its the one below :
Speedtest result on Linux
That’s it! But hey if you don’t want all this technical jargon, you can even use below one-liner to get speed test done right away.
Internet speed test using one liner in terminal
We are going to use a curl tool to fetch the above python script online and supply it to python for execution on the go!
Learn how to save PuTTY output in logfile locally on the desktop. Important settings to be done on PuTTY client before you start your sysadmin work!
Save PuTTY session output in file on desktop
PuTTY is one of the widely used SSH, telnet client to connect Linux Unix servers. Its open-source software and can be downloaded here. This article is intended to beginners who just stepped into the command-line world of *nix. Experienced sysadmins already knew what this article is all about!
Most of the beginners are not familiar with PuTTY settings and they just use default ones. This leaves them into two troubles :
If the command output is too long, it scrolls up the PuTTY screen and the output beginning is not visible.
After closing the PuTTY session, the user won’t have a trace of what he did in his session.
To avoid them we need to tweak few settings in PuTTY and set them in default ones. So that next time you fire up PuTTY client, it starts with tweaked settings as default and makes your life easy!
How to increase PuTTY scroll length
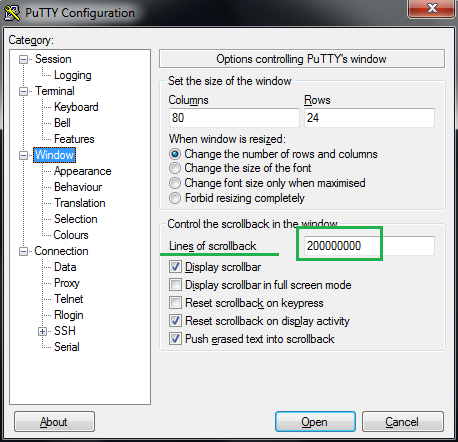
Many times your output is long enough to scroll beyond PuTTY screen buffer and you won’t be able to get to the beginning of the output. To avoid this you need to increase the screen buffer size in settings. Let’s see how to do it. Open PuTTY and select ‘Window‘ on left side pane as below :
Putty scrollback size
You will be presented with settings page on the right which has a field where you can set ‘Lines of scrollback‘. Enter the number of your choice here (big enough). That’s it. Now PuTTY will be having a scroll buffer of the number of lines you specified. Never lost your output beyond scroll!
How to save PuTTY session output on local storage
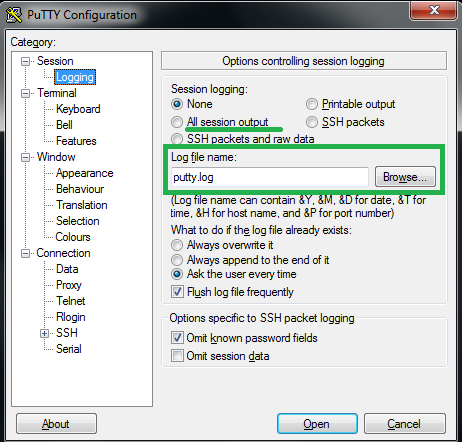
The next challenge is users don’t get any logs saved by default in PuTTY. So in case you want to a checklist of commands you ran and their outputs, it’s not possible to check (once you close your session). Here session logging comes to rescue. Let’s see how to set it. Open PuTTY and select ‘Logging‘ under ‘Session‘ on the left pane.
Save putty session logs
You will present with logging settings on right. Session logging is off by default. You need to check bullet box next to ‘All session output‘ to log all session output in file. Provide log file name using browse button (specify where to save logs on your system). You can use parameters like &Y, &M (meanings listed below option), so that every time you start a new session, new logfile have unique name. This will avoid overwriting existing file with same name.
PuTTY also offers you to set options what to do when it finds file name already existing on specified path. You can choose to overwrite, append or ask user.
Now whatever commands you type and outputs you see in your session will be saved as it is in a file on your computer as well. These log files can be opened in notepad/Wordpad to view later. Be sure you don’t leave your session running with commands like a top (which continuously changes data on the screen for infinite time). Because this will fill up your logfiles fast and you may end up filling your local hard disk!
Save customized settings in PuTTY as default settings
Now you learned these two settings which are very much important to set but you don’t want to set it everything you fire up PuTTY client. You can save them as default settings!
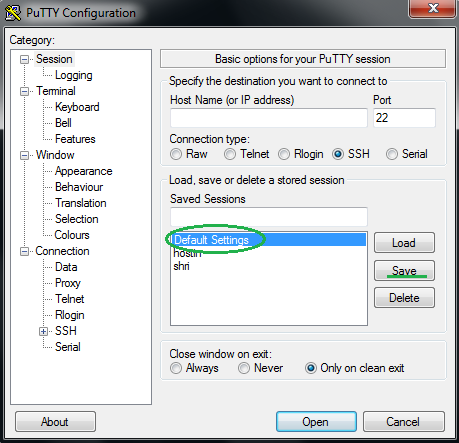
Open PuTTY and do the above changes. Now, click and select ‘Session‘ on left pane which will bring you back to the client home screen.
PuTTY default setting
Now click and select ‘Default Settings‘ as shown above and click ‘Save‘. That’s it! Your customized settings are now saved as default settings. Now whenever you start PuTTY client it will start with your customized settings.
Have any tips regarding PuTTY client? Share with us in the comments section below!
Cowsay command to have some ASCII graphics in your Linux terminal! This command displays strings of your choice as a cow is saying/thinking in graphical format.
Cowsay command!
Another article to have some fun in the Linux terminal. Previously we have seen how to create fancy ASCII banners and matrix falling code in Linux terminal. In this article we will see another small utility called cowsay which prints thinking cow ASCII picture on the terminal with a message of your choice. Cowsay is useful to write eye-catchy messages to users in motd (message of the day)!
From the man page “Cowsay generates an ASCII picture of a cow saying something provided by the user. If run with no arguments, it accepts standard input, word-wraps the message given at about 40 columns, and prints the cow saying the given message on standard output.” That explains the functionality of cowsay. Let’s see it in action!
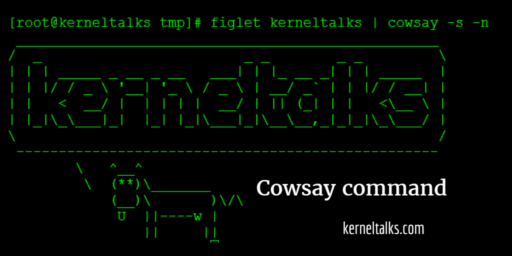
# cowsay I love kerneltalks.com
 ________________________
< I love kerneltalks.com >
 ------------------------
        \   ^__^
         \  (oo)\_______
            (__)\       )\/\
                ||----w |
                ||     ||
# yum install cowsay
Loaded plugins: amazon-id, rhui-lb, search-disabled-repos, security
Setting up Install Process
epel/metalink                                                                                                                         |  12 kB     00:00
epel                                                                                                                                  | 4.2 kB     00:00
http://mirror.math.princeton.edu/pub/epel/6/x86_64/repodata/repomd.xml: [Errno -1] repomd.xml does not match metalink for epel
Trying other mirror.
epel                                                                                                                                  | 4.3 kB     00:00
epel/primary_db                                                                                                                       | 5.9 MB     00:09
rhui-REGION-client-config-server-6                                                                                                    | 2.9 kB     00:00
rhui-REGION-rhel-server-releases                                                                                                      | 3.5 kB     00:00
rhui-REGION-rhel-server-releases-optional                                                                                             | 3.5 kB     00:00
rhui-REGION-rhel-server-rh-common                                                                                                     | 3.8 kB     00:00
Resolving Dependencies
--> Running transaction check
---> Package cowsay.noarch 0:3.03-8.el6 will be installed
--> Finished Dependency Resolution

Dependencies Resolved

=============================================================================================================================================================
 Package                              Arch                                 Version                                  Repository                          Size
=============================================================================================================================================================
Installing:
 cowsay                               noarch                               3.03-8.el6                               epel                                25 k

Transaction Summary
=============================================================================================================================================================
Install       1 Package(s)

Total download size: 25 k
Installed size: 31 k
Is this ok [y/N]: y
Downloading Packages:
cowsay-3.03-8.el6.noarch.rpm                                                                                                          |  25 kB     00:00
Running rpm_check_debug
Running Transaction Test
Transaction Test Succeeded
Running Transaction
  Installing : cowsay-3.03-8.el6.noarch                                                                                                                  1/1
  Verifying  : cowsay-3.03-8.el6.noarch                                                                                                                  1/1

Installed:
  cowsay.noarch 0:3.03-8.el6

Complete!
Once successfully installed you can run cowsay command followed by the text you want the cow to say! There are different cow modes which you can use to change the appearance of cow 😀 (outputs later in this post)
-b: borg mode
-d: Cow appears dead
-g: greedy mode
-s: stoned cow
-t: tired cow
-y: Young cow 😛
Different Cowsay command examples
Normally cowsay word wraps. If you want fancy banners in cowsay you should use -n switch so that cowsay won’t word wrap and you get nice formatted output.
If you observe in all different modes eyes and tongues are the only entities that change. So, you can define and change them manually too! You can define eyes with -e switch and tongue with -T switch.
Learn how to use two utilities called figlet and toilet to create beautiful ASCII text banners in the Linux terminal. Stylize your terminal!
Beautiful text banners in Linux
Have you seen some stylish ASCII text banners during login on some servers? Or have you seen pages of this blog that have titles written in ASCII? Check out a few styles below too.
  _   _   _   _   _   _   _   _   _   _   _   _   _   _   _
 / \ / \ / \ / \ / \ / \ / \ / \ / \ / \ / \ / \ / \ / \ / \
( k | e | r | n | e | l | t | a | l | k | s | . | c | o | m )
 \_/ \_/ \_/ \_/ \_/ \_/ \_/ \_/ \_/ \_/ \_/ \_/ \_/ \_/ \_/

+-+-+-+-+-+-+-+-+-+-+-+-+-+-+-+
|k|e|r|n|e|l|t|a|l|k|s|.|c|o|m|
+-+-+-+-+-+-+-+-+-+-+-+-+-+-+-+


|  _ ._._  _ |_|_ _.||  _  _ _ ._ _
|<(/_| | |(/_| |_(_|||<_>o(_(_)| | |
Beautiful eh? You can create them too with tools called figlet and toilet!
figlet tool
It’s a command-line text styling utility. You need to install figlet package. Once installed you can supply the text you want to stylize to figlet command and it will print stylish output on your terminal. You can copy it and use it anywhere. All the above texts are printed using the figlet only. By default, it will print in below style –
These text banners are useful to stylize your server’s login screens and print messages to users in a beautiful way!
Below are few examples of figlet in quick run :
figlet utility examples
toilet tool
I know its funny name. Yeah but it’s a tool which do exist in Linux! Check if the toilet package is installed or not and install it if required. Once installed you can submit text to toilet command.
cmatrix: One of the command to have fun in a Linux terminal. It will turn your terminal into the Hollywood movie “MATRIX” like a cool desktop.
Hollywood movie MATRIX falling code in Linux terminal
About cmatrix program:
It’s written by Chris Allegretta. The Cmatrix page can be found here. This program is distributed via the GNU GPL and its Sourceforge page is here. To download the latest release visit Sourceforge page.
Have you seen the Hollywood movie “Matrix”? You must have liked those monitors with falling green code. It looks like a cool hacker/coder desktop! After the movie went to the box office, many matrix screensavers were out for windows. Do you want one for Linux? Like the one below?
Matrix falling code in terminal
Yes, that’s possible. You can have such a matrix-like desktop in Linux terminal too. In very simple two steps.
If you don’t have a YUM repository configured then you can download a standalone file (check Sourceforge page if this link is broken). Then follow below commands to set it up from source code.
Download above mentioned file, un-zip, un-tar it and goto unpacked directory cmatrix-1.2a
Within cmatrix directory execute below commands.
# aclocal
aclocal: warning: autoconf input should be named 'configure.ac', not 'configure.in'
# autoconf
# automake -a
automake: warning: autoconf input should be named 'configure.ac', not 'configure.in'
configure.in:3: warning: AM_INIT_AUTOMAKE: two- and three-arguments forms are deprecated.  For more info, see:
configure.in:3: http://www.gnu.org/software/automake/manual/automake.html#Modernize-AM_005fINIT_005fAUTOMAKE-invocation
Makefile.am: installing './depcomp'
automake: warning: autoconf input should be named 'configure.ac', not 'configure.in'
Then configure and make ready to install.
# ./configure
checking for a BSD-compatible install... /bin/install -c
checking whether build environment is sane... yes
/root/cmatrix-1.2a/missing: Unknown `--is-lightweight' option
Try `/root/cmatrix-1.2a/missing --help' for more information
configure: WARNING: 'missing' script is too old or missing
checking for a thread-safe mkdir -p... /bin/mkdir -p
checking for gawk... gawk
checking whether make sets $(MAKE)... yes
checking whether make supports nested variables... yes
checking for gcc... gcc
checking whether the C compiler works... yes
checking for C compiler default output file name... a.out
checking for suffix of executables...
checking whether we are cross compiling... no
checking for suffix of object files... o
checking whether we are using the GNU C compiler... yes
checking whether gcc accepts -g... yes
checking for gcc option to accept ISO C89... none needed
checking for style of include used by make... GNU
checking dependency style of gcc... gcc3
checking whether make sets $(MAKE)... (cached) yes
checking for main in -lncurses... yes
checking how to run the C preprocessor... gcc -E
checking for grep that handles long lines and -e... /bin/grep
checking for egrep... /bin/grep -E
checking for ANSI C header files... yes
checking for sys/types.h... yes
checking for sys/stat.h... yes
checking for stdlib.h... yes
checking for string.h... yes
checking for memory.h... yes
checking for strings.h... yes
checking for inttypes.h... yes
checking for stdint.h... yes
checking for unistd.h... yes
checking fcntl.h usability... yes
checking fcntl.h presence... yes
checking for fcntl.h... yes
checking sys/ioctl.h usability... yes
checking sys/ioctl.h presence... yes
checking for sys/ioctl.h... yes
checking for unistd.h... (cached) yes
checking termios.h usability... yes
checking termios.h presence... yes
checking for termios.h... yes
checking termio.h usability... yes
checking termio.h presence... yes
checking for termio.h... yes
checking return type of signal handlers... void
checking for putenv... yes
checking curses.h usability... yes
checking curses.h presence... yes
checking for curses.h... yes
checking ncurses.h usability... yes
checking ncurses.h presence... yes
checking for ncurses.h... yes
checking for tgetent in -lncurses... yes
"Using ncurses as the termcap library"
checking for use_default_colors in -lncurses... yes
checking for resizeterm in -lncurses... yes
checking for wresize in -lncurses... yes
checking for consolechars... no
checking for setfont... /bin/setfont
checking for /usr/lib/kbd/consolefonts... yes
checking for /usr/share/consolefonts... no
checking for mkfontdir... no
checking for /usr/lib/X11/fonts/misc... no
checking for /usr/X11R6/lib/X11/fonts/misc... no
configure: WARNING:

*** You do not appear to have an X window fonts directory in the standard
*** locations (/usr/lib/X11/fonts/misc or /usr/X11R6/lib/X11/fonts/misc). The
*** mtx.pcf font will not be installed.  This means you will probably not
*** be able to use the mtx fonts in your x terminals, and hence be unable
*** to use the -x command line switch.  Sorry about that...

checking that generated files are newer than configure... done
configure: creating ./config.status
config.status: creating Makefile
config.status: creating cmatrix.spec
config.status: creating config.h
config.status: executing depfiles commands
# make
(CDPATH="${ZSH_VERSION+.}:" && cd . && autoheader)
autoheader: WARNING: Using auxiliary files such as `acconfig.h', `config.h.bot'
autoheader: WARNING: and `config.h.top', to define templates for `config.h.in'
autoheader: WARNING: is deprecated and discouraged.
autoheader:
autoheader: WARNING: Using the third argument of `AC_DEFINE' and
autoheader: WARNING: `AC_DEFINE_UNQUOTED' allows one to define a template without
autoheader: WARNING: `acconfig.h':
autoheader:
autoheader: WARNING:   AC_DEFINE([NEED_FUNC_MAIN], 1,
autoheader:             [Define if a function `main' is needed.])
autoheader:
autoheader: WARNING: More sophisticated templates can also be produced, see the
autoheader: WARNING: documentation.
rm -f stamp-h1
touch config.h.in
cd . && /bin/sh ./config.status config.h
config.status: creating config.h
make  all-am
make[1]: Entering directory `/root/cmatrix-1.2a'
gcc  -g -O2   -o cmatrix cmatrix.o  -lncurses  -lncurses
make[1]: Leaving directory `/root/cmatrix-1.2a'
Type cmatrixcommand and experience matrix! You can exit out the matrix screen anytime by hitting ctlr+c on the terminal. Check cmatrix command in action in the GIF above!
Reader’s tip :
One of our readers, @Pranit Raje sent us this one-liner which did the trick. Its not as exact matrix code as we saw above but yeah it’s promising. Try and have fun in the terminal.