Troubleshooting guide to reclaim space on disk after deleting files in Linux.
Space is not released after deleting files in Linux? Read this troubleshooting guide
One of the common issues Linux Unix system users face is disk space is not being released even after files are deleted. Sysadmins face some issues when they try to recover disk space by deleting high sized files in a mount point and then they found disk utilization stays the same even after deleting huge files. Sometimes, application users are moving/deleting large log files and still won’t be able to reclaim space on the mount point.
In this troubleshooting guide, I will walk you through steps that will help you to reclaim space on disk after deleting files. Here we will learn how to remove deleted open files in Linux. Most of the time files are deleted manually but processes using those files keep them open and hence space is not reclaimed. df also shows incorrect space utilization.
Process stop/start/restart
To resolve this issue, you need to gracefully or forcefully end processes using those deleted files. First, get a list of such deleted files that are still marked open by processes. Use lsof (list open files) command with +L1 switch for this or you can directly grep for deleted in lsof output without switch
Now, in above output check the PID 777and stop that process. If you can not stop it you can kill the process. In the case of application processes, you can refer application guides on how to stop, start, restart its processes. The restarting process helps in releasing the lock on that file which process made to hold it as open. Once the related process is stopped/restarted you can see space will be released and you can observe reduced utilization in df command output.
Clear from proc filesystem
Another way is to vacate the space used by file by de-allocating that space from /proc filesystem. As you are aware, every process in Linux has its allocations in /proc filesystem i.e. process filesystem. Make sure that the process/application has no impact if you are flushing files (which are held open by an app) from /proc filesystem.
You can find file allocation at /proc/<pid>/fd/<fd_number> location. Where PID and fd_number you can get from lsof output we saw above. If you check the type of this file then it’s a symbolic link to your deleted file.
root@kerneltalks # file /proc/777/fd/7
/proc/777/fd/7: broken symbolic link to `/tmp/ffiJEo5nz (deleted)
So, in our case we can do it using –
root@kerneltalks # > /proc/777/fd/7
That’s it! Flushing it will regain your lost space by those files which you already deleted.
An article explaining step by step procedure to add EBS disk on AWS Linux server with screenshots.
EBS disk addition on AWS instance
Nowadays most of the servers run on cloud platforms like Amazon Web Services (AWS), Azure, etc. So daily administrative tasks on Linux servers from AWS console is one of the common things in sysadmin’s task list. In this article, we will walk you through one such task i.e. adding a new disk to the AWS Linux server.
Adding a disk to the EC2 Linux server has two portions. The first portion is to be done on AWS EC2 console which is creating new volume to be attached to the server. And attaching it to EC2 instance on AWS console. The second portion is to be done on the Linux server which is to identify newly added disk at the kernel level and prepare it for use.
Creating & attaching EBS volume
In this step, we will learn how to create EBS volume in the AWS console and how to attach EBS volume to AWS EC2 instance.
Login to your EC2 console and navigate to Volumes which is under ELASTIC BLOCK STORAGE menu on the left-hand sidebar. You will be presented with the current list of volumes in your AWS account like below –
Create volume in AWS
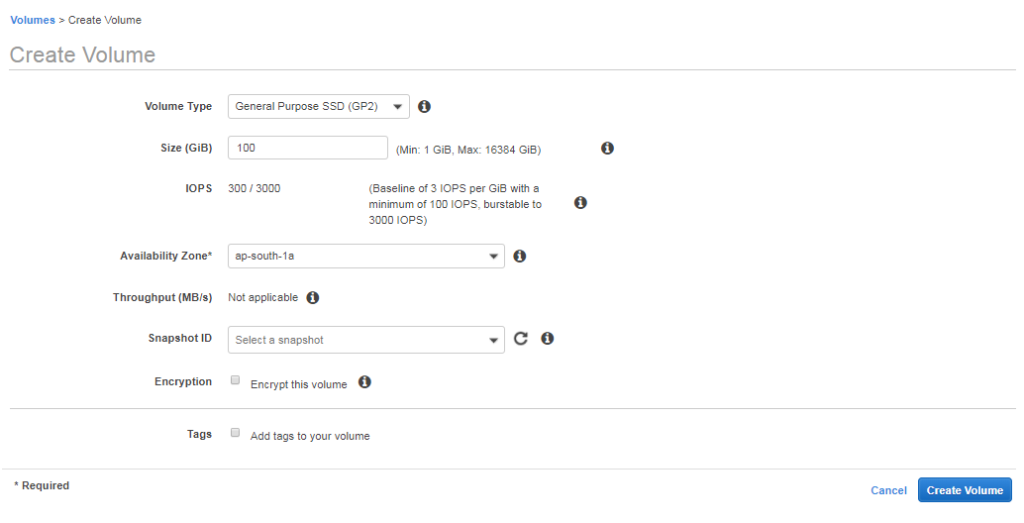
Now, click Create Volume button and you will be presented with the below screen.
Volume creation in AWS
Here you need to choose several parameters of your volume –
Volume Type. This decides your volume performance and obv billing.
Size. In GB. Min and Max available sizes differ according to your volume type choice.
IOPS. Performance parameters. Changes according to your volume type choice
Availability Zone. Make sure you select same AZ as your EC2 instance
Throughput. Performance parameter. Only available for ST1 & SC1 volume type.
Snapshot ID. Select snapshot if you want to create the new volume from existing snapshot backup. For fresh blank volume leave it blank.
Encryption. Checkmark if you want the volume to be encrypted. An extra layer of security.
Tags. Add tags for management, reporting, billing purposes.
After selecting proper parameters as per your requirement, click Create Volume button. You will be presented with ‘Volume created successfully’ dialogue if everything goes well along with the volume ID of your newly created volume. Click Close and you will be back of the volume list.
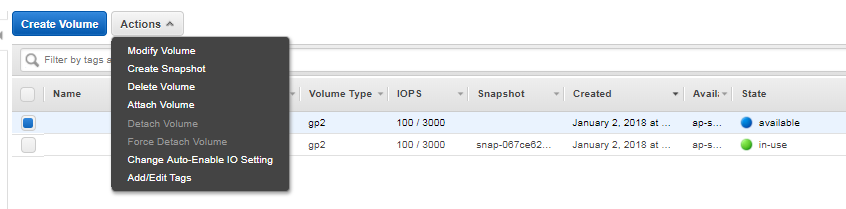
Now check volume ID to identify your newly created volume in this list. It will be marked with an ‘Available’ state. Select that volume and select Attach volume from Actions menu.
Attach volume menu
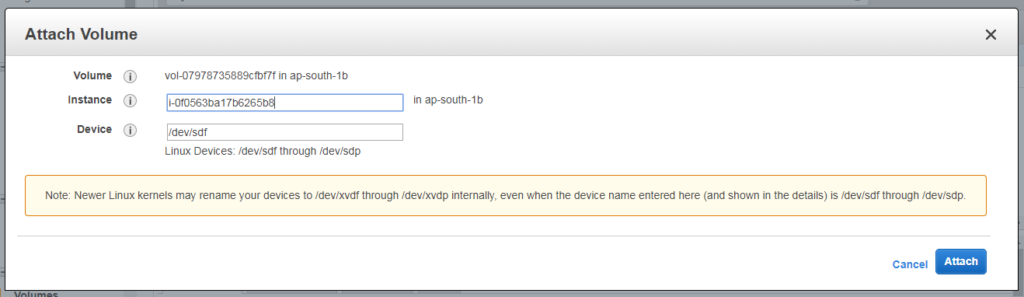
Now you will be presented with an instance selection menu. Here you need to choose an instance to which this volume is to be attached. Remember only instances in the same AZ of the volume are
Attach volume instance selection
Once you select the instance you can see the device name which will be reflected at the kernel level in your instance under Device field. Here its /dev/sdf.
Check out the note being displayed here. It says : Note: Newer Linux kernels may rename your devices to /dev/xvdf through /dev/xvdp internally, even when the device name entered here (and shown in the details) is /dev/sdf through /dev/sdp.
It says newer Linux kernels may interpret your device name as /dev/xvdf than /dev/sdf. This means this volume will be either /dev/sdf (on the old kernel) or /dev/xvdf on the new kernel.
That’s it. Once attached you can see volume state is changed from Available to in-use
Identifying volume on Linux instance
Now head back to your Linux server. Log in and check new volume in fdisk -l output.
root@kerneltalks # fdisk -l
WARNING: fdisk GPT support is currently new, and therefore in an experimental ph                                                                                        ase. Use at your own discretion.

Disk /dev/xvda: 10.7 GB, 10737418240 bytes, 20971520 sectors
Units = sectors of 1 * 512 = 512 bytes
Sector size (logical/physical): 512 bytes / 512 bytes
I/O size (minimum/optimal): 512 bytes / 512 bytes
Disk label type: gpt
Disk identifier: 25D08425-708A-47D2-B907-1F0A3F769A90


#         Start          End    Size  Type            Name
 1         2048         4095      1M  BIOS boot parti
 2         4096     20971486     10G  Microsoft basic

Disk /dev/xvdf: 10.7 GB, 10737418240 bytes, 20971520 sectors
Units = sectors of 1 * 512 = 512 bytes
Sector size (logical/physical): 512 bytes / 512 bytes
I/O size (minimum/optimal): 512 bytes / 512 bytes
As AWS mentioned new device name will be reflected as /dev/xvdf in the kernel, you can see /dev/xvdf in the above output.
Now you need to partition this disk using LVM (using pvcreate) or fdisk so that you can use it for creating mount points!
Learn xfs file system commands to create, grow, repair xfs file system along with command examples.
Learn xfs commands with examples
In our other article, we walked you through what is xfs, features of xfs, etc. In this article, we will see some frequently used xfs administrative commands. We will see how to create xfs filesystem, how to grow xfs filesystem, how to repair the xfs file system, and check xfs filesystem along with command examples.
Create XFS filesystem
mkfs.xfs command is used to create xfs filesystem. Without any special switches, command output looks like one below –
Note: Once the XFS filesystem is created it can not be reduced. It can only be extended to a bigger size.
Resize XFS file system
In XFS, you can only extend the file system and can not reduce it. To grow XFS file system use xfs_growfs. You need to specify a new size of mount point along with -D switch. -D takes argument number as file system blocks. If you don’t supply -D switch, xfs_growfs will grow the filesystem to the maximum available limit on that device.
In the above output, observe the last line. Since I supplied a new size smaller than the existing size, xfs_growfs didn’t change the filesystem. This shows you can not reduce the XFS file system. You can only extend it.
Now, I supplied new size 1 GB extra and it successfully grew the file system.
1 GB blocks calculation :
The current filesystem has bsize=4096 i.e. block size of 4MB. We need 1 GB i.e. 256 blocks. So add 256 in a current number of blocks i.e. 2883584 which gives you 2883840. So I used 2883840 as an argument to -D switch.
Repair XFS file system
File system consistency check and repair of XFS can be performed using xfs_repair command. You can run the command with -n switch so that it will not modify anything on the filesystem. It will only scans and reports which modifications to be done. If you are running it without -n switch, it will modify the file system wherever necessary to make it clean.
Please note that you need to un-mount the XFS filesystem before you can run checks on it. Otherwise, you will see the below error.
root@kerneltalks # xfs_repair -n /dev/xvdf
xfs_repair: /dev/xvdf contains a mounted filesystem
xfs_repair: /dev/xvdf contains a mounted and writable filesystem

fatal error -- couldn't initialize XFS library
Once successfully un-mounting file system you can run command on it.
root@kerneltalks # xfs_repair -n /dev/xvdf
Phase 1 - find and verify superblock...
Phase 2 - using internal log
        - zero log...
        - scan filesystem freespace and inode maps...
        - found root inode chunk
Phase 3 - for each AG...
        - scan (but don't clear) agi unlinked lists...
        - process known inodes and perform inode discovery...
        - agno = 0
        - agno = 1
        - agno = 2
        - agno = 3
        - agno = 4
        - process newly discovered inodes...
Phase 4 - check for duplicate blocks...
        - setting up duplicate extent list...
        - check for inodes claiming duplicate blocks...
        - agno = 0
        - agno = 1
        - agno = 2
        - agno = 3
        - agno = 4
No modify flag set, skipping phase 5
Phase 6 - check inode connectivity...
        - traversing filesystem ...
        - traversal finished ...
        - moving disconnected inodes to lost+found ...
Phase 7 - verify link counts...
No modify flag set, skipping filesystem flush and exiting.
In the above output you can observe, in each phase command shows possible modification which can be done to make the file system healthy. If you want the command to do that modification during the scan then run the command without any switch.
root@kerneltalks # xfs_repair /dev/xvdf
Phase 1 - find and verify superblock...
Phase 2 - using internal log
        - zero log...
        - scan filesystem freespace and inode maps...
        - found root inode chunk
Phase 3 - for each AG...
        - scan and clear agi unlinked lists...
        - process known inodes and perform inode discovery...
        - agno = 0
        - agno = 1
        - agno = 2
        - agno = 3
        - agno = 4
        - process newly discovered inodes...
Phase 4 - check for duplicate blocks...
        - setting up duplicate extent list...
        - check for inodes claiming duplicate blocks...
        - agno = 0
        - agno = 1
        - agno = 2
        - agno = 3
        - agno = 4
Phase 5 - rebuild AG headers and trees...
        - reset superblock...
Phase 6 - check inode connectivity...
        - resetting contents of realtime bitmap and summary inodes
        - traversing filesystem ...
        - traversal finished ...
        - moving disconnected inodes to lost+found ...
Phase 7 - verify and correct link counts...
done
In the above output, you can observer xfs_repair command is executing possible filesystem modification as well to make it healthy.
Check XFS version and details
Checking the xfs file system requires it to un-mount. Run xfs_db command on its device path and once you entered xfs_db prompt, run version command.
xfs_db command normally used for examining the XFS file system. version command used to enable features in the file system. Without any argument, the current version and feature bits are printed
To view details of the XFS file system like block size and number of blocks which helps you in calculating new block number for growing XFS file system, use xfs_info without any switch.
Learn timezone management using timedatectl command. An article explaining different uses of timedatectl command along with examples.
Learn timedatectl command
In our previous article, we have seen how to change the timezone of the Linux server using files or variables in the system. Few of our readers pushed timedatectl command to achieve this task easily. So I thought of writing a separate article on timedatectl command explaining all its usage.
In this article, we will see how to display server time details, view, list, and change the timezone of the server using timedatectl command. If you want to use date or time in a shell script or as a variable, we explained here how to format the date and time to use it as variable or in scripting.
timedatectl is Time Date Control command! It used to control the date and time of the server in Linux. To check your current system date and time details, run this command without any switch –
root@kerneltalks # timedatectl
      Local time: Wed 2017-11-15 15:58:33 UTC
  Universal time: Wed 2017-11-15 15:58:33 UTC
        RTC time: Wed 2017-11-15 15:58:32
       Time zone: UTC (UTC, +0000)
     NTP enabled: yes
NTP synchronized: yes
 RTC in local TZ: no
      DST active: n/a
Where,
Local time : Your system’s local date and time
Universal time : Current UTC time
RTC time : Current Real-time clock time
Time zone : Your system’s current timezone
NTP enabled : Is NTP is enabled on system or not
NTP synchronized : NTP time synced or not.
RTC in local TZ : Is RTC maintaining in configured system TZ? It is recommended to keep it off.
DST active : Daylight saving time enabled or not
List and change timezone using timedatectl
timedatectl allow you to change the timezone of the system with a list of available timezones. To view, a list of available timezones use the command with list-timezones switch.
You will be presented with a list of available timezones in a paged manner. You can use any of thee timezones to set on your local system. To change timezone of your system use set-timezone switch.
Above command will change server timezone to Australia/Sydney one.
Change date and time using timedatectl
Most of the servers are configured with NTP these days. But if not and/or if you want to change the date and time manually then you can use set-time switch. Time should be supplied with YYYY-MM-DD HH:MM:SS
If NTP is configured then you might see an error Failed to set time: Automatic time synchronization is enabled when attempting to change system time manually.
Enable/Disable RTC and NTP using timedatectl
You can enable or disable RTC (Real Time Clock) and NTP using timedatectl. For RTC use set-local-rtc and for NTP use set-ntp switch. Both arguments accepts 1 (to enable) and 0 (to disable) as values.
Please note that enabling NTP here does not take you through NTP configuration steps. That has to be done separately. This only controls if the system should sync time using configured NTP or not.
Manage date and time of other machine
You can use timedatectl command to manage the date and time of local containers or remote machines. To manage the time of local container use -M switch whereas to connect to the remote host and manage its time use -H switch.
-M switch takes argument as --host=ip/hostname. -H switch takes argument as --machine=container_name.
That’s all switches which are mainly useful in day-to-day operations. There are a few more that can be referred from its man page.
Learn how to troubleshoot RPC: Port mapper failure – Timed out error on NFS client. This will help you to resolve NFS mounting being timed out issue.
RPC: Port mapper failure – Timed out
In this article, we are going to discuss the troubleshooting of one of the NFS errors you see on NFS clients. This error can be seen while trying commands related to NFS like below :
root@kerneltalks # showmount -e mynfsserver
clnt_create: RPC: Port mapper failure - Timed out

root@kerneltalks # rpcinfo -p  mynfsserver
mynfsserver: RPC: Port mapper failure - Timed out
Normally when you see this error you are not able to mount NFS share as well. You will see mount.nfs: Connection timed out error when you try to mount NFS share.
root@kerneltalks # mount mynfsserver:/data /nfs_data
mount.nfs: Connection timed out
Troubleshooting steps
Follow below troubleshooting steps to fix RPC: Port mapper failure - Timed out error.
Check NFS services on NFS server
First, check if NFS server services are running smoothly on the NFS server.
root@mynfsserver # service nfs-server status
nfs-server.service - NFS server and services
   Loaded: loaded (/usr/lib/systemd/system/nfs-server.service; disabled)
  Drop-In: /usr/lib/systemd/system/nfs-server.service.d
           └─nfsserver.conf
        /run/systemd/generator/nfs-server.service.d
           └─order-with-mounts.conf
   Active: active (exited) since Tue 2017-11-07 15:58:08 BRST; 6 days ago
 Main PID: 1586 (code=exited, status=0/SUCCESS)
   CGroup: /system.slice/nfs-server.service
The above output is from the Suse Linux server. The output may look different n different Linux distros. If it’s not running or hung, you may need to restart NFS services.
Check connectivity between NFS server and client
Make sure you are able to reach the NFS server from your client. Check using ping and telnet to NFS ports like 111 and 2049 over both protocols TCP and UDP.
root@kerneltalks #  ping mynfsserver
PING lasnfsp01v.la.holcim.net (10.186.1.22) 56(84) bytes of data.
64 bytes from 10.186.1.22: icmp_seq=1 ttl=56 time=3.92 ms
64 bytes from 10.186.1.22: icmp_seq=2 ttl=56 time=3.74 ms
64 bytes from 10.186.1.22: icmp_seq=3 ttl=56 time=3.82 ms
^C
--- mynfsserver ping statistics ---
3 packets transmitted, 3 received, 0% packet loss, time 2003ms
rtt min/avg/max/mdev = 3.748/3.830/3.920/0.086 ms

root@kerneltalks # telnet 10.186.1.22 2049
Trying 10.186.1.22...
Connected to 10.186.1.22.
Escape character is '^]'.
root@kerneltalks # nc -v -u mynfsserver 111
Connection to mynfsserver 111 port [udp/sunrpc] succeeded!
^C
root@kerneltalks # nc -v -u mynfsserver 2049
Connection to mynfsserver 2049 port [udp/nfs] succeeded!
^C
root@kerneltalks # nc -v mynfsserver 111
Connection to mynfsserver 111 port [tcp/sunrpc] succeeded!
^C
root@kerneltalks # nc -v mynfsserver 2049
Connection to mynfsserver 2049 port [tcp/nfs] succeeded!
^C
Check if RPC info is reachable from client
Run below command to check if you can read RPC information of the NFS server from the client machine.
If you have connectivity issue then you will see mynfsserver: RPC: Port mapper failure - Timed out error here.
Check if you can read exported share info from client
Use the below command to check if you can read exported share info from the client.
root@kerneltalks # showmount -e  10.186.1.22
Export list for  10.186.1.22:
/data *(rw,sync,no_root_squash)
Check if antivirus kernel modules are blocking the NFS
Lastly, if you have SEP 14 (Symantec Endpoint Protection) antivirus installed on your server then you need to uninstall it. For some mysterious reason, SEP 14 holds on nfsd and crashes everything to NFS. You may see below messages in dmesg of NFS server to verify if SEP kernel modules are messing up with NFS
You need a reboot after uninstalling antivirus since its kernel modules loaded in kernel won’t get freed with uninstall. For that, you need to reboot the server. You cant even remove it from the kernel as you normally remove the module from the running kernel. So reboot is a way to go after uninstalling antivirus.
root@kerneltalks # lsmod |grep sym
symev_custom_4_12_14_95_48_default_x86_64    98304  1

root@kerneltalks # modprobe -r symev_custom_4_12_14_95_48_default_x86_64
modprobe: FATAL: Module symev_custom_4_12_14_95_48_default_x86_64 is in use.

root@kerneltalks # rmmod  symev_custom_4_12_14_95_48_default_x86_64
rmmod: ERROR: Module symev_custom_4_12_14_95_48_default_x86_64 is in use

root@kerneltalks # lsmod | grep sym
symev_custom_4_12_14_95_48_default_x86_64    98304  1

root@kerneltalks # modinfo symev_custom_4_12_14_95_48_default_x86_64
filename:       /lib/modules/4.12.14-95.48-default/kernel/drivers/char/symev-custom-4-12-14-95-48-default-x86-64.ko
modinfo: ERROR: could not get modinfo from 'symev_custom_4_12_14_95_48_default_x86_64': No such file or directory
Once all the above commands are able to provide you expected output, you will then be ready to mount your share without any issues and the issue will be resolved.
How to resolve connectivity issue
To resolve connectivity between two servers first you need to check on network ends that two servers are able to communicate over a network. If you are running it on AWS Linux EC2 instances then you might need to check security groups to allow proper traffic.
On the OS front, you may need to check iptables settings and allow NFS ports. SELinux is also an area where you need to explore settings if you have customized SELinux running on your server. Normally by default SELinux allows NFS traffic.
Learn how to change timezone in the Linux server. Understand timezone files location, configuration files, and way to change timezone using them.
Timezone configuration
This article is a beginner’s guide to change the timezone of the Linux server. Timezone is crucial for the server since the server’s native time is displayed according to timezone.
Server’s current timezone can be checked using simple date command
root@kerneltalks # date
Tue Nov  7 17:23:54 UTC 2017
In the above output, UTC (Coordinated Universal Time) is your server’s timezone. If you want to change it to match your region or application’s user’s timezone there are three ways you can do it.
If you want to change the timezone without much hassle and without messing around system files directly jump to datetimectl command option below.
How to change timezone in Linux using /etc/localtime file
/etc/localtime is the file used by the kernel to determine the timezone. If you check your current file, its a soft link to respective timezone file in /usr/share/zoneinfo directory.
root@kerneltalks # ll /etc/localtime
lrwxrwxrwx. 1 root root 25 Jul 11 16:06 /etc/localtime -> ../usr/share/zoneinfo/UTC

root@kerneltalks # ls -lrt /usr/share/zoneinfo/
total 284
-rw-r--r--.  1 root root 17722 Dec  5  2016 zone1970.tab
-rw-r--r--.  1 root root 19153 Feb 10  2017 zone.tab
-rw-r--r--.  1 root root  4445 Feb 28  2017 iso3166.tab
-rw-r--r--.  6 root root   118 Mar 21  2017 Zulu
-rw-r--r--.  2 root root  1518 Mar 21  2017 W-SU
-rw-r--r--.  1 root root  1873 Mar 21  2017 WET
-rw-r--r--.  6 root root   118 Mar 21  2017 UTC
-rw-r--r--.  6 root root   118 Mar 21  2017 Universal
-rw-r--r--.  2 root root   118 Mar 21  2017 UCT
-rw-r--r--.  3 root root  2126 Mar 21  2017 Turkey
-rw-r--r--.  2 root root   384 Mar 21  2017 Singapore
-rw-r--r--.  2 root root   517 Mar 21  2017 ROK
-rw-r--r--.  2 root root   764 Mar 21  2017 ROC
-rw-r--r--.  1 root root  2294 Mar 21  2017 PST8PDT
-rw-r--r--.  5 root root   388 Mar 21  2017 PRC
-rw-r--r--.  3 root root  3519 Mar 21  2017 posixrules
-rw-r--r--.  2 root root  3439 Mar 21  2017 Portugal
-rw-r--r--.  2 root root  2679 Mar 21  2017 Poland
-rw-r--r--.  2 root root  2047 Mar 21  2017 NZ-CHAT
-rw-r--r--.  4 root root  2434 Mar 21  2017 NZ
-rw-r--r--.  4 root root  2427 Mar 21  2017 Navajo
-rw-r--r--.  1 root root  2294 Mar 21  2017 MST7MDT
-rw-r--r--.  1 root root   118 Mar 21  2017 MST
-rw-r--r--.  1 root root  2102 Mar 21  2017 MET
-rw-r--r--.  2 root root   641 Mar 21  2017 Libya
-rw-r--r--.  2 root root   219 Mar 21  2017 Kwajalein
-rw-r--r--.  2 root root   292 Mar 21  2017 Japan
-rw-r--r--.  2 root root   481 Mar 21  2017 Jamaica
-rw-r--r--.  3 root root  8981 Mar 21  2017 Israel
-rw-r--r--.  2 root root  1690 Mar 21  2017 Iran
-rw-r--r--.  2 root root  1174 Mar 21  2017 Iceland
-rw-r--r--.  1 root root   119 Mar 21  2017 HST
-rw-r--r--.  2 root root  1175 Mar 21  2017 Hongkong
-rw-r--r--. 10 root root   118 Mar 21  2017 Greenwich
-rw-r--r--. 10 root root   118 Mar 21  2017 GMT+0
-rw-r--r--. 10 root root   118 Mar 21  2017 GMT-0
-rw-r--r--. 10 root root   118 Mar 21  2017 GMT0
-rw-r--r--. 10 root root   118 Mar 21  2017 GMT
-rw-r--r--.  7 root root  3661 Mar 21  2017 GB-Eire
-rw-r--r--.  7 root root  3661 Mar 21  2017 GB
-rw-r--r--.  1 root root  2294 Mar 21  2017 EST5EDT
-rw-r--r--.  1 root root   118 Mar 21  2017 EST
-rw-r--r--.  2 root root  3533 Mar 21  2017 Eire
-rw-r--r--.  2 root root  1946 Mar 21  2017 Egypt
-rw-r--r--.  1 root root  1876 Mar 21  2017 EET
-rw-r--r--.  2 root root  2411 Mar 21  2017 Cuba
-rw-r--r--.  1 root root  2294 Mar 21  2017 CST6CDT
-rw-r--r--.  1 root root  2102 Mar 21  2017 CET
drwxr-xr-x.  2 root root   176 Jul 11 15:57 Indian
drwxr-xr-x.  2 root root  4096 Jul 11 15:57 Africa
drwxr-xr-x.  2 root root    53 Jul 11 15:57 Mexico
drwxr-xr-x.  2 root root    59 Jul 11 15:57 Brazil
drwxr-xr-x.  6 root root  8192 Jul 11 15:57 America
drwxr-xr-x.  2 root root   161 Jul 11 15:57 Canada
drwxr-xr-x.  2 root root   187 Jul 11 15:57 Antarctica
drwxr-xr-x.  2 root root    26 Jul 11 15:57 Arctic
drwxr-xr-x.  2 root root  4096 Jul 11 15:57 Asia
drwxr-xr-x.  2 root root   196 Jul 11 15:57 Atlantic
drwxr-xr-x.  2 root root  4096 Jul 11 15:57 Australia
drwxr-xr-x.  2 root root    45 Jul 11 15:57 Chile
drwxr-xr-x.  2 root root  4096 Jul 11 15:57 Etc
drwxr-xr-x.  2 root root  4096 Jul 11 15:57 Europe
drwxr-xr-x.  2 root root   216 Jul 11 15:57 US
drwxr-xr-x.  2 root root  4096 Jul 11 15:57 Pacific
drwxr-xr-x. 18 root root  4096 Jul 11 15:57 posix
drwxr-xr-x. 18 root root  4096 Jul 11 15:57 right
Since our test server’s timezone is UTC, you can see /etc/localtime is a soft link to /usr/share/zoneinfo/UTC. To change the timezone delete existing /etc/localtime file and create a new one with a link to the desired timezone file.
root@kerneltalks #  rm /etc/localtime
rm: remove symbolic link ‘/etc/localtime’? y

root@kerneltalks # ln -s /usr/share/zoneinfo/US/Eastern /etc/localtime

root@kerneltalks # date
Tue Nov  7 12:32:19 EST 2017
You can see we have changed timezone to EST by linking new localtime file to appropriate zone file under /usr/share/zoneinfo
How to change timezone using shell variable TZ
Another way to change the timezone is to use shell variable TZ. You can do it with single line command as below :
root@kerneltalks # export TZ=Asia/Singapore

root@kerneltalks # date
Wed Nov  8 01:36:15 +08 2017
I exported the timezone variable TZ for Singapore timezone. Check the date command output. Timezone has been set to +08 which means UTC+08:00 i.e. SGT (Singapore Timezone)
But remember, this timezone setting will be available for current shell only from where you are exporting this TZ variable.
How to change timezone using /etc/timezone file
The third way to change timezone is through the use of /etc/timezone file. This is available in some distro like Ubuntu. The content of the file will be the timezone name you want to set.
root@kerneltalks # cat /etc/timezone
Etc/UTC

root@kerneltalks # date
Tue Nov  7 17:50:50 UTC 2017
You have to export the timezone variable TZ as well along with a change in /etc/timezone file. And then you can see timezone change in effect.
Change timezone using timedatectl command
You can use timedatectl command to safely change timezone when you don’t want to deal with system files and fear of messing them up.
timedatectl command used to display current timezone, list available timezones, and change timezone on the server. We have this dedicated article on timedatectl to learn this command in detail.
To change timezone of server, use timedatectl with set-timezone argument and its value.
root@kerneltalks # timedatectl set-timezone Africa/Malabo
root@kerneltalks # date
Wed Nov 15 16:59:23 WAT 2017
In the output, you can see we have changed the timezone of the server to the WAT timezone.
Learn how to create login banners in Linux to display a different warning or information message to the user who is about to log in or after he logs in.
Login banner messages in Linux
Whenever you log in to some production systems of the firm, you get to see some login messages, warnings, or info about the server you are about to log in or already logged in like below. Those are the login banners.
Login welcome messages in Linux
In this article we will walk you through how to configure them.
There are two types of banners you can configure.
Banner message to display before user logs in (configure in the file of your choice eg. /etc/login.warn)
Banner message to display after the user successfully logged in (configure in /etc/motd)
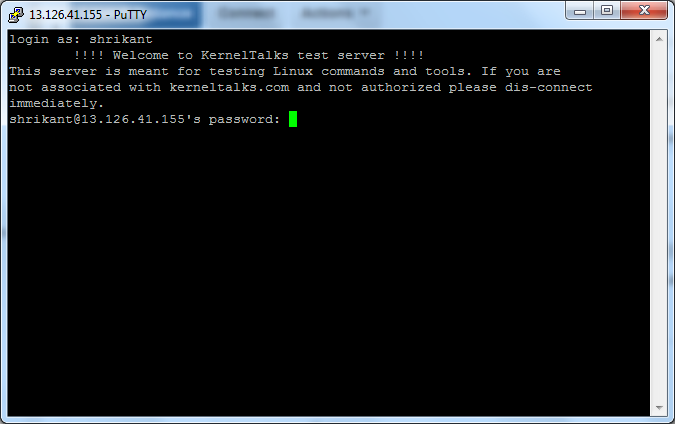
How to display message when user connects to system before login
This message will be displayed to the user when he connects to the server and before he logged in. This means when he enter the username, this message will be displayed before the password prompt.
You can use any filename and enter your message within. Here we used /etc/login.warn file and put our messages inside.
# cat /etc/login.warn
        !!!! Welcome to KernelTalks test server !!!!
This server is meant for testing Linux commands and tools. If you are
not associated with kerneltalks.com and not authorized please dis-connect
immediately.
Now, you need to supply this file and path to sshd daemon so that it can fetch this banner for each user login request. For that open /etc/sshd/sshd_config file and search for the line #Banner none
Here you have to edit the file and write your filename and remove the hash mark. It should look like : Banner /etc/login.warn
Save the file and restart sshd daemon. To avoid disconnecting existing connected users, use the HUP signal to restart sshd.
That’s it! Open new sessions and try login. You will be greeted with the message you configured in the above steps.
Login banner in Linux
You can see the message is displayed before the user enters his password and log in to the system.
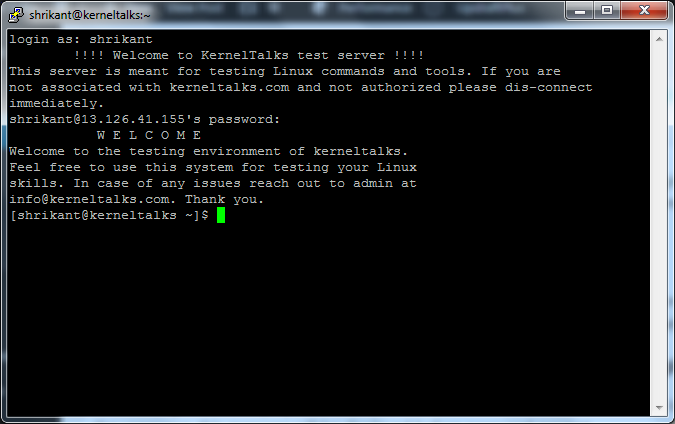
How to display message after user logs in
Message user sees after he logs into the system successfully is Message Of The Day & is controlled by /etc/motd file. Edit this file and enter the message you want to greet the user with once he successfully logged in.
root@kerneltalks # cat /etc/motd
           W E L C O M E
Welcome to the testing environment of kerneltalks.
Feel free to use this system for testing your Linux
skills. In case of any issues reach out to admin at
info@kerneltalks.com. Thank you.
You don’t need to restart sshd daemon to take this change effect. As soon as you save the file, its content will be read and displayed by sshd daemon from the very next login request it serves.
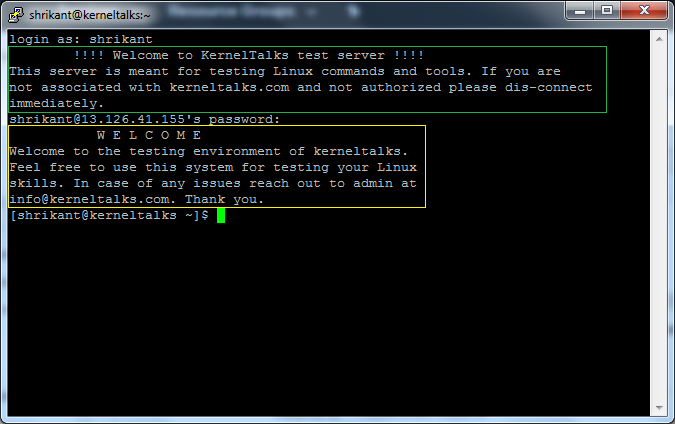
Message Of The Day
You can see in the above screenshot: Yellow box is MOTD controlled by /etc/motd and the green box is what we saw earlier login banner.
You can use tools like cowsay, banner, figlet, lolcat to create fancy, eye-catching messages to display at login. This method works on almost all Linux distros like RedHat, Centos, Ubuntu, Fedora, etc.
Understand sosreport in detail. Learn how to generate sosreport and how to read sosreport in this article.
sosreport
sosreport is not a new term for RedHat lovers! Its a tool on RedHat Linux which helps you grab system information in a single tarball which can be shared with the vendor for troubleshooting issues.
Whenever you log a case with RedHat for RHEL, the first thing first they ask is for sosreport. In this article, we will see how to generate a sosreport and how to read sosreport.
If sosreport package is not installed on your system you will see below error –
root@kerneltalks # sosreport
-bash: sosreport: command not found
Install sos package using yum. You can follow the installation steps explained here. Below are the installation logs for your reference.
root@kerneltalks # yum install sos
Loaded plugins: amazon-id, rhui-lb, search-disabled-repos
Resolving Dependencies
--> Running transaction check
---> Package sos.noarch 0:3.4-6.el7 will be installed
--> Processing Dependency: bzip2 for package: sos-3.4-6.el7.noarch
--> Running transaction check
---> Package bzip2.x86_64 0:1.0.6-13.el7 will be installed
--> Finished Dependency Resolution

Dependencies Resolved

========================================================================================================================================================================
 Package                        Arch                            Version                                 Repository                                                 Size
========================================================================================================================================================================
Installing:
 sos                            noarch                          3.4-6.el7                               rhui-REGION-rhel-server-releases                          381 k
Installing for dependencies:
 bzip2                          x86_64                          1.0.6-13.el7                            rhui-REGION-rhel-server-releases                           52 k

Transaction Summary
========================================================================================================================================================================
Install  1 Package (+1 Dependent package)

Total download size: 433 k
Installed size: 1.4 M
Is this ok [y/d/N]: y
Downloading packages:
(1/2): sos-3.4-6.el7.noarch.rpm                                                                                                                  | 381 kB  00:00:00
(2/2): bzip2-1.0.6-13.el7.x86_64.rpm                                                                                                             |  52 kB  00:00:00
------------------------------------------------------------------------------------------------------------------------------------------------------------------------
Total                                                                                                                                   610 kB/s | 433 kB  00:00:00
Running transaction check
Running transaction test
Transaction test succeeded
Running transaction
  Installing : bzip2-1.0.6-13.el7.x86_64                                                                                                                            1/2
  Installing : sos-3.4-6.el7.noarch                                                                                                                                 2/2
  Verifying  : sos-3.4-6.el7.noarch                                                                                                                                 1/2
  Verifying  : bzip2-1.0.6-13.el7.x86_64                                                                                                                            2/2

Installed:
  sos.noarch 0:3.4-6.el7

Dependency Installed:
  bzip2.x86_64 0:1.0.6-13.el7

Complete!
How to generate sosreport
To generate a sosreport you just need to run sosreport command. It saves the report in /var/tmp by default so make sure you have enough breathing space in /var mount point.
Output file follows naming conventions as sosreport-name.caseID-yyyymmddhhmmss.tar.xz where –
name is Name you provide or hostname by default
caseID if you provide or blank
Date in yyyymmdd format
Time in hhmmss
Its a tarball with compression. After running the command it will ask you name and case ID and then start executing its modules which collects all system information and save it into a tarball.
root@kerneltalks # sosreport

sosreport (version 3.4)

This command will collect diagnostic and configuration information from
this Red Hat Enterprise Linux system and installed applications.

An archive containing the collected information will be generated in
/var/tmp/sos.iNadXY and may be provided to a Red Hat support
representative.

Any information provided to Red Hat will be treated in accordance with
the published support policies at:

  https://access.redhat.com/support/

The generated archive may contain data considered sensitive and its
content should be reviewed by the originating organization before being
passed to any third party.

No changes will be made to system configuration.

Press ENTER to continue, or CTRL-C to quit.

Please enter your first initial and last name [kerneltalks]: Shrikant Lavhate
Please enter the case id that you are generating this report for []: 12345678

 Setting up archive ...
 Setting up plugins ...
 Running plugins. Please wait ...

  Running 74/74: yum...            er...
Creating compressed archive...

Your sosreport has been generated and saved in:
  /var/tmp/sosreport-ShrikantLavhate.12345678-20171105171210.tar.xz

The checksum is: 502b698f6052964ca1c2d348ea7e67a4

Please send this file to your support representative.
Command also shows you checksum of the output file. This will be helpful in checking the integrity of the file when it reaches destination party like vendor etc.
The output report generated above is the tarball file. You can un-tar it and read it on your own as well.
root@kerneltalks # tar xvf /var/tmp/sosreport-ShrikantLavhate.12345678-20171105171210.tar.xz
After extracting tarball you can see directory created with tarball name. Under which you can file many files and directories.
root@kerneltalks # ls -lrt sosreport-ShrikantLavhate.12345678-20171105171210
total 16
drwxr-xr-x.  5 root root   42 Jul 11 15:57 usr
dr-xr-xr-x.  3 root root   19 Jul 11 16:07 boot
dr-xr-xr-x. 10 root root 4096 Nov  5 12:19 proc
dr-xr-xr-x. 10 root root  112 Nov  5 12:19 sys
drwxr-xr-x.  4 root root   28 Nov  5 12:19 var
drwxr-xr-x.  2 root root   18 Nov  5 12:19 dev
dr-xr-xr-x.  7 root root   78 Nov  5 12:24 lib
dr-xr-x---.  2 root root   29 Nov  5 16:23 root
drwxr-xr-x. 34 root root 4096 Nov  5 17:08 etc
lrwxrwxrwx.  1 root root   29 Nov  5 17:12 mount -> sos_commands/filesys/mount_-l
lrwxrwxrwx.  1 root root   27 Nov  5 17:12 df -> sos_commands/filesys/df_-al
lrwxrwxrwx.  1 root root   27 Nov  5 17:12 uptime -> sos_commands/general/uptime
lrwxrwxrwx.  1 root root   28 Nov  5 17:12 uname -> sos_commands/kernel/uname_-a
drwx------.  3 root root   18 Nov  5 17:12 sos_strings
lrwxrwxrwx.  1 root root   25 Nov  5 17:12 lsmod -> sos_commands/kernel/lsmod
lrwxrwxrwx.  1 root root   45 Nov  5 17:12 java -> sos_commands/java/alternatives_--display_java
lrwxrwxrwx.  1 root root   29 Nov  5 17:12 hostname -> sos_commands/general/hostname
lrwxrwxrwx.  1 root root   31 Nov  5 17:12 dmidecode -> sos_commands/hardware/dmidecode
lrwxrwxrwx.  1 root root   25 Nov  5 17:12 date -> sos_commands/general/date
lrwxrwxrwx.  1 root root   32 Nov  5 17:12 route -> sos_commands/networking/route_-n
lrwxrwxrwx.  1 root root   30 Nov  5 17:12 ps -> sos_commands/process/ps_auxwww
lrwxrwxrwx.  1 root root   41 Nov  5 17:12 netstat -> sos_commands/networking/netstat_-W_-neopa
lrwxrwxrwx.  1 root root   22 Nov  5 17:12 last -> sos_commands/last/last
lrwxrwxrwx.  1 root root   34 Nov  5 17:12 ip_addr -> sos_commands/networking/ip_-o_addr
lrwxrwxrwx.  1 root root   24 Nov  5 17:12 free -> sos_commands/memory/free
lrwxrwxrwx.  1 root root  130 Nov  5 17:12 installed-rpms -> sos_commands/rpm/sh_-c_rpm_--nodigest_-qa_--qf_NAME_-_VERSION_-_RELEASE_._ARCH_INSTALLTIME_date_awk_-F_printf_-59s_s_n_1_2_sort_-f
lrwxrwxrwx.  1 root root   38 Nov  5 17:12 chkconfig -> sos_commands/services/chkconfig_--list
-rw-r--r--.  1 root root 1481 Nov  5 17:12 version.txt
drwx------.  2 root root   37 Nov  5 17:12 sos_reports
drwx------.  2 root root   35 Nov  5 17:12 sos_logs
drwx------. 43 root root 4096 Nov  5 17:12 sos_commands
drwxr-xr-x.  3 root root   19 Nov  5 17:12 run
Navigate to sos_reports directory within which you will find sos.txt & sos.html file.
In sos.txt file you can see all the plugins loaded, the command executed, files copied by sosreport. In sos.html file, all these things are hyperlinked to their original content within the directory. So you can directly view command output or files which are copied by script.
If there are any alerts detected by sosreport it will highlight those at the very beginning of these files.
This information is for sosreport version 3.4. If you are running different version there might be small differences in information.
I mounted it on the NFS client client1 successfully. I am able to read all data within this directory from the NFS client.
root@client1 # mount kerneltalks:/mydata /nfs_data
root@client1 # ls -lrt /nfs_data
Issue
I am not able to create a file or directory in the NFS mount even if rw option is set. I tried creating files, directory and I get access denied error.
By default, NFS prevents remote root users from gaining root-level privileges on its exports. It assigns user privileges of nfsnobody user to remotely logged in root users. This is what happened here and hence even if rw option is set, since we are using mount at root user we are not able to write any data on export.
This is called squashing root privileges to the normal ones. This to ensure accidental writing or modifying data on exports. You can set all_squash option which will squash privileges of all remote users including root to normal user nfsnobody.
For our issue, we have to set no_root_squash option on export so that remote root user keeps his power intact and will be able to write on the exported directory.
I re-exported directory using exportfs. Re-exporting mount points does not require the client to un-mount exported directories. Re-export also avoid the NFS server restart and catch up with new configuration.
root@kerneltalks # exportfs -ra
That’s it! Now I am able to create files and directories in the exported directory on NFS client.
When you are using NFS mount points with root account on client-side then export them with no_root_squash option. This will ensure you don’t face access related issues on NFS mount points.
Learn the search power tool Googler to search keywords on Google from the Linux terminal. The text-based search tool works on all Linux distros.
Googler! Logo @github.com/jarun/googler
One of the most visited sites by IT people is Google! Sample code, syntax, errors, solutions, tutorials, howtos we search all these things on Google every day. No one knows everything! No one can deny that he/she never used Google! So it’s an inseparable part of digital life.
What if you could Google right from your Linux terminal! Sounds crazy! Obviously Googling in text mode won’t be that easy-to-use experience but yes for Linux lovers its fascinating and must-do experience.
In this article, we will walk you through how to Google in Linux terminal.
Googler is a tool that provides the capability to search on Google from the Linux terminal. We will see how to install Googler and how to use Googler to search from the Linux terminal.
About Googler
Googler is a command-line utility originally started by Henri Hakkinen and now taken forward by Arun Jana. Its GIT repo is maintained here. When searched, it shows results with title, link, and excerpt in terminal window.
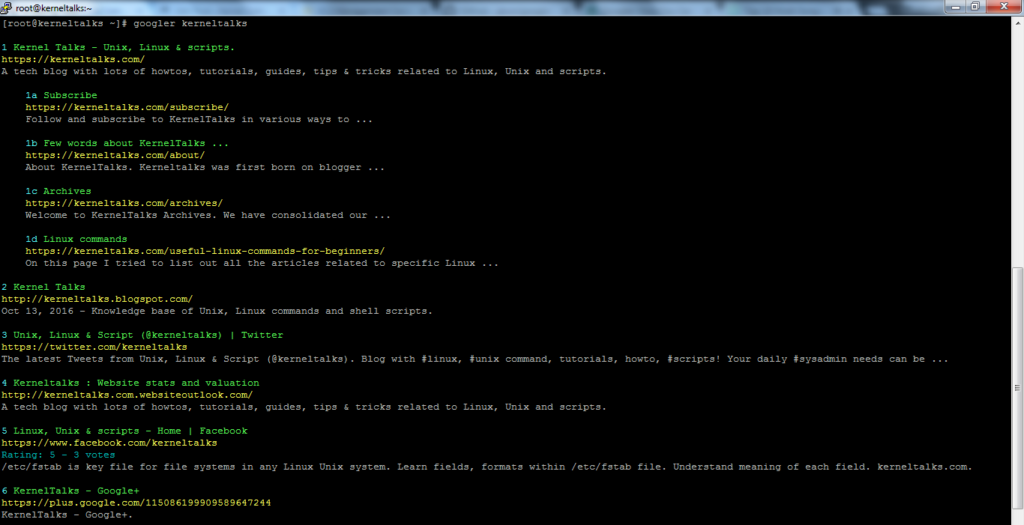
Take a look of Googler in action :
Googler searching kerneltalks on Google
How to install Googler
The Googler uses Python and the latest release needs Python 3 or later to run. Install Python 3 on your system if you don’t have it.
After a successful package installation, you will be able to run googler command. If you want to compile it on your system using source code then source code is available here.
How to use Googler
Googler has many options to search and interact with results. For simple search you just supply keyword and it will show you the first 10 search results the same as Google website do when you search keyword from browser.
Output is color coded for easy reading and identification where –
Green for titles
Yellow for links
cyan for indices and link metadata like published date etc.
Normal for link description
See above screenshot where you can see simple keyword search in googler and the color scheme.
If you run googler command without any argument it asks for a keyword or offers help via ?
root@kerneltalks # googler
Please initiate a query.
googler (? for help) ?

omniprompt keys:
  n, p                  fetch the next or previous set of search results
  index                 open the result corresponding to index in browser
  f                     jump to the first page
  o [index|range|a ...] open space-separated result indices, numeric ranges
                        (sitelinks unsupported in ranges), or all, in browser
                        open the current search in browser, if no arguments
  O [index|range|a ...] like key 'o', but try to open in a GUI browser
  g keywords            new Google search for 'keywords' with original options
                        should be used to search omniprompt keys and indices
  q, ^D, double Enter   exit googler
  ?                     show omniprompt help
  *                     other inputs issue a new search with original options
Here are few searches you can try with Googler :
Search within news for keyword
# googler -N Linux
Search on specific website
# googler -w kerneltalks.com nfs
Search specific filetype
# googler linux tutorial filetype:pdf
Many options to explore and use. Check googler manpage using man googler or help using googler -h !!