Learn how to setup domain names in RedHat, Ubuntu, CentOS, Fedora like Linux servers. Also, see how to verify domain name in Linux and FQDN setup in Linux
Domain name in Linux
Many companies have an internal domain for their IT infrastructure. This needs its servers to be configured with a domain name. This will ensure all servers will have FQDN (Fully Qualified Domain Name). For example, server12 is hostname and server12.kerneltalks.com is its FQDN. In such setup, many tools, monitoring requires servers to be identified by FQDN only.
For such a scenario you have to configure the domain name for your Linux server. We will walk you through steps that need to be taken to the setup domain name on your Linux server.
First of all, check if your server is having domain name already set up or not using below command :
root@server12 # dnsdomainname
kerneltalks.com
If you get output like above then your server is configured with the domain name. If your output is blank then you have to the setup domain name for your server.
Without further delay lets jump into steps to configure domain name.
Step 1.
How to setup FQDN in Linux?
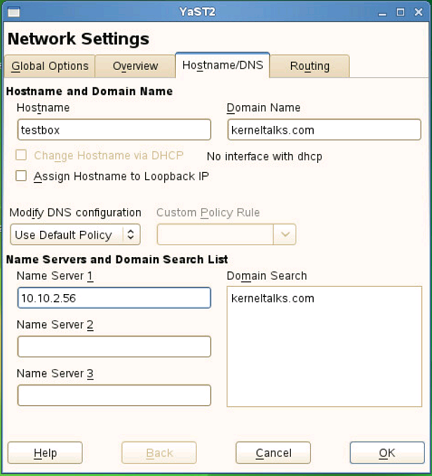
First thing to be done is add FQDN to your hostname in /etc/hosts file.
Beginners guide on how to configure nameserver in Red Hat, CentOs, Fedora, Debian, Ubuntu or Suse Linux to resolve DNS queries.
Configure nameserver in Linux
Nameserver is the DNS server to which your machine query for name resolutions. This is pretty much important on servers facing the Internet or having an active internet connection or if your system is part of an organization where the internal domain name system is implemented for IT Infra. In this article, we will walk you through how to set up nameserver in your Linux machine
What is nameserver?
Its server which response to the queries normally domain name resolution. It’s like a phone directory, where you query name and you get phone number. Nameserver receives hostname or domain name in the query and responds back with IP address.
How to setup nameserver in Red Hat?
You need to open file /etc/resolv.conf in a text editor like vi or nano and add your name server IP in the below format.
You can use the same above same method to configure nameserver in CentOS, Debian, Fedora.
How to setup nameserver in Ubuntu?
Addition to /etc/resolv.conf file, in ubuntu, you can edit file /etc/network/interfaceswith the same above said information. The format remains the same.
Learn to install VMware tools in Linux VMs like RedHat, Suse, Debian, Ubuntu, CentOS, etc. The article includes screenshots, commands, and a complete installation log.
VMware tools installation on Linux
Even the cloud market is bursting nowadays, many corporations still prefer to have in-house Infra virtualization using technologies like VMware. A wide variety of Operating systems can be hosted on virtual machines created under it.
Linux servers like Red Hat, Ubuntu, Suse, Fedora are hosted on VMware infra. After fresh installation you will see warning under VMware console that VMware Tools are not installed on your guest machine. Like below :
VMware Tools is not installed on this virtual machine!
vmware tools warning
It is not mandatory to install these tools but recommended having them on the guest machine so that host and guest can communicate properly. As a result, your VMware console has more power, visibility over your guest machine.
In this article, we will walk through steps on how to install VMWare tools on Linux guest OS like Red Hat, Ubuntu, Kali, Suse, Debian, etc.
Step 1.
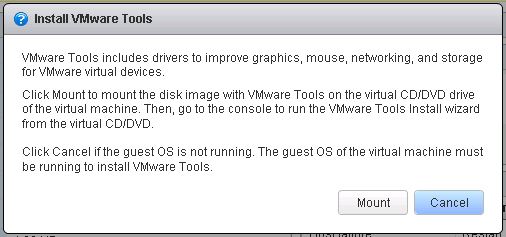
First make sure you have one empty CD-ROM drive attached with the guest machine. Click on the“Install VMware Tools” link in the warning shown above. That will be under the ‘Summary‘ tab of your virtual machine in the VMware console. This will pop up a message confirming to mount VMware tools cdrom on your guest OS.
Mounting VMware tools disc
Click ‘Mount‘ on the pop-up and it will mount VMware tools disc on your guest Linux machine. If you have VMware tools ISO, you can mount ISO as well.
Step 2.
Login to guest Linux machine and you will notice disc is automatically mounted on /media/VMware Tools. Verify it using df command.
root@kerneltalks # df -h
Filesystem                 Size  Used Avail Use% Mounted on
/dev/sr0                    71M   71M     0 100% /media/VMware Tools
If it’s not mounted automatically, you can mount it manually with below set of commands –
root@kerneltalks # mkdir /mnt/cdrom
root@kerneltalks # mount /dev/cdrom /mnt/cdrom
root@kerneltalks # df -h
Filesystem                 Size  Used Avail Use% Mounted on
/dev/sr0                    71M   71M     0 100% /mnt/cdrom
Once mounted confirm the content of discs are visible to you.
root@kerneltalks # cd "/media/VMware Tools"
root@kerneltalks # ll
total 71888
-r--r--r-- 1 root root 72162730 Feb 17  2016 VMwareTools-10.0.6-3560309.tar.gz
-r-xr-xr-x 1 root root     2012 Feb 17  2016 manifest.txt
-r-xr-xr-x 1 root root     1850 Feb 17  2016 run_upgrader.sh
-r-xr-xr-x 1 root root   687524 Feb 17  2016 vmware-tools-upgrader-32
-r-xr-xr-x 1 root root   757944 Feb 17  2016 vmware-tools-upgrader-64
It is important to copy files from disc to local directory. Since if you try to directly run things from the disc you may encounter permission related errors because the disc is mounted as read-only.
Step 3.
Copy installers in the local directory. Goto disc and copy tar file in it to local directory e.g. /tmp/vmware
root@kerneltalks  # cd vmware-tools-distrib
root@kerneltalks  # ll
total 488
-rw-r--r-- 1 root root 282475 Feb 17  2016 FILES
-rw-r--r-- 1 root root   2538 Feb 17  2016 INSTALL
drwxr-xr-x 1 root root    114 Feb 17  2016 bin
drwxr-xr-x 1 root root     18 Feb 17  2016 caf
drwxr-xr-x 1 root root     74 Feb 17  2016 doc
drwxr-xr-x 1 root root    598 Feb 17  2016 etc
drwxr-xr-x 1 root root    114 Feb 17  2016 installer
drwxr-xr-x 1 root root    158 Feb 17  2016 lib
drwxr-xr-x 1 root root     14 Feb 17  2016 vgauth
-rwxr-xr-x 1 root root    243 Feb 17  2016 vmware-install.pl
-rwxr-xr-x 1 root root 205571 Feb 17  2016 vmware-install.real.pl
Step 4.
Install VMware tools. The final step is to run the Perl script and install tools. It will ask you a couple of questions regarding directory structures, you can customize or just accept defaults.
All the below installation logs are minimized for the better reading experience. To view them, click on them to expand code.
root@kerneltalks # ./vmware-install.pl
Creating a new VMware Tools installer database using the tar4 format.

Installing VMware Tools.

In which directory do you want to install the binary files?
[/usr/bin]

What is the directory that contains the init directories (rc0.d/ to rc6.d/)?
[/etc/init.d]

What is the directory that contains the init scripts?
[/etc/init.d]

In which directory do you want to install the daemon files?
[/usr/sbin]

In which directory do you want to install the library files?
[/usr/lib/vmware-tools]

The path "/usr/lib/vmware-tools" does not exist currently. This program is
going to create it, including needed parent directories. Is this what you want?
[yes]

In which directory do you want to install the common agent library files?
[/usr/lib]

In which directory do you want to install the common agent transient files?
[/var/lib]

In which directory do you want to install the documentation files?
[/usr/share/doc/vmware-tools]

The path "/usr/share/doc/vmware-tools" does not exist currently. This program
is going to create it, including needed parent directories. Is this what you
want? [yes]

The installation of VMware Tools 10.0.6 build-3560309 for Linux completed
successfully. You can decide to remove this software from your system at any
time by invoking the following command: "/usr/bin/vmware-uninstall-tools.pl".

Before running VMware Tools for the first time, you need to configure it by
invoking the following command: "/usr/bin/vmware-config-tools.pl". Do you want
this program to invoke the command for you now? [yes]
Once it receives all the answers, installation begins –
Initializing...


Making sure services for VMware Tools are stopped.

Stopping VMware Tools services in the virtual machine:
   Guest operating system daemon:                                      done
   VMware User Agent (vmware-user):                                    done
   Unmounting HGFS shares:                                             done
   Guest filesystem driver:                                            done


Found a compatible pre-built module for vmci.  Installing it...


Found a compatible pre-built module for vsock.  Installing it...


The module vmxnet3 has already been installed on this system by another
installer or package and will not be modified by this installer.

The module pvscsi has already been installed on this system by another
installer or package and will not be modified by this installer.

The module vmmemctl has already been installed on this system by another
installer or package and will not be modified by this installer.
During installation it will ask you if you want to enable specific features or not. Submit your choices accordingly.
The VMware Host-Guest Filesystem allows for shared folders between the host OS
and the guest OS in a Fusion or Workstation virtual environment.  Do you wish
to enable this feature? [no]

Found a compatible pre-built module for vmxnet.  Installing it...


The vmblock enables dragging or copying files between host and guest in a
Fusion or Workstation virtual environment.  Do you wish to enable this feature?
[no]

VMware automatic kernel modules enables automatic building and installation of
VMware kernel modules at boot that are not already present. This feature can
be enabled/disabled by re-running vmware-config-tools.pl.

Would you like to enable VMware automatic kernel modules?
[no]


Disabling timer-based audio scheduling in pulseaudio.

Do you want to enable Guest Authentication (vgauth)? Enabling vgauth is needed
if you want to enable Common Agent (caf). [yes]

Do you want to enable Common Agent (caf)? [yes]
Finally it will detect and confirms GUI related parameters and builds boot image.
Detected X server version 1.6.5


Unable to detect guest resolution.


Please choose one of the following display sizes that X will start with:

[1]< 640x480
[2]  800x600
[3]  1024x768
[4]  1280x800
Please enter a number between 1 and 4:

[1] 2


X is running fine with the new config file.

Creating a new initrd boot image for the kernel.

Kernel image:   /boot/vmlinuz-3.0.101-63-default
Initrd image:   /boot/initrd-3.0.101-63-default
Root device:    UUID=6b24d38e-094f-471b-8215-aaf85a47fe8e (/dev/dm-2) (mounted on / as btrfs)
Resume device:  /dev/swapvg/swaplv
modprobe: Module crct10dif not found.
WARNING: no dependencies for kernel module 'crct10dif' found.
Kernel Modules: hwmon thermal_sys thermal processor fan scsi_mod libata libahci ahci scsi_transport_spi mptbase mptscsih mptspi ata_piix ata_generic vmxnet3

vmw_pvscsi vmxnet dm-mod dm-log dm-region-hash dm-mirror dm-snapshot scsi_dh scsi_dh_alua scsi_dh_emc scsi_dh_hp_sw scsi_dh_rdac libcrc32c zlib_deflate btrfs

usb-common usbcore ohci-hcd uhci-hcd ehci-hcd xhci-hcd hid usbhid linear crc-t10dif sd_mod crc32c
Features:       acpi dm block usb lvm2 btrfs resume.userspace resume.kernel
Bootsplash:     SLES (800x600)
51984 blocks
>>> Network: auto
>>> Calling mkinitrd -k /boot/vmlinuz-3.0.101-63-default -i /tmp/mkdumprd.XwBasPAr7V -f 'kdump network' -B  -s ''
Regenerating kdump initrd ...

Kernel image:   /boot/vmlinuz-3.0.101-63-default
Initrd image:   /tmp/mkdumprd.XwBasPAr7V
Root device:    UUID=6b24d38e-094f-471b-8215-aaf85a47fe8e (/dev/dm-2) (mounted on / as btrfs)
Resume device:  /dev/swapvg/swaplv
Dump device:    UUID=cbc439cd-3514-442e-bb42-b80f7823bdc1 (/dev/dm-3)
Boot device:    /dev/disk/by-uuid/9278503b-3bed-45b0-968a-6de4c9264d94 (/dev/sda1)
modprobe: Module crct10dif not found.
WARNING: no dependencies for kernel module 'crct10dif' found.
Kernel Modules: hwmon thermal_sys thermal processor fan scsi_mod libata libahci ahci scsi_transport_spi mptbase mptscsih mptspi ata_piix ata_generic vmxnet3

vmw_pvscsi vmxnet dm-mod dm-log dm-region-hash dm-mirror dm-snapshot scsi_dh scsi_dh_alua scsi_dh_emc scsi_dh_hp_sw scsi_dh_rdac libcrc32c zlib_deflate btrfs

usb-common usbcore ohci-hcd uhci-hcd ehci-hcd xhci-hcd hid usbhid af_packet linear nls_utf8 mbcache jbd ext3 crc-t10dif sd_mod crc32c
Features:       acpi dm block usb network lvm2 btrfs resume.userspace resume.kernel kdump
64862 blocks
Generating the key and certificate files.
Successfully generated the key and certificate files.
   Checking acpi hot plug                                              done
Starting VMware Tools services in the virtual machine:
   Switching to guest configuration:                                   done
   VM communication interface:                                         done
   VM communication interface socket family:                           done
   Guest operating system daemon:                                      done
   VGAuthService:                                                      done
   Common Agent:                                                       done
The configuration of VMware Tools 10.0.6 build-3560309 for Linux for this
running kernel completed successfully.
In the end, it presents you with the command to be used for VMware tools, greets and un-mount VMware tools disc (if it was mounted automatically in beginning)
You must restart your X session before any mouse or graphics changes take
effect.

You can now run VMware Tools by invoking "/usr/bin/vmware-toolbox-cmd" from the
command line.

To enable advanced X features (e.g., guest resolution fit, drag and drop, and
file and text copy/paste), you will need to do one (or more) of the following:
1. Manually start /usr/bin/vmware-user
2. Log out and log back into your desktop session; and,
3. Restart your X session.

Enjoy,

--the VMware team

Found VMware Tools CDROM mounted at /media/VMware Tools. Ejecting device
/dev/sr0 ...
VMware tools silent install on Linux VM
If you do not want to customize any of the answers asked during installation and want to go with all default values then you can use below command for starting non-interactive installation :
root@kerneltalks # ./vmware-install.pl -d default
This will install VMware tools in silent mode. No human interaction required and all default settings will be used for installation.
That’s it! You have successfully installed VMware tools on your Linux guest machine in VMware. You can now see IP details of guests in the VMware console. Also VMware tools status will be shown as ‘Installed and running‘.
An article explaining how to check physical memory (RAM) in the Linux server. 4 different commands to get memory information from the Linux server.
Checking physical memory (RAM)
In this article we will see basic commands to check physical memory on a server in Linux. Many beginners struggle with knowing their system well in context to resources like CPU, Memory, disks, etc. So I decided to write this small article pinpointing commands to check RAM on the Linux server. These commands will work in different flavors of Linux like Red Hat, CentOS, Suse, Ubuntu, Fedora, Debian, etc.
Without much delay lets dive into commands –
1. Using free command
The first command is free. This is the simplest command to check your physical memory. This command is mainly used for checking RAM and SWAP on the system. Using different switch you can change the byte-format of output. Like -b for bytes, -k for kilobytes, -m for megabytes and -g for gigabytes.
Check row with Mem: and number against it. That’s the physical RAM of your server.
In the above output you can see the system is installed with 125GB of physical RAM (observe highlighted rows). By using a different switch -b, -k, -m and -g output changed numbers according to selected byte-format.
2. Using /proc/meminfo file
Another way is to read memory info from the proc filesystem. /proc/meminfo is the file you should read to get detailed information about memory. The very first line or line starts with MemTotal is your total physical memory on the server.
As you can see from output, memory is displayed in kilobytes.
3. Using top command
The famous top command also lists physical memory information in a very clear way. In the upper section of the top command output lies the CPU, Memory, and SWAP information.
I clipped the above section of the top command output in the above example. Check second last line saying Mem: (highlighted row). This shows physical memory in kilobytes. You can see the total, used, and free portions of it. Total is your actual RAM installed on the server.
4. Using vmstat
Another way is to use vmstat (virtual memory stats) command with -s switch. This will list memory in detail with the first-line being total memory on the server.
# vmstat -s
    132039544  total memory
      1218692  used memory
       181732  active memory
----output trimmed----
Memory is displayed in kilobytes by default. The very first line shows you total memory on the server.
Learn to find command with these 14 examples. Find command examples handpicked to help you in your day-to-day operations.
‘find’ command
One of the most important, used and helpful command in Linux terminal is ‘find’ command. It will search files depending on your search criteria and bring the list for you! It saves you from going to many directories and wasting time looking out your required files.
In this article we will see a list of different find commands to search files. Normally find command syntax is –
# find <path_to_search> -switch <search_criteria>
Where, path_to_search is a directory location where you want to search and search_criteria is a condition that should be matched to search files. Note here that find command will search all sub-directories of given path_to_search recursively.
Let’s see 14 find command examples that are very helpful for you in your day to day operations on Linux servers like RedHat, Ubuntu, CentOS, Debian, etc.
Find file using name
Using –name switch you can specify the name of files to search in a particular location.
root@kerneltalks # find /tmp -name "*.gz"
You can use wild cards as well while specifying your search criteria. In the above example, we searched /tmp directory for all gun-zipped files.
Find only files
To search specific file type -type switch needs to be defined in find command.
root@kerneltalks # find /tmp -type f -name "*log"
For searching only files, we defined -type as f in the above example. The above command will search /tmp for files whose name ends with a log.
Find only directories
For searching only directories define -type as d.
root@kerneltalks # find /tmp -type d -name "box*"
In the above example, find command will search /tmp for only directories whose name starts with a box.
Find files which are modified in last 7 days
Searching files that are modified in the last X days is helpful for log management. When you don’t have utilities like logrotate configured then you will have to search and house keep files with this command.
root@kerneltalks # find /tmp -mtime 7
-mtime is a switch which takes a number of days as an argument. mtime stands for modification time.
You can combine the same switch two times to get a range of days for your search. For example to search files which are modified between last 10 to 20 days you can use :
Another variant of the above search is to find files that are accessed in the last X days. So that decisions can be made for those files who are not accessed for a long period of time and can be zipped/trimmed to save disk space.
root@kerneltalks # find /tmp -atime 7
-atime switch to be used and number of days to be supplied as argument.
You can combine the same switch two times to get a range of days for your search. For example to search files which are accessed between last 10 to 20 days you can use :
Some times housekeeping is done based on file size too. To search file based on its size you can use -size and supply human-readable size formats like 10M, 2G, etc.
root@kerneltalks # find /tmp -size 5M
Above command will search file with 5MB size.
Find files having size greater than
But, exact size search mostly doesn’t yield expected. It’s always good if you search with a file size range. To find files with size greater than X –
root@kerneltalks # find /tmp -size +10M
This command will search /tmp for files whose size is greater than 10MB.
Find files having size lesser than
Same way files can be searched with size less than specified value like –
root@kerneltalks # find /tmp -size -20M
Using above two option we can even define range of size to search file from.
This command will search files whose size is greater than 10MB and less than 20MB!
Find hidden files
As you know in Linux/Unix, hidden files name starts with .
So we can search for hidden files using -name switch explained earlier with the wild card as below –
root@kerneltalks # find /tmp -type f -name .*
We specified wild card asterisk with . means search all files whose name starts with .
Find files with particular permission
Searching files with particular permission is one of the tasks while auditing. This will help you to trace down files that might be having un-necessary extra permissions and can pose a security threat to the system.
-perm (permission) the switch can be used with findcommand followed by permissions.
root@kerneltalks # find / -type f -perm 0777
In above command we are searching all files with 777 permission.
Find world readable files
With the above example, we can search world-readable files i.e. everyone has only read access on that file (444 or -r--r--r-- permission)
root@kerneltalks # find / -type f -perm 444
OR
root@kerneltalks # find / -type f -perm /u=r -perm /g=r -perm /o=r
You can see numeric as well as u-g-o (user, group, others) format can be used with this switch.
Find files owner by particular user
If you are suspecting some user is spamming files on the server, you can directly search files with his ownership using -user switch.
root@kerneltalks # find / -type f -user shrikant
This command will search whole root directory for files which are owned by user ‘shrikant’
Find files owned by particular group
Similarly, files owned by a specific group can be searched using find command with -group switch
root@kerneltalks # find / -type f -group dba
In above example we are searching for files owned by group named ‘dba’
Find empty files or directories
Empty files and directories cleanup is crucial when you are hitting your inode limits. Sometimes deleting sources of soft links, left link files empty on server occupying inode. In such a case we can search them with -empty switch to find command.
root@kerneltalks # find / -type f -empty
root@kerneltalks # find / -type d -empty
Defining file type as file or directory will search respective empty entities.
Beginners guide to ls command. Learn ls command with 12 examples that can be used in your daily Linux tasks.
Learn ‘ls’ command
The very first command anyone types, when they logged into the terminal, is either ls or hostname! Yes, ls is the first command all beginners, newbies learn and use when they introduced to Linux world. It is one of the most used rather smashed commands in terminal 🙂
ls stands for list. This command helps in listing files and directories in Linux or Unix. There are many switches available to use with use to fit your need. We will walk you through 15 different examples of ls commands which can be useful for you in your daily routine.
Normal ls command without any switch
Without any switch ls command shows all files and directories names in a single line separated by space.
root@kerneltalks # ls
directory1  directory2  testfile1  testfile2
Long listing using ls -l
For more detailed information, use long listing. That is using -l switch with ls command.
You can see in the above output, hidden file .account_detail (name starts with .) is listed.
Listing human readable file sizes
In long listing we have seen that file size is displayed in block size. This is not a user-friendly format since you have to convert blocks to conventional byte size. Easy human-readable format like KB, Mb, GB is available with switch -h. Using these file sizes will be displayed in a human-readable format.
Numbers 18, 30, 32, and 43 are respective inodes of those files and directories on right.
Sorting files with time of last modify time
This is one of the most widely used formats of ls command. Switch used are -l (long listing), -r (reverse sort), -t (the sort with modification time). Due to the reverse sort, the latest updated file will be shown at the bottom of the output.
ls command without argument lists all files and directory names. But without long listing (in which directories have their permission string starts with d) you won’t be able to identify directories. So here is a tip. Use -p switch. It will append / to all directory names and you will identify them easily.
root@kerneltalks # ls -p
directory1/  directory2/  testfile1  testfile2
You can see both directories has / appended to their names.
Listing directories recursively
The long listing or normal ls command shows you only directories residing in the current directory (from where you are running the command). To view files inside those directories you need to run ls command recursively i.e using -R switch.
This is it! 12 different examples of ls command which can be helpful to you in your daily Linux learning. Do subscribe to our blog to get the latest post notifications about Linux howto guides. Let us know if you want to cover some beginner’s topics in the comments section below.
Linux server build template which will help you design your own build sheet or build book. This template can be used as a baseline and has all the necessary details regarding the new server build.
Linux server build sheet
Technical work needs to be documented well so that it can be referred by future sysadmins and make their life easy! One of the important documentation all Linux sysadmin has to maintain is the Server build book or server configuration sheet.
Although there are many automation tools available in the market which serve the purpose of pulling configuration from the server and presenting you in a formatted manner, they come into the picture once the server is up and running. What if you want to fill in this server build document before the server is made active. Or you need to draft a server build sheet wherein you require the requester to fill in details so that accordingly you will deploy the server. In such cases you can not rely on automation tools.
Before you read further please be noted that this is a pure process-related document being discussed not the technical.
It will be a manual method of collecting information from respective stakeholders and then using all information, you can build your server. Information collection can be done from various stakeholders like below –
Business authorities (project details, billing context, server tier classification)
Datacenter team (hardware details)
Storage team (Storage connectivity and capacity)
Network team (IP, connectivity matrix)
For building or deploying one Linux server, all the above-said stakeholders needs to be contacted to get relevant information which will help to deploy a server. I have created on sample template for Linux server build which you may refer (link at end of the article).
Business authorities can help you identify the server’s tier classification. It tells you how critical the server it is. Most critical servers will get high-performance resources (like SSD storage), latest tech while less critical receives less expensive resources (like SATA disk storage). This tier configuration mostly named under platinum (being most critical, high valued), gold, silver, copper (being least critical). The terminology may change in different organizations but this is widely used across the IT industry. Business authorities also help you identify server’s project so that you can use this information in your Inventory sheet or naming conventions for server infra etc.
Datacenter team helps you to identify hardware on which you can build your server. If its a physical server then its DC location along with Rack number, chassis number, blade number, etc details helps you in locating the server physically. Also iLO or management port connectivity can be arranged with the help of the data center team. This is crucial for a new server when they don’t have anything running on them and you have to start afresh install. If it’s a virtual server based on virtualization like VMware, the datacenter team can help you identify proper hosts within virtualized infra to host your server. Other details like VMware datacenter, cluster, ESXi host, datastore can be obtained with the help of the DC team.
The storage team can help you with LUN provisioning according to your requirement. Storage can be allocated according to the server tier. If its a new physical server then you need to have physical connectivity as well in place with the help of storage and DC team.
The network team can provide you with free IP, subnet mask, and gateways which are to be configured on the server. Any new VLAN creation request can be taken up with the network team for resolution.
Learn about the difference between /etc/passwd and /etc/shadow files in the Linux system. 9 points to understand the comparison of these two files.
/etc/passwd vs /etc/shadow
Its one of the Linux beginners interview question explain the difference between /etc/passwd and /etc/shadow files or compare passwd and shadow files in Linux. Basically both files serve different purposes on the system so it’s not completely logical to compare them but still if you want to we have this article for you explaining /etc/passwd vs /etc/shadow.
Before reading ahead, if you are not sure about these files read our articles explaining these files field by field.
File formats are the same i.e. fields separated by colons & new row for each user. But the number of fields is different. passwd file has 7 fields whereas the shadow file has 8 fields.
All fields are different except for the first one. It’s the same for both files and is the username.
/etc/passwd file aims at user account details while /etc/shadow aims at the user’s password details.
the passwd file is world-readable. shadow file can only be read by the root account.
The user’s encrypted password can only be stored in /etc/shadow file.
pwconv command is used to generate a shadow file from the passwd file if it doesn’t exist.
passwd file exists by default when the system is installed.
passwd file information is more of a static (home directory, shell, uid, gid which hardly changes)
shadow file information changes frequently since its related to password and user password changes frequently (if not, password policies are loosely defined!)
Article to understand fields, formats of /etc/shadow file. Learn each field in detail and how it can be modified.
/etc/shadow file in Linux
We have written about /etc/passwd file in the past. In this article, we will see /etc/shadow file, its format, its content, its importance for the Linux system. /etc/shadow file (henceforth referred to as shadow file in this article) is one of the crucial files on system and counterpart of /etc/passwd file.
Unlike the password file, the shadow file is not world-readable. It can be read by the root user only. Shadow file permissions are 400 i.e. -r-------- and ownership is root:root. This means it can be only read and by root users only. The reason for such security is password related information that is being stored in this file.
Since its normal text file, commands like cat, more will work without any issue on it.
/etc/shadow file has different fields separated by a colon. There are a total of 8 fields in the shadow file. They are –
Username
Encrypted password
Last password change
Min days
Max days
Warn days
Inactive days
Expiry
Lets walk through all these fields one by one.
Username
Username is the user’s login name. Its created on the system whenever the user is created using useradd command.
Encrypted password
Its user’s password in encrypted format.
Last password change
Its number of days since 1 Jan 1970, that password was last changed. For example in the above sample testuser’s last password change value is 17413 days. Means count 17413 days since 1 Jan 1970 which comes to 4 Sept 2017! That means testuser last changed his password on 4 Sept 2017.
You can easily add/subtract dates using scripts or online tools.
Min days
Its minimum number of days between two password changes of that account. That means the user can not change his password again unless min days have passed after his last password change. This field can be tweaked using chage command. This is set to 7 days generally but can be 1 too depends on your organization’s security norms.
Max days
Its maximum number of days for which the user password is valid. Once this period exhausted, the user is forced to change his/her password. This value can be altered using chage command. It is generally set to 30 days but value differs as per your security demands.
Warn days
Its number of days before password expiry, the user will start seeing a warning about his password expiration after login. Generally it is set to 7 but it’s up to you or your organization to decide this value as per organizational security policies.
Inactive days
A number of days after password expiry, the account will be disabled. This means if the user doesn’t log in to the system after his/her password expiry (so he doesn’t change the password) then after these many days account will be disabled. Once the account is disabled, the system admin needs to unlock it.
Expiry
Its number of days since 1 Jan 1970, the account is disabled. Calculations we already saw in the ‘last password change’ section.
Except for the first 2 fields, the rest of all fields are related to password aging/password policies.
Learn to kill the process in Linux using kill, kill, and killall commands. Kill processes using PID or process name.
Kill process in Linux with kill, pkill and killall
Windows users have a task manager where they can monitor running processes and choose to ‘End Task‘ to kill off unwanted/hung/less critical processes to save system resources. Same way, in Linux as well you can kill processes and save on your system resource utilization.
In this article we will walk through steps on how to kill the process in Linux using kill, kill, and killall commands. These three commands used to kill processes in a different manner. To proceed with you should know the concept of PID i.e. Process ID. It is the numeric value you will be used as an argument in kill commands.
What is PID?
PID is the Process ID, it’s a numeric identification of process in the kernel process table. Each process in Linux is identified by PID. PID 1 is always init process in Linux whereas new Linux distributions like RHEL7 has systemd as a PID 1 process. It is the parent of all processes. If any process don’t have a parent or if its parent process is terminated abruptly (zombie process), PID 1 process takes over that child process.
The next question is how to find process id in Linux? It can be obtained using below several commands :
With ps -A command you get a list of all running processes and their PID in the first column of the output. Grep out your desired process from the output. With ps auxcommand you can see more information about processes with PID in the second column of the output. Alternatively, you can use pidof command when you know the exact process name to get its only PID.
Now, you are ready with PID of the process to be killed. Let’s move on to killing it!
How to kill process in Linux?
There are a few limitations you should consider before killing any PID. They are as below –
You can kill the process which is owned by your userid only.
You can not kill system processes.
Only the root user can kill other user’s processes.
Only root can kill system using processes.
After fulfilling all above criteria, you can move ahead to kill PID.
Kill process using kill command
Kill command is used to send specific signals to specified PID. Signal numbers and PID you need to supply to command. The signal used are :
1 : Hung up
9 : Kill
15 : Terminate
Normally 9 signal is used (famous kill -9 command) while 15 is used if 9 doesn’t work. Hung up signal is rarely used. Kill process using command syntex kill -signal PID like –
root@kerneltalks # kill -9 8274
Kill process using pkill
If you want to use the process name instead of PID then you can use the pkill command. But remember to use the correct process name. Even a small typo can lead you to kill off unwanted processes. Syntex is simple, just specify process name to command.
root@kerneltalks # pkill myprocess
Kill process using killall
With the above two commands : kill and pkill, you are killing only a specific process whose PID or name is specified. This leads its child processes to hung or zombie. To avoid this situation, you can kill the process along with all its child processes using killall command.
root@kerneltalks # killall myprocess
Conclusion
As root you can kill any process including system ones on the Linux system. As a normal user you can kill processes owned by you only. Process ID i.e. PID can be obtained using command ps or pidof. This PID or process name can be used to kill the process using kill, pkill and killall commands.