Article explaining ‘ERROR Cannot fetch deployment URL via curl: Couldn’t resolve host. The given remote host was not resolved.’ and how to resolve it.
check_mk register error
check_mk is a utility that helps you configure your server to be monitored via nagios monitoring tool. While configuring one of the clients I came across below error :
ERROR Cannot fetch deployment URL via curl: Couldn't resolve host. The given remote host was not resolved.
This error came after I tried to register the client with the monitoring server with below command :
-s is monitoring server -i is Name of Check_MK site on that server -H is Hostname to fetch agent for -p is protocol Either HTTP or HTTPS (default is HTTPS) -U User-ID of a user who is allowed to download the agent. -S is secret. Automation secret of that user (in case of automation user) From the error, you can figure out that command is not able to resolve to monitor server DNS name monitor.kerneltalks.com
Solution
Its pretty simple. Check /etc/resolv.conf to make sure that you have proper DNS server entry for your environment. If it still doesn’t resolve the issue then you can add an entry in /etc/hosts for it.
Thats it. You would be able to register now successfully.
root@kerneltalks # /usr/bin/cmk-update-agent register -s monitor.kerneltalks.com -i master -H `hostname` -p http -U omdadmin -S ASFKWEFUNSHEFKG -v
Going to register agent at deployment server
Successfully registered agent for deployment.
You can now update your agent by running 'cmk-update-agent -v'
Saved your registration settings to /etc/cmk-update-agent.state.
By the way, you can directly use the IP address for -s switch and get rid of all the above jargon including error itself!
Troubleshooting error ‘mount.nfs: requested NFS version or transport protocol is not supported’ and how to resolve it.
Resolve NFS error
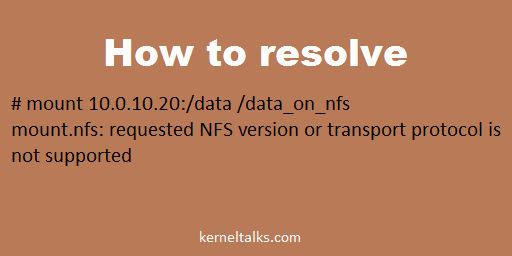
Another troubleshooting article aimed at specific errors and help you how to solve it. In this article, we will see how to resolve error ‘mount.nfs: requested NFS version or transport protocol is not supported’ seen on NFS client while trying to mount NFS share.
# mount 10.0.10.20:/data /data_on_nfs
mount.nfs: requested NFS version or transport protocol is not supported
Sometimes you see error mount.nfs: requested NFS version or transport protocol is not supported when you try to mount NFS share on NFS client. There are couple of reasons you see this error :
NFS services are not running on NFS server
NFS utils not installed on the client
NFS service hung on NFS server
NFS services at the NFS server can be down or hung due to multiple reasons like server utilization, server reboot, etc.
To get rid of this error and successfully mount your share follow the below steps.
Login to the NFS server and check the NFS services status.
[root@kerneltalks]# service nfs status
rpc.svcgssd is stopped
rpc.mountd is stopped
nfsd is stopped
rpc.rquotad is stopped
In the above output you can see the NFS services are stopped on the server. Start them.
[root@kerneltalks]# service nfs start
Starting NFS services: [ OK ]
Starting NFS quotas: [ OK ]
Starting NFS mountd: [ OK ]
Starting NFS daemon: [ OK ]
Starting RPC idmapd: [ OK ]
You might want to check for nfs-server or nfsserver service as well depends on your Linux distro.
Now try to mount NFS share on the client. And you will be able to mount them using the same command we see earlier!
Solution 2 :
If that doesn’t work for you then try installing package nfs-utils on your server and you will get through this error.
Solution 3 :
Open file /etc/sysconfig/nfs and try to check below parameters
# Turn off v4 protocol support
#RPCNFSDARGS="-N 4"
# Turn off v2 and v3 protocol support
#RPCNFSDARGS="-N 2 -N 3"
Removing hash from RPCNFSDARGS lines will turn off specific version support. This way clients with mentioned NFS versions won’t be able to connect to the NFS server for mounting share. If you have any of it enabled, try disabling it and mounting at the client after the NFS server service restarts.
Let us know if you have faced this error and solved it by any other methods in the comments below. We will update our article with your information to keep it updated and help the community live better!
Learn how to use speedtest CLI tool to test internet speed in the Linux terminal. It also includes a one-liner python command to get speed details right away.
Internet speed check in Linux
Most of us check the internet bandwidth speed whenever we connect to a new network or wifi. So why not our servers! Here is a tutorial that will walk you through to test internet speed in the Linux terminal.
Every one of us generally uses Speedtest by Ookla to check internet speed. It’s a pretty simple process for a desktop. Go to their website and just click the GO button. It will scan your location and speed test with the nearest server. If you are on mobile, they have their app for you. But if you are on the terminal with command-line interface things are little different. Let’s see how to check internet speed from the Linux terminal.
If you want to speed check only once and don’t want to download the tool on the server, jump here and see one-liner command.
Step 1 : Download speedtest cli tool
First of all, you have to download speedtest CLI tool from the GitHub repository. Nowadays, it also included in many well known Linux repositories as well. If it’s there then you can directly install that package on your Linux distro.
Let’s proceed with the Github download and install process. Install the git package depending on your distro. Then clone Github repo of speedtest like below:
It will be cloned to your present working directory. A new directory named speedtest-cli will be created. You can see the below files in it.
[root@kerneltalks ~]# cd speedtest-cli
[root@kerneltalks speedtest-cli]# ll
total 96
-rw-r--r--. 1 root root  1671 Oct  7 16:55 CONTRIBUTING.md
-rw-r--r--. 1 root root 11358 Oct  7 16:55 LICENSE
-rw-r--r--. 1 root root    35 Oct  7 16:55 MANIFEST.in
-rw-r--r--. 1 root root  5215 Oct  7 16:55 README.rst
-rw-r--r--. 1 root root    20 Oct  7 16:55 setup.cfg
-rw-r--r--. 1 root root  3196 Oct  7 16:55 setup.py
-rw-r--r--. 1 root root  2385 Oct  7 16:55 speedtest-cli.1
-rw-r--r--. 1 root root  1200 Oct  7 16:55 speedtest_cli.py
-rwxr-xr-x. 1 root root 47228 Oct  7 16:55 speedtest.py
-rw-r--r--. 1 root root   333 Oct  7 16:55 tox.ini
The python script speedtest.py is the one we will be using to check internet speed.
You can link this script for a command in /usr/bin so that all users on the server can use it. Or you can even create command alias for it and it will be easy for all users to use it.
Step 2 : Run python script
Now, run a python script without any argument and it will search the nearest server and test your internet speed.
[root@kerneltalks speedtest-cli]# python speedtest.py
Retrieving speedtest.net configuration...
Testing from Amazon (35.154.184.126)...
Retrieving speedtest.net server list...
Selecting best server based on ping...
Hosted by Spectra (Mumbai) [1.15 km]: 8.174 ms
Testing download speed................................................................................
Download: 548.13 Mbit/s
Testing upload speed................................................................................................
Upload: 323.95 Mbit/s
You can see here, the first column is a server identifier followed by the name of the company hosting that server, location, and finally its distance from your location.
To test the internet speed using specific server use --server switch and server identifier from the previous output as an argument.
[root@kerneltalks speedtest-cli]# python speedtest.py --server 2827
Retrieving speedtest.net configuration...
Testing from Amazon (35.154.184.126)...
Retrieving speedtest.net server list...
Selecting best server based on ping...
Hosted by Bharti Airtel Ltd (Mumbai) [1.15 km]: 13.234 ms
Testing download speed................................................................................
Download: 93.47 Mbit/s
Testing upload speed................................................................................................
Upload: 69.25 Mbit/s
To get the share link of your speed test, use –share switch. It will give you the URL of your test hosted on speedtest website. You can share this URL.
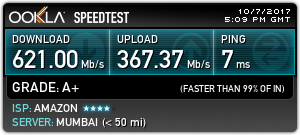
[root@kerneltalks speedtest-cli]# python speedtest.py --share
Retrieving speedtest.net configuration...
Testing from Amazon (35.154.184.126)...
Retrieving speedtest.net server list...
Selecting best server based on ping...
Hosted by Spectra (Mumbai) [1.15 km]: 7.471 ms
Testing download speed................................................................................
Download: 621.00 Mbit/s
Testing upload speed................................................................................................
Upload: 367.37 Mbit/s
Share results: http://www.speedtest.net/result/6687428141.png
Observe the last line which includes the URL of your test result. If I download that image its the one below :
Speedtest result on Linux
That’s it! But hey if you don’t want all this technical jargon, you can even use below one-liner to get speed test done right away.
Internet speed test using one liner in terminal
We are going to use a curl tool to fetch the above python script online and supply it to python for execution on the go!
Understand and learn about data center tier. The article explains the data center standardization matrix: tier 1 to tier 4 along with its eligibility criteria.
Data center tiers
Most of our readers are system administrators and surely come across term call data center tiers in their sysadmin life. This article will walk you through what is data center tiers? Different types of data center tiers, what is tier 1, tier 2, tier 3, and tier 4 data center? Which tier data center have maximum availability? etc.
All these might be interview questions for system architects at the beginner level. As a sysadmin its always good to know data center tiers so that you are well verse with your company infrastructure and can decide if that can really deliver on SLAs defined in your environment.
Without further delay, lets start with our topic.
What is data center tier?
Datacenter tier is the standardization matrix that defines overall performance, availability, fault tolerance capability, operating environment of a data center. It defines how the data center is fault-tolerant, how it can sustain to failures of various components, power, connectivity links, etc. It defines availability being offered for hosted servers.
Basically data center tier helps customers to determine which tier is best suitable for their application depending on the SLA requirement and data critical index they have. Mission-critical services should be hosted under a higher tier data center whereas less critical data should be hosted in lower-tier data centers. Obviously cost is another factor here too. As you go on high with tier, cost increases for hosting.
Different data center tiers
There are 4 data center tier standards defined by Uptime Institute. They are as below :
Tier 1: Non-redundant capacity and single power, connectivity distribution
Tier 2: Tier 1 feature + redundant capacity
Tier 3: Tier 2 features + Multiple independent power, connectivity distribution + onsite energy production system
Tier 4: Tier 3 features + All components are fault-tolerant, continuous cooling equipment.
A detailed list of requirements to be fulfilled by the data center to be eligible for specific tier is available here.
Data center tier deciding factors :
Datacenter to be eligible for certain tier it should complete certain criteria (as we saw above). There are many factors that affect/help in achieving those criteria. These factors are as below –
Datacenter design, location
Mechanical infrastructure design
Technology infrastructure design
Electric power distribution
Cables distribution
Network and internet connectivity distribution
Fire protection
Security in terms of soft security and physical security controls like biometric etc
Energy production, use, efficiency
Waste management
Environmental control and effects
Cooling management
Capacity management
Accepted downtime and availability tier wise
Tier 1: 99.671% uptime, 28.8 hours downtime per year
Tier 2: 99.749% uptime, 22 hours downtime per year
Tier 3: 99.982% uptime, 1.6 hours downtime per year
Tier 4: 99.995% uptime, 26.3 minutes downtime per year
That’s all I have to share with you about data center tier standards. Feel free to point out mistakes, suggestions, feedback in the comments section below.
Kerneltalks blog turned one today. This article crafts a year blog journey in info-graphics! Keep visiting us. Thank you!
Happy Birthday KernelTalks!
Yay! Happy Birthday KernelTalks!
Yup. The blog turned one today. It was slow but exponential growth for KernelTalks. Let me walk you through this one year journey with the info-graphic format below :
Step by step procedure to resolve “device eth0 does not seem to be present, delaying initialization.” error on Linux VM.
eth0 error on Linux vm
If you are working on VMware infrastructure when your Linux VM is hosted on it, you must have come across below error while bringing up Ethernet in Linux :
Bringing up interface eth0: Device eth0 does not seem to be present, delaying initialization.
root@kerneltalks # service network restart
Shutting down interface eth0:                              [  OK  ]
Shutting down loopback interface:                          [  OK  ]
Bringing up loopback interface:                            [  OK  ]
Bringing up interface eth0:  Device eth0 does not seem to be present, delaying initialization.
                                                           [FAILED]
In this article, we are going to resolve this error. First, let’s see the background of this error. This method works well on Red Hat, CentOS, Oracle Linux, etc.
This error comes up normally in VM which is cloned from other Linux VM or from the template. The root cause of this error is MAC address of eth0 which is same as the source (source VM or template) in its configuration file ifcfg-eth0. While as during boot NIC gets unique MAC address and it does not match with one in ifcfg-eth0.
So here are steps to resolve this error.
Step 1.
Remove file /etc/udev/ rules.d/70-persistent-net.rulesand reboot the server.
This ensures new fresh files to be generated at the next boot and get unique MAC assigned.
Step 2.
After reboot, confirm above file is generated again. It will look like :
root@kerneltalks # cat /etc/udev/rules.d/70-persistent-net.rules
# This file was automatically generated by the /lib/udev/write_net_rules
# program, run by the persistent-net-generator.rules rules file.
#
# You can modify it, as long as you keep each rule on a single
# line, and change only the value of the NAME= key.

# PCI device 0x15ad:0x07b0 (vmxnet3)
SUBSYSTEM=="net", ACTION=="add", DRIVERS=="?*", ATTR{address}=="00:50:56:99:3f:25", ATTR{type}=="1", KERNEL=="eth*", NAME="eth1"
Observe that new MAC is generated for eth1 (NAME="eth1"). Note down the MAC address from the file.
Step 3.
Now you have two choices :
Use eth1 as device name under ifcfg-eth0 config file.
Edit /etc/udev/ rules.d/70-persistent-net.ruleswith eth name as eth0
If you are choosing the first option then along with name change you need to change MAC.
If you are choosing the second option. Edit your ifcfg-eth0 located under /etc/sysconfig/network-scripts with new MAC address from above file. Also, since you made changes to /etc/udev/ rules.d/70-persistent-net.rules you have to again reboot the server. Rebooting the server here is important.
I would suggest going with the second choice since you will maintain naming conventions on your system. The first choice may create confusion to fellow sysadmins if you have more than one NIC on your server.
Step 4.
If you have used choice 1 i.e. using device name as eth1 under config file ifcfg-eth0 then you just need to restart network service and you should be all set.
root@kerneltalks # service network restart
Shutting down interface eth0:                              [  OK  ]
Shutting down loopback interface:                          [  OK  ]
Bringing up loopback interface:                            [  OK  ]
Bringing up interface eth0:                                [  OK  ]
If you have opted the second choice then reboot already taken care of things and your ethernet along with IP should be post-boot.