We have a 10GB EBS volume attached to the Linux EC2 server. /testmount of 9.9GB is created using this disk at OS level. We will be increasing it to 15GB.
root@kerneltalks # lsblk
NAME                   MAJ:MIN RM  SIZE RO TYPE MOUNTPOINT
xvda                   202:0    0   10G  0 disk
└─xvda1                202:1    0   10G  0 part /
xvdf                   202:80   0   10G  0 disk
└─datavg-datalv (dm-0) 253:0    0  9.9G  0 lvm  /testmount
Step 1: How to extend EBS volume attached to the EC2 server in AWS
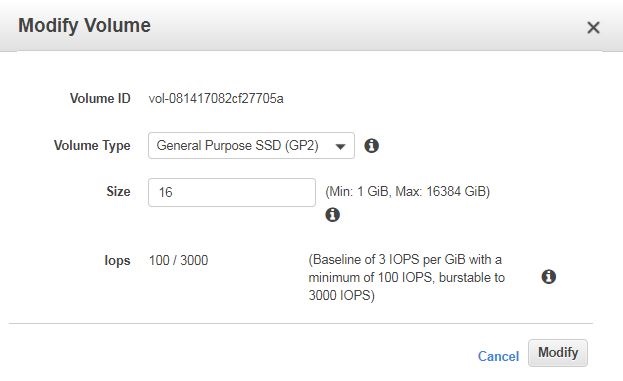
Login to AWS EC2 console, click on Volumes under Elastic Block Store in the left-hand side menu. Then select the volume you want to extend. From Actions drop-down menu select Modify Volume You will see below screen :
Modify EBS volume in AWS
Change size (in our case we changed from 10 to 16GB) and click Modify. Accept the confirmation dialogue box by clicking Yes.
Once modify operation succeeded, refresh the Volume list page and confirm the new size is being shown against the volume you modified just now. Now, your EBS volume is extended successfully at the AWS level. You need to extend it at OS level now.
Step 2: How to re-scan new size of EBS volume in Linux & extend filesystem online
Since EBS volumes size has been changed you need to rescan it in OS so that kernel and volume managers (LVM in our case) should make a note about the new size. In LVM, you can use pvresize command to rescan this extended EBS volume.
After successful rescan, check if the new size is identified by the kernel or not using lsblk command.
root@kerneltalks # lsblk
NAME                   MAJ:MIN RM  SIZE RO TYPE MOUNTPOINT
xvda                   202:0    0   10G  0 disk
└─xvda1                202:1    0   10G  0 part /
xvdf                   202:80   0   16G  0 disk
└─datavg-datalv (dm-0) 253:0    0  9.9G  0 lvm  /testmount
You can see in the above output, now xvdf disk is shown with size 16G! So, the new disk size is identified. Now proceed to extend file system online using lvextend and resize2fs. Read how to extend the filesystem online for more details.
root@kerneltalks # lvextend -L 15G /dev/datavg/datalv
  Extending logical volume datalv to 15.00 GiB
  Logical volume datalv successfully resized

root@kerneltalks # resize2fs /dev/datavg/datalv
resize2fs 1.41.12 (17-May-2010)
Filesystem at /dev/datavg/datalv is mounted on /testmount; on-line resizing required
old desc_blocks = 1, new_desc_blocks = 1
Performing an on-line resize of /dev/datavg/datalv to 3932160 (4k) blocks.
The filesystem on /dev/datavg/datalv is now 3932160 blocks long.
Check if the mount point is showing new bigger size.
root@kerneltalks # df -Ph /testmount
Filesystem                 Size  Used Avail Use% Mounted on
/dev/mapper/datavg-datalv   15G  153M   14G   2% /testmount
Yup, as we planned /testmount is now 15G in size from 9.9GB earlier size.
Learn the zypper command with 12 useful examples along with sample outputs. zypper is used for package and patch management in Suse Linux systems.
zypper command examples
zypper is a package management system powered by ZYpp package manager engine. Suse Linux uses zypper for package management. In this article, we will be sharing 12 useful zypper commands along with examples that are helpful for your day to day sysadmin tasks.
Without any argument zypper command will list you all available switches which can be used. It’s quite handy than referring to the man page which is pretty much in detail.
root@kerneltalks # zypper
  Usage:
        zypper [--global-options] <command> [--command-options] [arguments]
        zypper <subcommand> [--command-options] [arguments]

  Global Options:
        --help, -h              Help.
        --version, -V           Output the version number.
        --promptids             Output a list of zypper's user prompts.
        --config, -c <file>     Use specified config file instead of the default                                                                                        .
        --userdata <string>     User defined transaction id used in history and                                                                                         plugins.
        --quiet, -q             Suppress normal output, print only error
                                messages.
        --verbose, -v           Increase verbosity.
        --color
        --no-color              Whether to use colors in output if tty supports                                                                                         it.
        --no-abbrev, -A         Do not abbreviate text in tables.
        --table-style, -s       Table style (integer).
        --non-interactive, -n   Do not ask anything, use default answers
                                automatically.
        --non-interactive-include-reboot-patches
                                Do not treat patches as interactive, which have
                                the rebootSuggested-flag set.
        --xmlout, -x            Switch to XML output.
        --ignore-unknown, -i    Ignore unknown packages.

        --reposd-dir, -D <dir>  Use alternative repository definition file
                                directory.
        --cache-dir, -C <dir>   Use alternative directory for all caches.
        --raw-cache-dir <dir>   Use alternative raw meta-data cache directory.
        --solv-cache-dir <dir>  Use alternative solv file cache directory.
        --pkg-cache-dir <dir>   Use alternative package cache directory.

     Repository Options:
        --no-gpg-checks         Ignore GPG check failures and continue.
        --gpg-auto-import-keys  Automatically trust and import new repository
                                signing keys.
        --plus-repo, -p <URI>   Use an additional repository.
        --plus-content <tag>    Additionally use disabled repositories providing                                                                                         a specific keyword.
                                Try '--plus-content debug' to enable repos indic                                                                                        ating to provide debug packages.
        --disable-repositories  Do not read meta-data from repositories.
        --no-refresh            Do not refresh the repositories.
        --no-cd                 Ignore CD/DVD repositories.
        --no-remote             Ignore remote repositories.
        --releasever            Set the value of $releasever in all .repo files                                                                                         (default: distribution version)

     Target Options:
        --root, -R <dir>        Operate on a different root directory.
        --disable-system-resolvables
                                Do not read installed packages.

  Commands:
        help, ?                 Print help.
        shell, sh               Accept multiple commands at once.

     Repository Management:
        repos, lr               List all defined repositories.
        addrepo, ar             Add a new repository.
        removerepo, rr          Remove specified repository.
        renamerepo, nr          Rename specified repository.
        modifyrepo, mr          Modify specified repository.
        refresh, ref            Refresh all repositories.
        clean                   Clean local caches.

     Service Management:
        services, ls            List all defined services.
        addservice, as          Add a new service.
        modifyservice, ms       Modify specified service.
        removeservice, rs       Remove specified service.
        refresh-services, refs  Refresh all services.

     Software Management:
        install, in             Install packages.
        remove, rm              Remove packages.
        verify, ve              Verify integrity of package dependencies.
        source-install, si      Install source packages and their build
                                dependencies.
        install-new-recommends, inr
                                Install newly added packages recommended
                                by installed packages.

     Update Management:
        update, up              Update installed packages with newer versions.
        list-updates, lu        List available updates.
        patch                   Install needed patches.
        list-patches, lp        List needed patches.
        dist-upgrade, dup       Perform a distribution upgrade.
        patch-check, pchk       Check for patches.

     Querying:
        search, se              Search for packages matching a pattern.
        info, if                Show full information for specified packages.
        patch-info              Show full information for specified patches.
        pattern-info            Show full information for specified patterns.
        product-info            Show full information for specified products.
        patches, pch            List all available patches.
        packages, pa            List all available packages.
        patterns, pt            List all available patterns.
        products, pd            List all available products.
        what-provides, wp       List packages providing specified capability.

     Package Locks:
        addlock, al             Add a package lock.
        removelock, rl          Remove a package lock.
        locks, ll               List current package locks.
        cleanlocks, cl          Remove unused locks.

     Other Commands:
        versioncmp, vcmp        Compare two version strings.
        targetos, tos           Print the target operating system ID string.
        licenses                Print report about licenses and EULAs of
                                installed packages.
        download                Download rpms specified on the commandline to a                                                                                         local directory.
        source-download         Download source rpms for all installed packages
                                to a local directory.

     Subcommands:
        subcommand              Lists available subcommands.

Type 'zypper help <command>' to get command-specific help.
How to install the package using zypper
zypper takes in or install switch to install the package on your system. It’s the same as yum package installation, supplying package name as an argument, and package manager (zypper here) will resolve all dependencies and install them along with your required package.
# zypper install telnet
Refreshing service 'SMT-http_smt-ec2_susecloud_net'.
Refreshing service 'cloud_update'.
Loading repository data...
Reading installed packages...
Resolving package dependencies...

The following NEW package is going to be installed:
  telnet

1 new package to install.
Overall download size: 51.8 KiB. Already cached: 0 B. After the operation, additional 113.3 KiB will be used.
Continue? [y/n/...? shows all options] (y): y
Retrieving package telnet-1.2-165.63.x86_64                                                                                        (1/1),  51.8 KiB (113.3 KiB unpacked)
Retrieving: telnet-1.2-165.63.x86_64.rpm .........................................................................................................................[done]
Checking for file conflicts: .....................................................................................................................................[done]
(1/1) Installing: telnet-1.2-165.63.x86_64 .......................................................................................................................[done]
Above output for your reference in which we installed telnet package.
For erasing or removing packages in Suse Linux, use zypper with remove or rm switch.
root@kerneltalks # zypper rm telnet
Loading repository data...
Reading installed packages...
Resolving package dependencies...

The following package is going to be REMOVED:
  telnet

1 package to remove.
After the operation, 113.3 KiB will be freed.
Continue? [y/n/...? shows all options] (y): y
(1/1) Removing telnet-1.2-165.63.x86_64 ..........................................................................................................................[done]
We removed previously installed telnet package here.
Check dependencies and verify the integrity of installed packages using zypper
There are times when one can install the package by force ignoring dependencies. zypper gives you the power to scan all installed packages and checks for their dependencies too. If any dependency is missing, it offers you to install/remove it and hence maintain the integrity of your installed packages.
Use verify or ve switch with zypper to check the integrity of installed packages.
root@kerneltalks # zypper ve
Refreshing service 'SMT-http_smt-ec2_susecloud_net'.
Refreshing service 'cloud_update'.
Loading repository data...
Reading installed packages...

Dependencies of all installed packages are satisfied.
In the above output, you can see the last line confirms that all dependencies of installed packages are completed and no action required.
How to download package using zypper in Suse Linux
zypper offers a way to download the package in the local directory without installation. You can use this downloaded package on another system with the same configuration. Packages will be downloaded to /var/cache/zypp/packages/<repo>/<arch>/ directory.
root@kerneltalks # zypper download telnet
Refreshing service 'SMT-http_smt-ec2_susecloud_net'.
Refreshing service 'cloud_update'.
Loading repository data...
Reading installed packages...
Retrieving package telnet-1.2-165.63.x86_64                                                                                        (1/1),  51.8 KiB (113.3 KiB unpacked)
(1/1) /var/cache/zypp/packages/SMT-http_smt-ec2_susecloud_net:SLES12-SP3-Pool/x86_64/telnet-1.2-165.63.x86_64.rpm ................................................[done]

download: Done.

# ls -lrt /var/cache/zypp/packages/SMT-http_smt-ec2_susecloud_net:SLES12-SP3-Pool/x86_64/
total 52
-rw-r--r-- 1 root root 53025 Feb 21 03:17 telnet-1.2-165.63.x86_64.rpm
You can see we have downloaded telnet package locally using zypper
zypper allows you to view all available updates for your installed packages so that you can plan update activity in advance. Use list-updates or lu switch to show you a list of all available updates for installed packages.
root@kerneltalks # zypper lu
Refreshing service 'SMT-http_smt-ec2_susecloud_net'.
Refreshing service 'cloud_update'.
Loading repository data...
Reading installed packages...
S | Repository                        | Name                       | Current Version               | Available Version                  | Arch
--+-----------------------------------+----------------------------+-------------------------------+------------------------------------+-------
v | SLES12-SP3-Updates                | at-spi2-core               | 2.20.2-12.3                   | 2.20.2-14.3.1                      | x86_64
v | SLES12-SP3-Updates                | bash                       | 4.3-82.1                      | 4.3-83.5.2                         | x86_64
v | SLES12-SP3-Updates                | ca-certificates-mozilla    | 2.7-11.1                      | 2.22-12.3.1                        | noarch
v | SLE-Module-Containers12-Updates   | containerd                 | 0.2.5+gitr639_422e31c-20.2    | 0.2.9+gitr706_06b9cb351610-16.8.1  | x86_64
v | SLES12-SP3-Updates                | crash                      | 7.1.8-4.3.1                   | 7.1.8-4.6.2                        | x86_64
v | SLES12-SP3-Updates                | rsync                      | 3.1.0-12.1                    | 3.1.0-13.10.1                      | x86_64
The output is properly formatted for easy reading. Column wise it shows the name of repo where package belongs, package name, installed version, new updated available version & architecture.
List and install patches in Suse linux
Use list-patches or lp switch to display all available patches for your Suse Linux system which needs to be applied.
The output is pretty much nicely organized with respective headers. You can easily figure out and plan your patch update accordingly. We can see out of 37 patches available on our system 18 are security ones and needs to be applied on high priority!
You can install all needed patches by issuing zypper patch command.
How to update package using zypper
To update package using zypper, use update or up switch followed by package name. In the above list updates command, we learned that rsync package update is available on our server. Let update it now –
root@kerneltalks # zypper update rsync
Refreshing service 'SMT-http_smt-ec2_susecloud_net'.
Refreshing service 'cloud_update'.
Loading repository data...
Reading installed packages...
Resolving package dependencies...

The following package is going to be upgraded:
  rsync

1 package to upgrade.
Overall download size: 325.2 KiB. Already cached: 0 B. After the operation, additional 64.0 B will be used.
Continue? [y/n/...? shows all options] (y): y
Retrieving package rsync-3.1.0-13.10.1.x86_64                                                                                      (1/1), 325.2 KiB (625.5 KiB unpacked)
Retrieving: rsync-3.1.0-13.10.1.x86_64.rpm .......................................................................................................................[done]
Checking for file conflicts: .....................................................................................................................................[done]
(1/1) Installing: rsync-3.1.0-13.10.1.x86_64 .....................................................................................................................[done]
Search package using zypper in Suse Linux
If you are not sure about the full package name, no worries. You can search packages in zypper by supplying search string with se or search switch
root@kerneltalks # zypper se lvm
Refreshing service 'SMT-http_smt-ec2_susecloud_net'.
Refreshing service 'cloud_update'.
Loading repository data...
Reading installed packages...

S  | Name          | Summary                      | Type
---+---------------+------------------------------+-----------
   | libLLVM       | Libraries for LLVM           | package
   | libLLVM-32bit | Libraries for LLVM           | package
   | llvm          | Low Level Virtual Machine    | package
   | llvm-devel    | Header Files for LLVM        | package
   | lvm2          | Logical Volume Manager Tools | srcpackage
i+ | lvm2          | Logical Volume Manager Tools | package
   | lvm2-devel    | Development files for LVM2   | package
In the above example, we searched lvm string and came up with the list shown above. You can use Name in zypper install/remove/update commands.
Check installed package information using zypper
You can check installed packages details using zypper. info or if switch will list out information of the installed package. It can also display package details which are not installed. In that case, Installed parameter will reflect No value.
root@kerneltalks # zypper info rsync
Refreshing service 'SMT-http_smt-ec2_susecloud_net'.
Refreshing service 'cloud_update'.
Loading repository data...
Reading installed packages...


Information for package rsync:
------------------------------
Repository     : SLES12-SP3-Updates
Name           : rsync
Version        : 3.1.0-13.10.1
Arch           : x86_64
Vendor         : SUSE LLC <https://www.suse.com/>
Support Level  : Level 3
Installed Size : 625.5 KiB
Installed      : Yes
Status         : up-to-date
Source package : rsync-3.1.0-13.10.1.src
Summary        : Versatile tool for fast incremental file transfer
Description    :
    Rsync is a fast and extraordinarily versatile file  copying  tool. It can copy
    locally, to/from another host over any remote shell, or to/from a remote rsync
    daemon. It offers a large number of options that control every aspect of its
    behavior and permit very flexible specification of the set of files to be
    copied. It is famous for its delta-transfer algorithm, which reduces the amount
    of data sent over the network by sending only the differences between the
    source files and the existing files in the destination. Rsync is widely used
    for backups and mirroring and as an improved copy command for everyday use.
List repositories using zypper
To list repo use lr or repos switch with zypper command. It will list all available repos which include enabled and not-enabled both repos.
root@kerneltalks # zypper lr
Refreshing service 'cloud_update'.
Repository priorities are without effect. All enabled repositories share the same priority.

#  | Alias                                                                                | Name                                                  | Enabled | GPG Check | Refresh
---+--------------------------------------------------------------------------------------+-------------------------------------------------------+---------+-----------+--------
 1 | SMT-http_smt-ec2_susecloud_net:SLE-Module-Adv-Systems-Management12-Debuginfo-Pool    | SLE-Module-Adv-Systems-Management12-Debuginfo-Pool    | No      | ----      | ----
 2 | SMT-http_smt-ec2_susecloud_net:SLE-Module-Adv-Systems-Management12-Debuginfo-Updates | SLE-Module-Adv-Systems-Management12-Debuginfo-Updates | No      | ----      | ----
 3 | SMT-http_smt-ec2_susecloud_net:SLE-Module-Adv-Systems-Management12-Pool              | SLE-Module-Adv-Systems-Management12-Pool              | Yes     | (r ) Yes  | No
 4 | SMT-http_smt-ec2_susecloud_net:SLE-Module-Adv-Systems-Management12-Updates           | SLE-Module-Adv-Systems-Management12-Updates           | Yes     | (r ) Yes  | Yes
 5 | SMT-http_smt-ec2_susecloud_net:SLE-Module-Containers12-Debuginfo-Pool                | SLE-Module-Containers12-Debuginfo-Pool                | No      | ----      | ----
 6 | SMT-http_smt-ec2_susecloud_net:SLE-Module-Containers12-Debuginfo-Updates             | SLE-Module-Containers12-Debuginfo-Updates             | No      | ----      | ----
here you need to check enabled column to check which repos are enabled and which are not.
Learn how to enable repository using subscription-manager in RHEL. The article also includes steps to register system with Red Hat, attach subscription and errors along with resolutions.
Enable repository using subscription-manager
In this article, we will walk you through step by step process to enable Red Hat repository in RHEL fresh installed server.
The repository can be enabled using subscription-managercommand like below –
root@kerneltalks # subscription-manager repos --enable rhel-6-server-rhv-4-agent-beta-debug-rpms
Error: 'rhel-6-server-rhv-4-agent-beta-debug-rpms' does not match a valid repository ID. Use "subscription-manager repos --list" to see valid repositories.
You will see the above error when your subscription is not in place. Let’s go through step by step procedure to enable repositories via subscription-manager
Step 1 : Register your system with Red Hat
We are considering you have a freshly installed system and it’s not yet registered with Red Hat. If you have a registered system already then you can ignore this step.
You can check if your system is registered with Red Hat for the subscription using below command –
# subscription-manager version
server type: This system is currently not registered.
subscription management server: Unknown
subscription management rules: Unknown
subscription-manager: 1.18.10-1.el6
python-rhsm: 1.18.6-1.el6
Here, in the first line of output, you can see the system is not registered. So, let’s start with the registering system. You need to use the subscription-managercommand with register switch. You need to use your Red Hat account credentials here.
root@kerneltalks # subscription-manager register
Registering to: subscription.rhsm.redhat.com:443/subscription
Username: admin@kerneltalks.com
Password:
Network error, unable to connect to server. Please see /var/log/rhsm/rhsm.log for more information.
If you are getting above error then your server is not able to reach RedHat. Check internet connection & if you are able to resolve site names. Sometimes even if you are able to ping the subscription server, you will see this error. This might be because you have the proxy server in your environment. In such a case, you need to add its details in file /etc/rhsm/rhsm.conf. Below proxy details should be populated :
# an http proxy server to use
 proxy_hostname =

# port for http proxy server
 proxy_port =

# user name for authenticating to an http proxy, if needed
 proxy_user =

# password for basic http proxy auth, if needed
 proxy_password =
Once you are done, recheck if subscription-manager taken up new proxy details by using below command –
root@kerneltalks # subscription-manager register
Registering to: subscription.rhsm.redhat.com:443/subscription
Username: admin@kerneltalks.com
Password:
You must first accept Red Hat's Terms and conditions. Please visit https://www.redhat.com/wapps/tnc/termsack?event[]=signIn . You may have to log out of and back into the Customer Portal in order to see the terms.
You will see the above error if you are adding the server to your Red Hat account for the first time. Go to the URL and accept the terms. Come back to the terminal and try again.
root@kerneltalks # subscription-manager register
Registering to: subscription.rhsm.redhat.com:443/subscription
Username: admin@kerneltalks.com
Password:
The system has been registered with ID: xxxxb2-xxxx-xxxx-xxxx-xx8e199xxx
Bingo! The system is registered with Red Hat now. You can again verify it with version switch.
root@kerneltalks # subscription-manager version
server type: Red Hat Subscription Management
subscription management server: 2.0.43-1
subscription management rules: 5.26
subscription-manager: 1.18.10-1.el6
python-rhsm: 1.18.6-1.el6
Step 2: Attach subscription to your server
First, try to list repositories. You won’t be able to list any since we haven’t attached any subscription to our server yet.
root@kerneltalks # subscription-manager repos --list
This system has no repositories available through subscriptions.
As you can see subscription-manager couldn’t found any repositories, you need to attach subscriptions to your server. Once the subscription is attached, subscription-manager will be able to list repositories under it.
To attach subscription, check all available subscriptions for your server with below command –
root@kerneltalks # subscription-manager list --available
+-------------------------------------------+
Available Subscriptions
+-------------------------------------------+
Subscription Name: Red Hat Enterprise Linux for Virtual Datacenters, Standard
Provides: Red Hat Beta
Red Hat Software Collections (for RHEL Server)
Red Hat Enterprise Linux Atomic Host Beta
Oracle Java (for RHEL Server)
Red Hat Enterprise Linux Server
dotNET on RHEL (for RHEL Server)
Red Hat Enterprise Linux Atomic Host
Red Hat Software Collections Beta (for RHEL Server)
Red Hat Developer Tools Beta (for RHEL Server)
Red Hat Developer Toolset (for RHEL Server)
Red Hat Developer Tools (for RHEL Server)
SKU: RH00050
Contract: xxxxxxxx
Pool ID: 8a85f98c6011059f0160110a2ae6000f
Provides Management: Yes
Available: Unlimited
Suggested: 0
Service Level: Standard
Service Type: L1-L3
Subscription Type: Stackable (Temporary)
Ends: 12/01/2018
System Type: Virtual
You will get the list of such subscriptions available for your server. You need to read through what it provides and note down Pool ID of subscriptions that are useful/required for you.
Now, attach subscriptions to your server by using pool ID.
root@kerneltalks # subscription-manager attach --pool=8a85f98c6011059f0160110a2ae6000f
Successfully attached a subscription for: Red Hat Enterprise Linux for Virtual Datacenters, Standard
If you are not sure which one to pick, you can simply attach subscriptions automatically which are best suited for your server with below command –
root@kerneltalks # subscription-manager attach --auto
Installed Product Current Status:
Product Name: Red Hat Enterprise Linux Server
Status: Subscribed
Move on to the final step to enable repository.
Step 3: Enable repository
Now you will enable repository which is available under your attached subscription.
root@kerneltalks # subscription-manager repos --enable rhel-6-server-rhv-4-agent-beta-debug-rpms
Repository 'rhel-6-server-rhv-4-agent-beta-debug-rpms' is enabled for this system.
Learn how to boot SPYRUS WorkSafe PRO Linux2Go drive along with Video Demo.
how to boot Linux from Linux2Go drive
In this article, we will be walking you through steps to first boot your SPYRUS WorkSafe Pro Linux2Go drive and use it. More details about the SPYRUS WorkSafe Pro Linux2Go device. We will be covering more about the device in another article.
Step 1 :
Set your host machine which might be a laptop or desktop on which you are attaching SPYRUS Linux2Go drive in USB port to boot from USB. For altering boot sequences and priority you need to enter BIOS settings of your laptop or desktop.
The process to enter into BIOS changes from hardware to hardware and also the base Operating System you use. In most of the cases pressing orF2F8 or DEL key, while the system is booting, takes you to BIOS. You can search your hardware vendor support manual or website to find the process to get into BIOS.
Once you are in BIOS, you need to change the boot sequence. Normally its Optical drive, Hard Disk, and network/external. Means machine will search for the attached optical drive CD or DVD ROM for the operating system to boot. If not found then it will search attached hard disks. If it doesn’t found OS there it will proceed to check network boot or peripherals devices that have OS to boot.
In our case, we want to boot from USB change the sequence to the external boot method before the internal hard disk. So, the system will check peripheral i.e. USB i.e. our Linux2Go device to boot before internal hard disk which already has OS. This way we are booting from the Linux2Go device rather than the host computer’s hard disk.
Save the settings and reboot the system. Its usually can be done by pressing F10 key and then answering yes to prompt saying ‘save settings and reboot’. But again this might be little different depending on your hardware manufacturer standards.
Step 2:
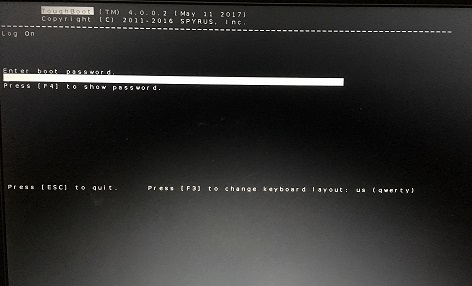
Connect Linux2Go device to the USB port and reboot the system. Now your system will boot from the SPYRUS Linux2Go device and it will display a bootloader security screen which is known as Toughboot as below.
Toughboot in linux2go drive
You need to enter the Toughboot password here to actually begin booting of OS installed on the Linux2Go device. This password can be found on paper you receive along with your Linux2Go drive. This is additional security by SPYRUS implemented on the drive.
That’s it! after successful password authentication, you will be booted into OS installed on your drive. I have Ubuntu 16.04 LTS installed on my drive. So I booted into it.
Here is a small video of booting SPYRUS WorkSafe Pro Linux2go drive!
Beginners guide to learn grep command with these 19 different practical examples.
Learn grep command with examples
grep : one of the widely used Linux / Unix commands which help sysadmins narrowing down their searches! grep stands for Global Regular Expression Print which is used for searching regular expressions within the source stream of data.
grep command syntax is simple.
grep <switch> <string to search> file
where the switch is from the variety of switches available to use with command. string to search is a regular expression that you want to search within source data. The file is a source of data in which you expect grep command to search.
It is also used widely with pipe for searching strings in data outputted by the previous command. In such a scenario, syntax followed is –
command1 | grep <switch> <string to search>
where output of command1 is being searched using grep command.
We are sharing here 19 grep command practical examples which will help beginners to well versed with this command and use it in their daily operations. Without further delay, let’s learn to grep command with below 20 examples. In all below examples, we will be searching string ‘kerneltalks’ in file1 which is as below –
root@kerneltalks # cat file1
This is demo file for kerneltalks.com
Demo file to be used for demonstrating grep commands on KernelTalks blog.
We are using kerneltalks as a search string for grep examples
Filling data with kernelTalks words for demo purpose.
This line does not contain our targeted search string.
Junk data kasdiohn fjad;ioe;ion cslfns;o;nfg
Find out string in file
# grep kerneltalks file1
This is demo file for kerneltalks.com
We are using kerneltalks as a search string for grep examples
Recursive search in the directory
You can use recursive grep in the directory to search for string/pattern in all files within a directory.
# grep -r "kerneltalks" /tmp/data
OR
# grep -R "kerneltalks" /tmp/data
Count pattern match in grep
You can use -c i.e. count switch with grep command to count how many times a pattern is matched in given data.
# grep -c kerneltalks file1
2
Search exact word in the file
Normally, grep returns lines from data that have pattern matching in it. If you want to search exact word in data then use -w switch.
# grep -w kerneltalks file1
This is demo file for kerneltalks.com
We are using kerneltalks as a search string for grep examples
You can combine it with count switch above and can get the number of times the exact word appeared in the file.
Ignore case while searching with grep
To ignore case while finding match use -i switch i.e. case-insensitive match. So when you search for kerneltalks with -i switch it will show the occurrence of kerneltalks, KERNELTALKS, KernelTalks, etc.
# grep -i kerneltalks file1
This is demo file for kerneltalks.com
Demo file to be used for demonstrating grep commands on KernelTalks blog.
We are using kerneltalks as a search string for grep examples
Filling data with kernelTalks words for demo purpose.
Use of wild card with grep
Wild cards or repetition operators can be used with grep command.
# grep kernel* file1
here, * match anything which precedes with string kernel. You can use repetition operators like ?, *, + with grep.
Reverse grep operation
If you want to display data just by omitting the lines containing your targeted string then you can use grep operation in a reverse way i.e. by using -v switch. Some people also call it an inverted match or grep operation.
# grep -v kerneltalks file1
Demo file to be used for demonstrating grep commands on KernelTalks blog.
Filling data with kernelTalks words for demo purpose.
This line does not contain our targeted search string.
Junk data kasdiohn fjad;ioe;ion cslfns;o;nfg
The above command displays all lines within file1 except the ones which contain string kerneltalks.
Display N lines before matching string using grep
Use of -B switch followed by N number argument will let you display N lines before matching string in a file.
# grep -B 2 targeted  file1
We are using kerneltalks as a search string for grep examples
Filling data with kernelTalks words for demo purpose.
This line does not contain our targeted search string.
The above command will display 2 lines above the line which contains string targeted including the line with the string.
Display N lines after matching string using grep
Opposite to above, if you want to display N lines after the match is found, use -A switch with the same above syntax.
# grep -A 2 targeted  file1
This line does not contain our targeted search string.
Junk data kasdiohn fjad;ioe;ion cslfns;o;nfg
Here it will display 2 lines below the line which has string targeted in it including a line with the string.
Display N lines around matching string using grep
Using both -A and -B switches, you can display N lines before and after of matching string line. But, grep comes with inbuild switch -C which will do this for you.
# grep -C 1 targeted  file1
Filling data with kernelTalks words for demo purpose.
This line does not contain our targeted search string.
Junk data kasdiohn fjad;ioe;ion cslfns;o;nfg
The above command will display 1 line above and 1 line after the line which has matching string.
Match multiple pattern with grep
Searching more than one pattern/string is possible with grep. Stack up your strings using -e switch.
# grep -e Junk -e KernelTalks file1
Demo file to be used for demonstrating grep commands on KernelTalks blog.
Junk data kasdiohn fjad;ioe;ion cslfns;o;nfg
It will search for string1 and string2 in file1 and display all lines with either string in them.
List only file names with matching string in them
When you are searching through a bunch of files and only interested in file names within which string is matched then use -l switch.
# grep -l kerneltalks *.log
Here, we are searching string kerneltalks in all files ending with .log. Since -l switch is used, grep will display only file names where string match is found.
Display line number of match with grep
If you want to get the line number where your string found the match, you can use -n switch.
# grep -n kerneltalks file1
1:This is demo file for kerneltalks.com
3:We are using kerneltalks as a search string for grep examples
Display matched string only rather than whole line of match
By default, grep displays the whole line which contains the match of your searched string. To display only matched string rather than the whole line, you need to use -o switch. Obviously, it not useful when you are searching for the whole string or word but it is very useful when you are searching with wild cards.
# grep -o kernel* file1
Coloring up your grep search output
To highlight matched strings in output use –-color switch
# grep --color=always kerneltalks file1 This is demo file for kerneltalks.com We are using kerneltalks as a search string for grep examples
You have three options to used with --color switch. auto, always and never
Grep out blank lines
You can search and count for blank lines with grep.
# grep -e ^$ file1
It’s helpful for removing blank lines from a file and get only data lines. Use reverse grep we saw earlier (-v switch)
# grep -v -e ^$ file1
It will show you only data lines, omitting all blank lines. You can redirect it to a new file and get a clean data file! You can use the same technique to remove hashed entries from the file by using ^# as a search string. This will helps to remove comments from scripts as well.
Invoke Egrep using grep
Egrep is extended grep with additional character support. egrep is derivative from grep utility. You can use it with egrep command or invoke using grep as below :
# grep -E
Fixed grep Fgrep using grep
Fixed grep is used for fast searching direct strings without any meta-characters or regular expressions. As the name suggests, fgrep is fixed grep! Only direct strings to search and it will be a bit fast than normal grep. fgrep is also another derivative from normal grep and used as fgrep separate command. But it can also be invoked using grep with below switch –
# grep -F
Search pattern in zip file
One more derivative of grep is zgrep. IT is used to find and match string in zip files. It uses almost the same switches as grep only difference is you have to source its zip file to search
# zgrep kerneltalks file2.gz
Let us know if you have any other grep command examples in comments below which re really helpful for sysadmin in day to day operations.