Learn how to disable the iptables firewall in Linux temporarily for troubleshooting purposes. Also, learn how to save policies and how to restore them back when you enable the firewall back.
Disable iptables firewall!
Sometimes you have the requirement to turn off the iptables firewall to do some connectivity troubleshooting and then you need to turn it back on. While doing it you also want to save all your firewall policies as well. In this article, we will walk you through how to save firewall policies and how to disable/enable an iptables firewall. For more details about the iptables firewall and policies read our article on it.
Save iptables policies
The first step while disabling the iptables firewall temporarily is to save existing firewall rules/policies. iptables-save command lists all your existing policies which you can save in a file on your server.
So iptables-save is the command with you can take iptables policy backup.
Stop/disable iptables firewall
For older Linux kernels you have an option of stopping service iptables with service iptables stop but if you are on the new kernel, you just need to wipe out all the policies and allow all traffic through the firewall. This is as good as you are stopping the firewall.
Once done, check current firewall policies. It should look like below which means everything is accepted (as good as your firewall is disabled/stopped)
Once you are done with troubleshooting and you want to turn iptables back on with all its configurations. You need to first restore policies from the backup we took in the first step.
And then start iptables service in case you have stopped it in the previous step using service iptables start. If you haven’t stopped service then only restoring policies will do for you. Check if all policies are back in iptables firewall configurations :
Learn about Docker DNS. How docker container DNS works? How to change nameserver in Docker container to use external DNS?
Docker DNS
Docker container has inbuilt DNS which automatically resolves IP to container names in user-defined networks. But what if you want to use external DNS into the container for some project need. Or how to use external DNS in all the containers run on my host? In this article, we will walk you through the below points :
Docker native DNS
Nameservers in Docker
How to use external DNS in the container while starting it
How to use external DNS in all the containers on a docker host
Docker native DNS
In a user-defined docker network, DNS resolution to container names happens automatically. You don’t have to do anything if your containers are using your defined docker network they can find each other with hostname automatically.
We have 2 Nginx containers running using my newly created docker network named kerneltalks. Both Nginx containers are installed with ping utility.
$ docker container ls
CONTAINER ID        IMAGE               COMMAND                  CREATED             STATUS              PORTS               NAMES
1b1bb99559ac        nginx               "nginx -g 'daemon of…"   27 minutes ago      Up 27 minutes       80/tcp              nginx2
239c662d3945        nginx               "nginx -g 'daemon of…"   27 minutes ago      Up 27 minutes       80/tcp              nginx1

$ docker network inspect kerneltalks
"Containers": {
"1b1bb99559ac21e29ae671c23d46f2338336203c96874ac592431f60a2e6a5de": {
"Name": "nginx2",
"EndpointID": "4141f56fe878275e322b9283476508d1135e813d12ea2b7d87a5c3d0db527f79",
"MacAddress": "02:42:ac:13:00:05",
"IPv4Address": "172.19.0.5/16",
"IPv6Address": ""
},
"239c662d3945031413e4c69b99e3ddde57832004bd6193bdbc30bd5e6ca6f4e2": {
"Name": "nginx1",
"EndpointID": "376da79e6746cc80d178f4363085e521a9d45c65df08248b77c1bc744b495ae4",
"MacAddress": "02:42:ac:13:00:04",
"IPv4Address": "172.19.0.4/16",
"IPv6Address": ""
},
And they can ping each other without any extra DNS efforts. Since user-defined networks have inbuilt DNS which resolves IP addresses from container names.
$ docker exec -it nginx1 ping nginx2
PING nginx2 (172.19.0.5) 56(84) bytes of data.
64 bytes from nginx2.kerneltalks (172.19.0.5): icmp_seq=1 ttl=64 time=0.151 ms
64 bytes from nginx2.kerneltalks (172.19.0.5): icmp_seq=2 ttl=64 time=0.053 ms

$ docker exec -it nginx2 ping nginx1
PING nginx1 (172.19.0.4) 56(84) bytes of data.
64 bytes from nginx1.kerneltalks (172.19.0.4): icmp_seq=1 ttl=64 time=0.088 ms
64 bytes from nginx1.kerneltalks (172.19.0.4): icmp_seq=2 ttl=64 time=0.054 ms
But in default docker bridge network (which installs with docker daemon) automatic DNS resolution is disabled to maintain container isolation. You can add container inter-comm just by using --link option while running container (when on default bridge network)
--link is a legacy feature and may be removed in upcoming features. So it is always advisable to use user-customized networks rather than using default docker networks.
DNS nameservers in Docker
Docker is coded in a smart way. When you run a new container on the docker host without any DNS related option in command, it simply copies host’s /etc/resolv.conf into container. While copying it filter’s out all localhost IP addresses from the file. That’s pretty obvious since that won’t be reachable from container network so no point in keeping them. During this filtering, if no nameserver left to add in container’s /etc/resolv.conf the file then Docker daemon smartly adds Google’s public nameservers 8.8.8.8 and 8.8.4.4 in to file and use it within the container.
Also, host and container /etc/resolv.conf always be in sync. Docker daemon takes help from the file change notifier and makes necessary changes in the container’s resolve file when there are changes made in the host’s file! The only catch is these changes will be done only if the container is not running. So to pick up changes you need to stop and start the container again. All stopped containers will be updated immediately after the host’s file changes.
How to use external DNS in container while starting it
If you want to use external DNS in the container other than docker native or other than what’s in host’s resolv.conf file, then you need to use --dns switch in docker container run command.
In the above example, we chose to have nameserver 10.2.12.2 in the container we run. And you can see /etc/resolv.conf inside the container saves this new nameserver in it. Make a note that whenever you are using --dns switch it will wipe out all existing nameserver entries within the container and keeps only the one you supply.
This is a way if you want to use custom DNS in a single container. But what if you want to use this custom DNS to all containers which will run on your docker host then you need to define it in the config file. We are going to see this in the next point.
How to use external DNS in all the containers on docker host
You need to define the external DNS IP in docker daemon configuration file /etc/docker/daemon.json as below –
{
    "dns": ["10.2.12.2", "3.4.5.6"]
}
Once changes saved in the file you need to restart docker daemon to pick up these new changes.
root@kerneltalks # systemctl docker restart
and it’s done! Now any container you run fresh on your docker host will have these two DNS nameservers by default in it.
Docker swarm cheat sheet. List of all commands to create, run, manage container cluster environment, Docker Swarm!
Docker swarm cheat-sheet
Docker swarm is a cluster environment for Docker containers. Swarm is created with a number of machines running docker daemons. Collectively they are managed by one master node to run clustered environment for containers!
In this article, we are listing out all the currently available docker swarm commands in a very short overview. This is a cheat sheet you can glance through to brush or your swarm knowledge or quick reference for any swarm management command. We are covering most used or useful switches with the below commands. There are more switches available for each command and you can get them with --help
Read all docker or containerization related articles here from KernelTalk’s archives.
Docker swarm commands for swarm management
This set of command is used mainly to start, manage the swarm cluster as a whole. For node management, within the cluster, we have a different set of commands following this section.
docker swarm init : Initiate swam cluster
–advertise-addr: Advertised address on which swarm lives
–autolock: Locks manager and display key which will be needed to unlock stopped manager
–force-new-cluster: Create a new cluster from backup and dont attempt to connect to old known nodes
docker swarm join-token: Lists join security token to join another node in swarm as worker or manager
–quite: Only display token. By default, it displays complete command to be used along with the token.
–rotate: Rotate (change) token for security reasons.
docker swarm join: Join already running swarm as a worker or manager
–token: Security token to join the swarm
–availability: Mark node’s status as active/drain/pause after joining
docker swarm leave: Leave swarm. To be run from the node itself
-f: Leave forcefully ignoring all warnings.
docker swarm unlock: Unlocks swarm by providing key after manager restarts
docker swarm unlock-key: Display swarm unlock key
-q: Only display token.
–rotate: Rotate (change) token for security reasons.
docker swarm update: Updates swarm configurations
–autolock: true/false. Turns on or off locking if not done while initiating.
Docker swarm node commands for swarm node management
Node is a server participating in Docker swarm. A node can either be a worker or manager in the swarm. The manager node has the ability to manage swarm nodes and services along with serving workloads. Worker nodes can only serve workloads.
docker node ls : Lists nodes in the swarm
-q : Only display node Ids
–format : Format output using GO format
–filter : Apply filters to output
docker node ps : Display tasks running on nodes
Above all switches applies here too.
docker node promote : Promote node to a manager role
docker node demote : Demote node from manager to worker role
docker node rm : Remove node from the swarm. Run from the manager node.
-f : Force remove
docker node inspect : Detailed information about the node
–format : Format output using GO format
–pretty : Print in a human-readable friendly format
docker node update : Update node configs
–role : worker/manager. Update node role
–availability : active/pause/drain. Set node state.
Docker swarm service commands for swarm service management
Docker service is used to create and spawn workloads to swarm nodes.
docker service create : Start new service in Docker swarm
Switches of docker container run command like -i (interactive), -t (pseud terminal), -d (detached), -p (publish port) etc supported here.
docker service ls : List services
–filter, –format and -q (quiet) switches which we saw above are supported with this command.
docker service ps : Lists tasks of services
–filter, –format and -q (quiet) switches which we saw above are supported with this command.
docker service logs : Display logs of service or tasks
docker service rm : Remove service
-f : Force remove
docker service update : Update service config
Most of the parameters defined in service create command can be updated here.
docker service rollback : Revert back changes done in service config.
docker service scale : Scale one or more replicated services.
servicename=number format
docker service inspect : Detailed information about service.
Learn the basics of the Docker image. Beginners guide explaining What is Docker image, what are different types of Docker images, and how to pull/push docker image?
Learn basics of Docker Image
In this article, we will be discussing the Docker image mainly. We will touch base all the below points :
What is the Docker image?
Difference between Docker image and Docker container
What is the official Docker image
Public and private Docker image
How to download/upload pull/push Docker image from/to Docker hub
What is Docker image?
The official definition of Docker image is – ” Docker images are the basis of containers. An Image is an ordered collection of root filesystem changes and the corresponding execution parameters for use within a container runtime. An image typically contains a union of layered filesystems stacked on top of each other. An image does not have state and it never changes. “
Read all docker or containerization related articles here from KernelTalk’s archives.
Lets cut this definition for our understanding. The first sentence means containers are launched using images. The second one tells it has binaries, dependencies & parameters to run a container (i.e. application). Third denotes image changes are layered and it never changes actual image file which means the image is the read-only file.
In the virtualization world’s concept Image can be visualized as a template from which you can launch as many containers as you want. In short, Image is an application binary along with its dependencies and metadata which tells how this image should be run in the container.
The image is named with the syntax:software_name:version_tag if the tag is not specified then latest is considered as default tag.
Difference between Docker image and Docker container
Let me summarize the difference between Docker image and container in tabular format for easy understanding :
Docker Image
Docker container
An ordered collection of root filesystem changes and the corresponding execution parameters for use within a container runtime
An active (or inactive if exited) stateful instantiation of an image.
Can be pulled from Docker hub
Runs locally on your host OS
Its read only
Dynamic
Its a template from which container launches
Its running/stopped instance of image
It’s a file
It’s a process
Management command : #docker image <..>
Management command : #docker container <..>
What is official Docker image?
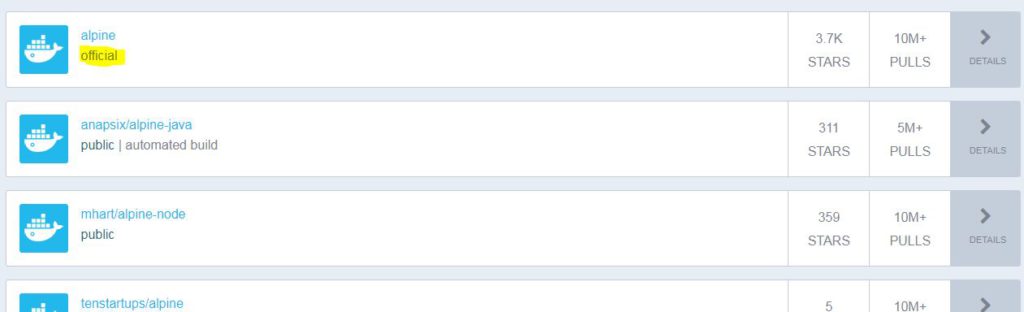
Docker hub is a repository like Git for Docker images. Any registered user can upload images to it. But, for popular software like Nginx, alpine, Redis, Mongo Docker has a team which creates, test, verify images with standard settings and keep them for public use on Docker hub. The official docker image always has an only software name as its image name. Any other image other than official is named with syntax username/software_name where username is a user who uploaded that image on Docker hub. Also, the official image has official written below it in listing as shown in the below screenshot.
Identify official docker image
You can see apart from the first official image all other images of alpine are named username on the left. Only the official image has only the software name in its name.
Public and private Docker image
You can upload your image to a private or public on Docker hub. Public images are available to download for free for everyone. Private images are access restrictions defined by the uploader. While using the public image you should be very careful to choose which image to pull.
Docker hub has a star grading system for images. The user can star images and the total number of stars earned by the image are shown on the right column in listing (it can be seen in the above screenshot). Also, alongside stars, you can see the number of pulls images witnessed. Image with maximum stars and/or pulls considered a good image.
How to pull or download image from Docker hub?
You don’t need a Docker account to pull the image from the Docker hub. You only need to have an active internet connection on the server and you can use docker image pull to download the image from the Docker hub.
root@kerneltalks # docker image pull alpine
Using default tag: latest
latest: Pulling from library/alpine
Digest: sha256:e1871801d30885a610511c867de0d6baca7ed4e6a2573d506bbec7fd3b03873f
Status: Image is up to date for alpine:latest
Since my local image cache already has alpine image downloaded, pull command verified its SHA. Once it found that the cached image is the same as the one available on Docker hub so it didn’t download image! It saved bandwidth and storage both.
Now, I will pull the alpine image which has java available in it. Also, it’s not in my local image cache.
root@kerneltalks # docker image pull  anapsix/alpine-java
Using default tag: latest
latest: Pulling from anapsix/alpine-java
ff3a5c916c92: Already exists
b2573fe715ab: Pull complete
Digest: sha256:f4271069aa69eeb4cfed50b6a61fb7e4060297511098a3605232dbfe8f85de74
Status: Downloaded newer image for anapsix/alpine-java:latest
If you observe output above, command pulled only one file with ID b2573fe715ab whereas the other one it says already exists! So here comes the logic of Union layered filesystem.
As explained in the definition image is consists of a layered union filesystem. Since this image is alpine with java, it has the base of alpine image (which I already have in my image cache). And hence only extra java layer on this image is downloaded by pull command. And then together it stored alpine java image in my local cache!
You can even check details of this image on Docker hub and it indeed mentions that its build on top of the base alpine image. Which explains pull behavior and support our above explanation.
How to push or upload image to Docker hub?
To upload the image on Docker hub you will need a Docker account. It’s free to create. Just head to https://hub.docker.com/ and sign up. Once logged in you can create your private repo in which you can upload images and those will be private images. Otherwise, images uploaded will be public.
You need to login to Docker account from server where you have locally built images stored using docker login command.
root@kerneltalks # docker login
Login with your Docker ID to push and pull images from Docker Hub. If you don't have a Docker ID, head over to https://hub.docker.com to create one.
Username: shrikantlavhate
Password:
WARNING! Your password will be stored unencrypted in /root/.docker/config.json.
Configure a credential helper to remove this warning. See
https://docs.docker.com/engine/reference/commandline/login/#credentials-store

Login Succeeded
Now you can push your image to the public repo or private repo. I created my private repo with the name kerneltalks. So I am pushing the image to Docker hub in my private repo. But before pushing the image to Docker hub you need to properly tag it. To upload the image in the private repo you need to tag it like – username/reponame
root@kerneltalks # docker image tag 3fd9065eaf02 shrikantlavhate/kerneltalks
root@kerneltalks # docker image push shrikantlavhate/kerneltalks
The push refers to repository [docker.io/shrikantlavhate/kerneltalks]
cd7100a72410: Pushed
latest: digest: sha256:8c03bb07a531c53ad7d0f6e7041b64d81f99c6e493cb39abba56d956b40eacbc size: 528
Once the image is tagged properly it can be pushed to Docker hub. Using the tag Docker hub determines it’s a public or private image and accordingly uploads it.
Be noted that your login information is kept in local profiles for the seamless experience. Don’t forget to logout from the Docker account if you are on the shared machine.
Learn how to resolve Authorisation not recognized error while using xterm in Linux
xclock error
Error :
Sometimes your users complain they can’t use GUI via X server from Linux box (in this case mobaXterm). They are receiving their display authorization is not recognized. An error like below –
appuser@kerneltalks@ xclock
MobaXterm X11 proxy: Authorisation not recognised
Error: Can't open display: localhost:10.0
Sometimes these errors show up when you switch user from the root account or any other account.
Quick Solution:
Login directly with user on which you want to use xclock
appuser needs to log in directly on the server and you won’t see this issue. Most of the time it arises once you su to appuser from root or different users.
Read further if you have to switch user and then use x-term.
appuser need to add its entry to authorization. This entry will be the last entry in .Xauthority file in a home directory of the previous user with which you have logged in the server in the first place. Let’s say its root in our case. i.e. we logged in as root and then su to appuser
So here we got values from root home directory file and then we added it in using xauth in currently su user i.e. appuser
and you are good to go!
Bit of an explanation :
This error occurs since your ID doesn’t have the authorization to connect to the X server. Let’s walk through how to resolve this error. List out authorization entries for displays using xauth list
Protocol name (MIT-MAGIC-COOKIE-1 referred to single period)
hexkey
If you have many sessions and you are on test/dev environment and you are the only one using your system you can remove all the above entries using xauth remove to make sure you have a clean slate and getting only your session cookie. Or, you can save this output for reference. Log in again, try xclock and new the entry will be generated. Compare the latest output with the older one and get your new entry filtered out. Or as mentioned above in a quick solution it will be last entry in .Xauthority file in a home directory of appuser. You can not read .Xauthority file like text file so you have to use xauth -f command to view its content.
Logout from all sessions. Login again with the app user and run xclock once. This will generate a new session cookie token which you can see in xauth list .
appuser@kerneltalks $ xauth list
kerneltalks/unix:10  MIT-MAGIC-COOKIE-1  df22dfc7df88b60f0653198cc85f543c
Now, grab this entry and add authorization using below command –
X11-forwarding : ✘ (disabled or not supported by server)
Solution :
The best way to make sure you have all X11 stuff installed is to run the install package xclock. Additionally, you need to install xauth package as well.
Secondly, make sure you have X11Forwarding yes set in your /etc/ssh/sshd_config. If not then set and restart sshd daemon.
That’s all! Try re-logging to the server and it should work. You should see the below message after login using MobXterm.
X11-forwarding : ✔ (remote display is forwarded through SSH)
An article explaining Docker container utilization monitoring. How to monitor or save reports of Docker container resource utilization and how to format output according to your requirement.
Monitor your Docker containers
Docker containers are processes running on host OS using its resources. It means Docker containers are using CPU, Memory, and IO from Host OS to execute their commands or perform their tasks. Resource utilization is a major area leading to the performance of a server or application.
Host OS being a Linux in our case can be monitored using tools like sar, top, etc for resource utilization. You can trace down PID of Docker containers and then drill down to those PID’s utilization in the host’s monitoring tool to get container utilization. But this is a bit tedious job and not feasible in case you have the number of containers running on your server. Docker already took care of it and provided its own real-time monitoring tool which reports resource utilization by each container in real-time.
Docker provided command stats to provide real-time container’s resource utilization statistics. Commands run in terminal like top command and update values in real-time.
Read all docker or containerization related articles here from KernelTalk’s archives.
You can supply a container ID or name to this command to view the statistics of that specific container. If no container name/ID supplied, it will show stats of all running containers.
root@kerneltalks # docker container stats
CONTAINER ID        NAME                    CPU %               MEM USAGE / LIMIT   MEM %               NET I/O             BLOCK I/O           PIDS
2554070a4ba7        friendly_hodgkin        0.19%               205MiB / 991MiB     20.69%              1.21kB / 767B       105MB / 8.7kB       31
b60fa988daee        condescending_galileo   0.18%               201MiB / 991MiB     20.29%              1.21kB / 761B       96.3MB / 9.22kB     31

root@kerneltalks # docker container stats friendly_hodgkin
CONTAINER ID        NAME                CPU %               MEM USAGE / LIMIT   MEM %               NET I/O             BLOCK I/O           PIDS
2554070a4ba7        friendly_hodgkin    0.15%               205.2MiB / 991MiB   20.71%              1.21kB / 767B       105MB / 8.7kB       31
The output is tabulated and column-wise it has –
Container ID: Docker container ID
Name: Docker container name
CPU %: CPU percentage of the host being utilized by container right now.
MEM USAGE / LIMIT: Memory being utilized by container right now / Max memory which can be used by the container
MEM %: Memory percentage of Host being utilized by container right now.
NET I/ O: Network Input Output traffic on container’s network interface
BLOCK I/ O: Disk IO did on the Host storage
PIDS: Total number of processes/threads container created/forked.
You have to press cntrl+c to return to a prompt from real-time updating stats screen.
How to save Docker container utilization?
Now, if you want to save container utilization or you want to use stats command in some script then you may want to run it for 1 iteration only and exits automatically rather than keep running.
In such a case, you need to use --no-stream switch along with stats command.
root@kerneltalks # docker container stats --no-stream
CONTAINER ID        NAME                    CPU %               MEM USAGE / LIMIT   MEM %               NET I/O             BLOCK I/O           PIDS
2554070a4ba7        friendly_hodgkin        0.15%               205.2MiB / 991MiB   20.71%              1.21kB / 767B       105MB / 8.7kB       31
b60fa988daee        condescending_galileo   0.15%               201.3MiB / 991MiB   20.31%              1.21kB / 761B       96.3MB / 9.22kB     31
root@kerneltalks #
You can redirect this output to file for further processing.
CPU and Memory utilization of Docker container
stats command offers to format according to your need by using --format switch. It has GO template formatting available with this switch.
Using it, you can make stats command to display only CPU and MEM utilization of containers like below :
root@kerneltalks # docker container stats --format "table {{.Container}}\t{{.CPUPerc}}\t{{.MemPerc}}"
CONTAINER           CPU %               MEM %
2554070a4ba7        0.18%               20.71%
b60fa988daee        0.18%               20.32%
Placeholders of this formatting are as below –
.Container Container name or ID (user input)
.Name Container name
.ID Container ID
.CPUPerc CPU %
.MemPerc Memory %
.MemUsage Memory usage
.NetIO Network IO
.BlockIO Block IO
.PIDs Number of PIDs
So you can format the output the way you want it and with only values, you are interested in. Then you can use no-stream and get the utilization figures to another file or pipe them to other commands for further processing.
Learn how to import VG with a different name. Useful when the system has the same name VG already existing and you are trying to import VG there.
Change VG name during import
In this tutorial, we will walk you through the process to import VG with a different name. During migrations, data movement activities, etc you may face issues in the VG import process. Sometimes you have disks with VGs exported on them & the same VG name is exiting on the server where you try to import VG from those disks.
In such cases, where you try to import VG when same VG name already existing in the system you get below error :
# vgimport vg02 /dev/xvdg
  Multiple VGs found with the same name: skipping vg01
  Use --select vg_uuid=<uuid> in place of the VG name.
Now, you have two choices to import VG in such case.
Import using VG UUID while keeping VG name the same. In this case, you will have 2 VG on the system with the same name and administer them & mounting LVs in them is havoc
Use vgimportclone command and import VG using a different name.
Import VG using the same name with UUID
If you took the VG map file while exporting VG then you can get VG UUID from it or you must have noted it down from vgdisplay output as well. This process also answers for how to import VG with the duplicate names!
# vgimport  --select vg_uuid=kzwQmc-qIzF-IZcv-9eW8-ToA1-mkDV-fLari2
  Volume group "vg02" successfully imported
Now you see vg02 is imported. But we already had VG named vg02 in our system. So, now we have two VGs with the same name in our system.
# vgdisplay
  --- Volume group ---
  VG Name               vg02
  System ID
  Format                lvm2
  Metadata Areas        1
  Metadata Sequence No  2
  VG Access             read/write
  VG Status             resizable
  MAX LV                0
  Cur LV                0
  Open LV               0
  Max PV                0
  Cur PV                1
  Act PV                1
  VG Size               1020.00 MiB
  PE Size               4.00 MiB
  Total PE              255
  Alloc PE / Size       0 / 0
  Free  PE / Size       255 / 1020.00 MiB
  VG UUID               aRmosT-KZCY-5k40-DGSK-3WGd-ZwWD-eEXXgk

  --- Volume group ---
  VG Name               vg02
  System ID
  Format                lvm2
  Metadata Areas        1
  Metadata Sequence No  5
  VG Access             read/write
  VG Status             exported/resizable
  MAX LV                0
  Cur LV                1
  Open LV               0
  Max PV                0
  Cur PV                1
  Act PV                1
  VG Size               <5.00 GiB
  PE Size               4.00 MiB
  Total PE              1279
  Alloc PE / Size       25 / 100.00 MiB
  Free  PE / Size       1254 / <4.90 GiB
  VG UUID               kzwQmc-qIzF-IZcv-9eW8-ToA1-mkDV-fLari2
Now the real challenge is to mount LV within them. You can do that but to ease out your pain, you can simply rename newly imported VG to some different name. You should use VG UUID again in vgrename command.
# vgrename kzwQmc-qIzF-IZcv-9eW8-ToA1-mkDV-fLari2 vg03
  Processing VG vg02 because of matching UUID kzwQmc-qIzF-IZcv-9eW8-ToA1-mkDV-fLari2
  Volume group "kzwQmc-qIzF-IZcv-9eW8-ToA1-mkDV-fLari2" successfully renamed to "vg03"
Once you renamed newly imported VG, your existing and new VG has different names as well. Now, you will be able to mount LVs within them without much hassle.
Hence its recommended in such a scenario you must import VG with a different name.
Import VG with the different name using vgimportclone command
vgimportclone command should be supplied with a new name with which you want VG to be imported with switch -n followed by disk name on which you exported VG
# vgimportclone -n vg01 /dev/xvdg
  VG vg02 is exported, use the --import option.
So, the command here detected that VG was exported and asks us to confirm import operation with --import switch. Let’s do that –
# vgimportclone --import -n vg01 /dev/xvdg
And command ran successfully. It won’t print any message on the terminal. You can verify that new VG on the system using vgdisplay command.
If you are looking for answers for how to change VG name during import? or how to import VG with a new name? then vgimportclone is the answer!
That’s it. You successfully imported VG with a different name. Since existing VG and your imported VG has different names now you won’t face any hurdles in mounting LVs from both of them.
Learn how to access shell and execute a command inside a Docker container. Explains running commands inside already running containers or while launching containers.
Execute commands in Docker container
If you are following the Docker series on my blog then you must have been gone through Docker basics and Docker container maintenance commands by now. In this tutorial, we will walk you through how to access shell inside Docker container and how to execute commands inside the container.
First of all, you can not execute commands or access shells in any container. Basically, the container image you are using to launch your container should have a shell in it. If the image does not support shell then you can not do anything inside the container during launch or even after launch.
Read all docker or containerization related articles here from KernelTalk’s archives.
For example, if you are launching a container from Nginx image i.e. web-server container then you won’t be able to access the shell or execute the command within it. Since its just a web-server process! But, if you are launching a container from the ubuntu image or alpine image then you will be able to access its shell since those images/software does support shell.
You can access shell inside a docker container and execute commands inside container either of using two ways –
Execute bash shell while launching container
Use docker command to execute single command inside container
Remember, each Docker image has a default command defined in it which it executes whenever it launches any container. You can edit it anytime but if you want to change it on the fly then you need to specify it at the end of the run command. So, image ignores default defined command and it executes a command specified in docker run command after it launches container.
Access shell & execute command in Docker container while launching it
Once you are confirmed that the image you are using to launch container does support shell (mostly its bash) then you need to launch a container using -it switch. where –
-i is the interactive mode.It keeps STDIN open even if you choose to detach container after launch
-t is to assign pseudo-terminal through which STDIN is kept open for user input.
I launched Ubuntu container with -it switch and I presented with shell prompt within. Observe output below –
With the output, you can see after the container is launched promptly is given root@2493081de86f . Now you are within the container with root the account. Keep in mind everything inside the container happens with root id. If you see hostname of Ubuntu container is set the same as container ID. I executed a couple of commands inside the container in the above output.
Keep in mind, since the container is aimed to be very lightweight they always consist of minimal software inside. So if you are running any Linux distribution container, you won’t be able to run all commands as you would normally do in VM or Linux server.
Execute command inside already running container
The above process is applicable for the container you are about to launch. But what if you want to execute a command on the container which is already running on the system. Docker provided exec switch to access running container shell. Syntax is docker container exec <container name/ID> <command to run>
I have already a ubuntu container running in my system. I used exec switch to execute hostname, date and df commands inside the container.
root@kerneltalks # docker container ls
CONTAINER ID IMAGE COMMAND CREATED STATUS PORTS NAMES
ae0721fb8ecf ubuntu:latest "/bin/bash" 2 minutes ago Up 2 minutes loving_bohr

root@kerneltalks # docker container exec ae0721fb8ecf date
Sat Jun 2 15:41:24 UTC 2018
root@kerneltalks # docker container exec ae0721fb8ecf hostname
ae0721fb8ecf
root@kerneltalks # docker container exec ae0721fb8ecf df
Filesystem                                                                                         1K-blocks    Used Available Use% Mounted on
/dev/mapper/docker-202:1-26198093-57ab60113158ca3f51c470fefb25a3fdf154a5309f05f254c660dba2a55dbab7  10474496  109072  10365424   2% /
tmpfs                                                                                                  65536       0     65536   0% /dev
tmpfs                                                                                                 507368       0    507368   0% /sys/fs/cgroup
/dev/xvda1                                                                                           8376320 5326996   3049324  64% /etc/hosts
shm                                                                                                    65536       0     65536   0% /dev/shm
tmpfs                                                                                                 507368       0    507368   0% /proc/scsi
tmpfs                                                                                                 507368       0    507368   0% /sys/firmware
Observe about output and all 3 commands ran successfully inside container and shown output on our host machine terminal.
Learn basic Docker container management with the help of these 8 commands. A useful guide for Docker beginners which includes sample command outputs.
Docker container management
In this article we will walk you through 6 basic Docker container commands which are useful in performing basic activities on Docker containers like run, list, stop, view logs, delete, etc. If you are new to the Docker concept then do check our introduction guide to know what is Docker & how-to guide to install Docker in Linux. Without further delay lets directly jump into commands.
How to run Docker container?
As you know, the Docker container is just an application process running on the host OS. For Docker container, you need a image to run from. Docker image when runs as process called a Docker container. You can have Docker image available locally or you have to download it from Docker hub. Docker hub is a centralized repository that has public and private images stored to pull from. Docker’s official hub is at hub.docker.com. So whenever you instruct the Docker engine to run a container, it looks for image locally, and if not found it pulls it from Docker hub.
Read all docker or containerization related articles here from KernelTalk’s archives.
Let’s run a Docker container for Apache web-server i.e httpd process. You need to run the command docker container run. The old command was just docker run but lately, Docker added sub-command section so new versions support below command –
Docker run command takes image name as a mandatory argument along with many other optional ones. Commonly used arguments are –
-d : Detach container from the current shell
-p X:Y : Bind container port Y with host’s port X
--name : Name your container. If not used, it will be assigned randomly generated name
-e : Pass environmental variables and their values while starting a container
In the above output you can see, we supply httpd as an image name to run a container from. Since the image was not locally found, the Docker engine pulled it from Docker Hub. Now, observe it downloaded image httpd:latest where: is followed by version. That’s the naming convention of Docker container image. If you want a specific version container to run from then you can provide a version name along with image name. If not supplied, the Docker engine will always pull the latest one.
The very last line of output shown a unique container ID of your newly running httpd container.
How to list all running Docker containers?
Now, your container is running, you may want to check it or you want to list all running containers on your machine. You can list all running containers using docker container ls command. In the old Docker version, docker ps does this task for you.
root@kerneltalks # docker container ls
CONTAINER ID        IMAGE               COMMAND              CREATED             STATUS              PORTS                NAMES
c46f2e9e4690        httpd               "httpd-foreground"   11 minutes ago      Up 11 minutes       0.0.0.0:80->80/tcp   cranky_cori
Listing output is presented in column-wise format. Where column-wise values are –
Container ID: First few digits of the unique container ID
Image: Name of the image used to run the container
Command: Command ran by container after it ran
Created: Time created
Status: Current status of the container
Ports: Port binding details with host’s ports
Names: Name of the container (since we haven’t named our container you can see randomly generated name assigned to our container)
How to view logs of Docker container?
Since during the first step we used -d switch to detach container from the current shell once it ran its running in the background. In this case, we are clueless about what’s happening inside the container. So to view logs of the container, Docker provided logs command. It takes a container name or ID as an argument.
root@kerneltalks # docker container logs cranky_cori
AH00558: httpd: Could not reliably determine the server's fully qualified domain name, using 172.17.0.2. Set the 'ServerName' directive globally to suppress this message
AH00558: httpd: Could not reliably determine the server's fully qualified domain name, using 172.17.0.2. Set the 'ServerName' directive globally to suppress this message
[Thu May 31 18:35:07.301158 2018] [mpm_event:notice] [pid 1:tid 139734285989760] AH00489: Apache/2.4.33 (Unix) configured -- resuming normal operations
[Thu May 31 18:35:07.305153 2018] [core:notice] [pid 1:tid 139734285989760] AH00094: Command line: 'httpd -D FOREGROUND'
I used the container name in my command as an argument. You can see the Apache related log within our httpd container.
How to identify Docker container process?
The container is a process that uses host resources to run. If it’s true, then you will be able to locate the container process on the host’s process table. Let’s see how to check the container process on the host.
Docker used famous top command as its sub-commands name to view processes spawned by the container. It takes the container name/ID as an argument. In the old Docker version, only docker top command works. In newer versions, docker top and docker container top both works.
In the first output, the list of processes spawned by that container. It has all details like use, PID, PPID, start time, command, etc. All those PID you can search in your host’s process table and you can find them there. That’s what we did in the second command. So, this proves containers are indeed just processes on Host’s OS.
How to stop Docker container?
It’s simple stop command! Again it takes container name /ID as an argument.
How to list stopped or not running Docker containers?
Now we stopped our container if we try to list container using ls command, we won’t be able to see it.
root@kerneltalks # docker container ls
CONTAINER ID        IMAGE               COMMAND             CREATED             STATUS              PORTS               NAMES
So, in this case, to view stopped or nonrunning container you need to use -a switch along with ls command.
root@kerneltalks # docker container ls -a
CONTAINER ID        IMAGE               COMMAND              CREATED             STATUS                     PORTS               NAMES
c46f2e9e4690        httpd               "httpd-foreground"   33 minutes ago      Exited (0) 2 minutes ago                       cranky_cori
With -a switch we can see stopped container now. The notice status of this container is mentioned ‘Exited’. Since the container is just a process its termed as ‘exited’ rather than stopped!
How to start Docker container?
Now, we will start this stopped container. There is a difference between running and starting a container. When you run a container, you are starting a command in a fresh container. When you start a container, you are starting an old stopped container which has an old state saved in it. It will start it from that state forward.
root@kerneltalks #  docker container start c46f2e9e4690
c46f2e9e4690

root@kerneltalks # docker container ls -a
CONTAINER ID        IMAGE               COMMAND              CREATED             STATUS              PORTS                NAMES
c46f2e9e4690        httpd               "httpd-foreground"   35 minutes ago      Up 8 seconds        0.0.0.0:80->80/tcp   cranky_cori
How to remove Docker container?
To remove the container from your Docker engine use rm command. You can not remove the running containers. You have to first stop the container and then remove it. You can remove it forcefully using -f switch with rm command but that’s not recommended.
root@kerneltalks # docker container rm cranky_cori
cranky_cori
root@kerneltalks # docker container ls -a
CONTAINER ID        IMAGE               COMMAND             CREATED             STATUS              PORTS               NAMES
You can see once we remove container, its not visible in ls -a listing too.