Monthly Archives: November 2018

How to configure Cockpit in RHEL 8

Learn how to install, configure and use cockpit web console in RHEL 8.

Install, configure and use Cockpit in RHEL 8

What is cockpit web console?

The cockpit is an open-source project aims at Red Hat Enterprise Linux web console using which system can be administered. Introduced in RHEL 7, Cockpit provides a user and device friendly web console to manage your systems. Being a web console, it can be accessed over mobile devices as well. Obviously CLI (Command Line Interface) is the wizard wand in sysadmin’s hand but sometimes small and quick changes can be done through this console. Cockpit is integrated systemd. Let’s see how to install the cockpit on RHEL.

How to install Cockpit web console in RHEL 8?

The cockpit is offered with a package of the same name. Install package cockpit, using yum to install the Cockpit web console in RHEL 8. If YUM configuration is not in place on your system, you can always mount RHEL 8 BETA ISO and configure yum with this ISO as a repo. Below are commands for it –

[root@kerneltalks ~]# cat /etc/yum.repos.d/dvdiso.repo
[dvdiso]
name=RedHat DVD ISO
baseurl=file:///mnt/dvd/BaseOS/
enabled=1
gpgcheck=1
gpgkey=file:///mnt/dvd/BaseOS/RPM-GPG-KEY-redhat-release
[root@kerneltalks BaseOS]# yum repolist
RedHat DVD ISO                                                                                                                          1.0 MB/s | 2.2 MB     00:02
Last metadata expiration check: 0:00:01 ago on Wed 28 Nov 2018 12:30:43 PM EST.
repo id                                                                      repo name                                                                            status
dvdiso                                                                       RedHat DVD ISO                                                                       1,688

Now install package cockpit using yum –

[root@kerneltalks ~]# yum --nogpg install cockpit
Last metadata expiration check: 0:01:21 ago on Wed 28 Nov 2018 12:30:43 PM EST.
Dependencies resolved.
========================================================================================================================================================================
 Package                                               Arch                            Version                                    Repository                       Size
========================================================================================================================================================================
Installing:
 cockpit                                               x86_64                          180-1.el8                                  dvdiso                           66 k
Installing dependencies:
 cockpit-bridge                                        x86_64                          180-1.el8                                  dvdiso                          553 k
 cockpit-system                                        noarch                          180-1.el8                                  dvdiso                          1.6 M
 cockpit-ws                                            x86_64                          180-1.el8                                  dvdiso                          820 k
 glib-networking                                       x86_64                          2.56.1-1.el8                               dvdiso                          155 k
 gsettings-desktop-schemas                             x86_64                          3.28.1-1.el8                               dvdiso                          619 k
 libmodman                                             x86_64                          2.0.1-17.el8                               dvdiso                           36 k
 libproxy                                              x86_64                          0.4.15-5.2.el8                             dvdiso                           74 k
Installing weak dependencies:
 redhat-logos                                          x86_64                          80.5-1.el8                                 dvdiso                          975 k
 subscription-manager-cockpit                          noarch                          1.23.8-1.el8                               dvdiso                          952 k

Transaction Summary
========================================================================================================================================================================
Install  10 Packages

Total size: 5.7 M
Installed size: 13 M
Is this ok [y/N]: y
Downloading Packages:
Running transaction check
Transaction check succeeded.
Running transaction test
Transaction test succeeded.
Running transaction
  Preparing        :                                                                                                                                                1/1
Installed: redhat-logos-80.5-1.el8.x86_64
  Installing       : redhat-logos-80.5-1.el8.x86_64                                                                                                                1/10
  Running scriptlet: redhat-logos-80.5-1.el8.x86_64                                                                                                                1/10
Installed: redhat-logos-80.5-1.el8.x86_64
Installed: libmodman-2.0.1-17.el8.x86_64
  Installing       : libmodman-2.0.1-17.el8.x86_64                                                                                                                 2/10
  Running scriptlet: libmodman-2.0.1-17.el8.x86_64                                                                                                                 2/10
Installed: libmodman-2.0.1-17.el8.x86_64
Installed: libproxy-0.4.15-5.2.el8.x86_64
  Installing       : libproxy-0.4.15-5.2.el8.x86_64                                                                                                                3/10
  Running scriptlet: libproxy-0.4.15-5.2.el8.x86_64                                                                                                                3/10
Installed: libproxy-0.4.15-5.2.el8.x86_64
Installed: gsettings-desktop-schemas-3.28.1-1.el8.x86_64
  Installing       : gsettings-desktop-schemas-3.28.1-1.el8.x86_64                                                                                                 4/10
Installed: gsettings-desktop-schemas-3.28.1-1.el8.x86_64
Installed: glib-networking-2.56.1-1.el8.x86_64
  Installing       : glib-networking-2.56.1-1.el8.x86_64                                                                                                           5/10
Installed: glib-networking-2.56.1-1.el8.x86_64
Installed: cockpit-bridge-180-1.el8.x86_64
  Installing       : cockpit-bridge-180-1.el8.x86_64                                                                                                               6/10
Installed: cockpit-bridge-180-1.el8.x86_64
Installed: cockpit-system-180-1.el8.noarch
  Installing       : cockpit-system-180-1.el8.noarch                                                                                                               7/10
Installed: cockpit-system-180-1.el8.noarch
Installed: subscription-manager-cockpit-1.23.8-1.el8.noarch
  Installing       : subscription-manager-cockpit-1.23.8-1.el8.noarch                                                                                              8/10
Installed: subscription-manager-cockpit-1.23.8-1.el8.noarch
Installed: cockpit-ws-180-1.el8.x86_64
  Running scriptlet: cockpit-ws-180-1.el8.x86_64                                                                                                                   9/10
  Installing       : cockpit-ws-180-1.el8.x86_64                                                                                                                   9/10
  Running scriptlet: cockpit-ws-180-1.el8.x86_64                                                                                                                   9/10
Installed: cockpit-ws-180-1.el8.x86_64
Installed: cockpit-180-1.el8.x86_64
  Installing       : cockpit-180-1.el8.x86_64                                                                                                                     10/10
Installed: cockpit-180-1.el8.x86_64
  Running scriptlet: redhat-logos-80.5-1.el8.x86_64                                                                                                               10/10
  Running scriptlet: cockpit-180-1.el8.x86_64                                                                                                                     10/10
  Verifying        : cockpit-180-1.el8.x86_64                                                                                                                      1/10
  Verifying        : cockpit-bridge-180-1.el8.x86_64                                                                                                               2/10
  Verifying        : cockpit-system-180-1.el8.noarch                                                                                                               3/10
  Verifying        : cockpit-ws-180-1.el8.x86_64                                                                                                                   4/10
  Verifying        : glib-networking-2.56.1-1.el8.x86_64                                                                                                           5/10
  Verifying        : gsettings-desktop-schemas-3.28.1-1.el8.x86_64                                                                                                 6/10
  Verifying        : libmodman-2.0.1-17.el8.x86_64                                                                                                                 7/10
  Verifying        : libproxy-0.4.15-5.2.el8.x86_64                                                                                                                8/10
  Verifying        : redhat-logos-80.5-1.el8.x86_64                                                                                                                9/10
  Verifying        : subscription-manager-cockpit-1.23.8-1.el8.noarch                                                                                             10/10

Installed:
  cockpit-180-1.el8.x86_64          redhat-logos-80.5-1.el8.x86_64   subscription-manager-cockpit-1.23.8-1.el8.noarch   cockpit-bridge-180-1.el8.x86_64
  cockpit-system-180-1.el8.noarch   cockpit-ws-180-1.el8.x86_64      glib-networking-2.56.1-1.el8.x86_64                gsettings-desktop-schemas-3.28.1-1.el8.x86_64
  libmodman-2.0.1-17.el8.x86_64     libproxy-0.4.15-5.2.el8.x86_64

Complete!

Now, make sure you have open firewall ports for Cockpit. Mostly it’s enabled by default during installation but its always good to verify.

[root@kerneltalks ~]# firewall-cmd --add-service=cockpit --permanent
Warning: ALREADY_ENABLED: cockpit
success

Next step is to enable and start Cockpit using sysctl command so it will load on every boot.

[root@kerneltalks ~]# systemctl enable cockpit.socket
Created symlink /etc/systemd/system/sockets.target.wants/cockpit.socket → /usr/lib/systemd/system/cockpit.socket.

[root@kerneltalks ~]# systemctl start cockpit.socket
[root@kerneltalks ~]# systemctl status cockpit.socket
● cockpit.socket - Cockpit Web Service Socket
   Loaded: loaded (/usr/lib/systemd/system/cockpit.socket; enabled; vendor preset: disabled)
   Active: active (listening) since Wed 2018-11-28 12:38:52 EST; 1s ago
     Docs: man:cockpit-ws(8)
   Listen: [::]:9090 (Stream)
  Process: 9823 ExecStartPost=/bin/ln -snf active.motd /run/cockpit/motd (code=exited, status=0/SUCCESS)
  Process: 9816 ExecStartPost=/usr/share/cockpit/motd/update-motd  localhost (code=exited, status=0/SUCCESS)
    Tasks: 0 (limit: 11516)
   Memory: 392.0K
   CGroup: /system.slice/cockpit.socket

Nov 28 12:38:52 kerneltalks.com systemd[1]: Starting Cockpit Web Service Socket.
Nov 28 12:38:52 kerneltalks.com systemd[1]: Listening on Cockpit Web Service Socket.

This will enable and activate the Cockpit service on RHEL. Since service is running now, Cockpit will listen to port 9090 by default. Check if the Cockpit service is listening on a port and open up your browser to access the web console.

How to connect Cockpit web console on RHEL 8

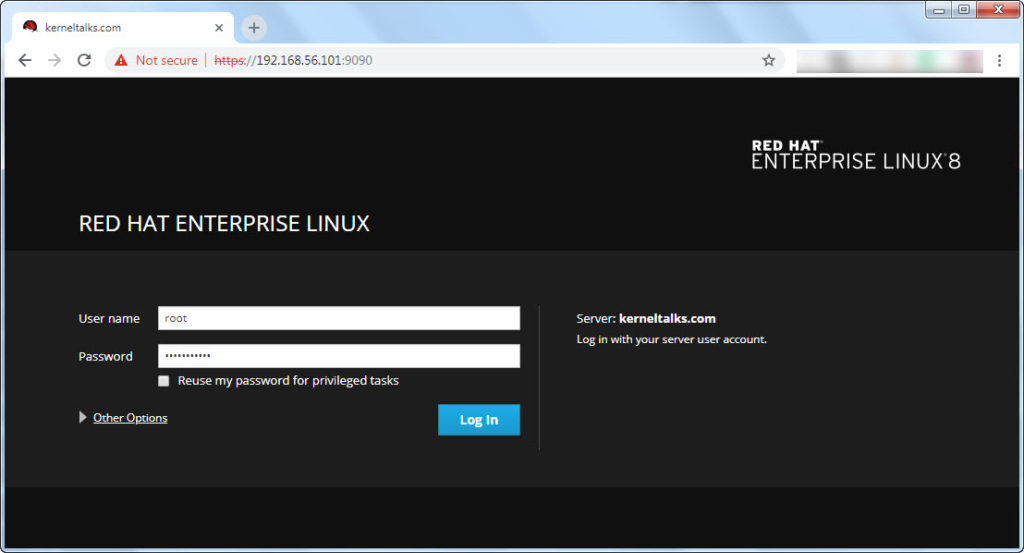
As we already mentioned, by default Cockpit listens on port 9090. All you have to do is open up a browser and go to https://ip_or_hostname:9090 URL and you will be connected to the Cockpit web console. So, in our case the Cockpit URL is https://192.168.56.101:9090. You will be greeted with the login screen as below –

Cockpit web console in RHEL 8

Use root account to login and you will be presented with the home screen of Cockpit web administration console like below –

System administration using Cockpit web console

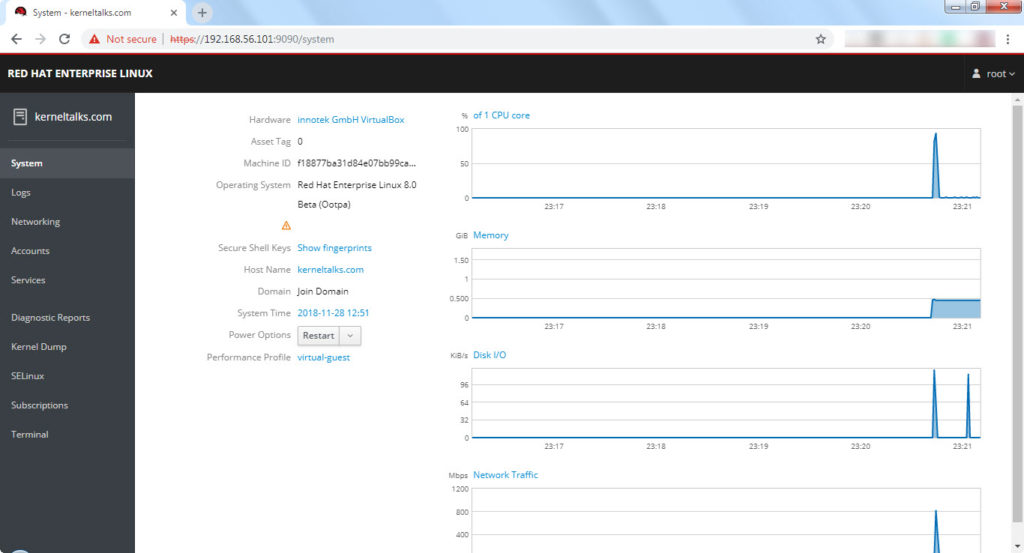
That’s it. You have web console in front of you. You can see utilization metrics in real time on home screen. Left hand side menu gives you ways to manage your system. Explore!

RHEL 8 BETA installation with screenshots

Complete step by step guide of RHEL 8 BETA installation with screenshots. 

RHEL 8 BETA installation

In this article, we will walk you through step by step installation of Red Hat Enterprise Linux 8.0 BETA along with screenshots. Before you begin to read what’s new in RHEL 8 and how to download RHEL 8 ISO. For this article, we installed RHEL 8 BETA on Oracle VM VirtualBox but the process almost remains the same whether you install on VM or physical machine. So, let’s learn how to install RHEL 8 BETA with screenshots.

Boot server with bootable ISO and you will be presented with below boot menu. Test media and install will be by default selected and you get the 60-sec timer to cancel it out. Since ISO is almost 6.5 GB it takes a while to test media so you can cancel this out, move up and choose to install without checking media.

RHEL 8 installer boot screen

Select Install Red Hat Enterprise Linux 8.0 and press enter

RHEL 8 BETA installer will load into memory and you will be presented with a language selection screen.

RHEL 8 installer language selection screen

Note here that Red Hat highlighted its PRE-RELEASE/TESTING so you understand it’s not to run in your live environment.

Select language of your choice and click Continue

Now, before moving forward installer will again remind you that this is pre-release software with below notice screen.

RHEL 8 installer notice

Click I want to proceed

Now you will see installation summary screen. Here all the custom configurations to be made.  Everything is segregated in three categories :

  1. Localization
    • Keyboard
    • Language Support
    • Time & Date
  2. Software
    • Installation Source
    • Software Selection
  3. System
    • Installation Destination
    • Kdump
    • Network & Host Name
    • Security Policy
    • System Purpose

You can click on each category and customize it according to your choice. We will walk you through each of them with screenshots except Keyboard and Language Support.

Lets start with Time & DateClick on it and you will see below screen –

RHEL 8 installer notice

Select timezone, date, time of your choice. You can even setup NTP here. Slide button on upper-right corner next to Network Time to configure NTP.

Click Done at top left corner once done.

You will come back to the installation summary screen. Click on Installation Source. It will bring up below screen –

RHEL 8 install source

By default, the install source is selected from where you boot up this system. You can notice additional AppStream repo here which is one of the features of RHEL 8 BETA. Click DoneYou will be back on the installation summary screen.

Click Software Selection. You will see below screen –

RHEL 8 install software selection

Here you select base and add-ons depending on your server role. Since we are installing it for testing, we choose minimal install. Click DoneYou will be back on the installation summary screen.

Click Installation Destination and you get access to partition your root disk. By default, Automatic partitioning is selected.

RHEL 8 installer manual partitioning screen

Here you can select different custom partitioning along with different volume managers. We re sticking with automatic partitioning here. Click DoneYou will be back on the installation summary screen.

Click KDUMP and you will be able to do kdump configuration.

RHEL 8 kdump configuration

You can enable/disable kdump here. Also if enabled you can specify reserve memory for it or leave to automatic. Click DoneYou will be back on installation summary screen.

Click Network & Host Name. Here hostname and networking details can be configured. You will be presented with below screen –

RHEL 8 hostname and network configuration

Define hostname in the lower left bottom space. To configure networking details click Configure and it will pop up below network configuration window.

RHEL 8 network configuration

Configure details. Click Save. Come back to the previous window.  Click DoneYou will be back on the installation summary screen.

Click Security Policy and below screen will allow you to define security policies of your choice. You can even specify URL to fetch policies

RHEL 8 installation security policy selection screen

Once done click DoneYou will be back on installation summary screen.

Click System Purpose to define the role of server. Below window let you define your server role –

RHEL 8 installation system purpose selection screen

Select appropriately. We selected it as an RHEL, self-supported test server. Click DoneYou will be back on the installation summary screen.

Now all customization according to your requirement has been done. You are now ready to start OS installation. Hit Begin installation button. The installer will start partitioning your disks and prepare them for installation. Meanwhile, it shows you below the screen to set the root password and add users to the system.

RHEL 8 root password setup

Set root password, sit back, and relax while installer complete setup! Once setup finishes, it will show up completion screen as below and ask for a reboot.

Click Reboot to enter whole new world of Red Hat Enterprise Linux 8.0 BETA!

System reboots and here you have first ever boot menu of RHEL 8.0

Booting RHEL 8 first time

Default kernel will be automatically selected to boot in 5s. Let system boot and then login !!

And here we are! On root hash prompt of RHEL 8.0 BETA!!!

You have successfully completed RHEL8 installation and now it’s ready to use.

What’s new in RHEL 8

A quick article listing what’s new in RHEL 8 BETA. Also, enlist steps to download RHEL 8 BETA ISO from the Red Hat developer portal.

RHEL 8 Beta version got released recently (Nov 14, 2018) and its Beta version is available for developers! In this quick post, we will walk you through features RHEL 8 offering currently and how to download your own RHEL 8 ISO for testing. If you are looking for more details then follow RHEL 8 release notes by Red Hat.

How to download RHEL 8 ISO

Red Hat Enterprise Linux 8 Beta is available to download on their developers portal. You need to sign up for a free account on the Red Hat developers portal. Login to the portal using your created account Navigate to download section. There you can check the link to RHEL 8 separate page or you can directly go to RHEL 8 page here. Here you will find links to download RHEL 8 ISO.

Download ISO and go ahead with the install.

Do check out our article on RHEL 8 installation with screenshots.

New features in RHEL 8

Lets check out what’s new in RHEL 8

RHEL 8 is built with developers in mind! There is so much in the box for application developers.

  1. RHEL 8 comes with pre-enabled repository Application Stream (AppStream) which provides many developers tools.
  2. Its developer-friendly means fewer efforts needed for setup or configuration. A developer can start working on codes easily without wasting many efforts in setting up the environment for it.
  3. Easy to use for developers who are new to Linux
  4. It has all cloud/container application development tools.
  5. Linux containers included in the bag
  6. cockpit is available by default in RHEL repos. A cockpit is a web-based tool used by the sysadmin to manage systems.
  7. KDE environment is deprecated from RHEL 7.6 hence it’s removed in RHEL 8
  8. GNOME v3.28 is loaded with RHEL 8.
  9. With GNOME, RHEL 8 uses Wayland as default display server instead of X.org
  10. Startis is a new volume management tool introduced.
  11. XFS file system now supports shared copy on write data extents functionality
  12. LUKS2 encryption format (default) introduced which replaces legacy LUKS1 format.
  13. DNF is rolling out behind YUM
  14. RPM v4.14 is distributed in RHEL 8 which validates entire package contents before starting installation.
  15. iptables are replaced by nftables.
  16. OpenLDAP is no more available.
  17. It has composer included. It’s used to deploy custom images in the cloud.
  18. Few software versions available with RHEL 8 are Python 3.6, Nginx 1.14, Apache 2.4.35, PHP 7.2, Ruby 2.5, Perl 5.26,  Databases like MariaDB 10.3, MySQL 8.0, PostgreSQL 10, PostgreSQL 9.6, and Redis 4.0
  19. OS content is available through pre-enabled repository BaseOS
  20. Supports up to 4PB of physical memory.
  21. nobody user replaced by nfsnobody
  22. KVM supports 5 level paging, increasing physical and virtual address space used by host or guest.
  23. qemu-kvm 2.12 added which has many enhancement ones being hot vCPU plug-unplug
  24. and many more…

We have curated only a few features in the above list. You can always navigate to 8.0 release notes and read the detailed list of enhancements and features in RHEL 8!

Go ahead, grab your ISO copy of RHEL 8 and get your hands on this new sensation in Linux world.

How to connect Windows EC2 AWS server using RDP?

Quick post explaining how to connect Windows EC2 AWS server using RDP.

Connecting AWS Windows server using RDP

Step 1. Get windows password in AWS

Retrieve administrator password from the Windows EC2 server.  Login to the EC2 dashboard from the AWS console. Select your Windows server EC2 instance and choose ‘Get Windows password‘ from the Actions menu.

Get windows password in AWS

Sometimes you may see below error complaining that Windows password is not available –

Windows password not available in AWS

Error is self explanatory. You are seeing it because –

  1. You need to wait for your server to properly boot and module to start which decrypt windows password and share with you.
  2. You spun windows server from AMI which does not have a module which could retrieve administrator password from Windows.

In the case of the first situation wait for few minutes and again try to ‘Get Windows Password‘. In the case of the second situation, you need to spin up EC2 with proper AMI.

Also read : How to deploy Linux server in AWS

Once the above issue is resolved, you will see the next window which asks for key pair you used while deploying the Windows server. This is AWS authenticating you again before it releases administrator password to you.

Key pair required to get windows password in aws

Browse key pair on your local machine and then hit the ‘Decrypt Password‘ button. If you have supplied proper key pair you will be presented with a password window like below –

Windows password in aws

That’s it. You have the administrator password for your Windows server on AWS.

Step 2 : Login to Windows AWS server using RDP

Logged in to Windows AWS server

Open remote desktop connection on your local machine. Punch in details that are given to you by AWS in the above window. Public DNS is the hostname you should use to connect to the server followed by the user name and password.

And you are in !

How to configure proxy for YUM in RHEL, CentOS ?

A quick tutorial to configure a proxy for YUM in RHEL, CentOS, or Fedora Linux.

Proxy configuration in YUM in RHEL, CentOS, Fedora

1. Enable proxy for yum in configuration file. (global)

If your server is connected to the internet via proxy server then you can define it in the configuration file located at /etc/yum.conf. For a definition, you should have below details ready with you  –

  1. Proxy server IP or hostname
  2. Port to be used for proxy connectivity
  3. User ID and password for authenticating you at proxy if enabled on proxy

Now, edit /etc/yum.conf using any text editor like vi and edit below parameters :

proxy=http://kerneltalksproxy.com:3487
proxy_username=shrikant
proxy_password=funWif#92cE

where –

kerneltalksproxy.com: Proxy server name
3487: Port
Username for proxy authentication: shrikant
Password for proxy authentication: funWif#92cE

Save and exit. List repo to verify internet connectivity using yum repolist.

Using this method you are configuring proxy within YUM configuration which will be used or available for all users on the system whenever they use yum commands.

2. Using profile proxy (User specific)

If you don’t want global proxy setup through /etc/yum.conf file then you can opt to define proxy at the user level by defining it in the user’s individual profile files. Add below config in .profile ( .profile file has different names depends on which login shell you are using) of the user so that it will be loaded every time user logged in to the system.

http_proxy="http://shrikant:funWif#92cE@kerneltalksproxy.com:3487" 
export http_proxy

If the proxy doesn’t need authentication then you can remove username, password portion and configure rest of the part –

http_proxy="http://kerneltalksproxy.com:3487" 
export http_proxy

So, this proxy setting will be available for all applications who use system proxy (like curl, yum) under that user’s login. Ask the user to login and verify proxy by refreshing yum repo.

Install and configure checkmk server on Linux

Complete installation guide to install & configure checkmk server on Linux. Also steps to add Linux client to checkmk monitoring using checkmk monitoring instance console.

Complete installation guide for check_mk on Linux

checkmk is a free, open-source IT infrastructure monitoring tool. It’s actually Nagios plugins that enhances their capabilities and performance. In this article, we will walk you through step by step procedure to setup checkmk monitoring server and add the client to its monitoring.

Check_mk is re-branded as checkmk

Also website is moved from mathias-kettner.com to checkmk.com. There are few pointers in article which needs to be treated with new URL although I made necessary changes.

1.  Download and install package

Download the appropriate package from the download page. For this article, we are using check_mk RAW edition CRE 1.5.0.p7 (since its 100% free). You can use tools like wget to directly download packages on the server.

[root@kerneltalks ~]# wget https://mathias-kettner.de/support/1.5.0p7/check-mk-raw-1.5.0p7-el7-38.x86_64.rpm
--2018-11-14 04:34:47--  https://mathias-kettner.de/support/1.5.0p7/check-mk-raw-1.5.0p7-el7-38.x86_64.rpm
Resolving mathias-kettner.de (mathias-kettner.de)... 178.248.246.154
Connecting to mathias-kettner.de (mathias-kettner.de)|178.248.246.154|:443... connected.
HTTP request sent, awaiting response... 200 OK
Length: 123984316 (118M) [application/x-redhat-package-manager]
Saving to: ‘check-mk-raw-1.5.0p7-el7-38.x86_64.rpm’

100%[==============================================================================================================================>] 123,984,316 13.9MB/s   in 9.6s

2018-11-14 04:34:57 (12.3 MB/s) - ‘check-mk-raw-1.5.0p7-el7-38.x86_64.rpm’ saved [123984316/123984316]

Now, install the package along with all of its dependencies. Use your package manager like yum, zipper, or apt to install package so that it will resolve its dependencies automatically and install them too.

2. Allow http protocol and port in firewall

Since the checkmk portal runs on HTTP protocol with default port 80, you need to allow them in the firewall.

[root@kerneltalks1 ~]# setsebool -P httpd_can_network_connect 1

If your machine has SELinux activated, you need to allow it in SELinux. If you have a local firewall i.e. iptables enabled, you need to allow it in iptables as well.

If you are on the AWS server, you need to open the security group as well to allow HTTP protocol.

3. Create and start check_mk server

After RPM installation, check if omd command is running properly.

[root@kerneltalks1 ~]# omd version
OMD - Open Monitoring Distribution Version 1.5.0p7.cre

Now, proceed with creating a monitoring instance and then starting it. Create a monitoring instance with omd create command.

[root@kerneltalks1 ~]# omd create kerneltalks_test
Adding /opt/omd/sites/kerneltalks_test/tmp to /etc/fstab.
Creating temporary filesystem /omd/sites/kerneltalks_test/tmp...OK
Restarting Apache...OK
Created new site kerneltalks_test with version 1.5.0p7.cre.

  The site can be started with omd start kerneltalks_test.
  The default web UI is available at http://kerneltalks1/kerneltalks_test/

  The admin user for the web applications is cmkadmin with password: Pz4IM7J7
  (It can be changed with 'htpasswd -m ~/etc/htpasswd cmkadmin' as site user.
)
  Please do a su - kerneltalks_test for administration of this site.

Our monitoring server instance is ready. You can gather details like URL, login credentials, the command to change password, etc from the command output.

Now if you try to login to the mentioned URL you will see OMD: Site Not Started error.

OMD site not started error

So, to use this server instance you need to start it using the command omd start

[root@kerneltalks1 ~]# omd start kerneltalks_test
OK
Starting mkeventd...OK
Starting rrdcached...OK
Starting npcd...OK
Starting nagios...2018-11-14 04:09:41 [6] updating log file index
2018-11-14 04:09:41 [6] updating log file index
OK
Starting apache...OK
Initializing Crontab...OK

Now you are good to go! You can go back to the URL and login to your monitoring server console!

check_mk console login
check_mk console

You can see everything is valued to zero since its being a fresh monitoring server instance we just created. Let’s add one Linux host into this monitoring instance to monitor.

How to install check_mk agent on Linux client

In this part, we will install check_mk agent on the Linux client and will add that client into monitoring. Below 2 pre-requisite should be completed before agent installation.

  1. check_mk client works with xinetd service on the machine. You should install xinetd service and start it before you attempt to agent install.
  2. Port 6556 TCP should be open between check_mk server and client for communication

check_mk client package is available on check_mk server at path http://<servername>/<instance_name>/check_mk/agents/. In our case it will be at http://kerneltalks1/kerneltalks_test/check_mk/agents/

check_mk agents location on check_mk server.

You can find almost all platform agents here. Let’s download the agent on our Linux client using the command line and install it.

[root@kerneltalks2 ~]# rpm -ivh check-mk-agent-1.5.0p7-1.noarch.rpm
Preparing...                          ################################# [100%]
Updating / installing...
   1:check-mk-agent-1.5.0p7-1         ################################# [100%]
Activating startscript of xinetd
Note: Forwarding request to 'systemctl enable xinetd.service'.
Reloading xinetd...
Redirecting to /bin/systemctl reload xinetd.service

After agent installation, you need to go back to check_mk console to add this new host into monitoring.

Add new client in check_mk monitoring

Login to console and navigate to WATO configurations > Hosts > Create new host

Add new host in check_mk monitoring

Fill in details like hostname, IP address, agent details in next screen, and hit ‘Save & Goto services‘. You will be presented with the below screen in which check_mk discovers services on the client.

check_mk add host

Click on the red button with a number of changes written on it. Activate changes and you are done!

activate changes check_mk

Once changes are completed activated you can see one host is added into monitoring. This completes end to end walkthrough tutorial to install the check_mk monitoring server and add Linux client to it.

How to disable IPv6 on Linux

Short post on how to disable IPv6 in RHEL, Suse or Ubuntu Linux.

Disable IPv6 on RHEL, SUSE, Ubuntu Linux

How to disable IPv6 in RHEL 7

Edit /etc/default/grub and append ipv6.disable=1 to GRUB_CMDLINE_LINUXline like below :

GRUB_CMDLINE_LINUX="rd.lvm.lv=rhel/swap crashkernel=auto rd.lvm.lv=rhel/root ipv6.disable=1"

Now, you need to regenerate the grub.cfg file by running the grub2-mkconfig command :

root@kerneltalks # grub2-mkconfig -o /boot/grub2/grub.cfg

That’s it. Reboot and it will disable IPv6 on your system.

Another method is to disable it using /etc/sysctl.d/ipv6.conf file.

Add below entry in file :

# To disable for all interfaces
net.ipv6.conf.all.disable_ipv6 = 1
#Disable default
net.ipv6.conf.default.disable_ipv6 = 1
#Disable on loopback
net.ipv6.conf.lo.disable_ipv6 = 1

Now, reload sysctl file,

root@kerneltalks # sysctl -p /etc/sysctl.d/ipv6.conf

You need to re-build the Initial RAM Disk as well. You can do it using :

root@kerneltalks # dracut -f

That’s it. You are done.

Disable IPv6 in RHEL 6

Create a new file /etc/modprobe.d/ipv6.conf with below one liner –

root@kerneltalks # echo "options ipv6 disable=1" >/etc/modprobe.d/ipv6.conf

Stop ip6tables service from loading at boot by using chkconfig

root@kerneltalks # chkconfig ip6tables off

And you are done Reboot the system to run it without IPv6.

Disable IPv6 in Suse Linux

Add below lines in /etc/sysctl.conf

net.ipv6.conf.all.disable_ipv6 = 1
net.ipv6.conf.default.disable_ipv6 = 1
net.ipv6.conf.lo.disable_ipv6 = 1

Reload file with sysctl -p and you are done.

If you are having GUI access of server then  you can do it under network settings. Navigate to Applications > System Tools > YaST > Network Settings . Goto Global Options tab and uncheck Enable IPv6.

Disable ipv6 in suse

You will require to reboot server to take this effect.

Disable IPv6 in Ubuntu Linux

Above process of Suse Linux applies to ubuntu as well. You need to edit /etc/sysctl.conf and add above lines. Reload the file with sysctl -p and you are done.

To verify if IPv6 is disabled on server use below command –

root@kerneltalks # cat /proc/sys/net/ipv6/conf/all/disable_ipv6

If output is 1 then IPv6 is disabled. If output is 0 then IPv6 is enabled.