Learn how to disable GUI in SUSE Linux. Also, how to enable GUI at boot time in SUSE Linux.
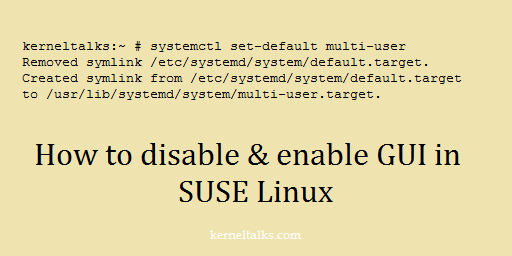
Disable GUI in SUSE Linux
Sometimes when installing with ISO you end up in booting the Suse Linux system in GUI mode. In this short article, we will walk you through how to disable GUI and how to enable GUI in Suse Linux.
For the demonstration, we used SUSE12 in this article. You can use system control systemctl to set the default for the next reboot. We will be using this feature to enable or disable GUI in SUSE Linux
Disable GUI in SUSE Linux
Note that, you will require downtime for this activity. You can disable GUI for the next reboot. So once you run the command you need to reboot your server. To disable GUI in SUSE Linux run below command –
kerneltalks:~ # systemctl set-default multi-user
Removed symlink /etc/systemd/system/default.target.
Created symlink from /etc/systemd/system/default.target to /usr/lib/systemd/system/multi-user.target.
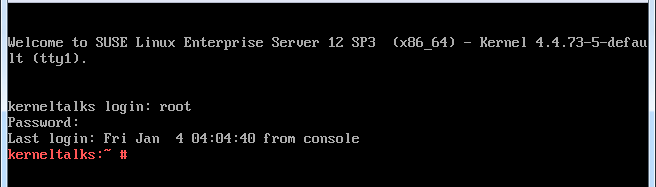
This will set the system to boot into CLI mode only. Now reboot your server and you can see server boots into CLI.
Suse CLI login screen
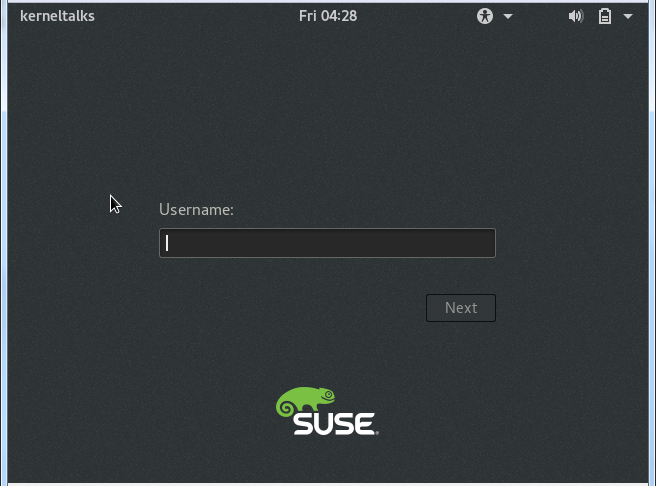
Enable GUI in SUSE Linux
If you want to go back into GUI mode again, run below command –
kerneltalks:~ # systemctl set-default graphical
Removed symlink /etc/systemd/system/default.target.
Created symlink from /etc/systemd/system/default.target to /usr/lib/systemd/system/graphical.target.
Reboot the server and you will be back greeted with GUI login screen.
SUSE GUI login
That’s it. You can toggle CLI or GUI using systemctl command. The only thing is you need a reboot each time you toggle.
Learn how to restart inetd service in Linux. Xinetd service is a replacement for inetd service in new Linux versions.
inetd or xinetd service in Linux
inetd is internet daemon. Inetd is responsible for internet services like telnet, pop3, ftp, etc. Whenever a packet comes over the network to a server on a particular port, inetd is responsible to check it and launch the appropriate program to handle the connection request. For checking port information and its related services it consults /etc/services file.
Below is a list of commands to manage inetd service. In newer systems inetd is replaced with more powerful daemon xinetd.
Start inetd service
# /etc/init.d/inetd start
Stop inetd service
# /etc/init.d/inetd stop
Restart inetd service
# /etc/init.d/inetd restart OR # killall -HUP inetd
All inetd configuration can be found in file /etc/inetd.conf
On newer systems, inetd is being replaced by xinetd. xinetd is an Extended internet daemon. If you fail to run above command your system probably runs xinetd as an inetd replacement. In that case, follow below commands –
Start inetd service
# service xinetd start
Stop inetd service
# service xinetd stop
Restart inetd service
# service xinetd restart
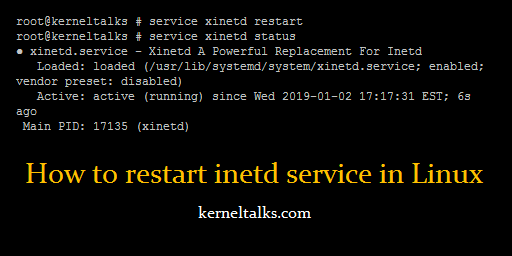
Check xinetd service state
root@kerneltalks # service xinetd status
● xinetd.service - Xinetd A Powerful Replacement For Inetd
   Loaded: loaded (/usr/lib/systemd/system/xinetd.service; enabled; vendor preset: disabled)
   Active: active (running) since Wed 2019-01-02 17:17:31 EST; 6s ago
 Main PID: 17135 (xinetd)
    Tasks: 1 (limit: 512)
   CGroup: /system.slice/xinetd.service
           └─17135 /usr/sbin/xinetd -stayalive -dontfork
All the services being handled by xinetd can be found under/etc/xinetd.d directory. Each service has its own configuration file under /etc/xinetd.d directory.
A quick tutorial to configure a proxy for YUM in RHEL, CentOS, or Fedora Linux.
Proxy configuration in YUM in RHEL, CentOS, Fedora
1. Enable proxy for yum in configuration file. (global)
If your server is connected to the internet via proxy server then you can define it in the configuration file located at /etc/yum.conf. For a definition, you should have below details ready with you –
Proxy server IP or hostname
Port to be used for proxy connectivity
User ID and password for authenticating you at proxy if enabled on proxy
Now, edit /etc/yum.conf using any text editor like vi and edit below parameters :
kerneltalksproxy.com: Proxy server name 3487: Port Username for proxy authentication: shrikant Password for proxy authentication: funWif#92cE
Save and exit. List repo to verify internet connectivity using yum repolist.
Using this method you are configuring proxy within YUM configuration which will be used or available for all users on the system whenever they use yum commands.
2. Using profile proxy (User specific)
If you don’t want global proxy setup through /etc/yum.conf file then you can opt to define proxy at the user level by defining it in the user’s individual profile files. Add below config in .profile ( .profile file has different names depends on which login shell you are using) of the user so that it will be loaded every time user logged in to the system.
So, this proxy setting will be available for all applications who use system proxy (like curl, yum) under that user’s login. Ask the user to login and verify proxy by refreshing yum repo.
A Short article to learn how to enter a single-user mode in SUSE 12 Linux server.
Single user mode in SUSE 12 Linux
In this short article, we will walk you through steps that demonstrate how to enter a single-user mode in SUSE 12 Linux. Single user mode is always preferred when you are troubleshooting major issues with your system. Single user mode disables networking and no other users are logged in, you rule out many situations of the multi-user system and it helps you in troubleshooting fast. One of the most popular uses of single-user mode is to reset forgotten root password.
1. Halt boot process
First of all, you need to have a console of your machine to get into single-user mode. If its VM then VM console, if its physical machine then you need its iLO/serial console connected. Reboot the system and halt automatic booting of the kernel at the grub boot menu by pressing any key.
Kernel selection menu at boot in SUSE 12
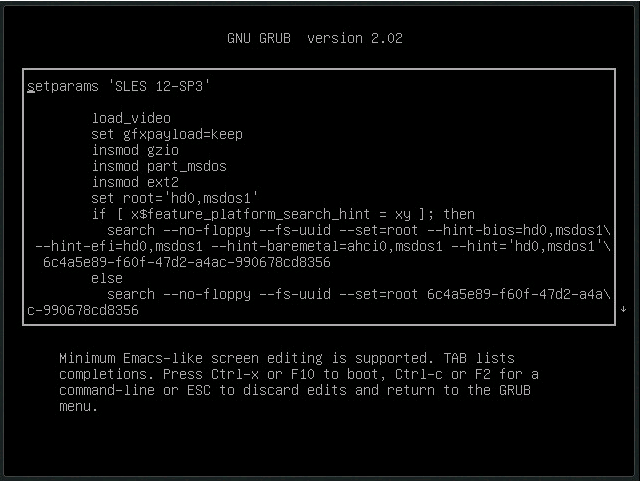
2. Edit boot option of kernel
Once you are on the above screen, press e on selected kernel (which is normally your preferred latest kernel) to update its boot options. You will see be below screen.
grub2 edits in SUSE
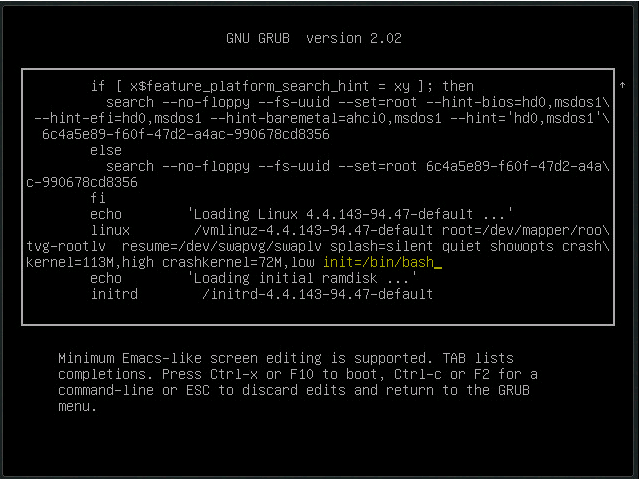
Now, scroll down to your booting kernel line and add init=/bin/bash at the end of the line as shown below.
Edit to boot in single-user shell
3. Boot kernel with edited entry
Now press Ctrl-x or F10 to boot this edited kernel. The kernel will be booted in single-user mode and you will be presented with hash prompt i.e. root access to the server. At this point in time, your root file system is mounted in read-only mode. So any changes you are doing to the system won’t be saved.
Run below command to remount root filesystem as re-writable.
kerneltalks:/ # mount -o remount,rw /
And you are good to go! Go ahead and do your necessary actions in single-user mode. Don’t forget to reboot the server or type exit to boot into normal multiuser mode once you are done.
That’s it. Reboot and it will disable IPv6 on your system.
Another method is to disable it using /etc/sysctl.d/ipv6.conf file.
Add below entry in file :
# To disable for all interfaces
net.ipv6.conf.all.disable_ipv6 = 1
#Disable default
net.ipv6.conf.default.disable_ipv6 = 1
#Disable on loopback
net.ipv6.conf.lo.disable_ipv6 = 1
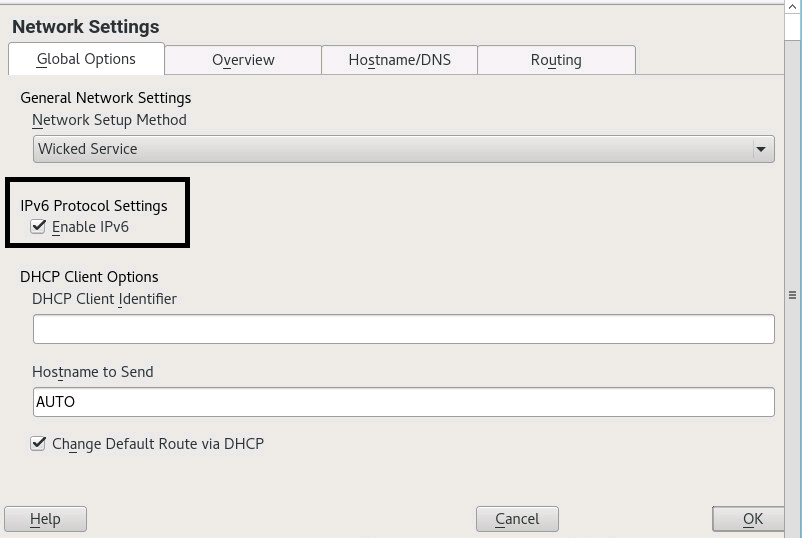
If you are having GUI access of server then you can do it under network settings. Navigate to Applications > System Tools > YaST > Network Settings . Goto Global Options tab and uncheck Enable IPv6.
Disable ipv6 in suse
You will require to reboot server to take this effect.
Disable IPv6 in Ubuntu Linux
Above process of Suse Linux applies to ubuntu as well. You need to edit /etc/sysctl.conf and add above lines. Reload the file with sysctl -p and you are done.
To verify if IPv6 is disabled on server use below command –
Learn how to disable the iptables firewall in Linux temporarily for troubleshooting purposes. Also, learn how to save policies and how to restore them back when you enable the firewall back.
Disable iptables firewall!
Sometimes you have the requirement to turn off the iptables firewall to do some connectivity troubleshooting and then you need to turn it back on. While doing it you also want to save all your firewall policies as well. In this article, we will walk you through how to save firewall policies and how to disable/enable an iptables firewall. For more details about the iptables firewall and policies read our article on it.
Save iptables policies
The first step while disabling the iptables firewall temporarily is to save existing firewall rules/policies. iptables-save command lists all your existing policies which you can save in a file on your server.
So iptables-save is the command with you can take iptables policy backup.
Stop/disable iptables firewall
For older Linux kernels you have an option of stopping service iptables with service iptables stop but if you are on the new kernel, you just need to wipe out all the policies and allow all traffic through the firewall. This is as good as you are stopping the firewall.
Once done, check current firewall policies. It should look like below which means everything is accepted (as good as your firewall is disabled/stopped)
Once you are done with troubleshooting and you want to turn iptables back on with all its configurations. You need to first restore policies from the backup we took in the first step.
And then start iptables service in case you have stopped it in the previous step using service iptables start. If you haven’t stopped service then only restoring policies will do for you. Check if all policies are back in iptables firewall configurations :
Learn how to import VG with a different name. Useful when the system has the same name VG already existing and you are trying to import VG there.
Change VG name during import
In this tutorial, we will walk you through the process to import VG with a different name. During migrations, data movement activities, etc you may face issues in the VG import process. Sometimes you have disks with VGs exported on them & the same VG name is exiting on the server where you try to import VG from those disks.
In such cases, where you try to import VG when same VG name already existing in the system you get below error :
# vgimport vg02 /dev/xvdg
  Multiple VGs found with the same name: skipping vg01
  Use --select vg_uuid=<uuid> in place of the VG name.
Now, you have two choices to import VG in such case.
Import using VG UUID while keeping VG name the same. In this case, you will have 2 VG on the system with the same name and administer them & mounting LVs in them is havoc
Use vgimportclone command and import VG using a different name.
Import VG using the same name with UUID
If you took the VG map file while exporting VG then you can get VG UUID from it or you must have noted it down from vgdisplay output as well. This process also answers for how to import VG with the duplicate names!
# vgimport  --select vg_uuid=kzwQmc-qIzF-IZcv-9eW8-ToA1-mkDV-fLari2
  Volume group "vg02" successfully imported
Now you see vg02 is imported. But we already had VG named vg02 in our system. So, now we have two VGs with the same name in our system.
# vgdisplay
  --- Volume group ---
  VG Name               vg02
  System ID
  Format                lvm2
  Metadata Areas        1
  Metadata Sequence No  2
  VG Access             read/write
  VG Status             resizable
  MAX LV                0
  Cur LV                0
  Open LV               0
  Max PV                0
  Cur PV                1
  Act PV                1
  VG Size               1020.00 MiB
  PE Size               4.00 MiB
  Total PE              255
  Alloc PE / Size       0 / 0
  Free  PE / Size       255 / 1020.00 MiB
  VG UUID               aRmosT-KZCY-5k40-DGSK-3WGd-ZwWD-eEXXgk

  --- Volume group ---
  VG Name               vg02
  System ID
  Format                lvm2
  Metadata Areas        1
  Metadata Sequence No  5
  VG Access             read/write
  VG Status             exported/resizable
  MAX LV                0
  Cur LV                1
  Open LV               0
  Max PV                0
  Cur PV                1
  Act PV                1
  VG Size               <5.00 GiB
  PE Size               4.00 MiB
  Total PE              1279
  Alloc PE / Size       25 / 100.00 MiB
  Free  PE / Size       1254 / <4.90 GiB
  VG UUID               kzwQmc-qIzF-IZcv-9eW8-ToA1-mkDV-fLari2
Now the real challenge is to mount LV within them. You can do that but to ease out your pain, you can simply rename newly imported VG to some different name. You should use VG UUID again in vgrename command.
# vgrename kzwQmc-qIzF-IZcv-9eW8-ToA1-mkDV-fLari2 vg03
  Processing VG vg02 because of matching UUID kzwQmc-qIzF-IZcv-9eW8-ToA1-mkDV-fLari2
  Volume group "kzwQmc-qIzF-IZcv-9eW8-ToA1-mkDV-fLari2" successfully renamed to "vg03"
Once you renamed newly imported VG, your existing and new VG has different names as well. Now, you will be able to mount LVs within them without much hassle.
Hence its recommended in such a scenario you must import VG with a different name.
Import VG with the different name using vgimportclone command
vgimportclone command should be supplied with a new name with which you want VG to be imported with switch -n followed by disk name on which you exported VG
# vgimportclone -n vg01 /dev/xvdg
  VG vg02 is exported, use the --import option.
So, the command here detected that VG was exported and asks us to confirm import operation with --import switch. Let’s do that –
# vgimportclone --import -n vg01 /dev/xvdg
And command ran successfully. It won’t print any message on the terminal. You can verify that new VG on the system using vgdisplay command.
If you are looking for answers for how to change VG name during import? or how to import VG with a new name? then vgimportclone is the answer!
That’s it. You successfully imported VG with a different name. Since existing VG and your imported VG has different names now you won’t face any hurdles in mounting LVs from both of them.
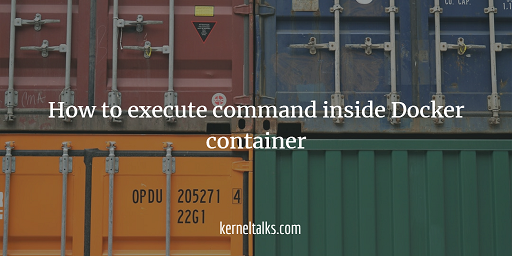
Learn how to access shell and execute a command inside a Docker container. Explains running commands inside already running containers or while launching containers.
Execute commands in Docker container
If you are following the Docker series on my blog then you must have been gone through Docker basics and Docker container maintenance commands by now. In this tutorial, we will walk you through how to access shell inside Docker container and how to execute commands inside the container.
First of all, you can not execute commands or access shells in any container. Basically, the container image you are using to launch your container should have a shell in it. If the image does not support shell then you can not do anything inside the container during launch or even after launch.
Read all docker or containerization related articles here from KernelTalk’s archives.
For example, if you are launching a container from Nginx image i.e. web-server container then you won’t be able to access the shell or execute the command within it. Since its just a web-server process! But, if you are launching a container from the ubuntu image or alpine image then you will be able to access its shell since those images/software does support shell.
You can access shell inside a docker container and execute commands inside container either of using two ways –
Execute bash shell while launching container
Use docker command to execute single command inside container
Remember, each Docker image has a default command defined in it which it executes whenever it launches any container. You can edit it anytime but if you want to change it on the fly then you need to specify it at the end of the run command. So, image ignores default defined command and it executes a command specified in docker run command after it launches container.
Access shell & execute command in Docker container while launching it
Once you are confirmed that the image you are using to launch container does support shell (mostly its bash) then you need to launch a container using -it switch. where –
-i is the interactive mode.It keeps STDIN open even if you choose to detach container after launch
-t is to assign pseudo-terminal through which STDIN is kept open for user input.
I launched Ubuntu container with -it switch and I presented with shell prompt within. Observe output below –
With the output, you can see after the container is launched promptly is given root@2493081de86f . Now you are within the container with root the account. Keep in mind everything inside the container happens with root id. If you see hostname of Ubuntu container is set the same as container ID. I executed a couple of commands inside the container in the above output.
Keep in mind, since the container is aimed to be very lightweight they always consist of minimal software inside. So if you are running any Linux distribution container, you won’t be able to run all commands as you would normally do in VM or Linux server.
Execute command inside already running container
The above process is applicable for the container you are about to launch. But what if you want to execute a command on the container which is already running on the system. Docker provided exec switch to access running container shell. Syntax is docker container exec <container name/ID> <command to run>
I have already a ubuntu container running in my system. I used exec switch to execute hostname, date and df commands inside the container.
root@kerneltalks # docker container ls
CONTAINER ID IMAGE COMMAND CREATED STATUS PORTS NAMES
ae0721fb8ecf ubuntu:latest "/bin/bash" 2 minutes ago Up 2 minutes loving_bohr

root@kerneltalks # docker container exec ae0721fb8ecf date
Sat Jun 2 15:41:24 UTC 2018
root@kerneltalks # docker container exec ae0721fb8ecf hostname
ae0721fb8ecf
root@kerneltalks # docker container exec ae0721fb8ecf df
Filesystem                                                                                         1K-blocks    Used Available Use% Mounted on
/dev/mapper/docker-202:1-26198093-57ab60113158ca3f51c470fefb25a3fdf154a5309f05f254c660dba2a55dbab7  10474496  109072  10365424   2% /
tmpfs                                                                                                  65536       0     65536   0% /dev
tmpfs                                                                                                 507368       0    507368   0% /sys/fs/cgroup
/dev/xvda1                                                                                           8376320 5326996   3049324  64% /etc/hosts
shm                                                                                                    65536       0     65536   0% /dev/shm
tmpfs                                                                                                 507368       0    507368   0% /proc/scsi
tmpfs                                                                                                 507368       0    507368   0% /sys/firmware
Observe about output and all 3 commands ran successfully inside container and shown output on our host machine terminal.
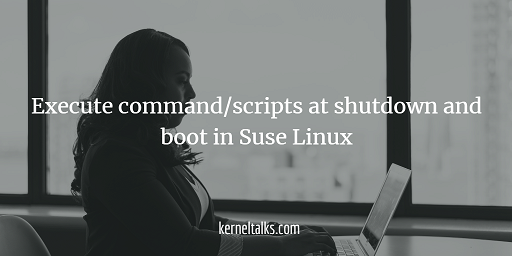
Learn how to setup commands or scripts to execute at shutdown and boot in Suse Linux
Execute a command at shutdown and boot in Suse Linux
In this article, we will walk you through the procedure to schedule scripts at shutdown and boot in Suse Linux. Many times, we have a requirement to start certain applications or services or script after server boots. Sometimes you want to stop application or service or run the script before the server shuts down. This can be done automatically by defining commands or scripts in certain files in Suse Linux.
Application auto start-stop along with OS reboot
Let’s walk through steps to configure the custom applications to auto-start and stop along with Linux reboot. Create a file with a custom name (e.g autoapp) in /etc/init.d as below –
#!/bin/sh
### BEGIN INIT INFO
# Provides: auto_app
# Required-Start: $network $syslog $remote_fs $time
# X-UnitedLinux-Should-Start:
# Required-Stop:
# Default-Start: 3 5
# Default-Stop: 0 1 2 6
# Short-Description: Start and stop app with reboot
# Description: Start and stop custom application with reboot
### END INIT INFO#
case "$1" in
"start")

        su - appuser -c "/app/start/command -options"
        echo "Application started"
        ;;
"stop")
        su - appuser -c "/app/stop/command -options"
        ;;
*)
        echo "Usage: $0 { start|stop }"
        exit 1
        ;;
esac
exit 0
Make sure you copy all the above text including INIT block at the beginning of the file. Edit appuser and app commands under start and stop blocks.
Set executable permission on this file.
The next step is to identify this file as a service using chkconfig. Use filename as a service name in the below command.
root@kerneltalks # chkconfig --add autoapp
Now enable it to be handeled by systemctl
root@kerneltalks # systemctl enable autoapp
And you are done. Try to start and stop the application using systemctl command to make sure your configuration is working fine. To rule out any permission issues, script entries typo, etc.
If systemctl is properly starting and stopping application as expected then you are all set. Final test you can do by rebooting your server and then verifying if the application was down while the server was shut and did it came up along with server boot.
Run script or command after server boot
In Suse Linux, you have to define commands or scripts in /etc/init.d/after.local to run them after server boots. I am running SLES 12 SP3 and my /etc/init.d/after.locallooks likes below –
root@kerneltalks # cat  /etc/init.d/after.local
#! /bin/sh
#
# Copyright (c) 2010 SuSE LINUX Products GmbH, Germany.  All rights reserved.
#
# Author: Werner Fink, 2010
#
# /etc/init.d/after.local
#
# script with local commands to be executed from init after all scripts
# of a runlevel have been executed.
#
# Here you should add things, that should happen directly after
# runlevel has been reached.
#
I added below command at end of this file.
echo "I love KernelTalks"
Then to test it, I rebooted the machine. After reboot, since command output is printed to console I need to check logs to confirm if the command executed successfully.
You can check logs of after local service as below :
# systemctl status after-local -l
● after-local.service - /etc/init.d/after.local Compatibility
   Loaded: loaded (/usr/lib/systemd/system/after-local.service; static; vendor preset: disabled)
   Active: active (exited) since Thu 2018-05-24 03:52:14 UTC; 7min ago
  Process: 2860 ExecStart=/etc/init.d/after.local (code=exited, status=0/SUCCESS)
 Main PID: 2860 (code=exited, status=0/SUCCESS)

May 24 03:52:14 kerneltalks systemd[1]: Started /etc/init.d/after.local Compatibility.
May 24 03:52:15 kerneltalks after.local[2860]: I love KernelTalks
If you observe the above output, the last line shows the output of our command which we configured in /etc/init.d/after.local! Alternatively, you can check syslog/var/log/messages file as well to check the same logs.
So it was a successful run.
Run script or command before server shutdown
To run a script or command before server initiate shutdown, you need to specify them in /etc/init.d/halt.local. Typical vanilla /etc/init.d/halt.local looks like below –
root@kerneltalks #  cat /etc/init.d/halt.local
#! /bin/sh
#
# Copyright (c) 2002 SuSE Linux AG Nuernberg, Germany.  All rights reserved.
#
# Author: Werner Fink, 1998
#         Burchard Steinbild, 1998
#
# /etc/init.d/halt.local
#
# script with local commands to be executed from init on system shutdown
#
# Here you should add things, that should happen directly before shuting
# down.
#
I added below command at end of this file.
echo "I love KernelTalks"
To make sure, this file is picked up for execution before the shutdown halt.local service should be running. Check if service is running and if not then start it.
# systemctl enable halt.local
halt.local.service is not a native service, redirecting to systemd-sysv-install
Executing /usr/lib/systemd/systemd-sysv-install enable halt.local
# systemctl start halt.local
# systemctl status halt.local
● halt.local.service
   Loaded: loaded (/etc/init.d/halt.local; bad; vendor preset: disabled)
   Active: active (exited) since Thu 2018-05-24 04:20:18 UTC; 11s ago
     Docs: man:systemd-sysv-generator(8)
  Process: 3074 ExecStart=/etc/init.d/halt.local start (code=exited, status=0/SUCCESS)

May 24 04:20:18 kerneltalks systemd[1]: Starting halt.local.service...
Then to test it, I shut down the machine. After boot, check logs to confirm if a command was run when the system was shut down.
# cat /var/log/messages |grep halt
2018-05-24T04:21:12.657033+00:00 kerneltalks systemd[1]: Starting halt.local.service...
2018-05-24T04:21:12.657066+00:00 kerneltalks halt.local[832]: I Love KernelTalks
2018-05-24T04:21:12.657080+00:00 kerneltalks systemd[1]: Started halt.local.service.

# systemctl status halt.local -l
● halt.local.service
   Loaded: loaded (/etc/init.d/halt.local; bad; vendor preset: disabled)
   Active: active (exited) since Thu 2018-05-24 04:21:12 UTC; 1min 18s ago
     Docs: man:systemd-sysv-generator(8)
  Process: 832 ExecStart=/etc/init.d/halt.local start (code=exited, status=0/SUCCESS)
    Tasks: 0 (limit: 512)

May 24 04:21:12 kerneltalks systemd[1]: Starting halt.local.service...
May 24 04:21:12 kerneltalks halt.local[832]: I Love KernelTalks
May 24 04:21:12 kerneltalks systemd[1]: Started halt.local.service.
That’s it. You can see our echo message is printed in logs which indicates commands successfully ran before shutdown.
In this way, you can configure your application start-stop commands in Suse Linux to start and stop application after boot and before the shutdown of the server. Also, you can schedule scripts to execute before shutdown and after boot of the Suse Linux server.
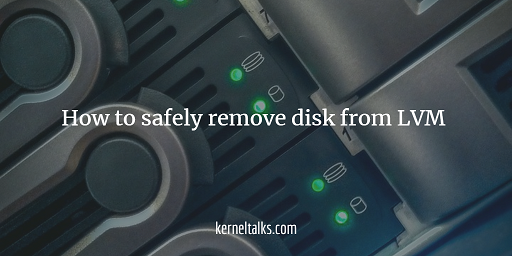
Learn how to safely remove the disk from LVM. It’s useful when you need to free up disks from the volume group and re-use somewhere else or replace a faulty disk.
How to safely remove disk from LVM
This article will serve solution for below questions :
How to safely remove the disk from LVM
How to remove the disk from VG online
How to copy data from one disk to other at the physical level
How to replace a faulty disk in LVM online
How to move physical extents from one disk to another
How to free up disk from VG to shrink VG size
How to safely reduce VG
We have volume group named vg01 which has 20M logical volume created in it and mounted it on /mydata mount point. Check lsblk output below –
root@kerneltalks # lsblk
NAME         MAJ:MIN RM SIZE RO TYPE MOUNTPOINT
xvda         202:0    0  10G  0 disk
├─xvda1      202:1    0   1M  0 part
└─xvda2      202:2    0  10G  0 part /
xvdf         202:80   0   1G  0 disk
└─vg01-lvol1 253:0    0  20M  0 lvm  /mydata
Now, attach new disk of the same or bigger size of the disk /dev/xvdf. Identify the new disk on the system by using lsblk command again and comparing the output to the previous one.
root@kerneltalks # lsblk
NAME         MAJ:MIN RM SIZE RO TYPE MOUNTPOINT
xvda         202:0    0  10G  0 disk
├─xvda1      202:1    0   1M  0 part
└─xvda2      202:2    0  10G  0 part /
xvdf         202:80   0   1G  0 disk
└─vg01-lvol1 253:0    0  20M  0 lvm  /mydata
xvdg         202:96   0   1G  0 disk
You can see the new disk has been identified as /dev/xvdg. Now, we will add this disk to current VG vg01. This can be done using vgextend command. Obviously, before using it in LVM you need to run pvcreate on it.
Observe the above output. Since we created a 20M mount point from disk /dev/xvdf it has 20M less free size. The new disk /dev/xvdg is completely free.
Now, we need to move physical extents from disk xvdf to xvdg. pvmove is the command used to achieve this. You just need to supply a disk name from where you need to move out PE. Command will move PE out of that disk and write them to all available disks in the same volume group. In our case, only one other disk is available to move PE.
Move progress is shown periodically. If due to any reason operation interrupted in between then moved PE will remain at destination disks and un-moved PEs will remain on the source disk. The operation can be resumed by issuing the same command again. It will then move the remaining PE out of the source disk.
In the above command, it will run pvmove in the background. It will redirect normal console outputs in normal.log file under the current working directory whereas errors will be redirected and saved in error.log file in the current working directory.
Now if you check pvs output again, you will find all space on disk xvdf is free which means its not been used to store any data in that VG. This ensures you can remove the disk without any issues.
Before removing/detaching disk from the server, you need to remove it from LVM. You can do this by reducing VG and opting for that disk out.
root@kerneltalks # vgreduce vg01 /dev/xvdf
  Removed "/dev/xvdf" from volume group "vg01"
Now disk xvdf can be removed/detached from server safely.
Few useful switches of pvmove :
Verbose mode prints more detailed information on the operation. It can be invoked by using -v switch.
root@kerneltalks # pvmove -v /dev/xvdf
    Cluster mirror log daemon is not running.
    Wiping internal VG cache
    Wiping cache of LVM-capable devices
    Archiving volume group "vg01" metadata (seqno 17).
    Creating logical volume pvmove0
    activation/volume_list configuration setting not defined: Checking only host tags for vg01/lvol1.
    Moving 5 extents of logical volume vg01/lvol1.
    activation/volume_list configuration setting not defined: Checking only host tags for vg01/lvol1.
    Creating vg01-pvmove0
    Loading table for vg01-pvmove0 (253:1).
    Loading table for vg01-lvol1 (253:0).
    Suspending vg01-lvol1 (253:0) with device flush
    Resuming vg01-pvmove0 (253:1).
    Resuming vg01-lvol1 (253:0).
    Creating volume group backup "/etc/lvm/backup/vg01" (seqno 18).
    activation/volume_list configuration setting not defined: Checking only host tags for vg01/pvmove0.
    Checking progress before waiting every 15 seconds.
  /dev/xvdf: Moved: 0.00%
  /dev/xvdf: Moved: 100.00%
    Polling finished successfully.
The interval at which command updates the progress can be changed. -i switch followed by a number of seconds can be used to get updates from command on user-defined intervals on progress.