An article explaining Docker container utilization monitoring. How to monitor or save reports of Docker container resource utilization and how to format output according to your requirement.

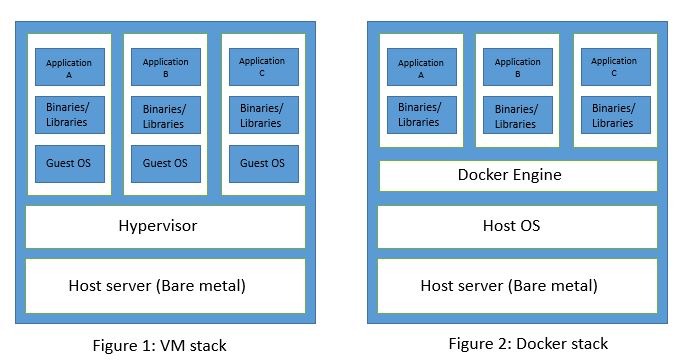
Docker containers are processes running on host OS using its resources. It means Docker containers are using CPU, Memory, and IO from Host OS to execute their commands or perform their tasks. Resource utilization is a major area leading to the performance of a server or application.
Host OS being a Linux in our case can be monitored using tools like sar, top, etc for resource utilization. You can trace down PID of Docker containers and then drill down to those PID’s utilization in the host’s monitoring tool to get container utilization. But this is a bit tedious job and not feasible in case you have the number of containers running on your server. Docker already took care of it and provided its own real-time monitoring tool which reports resource utilization by each container in real-time.
If you still don’t have Docker on your system, read here how to install Docker in Linux and 8 basic Docker management commands.
How to monitor Docker container utilization?
Docker provided command stats to provide real-time container’s resource utilization statistics. Commands run in terminal like top command and update values in real-time.
Read all docker or containerization related articles here from KernelTalk’s archives.
You can supply a container ID or name to this command to view the statistics of that specific container. If no container name/ID supplied, it will show stats of all running containers.
root@kerneltalks # docker container stats
CONTAINER ID        NAME                    CPU %               MEM USAGE / LIMIT   MEM %               NET I/O             BLOCK I/O           PIDS
2554070a4ba7        friendly_hodgkin        0.19%               205MiB / 991MiB     20.69%              1.21kB / 767B       105MB / 8.7kB       31
b60fa988daee        condescending_galileo   0.18%               201MiB / 991MiB     20.29%              1.21kB / 761B       96.3MB / 9.22kB     31

root@kerneltalks # docker container stats friendly_hodgkin
CONTAINER ID        NAME                CPU %               MEM USAGE / LIMIT   MEM %               NET I/O             BLOCK I/O           PIDS
2554070a4ba7        friendly_hodgkin    0.15%               205.2MiB / 991MiB   20.71%              1.21kB / 767B       105MB / 8.7kB       31
The output is tabulated and column-wise it has –
- Container ID: Docker container ID
- Name: Docker container name
- CPU %: CPU percentage of the host being utilized by container right now.
- MEM USAGE / LIMIT: Memory being utilized by container right now / Max memory which can be used by the container
- MEM %: Memory percentage of Host being utilized by container right now.
- NET I/ O: Network Input Output traffic on container’s network interface
- BLOCK I/ O: Disk IO did on the Host storage
- PIDS: Total number of processes/threads container created/forked.
You have to press cntrl+c to return to a prompt from real-time updating stats screen.
How to save Docker container utilization?
Now, if you want to save container utilization or you want to use stats command in some script then you may want to run it for 1 iteration only and exits automatically rather than keep running.
In such a case, you need to use --no-stream switch along with stats command.
root@kerneltalks # docker container stats --no-stream
CONTAINER ID        NAME                    CPU %               MEM USAGE / LIMIT   MEM %               NET I/O             BLOCK I/O           PIDS
2554070a4ba7        friendly_hodgkin        0.15%               205.2MiB / 991MiB   20.71%              1.21kB / 767B       105MB / 8.7kB       31
b60fa988daee        condescending_galileo   0.15%               201.3MiB / 991MiB   20.31%              1.21kB / 761B       96.3MB / 9.22kB     31
root@kerneltalks #
You can redirect this output to file for further processing.
CPU and Memory utilization of Docker container
stats command offers to format according to your need by using --format switch. It has GO template formatting available with this switch.
Using it, you can make stats command to display only CPU and MEM utilization of containers like below :
root@kerneltalks # docker container stats --format "table {{.Container}}\t{{.CPUPerc}}\t{{.MemPerc}}"
CONTAINER           CPU %               MEM %
2554070a4ba7        0.18%               20.71%
b60fa988daee        0.18%               20.32%
Placeholders of this formatting are as below –
- .Container Container name or ID (user input)
- .Name Container name
- .ID Container ID
- .CPUPerc CPU %
- .MemPerc Memory %
- .MemUsage Memory usage
- .NetIO Network IO
- .BlockIO Block IO
- .PIDs Number of PIDs
So you can format the output the way you want it and with only values, you are interested in. Then you can use no-stream and get the utilization figures to another file or pipe them to other commands for further processing.