Assorted list of resources to help you with your work in AWS!
Swiss knife for AWS tasks!
In this post, I will quickly run down the assorted list of different software, tools, or online resources that will help you with your AWS journey. So without further delay, let’s jump into it.
AWS Simple Monthly Calculator: Estimate the monthly running cost of your infra on AWS. It is going to be deprecated soon and will be replaced by the former one.
AWS Architecture Icons: List of supported drawing and diagramming tools and download links for Icons assets and toolkits. It’s very much helpful in designing presentable diagrams with updated, latest AWS icons. Every architecture’s must-have resource!
Draw.io: Create architecture diagrams with draw.io
Visual subnet calculator: Easy way to slice up your CIDR block into the required number of subnets.
SQLectron: An open-source lightweight utility for connecting to RDS.
Infrastructure coding
Visual Studio Code: Most favoured and loved software for all coding you do on your computer. Supports almost all languages and clouds. Allows you to connect to your cloud and run your code from the software window itself.
cfn-lint plugin: Cloudformation Linter plugin for Microsoft Visual Studio Code.
InfraCost: cloud cost estimates on the terraform pull requests!
The list can grow on and on. I just collected a few of them here to start with. Let me know your additions in the comments down below!
A quick post on advanced container configurations in Amazon ECS.
ECS container advanced configurations.
Container definitions are part of Task Definitions in Amazon ECS. It’s the configuration where you can customize the container’s infrastructure aspects. In this article, we will walk you through advanced configurations of containers.
In our last article about Task Definitions, we walked you through standard container configurations. Now, we will check all the parameters available in Advanced container definitions.
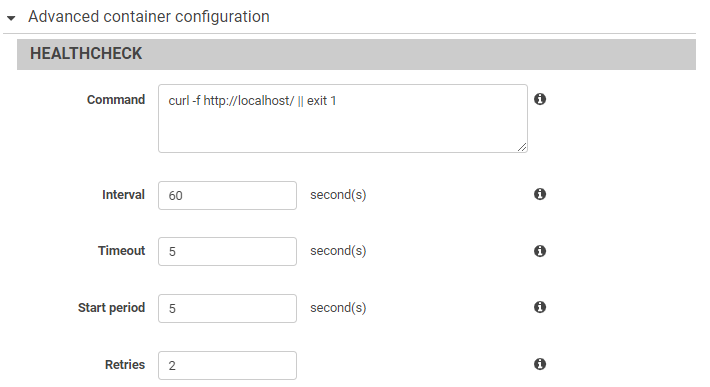
Command: It will be run within containers to determine if the container is healthy. Since I am spinning up a webserver I used the curl command. It depends on what kind of container is and how you can determine its health.
Interval: Duration of two consecutive health checks. (Range: 5-300, default: 30)
Timeout: Duration to wait to check health check once it’s executed. (Range: 2-60, default: 5)
Start period: Grace period for the container to recover before it can be marked unhealthy after max health check retries. (Range: 0-300)
Retries: Max number of failed health checks to mark containers as unhealthy and terminate. (Range: 1-10, default: 3)
Container environment
Environment
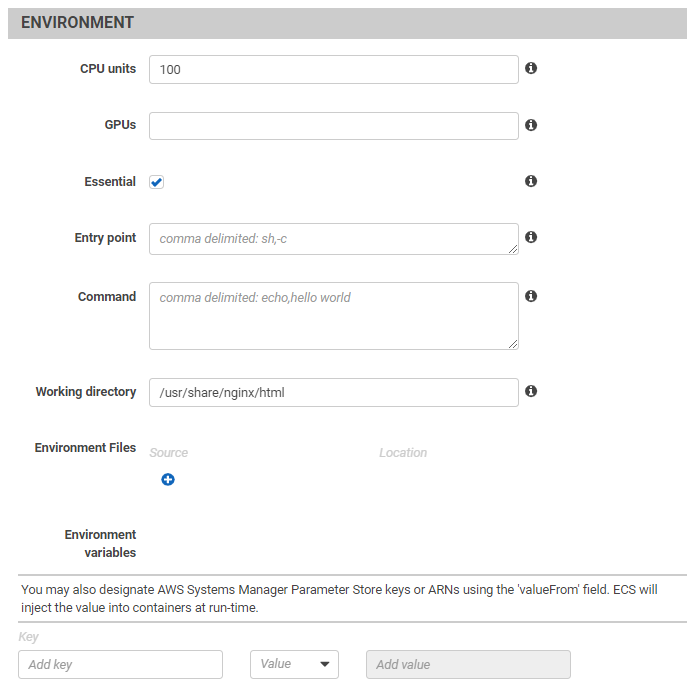
CPU Units: 1 CPU core of ECS instances = 1024 CPU units. These are units of CPUs allocated for the container.
GPUs: Number of GPU units reserved for containers. 1 GPU = 1 unit. ECS instances must be GPU supported.
Essential: If this is checked, the task will be marked as failed on the failing of this container. If unchecked, the task will continue to run even if this container is failed.
Environment Files: Source container environments saved in S3.
Environment variables: Key-value pairs of variables to be used by the container.
Container timeout and network settings
Container timeouts
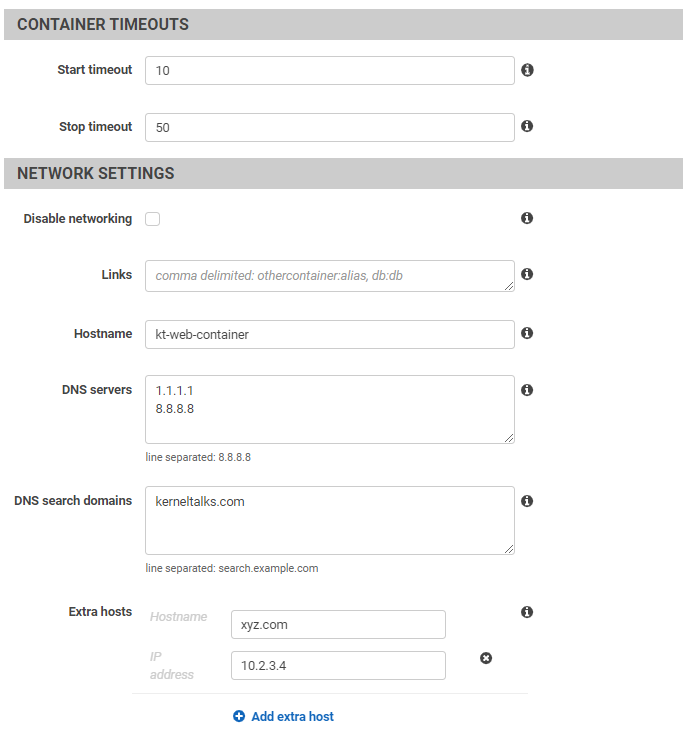
Start timeout: Duration to wait for the container to resolve all dependencies to become fully operational
Stop timeout: Duration to wait for the container to exit normally or kill it after this timeout.
Network settings
Disable networking: No communication outside of the container. The container will be assigned with a loopback address.
Links: To communicate with other containers.
Hostname: Hostname for the container.
DNS servers: To be used by the container
DNS search domains: To be used by containers.
Extra hosts: Any entry not resolvable by the above two options can be added here.
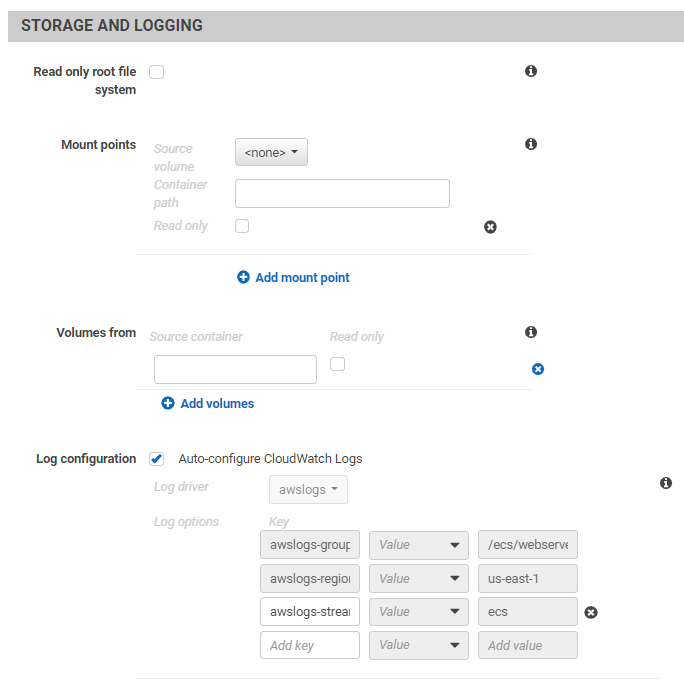
Container storage and logging
Storage and logging
Read only root file system: RO for root FS in the container. If mounted it will be able to write on data volumes.
Mount points: Data volumes to be mounted inside the container
Volumes from: Data volumes from other containers
Log configuration: Loggings container logs in AWS CloudWatch
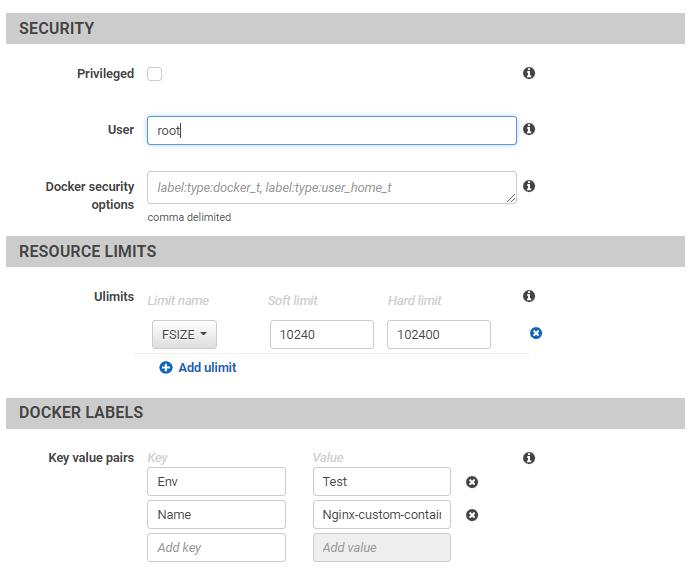
Rest of the configs
Security
Privileged: Container gets elevated privileges on container instances
User: To be used inside the container
Docker security options: SELinux and AppArmor security settings to be passed to the container
Resource Limits
Ulimits: Those are Linux kernel ulimit values.
CORE: Limites the core file size (KB)
CPU: Max CPU time (MIN)
FSIZE: Maximum filesize (KB)
LOCKS: Max file locks user can hold
MEMLOCK: Max locked-in-memory space (KB)
MSGQUEUE: Max memory used by POSIX messages queue (bytes)
Docker labels
Key value pairs: Tags
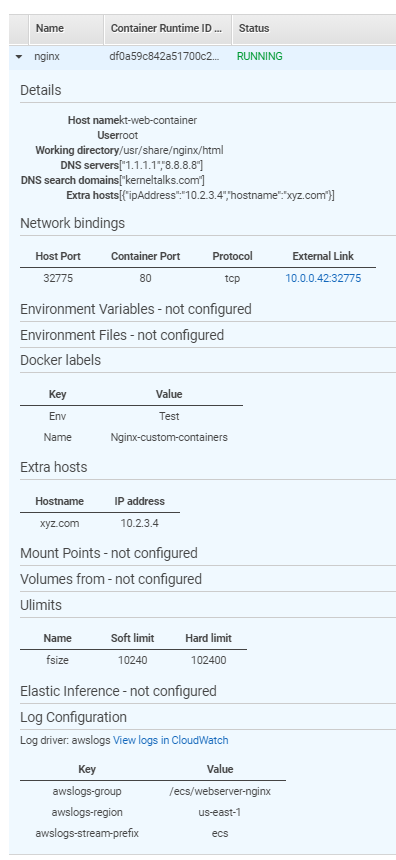
Once I run the Task containing the above container definition, it ran successfully. All the custom configurations can be seen in the AWS console. under Task details.
Container details under running task in Amazon ECS
Alternatively, we can log into the ECS instance and then a container to verify stuff.
Checking container on ECS instance
First verify if the container is running.
[ec2-user@ip-10-0-0-122 ~]$ docker container ls
CONTAINER ID        IMAGE                            COMMAND                  CREATED              STATUS                                 PORTS                   NAMES
2c2267e6ce85        nginx:latest                     "/docker-entrypoint.…"   About a minute ago   Up About a minute (health: starting)   0.0.0.0:32768->80/tcp   ecs-webserver-nginx-8-nginx-d28beae194c4eada5b00
9bb8f8b0b6ea        amazon/amazon-ecs-agent:latest   "/agent"                 2 minutes ago        Up 2 minutes (healthy)
Log in to container and verify if custom configurations are applied.
You can see container hostname is set, DNS nameservers are set, extra IP-hostname pair has been added to /etc/hosts, logged in user is the root and working directory is set to /usr/share/nginx/html! Everything is accommodated.
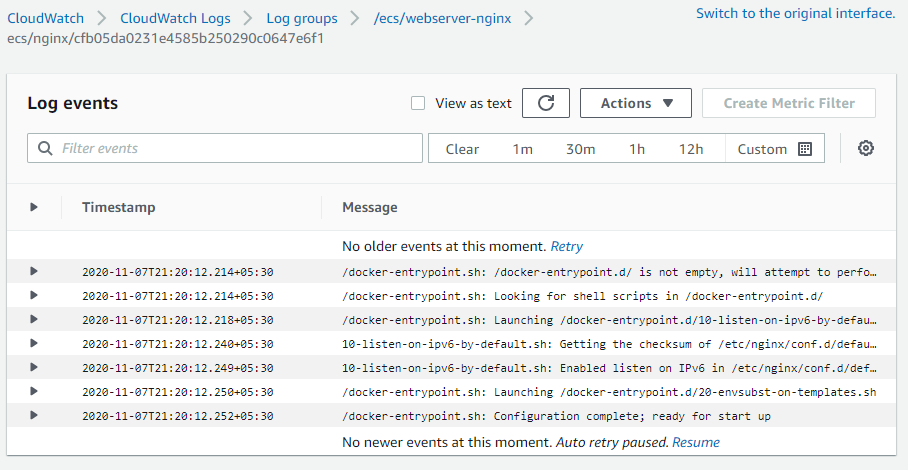
Last thing to verify if the container is sending logs to the CloudWatch service. Click on the link View Logs in CloudWatch under container details on the Tasks page. (can be seen in the above screenshot)
ECS container logs in CloudWatch
And logs are being populated in CloudWatch!
That’s all! All advanced container configuration which one can configure under Amazon ECS Task Definition.
An article about service in Amazon ECS. What is the service? How to configure it? and how to run it?
Services in Amazon ECS
Amazon ECS helps you to spin containers on the cloud. ECS is a complete managed orchestration service offered by AWS. Container instantiation in ECS is taken care of by ECS Tasks. And to manage the ECS Tasks we have Services.
What are Services in Amazon ECS?
Amazon ECS Services enables you to run and maintain the desired number of instances of a task definition on the Amazon ECS cluster. It spins up a new instance of tasks in case existing running tasks die/fail and maintain the desired count.
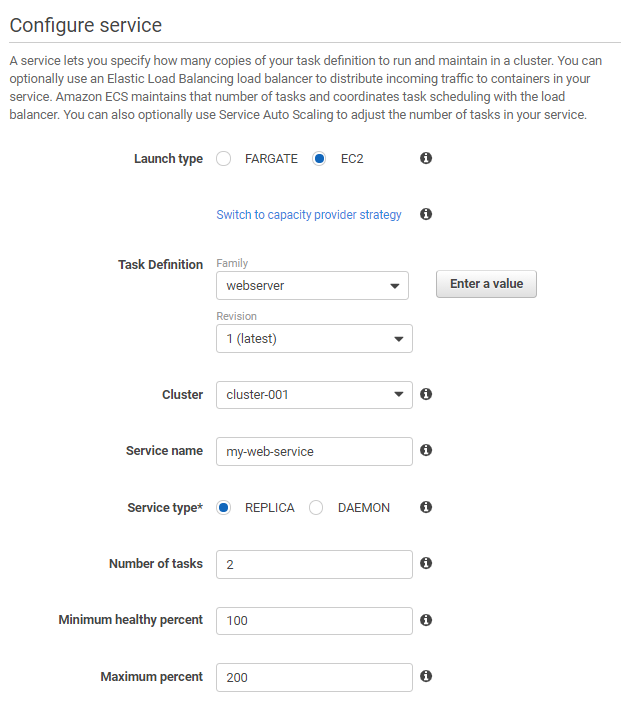
How to configure Service in Amazon ECS?
I will be using the same Task Definition created in the previous article here to configure in Service.
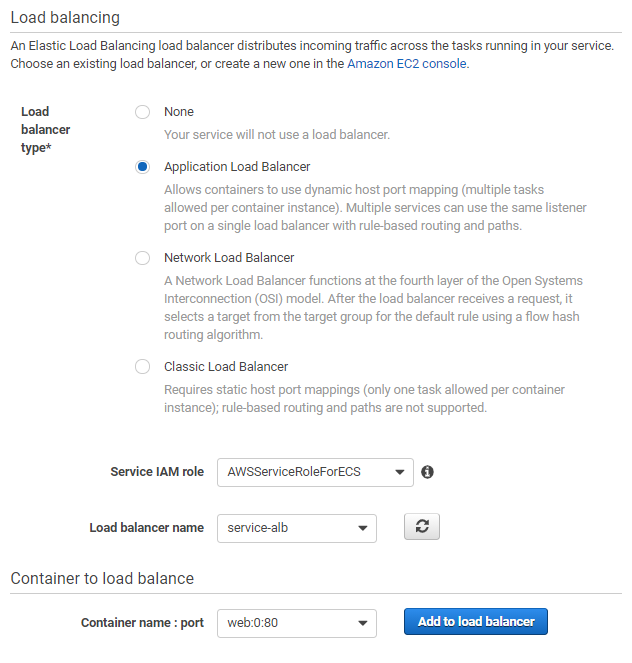
Load balancer name: Select existing LB from the dropdown. If not then create a new LB from the EC2 console and then select here. You don’t need to register targets while creating a load balancer. It will be managed by the ECS cluster.
Container to load balance: Your container port will be listed which is fetched from Task Definition. Click on Add to loan balancer button
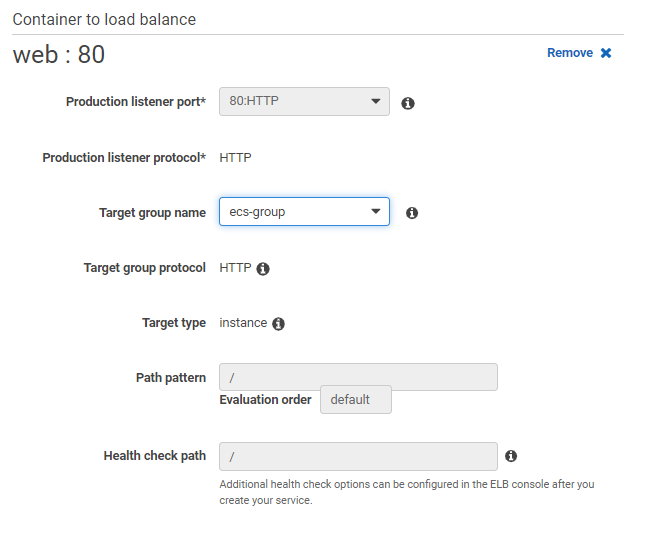
Container load balancing
Production listener port: ALB listening port
Production listener protocol
Target group name: If you haven’t created it with ALB then you can create here or select from the dropdown.
Target group protocol
Target type: ECS instances
Path pattern: For path-based routing. If you want to route traffic depending on different paths then list it here along with the order.
Health check path: for ALB, to determine the health of the target. If this path is reachable then ALB considers the target as healthy.
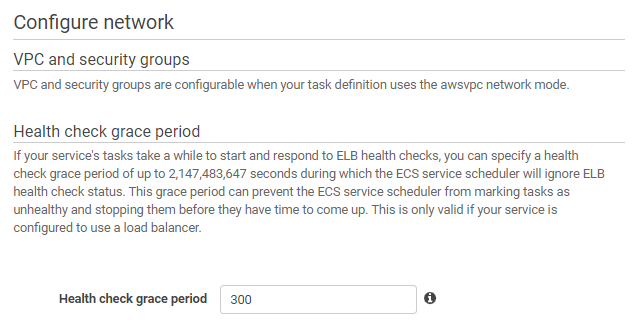
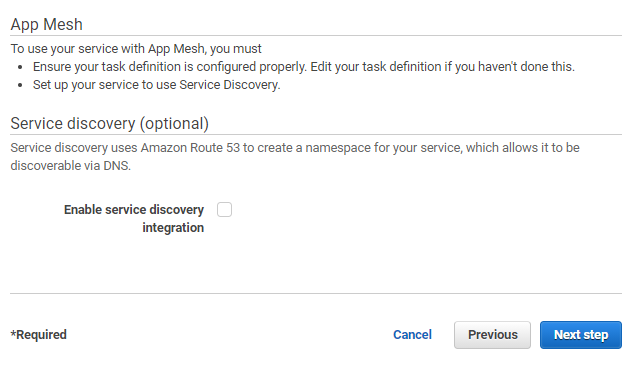
ECS service discovery.
Lastly, App Mesh as defined in Task Definition and Service discovery for using it with DNS.
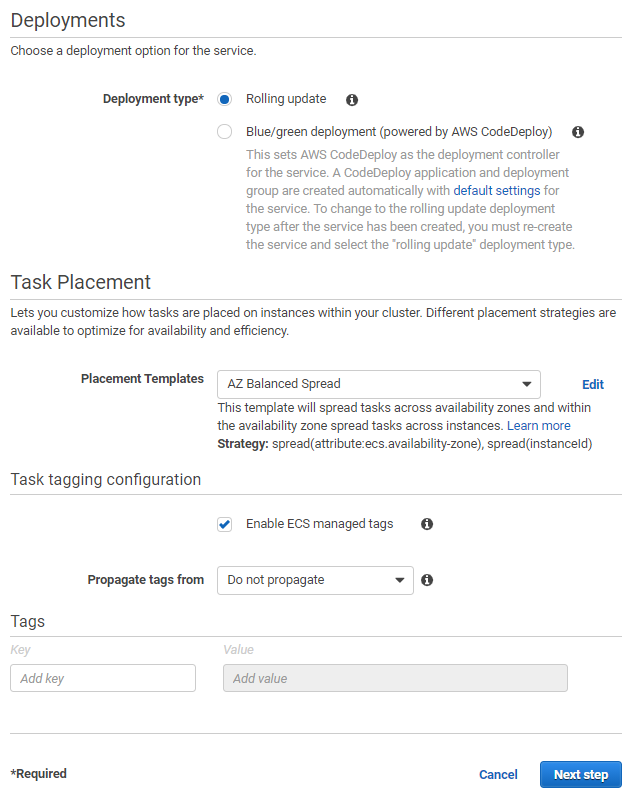
Click Next step button.
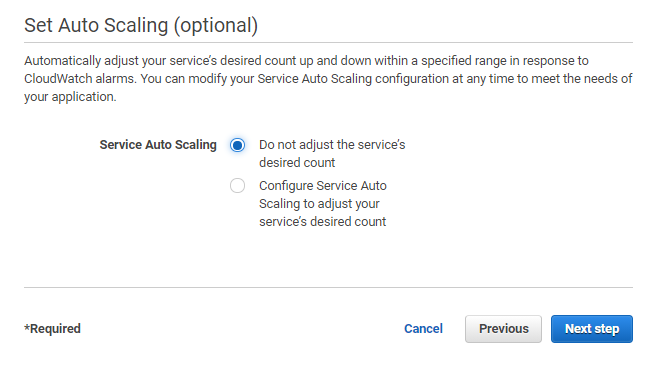
ECS service auto scaling
On the next screen, you should be able to configure service auto-scaling to handle the high and low demands.
Click Next step button
Review complete configuration once and then click on the Create Service button.
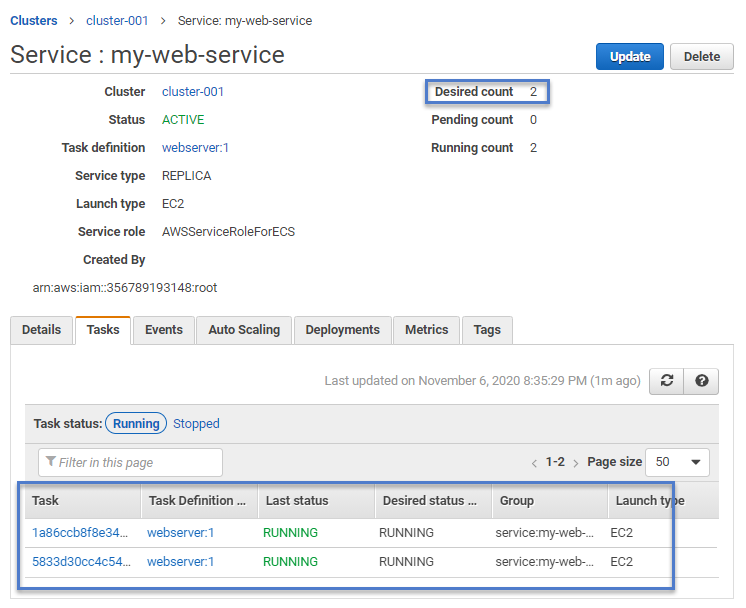
Service will be created and you can click on the View service button and you should be seeing service launching tasks in a couple of minutes.
Running ECS service.
As configured, 2 tasks are launched by service and both are running. Now to verify if service is working fine and containers are serving the purpose, ALB needs to be checked.
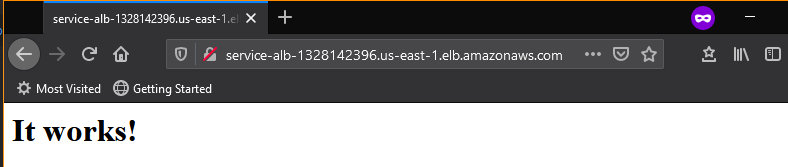
I took the ALB DNS name and opened it in the browser. It should go to target groups which are ECS instances and hence to the containers where Apache is running. And then it should display the Apache default page.
ALB test
And it does! Test succesful! ECS service is runnign as expected.
If it does not, then do check if the security group attached to ALB allows incoming HTTP port 80 traffic from the world. Secondly, check the security group of ECS instances that allows HTTP port 80 traffic from ALB’s security group/subnet.
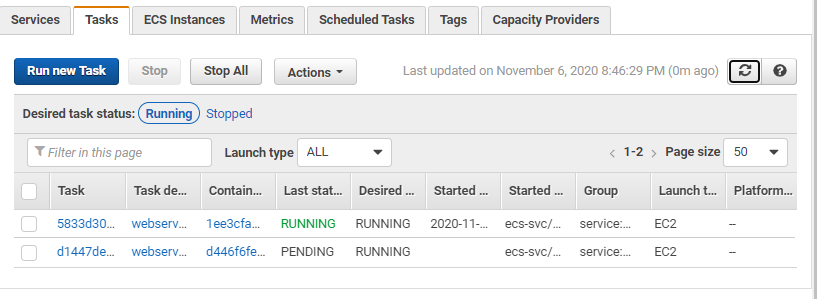
Now, to check if the service maintains the desired count of tasks let’s run a small test. Click on any one task ID and click the Stop button to stop that Task. This should kick in service to start a new task in order to maintain the desired count of 2 Tasks. I killed one task and it did start another task on its own.
Service test
The new task is in pending status and went into RUNNING in a couple of seconds since containers are pretty much fast to insatiate and start serving.
That’s all. We did not cover auto-scaling in this article. That will be something similar to having ASG of EC2 but here for containers!
A step by step guide on how to create task definition in Amazon ECS and how to run tasks in Amazon ECS Cluster
All about Tasks in Amazon ECS
In this article, we will walk you through defining ECS tasks and running them on ECS Cluster. To begin with, let’s understand the basics of ECS tasks.
What is ECS task?
ECS task is responsible to instantiate docker containers in ECS instances or Fargate. Tasks are defined using Task definitions. Each task definition is a collection of parameters like docker image to use, CPU, memory limits, networking mode, etc. When the task is run in the ECS Cluster, it reads Task definitions and accordingly spins up docker containers.
In the left navigation panel, click on Task Definitions
Under the task definitions page, click on the Create new Task Definition button.
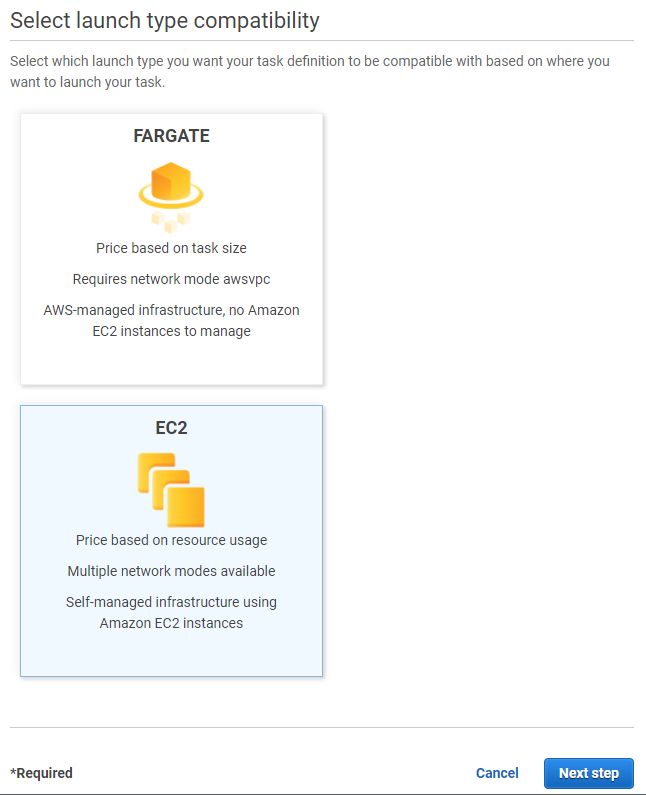
Task definitions start with defining the launch type. Choose launch type and click the Next step button.
ECS Task Launch types
ECS offers 2 launch types –
Fargate
Tasks will be launched on infra managed by AWS. (serverless)
Tasks will be billed on resources being used and usage duration.
EC2
TAsks will be launched on ECS instances registered to ECS Cluster
No separate bills. You will be paying for ECS instances as per normal EC2 instance bills.
For this exercise, I am using the ECS launch type since I have an ECS cluster running with 2 ECS instances registered to it.
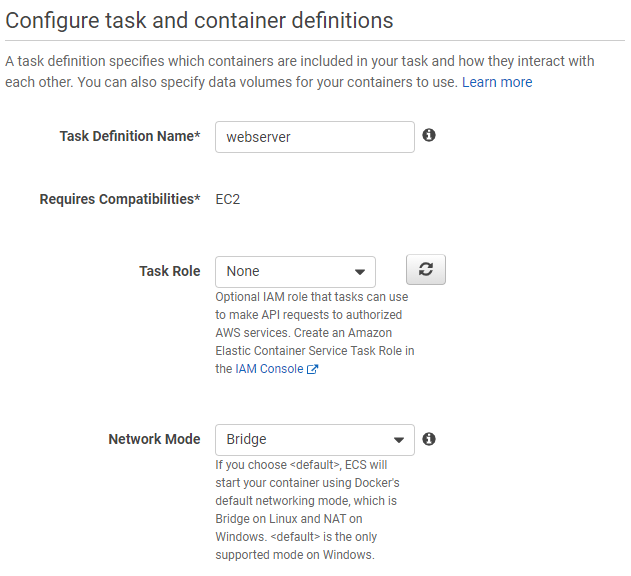
After clicking the Next step button, the task and container definition screen should appear. Lots of things to be defined on this screen. Let’s go one by one –
Task definitions
Task Definition Name: For identification purpose
Task Role: If containers being used designed to access some AWS services then you can specify the IAM role here which to be used by containers while accessing AWS services.
Network Mode: There are 4 modes available here –
<default> which is bridge mode
Bridge: Traffic forwards between host and container by bridge (kernel-level software)
Host: Container network mapped directly to host network
awsvpc: Each container assigned with ENI (and hence SG too) Hence each container’s networking can behave like EC2’s ENI.
None: No networking for containers. Containers spin up with the loopback IP address assigned.
Task sizing
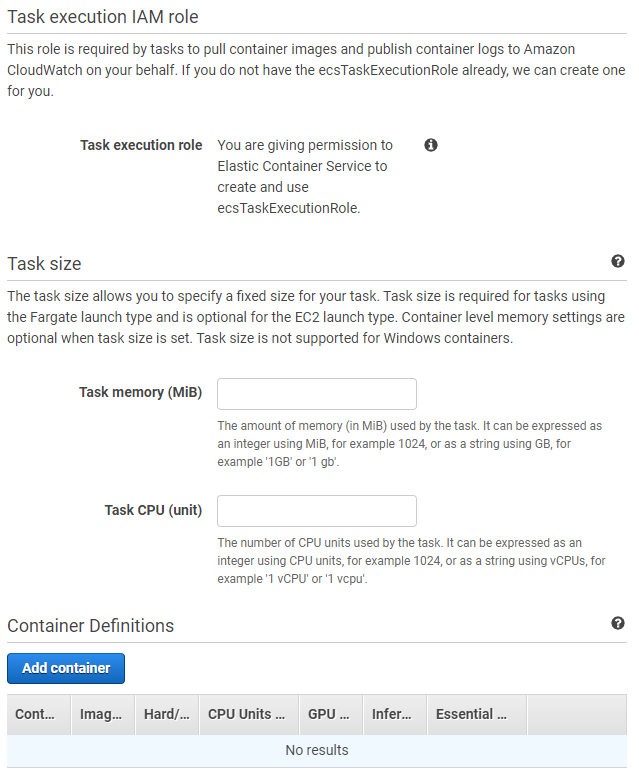
Task execution IAM role: Needed for pulling container images and sending container logs to Cloudwatch.
Task size: Resource allocation for the task. Limiting resources to be consumed by task container. Should be defined properly when using the FARGATE launch type. For EC2 launch type, this should be calculated depending on ECS instances resources available to the task. Since I am launching a small Apache container on EC2 I left it unfilled.
Container definitions
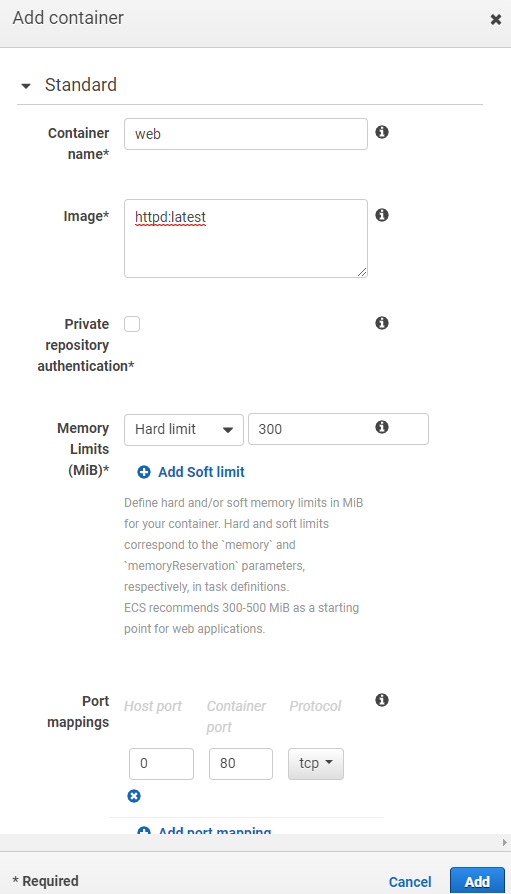
Container Definitions: Under this section, all container-related settings can be defined. Click on the Add container button and it should take you to the container definitions screen.
Image: Container image. repository-url/image:tag. If you want to use an image from Dockerhub then simply specify image:tag. And for that, you should be having internet access on ECS instances to pull images either via NAT or Internet gateway.
Private repository authentication: If you are using private container repo like ECR use this option.
Memory limits: Its memory reserved or allowed for containers during execution.
Hard limit: Max allowed memory for containers to use.
Soft limit: Memory reserved for the container.
Port mappings: Host port to container port mapping. It’s always advisable to use dynamic host port mapping by defining the host port as zero.
Click Add button to add this image definition in task definition.
More task definitions
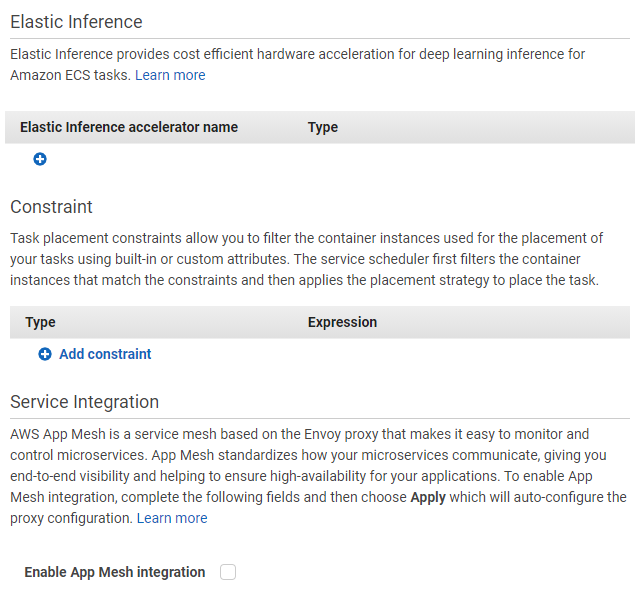
Elastic Inference: Allows you to attach low-cost GPU powered acceleration to tasks. The inference is the process of making predictions using the trained model. It requires processing power. If your container is into such stuff it makes sense to use Elastic Inference which can save you up to 75% cost.
Constraint: Helps you to decide the placement of containers on ECS instances. Not applicable for the FARGATE launch type. Define conditions to filter and select ECS instances. Once the constraint is applied and instances are selected for task deployment, further placement strategy (Explained in the Run Task section below) will be applied and finally, tasks will be launched on the final instance.
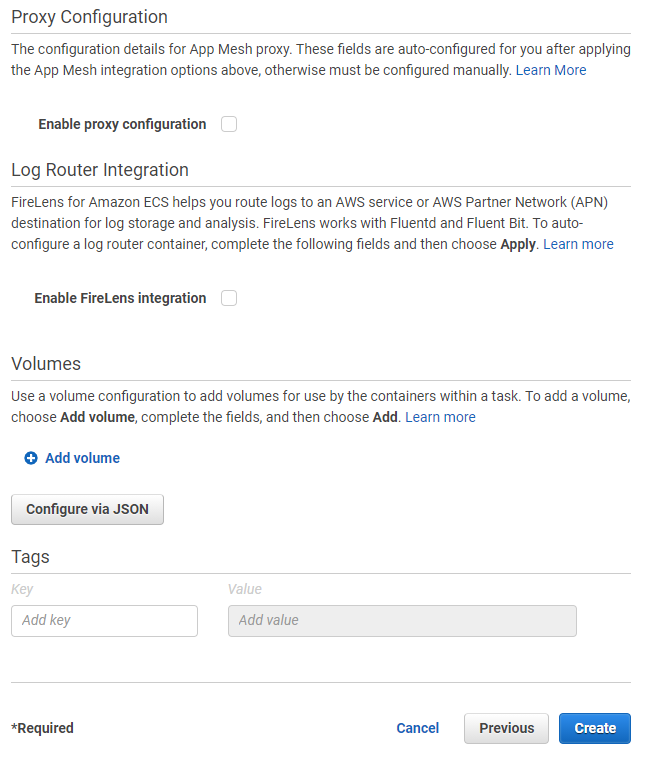
Service Integration: It’s a facility by AWS to manage your microservices easily. This configures proxy to communicate between microservices for better visibility and HA for services.
Proxy configuration: Should be auto-configured once you select App Mesh and fill out the required details in that section.
Log Router Integration: Enables routing of container logs to other AWS services or APN services for storage and analysis. It will spin up the respective container using AWS provided image.
Volumes: Volumes to be mounted inside containers. It supports 3 types
Bind mount: Mounts file or directory on the host inside the container. More info.
Docker: Managed by docker and creates /var/lib/docker/volumes on the container where volume data resides. Drivers can be selected local or third-party. Can persist on task completion if declared as shared.
EFS: Mount EFS volumes in containers!
Tags: For identification.
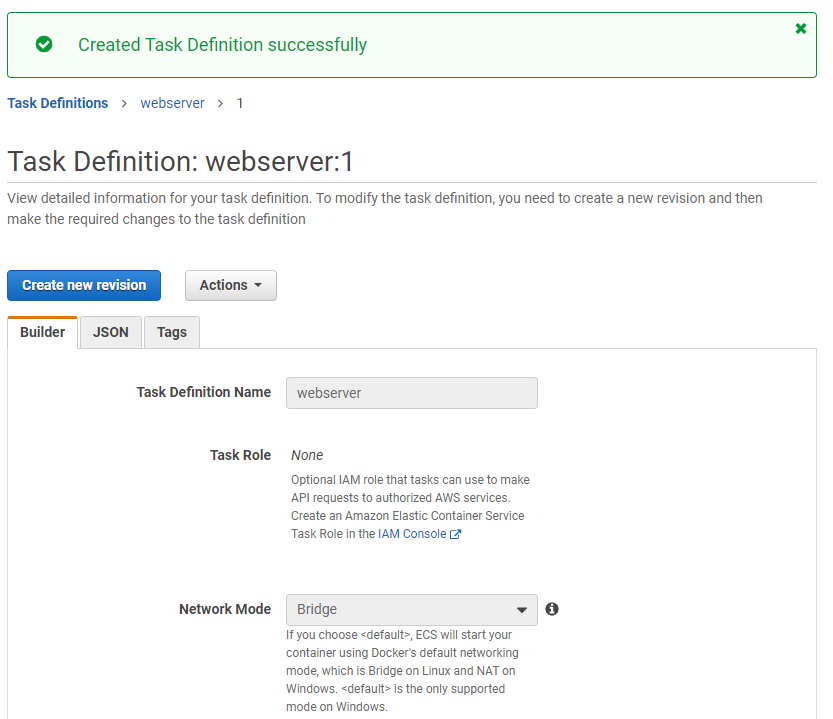
Click Create button to create task definition.
Task definition created!
Task definition should be created and it will be versioned as :1. Task definition can be edited using the Create new revision button and it will be versioned as :2 and so on.
How to run Amazon ECS Task?
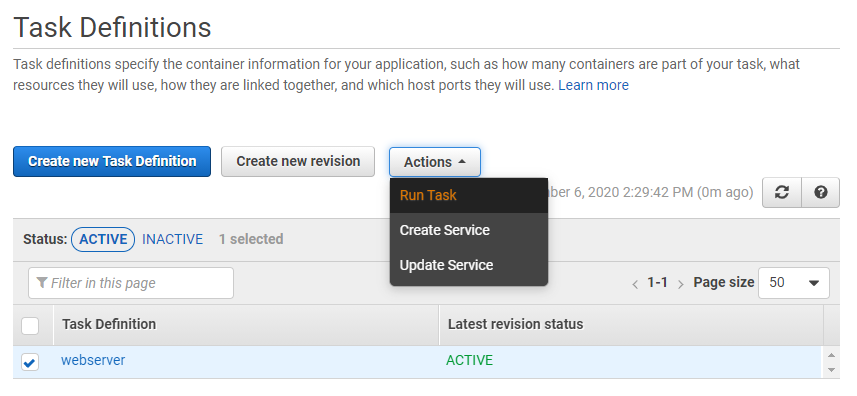
From same page or going back to Task definitions page, select recently created task definition and click on Actions button.
Run ECS task
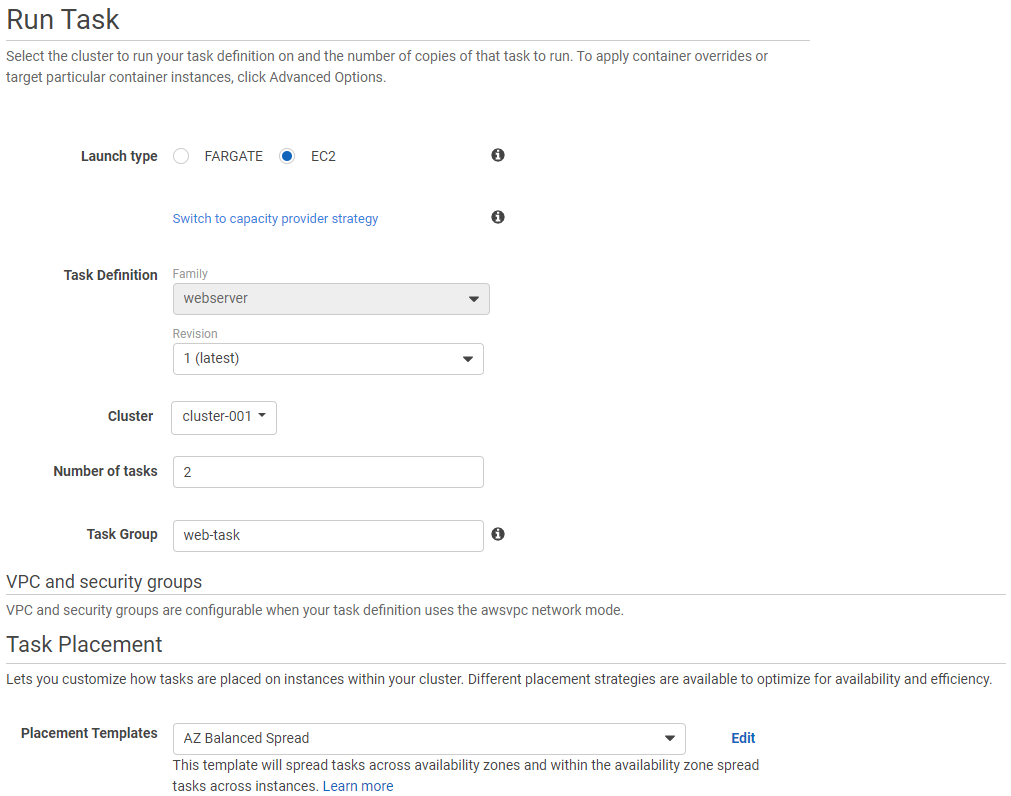
Run Task screen should appear where you can provide details on how tasks should be run.
Run Task screen!
Launch type: Fargate or EC2
Task Definition: choose which revision to be used
Cluster: On which cluster task should be run
Number of tasks: How many containers need to spin up. This count is for HA, FT, or for performance.
Task Group: Identification purpose.
VPC and security groups: Available only if the task definition mentions the use of awsvpc networking mode. Defines ENI level networking details for containers.
Task Placement: Supports 5 templates –
AZ Balanced Spread
Deploy containers so that they are evenly spread across AZ
Make use of available ECS instances in each AZ
AZ Balanced BinPack
Deploy containers by filling one host at a time.
Do not start with another host unless the current host capacity is full. Allows maintaining unused hosts.
Balanced it across AZ. So start with one host in each AZ and go on filling it till full capacity then move on to the next host in that AZ.
BinPack
Same as above except AZ balancing
One Task Per Host
Strictly one task per host.
If no free hosts available, the task will fail.
make sure you have enough available hosts for tasks you are running.
Custom
User-defined with a combination of Spread, BinPack or random
Configure the order in which it needs to be evaluated.
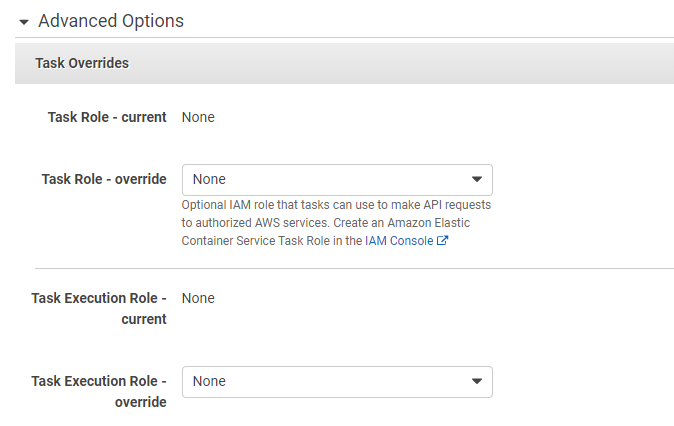
Run Task advanced options
Under advanced options, IAM roles can be overridden that are defined in Task Definitions.
Task role and Task Execution role, both the IAM role can be overridden with a new one under this section.
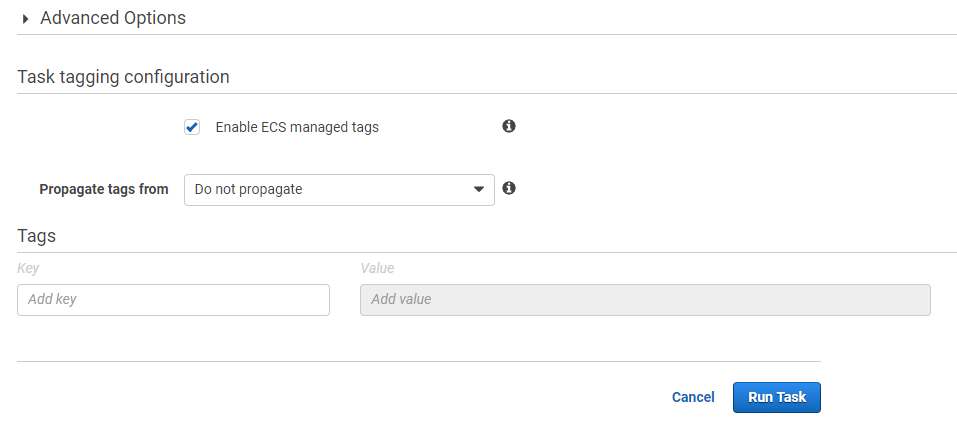
ECS Task tagging
Lastly, tagging settings to be done. Enable ECS managed tags as ECS tag tasks with cluster and service name which is pretty much easy for identification later.
Click on Run Task button.
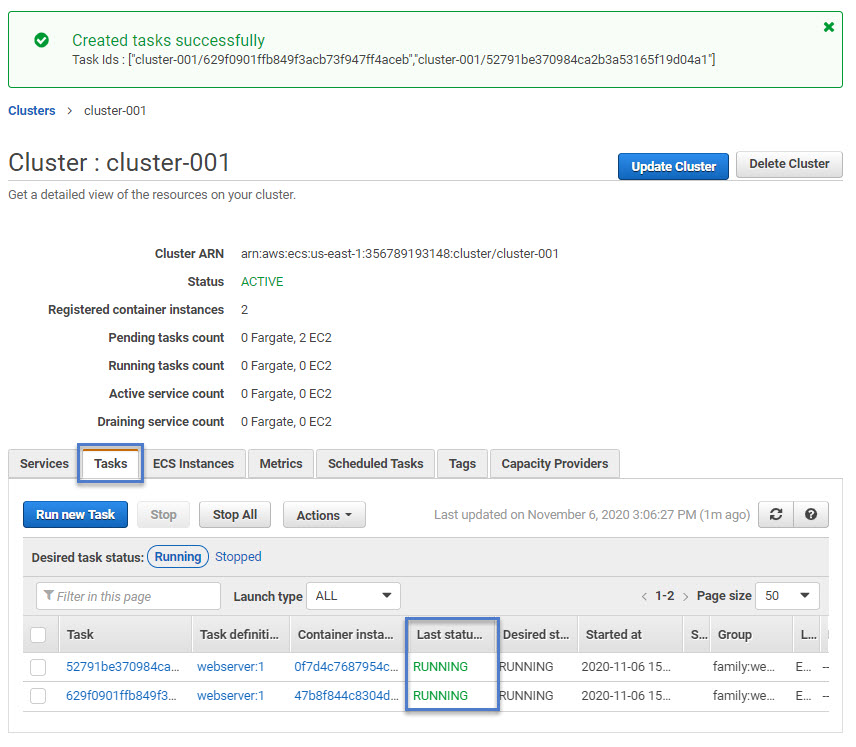
Running tasks in ECS cluster
The task will be started and in a couple of minutes, you should be seeing them in RUNNING state. In the above screenshot, the Pending tasks count lists 2 EC2 since I captured the screen by refreshing only the Tasks tab below. I did not refresh whole cluster page 🙂
Now, the task is in a RUNNING state that means containers are instantiated on ECS instances and port 80 of container bound to host port.
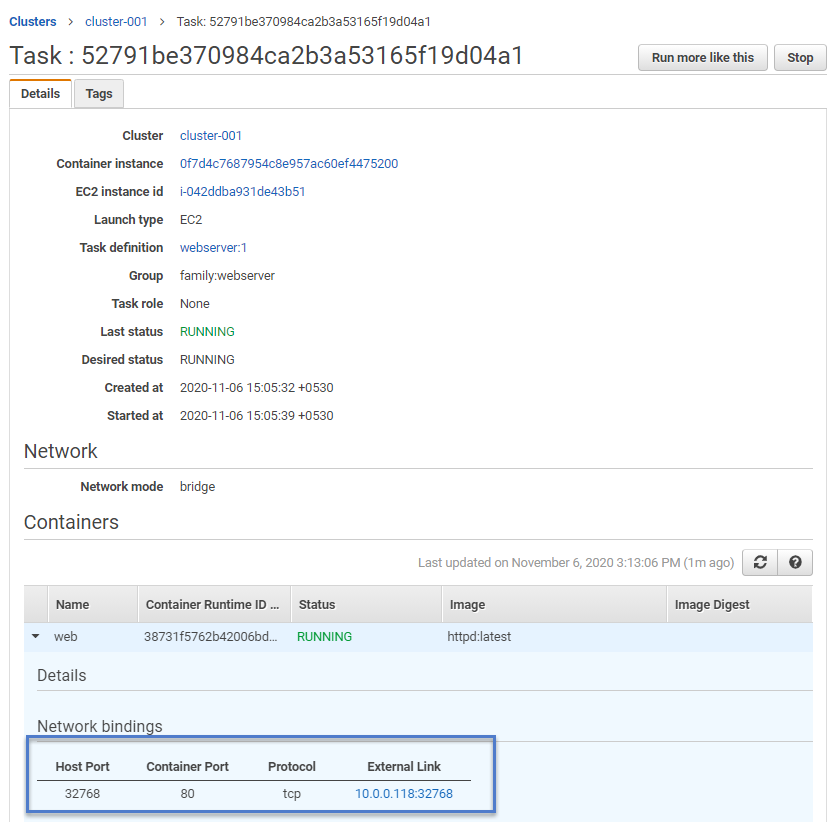
Click on any single task ID and it should show task details like below –
Finding host port
Under container details, a host port can be obtained. In this case, the 32768 host port is bounded to port 80 of the container. To verify the functionality of the Apache container, the external link needs to be checked.
Since this cluster is running with ECS instances placed in a private subnet we need to use bastion host to open this external link. Also, since these are private instances you can see the external link is a private IP address, not the public one.
I curled to the external link from bastion host and it worked!
If it’s not working for you make sure security groups allow the respective traffic between hosts.
And with this, we are completing the creating and running of ECS tasks tutorials. ECS services are used to manage the ECS tasks. We will walk through it in an upcoming article.
A step by step guide to create VPC endpoint for Amazon ECS
ECS VPC endpoints!
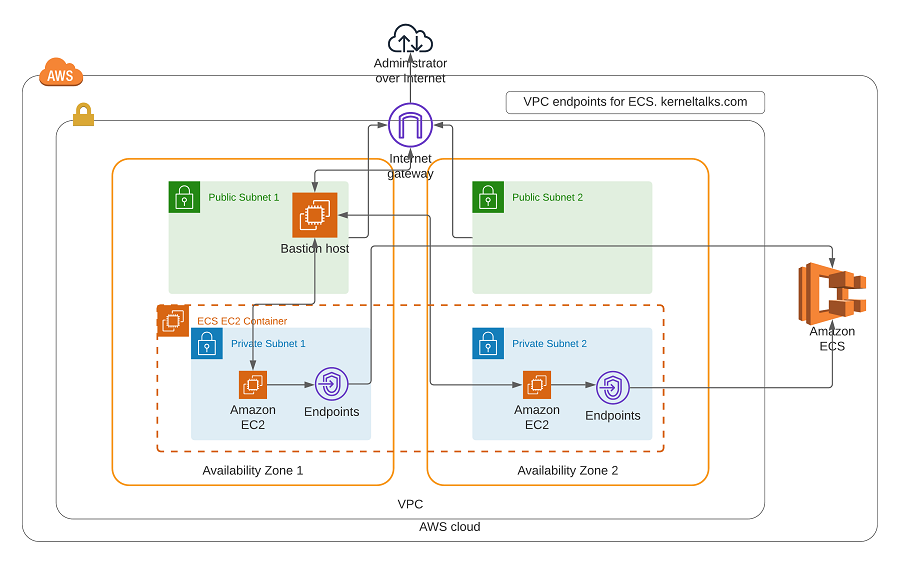
Let’s start with some VPC endpoint basics and why we need VPC endpoint for Amazon ECS. Followed by step by step procedure to create the VPC endpoints for ECS along with screenshots.
What is VPC endpoint?
The VPC endpoint is your gateway for communicating with AWS services public endpoints from resources having no internet access at all. Services like S3, ECS, API Gateway has public endpoints. So when you access them, your request will route through the internet to those service endpoints.
In a secure environment, where instances or resources in the private subnet have absolutely no access to the internet not even via NAT gateway etc., they will not be able to communicate with public AWS endpoints. In such cases, we can leverage VPC endpoints to communicate with such services using Amazon’s internal network (Amazon PrivateLink).
Even with internet access, since traffic is going out to the internet and then reaching AWS services it will have some delay. Using VPC Endpoint makes your access pretty fast using Amazon PrivateLink!
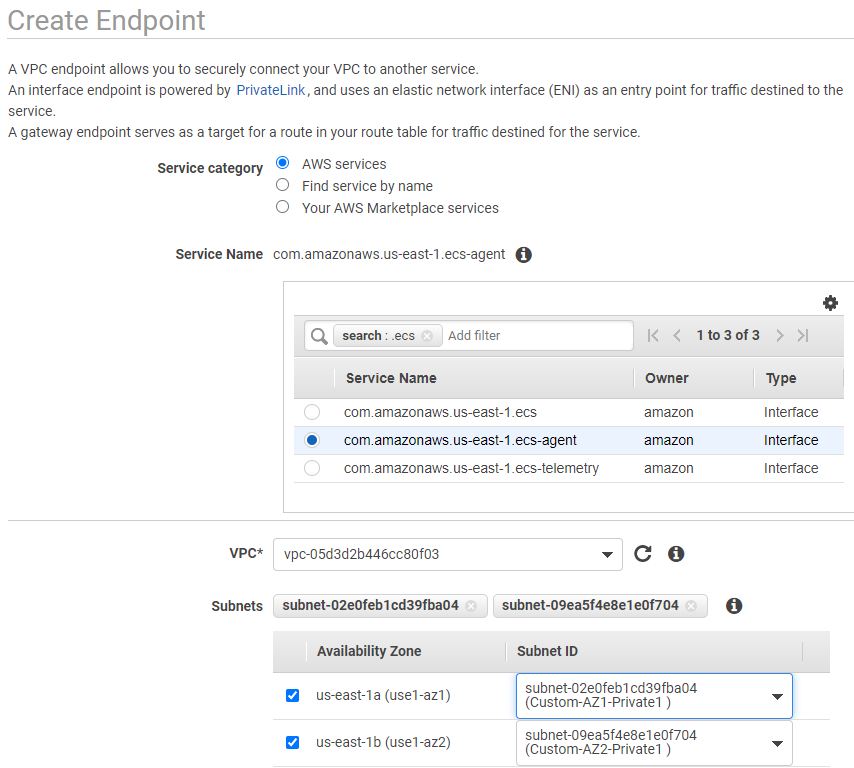
On the endpoint page displayed on right, click Create Endpoint
3 endpoints need to be created for ECS.
com.amazonaws.region.ecs-agent
com.amazonaws.region.ecs-telemetry
com.amazonaws.region.ecs
where the region is a region where the ECS cluster is running. In my case its us-east-1
Creating VPC Endpoint for ECS
Here list of fields to be set –
Service category: AWS services
Service Name: All 3 provided above.
VPC: Select VPC where ECS cluster is running
Subnets: Select subnets to associate endpoints with. I selected private subnets only.
Enable DNS name: Recommended to enable so that ECS agents can communicate with ECS service without any trouble.
Security Group: Security group to be attached to the ENI of this gateway. Make sure port 443 inbound traffic is allowed from above subnets
Tags: For identification
Finally, click the Create endpoint button. Repeat the same process to create 3 endpoints for the services mentioned above.
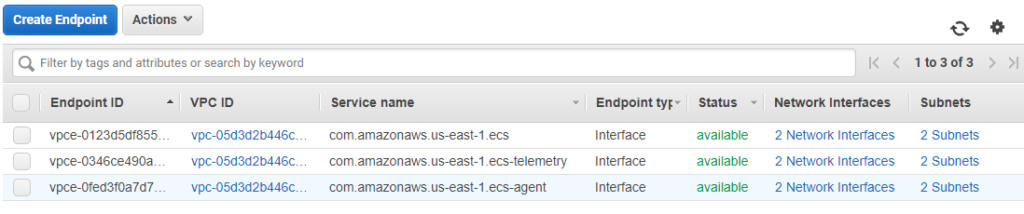
3 Endpoints should goto available status from pending.
3 VPC Endpoints for Amazon ECS
It is clear that each endpoint is having 2 ENIs in 2 subnets. i.e. one interface in each subnet.
This completes VPC Endpoint creation for ECS service. Now, ECS instances can make use of these interfaces when they spun up. If instances are already running then you need to restart the ECS agent on them using the below command and it will start using VPC Endpoints.
For testing, I just terminated existing ECS instances and the ECS autoscaling group spun up new ECS instances in a private zone (which does not have a NAT gateway so no internet). Both got registered to the ECS cluster successfully via VPC endpoint!
Private instances in ECS cluster
Troubleshooting:
In case ECS instances are not getting registered to the ECS cluster using VPC endpoints then the below points needs to be validated –
The instance is running ECS agent version 1.25.1 or higher
Security group of endpoints is allowing 443 traffic from instances
Endpoints are created in the same region as the ECS cluster
ECS agents are restarted on ECS instances after endpoints creation.
If ECS instances are registered but Agent connected is being shown as False. In such scenario below points needs to be validated –
Docker and ECS agent services are running on the server. (systemctl status docker/ecs)
The proper instance role (ecsInstanceRole) is attached to ECS instances. (curl http://169.254.169.254/latest/meta-data/iam/info)
Inspect logfile at location : /var/log/ecs/ecs-agent.log on ECS instances.
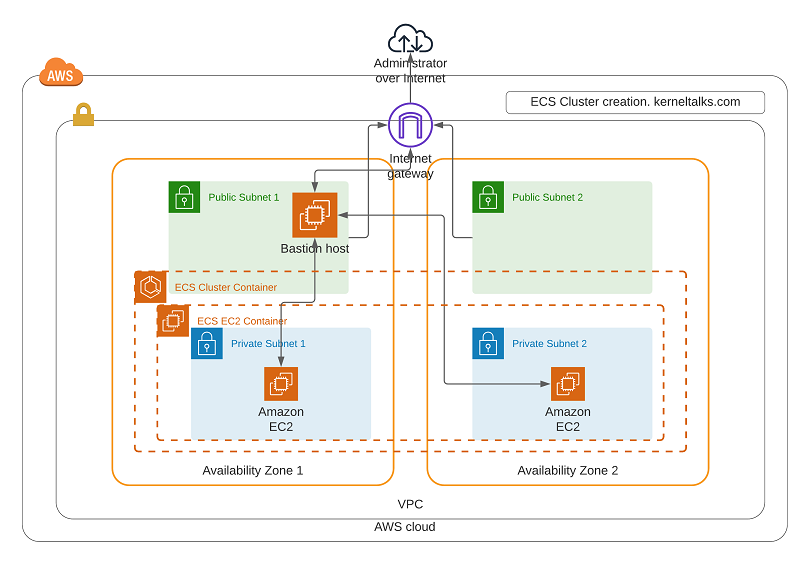
A quick walkthrough on how to create new ECS cluster
New ECS Cluster!
In our previous article, we got acquainted with Amazon ECS service theoretically. In this article, we will walk you through steps to create a new ECS cluster.
ECS Cluster is a logical grouping of ECS instances on which containerized application can be orchestrated.
This article is using below design to provision ECS cluster.
Now, on the right-hand side click on the Create Cluster button
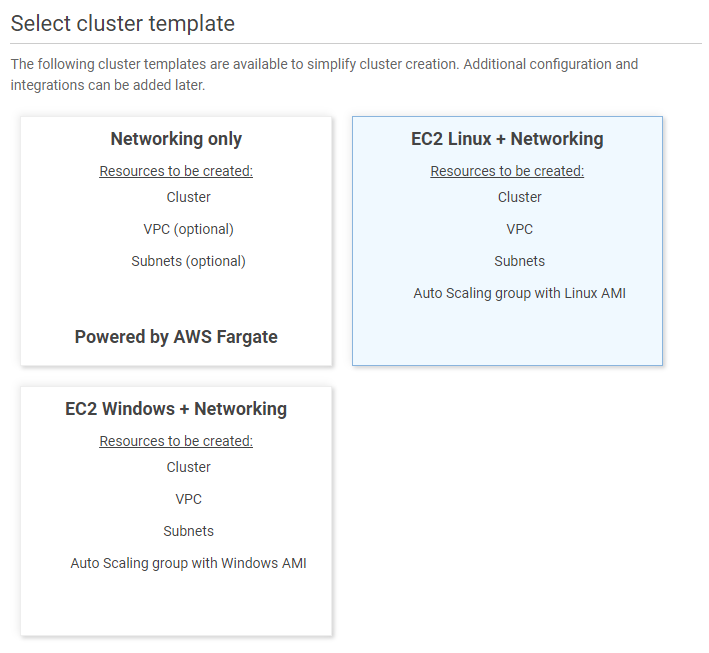
Here a user should be choosing the cluster template for the new cluster
Cluster template choice
Three templates mentioned here are :
Networking only
No ECS instances.
All tasks will be launched using the Fargate launch type!
EC2 Linux + Networking
Deploy with Linux ECS instances
EC2 and Fargate both launch types available for tasks
EC2 Windows + Networking
Deploy with Windows ECS instances
EC2 and Fargate both launch types available for tasks
Most of the time, EC2 Linux + Networking should suffice the requirement. Select the appropriate template and click the Next Step button.
On cluster configuration screen various details can be filled.
Cluster name
Create an empty cluster is an option to create clusters with no ECS instances.
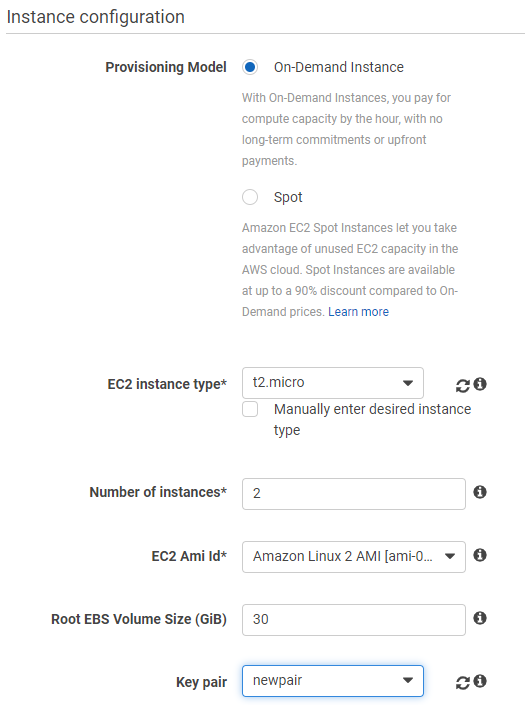
Then, instance configurations should be defined.
ECS Instance configuration
Under instance configurations choose :
Provisioning model: Choose billing type of instances (on-demand or spot)
Number of instances
EC2 AMI ID. The dropdown allows choosing Amazon Linux AMI.
Root EBS size
Key Pair: If you want to log into ECS instances. If not then choose None.
Next section allows network configuration.
ECS cluster networking
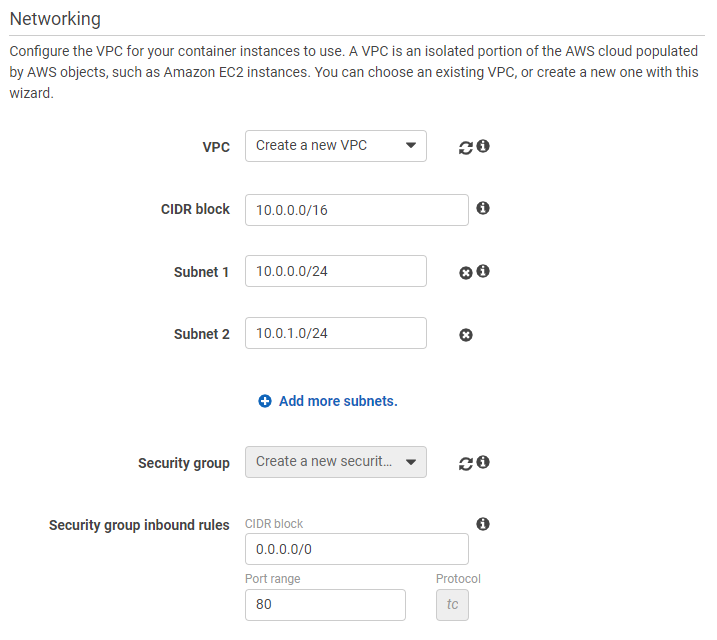
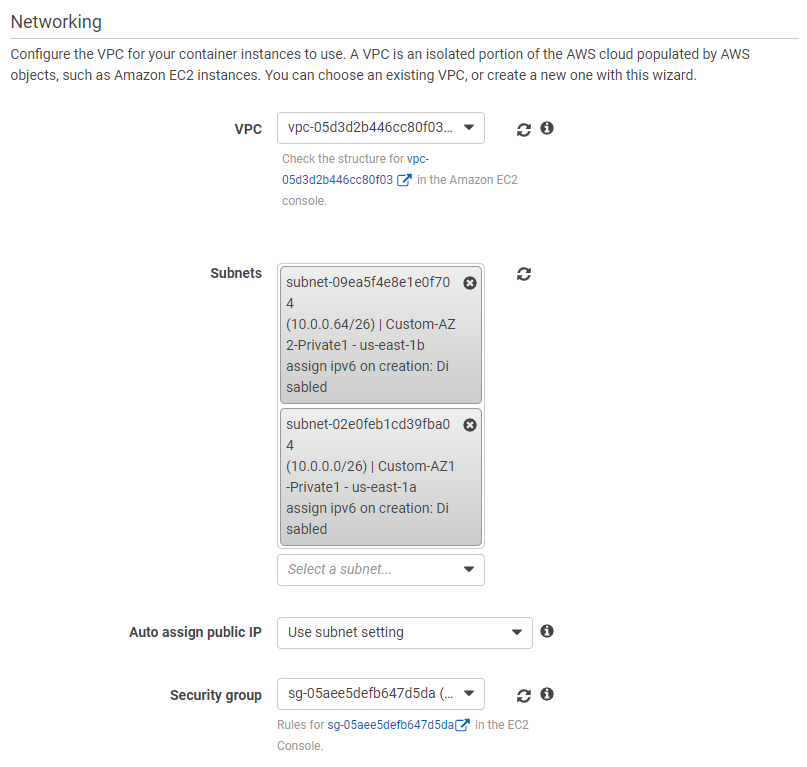
By default setup present to create a new VPC to be used for this ECS cluster. But, if you wish to use existing or already created VPC then choose it from the dropdown.
In my case, I have a custom VPC created already. So I will use it from drop down. While using existing VPC, you need to choose which subnets to be used to place container instances and which security group should be applied to them.
Using existing VPC in ECS cluster
I used my existing VPC along with 2 private subnets in different AZ and security groups which allows SSH and HTTP traffic to instances. Since I will be testing webserver containers on this cluster. This SG should allow the ports you will be using in your containerized applications. Also, they should be allowing traffic from only intended sources.
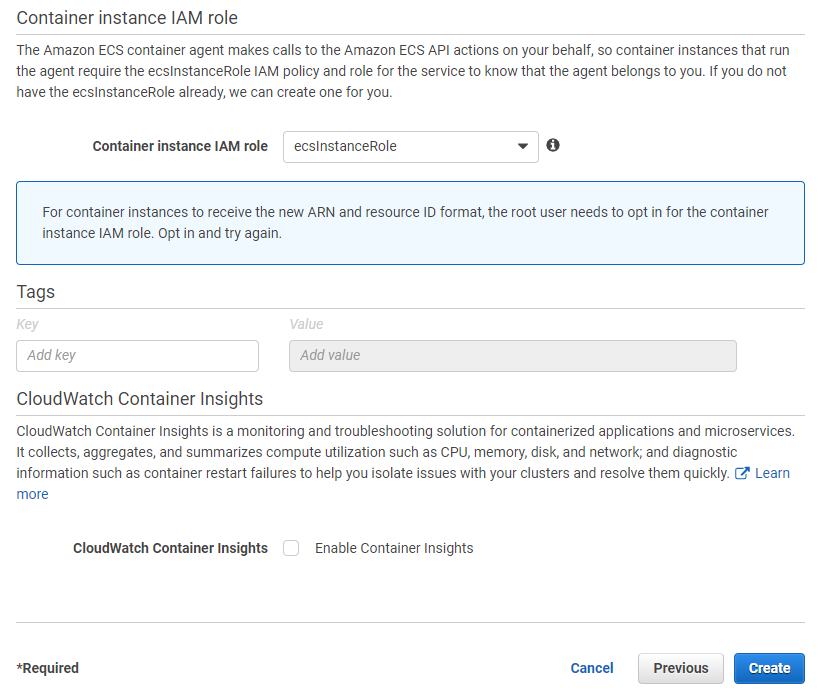
Finally, IAM roles to be defined which will be attached to ECS instances.
Tags can be applied to instances here. Also, if container-level monitoring needs to be enabled it can be done here. Click Create and a cluster will be created in a few.
ECS Cluster creation complete!
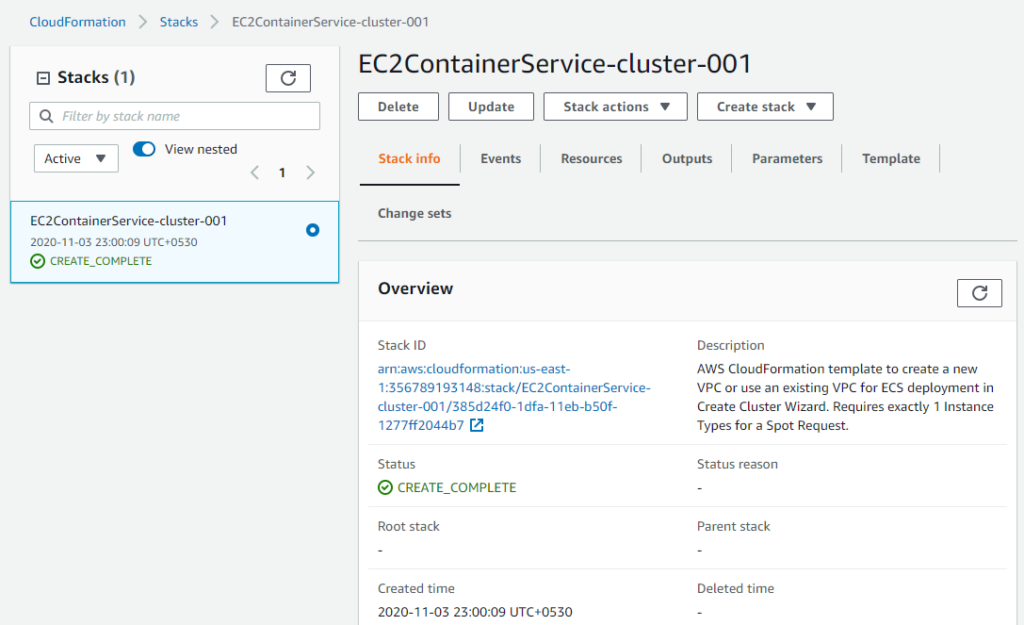
ECS uses CloudFormation in the backend to deploy the whole stack. It can be verified in the Launch status or CloudFormation service dashboard as well.
ECS CloudFormation stack!
Now, click on the View Cluster button and new ECS cluster details will be presented on screen.
Cluster info
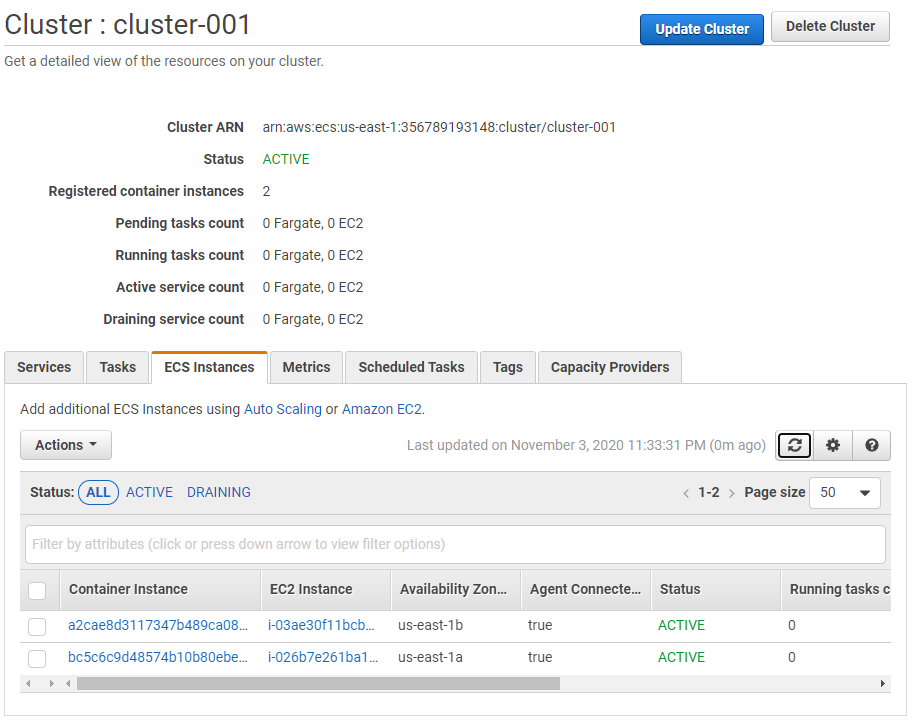
Both ECS instances are registered to cluster as well at this stage. Those Cluster ECS instances can be viewed from the EC2 dashboard as well.
ECS instances.
These instances will be named automatically by ECS. And if you observe those are deployed in different AZ (supplied at cluster creation) and assigned with SG as well.
So the ECS cluster is up and ready along with both ECS instances registered to cluster and ready to run tasks!
Issue: ECS instances not registering in ECS cluster
One of the common issues seen at this stage is although EC2 instances are running fine they do not get registered to the ECS cluster. You do not see them in the ECS Instances tab on the cluster details page.
Cause: This is caused when ECS instances have not to route to the internet. ECS agent on the instances needs to reach ECS public endpoint to register the instance in the ECS cluster. Since no route to the internet, they can not reach ECS public endpoint and can not register to cluster.
Solution: If instances are launched in a private subnet then they should be able to reach the internet using NAT gateway or HTTP proxy. Or you can configure VPC endpoints for Amazon ECS and route traffic from instances to ECS without giving them internet access at all.
If instances are launched in public subnet then make sure auto-assign public IPv4 address is enabled and the instance is allocated with public IPv4 address. Also, the subnet is associated with a routeing table that has a route to Internet Gateway.
An article about Amazon ECS foundational topics for beginners
ECS basics.
Amazon ECS stands for Amazon Elastic Container Service. We will walk you through ECS bit by bit to help you understand what is ECS. We will touch base below topics –
What is ECS?
Use cases for ECS
ECS component concepts
Pricing
What is ECS?
Amazon ECS is a fully managed container orchestration service. It aimed to do all the heavy lifting of managing container orchestration clusters for customers while customers can focus on developing their containerized application.
If you are new to containers, please read our container articles –
In a nutshell, ECS is Amazon’s own homegrown container orchestration service. If you have learned about Docker Swarm then consider ECS as Amazon’s version of Swarm to manage your containers.
Amazon’s other service ‘Elastic Beanstalk’ actually using ECS in the background to spin up clusters of containers running your desired applications.
Where to use ECS?
In this section, we will see the use cases of Amazon ECS. This service sees uses cases mainly in two sectors:
Microservices
Application following microservices architecture approach can make most of ECS! The Microservices approach aims at decoupling the design so that architecture is failure-proof, can be scaled at the service level, etc. These benefits can be leveraged using containers! Containers can be spun using immutable images, tested locally, scaled using ECS clusters, each service can be defined using different tasks, and pipelined using CI/CD.
Batch Jobs
Since containers are easy, quick to spin up, and terminate they are perfect for running batch jobs. Using containers you can cut down your time to spin up EC2 instances for processing jobs, save time for their terminations, get away with the huge billing associated with them. And all of this can be well managed by AWS in the backend when you spin your containers using ECS. Fargate launch type in ECS is well suited for batch jobs since it doesn’t require to spin us even EC2 container instances. It’s like serverless and you pay for the resources you used and the time you used them.
ECS concepts
With a little bit of foundation let’s dive into a few ECS concepts. While using ECS you will come across the below terms –
Clusters
Container Instance
Task definitions
Launch types
Services
Amazon ECR
Cluster
Cluster is a grouping of tasks and/or services. These tasks/services are run on container instances (in case of EC2 launch types), in that case, EC2 container instances also come under this logical grouping called a cluster. You can have one or more clusters in your account.
Container instance
When you are running a task/service using the EC2 launch type, it will run on EC2 instances. These instances (Linux/Windows) are created when you are creating clusters. Basically, those are normal EC2 instances with docker software, ECS agent preinstalled. You can even connect to them like any other EC2 instances using SSH or RDP. You can view them in the EC2 dashboard of your account as well. Under ECS those will be referred to as container instances.
Tasks definitions
Task definitions are a collection of settings required to run a container in the Amazon ECS cluster. It has numerous parameters that you can configure including container definitions as well. The core of the task definition is container definition and launch type, where you define how your container should be instantiated. In short, you can visualize it as a container Dockerfile.
Launch types
It’s a type of compute on which containers should be instantiated. Amazon offers 2 launch types –
EC2 Launch type
Runs containers on cluster container instances
You will be billed for EC2 instances, not the container runtimes
Fargate types
Runs containers on serverless/managed infra in the backend
You will be billed on the number of resources used and for the duration, they are used
Services
Services are the schedulers that are responsible to maintain the desired number of containers of running tasks in a cluster. So container instantiation and termination to match the given conditions is done by services.
Amazon ECR
It’s Amazon Elastic Container Registry. It’s your own private container registry hosted on AWS. You can use IAM authentications to control the access to ECR and it can be connected to various apps for CI/CD purposes. Container definitions under tasks can refer to ECR images securely.
Pricing
ECS is a free service just like cloudformation! You will be billed only for the resources you deployed/used for using ECS.
When creating clusters, the container instance type should be selected. As I explained earlier these are normal EC2 instances that can be viewed in the EC2 dashboard as well. So they will be billed like any other EC2 instances (instance types and time for which they are running).
Another billing you can incur is when running containers on fargate launch type. It’s considered as pretty costly than the EC2 launch type and hence should be used only for short-running tasks. You will be billed for the number of resources you are using and the duration for which they are being used.
If you are leveraging ECR to maintain your own private container image repository then ECR charges will be applied to your account as well. ECR charges include two components :
Storage. Billed for total storage being used by all of the images
Data transfer. Data in and out bills i.e. data transferred from/to ECR during image pull/push operations
Conclusion
That’s pretty much about ECS basics. So, if you are working on a self-hosted container environment, it’s time to move to ECS and let AWS manage the stuff for you while you can concentrate on developing apps in containers!
A quick post on how to forward SSH key in Putty on Windows.
PuTTY SSH agent forwarding
Let’s start with some basics about SSH key/agent forwarding. Then we will dive into how to configure it in putty.
What is SSH key/agent forwarding?
Traditionally we used to have password-based authentication for Linux servers. In this age of cloud, all the Linux servers deployed in the cloud come with default key-based authentication Authentication is done using pair of keys: Private key (with user) and Public key (stored on server). So every time you connect to the server you need to supply your private key for authentication.
If you are using some jump server or bastion host for connecting servers then you need to store your private key on that server (jump/bastion). So that it can be used for authentication when connecting to servers. This leaves a security risk of the private key being exposed/accessed by other users of jump/bastion host.
In such a scenario, SSH agent forwarding should be used. SSH agent forwarding allows you to forward the SSH key remotely. That means you can authenticate without storing the key on the jump/bastion host! Putty takes care of using the key stored on your local computer and forward it so that it can be used for remote authentications.
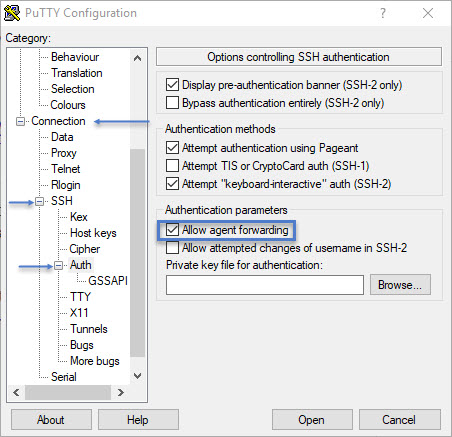
How to configure SSH agent forwarding in Putty?
It can be done by using utility pagent.exe which comes with PuTTY. pagent.exe is an SSH authentication agent for PuTTY. It can be downloaded for free from PuTTY website along with the PuTTY executable.
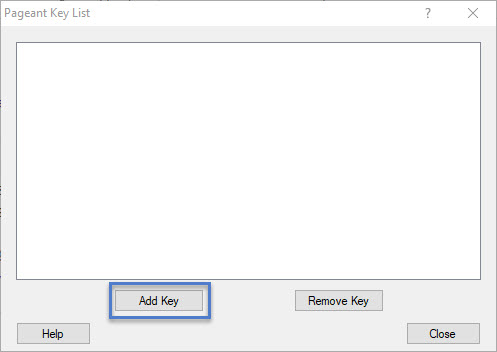
Now Open pagent.exe. It will start in the background. You can click on pagent icon in the taskbar and bring it to the foreground. You should see the below screen –
pagent list of keys
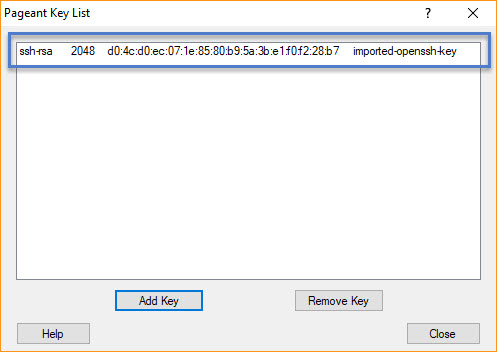
Click on the Add Key button. Browse your PPK key stored on the local computer and click Open. Key will be added to the database and you should see it in the key list as below –
Imported key
Now click the Close button. Make sure pagent is running in the background. And open PuTTY. In the left panel of the category, goto Connection > SSH > Auth and select the checkbox next to Allow agent forwarding
PuTTY agent forwarding
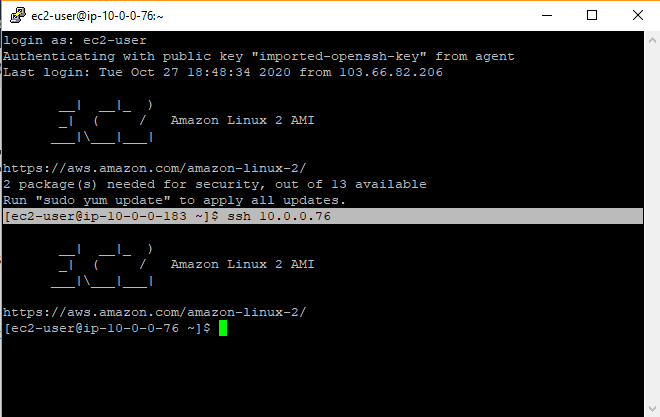
Now you are ready to connect to your jump/bastion host. And from there to the remote Linux machines. You will not be prompted for key since it’s already added to pagent and PuTTY is making sure to forward it for further connections!
Below is my test where I connected my instance in a private subnet without supplying the SSH key in command.
Login using SSh agent forwarding!
That’s all! You can add a number of keys in pagent and use them without leaving a key footprint on intermediate servers!
Everything you need to know about Bastion host in AWS infrastructure.
All about bastion host!
In this article, we will touch base below points in context to bastion host:
What is a bastion host?
What is the role of bastion host in AWS infrastructure?
How to deploy and configure a bastion host?
Lets start with the introduction to bastion host.
What is bastion host?
A bastion host is a Windows or Linux machine sitting in the Public subnet of your AWS infrastructure. It’s a machine that is used to securely access the rest of the infrastructure for administration purposes. Since you don’t want to expose everything in your infra to the internet, the bastion host will do that heavy lifting and hence securing the infrastructure.
As this host is exposed to the internet it is recommended to implement a strong system hardening on this machine. Secure this machine at OS level with all available hardening techniques since this machine is a gateway to your whole infrastructure.
What is the role of bastion host in AWS infrastructure?
As explained above, the bastion host will be used to access the rest of the infrastructure. for administrative tasks. Sometimes, cloud newbies treat bastion host as a way of accessing instances in the private subnet only. But that’s not it. One should block access (SSH or RDP) to instances in the public subnet as well and allow them only through the bastion host.
This way one can secure administrative level access to instances in public and private subnets. And this is the recommended practice. Your all instances no matter they are in which subnet should be accessible via bastion host only.
In a nutshell, bastion hosts used to secure administrative access to instances in private and public subnets.
How to deploy bastion and configure host?
For this exercise, we will deploy Linux bastion host in the same architecture which we used while creating our last custom VPC. In the case of the Windows environment, SSH can be replaced with RDP, and Linux bastion can be replaced with a Windows machine. Bastion host deployment and configuration can be summarised as –
Deploy EC2 instance in the public subnet (that’s your bastion host)
Create a new security group which allows SSH traffic from bastion to destination public and private subnets
Attach security group to instances
Lets dive into it.
For step 1, I deployed Amazon Linux 2 EC2 instance. You can even use customized AMI which has all hardening already done, logging enabled for a bastion, etc things. But for this exercise, I will be using normal Amazon Linux AMI. The SG created along with this launch should allow SSH traffic from 0.0.0.0/0. Let’s tag this SG as bastion-sg
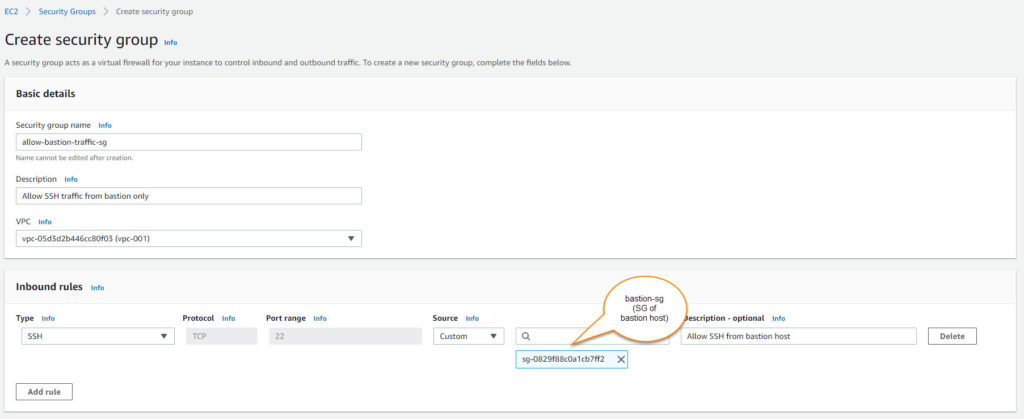
Now, it’s time to create a custom security group to allow bastion traffic to instances. Custom SG is handy so that you can attach it instances while launching and you don’t need to manually edit instances security groups to allow bastion traffic. On other hand, in this SG we are allowing traffic from SG of bastion host. So even in future IP of bastion host gets changed (or even bastion host gets replaced) we don’t have to edit any SG settings anywhere. The only thing you need to keep in mind that, you need to deploy a new bastion host with the existing bastion SG.
On the left navigation plane, click on Security Groups
Now on the security groups page, click on the Create security group button
You will be presented with the below screen :
Create custom security group
You need to fill in below details-
Security group name: For identification
Description
VPC: Select your VPC from the dropdown.
Inbound rules: Allow SSH from SG of bastion host (bastion-sg from step 1)
Outbound rule: Keep it default. Allow all traffic.
Tags: optional.
This SG (allow-bastion-traffic-sg) to be attached with instances launched in public/private instances. Make sure you remove the existing default SG attached to them which allows SSH traffic from 0.0.0.0/0 OR edit an inbound rule in the existing SGs which allows this.
It confirms that SSH traffic to all instances in your VPC will be allowed only from the bastion host.
At this stage, bastion host SG should have below inbound rule:
Inbound rule for bastion host SG
And instances in VPC (any subnet) should have below inbound rule where the source is bastion-sg (SG of bastion host):
Inbound rule for instances
We are all set! It’s time to test. Below are 2 instances for testing. Once is the bastion and another is launched in the private subnet. This could work with an instance in the public subnet as well but they will be having public IP allocated as well so to avoid confusion I took an instance from the private subnet.
Instance details
I logged in to the bastion host using its public IP. Remember, we deployed bastion host in public subnet hence it will get public IP on launch. And since public IP reachable over the internet, I can directly putty to public IP of bastion host.
Once I am in the bastion host, I tried to ssh to the private IP of an instance launched in the private subnet. Since instance is launched in a private subnet, it won’t be allocated with the public IP so it’s not reachable over the internet. So I have to use a bastion host to get into it and it worked!
Note: I used PuTTY SSH agent forwarding here so I did not have to supply the SSH key in command when connecting to the private instance.
SSH from bastion to private instance
In such a way you can secure administrative access to your instances in VPC (inside public and private subnet) by using bastion hosts.
A quick article on AWS VPC creation along with screenshots.
VPC Creation!
In this article, we will be creating a custom VPC in the AWS account and check all available options along with screenshots. You must be aware that every AWS account comes with a default VPC already created for you. Few of the AWS services require the existence of this default VPC while it’s recommended to have custom VPC for some. So without further delay, let’s start with some VPC introduction.
What is VPC?
VPC stands for Virtual Private Cloud. It’s your own isolated network section in the AWS cloud. It’s safe to say it’s your own small cloud within the AWS cloud! VPC can be visualized as the outer boundary of your account in AWS within which you deploy all your cloud resources.
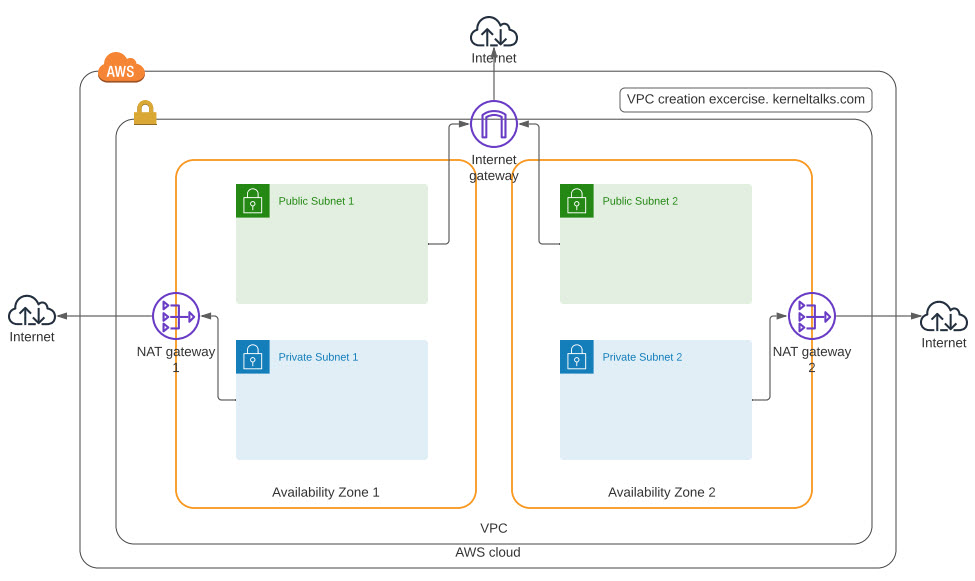
For this exercise we will try to implement below design in AWS.
Now on the VPC page, click on the Create VPC button
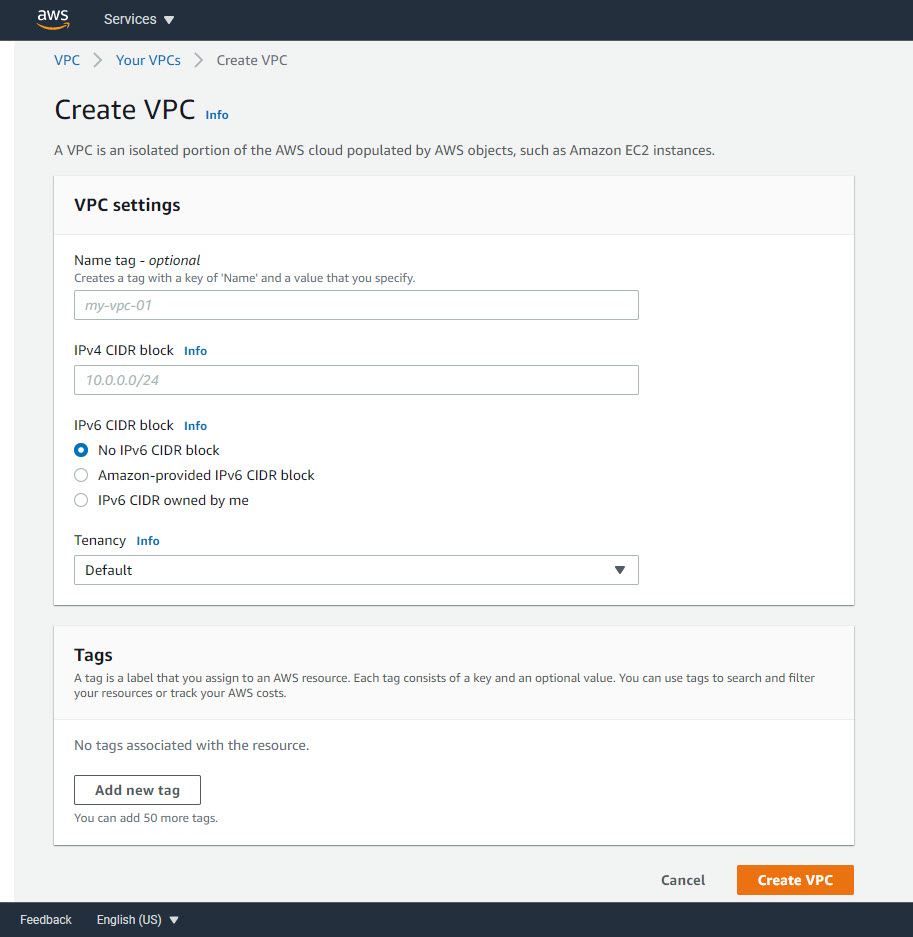
You will be presented with the below screen :
Create VPC screen
Here you can fill in below details-
Name tag (optional): For identifying your VPC within your account.
IPv4 CIDR block: This CIDR block will be available throughout your VPC. Make sure you choose wisely to support your IP appetite. You can later add 4 more secondary CIDR blocks to VPC. Plan accordingly.
IPv6 CIDR block: Depending on your requirement. You can specify your own block or use Amazon assigned one.
Tenancy: Choose how your instances will be launched.
Default: Follow the tenancy attribute defined at instance launch
Dedicated: Regardless of tenancy type selected at instance launch, always launch an instance on dedicated hardware.
Tags: Add tags to manage billing, identification, etc. If you choose the Name tag in the first field then it will appear here automatically.
Once you fill everything, click Create VPC and your VPC will be created. You should be seeing a confirmation screen-
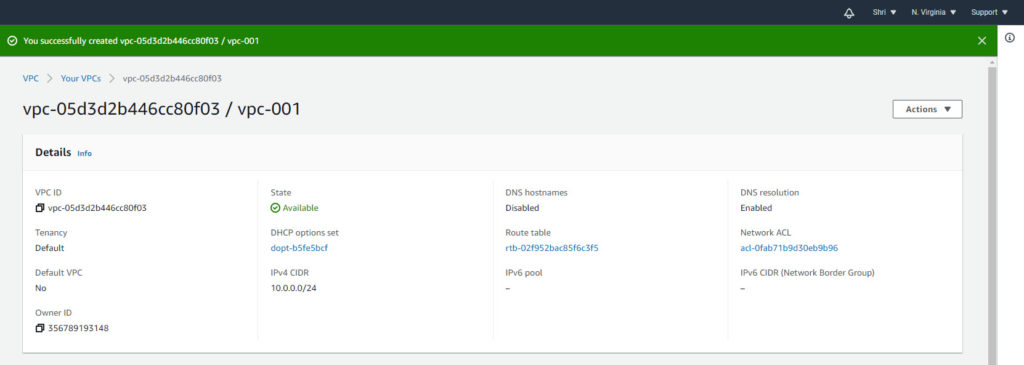
VPC Creation confirmation
Now, your VPC is created. You need to remember below points when you create custom VPC with this method :
Along with this VPC below resources are created automatically –
1 NACL
All traffic is allowed in and out with ALLOW rule with rule number 100
Also has the * DENY rule which means if the packet does not match any of the specified rules it will be denied.
1 DHCP options set
With Internal domain name
No NTP servers defined
Name servers pointing to Amazon-provided DNS
You can not edit it. You can delete this one and create a new one.
1 route table
All traffic destined to remain within VPC i.e. Target defined as local
1 security group
All Traffic allowed in inbound and outbound rules.
You need to create below manually –
Subnets
Internet gateway (If Public subnet is created)
NAT gateways (For internet access to Private subnet)
So to launch an instance in this VPC you have to create a subnet first.
How to create subnets in custom VPC?
Lets go ahead and create subnets in our custom VPC.
Subnet creation needs proper planning. You need to decide on how you want to use your available IP pool. For example, since we have used the 10.0.0.0/24 CIDR block while creating VPC, we have 256 IPv4 addresses available in our VPC. I plan for –
Use of 2 availability zones for HA
Each zone should have 1 public and 1 private subnet.
IPs to be spread across all subnets equally.
So in a nutshell I have to spread 256 IPs in 4 subnets. Also, you should be aware that in each subnet 5 IPs are not available for use –
First IP: Network address
Second IP: AWS VPC router
Third IP: AWS DNS
Fourth IP: Reserved by AWS for future use
Last IP: Broadcast and since the broadcast is blocked in AWS this IP can not be used.
Now, 4 subnets that mean 20 IPs are reserved and not available to us. So in total, we have 246 IPs available to use when we create below 4 subnet –
10.0.0.0/26
10.0.0.64/26
10.0.0.128/26
10.0.0.192/26
Calculation is done! Its time to create subnets in AWS console.
Note: For CIDR notation understanding use https://cidr.xyz/ and for subnetting use online subnet calculators.
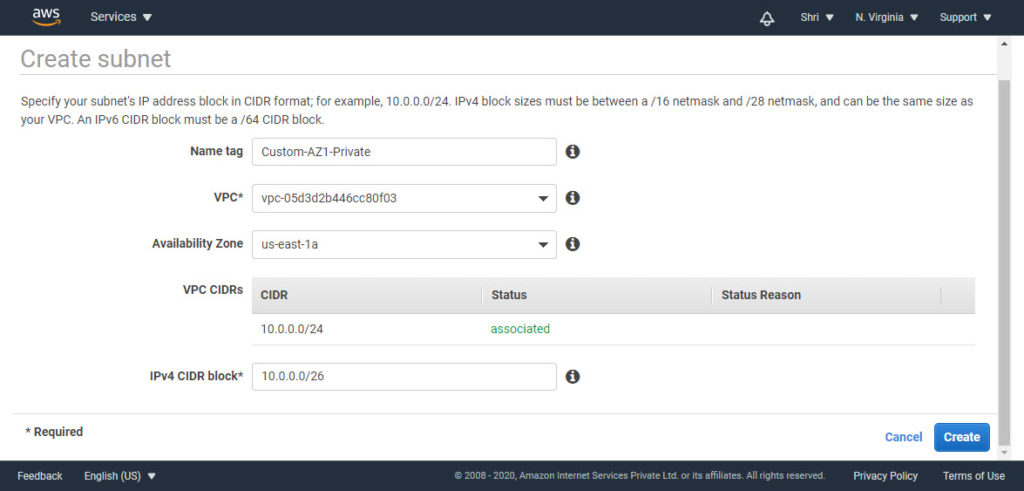
On the same VPC AWS console, in the left navigation pane click on Subnets. Then click on the Create subnet button. You should see below screen –
Create subnet screen
Here we need to fill in –
Name tag: For identification purpose
VPC: Select your custom VPC from the dropdown.
Availability Zone: Select desired AZ from drop-down
IPv4 CIDR block: Choose from your calculation (which we did earlier)
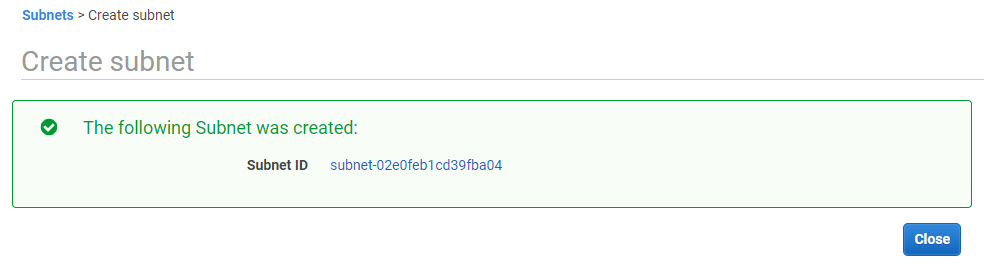
Once done, click Create button. Your subnet should be created and you will see confirmation like this –
Subnet created.
Repeat the same process to create the rest of the subnets. Once all subnets are created you should see them in the subnet dashboard.
Subnet list
If you observe here, all subnets will be associated with the same route table which was created during VPC creation. This needs to be changed.
For public subnet, we need to create an internet gateway, create a custom route table who has a route to this IG, and then associate public subnets to that route table. This way we will enable internet connectivity for public subnets.
Optional: You can enable Auto-assign IPv4 setting in Public subnet settings which will enable auto-assign public IPv4 addresses to instances launched in this subnet.
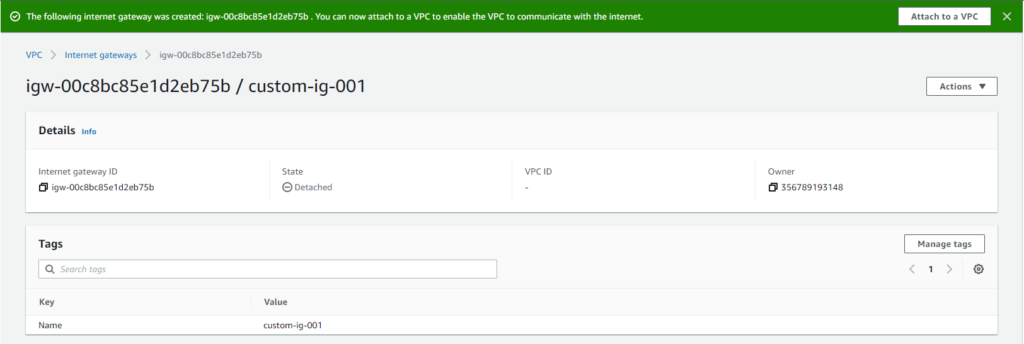
How to create Internet Gateway and associate them with subnet?
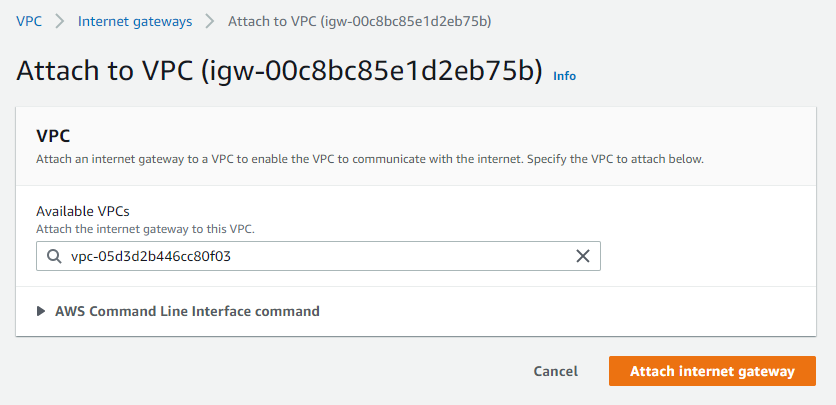
On the left navigation plane, click on Route Tables
Now on the route tables page, click on the Create route table button
Where you just need to add a Name tag for it, select custom VPC from the drop-down and click the Create button
Your route table will be created.
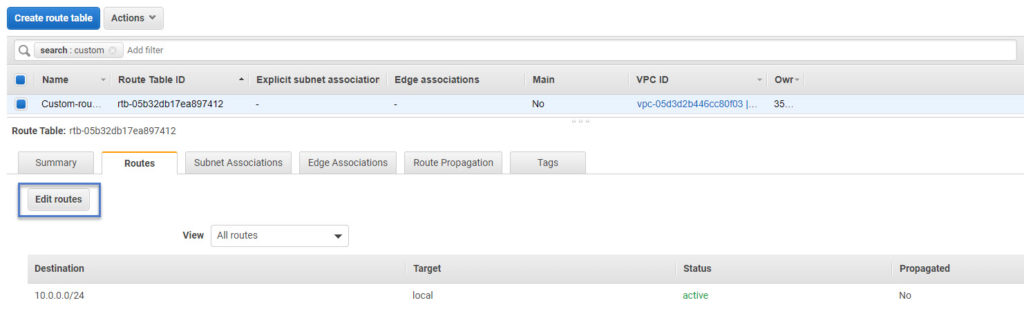
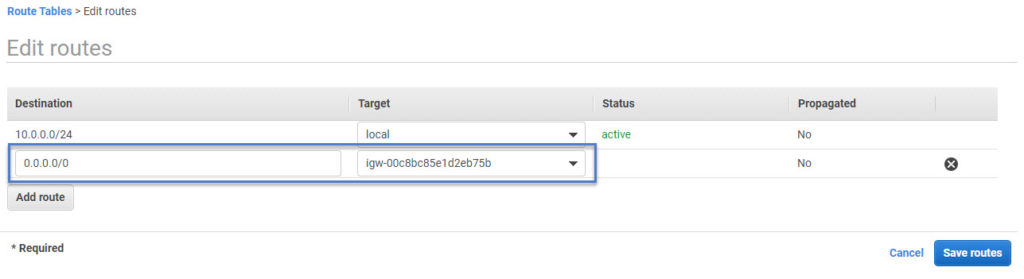
Now go back to Route Tables screen and select the recently created route. And click on Routes tab
Edit routes in route table
In the edit route screen, you need to add a route for destination 0.0.0.0/0 with a target to a recently created internet gateway. And then click Save routes. Make sure you keep the existing local route since it’s needed within VPC communication.
Adding internet route to route table
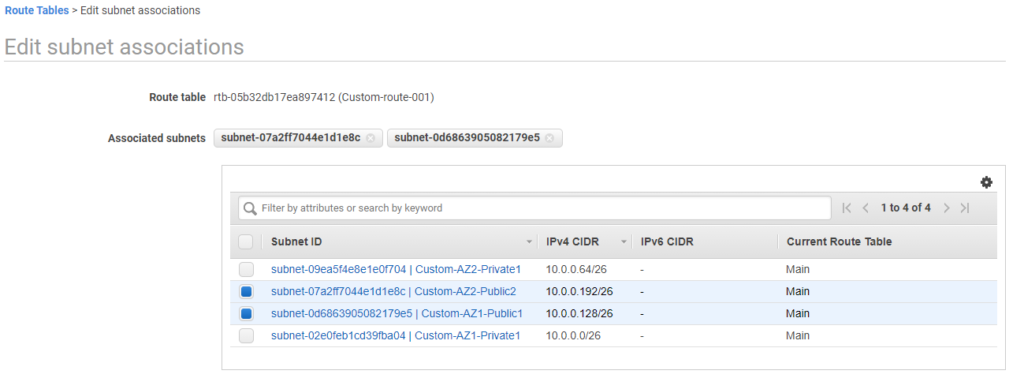
Now the internet route table is ready. We need to associate it with the public subnets created in earlier steps.
Select Subnet Associations tab under same route table and click on Edit subnet associations button
Subnet associations
Select public subnets and click Save
At this stage, our subnets are properly segregated as public and private. Public subnets are associated with route table having a route to the internet and private subnet associated with route table having route for only within VPC communication.
The last piece of the puzzle is to create a NAT gateway for instances in the private subnet. Using NAT gateway, those instances can access the internet for downloading updates, etc. and yet they won’t be accessible from the internet i.e. not exposed on the open internet.
If you want absolute isolation from the internet for a private subnet then you can skip the NAT gateway topics.
Elastic IP availability is the pre-requisite for creating a NAT gateway. If you don’t have an Elastic IP allocated in your account, please get it allocated first.
On the left navigation plane, click on Elastic IPs
Now on the Elastic IPs page, click on the Allocate Elastic Ip address button
Where you just need to add a Network Broder Group for it and click the Allocate button.
Network broder group is a collection of AZs where allocated Elastic IPs will be available for use. In a nutshell, you will be choosing a region here since Elastic IPs are regional resources.
On the left navigation plane, click on NAT Gateways
Now on the NAT Gateway page, click on the Create NAT gateway button
Where you need to add a Name tag for it, Subnet, Elastic IP and click the Create internet gateway button
make sure you select public subnet here and Elastic Ip which we got allocated in the previous step.
NAT Gateway is now created. We need to create a custom route table which has a target to this NAT gateway. Follow the same procedure we seen above for IG and associate private subnet to this new custom route table.
Route to NAT gateway
Repeat the same [procedure to create NAT gateway in another Availability zone as well so that it can be tagged to private subnet in that AZ. Remember NAT gateway is not a regional resource. You need to create it per availability zone.
At this stage, both subnets are all set for instance deployments.
A public subnet is associated with a routing table having a route to the Internet gateway
A private subnet is associated with route table having a route to NAT gateway
This completes our custom VPC creation and we achieved the targeted design !