Learn how to save PuTTY output in logfile locally on the desktop. Important settings to be done on PuTTY client before you start your sysadmin work!

PuTTY is one of the widely used SSH, telnet client to connect Linux Unix servers. Its open-source software and can be downloaded here. This article is intended to beginners who just stepped into the command-line world of *nix. Experienced sysadmins already knew what this article is all about!
Most of the beginners are not familiar with PuTTY settings and they just use default ones. This leaves them into two troubles :
- If the command output is too long, it scrolls up the PuTTY screen and the output beginning is not visible.
- After closing the PuTTY session, the user won’t have a trace of what he did in his session.
To avoid them we need to tweak few settings in PuTTY and set them in default ones. So that next time you fire up PuTTY client, it starts with tweaked settings as default and makes your life easy!
How to increase PuTTY scroll length
Many times your output is long enough to scroll beyond PuTTY screen buffer and you won’t be able to get to the beginning of the output. To avoid this you need to increase the screen buffer size in settings. Let’s see how to do it. Open PuTTY and select ‘Window‘ on left side pane as below :
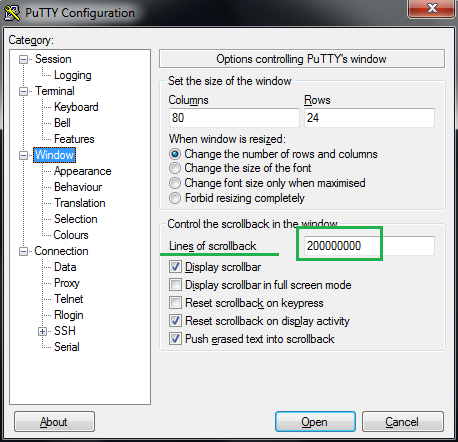
You will be presented with settings page on the right which has a field where you can set ‘Lines of scrollback‘. Enter the number of your choice here (big enough). That’s it. Now PuTTY will be having a scroll buffer of the number of lines you specified. Never lost your output beyond scroll!
How to save PuTTY session output on local storage
The next challenge is users don’t get any logs saved by default in PuTTY. So in case you want to a checklist of commands you ran and their outputs, it’s not possible to check (once you close your session). Here session logging comes to rescue. Let’s see how to set it. Open PuTTY and select ‘Logging‘ under ‘Session‘ on the left pane.
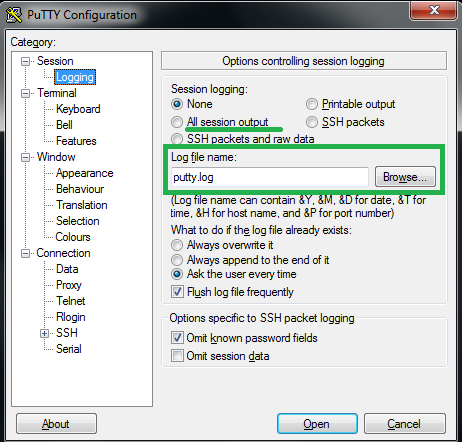
You will present with logging settings on right. Session logging is off by default. You need to check bullet box next to ‘All session output‘ to log all session output in file. Provide log file name using browse button (specify where to save logs on your system). You can use parameters like &Y, &M (meanings listed below option), so that every time you start a new session, new logfile have unique name. This will avoid overwriting existing file with same name.
PuTTY also offers you to set options what to do when it finds file name already existing on specified path. You can choose to overwrite, append or ask user.
Now whatever commands you type and outputs you see in your session will be saved as it is in a file on your computer as well. These log files can be opened in notepad/Wordpad to view later. Be sure you don’t leave your session running with commands like a top (which continuously changes data on the screen for infinite time). Because this will fill up your logfiles fast and you may end up filling your local hard disk!
Save customized settings in PuTTY as default settings
Now you learned these two settings which are very much important to set but you don’t want to set it everything you fire up PuTTY client. You can save them as default settings!
Open PuTTY and do the above changes. Now, click and select ‘Session‘ on left pane which will bring you back to the client home screen.
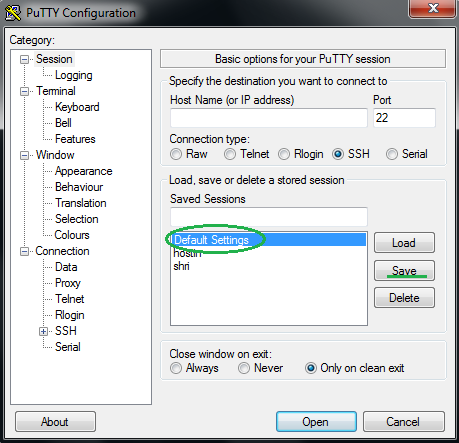
Now click and select ‘Default Settings‘ as shown above and click ‘Save‘. That’s it! Your customized settings are now saved as default settings. Now whenever you start PuTTY client it will start with your customized settings.
Have any tips regarding PuTTY client? Share with us in the comments section below!
How about this… Say I have a session opened already. Is there a way to save that session (not the output) so that the next time I want to SSH into that same device it will be in my saves sessions list. I know I can do this manually before launching a session but how do I do it from within the session?
Hi Jason,
You can do it. From your running session window, right click on window header bar. Click on “Change settings” from dropped down menu. You will see ‘Putty reconfiguration’ window.
Select ‘Session’ category on left panel. On right hand side you will see ‘Save the current session settings’ header. Type in your session name ( maybe ip or server name for easy identification) and click ‘Save’.
You will see your saved session name in session list box on left hand side of ‘Save’ button.
Thats it. Your session is saved (IP, protocol used etc).
Now you can open fresh putty and load session by clicking on your session name and then ‘Load’ button. You will see server name/ip , protocol will be auto-populated. Click ‘Open’ and you will be connected to saved server.
Obviously you need to re-authenticate yourself on server by supplying password or authentication you used previously.