• Home
  • Disclaimer
  • Contact
  • Archives
  • About
  • Subscribe
  • Support
  • Advertise

Kernel Talks

Unix, Linux, & Cloud!

  • How-to guides
    • Howto
    • Disk management
    • Configurations
    • Troubleshooting
  • OS
    • HPUX
    • Linux
  • Miscellaneous
    • Software & Tools
    • Cloud Services
    • System services
    • Virtualization
  • Certification Preparations
    • AWS Certified Solutions Architect – Associate
    • AWS Certified Solutions Architect – Professional
    • AWS Certified SysOps Administrator – Associate
    • AWS Certified Cloud Practitioner
    • Certified Kubernetes Administrator
    • Hashicorp Certified Terraform Associate
    • Oracle Cloud Infrastructure Foundations 2020 – Associate
  • Tips & Tricks
  • Linux commands
You are here: Home / Howto

How to remount filesystem in the read-write mode under Linux

Published: January 10, 2018 | Modified: June 25, 2020


Learn how to remount the file system in the read-write mode under Linux. The article also explains how to check if the file system is read-only and how to clean the file system

Re-mount filesystem as read-write

Most of the time on newly created file systems of NFS filesystems we see an error like below :

root@kerneltalks # touch file1
touch: cannot touch ‘file1’: Read-only file system

This is because the file system is mounted as read-only. In such a scenario you have to mount it in read-write mode. Before that, we will see how to check if the file system is mounted in read-only mode and then we will get to how to remount it as a read-write filesystem.

How to check if file system is read only

To confirm file system is mounted in read only mode use below command –

# cat /proc/mounts | grep datastore
/dev/xvdf /datastore ext3 ro,seclabel,relatime,data=ordered 0 0

Grep your mount point in cat /proc/mounts and observer third column which shows all options which are used in the mounted file system. Here ro denotes file system is mounted read-only.

You can also get these details using mount -v command

root@kerneltalks # mount -v |grep datastore
/dev/xvdf on /datastore type ext3 (ro,relatime,seclabel,data=ordered)

In this output. file system options are listed in braces at last column.

Re-mount file system in read-write mode

To remount file system in read-write mode use below command –

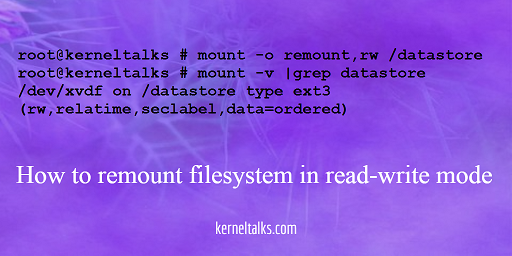
root@kerneltalks # mount -o remount,rw /datastore

root@kerneltalks # mount -v |grep datastore
/dev/xvdf on /datastore type ext3 (rw,relatime,seclabel,data=ordered)

Observe after re-mounting option ro changed to rw. Now, the file system is mounted as read-write and now you can write files in it.

Note : It is recommended to fsck file system before re mounting it.

You can check file system by running fsck on its volume.

root@kerneltalks # df -h /datastore
Filesystem      Size  Used Avail Use% Mounted on
/dev/xvda2       10G  881M  9.2G   9% /

root@kerneltalks # fsck /dev/xvdf
fsck from util-linux 2.23.2
e2fsck 1.42.9 (28-Dec-2013)
/dev/xvdf: clean, 12/655360 files, 79696/2621440 blocks

Sometimes there are some corrections that need to be made on a file system that needs a reboot to make sure there are no processes are accessing the file system.

⇠ Previous article
How to list YUM repositories in RHEL / CentOS
Next article ⇢
Documentary films on Linux!

Related stuff:

  • How to move /tmp on a separate disk as a separate mount point
  • How to disable IPv6 on Linux
  • How to setup domain name in Linux server
  • How to forward SSH key in Putty
  • How to resolve the MFA entity already exists error
  • 4 steps guide for SMTP configuration in HPUX
  • How to map Linux disk to vmware disk
  • Execute command at shutdown and boot in Suse Linux
  • 5 steps guide for SMTP configuration in Linux
  • How to disable direct root login on Linux & HPUX
  • Howto get Disk serial number in HPUX
  • How to find AWS resources that need to be tagged

Filed Under: Howto Tagged With: how to check file system options, how to fsck file system, how to mount read only filesystem as read write, how to scan file system

If you like my tutorials and if they helped you in any way, then

  • Consider buying me a cup of coffee via paypal!
  • Subscribe to our newsletter here!
  • Like KernelTalks Facebook page.
  • Follow us on Twitter.
  • Add our RSS feed to your feed reader.

Comments

  1. Rohit says

    January 21, 2021 at 1:29 pm

    I have tried the above solution but it’s didn’t work in my case. This problem arises because windows doesn’t unmount the disks properly on shutdown just for the sake of faster boot of windows. The solution is turning off the optiion of fast startup from Right Click Windows Button>Power Options>Additional Power Settings>Change settings which are not available>Uncheck the fast start up option > Save changes.
    And you are done.

    Reply
    • Florian says

      August 10, 2021 at 6:16 pm

      It worked for me I recommand also this one. Thank you very much.

      Reply
  2. Florian says

    August 10, 2021 at 5:57 pm

    It doesn’t work I think you have to be more explicit we don’t have any information about your actual directory or your mount point.

    Reply

Share Your Comments & Feedback: Cancel reply

This site uses Akismet to reduce spam. Learn how your comment data is processed.

Get fresh content from KernelTalks

  • Email
  • Facebook
  • RSS
  • Twitter

Get Linux & Unix stuff right into your mailbox. Subscribe now!

* indicates required

This work is licensed under a CC-BY-NC license · Privacy Policy
© Copyright 2016-2023 KernelTalks · All Rights Reserved.
The content is copyrighted to Shrikant Lavhate & can not be reproduced either online or offline without prior permission.