A quick article on how to configure ALB Auth via Amazon Cognito for ConsoleMe webapp
In our last article, we looked at Netflix’s IAM management tool ConsoleMe. We installed it on the Ubuntu Linux machine with the Local install method, and we got it up and running with the default example configuration. In this article, we will walk you through the process of configuring ALB authentication for the ConsoleMe webapp.
With the default example configuration, ConsoleMe webapp opens up without any authentication. However, since ConsoleMe will manage your AWS account’s IAM, it’s not safe to keep your keys to kingdom open on the internet without any authentication mechanism in place. Hence, we will be protecting it with the ALB auth method.
ConsoleMe supports webapp authentication via –
- ALB Auth (Recommended)
- Google groups
- OIDC/OAuth2
- SAML
- Headers
As recommended by ConsoleMe, we will move ahead with ALB Auth.
Let’s get into it.
Pre-requisites
- ConsoleMe is up and running
- ALB is configured to listen on HTTPS with target group configured on 8081 port with ConsoleMe instance as target
- Above mentioned setup is working correctly and you are able to open up ConsoleMe webapp using ALB DNS name/DNS ALIAS you configured for ALB.
- Amazon Cognito user pool is created. Read how to create Cognito user pool
Procedure
Before you proceed, you need to make few configuration changes in the Amazon Cognito user pool if you have followed the above link to create it.
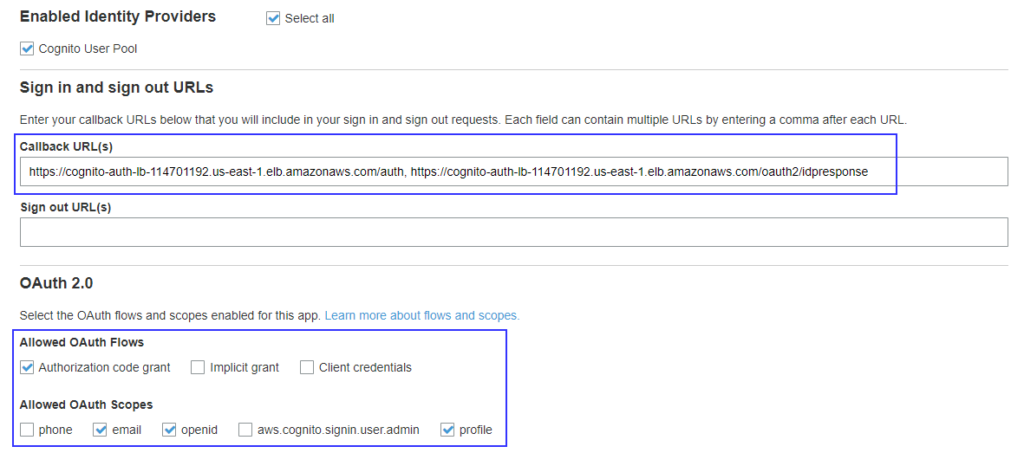
Edit/ make sure you have the below configurations in the Cognito user pool’s App client settings :
- Callback URLs are set to http://DNS-NAME/auth, http://DNS-NAME/oauth2/idpresponse. Where DNS-NAME is DNS name of ALB or the ALIAS defined for DNS name.
- Enable Authorization code grant
- Allowed Oauth scope has email, openid and profile enabled.
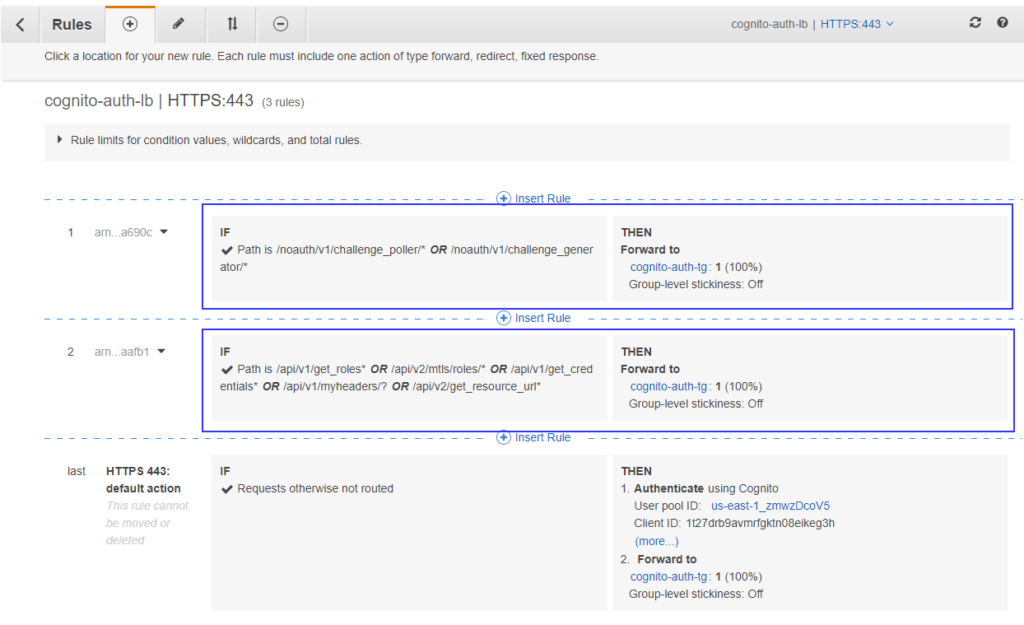
Now, you need to edit ALB listener rules to enable Amazon Cognito authentication. Next, follow the step by step procedure to enable Cognito authentication on ALB.
Apart from the steps in the above link, you need to add extra rules in the HTTPS listener that forwards below path patterns directly to the target group bypassing Cognito authentication.
- /api/v1/get_roles*
- /api/v2/mtls/roles/*
- /api/v1/get_credentials*
- /api/v1/myheaders/?
- /api/v2/get_resource_url*
- /noauth/v1/challenge_poller/*
- /noauth/v1/challenge_generator/*
ConsoleMe leverages these path patterns to perform CLI actions and authentication.
After adding them, your listener should look like –
Now, the final step is to do the custom configuration on the ConsoleMe part. As you are aware from the ConsoleMe installation that it runs the default example configuration. We should override that open configuration with the one that supports ALB Auth. Copy the sample configuration file from GitHub here.
Save this file as in the installation directory. We installed ConsoleMe in /consoleme directory, so it should be saved as /consoleme/consoleme.yaml
Edit below parameters in the configuration file –
application_admin: Email that will receive the approval requestsmetadata_url: Replace region and Cognito pool id.is_example_config: falseses: Edit if you are using SESaws: with relevent details
Restart application
systemctl restart consolme
OR
python consoleme/__main__.py
Now, your application is reading the newly created configuration file. Next, open up ALB’s DNS/ ALIAS DNS, and you will be prompted to log in from Cognito. We discussed this part in an earlier article on Cognito authentication.
Once you are successfully authenticated, you should see the ConsoleMe console with custom config!
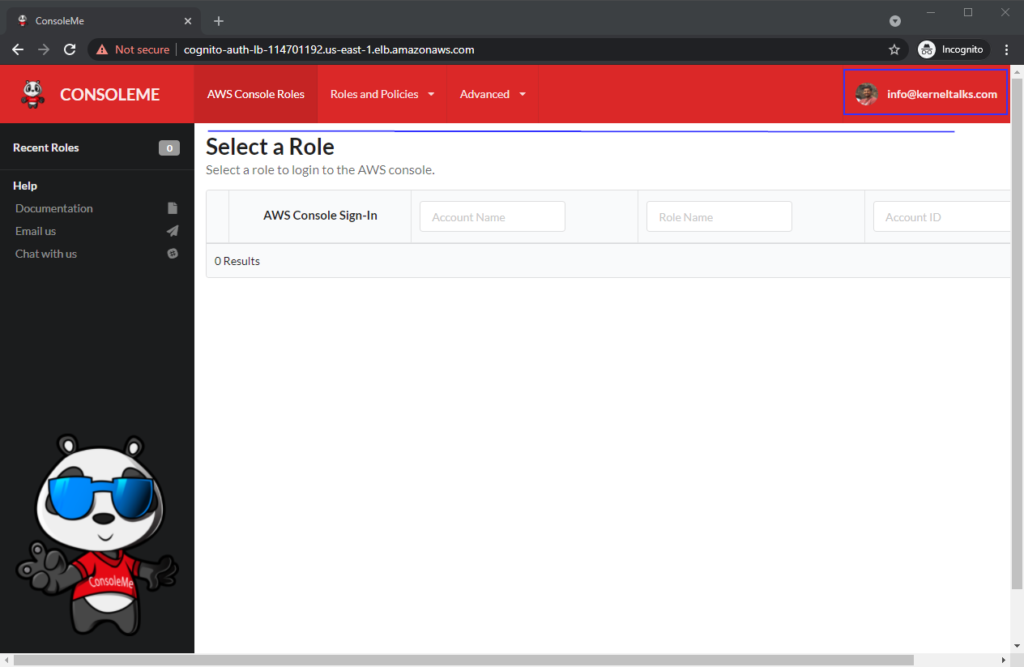
Notice that the example configuration notice is vanished now. Also, you can see Cognito user ID’s email as a logged-in user in ConsoleMe!
We successfully enabled ALB Auth for securing ConsoleMe webapp!
Share Your Comments & Feedback: