An overview of the global data center presence of top Cloud companies like AWS, Google Cloud, Azure, etc. This article lists maps and links which will help you understand the data center presence of various firms.
Data center presence of Cloud providers
All companies are moving to the cloud now. Since the cloud model aims at pay-per-use its best fit in cost-cutting for every company that works in the IT field. The latest hardware and technologies are at your service without investing and worrying about the maintenance of hardware and facilities is the biggest benefit luring customers to cloud companies.
Since the cloud is a hot cake and its demand is growing day by day, we see lots of players in the cloud providers market. It’s not easy to offer cloud services since you need huge facilities all over the globe rather a network of such facilities across the globe to build your own cloud. It’s not an easy task, not at all! Data centers are the backbone of these clouds. They house the hardware which actually runs cloud services. So it’s important to know your cloud provider’s data center locations which helps you deciding many aspects of your services before moving in.
Here in this article, we will be listing all top-level cloud provider’s data center locations. This information is available on their respective websites, but we are consolidating it here for your quick reference!
Below data is as on 24th May 2020
Amazon Web Service (AWS)
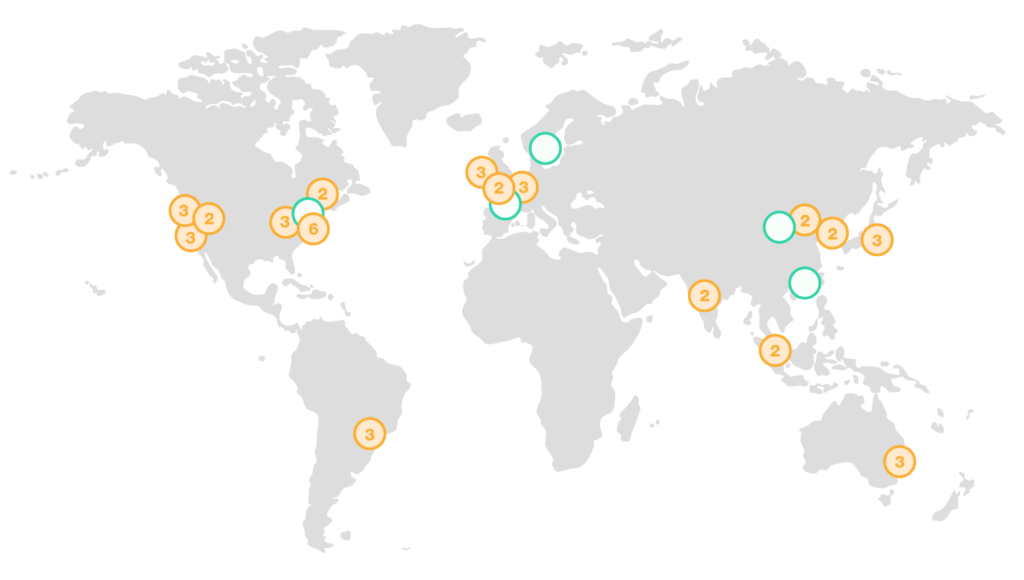
AWS global infrastructures consist of 24 regions with 76 availability zones within & 216 Point of Presence. Zone normally indicates one or more datacenter. The latest updated details can be found on their page here. AWS global infrastructure map looks like :
AWS Global Infrastructure. Image credit : Amazon
Where, numbers denote the number of availability zones in that region and green circles show upcoming regions.
AWS Infrastructure is visually represented on this website which is nice to understand.
Google Cloud Platform
Another biggie in the Cloud service market. Google has a presence in 23 regions with 70 zones within & 140 Network Edge Locations. Google also shared their network map details along with data center presence here on this page. Their global locations map looks like below :
Google Cloud global locations. Image credit : Google
Where number denotes available zones and blue ones are upcoming locations.
Microsoft Azure
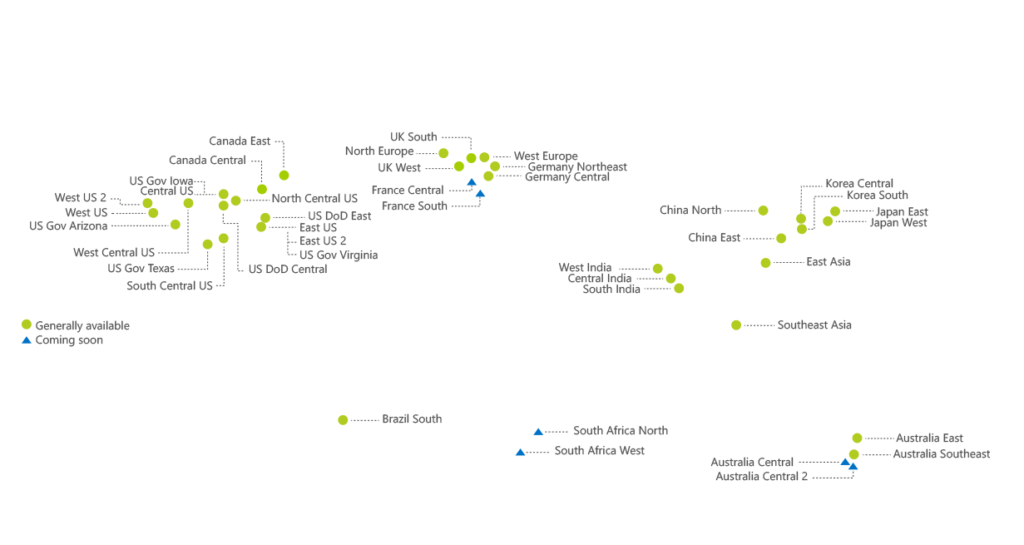
Azure is a cloud service from Microsoft. Their global infrastructure consists of 60+ regions. The latest and updated info can be grabbed from this page. Microsoft’s data center map looks like one below :
Microsoft Azure global infrastructure map. Image credit : Microsoft
Where triangle ones are upcoming locations.
IBM Bluemix
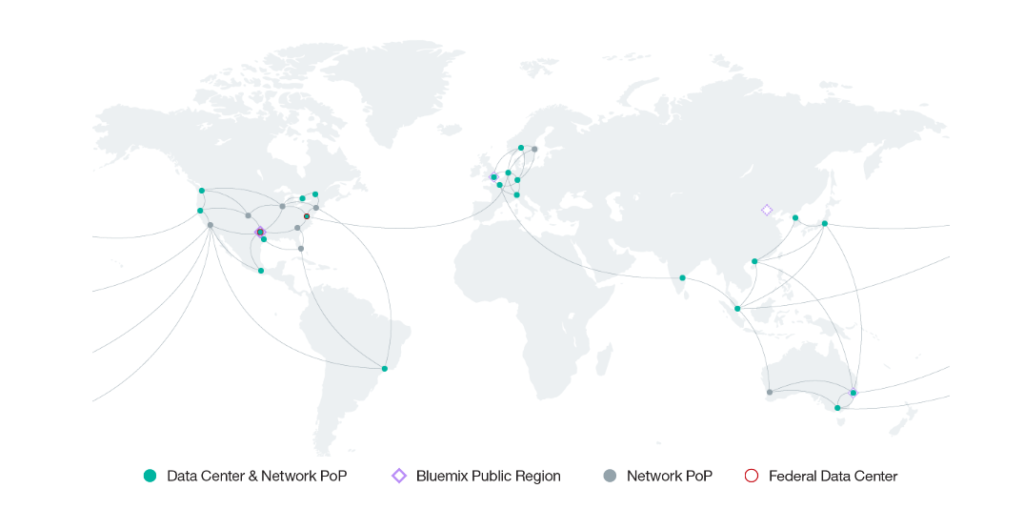
IBM offers its cloud platform as a service in Bluemix. The latest updated infra details can be found here on this page.
IBM Bluemix data centers. Image credit : IBM
HP Cloud
I could not find infrastructure maps or consolidated information for the Hewlett Packard (HP) cloud global infrastructure. However I got some info on the HP UK website here. Where HP states they have 28 data centers powering their cloud and they are building new 5 data centers in the EMEA region.
vCloud
VMware cloud also referred to as vCloud has 11 zones in a total of 4 countries. VMware doesn’t define regions, rather they deny zones within countries. VMware released this PDF which has all these details.
So looking at above maps and numbers we can jot down current infrastructure reach of three top cloud companies in below table :
Amazon web services
Google Cloud
Microsoft Azure
Regions
16
11
36
Zones
44
33
Upcoming regions
5
6
6
Every company uses different terminology. Where regions are common for all but not zones. Zones are referred to as single or multiple data centers in that geographical vicinity. Microsoft, IBM doesn’t refer zones term they only refer to regions. VMware doesn’t refer regions they only refer to country-wise zones. So the exact data center count for each company is not known rather shouldn’t be!
Let us know if you have more information of links regarding data center details of cloud providers (publically made available by owners) in comments below.
Learn how to rsync to EC2 with the help of SSH protocol authenticated using a private key file. The process can be used for Rsync from and between EC2.
Rsync to EC2 Linux instance
We learned about Rsync in our last post. We learned how Rsync helps in a data backup or mirroring by using less bandwidth, time on the second run. Since it syncs only changes in later executions after the first fresh copy operation. Now many traditional data centers are moving to cloud services like AWS. Rsync can be useful to sync data from your local server to AWS hosted EC2 instance (if the data size is not huge).
In this article we will learn about how to rsync to EC2 server in AWS. Since you know EC2 Linux instances don’t use a conventional used id-password combination for authentication, Key pairs need to be used in Rsync for authentication EC2. For the Rsync setup, your EC2 instance must be launched with public-private key pair and you should have a private key file with you.
Get started
To start with making sure your EC2 instance is launched with a key pair.
Upload private key file on the source server (from where you are going to Rsync to EC2)
Make sure key file set with 400 permission
Get public IP or public DNS name of EC2 server from AWS EC2 console web page
Confirm you are able to connect from source to EC2. (verify AWS security groups and firewall settings)
Execute Rsync to EC2
We have testfile.tar for testing copy and private key file (mykey.pem) ready on the source server.
[root@kerneltalks ~]# rsync -avz -e "ssh -i /root/mykey.pem" testfile.tar ec2-user@ec2-13-126-114-120.ap-south-1.compute.amazonaws.com:/tmp/
sending incremental file list
testfile.tar

sent 8520069 bytes  received 31 bytes  3408040.00 bytes/sec
total size is 39198720  speedup is 4.60
Where –
-a: Archive mode preserves permission and ownership
-v: verbose mode
-z: compress
-e: Choose remote shell of execution
ssh -i keyfile: Use the private key for authentication on destination using ssh protocol
source (testfile.tar)
Destination: Public DNS name of EC2 instance
That’s it! Your file is copied over to EC2. This can be done vice versa as well. You can sync files from the EC2 server to the local server as well. Just switch source-destination paths and you are all set to go.
Rsync between two EC2 servers
Rsync can be executed between two EC2 servers i.e. from one EC2 server to another. The same above command can be used. If you are doing it for EC2 instances within the same region then the Internal DNS name can be used in a command.
Conclusion :
Rsync is possible from, to, and between EC2 servers. Key file authenticated SSH protocol should be used in the Rsync command to achieve this.
Small tutorial to learn how to transfer data between two EC2 Linux instances on AWS. Explains the use of key authentication in the SCP command.
Copy data between two EC2 Linux instances
EC2 instance in AWS is a server instance that uses key-based authentication for login. Now, beginners or first time EC2 users wonder how to copy files from one EC2 server to another? or how to transfer data between two EC2 instances? You can achieve it using key files in scp command.
Few pre-requisites are :
Source and destination EC2 instances should be in the same region (can be in different availability zones)
followed by destination in userid@hostname/ip:/path/ format.
You have to use the Private IP of the destination EC2 instance. You can get this from your AWS EC2 console web page. Here kerneltalks2 has private IP 172.31.24.59. You can use hostname if you make an entry in /etc/hosts file. Remember different Linux distros on AWS have different login id to be used.
# scp -i /root/mykey.pem testfile.tar ec2-user@172.31.29.79:/tmp
The authenticity of host '172.31.29.79 (172.31.29.79)' can't be established.
RSA key fingerprint is 66:c4:ce:37:c6:e6:a1:6c:2f:f9:9b:f2:f5:05:e3:38.
Are you sure you want to continue connecting (yes/no)? yes
Warning: Permanently added '172.31.29.79' (RSA) to the list of known hosts.
testfile.tar                                                                                                               100%   37MB  37.4MB/s   00:00
In the above output, you can see kerneltalks2 authenticated using key file and file transfer was completed.
[root@kerneltalks2 ~]# ls /tmp/testfile.tar
-rw-r--r--. 1 root root 39198720 Dec 19  2016 testfile.tar
Rsync is another good way to copy data between two EC2 instances. You can learn about it in our other article: Rsync for EC2 on AWS.
Conclusion :
Files and directories can be transferred between two ec2 instances using the same Linux scp command. Only the authentication part is to be done using a key file with -i switch.
Learn how to create access keys in AWS with screenshots. Also see how to make access key active, inactive, and delete.
Access keys in AWS
Security is a top priority when you are using cloud services. Username/password is a primitive form of security we used for account security. Since technology has evolved and automation took over the day-to-day activities, manual work has been transformed into API calls. Many things get their work done by making API calls to respected services.
In the cloud, once service gets connected to another service with API Calls. API calls also need to get authenticated across services so that your cloud infra stays secure. For that AWS uses access keys that can be supplied to source service to get it authenticated at destination service and complete API calls. Now, the question is where are my access keys in AWS? Where to create access keys in AWS? In this article we will see how to create, make active, make inactive, and delete access keys in AWS.
How to create access keys in AWS?
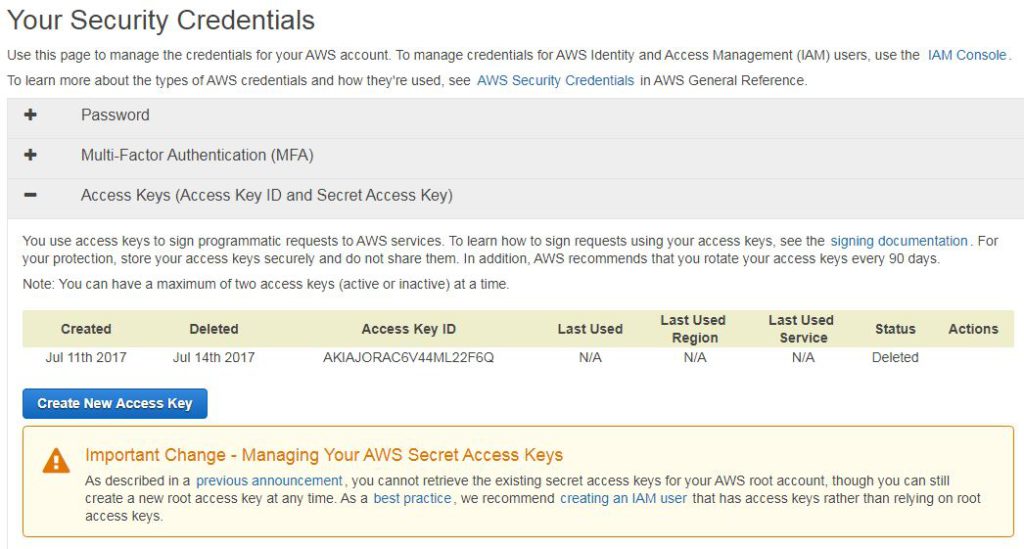
Login to your AWS console and navigate to this IAM dashboard part. This page helps you to manage your security credentials like password, MFA, access keys, certificates, etc. Expand ‘Access Keys (Access Key ID and Secret Access Key)‘ and you will see space to create new access keys like below.
Access keys dashboard
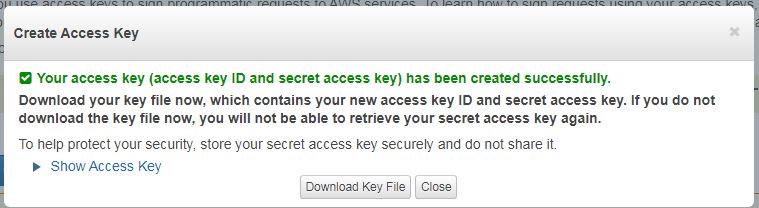
Here, click on the button ‘Create New Access Key‘. Once clicked your access key pair will be generated automatically. Each access key pair consist of access key ID and secret access key. Access key ID will be visible to you in your account all the time (like you can see it in the above screenshot). But, the secret access key is visible only time of the creation for security purposes. You also have the choice to download a secret access key file. But apart from this file and time of creation you won’t be able to see/retrieve this key. It’s your duty to keep it safe. After hitting create keys button you will see below screen :
Create access keys
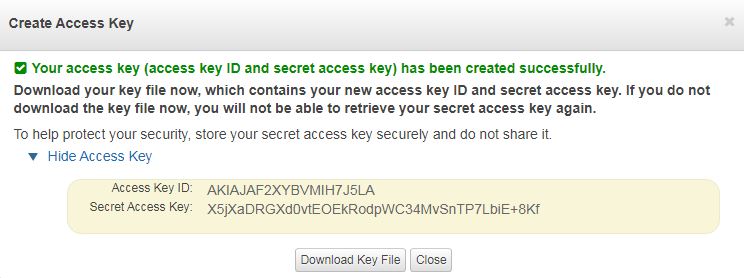
Both keys can be reveled to copy and save, by clicking the‘Show Access Key‘ link in the above dialogue box. Keys will be shown to you in plain text like below :
Display access keys
You can also opt to save this key pair. Click Download Key File button. Your key pair will be downloaded as a rootkey.csv file. Inside the CSV file, the key pair is in plain text format as stated below.
Your existing key pairs you must be used in some services. But sometimes they are sitting idle there since you haven’t used them. Sometimes, you need to stop the access to service which was using key pair. In such cases, it’s best to make that key pair inactive. So that access to service using that key pair will be paused. This might be useful in troubleshooting as well.
To make access key inactive visit the same security console in your AWS account and list all existing key pairs by expanding ‘Access Keys (Access Key ID and Secret Access Key)‘. Identify your required key and click the‘Make Inactive‘ link against it in the last column named ‘Actions’.
The key status will turn inactive and all its authorizations will be paused. It can be verified in a column named status against it.
How to make access key active?
For all keys which are inactive in the state will have a ‘Make Active’ link against them in the last ‘Actions’ column. You have to click it to make them active again.
How to delete access key?
Under Actions column you will also see Delete link besides active/inactive one. This is to be used when you want to delete access key.
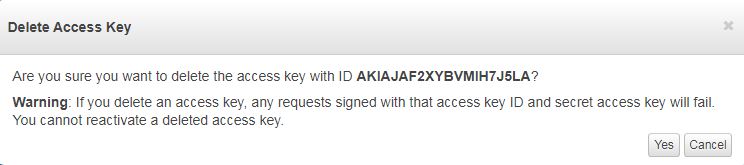
Delete access key
It will confirm you like the above screenshot before deleting. Deleting key will still keep it in dashboard listing with status as ‘delete’ but you won’t be able to use it in the future.
Learn to mount an S3 bucket in RHEL, Ubuntu, CentOS Linux server. Understand how to debug issues while mounting an S3 bucket.
Mount S3 bucket in Linux
In this article we will walk through the process by which you can mount an S3 bucket on the Linux server. S3 bucket is a storage container of S3 (simple storage service) AWS service. As all traditional data centers are moving to cloud computing, it is necessary to know how to interconnect cloud and traditional services. Let’s dive into the process to mount an S3 bucket in RHEL, Ubuntu, CentOS Linux. The complete process can be done in below 3 steps:
Install fuse and s3fs packages
Configure access keys of your AWS account
Mount S3 bucket
For this tutorial, we are assuming you have an S3 bucket ready in your AWS account with a proper permission setup. If not, follow this tutorial to create an S3 bucket in AWS.
Install fuse and s3fs packages
These packages can be found here: fuse & s3fs. You have to download them on the Linux server with tools like wget and compile them. Make sure you have their dependencies installed before you try to compile them.
Dependencies are :
for RedHat based : automakegccgcc-c++gitlibcurl-devellibxml2-develmakeopenssl-develmailcapcurl-devellibstdc++-devel
for Debian based : automakeautotools-devg++gitlibcurl4-gnutls-devlibfuse-devlibssl-devlibxml2-devmakepkg-config
Install all these packages and follow the below steps to configure fuse and s3fs. Make sure there is no package named fuse of s3fs exist in the server before you proceed. This is to avoid conflicts in installation.
Fuse installation –
Use the below commands. Use the latest Fuse download link used in wget command. You can obtain it from Github here.
# cd /usr/src/
# wget https://github.com/libfuse/libfuse/releases/download/fuse-3.1.0/fuse-3.1.0.tar.gz
# tar -zxf fuse-3.1.0.tar.gz
# cd fuse-3.1.0
# ./configure -prefix=/usr/local
# make && make install
# export PKG_CONFIG_PATH=/usr/local/lib/pkgconfig
# ldconfig
# modprobe fuse
The fuse installation output is below for your reference. Click and expand if you want to view it.
# cd /usr/src/
# wget https://github.com/libfuse/libfuse/releases/download/fuse-3.1.0/fuse-3.1.0.tar.gz
--2017-07-11 05:19:36--  https://github.com/libfuse/libfuse/releases/download/fuse-3.1.0/fuse-3.1.0.tar.gz
Resolving github.com (github.com)... 192.30.253.112, 192.30.253.113
Connecting to github.com (github.com)|192.30.253.112|:443... connected.
HTTP request sent, awaiting response... 302 Found
Location: https://github-production-release-asset-2e65be.s3.amazonaws.com/48296177/00b4f6e4-63dc-11e7-938f-c32c894af199 [following]
--2017-07-11 05:19:37--  https://github-production-release-asset-2e65be.s3.amazonaws.com/48296177/00b4f6e4-63dc-11e7-938f-c32c894af199
Resolving github-production-release-asset-2e65be.s3.amazonaws.com (github-production-release-asset-2e65be.s3.amazonaws.com)... 52.216.230.243
Connecting to github-production-release-asset-2e65be.s3.amazonaws.com (github-production-release-asset-2e65be.s3.amazonaws.com)|52.216.230.243|:443... connected.
HTTP request sent, awaiting response... 200 OK
Length: 809470 (790K) [application/octet-stream]
Saving to: ‘fuse-3.1.0.tar.gz’

fuse-3.1.0.tar.gz                       100%[============================================================================>] 790.50K   479KB/s    in 1.7s

2017-07-11 05:19:40 (479 KB/s) - ‘fuse-3.1.0.tar.gz’ saved [809470/809470]

# tar -zxf fuse-3.1.0.tar.gz
# cd fuse-3.1.0

# ./configure -prefix=/usr/local
checking build system type... x86_64-pc-linux-gnu
checking host system type... x86_64-pc-linux-gnu
checking target system type... x86_64-pc-linux-gnu
checking for a BSD-compatible install... /usr/bin/install -c
checking whether build environment is sane... yes
checking for a thread-safe mkdir -p... /bin/mkdir -p
checking for gawk... gawk
checking whether make sets $(MAKE)... yes
checking whether make supports nested variables... yes
checking whether make supports nested variables... (cached) yes
checking how to print strings... printf
checking for style of include used by make... GNU
checking for gcc... gcc
checking whether the C compiler works... yes
checking for C compiler default output file name... a.out
checking for suffix of executables...
checking whether we are cross compiling... no
checking for suffix of object files... o
checking whether we are using the GNU C compiler... yes
checking whether gcc accepts -g... yes
checking for gcc option to accept ISO C89... none needed
checking whether gcc understands -c and -o together... yes
checking dependency style of gcc... gcc3
checking for a sed that does not truncate output... /bin/sed
checking for grep that handles long lines and -e... /bin/grep
checking for egrep... /bin/grep -E
checking for fgrep... /bin/grep -F
checking for ld used by gcc... /usr/bin/ld
checking if the linker (/usr/bin/ld) is GNU ld... yes
checking for BSD- or MS-compatible name lister (nm)... /usr/bin/nm -B
checking the name lister (/usr/bin/nm -B) interface... BSD nm
checking whether ln -s works... yes
checking the maximum length of command line arguments... 1572864
checking how to convert x86_64-pc-linux-gnu file names to x86_64-pc-linux-gnu format... func_convert_file_noop
checking how to convert x86_64-pc-linux-gnu file names to toolchain format... func_convert_file_noop
checking for /usr/bin/ld option to reload object files... -r
checking for objdump... objdump
checking how to recognize dependent libraries... pass_all
checking for dlltool... no
checking how to associate runtime and link libraries... printf %s\n
checking for ar... ar
checking for archiver @FILE support... @
checking for strip... strip
checking for ranlib... ranlib
checking command to parse /usr/bin/nm -B output from gcc object... ok
checking for sysroot... no
checking for a working dd... /bin/dd
checking how to truncate binary pipes... /bin/dd bs=4096 count=1
checking for mt... mt
checking if mt is a manifest tool... no
checking how to run the C preprocessor... gcc -E
checking for ANSI C header files... yes
checking for sys/types.h... yes
checking for sys/stat.h... yes
checking for stdlib.h... yes
checking for string.h... yes
checking for memory.h... yes
checking for strings.h... yes
checking for inttypes.h... yes
checking for stdint.h... yes
checking for unistd.h... yes
checking for dlfcn.h... yes
checking for objdir... .libs
checking if gcc supports -fno-rtti -fno-exceptions... no
checking for gcc option to produce PIC... -fPIC -DPIC
checking if gcc PIC flag -fPIC -DPIC works... yes
checking if gcc static flag -static works... yes
checking if gcc supports -c -o file.o... yes
checking if gcc supports -c -o file.o... (cached) yes
checking whether the gcc linker (/usr/bin/ld -m elf_x86_64) supports shared libraries... yes
checking whether -lc should be explicitly linked in... no
checking dynamic linker characteristics... GNU/Linux ld.so
checking how to hardcode library paths into programs... immediate
checking whether stripping libraries is possible... yes
checking if libtool supports shared libraries... yes
checking whether to build shared libraries... yes
checking whether to build static libraries... yes
checking for gcc option to accept ISO C99... none needed
checking for gcc option to accept ISO Standard C... (cached) none needed
checking for special C compiler options needed for large files... no
checking for _FILE_OFFSET_BITS value needed for large files... no
checking for fork... yes
checking for setxattr... yes
checking for fdatasync... yes
checking for splice... yes
checking for vmsplice... yes
checking for utimensat... yes
checking for pipe2... yes
checking for posix_fallocate... yes
checking for fstatat... yes
checking for openat... yes
checking for readlinkat... yes
checking for struct stat.st_atim... yes
checking for struct stat.st_atimespec... no
checking for library containing dlopen... -ldl
checking for library containing clock_gettime... none required
checking for ulockmgr_op in -lulockmgr... no
checking for ld used by gcc... /usr/bin/ld -m elf_x86_64
checking if the linker (/usr/bin/ld -m elf_x86_64) is GNU ld... yes
checking for shared library run path origin... done
checking for iconv... yes
checking for working iconv... yes
checking for iconv declaration...
         extern size_t iconv (iconv_t cd, char * *inbuf, size_t *inbytesleft, char * *outbuf, size_t *outbytesleft);
configure: MOUNT_FUSE_PATH env var not set, using default ${sbindir}
configure: UDEV_RULES_PATH env var not set, using default ${libdir}/udev/rules.d
configure: INIT_D_PATH env var not set, using default ${sysconfdir}/init.d
checking if umount supports --fake --no-canonicalize... yes
checking that generated files are newer than configure... done
configure: creating ./config.status
config.status: creating fuse3.pc
config.status: creating Makefile
config.status: creating lib/Makefile
config.status: creating util/Makefile
config.status: creating example/Makefile
config.status: creating include/Makefile
config.status: creating doc/Makefile
config.status: creating test/Makefile
config.status: creating include/config.h
config.status: executing depfiles commands
config.status: executing libtool commands

# make && make install
Making all in include
make[1]: Entering directory '/usr/src/fuse-3.1.0/include'
make  all-am
make[2]: Entering directory '/usr/src/fuse-3.1.0/include'
make[2]: Nothing to be done for 'all-am'.
make[2]: Leaving directory '/usr/src/fuse-3.1.0/include'
make[1]: Leaving directory '/usr/src/fuse-3.1.0/include'
Making all in lib
make[1]: Entering directory '/usr/src/fuse-3.1.0/lib'
  CC       fuse.lo
  CC       fuse_loop.lo
  CC       fuse_loop_mt.lo
  CC       fuse_lowlevel.lo
  CC       fuse_opt.lo
  CC       fuse_signals.lo
  CC       buffer.lo
  CC       cuse_lowlevel.lo
  CC       helper.lo
helper.c: In function ‘fuse_daemonize’:
helper.c:226:4: warning: ignoring return value of ‘read’, declared with attribute warn_unused_result [-Wunused-result]
    (void) read(waiter[0], &completed, sizeof(completed));
    ^
helper.c:235:3: warning: ignoring return value of ‘chdir’, declared with attribute warn_unused_result [-Wunused-result]
   (void) chdir("/");
   ^
helper.c:248:3: warning: ignoring return value of ‘write’, declared with attribute warn_unused_result [-Wunused-result]
   (void) write(waiter[1], &completed, sizeof(completed));
   ^
helper.c:252:3: warning: ignoring return value of ‘chdir’, declared with attribute warn_unused_result [-Wunused-result]
   (void) chdir("/");
   ^
  CC       modules/subdir.lo
  CC       modules/iconv.lo
  CC       mount.lo
  CC       mount_util.lo
mount_util.c: In function ‘mtab_needs_update’:
mount_util.c:68:4: warning: ignoring return value of ‘setreuid’, declared with attribute warn_unused_result [-Wunused-result]
    setreuid(0, -1);
    ^
mount_util.c:73:4: warning: ignoring return value of ‘setreuid’, declared with attribute warn_unused_result [-Wunused-result]
    setreuid(ruid, -1);
    ^
  CCLD     libfuse3.la
ar: `u' modifier ignored since `D' is the default (see `U')
make[1]: Leaving directory '/usr/src/fuse-3.1.0/lib'
Making all in util
make[1]: Entering directory '/usr/src/fuse-3.1.0/util'
make  all-am
make[2]: Entering directory '/usr/src/fuse-3.1.0/util'
  CC       fusermount3-fusermount.o
  CC       fusermount3-mount_util.o
mount_util.c: In function ‘mtab_needs_update’:
mount_util.c:68:4: warning: ignoring return value of ‘setreuid’, declared with attribute warn_unused_result [-Wunused-result]
    setreuid(0, -1);
    ^
mount_util.c:73:4: warning: ignoring return value of ‘setreuid’, declared with attribute warn_unused_result [-Wunused-result]
    setreuid(ruid, -1);
    ^
  CCLD     fusermount3
  CC       mount.fuse.o
  CCLD     mount.fuse3
make[2]: Leaving directory '/usr/src/fuse-3.1.0/util'
make[1]: Leaving directory '/usr/src/fuse-3.1.0/util'
Making all in example
make[1]: Entering directory '/usr/src/fuse-3.1.0/example'
  CC       passthrough.o
  CCLD     passthrough
  CC       passthrough_fh.o
  CCLD     passthrough_fh
  CC       null.o
  CCLD     null
  CC       hello.o
  CCLD     hello
  CC       hello_ll.o
  CCLD     hello_ll
  CC       ioctl.o
  CCLD     ioctl
  CC       ioctl_client-ioctl_client.o
  CCLD     ioctl_client
  CC       poll.o
  CCLD     poll
  CC       poll_client-poll_client.o
  CCLD     poll_client
  CC       passthrough_ll.o
  CCLD     passthrough_ll
  CC       notify_inval_inode.o
  CCLD     notify_inval_inode
  CC       notify_store_retrieve.o
  CCLD     notify_store_retrieve
  CC       notify_inval_entry.o
  CCLD     notify_inval_entry
  CC       cuse.o
  CCLD     cuse
  CC       cuse_client.o
  CCLD     cuse_client
make[1]: Leaving directory '/usr/src/fuse-3.1.0/example'
Making all in test
make[1]: Entering directory '/usr/src/fuse-3.1.0/test'
  CC       test_syscalls.o
  CCLD     test_syscalls
  CC       test_write_cache.o
  CCLD     test_write_cache
  CC       test_setattr.o
  CCLD     test_setattr
make[1]: Leaving directory '/usr/src/fuse-3.1.0/test'
Making all in doc
make[1]: Entering directory '/usr/src/fuse-3.1.0/doc'
make[1]: Nothing to be done for 'all'.
make[1]: Leaving directory '/usr/src/fuse-3.1.0/doc'
make[1]: Entering directory '/usr/src/fuse-3.1.0'
make[1]: Nothing to be done for 'all-am'.
make[1]: Leaving directory '/usr/src/fuse-3.1.0'
Making install in include
make[1]: Entering directory '/usr/src/fuse-3.1.0/include'
make[2]: Entering directory '/usr/src/fuse-3.1.0/include'
make[2]: Nothing to be done for 'install-exec-am'.
 /bin/mkdir -p '/usr/local/include/fuse3'
 /usr/bin/install -c -m 644 fuse.h fuse_common.h fuse_lowlevel.h fuse_opt.h cuse_lowlevel.h '/usr/local/include/fuse3'
make[2]: Leaving directory '/usr/src/fuse-3.1.0/include'
make[1]: Leaving directory '/usr/src/fuse-3.1.0/include'
Making install in lib
make[1]: Entering directory '/usr/src/fuse-3.1.0/lib'
make[2]: Entering directory '/usr/src/fuse-3.1.0/lib'
 /bin/mkdir -p '/usr/local/lib'
 /bin/bash ../libtool   --mode=install /usr/bin/install -c   libfuse3.la '/usr/local/lib'
libtool: install: /usr/bin/install -c .libs/libfuse3.so.3.1.0 /usr/local/lib/libfuse3.so.3.1.0
libtool: install: (cd /usr/local/lib && { ln -s -f libfuse3.so.3.1.0 libfuse3.so.3 || { rm -f libfuse3.so.3 && ln -s libfuse3.so.3.1.0 libfuse3.so.3; }; })
libtool: install: (cd /usr/local/lib && { ln -s -f libfuse3.so.3.1.0 libfuse3.so || { rm -f libfuse3.so && ln -s libfuse3.so.3.1.0 libfuse3.so; }; })
libtool: install: /usr/bin/install -c .libs/libfuse3.lai /usr/local/lib/libfuse3.la
libtool: install: /usr/bin/install -c .libs/libfuse3.a /usr/local/lib/libfuse3.a
libtool: install: chmod 644 /usr/local/lib/libfuse3.a
libtool: install: ranlib /usr/local/lib/libfuse3.a
libtool: finish: PATH="/usr/local/sbin:/usr/local/bin:/usr/sbin:/usr/bin:/sbin:/bin:/snap/bin:/sbin" ldconfig -n /usr/local/lib
----------------------------------------------------------------------
Libraries have been installed in:
   /usr/local/lib

If you ever happen to want to link against installed libraries
in a given directory, LIBDIR, you must either use libtool, and
specify the full pathname of the library, or use the '-LLIBDIR'
flag during linking and do at least one of the following:
   - add LIBDIR to the 'LD_LIBRARY_PATH' environment variable
     during execution
   - add LIBDIR to the 'LD_RUN_PATH' environment variable
     during linking
   - use the '-Wl,-rpath -Wl,LIBDIR' linker flag
   - have your system administrator add LIBDIR to '/etc/ld.so.conf'

See any operating system documentation about shared libraries for
more information, such as the ld(1) and ld.so(8) manual pages.
----------------------------------------------------------------------
make[2]: Nothing to be done for 'install-data-am'.
make[2]: Leaving directory '/usr/src/fuse-3.1.0/lib'
make[1]: Leaving directory '/usr/src/fuse-3.1.0/lib'
Making install in util
make[1]: Entering directory '/usr/src/fuse-3.1.0/util'
make  install-am
make[2]: Entering directory '/usr/src/fuse-3.1.0/util'
make[3]: Entering directory '/usr/src/fuse-3.1.0/util'
 /bin/mkdir -p '/usr/local/bin'
  /bin/bash ../libtool   --mode=install /usr/bin/install -c fusermount3 '/usr/local/bin'
libtool: install: /usr/bin/install -c fusermount3 /usr/local/bin/fusermount3
/bin/mkdir -p /usr/local/sbin
/usr/bin/install -c ./mount.fuse3 /usr/local/sbin/mount.fuse3
/bin/mkdir -p /usr/local/etc/init.d
/usr/bin/install -c ./init_script /usr/local/etc/init.d/fuse3
/usr/sbin/update-rc.d fuse start 34 S . start 41 0 6 . || true
update-rc.d: error: unable to read /etc/init.d/fuse
make  install-exec-hook
make[4]: Entering directory '/usr/src/fuse-3.1.0/util'
chmod u+s /usr/local/bin/fusermount3
make[4]: Leaving directory '/usr/src/fuse-3.1.0/util'
/bin/mkdir -p /usr/local/lib/udev/rules.d
/usr/bin/install -c -m 644 ./udev.rules /usr/local/lib/udev/rules.d/99-fuse3.rules
make[3]: Leaving directory '/usr/src/fuse-3.1.0/util'
make[2]: Leaving directory '/usr/src/fuse-3.1.0/util'
make[1]: Leaving directory '/usr/src/fuse-3.1.0/util'
Making install in example
make[1]: Entering directory '/usr/src/fuse-3.1.0/example'
make[2]: Entering directory '/usr/src/fuse-3.1.0/example'
make[2]: Nothing to be done for 'install-exec-am'.
make[2]: Nothing to be done for 'install-data-am'.
make[2]: Leaving directory '/usr/src/fuse-3.1.0/example'
make[1]: Leaving directory '/usr/src/fuse-3.1.0/example'
Making install in test
make[1]: Entering directory '/usr/src/fuse-3.1.0/test'
make[2]: Entering directory '/usr/src/fuse-3.1.0/test'
make[2]: Nothing to be done for 'install-exec-am'.
make[2]: Nothing to be done for 'install-data-am'.
make[2]: Leaving directory '/usr/src/fuse-3.1.0/test'
make[1]: Leaving directory '/usr/src/fuse-3.1.0/test'
Making install in doc
make[1]: Entering directory '/usr/src/fuse-3.1.0/doc'
make[2]: Entering directory '/usr/src/fuse-3.1.0/doc'
make[2]: Nothing to be done for 'install-exec-am'.
 /bin/mkdir -p '/usr/local/share/man/man1'
 /usr/bin/install -c -m 644 fusermount3.1 '/usr/local/share/man/man1'
 /bin/mkdir -p '/usr/local/share/man/man8'
 /usr/bin/install -c -m 644 mount.fuse.8 '/usr/local/share/man/man8'
make[2]: Leaving directory '/usr/src/fuse-3.1.0/doc'
make[1]: Leaving directory '/usr/src/fuse-3.1.0/doc'
make[1]: Entering directory '/usr/src/fuse-3.1.0'
make[2]: Entering directory '/usr/src/fuse-3.1.0'
make[2]: Nothing to be done for 'install-exec-am'.
 /bin/mkdir -p '/usr/local/lib/pkgconfig'
 /usr/bin/install -c -m 644 fuse3.pc '/usr/local/lib/pkgconfig'
make[2]: Leaving directory '/usr/src/fuse-3.1.0'
make[1]: Leaving directory '/usr/src/fuse-3.1.0'

# export PKG_CONFIG_PATH=/usr/local/lib/pkgconfig
# ldconfig
# modprobe fuse
s3fs installation-
Use the below commands. We are cloning git here so no need to check the latest release from GitHub website.
# git clone https://github.com/s3fs-fuse/s3fs-fuse.git
# cd s3fs-fuse
# ./autogen.sh
# ./configure
# make
# make install
s3fs installation output is below for your reference. Click and expand if you want to refer it.
# git clone https://github.com/s3fs-fuse/s3fs-fuse.git
Cloning into 's3fs-fuse'...
remote: Counting objects: 3552, done.
remote: Compressing objects: 100% (5/5), done.
remote: Total 3552 (delta 0), reused 2 (delta 0), pack-reused 3547
Receiving objects: 100% (3552/3552), 1.80 MiB | 1.15 MiB/s, done.
Resolving deltas: 100% (2426/2426), done.
Checking connectivity... done.

# cd s3fs-fuse
# ./autogen.sh
--- Make commit hash file -------
--- Finished commit hash file ---
--- Start autotools -------------
configure.ac:30: installing './compile'
configure.ac:26: installing './config.guess'
configure.ac:26: installing './config.sub'
configure.ac:27: installing './install-sh'
configure.ac:27: installing './missing'
src/Makefile.am: installing './depcomp'
parallel-tests: installing './test-driver'
--- Finished autotools ----------

# ./configure
checking build system type... x86_64-pc-linux-gnu
checking host system type... x86_64-pc-linux-gnu
checking target system type... x86_64-pc-linux-gnu
checking for a BSD-compatible install... /usr/bin/install -c
checking whether build environment is sane... yes
checking for a thread-safe mkdir -p... /bin/mkdir -p
checking for gawk... gawk
checking whether make sets $(MAKE)... yes
checking whether make supports nested variables... yes
checking for g++... g++
checking whether the C++ compiler works... yes
checking for C++ compiler default output file name... a.out
checking for suffix of executables...
checking whether we are cross compiling... no
checking for suffix of object files... o
checking whether we are using the GNU C++ compiler... yes
checking whether g++ accepts -g... yes
checking for style of include used by make... GNU
checking dependency style of g++... gcc3
checking for gcc... gcc
checking whether we are using the GNU C compiler... yes
checking whether gcc accepts -g... yes
checking for gcc option to accept ISO C89... none needed
checking whether gcc understands -c and -o together... yes
checking dependency style of gcc... gcc3
checking how to run the C preprocessor... gcc -E
checking for grep that handles long lines and -e... /bin/grep
checking for egrep... /bin/grep -E
checking for ANSI C header files... yes
checking for sys/types.h... yes
checking for sys/stat.h... yes
checking for stdlib.h... yes
checking for string.h... yes
checking for memory.h... yes
checking for strings.h... yes
checking for inttypes.h... yes
checking for stdint.h... yes
checking for unistd.h... yes
checking sys/xattr.h usability... yes
checking sys/xattr.h presence... yes
checking for sys/xattr.h... yes
checking attr/xattr.h usability... no
checking attr/xattr.h presence... no
checking for attr/xattr.h... no
checking sys/extattr.h usability... no
checking sys/extattr.h presence... no
checking for sys/extattr.h... no
checking s3fs build with nettle(GnuTLS)... no
checking s3fs build with OpenSSL... no
checking s3fs build with GnuTLS... no
checking s3fs build with NSS... no
checking for pkg-config... /usr/bin/pkg-config
checking pkg-config is at least version 0.9.0... yes
checking for common_lib_checking... yes
checking compile s3fs with... OpenSSL
checking for DEPS... yes
checking for malloc_trim... yes
checking for library containing clock_gettime... none required
checking for clock_gettime... yes
checking pthread mutex recursive... PTHREAD_MUTEX_RECURSIVE
checking for git... yes
checking for .git... yes
checking github short commit hash... b1fe419
checking that generated files are newer than configure... done
configure: creating ./config.status
config.status: creating Makefile
config.status: creating src/Makefile
config.status: creating test/Makefile
config.status: creating doc/Makefile
config.status: creating config.h
config.status: executing depfiles commands

# make
make  all-recursive
make[1]: Entering directory '/usr/src/s3fs-fuse'
Making all in src
make[2]: Entering directory '/usr/src/s3fs-fuse/src'
g++ -DHAVE_CONFIG_H -I. -I..  -D_FILE_OFFSET_BITS=64 -I/usr/include/fuse -I/usr/include/libxml2    -g -O2 -Wall -D_FILE_OFFSET_BITS=64 -MT s3fs.o -MD -MP -MF .deps/s3fs.Tpo -c -o s3fs.o s3fs.cpp
mv -f .deps/s3fs.Tpo .deps/s3fs.Po
g++ -DHAVE_CONFIG_H -I. -I..  -D_FILE_OFFSET_BITS=64 -I/usr/include/fuse -I/usr/include/libxml2    -g -O2 -Wall -D_FILE_OFFSET_BITS=64 -MT curl.o -MD -MP -MF .deps/curl.Tpo -c -o curl.o curl.cpp
mv -f .deps/curl.Tpo .deps/curl.Po
g++ -DHAVE_CONFIG_H -I. -I..  -D_FILE_OFFSET_BITS=64 -I/usr/include/fuse -I/usr/include/libxml2    -g -O2 -Wall -D_FILE_OFFSET_BITS=64 -MT cache.o -MD -MP -MF .deps/cache.Tpo -c -o cache.o cache.cpp
mv -f .deps/cache.Tpo .deps/cache.Po
g++ -DHAVE_CONFIG_H -I. -I..  -D_FILE_OFFSET_BITS=64 -I/usr/include/fuse -I/usr/include/libxml2    -g -O2 -Wall -D_FILE_OFFSET_BITS=64 -MT string_util.o -MD -MP -MF .deps/string_util.Tpo -c -o string_util.o string_util.cpp
mv -f .deps/string_util.Tpo .deps/string_util.Po
g++ -DHAVE_CONFIG_H -I. -I..  -D_FILE_OFFSET_BITS=64 -I/usr/include/fuse -I/usr/include/libxml2    -g -O2 -Wall -D_FILE_OFFSET_BITS=64 -MT s3fs_util.o -MD -MP -MF .deps/s3fs_util.Tpo -c -o s3fs_util.o s3fs_util.cpp
mv -f .deps/s3fs_util.Tpo .deps/s3fs_util.Po
g++ -DHAVE_CONFIG_H -I. -I..  -D_FILE_OFFSET_BITS=64 -I/usr/include/fuse -I/usr/include/libxml2    -g -O2 -Wall -D_FILE_OFFSET_BITS=64 -MT fdcache.o -MD -MP -MF .deps/fdcache.Tpo -c -o fdcache.o fdcache.cpp
mv -f .deps/fdcache.Tpo .deps/fdcache.Po
g++ -DHAVE_CONFIG_H -I. -I..  -D_FILE_OFFSET_BITS=64 -I/usr/include/fuse -I/usr/include/libxml2    -g -O2 -Wall -D_FILE_OFFSET_BITS=64 -MT common_auth.o -MD -MP -MF .deps/common_auth.Tpo -c -o common_auth.o common_auth.cpp
mv -f .deps/common_auth.Tpo .deps/common_auth.Po
g++ -DHAVE_CONFIG_H -I. -I..  -D_FILE_OFFSET_BITS=64 -I/usr/include/fuse -I/usr/include/libxml2    -g -O2 -Wall -D_FILE_OFFSET_BITS=64 -MT addhead.o -MD -MP -MF .deps/addhead.Tpo -c -o addhead.o addhead.cpp
mv -f .deps/addhead.Tpo .deps/addhead.Po
g++ -DHAVE_CONFIG_H -I. -I..  -D_FILE_OFFSET_BITS=64 -I/usr/include/fuse -I/usr/include/libxml2    -g -O2 -Wall -D_FILE_OFFSET_BITS=64 -MT openssl_auth.o -MD -MP -MF .deps/openssl_auth.Tpo -c -o openssl_auth.o openssl_auth.cpp
mv -f .deps/openssl_auth.Tpo .deps/openssl_auth.Po
g++  -g -O2 -Wall -D_FILE_OFFSET_BITS=64   -o s3fs s3fs.o curl.o cache.o string_util.o s3fs_util.o fdcache.o common_auth.o addhead.o openssl_auth.o   -lfuse -pthread -lcurl -lxml2 -lcrypto
fdcache.o: In function `FdEntity::OpenMirrorFile()':
/usr/src/s3fs-fuse/src/fdcache.cpp:761: warning: the use of `tmpnam' is dangerous, better use `mkstemp'
g++ -DHAVE_CONFIG_H -I. -I..  -D_FILE_OFFSET_BITS=64 -I/usr/include/fuse -I/usr/include/libxml2    -g -O2 -Wall -D_FILE_OFFSET_BITS=64 -MT test_string_util.o -MD -MP -MF .deps/test_string_util.Tpo -c -o test_string_util.o test_string_util.cpp
mv -f .deps/test_string_util.Tpo .deps/test_string_util.Po
g++  -g -O2 -Wall -D_FILE_OFFSET_BITS=64   -o test_string_util string_util.o test_string_util.o
make[2]: Leaving directory '/usr/src/s3fs-fuse/src'
Making all in test
make[2]: Entering directory '/usr/src/s3fs-fuse/test'
make[2]: Nothing to be done for 'all'.
make[2]: Leaving directory '/usr/src/s3fs-fuse/test'
Making all in doc
make[2]: Entering directory '/usr/src/s3fs-fuse/doc'
make[2]: Nothing to be done for 'all'.
make[2]: Leaving directory '/usr/src/s3fs-fuse/doc'
make[2]: Entering directory '/usr/src/s3fs-fuse'
make[2]: Nothing to be done for 'all-am'.
make[2]: Leaving directory '/usr/src/s3fs-fuse'
make[1]: Leaving directory '/usr/src/s3fs-fuse'

# make install
Making install in src
make[1]: Entering directory '/usr/src/s3fs-fuse/src'
make[2]: Entering directory '/usr/src/s3fs-fuse/src'
 /bin/mkdir -p '/usr/local/bin'
  /usr/bin/install -c s3fs '/usr/local/bin'
make[2]: Nothing to be done for 'install-data-am'.
make[2]: Leaving directory '/usr/src/s3fs-fuse/src'
make[1]: Leaving directory '/usr/src/s3fs-fuse/src'
Making install in test
make[1]: Entering directory '/usr/src/s3fs-fuse/test'
make[2]: Entering directory '/usr/src/s3fs-fuse/test'
make[2]: Nothing to be done for 'install-exec-am'.
make[2]: Nothing to be done for 'install-data-am'.
make[2]: Leaving directory '/usr/src/s3fs-fuse/test'
make[1]: Leaving directory '/usr/src/s3fs-fuse/test'
Making install in doc
make[1]: Entering directory '/usr/src/s3fs-fuse/doc'
make[2]: Entering directory '/usr/src/s3fs-fuse/doc'
make[2]: Nothing to be done for 'install-exec-am'.
 /bin/mkdir -p '/usr/local/share/man/man1'
 /usr/bin/install -c -m 644 man/s3fs.1 '/usr/local/share/man/man1'
make[2]: Leaving directory '/usr/src/s3fs-fuse/doc'
make[1]: Leaving directory '/usr/src/s3fs-fuse/doc'
make[1]: Entering directory '/usr/src/s3fs-fuse'
make[2]: Entering directory '/usr/src/s3fs-fuse'
make[2]: Nothing to be done for 'install-exec-am'.
make[2]: Nothing to be done for 'install-data-am'.
make[2]: Leaving directory '/usr/src/s3fs-fuse'
make[1]: Leaving directory '/usr/src/s3fs-fuse'
Configure access keys of your AWS account
Now you need to configure your AWS account security keys in s3fs utility. For that you need to visit your AWS account’s IAM (Identity and Access Management) page and get those keys under ‘Access Keys (Access Key ID and Secret Access Key)‘. If you haven’t created any till the time, then you can create a new key pair and use it.
There are two keys: Access Key ID and Secret Access Key. Add those keys in file/etc/s3fs-keysseparated by a colon. You can keep them in any file name and path of your choice. I prefer to keep it in /etc where other OS imp files reside.
Remove other permission to read this key file. If you don’t set permission 0 to others then s3fs command utility will warn you about it like below. For extra security you can make this file hidden by adding . in the filename.
s3fs: credentials file /etc/s3fs-keys should not have others permissions.
Now you are ready to mount your bucket.
Mount S3 bucket
Now run s3fs utility with bucket name you want to mount followed by directory on which you want to mount it. -o switch to be used to specify a key file path. If you used another filename and path than /etc/s3fs-keys then use it accordingly. There are many other options that can be supplied with this command to control cache and permission on the Linux server (OS side) which I haven’t mentioned here.
You can perform all file and directory operations as you do on normal mount point. Observe size it showing – 256T! That’s huge, that’s S3 – almost unlimited storage!
You can add an entry in /etc/fstab to mount your bucket on boot too. Use below entry :
If your bucket name includes . then s3fs may fail to mount your bucket. Curl will exist the mount operation as SSL on Amazon won’t be matched as certificate wild card matching fails due to extra . in your bucket name. To understand, if I have bucket name kerneltalks.bucket then SSL wildcard mismatch will happen as indicated by below error –
SSL: certificate subject name (*.s3.amazonaws.com) does not match target host name ‘kerneltalks.bucket.s3.amazonaws.com’
To see errors, warning during mount operation you can run s3fs command with debugging on. Append below switches to the end of your s3fs mount command:
-d -d -f -o f2 -o curldbg
This will help you troubleshoot any issues you faced during the S3 bucket mount.
This is how we mount S3 bucket in Linux servers like Redhat, Ubuntu, Debian, etc. Let us know if you have any feedback/comments/suggestions in below comment box.
Learn how to create an S3 bucket in AWS step by step. Understand permissions and properties of the bucket which are to be set while creating.
S3 bucket creation in AWS
S3 which stands for Simple Storage Service is a storage web service provided by Amazon web service. S3 is the replacement of storage boxes in traditional data centers. Its highly scale-able, cheap, reliable alternative. In S3 data is stored in a bucket. The bucket is the root folder in S3. You can have more than one bucket in a single AWS account. Files stored in buckets are called objects. You can control access to data by defining permissions at the bucket level and object level.
In this article we will see how to create S3 bucket with screenshots.
Step 1 –
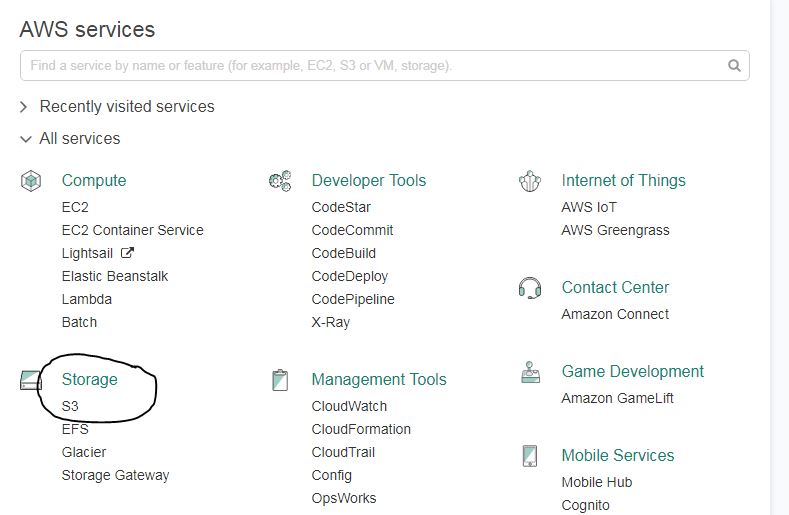
Login to AWS console and select S3 under Storage. You can even search it under the search bar of the console.
S3 in AWS console
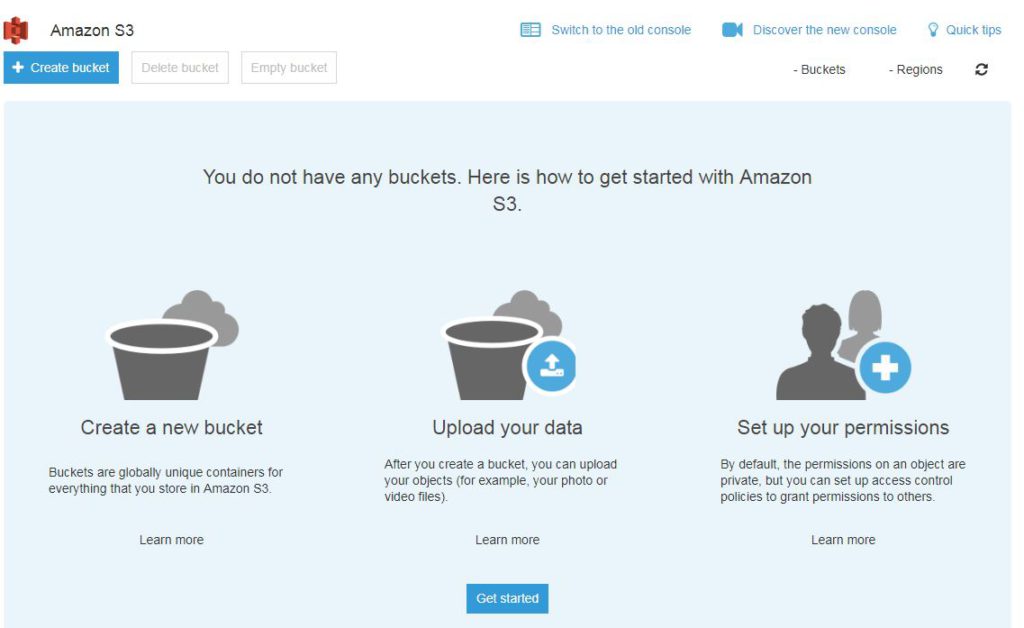
It will take you to Amazon S3 console where you can see ‘create bucket‘ button along with Delete bucket and Empty bucket button in header.
S3 console
Step 2 –
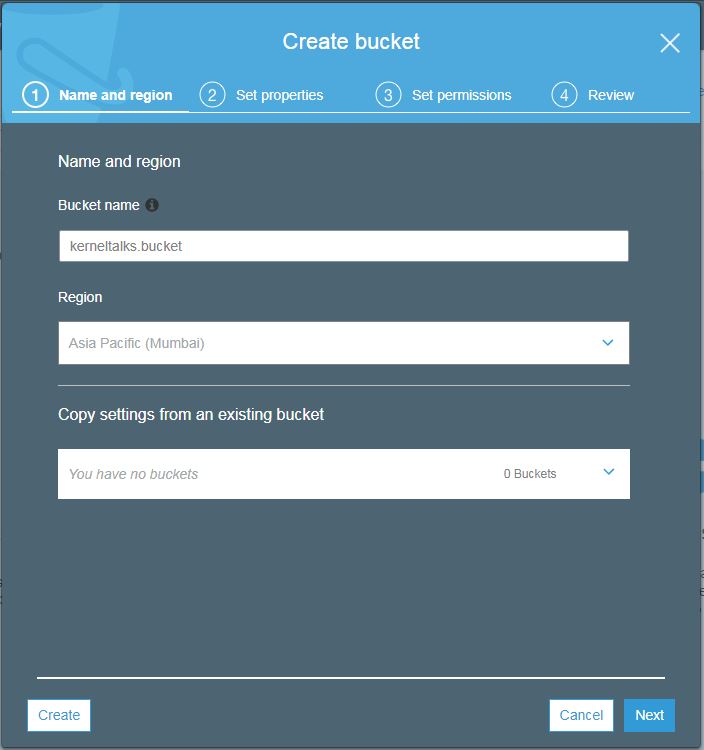
Click create a bucket and you will be presented with bucket wizard. Enter the bucket name of your choice. Remember it should be unique across all AWS infrastructure. Select region (geographically nearest to source/destination from where read/write of data will happen to/from this bucket to avoid latency). If you want to create a new bucket with the setting of the existing bucket, you can specify the existing bucket name in the last option.
Create bucket wizard
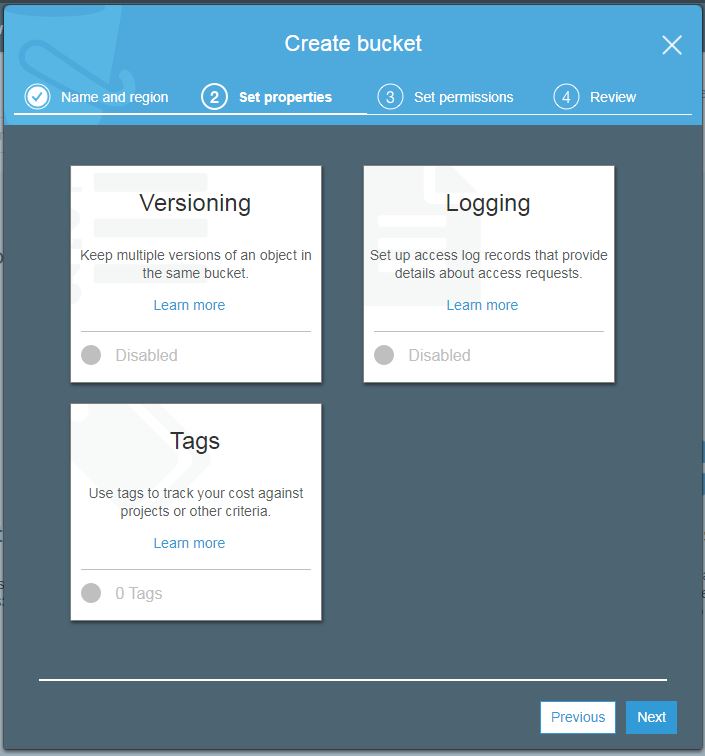
Hit next after filling the required details. You will enter the bucket properties screen as below.
S3 Bucket properties
Here you can set these properties to your bucket.
Versioning. Enable to keep all versions of objects when altered. Once enabled it can not be disabled. It can only be suspended then.
Logging. It will track all access requests made to this bucket.
Tags. Add tags of your choice to identify bucket easily in other AWS services and billing.
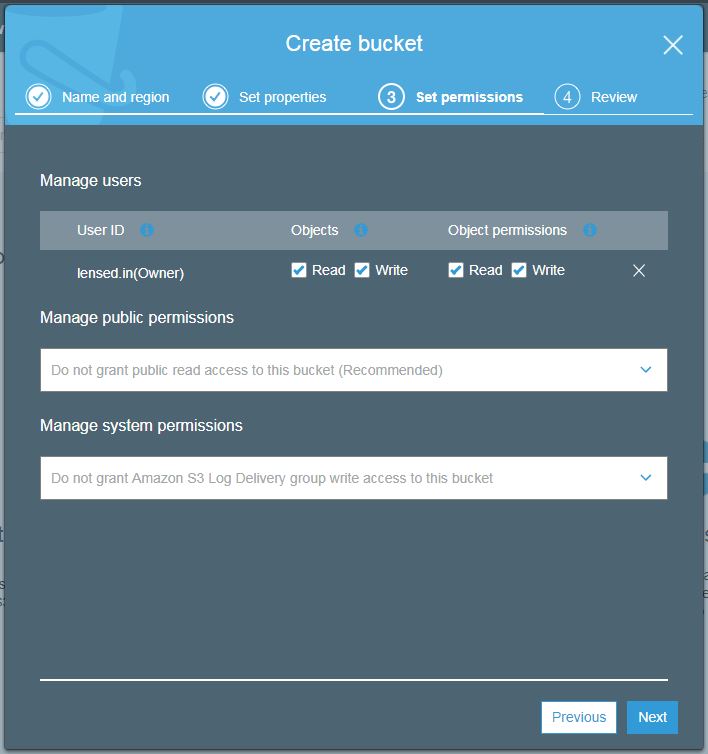
All are disabled by default. Once you enable features of your choice hit next. You will enter the permission settings screen.
S3 bucket permissions
Here you can manage permissions at the user, public, and system level. Public and system permissions can be enabled or disabled. User-level permission can be set read, write and user id wise.
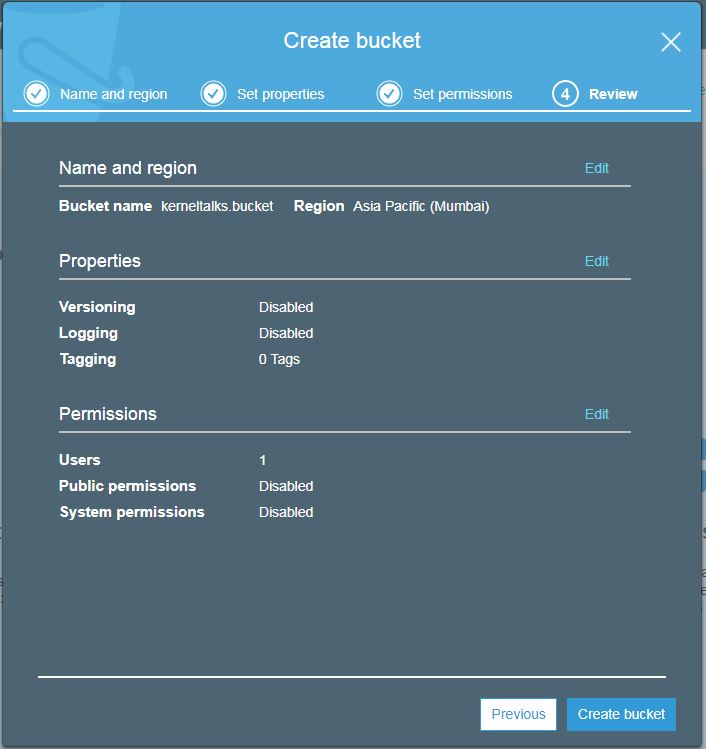
Once you are done, hit next and the review screen will show you all the options you have selected as a final confirmation before creating a bucket.
Bucket review screen before creation
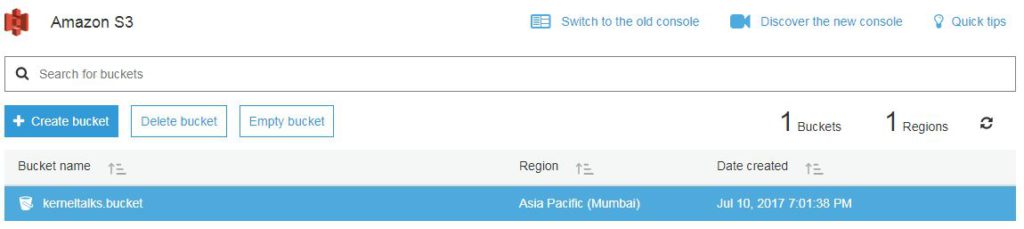
Hit create bucket now. Your bucket will be created and you will be redirected back to bucket list screen where you can see your newly created bucket!
Bucket list
Step 3 –
If you click on bucket name you will be able to get into bucket itself where you can upload objects.
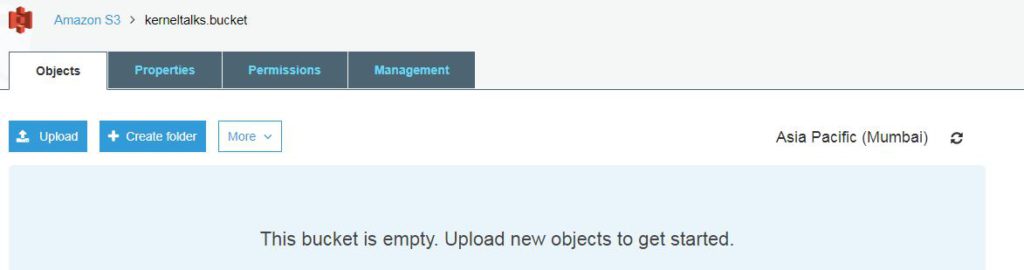
Inside S3 bucket
Even tabs like properties, permissions, management are visible in the menu bar which can be used to administer this bucket. We will see them in another post.
A how-to guide for Virtual Private Cloud in AWS. Learn what is vpc, how to create, configure, and delete VPC in AWS with screenshots.
How to guide : VPC in AWS
What is VPC?
VPC is a Virtual Private Cloud. It’s your own private cloud in the public cloud. You control every aspect of VPC and its communication with the outer world. It’s like having your own datacenter which is isolated from other datacenters. When you are using cloud services, you are working inside your VPC. Servers, storage, load balancer, databases everything you create, configure is executed under your VPC. VPC gives you great flexibility to control your data privacy and security even its on cloud.
How to create VPC in AWS?
We will walk through the process of creating VPC in AWS (Amazon Web Services) cloud. By default, one VPC is created for you when you create a new account with AWS. This VPC is marked as default VPC. Whenever you are using services within AWS, this VPC will be used by default if multiple VPC exists in your account.
Lets follow these series of screenshots to create VPC.
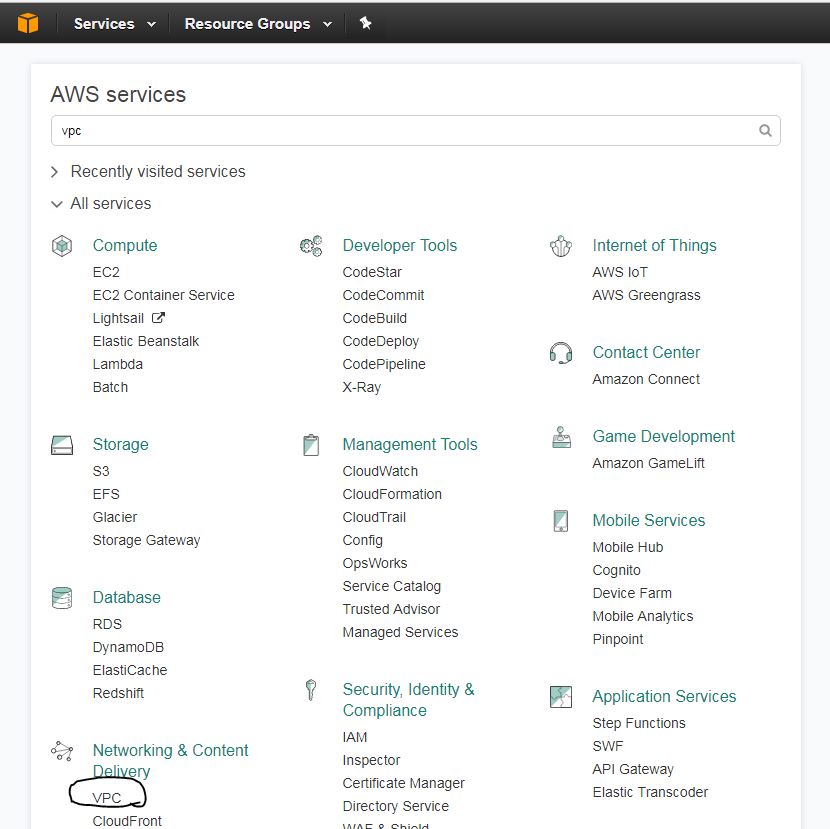
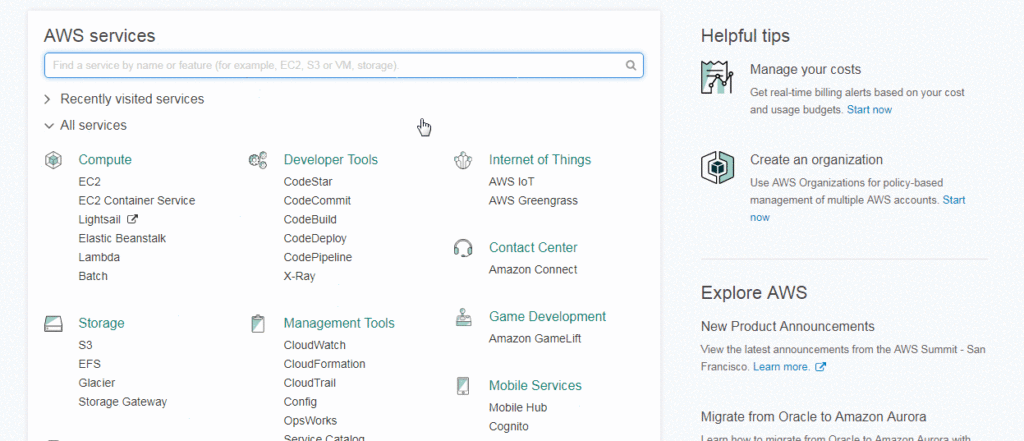
First login to your AWS management console and navigate to ‘VPC‘ under the category ‘Networking and Content delivery‘. See the below image. Or you can type VPC in the AWS services search bar you will be presented with VPC link.
VPC in AWS management console
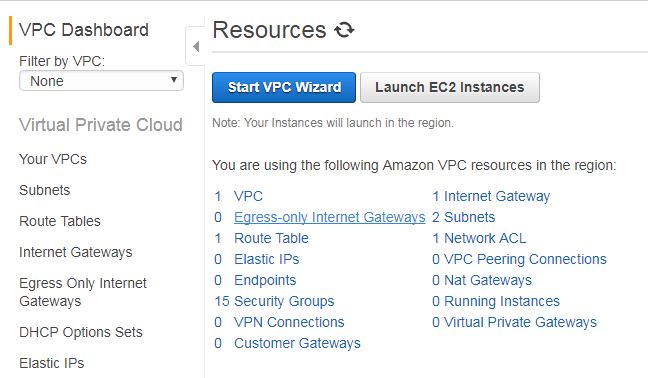
Now you will be presented with VPC dashboard which shows you a summary of your VPC resources like below :
VPC dashboard showing resources details
Here click on ‘Start VPC Wizard‘. This will kick off the VPC wizard to create your VPC step by step.
Step 1 :
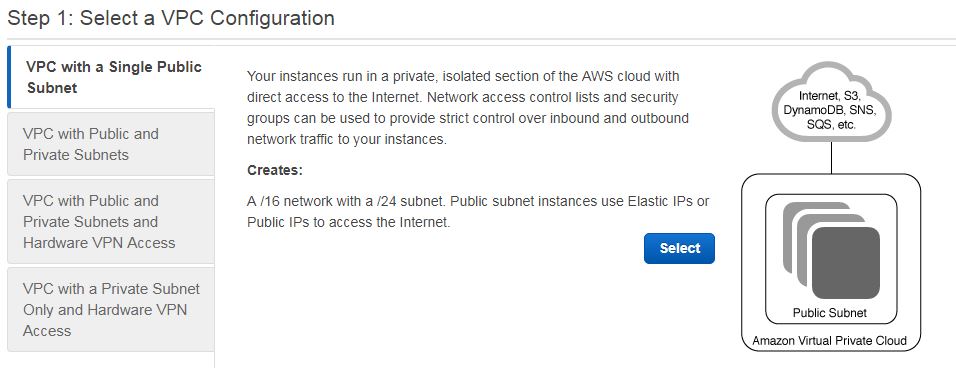
Choose which kind of VPC you need. You have these choices –
VPC with a single public subnet
VPC with public and private subnets
VPC with public and private subnets with hardware VPN access
VPC with private subnet only with hardware VPN access
Each choice has its own features to offer. You can see what it offers by clicking on it. We will be creating the first type of VPC in this tutorial.
Select type of VPC
Select your type of VPC on the left column and then click on Select blue button on right.
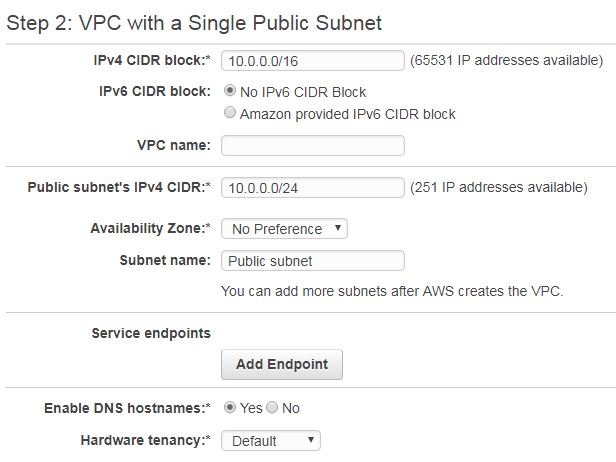
Step 2:
Here you need to configure your subnet IP ranges, hardware related stuff, etc. See below screenshot and we will understand each field one by one.
VPC configuration
IPv4 CIDR block: CIDR is Class-less Inter Domain Routing. It is your subnet range to be used by VPC. The IP addresses from this range will be assigned to components or services you will be using in this VPC. This is a mandatory field. You have to specify your range with subnet notation. Note that this range is configured and reachable only within your VPC.
IPv6 CIDR block: Optional field. You can have IPv6 support in your VPC with this. Here IP range will be automatically generated and assigned by Amazon. You do not have the privilege to choose your own.
VPC Name: Name of your choice. It helps you to identify this VPC in other parts of AWS within your account for configuration purposes. You can leave this blank since AWS identifies its every component by ARN (Amazon resource name). This ARN is an alphanumeric system-generated name that is not user friendly hence this field is optionally provided so that you can name your components with an easily recognizable name.
Public subnet’s IPv4 CIDR: This range is meant for outside world communication. Your resources will be assigned IP from this block when you want them to communicate outside VPC.
Availability zone: These zones are logical grouping of AWS hardware within one specified region (geographical grouping). At a one time you can select one region to work within and availability zones from that region will be listed here as a dropdown. If no zone selected, AWS will create VPC in any of the zones which has max free resources at that instant of time.
Subnet name: Again this one is to name your public subnet with an easily recognizable name.
Service endpoints: These are virtual devices in AWS. If you want any of them to add with this VPC then you can browse and select them here.
Enable DNS hostnames: It enables DNS names to be generated for components when they created in this VPC. These names are system generated.
Hardware Tenancy: Choose if you want your VPC components to be on single dedicated hardware (dedicated, physically as close as possible) or anywhere (physically may be near or long) within the zone you specified above. Dedicated tenancy assigns hardware which is the same rack or nearby racks so that you have very minimum network latency and highest performance.
Step 3 :
Click ‘Create VPC ‘ button. Your VPC will be created within seconds and you will be greeted with a screen saying “Your VPC has been successfully created. You can launch instances into the subnets of your VPC. For more information, see Launching an Instance into Your Subnet.” (link altered here with my blog post link). Click ok and you will be presented with VPC list screen as below :
VPC list
Here you can see out newly created VPC named kerneltalks_vpc! All details of this VPC can be seen here. You VPC is ready to
How to modify VPC in AWS?
After creation you can modify VPC parameters. From the VPC list shown above, select any VPC you want to edit and then click the Actions button in the header. Dropdown menu will appear to edit below parameters :
Delete VPC
Edit CIDRs
Edit DHCP options set
Edit DNS resolution
Edit DNS hostnames
Create flow log
Flow logs are created fro any resources in VPC to trace and see IP traffic flow information. The rest of the options are self-explanatory. Here you can modify VPc and delete VPC too.
Here is small GIF I created which shows all above process of creating VPC.
Small AWS CSA Associate exam preparation guide to help you get ready for the certification exam. Get confident with the list of test quizzes listed here.
AWS CSA Associate exam preparation guide
Note: SAA-C01 is retiring now and being replaced with SAA-C02.
Recently I cleared the Amazon Web Services Certified Solutions Architect Associate-level exam and I was bombarded with many questions like How to prepare for the AWS CSA exam? Which book to refer to preparing AWS CSA certification? How to study for AWS CSA? Which online resources available for the certified solutions architect exam? So I thought of summing all this up in a small post which can be useful for AWS CSA aspirants.
Remember this post is compiled from my own experience and should not be taken as the final benchmark for taking the certification exams. This post is mainly aimed to help you gaining confidence in taking examination once you are through your syllabus and hands-on experience.
AWS has three streams where you can pursue your cloud career.
All these three streams have an associate-level (primary or base) level certification. Later professional (higher level) certification is available for solution architect only. Developer and SysOps get merged into single AWS certified DevOps Engineer professional certification.
So, we are talking here about the Amazon Web Services Certified Solutions Architect Associate level exam! Obviously you should be well versed with AWS and requirements stated by Amazon on exam link. Let’s have some examination details :
AWS CSA Exam details :
Total number of questions: 60-65
Duration: 130 minutes
Cost : $150
Type: Multiple choice questions
Can be retaken after 7 days of cooldown period if failed in the first attempt
Below is a list of AWS quiz which I gathered from the web which can help you to put your cloud knowledge to test and gain the confidence to get ready for the exam.
AWS Training practice tests $20. It’s free if you are AWS certified. You can get a voucher from your certification benefits section on the AWS certification portal.
Quick revision on topics AWS SWF, Beanstalk, EMR, Cloudfomation before appearing AWS Certified Solutions Architect – Associate exam.
This article notes down a few important points about AWS (Amazon Web Services) SWF, Beanstalk, EMR, Cloudfomation. This can be helpful in last-minute revision before appearing for the AWS Certified Solutions Architect – Associate level certification exam.
This is forth part of AWS CSA revision series. Rest of the series listed below :
In this article we are checking out key points about SWF (Simple Work Flow), Beanstalk (App deployment Service), EMR (Elastic MAp Reduce), Cloudfomation (Infrastructure as code).
Quick revision on topics AWS CloudFront, SNS, SQS before appearing AWS Certified Solutions Architect – Associate exam.
CloudFront, SNS, SQS revision!
This article notes down a few important points about AWS (Amazon Web Services) CloudFront, SNS, and SQS. This can be helpful in last-minute revision before appearing for the AWS Certified Solutions Architect – Associate level certification exam.
This is third part of AWS CSA revision series. Rest of the series listed below :
In this article, we are checking out key points about CloudFront(CDN Content Delivery Network), SNS (Simple Notification Service), and SQS (Simple Queue Service).
Origin can be S3 bucket or CNAME of Elastic Load Balancer ELB
S3 bucket as the origin. URL will be bucket_name.s3-reagion.cloudfront.net
Private content sharing with signed URL with an expiration time limit
To serve a new object version, create a new distribution, or create invalidation of the old objects. Since invalidation costs, creating new distribution always helps.
Limits :
1,00,000 Requests per second per distribution
200 distributions per account
40Gbps speed per distribution
25 origins per distribution
20 GB max file size to serve
By default, object expiration is 24 hours. The minimum TTL is 0.
Amazon SNS
The latest addition to SNS is Lambda
SNS has two clients: Publishers and subscribers
Publishers communicate with subscribers by sending messages to the topic.
Protocol supported :
HTTP
HTTPS
SMS
email
email-JSON
Amazon SQS
AWS Lambda
SNS Topic of the same name can be created after 30-60 seconds the previous topic deleted.
Amazon SQS
The default visibility timeout is 30 secs. The maximum is 12 hours.
Mainly used to decouple your application
The default period message stays in queue is 4 days. Min-Max periods are 1 min to 2 weeks.
The maximum SQS message size is 256KB.
Supports an unlimited number of queues and unlimited messages per queue.