Suse Manager 4 configuration. It includes all steps to set up your SUSE Manager right from scratch till your first login in the SUSE Manager web UI.
Adding product channel in SUSE Manager. Procedure to add SUSE product channels in SUSE Manager so that you can sync packages on your SUSE Manager server.
Oracle Public repo in SUSE Manager. Complete process to add Oracle Public repo in SUSE Manager so you can sync packages from public repo to SUSE Manager.
Remove product channels. Procedure to remove product channels from SUSE Manager from the command line.
A quick post to configure oracle public repo in SUSE Manager
Oracle public repo in SUSE Manager
In this article, we will walk you through step by step procedure to add Oracle Linux client in SUSE Manager. The complete process is operated in the below steps :
Add Oracle YUM repositories to SUSE Manger
Manually sync Oracle Linux repo to SUSE Manager
Copy GPG key from Oracle public repo to SUSE Manager
Create Oracle Linux bootstrap repository in SUSE Manger
Create activation key
Generate and modify the bootstrap script for Oracle Linux
Register Oracle Linux client to SUSE Manger
By adding Oracle Linux client in SUSE Manager you can manage OEL clients and their patching from your enterprise tool. You can do content lifecycle management as well with Oracle public channels. Without further delay lets jump into it.
How to add Oracle Public repositories in SUSE Manager
First thing first, install spacewalk utilities on your SUSE Manager server.
kerneltalks:~ # zypper in spacewalk-utils
Now, run spacewalk command to list all available base channels along with their available architectures.
You need to choose the channel you want to sync per your requirement. For this tutorial, we will register the OEL7 client to SUSE Manager. For that, we will select two channels oraclelinux7 & oraclelinux7-spacewalk24-client
Always base version of OS and spacewalk client channels are mandatory. Rest related channels to your base OS are optional for you to choose. You need to sync these channels to SUSE Manager using below command –
kerneltalks:~ # spacewalk-common-channels -v -a x86_64 oraclelinux7
Connecting to http://localhost/rpc/api
SUSE Manager username: suseadmin
SUSE Manager password:
Base channel 'Oracle Linux 7 (x86_64)' - creating...

kerneltalks:~ # spacewalk-common-channels -v -a x86_64 oraclelinux7-spacewalk24-client
Connecting to http://localhost/rpc/api
SUSE Manager username: suseadmin
SUSE Manager password:
Base channel 'Oracle Linux 7 (x86_64)' - exists
* Child channel 'Spacewalk 2.4 Server for Oracle Linux 7 (x86_64)' - creating...
Now both channels are created and now you can even view them in the SUSE Manager web console.
Sync Oracle Linux Public repo to SUSE Manager
The next step is to sync these channels manually for the first time. Later you can schedule them to sync automatically. To sync Oracle public repo manually run below command –
It takes time depending on your server internet bandwidth. If you are getting any python errors like AttributeError: 'ZypperRepo' object has no attribute 'repoXML' then make sure your SUSE Manager is up to date (zypper up) and then execute these steps.
You can navigate to SUSE Manager > Channel List, click on the channel name, Manage channel (right-hand top corner), goto last tab Repositories, and sync tab. Here, you can schedule automatic sync daily, weekly, etc as per your choice.
Copy GPG key
Copy key from RPM-GPG-KEY-oracle-ol7 to /srv/www/htdocs/pub/RPM-GPG-KEY-oracle-ol7 on the SUSE Manager server.
We will define this GPG key to use in the bootstrap script.
Create Oracle Linux bootstrap repo in SUSE Manager
Follow the below set of commands to create a bootstrap repo. Since we synced public repo channels (which are not Suse backed channels) command mgr-create-bootstrap-repo won’t work to create Oracle Linux bootstrap repo.
This step is pretty much the same as we normally do for any other channel. You can refer to this article with screenshots for the procedure.
We created the activation key 1-oel7 here for this demo. We will refer to this key throughout later this chapter.
Generate and modify the bootstrap script for Oracle Linux
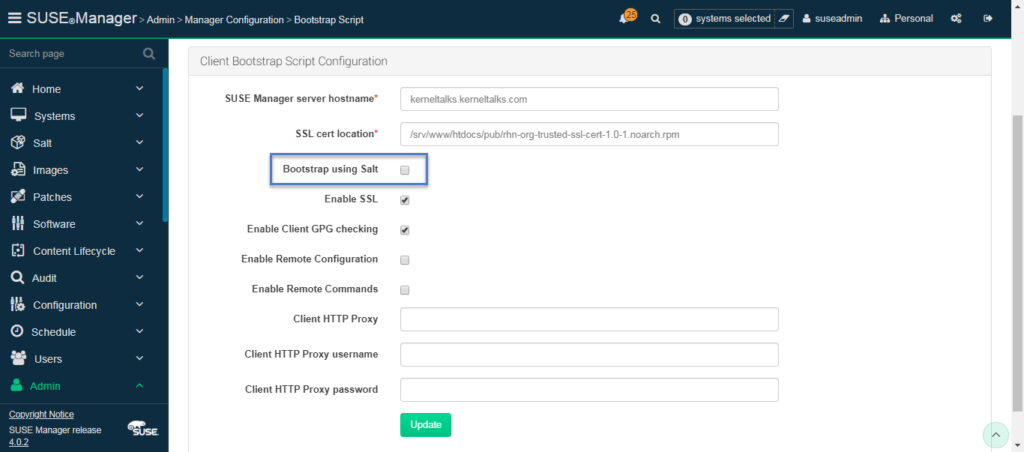
You need to follow the same step you did earlier for salt clients. Goto SUSE Manager > Admin > Manager Configuration > Bootstrap Script.
The only thing here you need to uncheck ‘Bootstrap using salt’ option. Since salt is not supported, we will register Oracle Linux as the traditional system. For that you need to generate bootstrap script without salt part.
bootstrap script for traditional clients in SUSE Manager
The script will be generated at /srv/www/htdocs/pub/bootstrap on SUSE Manager Server. Make a copy of it and edit it.
Modify the script to edit the below parameters (Make sure you enter your activation key and related GPG key value). Also, don’t forget to enable the script by commenting out exit 1 at beginning of script.:
Also, rename all occurrences of spacewalk-check & spacewalk-client-tools to rhn-check & rhn-client-tools. And delete spacewalk-client-setup in the same lines. These 3 packages are being referred by SUSE Manager by old name so we are updating them accordingly. Below 3 sed one-liner command to perform this task for you! Make sure you edit the last file name to match your bootstrap script name.
kerneltalks:~ # sed --in-place 's/spacewalk-check/rhn-check/' /srv/www/htdocs/pub/bootstrap/oel7_bootstrap.sh
kerneltalks:~ # sed --in-place 's/spacewalk-client-tools/rhn-client-tools/' /srv/www/htdocs/pub/bootstrap/oel7_bootstrap.sh
kerneltalks:~ # sed --in-place 's/spacewalk-client-setup//' /srv/www/htdocs/pub/bootstrap/oel7_bootstrap.sh
Register Oracle Linux client to SUSE Manager as traditional client
That’s all. You are all ready to register the client. Login to the client with root account and run bootstrap script.
If your script exits with below error which indicates CA trust updates are disabled on your server –
ERROR: Dynamic CA-Trust > Updates are disabled. Enable Dynamic CA-Trust Updates with '/usr/bin/update-ca-trust force-enable'
Run mentioned command in error i.e. /usr/bin/update-ca-trust force-enable and re-run the bootstrap script. You will be through next time.
Also, if you see certificate error about expiry for certificate /usr/share/rhn/ULN-CA-CERT like below –
The certificate /usr/share/rhn/ULN-CA-CERT is expired. Please ensure you have the correct certificate and your system time is correct.
then get the fresh copy of the certificate from Oracle.com and replace it with /srv/www/htdocs/pub/ULN-CA-CERT on SUSE Manager server. Re-run bootstrap script on client.
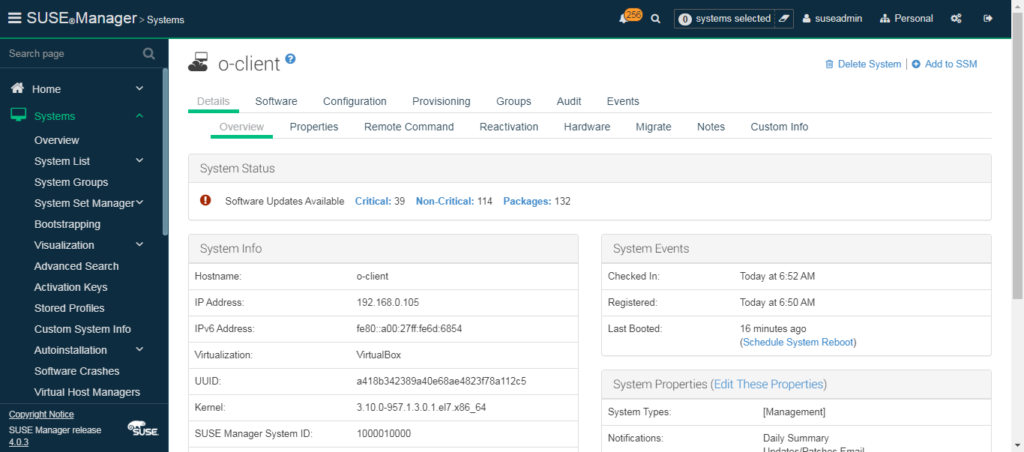
Once the bootstrap script completes you can see your system in SUSE Manager > Systems. Since its non-salt i.e. traditional system you don’t need to approve salt key in the web console. The system will directly appear in SUSE Manager.
Oracle Linux client in SUSE Manager
Now you can check repositories on Oracle Linux client to confirm its subscribed to SUSE Manager.
root@o-client ~ # yum repolist
Loaded plugins: rhnplugin
This system is receiving updates from Spacewalk server.
repo id                                                                     repo name                                                                             status
oraclelinux7-x86_64                                                         Oracle Linux 7 (x86_64)                                                               12,317
oraclelinux7-x86_64-spacewalk24-client                                      Spacewalk 2.4 Client for Oracle Linux 7 (x86_64)                                          31
repolist: 12,348
That’s it! You have created, synced Oracle Linux Public repo in SUSE Manager and registered Oracle Linux Client in SUSE Manager!
How to configure CentOS repo in SUSE Manager
Bonus tip !!
All the above process applies fro CentOS repo as well. Everything remains the same except below points –
Instead of spacewalk-client you need to sync uyuni-client repo.
GPG keys you can get from CentOS page . Choose CentOs X signing key according to your synced repo.
Create bootstrap repo in the path /srv/www/htdocs/pub/repositories/centos/6/bootstrap/
A quick post to walk you through step by step procedure to set up SUSE Manager in the AWS EC2 server.
Setting up SUSE Manager on AWS EC2 instance
We have written many articles about the SUSE Manager server product from SUSE. It was about hosting it on an on-premise server. All outputs, screenshots are from my setup hosted on Oracle Virtual box.
So one question arises, is it possible to host SUSE Manager on a public cloud server? Yes, it’s possible to host the SUSE Manager server on AWS EC2 instance. Only a few steps are different when you configure SUSE Manager on the EC2 server. I will walk you through them and it will be a piece of cake to set up.
Configuring SUSE Manager on AWS public cloud server
The whole process can be listed as :
Image selection to spin public cloud server
EC2 instance type selection and extra EBS volumes
Security group port opening
SUSE Manager setup
Image selection
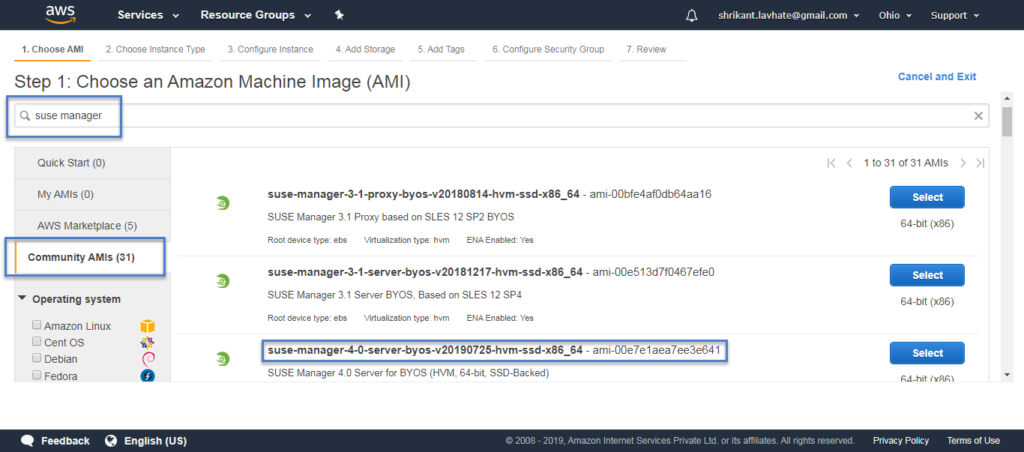
You need to spin EC2 instance using SUSE Manager images available on Community AMIs. Search for SUSE Manager in AMIs listing. You will see AMI for SUSE Manager 3.1, 3.2, 4. Always go for the latest one. We discussed SUSE Manager 4 in all our articles. See screenshot below –
SUSE Manager AMI on AWS Community AMI listing
Select AMI and spin up your EC2 server.
Read below article which explains step by step procedure to spin up EC2 instance in AWS public cloud
While creating EC2 instance keep in mind the hardware requirement of SUSE Manager. Make sure you add extra EBS volumes to create filesystems /var/lib/pgsql and /var/spacewalk mentioned in requirements.
Spin up the instance, log in and create filesystems on those EBS volumes. Simple LVM tasks eh!
TCP Port 4505-4506 for communicating with managed systems via Salt
TCP Port 5269 for pushing actions to or via a SUSE Manager Proxy.
TCP Port 5222 for pushing client actions by the osad daemon running on client systems.
SUSE Manager setup
Make sure you update the system using zypper up before you proceed further.
Finally the SUSE Manager setup! Register your system to SCC (Suse Customer Center) using SUSEConnect command. Proceed with the SUSE Manager setup using yast susemanager_setup command as usual. All process remains the same for SUSE Manager setup.
Additional steps for AWS public cloud servers are as below –
Setup will automatically create a default administrator account admin and default Organization organization for SUSE Manager. You need to set a password for this admin account using the command below –
kerneltalks_aws # satpasswd admin
New password: *****
Confirm password: *****
Now you have an admin account with the password. Log in to the SUSE Manager web console using these credentials and you are done! You have working SUSE Manager on AWS Public Cloud.
The next step you want to do is add a new administrator account and organization. Then get rid of these default acc and org. These are pretty easy steps through the SUSE Manager web console.
Step by step procedure to add a new client in SUSE Manager.
In this article, we will walk you through step by step procedure to register a client in SUSE Manager. The complete process can be split into 5 parts as below where first 4 are pre-requisite –
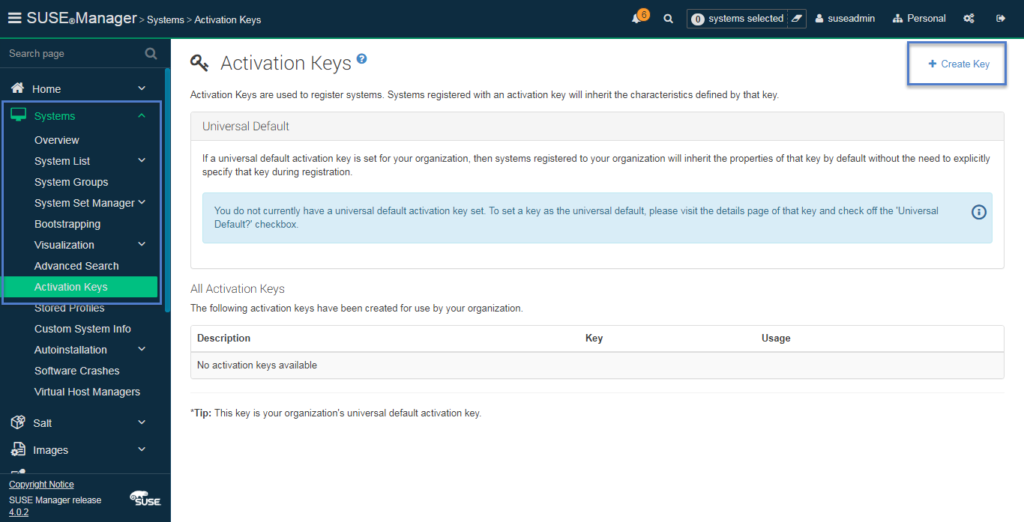
Create custom channels
Create Activation Keys
Create bootstrap scripts
Create bootstrap repo
Register client
If you already have an established SUSE Manager in your infra then the first 4 steps must have been already completed and configured. Let’s go one by one now –
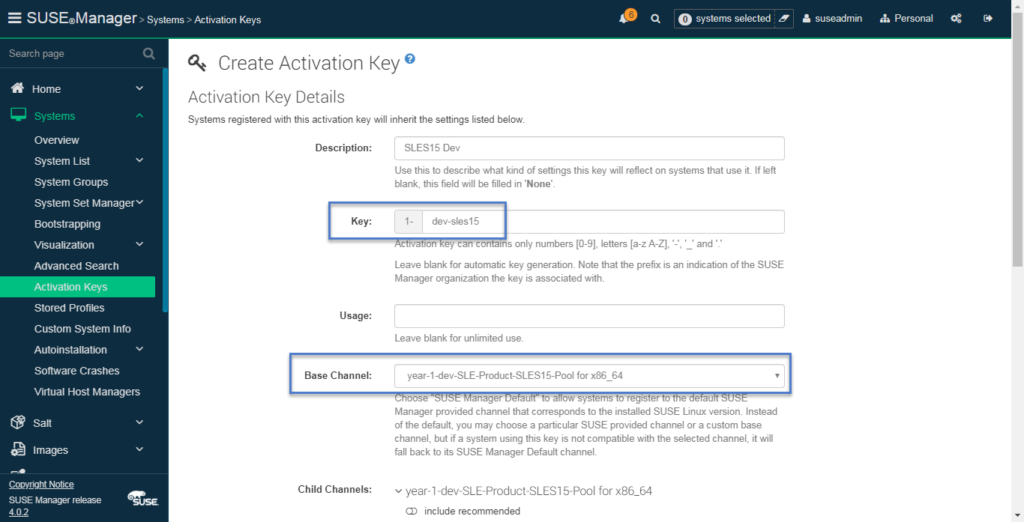
For this step, we will use dev channel we created in the previous step. So we will create Activation Key (AK) for channel year-1-dev-SLE-Product-SLES15-Pool for x86_64
Navigate to Systems > Activation Keys
Hit Create Key button
Create Activation Key
I next screen there are 3 important fields you need to fill in –
Key : which starts with 1-. Rest you need to fill in some standard format so that its easier for you to identify later. We used 1-dev-sles15 here
Base Channel: You need to select the proper custom channels from the drop-down menu. Here custom channels created by Content Lifecycle Management and SUSE product channels will be listed. Choose wisely.
Child channels: Select child channels from your main base custom channel.
Activation key creation options
Leave rest to default. Every option has help text as well which will help you to understand it and its pretty simple. Finally, click Create Activation Key button at the bottom of the page.
Your key will be created and can be checked at the Activation Keys home menu we visited in the first step.
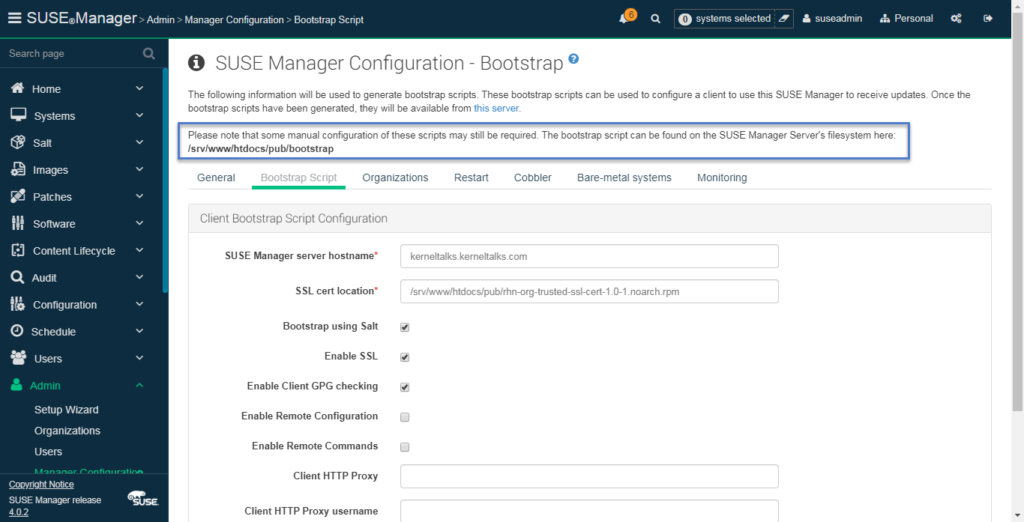
Create bootstrap scripts
Don’t worry you don’t have to script the code on your own. SUSE Manager got you covered. You just need to edit Activation Key in the ready-made script.
Navigate to Admin > Manager Configuration > Bootstrap Script
Here you can see the location of bootstrap script located in your SUSE Manager along with few options like a proxy (mainly) which can be tweaked. Make sure to hit Update button at bottom of the page to generate a script on the mentioned location for the first time before you use it.
Bootstrap script location on SUSE Manager
As you can see the bootstrap script is located in /srv/www/htdocs/pub/bootstrap on SUSE Manager. Log in to the SUSE Manager server using putty and make a copy of the script.
kerneltalks:~ # cp /srv/www/htdocs/pub/bootstrap/bootstrap.sh dev_sles15_bootstrap.sh
kerneltalks:~ # vi dev_sles15_bootstrap.sh
And in the copy edit below parameter to your Activation key.
ACTIVATION_KEYS=1-dev-sles15
That’s it. Your bootstrap script is ready to register client under dev channel.
Create bootstrap repo
Now, you need to create a bootstrap repo as well. This repo will be added to the client temporarily to fetch all SUSE Manager registration-related packages and their dependent packages so that registration can be initiated on the client. All this happens in the background when you run the bootstrap script on the client.
To create bootstrap repo run below command on SUSE Manager. Make sure all SUSE product repos are synced completely before running this command –
Make sure you edit command and choose OS distribution as per your channel you are selecting. We are working on dev SLES15 channel here so I chose SLE-15-x86_64 product in command.
You can see it copies all packages and their dependencies to the new repo for new clients. Sample output :
And we came to the last step for which we have been sweating on all the above pre-requisite!
Its a very simple one command step to be executed on the client machine. The client can be registered from the SUSE Manager console itself as well. We will see both steps here.
Before that one point to note – If your system is VM built from template or clone or if it’s a clone system in any way then you should run below commands on client systems to assign unique system Id and then proceed with registration.
It will do all the work for you and once the script finishes the execution you should see the client’s key is pending for approval in the SUSE Manager console. Unless you approve it, the client won’t be registered to SUSE Manager. Script has a long output so I am not mentioning it here.
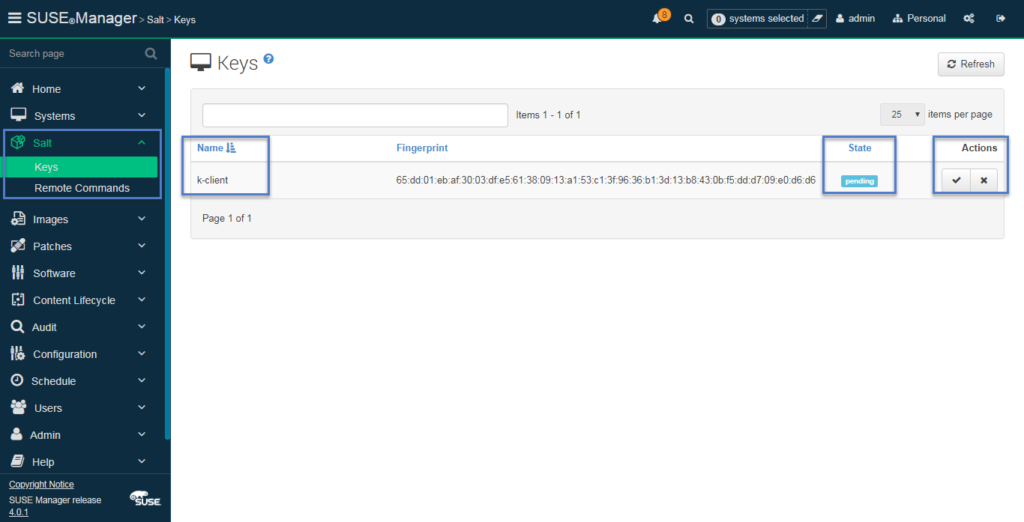
To approve client key navigate to SUSE Manager > Salt > Keys
Accept salt client in SUSE Manager
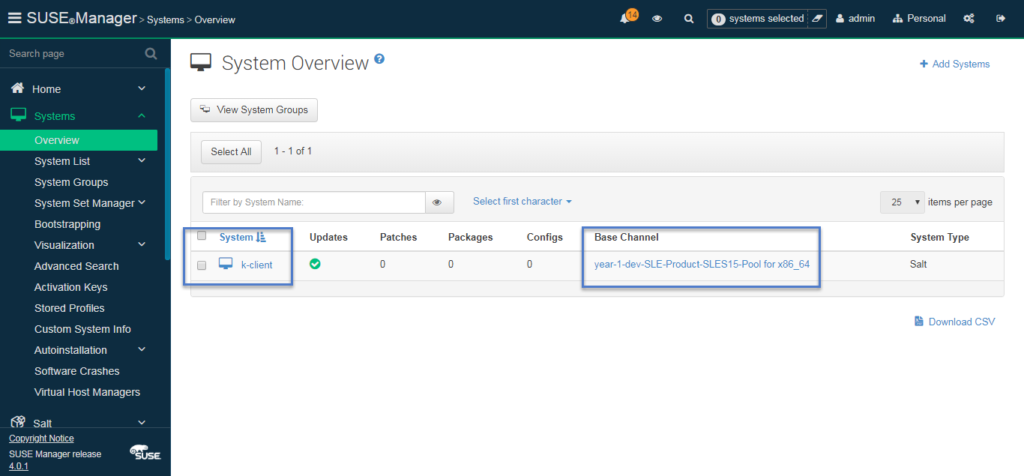
Click the tick button and your client is registered! It will be shown as accepted in Salt then. You can view it under SUSE Manager > Systems > Overview
System Overview in SUSE Manager
You can system is registered in SUSE Manager under dev channel!
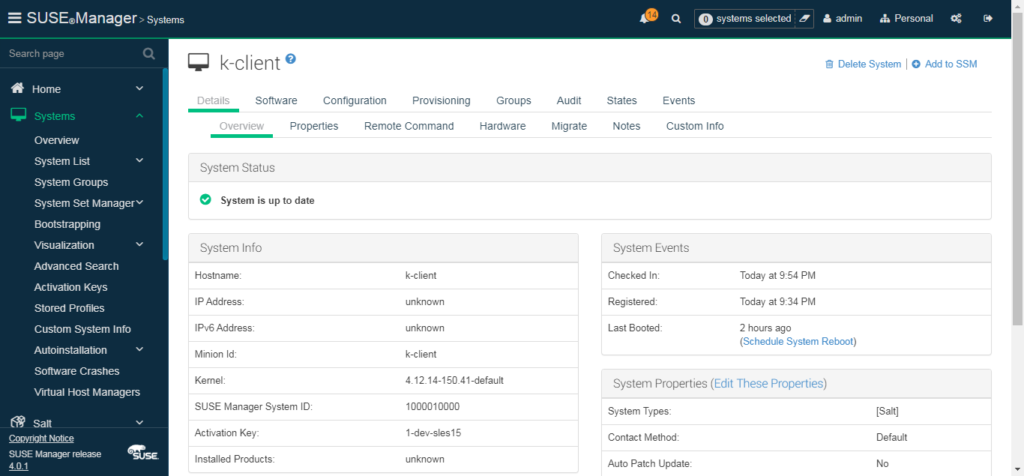
To view more details about the system, click on hostname and you will see client details along with a tabbed menu bar which will help you manage that client from the SUSE Manager console.
Client details in SUSE Manager
Register client to SUSE Manager from the console itself
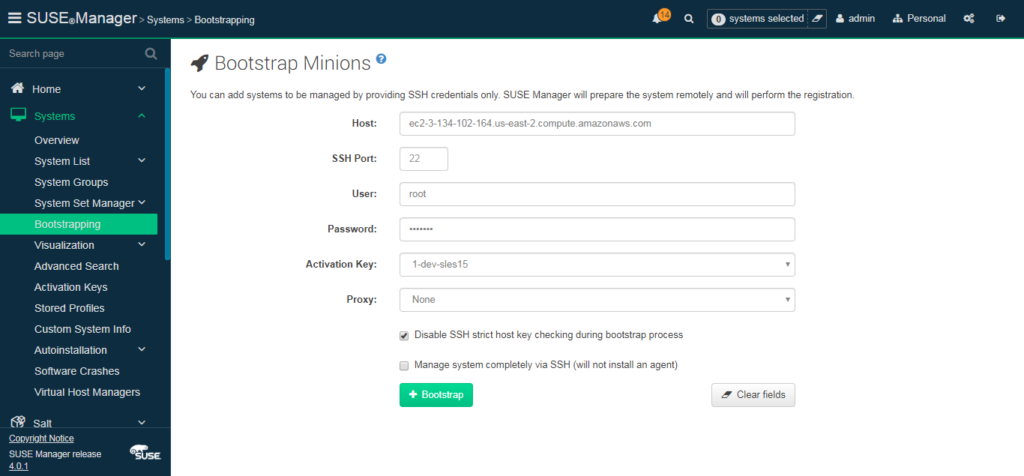
You can provide SSH login to the SUSE Manager console and it will do all the above steps which you need to do manually by logging into the client using putty.
Navigate to SUSE Manager > Systems > Bootstrapping
Bootstrapping client from SUSE Manager
Fill in details and hit Bootstrap button. It will start connecting system via SSH in backend and execute stuff. On console you will be shown message Your system is bootstrapping: waiting for a response..
Once completed, your system is registered and you can view it in system overview as explained above. You need not accept key in this case since SUSE Manager auto approves this salt request.
Issue on SUSE clients
You may face issues on some SUSE clients where even after bootstrap completes properly salt-minion process wont start and hence you can not register server with SUSE Manager.
You might see below error in such case :
root@kerneltalks # systemctl status salt-minion
● salt-minion.service - The Salt Minion
   Loaded: loaded (/usr/lib/systemd/system/salt-minion.service; enabled; vendor preset: disabled)
   Active: activating (auto-restart) (Result: exit-code) since Tue 2020-07-21 18:19:14 IST; 3s ago
  Process: 3708 ExecStart=/usr/bin/salt-minion (code=exited, status=1/FAILURE)
 Main PID: 3708 (code=exited, status=1/FAILURE)

Jul 21 18:19:14 kerneltalks systemd[1]: salt-minion.service: Unit entered failed state.
Jul 21 18:19:14 kernelatalks systemd[1]: salt-minion.service: Failed with result 'exit-code'.
And you can check /var/log/messges for below error messages :
2020-07-21T18:32:04.575062+02:00 kerneltalks salt-minion[6530]: /usr/lib/python2.7/site-packages/salt/scripts.py:198: DeprecationWarning: Python 2.7 will reach the end of its life on January 1st, 2020. Please upgrade your Python as Python 2.7 won't be maintained after that date.  Salt will drop support for Python 2.7 in the Sodium release or later.
2020-07-21T18:32:04.778852+02:00 kerneltalks salt-minion[6530]: Process Process-1:
2020-07-21T18:32:04.779245+02:00 kerneltalks salt-minion[6530]: Traceback (most recent call last):
2020-07-21T18:32:04.779495+02:00 kerneltalks salt-minion[6530]:   File "/usr/lib64/python2.7/multiprocessing/process.py", line 258, in _bootstrap
2020-07-21T18:32:04.779891+02:00 kerneltalks salt-minion[6530]:     self.run()
2020-07-21T18:32:04.780163+02:00 kerneltalks salt-minion[6530]:   File "/usr/lib64/python2.7/multiprocessing/process.py", line 114, in run
2020-07-21T18:32:04.780408+02:00 kerneltalks salt-minion[6530]:     self._target(*self._args, **self._kwargs)
2020-07-21T18:32:04.780642+02:00 kerneltalks salt-minion[6530]:   File "/usr/lib/python2.7/site-packages/salt/scripts.py", line 157, in minion_process
2020-07-21T18:32:04.781024+02:00 kerneltalks salt-minion[6530]:     minion.start()
2020-07-21T18:32:04.781263+02:00 kerneltalks salt-minion[6530]:   File "/usr/lib/python2.7/site-packages/salt/cli/daemons.py", line 343, in start
2020-07-21T18:32:04.781684+02:00 kerneltalks salt-minion[6530]:     super(Minion, self).start()
2020-07-21T18:32:04.781923+02:00 kerneltalks salt-minion[6530]:   File "/usr/lib/python2.7/site-packages/salt/utils/parsers.py", line 1064, in start
2020-07-21T18:32:04.782900+02:00 kerneltalks salt-minion[6530]:     self.prepare()
2020-07-21T18:32:04.783141+02:00 kerneltalks salt-minion[6530]:   File "/usr/lib/python2.7/site-packages/salt/cli/daemons.py", line 311, in prepare
2020-07-21T18:32:04.783385+02:00 kerneltalks salt-minion[6530]:     import salt.minion
2020-07-21T18:32:04.783613+02:00 kerneltalks salt-minion[6530]:   File "/usr/lib/python2.7/site-packages/salt/minion.py", line 69, in <module>
2020-07-21T18:32:04.784700+02:00 kerneltalks salt-minion[6530]:     import salt.client
2020-07-21T18:32:04.784942+02:00 kerneltalks salt-minion[6530]:   File "/usr/lib/python2.7/site-packages/salt/client/__init__.py", line 40, in <module>
2020-07-21T18:32:04.785631+02:00 kerneltalks salt-minion[6530]:     import salt.utils.minions
2020-07-21T18:32:04.785870+02:00 kerneltalks salt-minion[6530]:   File "/usr/lib/python2.7/site-packages/salt/utils/minions.py", line 24, in <module>
2020-07-21T18:32:04.786399+02:00 kerneltalks salt-minion[6530]:     import salt.auth.ldap
2020-07-21T18:32:04.786634+02:00 kerneltalks salt-minion[6530]:   File "/usr/lib/python2.7/site-packages/salt/auth/ldap.py", line 21, in <module>
2020-07-21T18:32:04.787043+02:00 kerneltalks salt-minion[6530]:     from jinja2 import Environment
2020-07-21T18:32:04.787300+02:00 kerneltalks salt-minion[6530]: ImportError: No module named jinja2
2020-07-21T18:32:04.818391+02:00 kerneltalks systemd[1]: salt-minion.service: Main process exited, code=exited, status=1/FAILURE
2020-07-21T18:32:04.818897+02:00 kerneltalks systemd[1]: salt-minion.service: Unit entered failed state.
2020-07-21T18:32:04.819261+02:00 kerneltalks systemd[1]: salt-minion.service: Failed with result 'exit-code'.
In this case, you should be able to run the salt-minion process manually by exporting the python path. Check the salt-minion binary to make sure which python is being used for this process in case your system has multiple versions installed.
root@kerneltalks # head -1 /usr/bin/salt-minion
root@kerneltalks # export PATH=$PATH:/usr/lib64/python2.6/site-packages/
root@kerneltalks # export PYTHONPATH=/usr/lib64/python2.6/site-packages/
root@kerneltalks # salt-minion start &
Once salt-minion is running you will be able to register a client to SUSE Manager. After registration update python by zypper up python* and then your salt-minion process will run using systemctl properly.
Issue of RHEL/OEL clients
I observed a peculiar problem where patch update tasks are sitting idle in a pending state for a long time and not being picked up by the client.
It shows in SUSE Manager GUI that –
This action will be executed after 1/10/20 10:28:00 AM IST
This action's status is: Queued.
This action has not yet been picked up.
and it sits there and does nothing.
The solution is to run rhn_check -vvvv on the client machine for which the job is stuck on SUSE Manager. It will be checked, picked up and executed!
How to create custom channels using Content Lifecycle Management in SUSE Manager
CLM in SUSE Manager
In this article, we will discuss Content Lifecycle Management in SUSE Manager for controlling patching in your infrastructure.
What is Content Lifecycle Management in SUSE Manager
Content Lifecycle management is managing how patches flow through your infra in a staged manner. In ideal infra, the latest patches will always be applied on development servers. If everything is good there then those patches will be applied to QA servers and lastly to production servers. This enables sysadmins to catch issues if any and hence preventing patching of the prod system which may create downtime of live environments.
SUSE Manager gives you this control via the content lifecycle. In this, you create custom channels in SUSE Manager for example dev, QA and prod. Then you register your systems to those channels according to their criticality. Now whenever channels get the new patches it will be available to respective systems (registered to those channels) to install. So if you control channels you control the patch availability to systems.
In content lifecycle management, SUSE manager enables you to push patches to channels manually. Like on first deploy all latest patches will be available to dev channels and hence dev systems. At this stage, if you run update commands (zypper up, yum update) they will show the latest patches only on dev servers. QA and prod servers won’t show any new patches.
Once dev is found to be ok after updates, you can go and manually promote patches to QA so now QA channels will have new latest patches and hence QA servers. Finally the same for prod. This is how you control and hence manage the patch lifecycle using SUSE Manager.
If it found confusing to you then go through the below process and screenshots, it will be more clear for you.
How to create custom channels in SUSE Manager
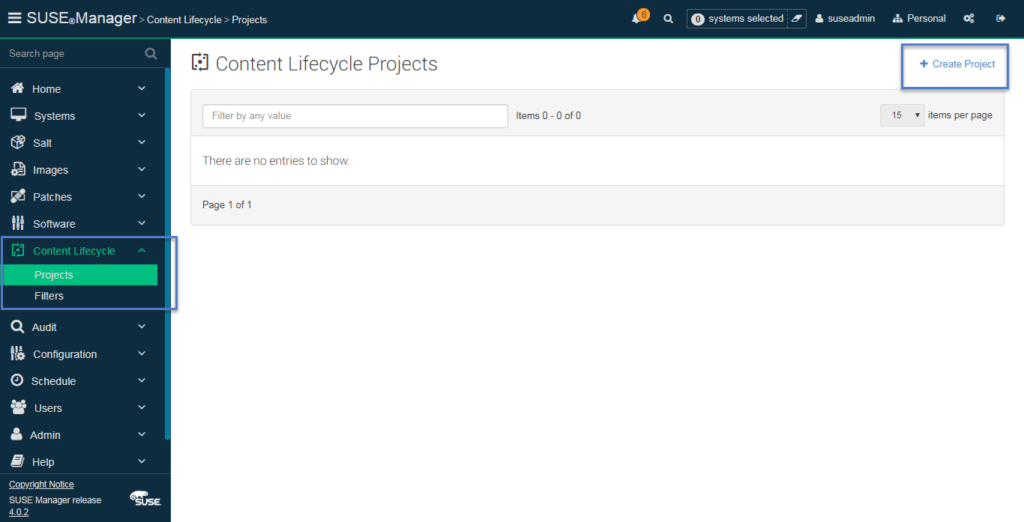
Now we will start with Content Lifecycle Management in SUSE Manager we setup. Log in to SUSE Manager and navigate to Content Lifecycle > Projects and click Create Project button.
Creating a project in Content Lifecycle Management of SUSE Manager
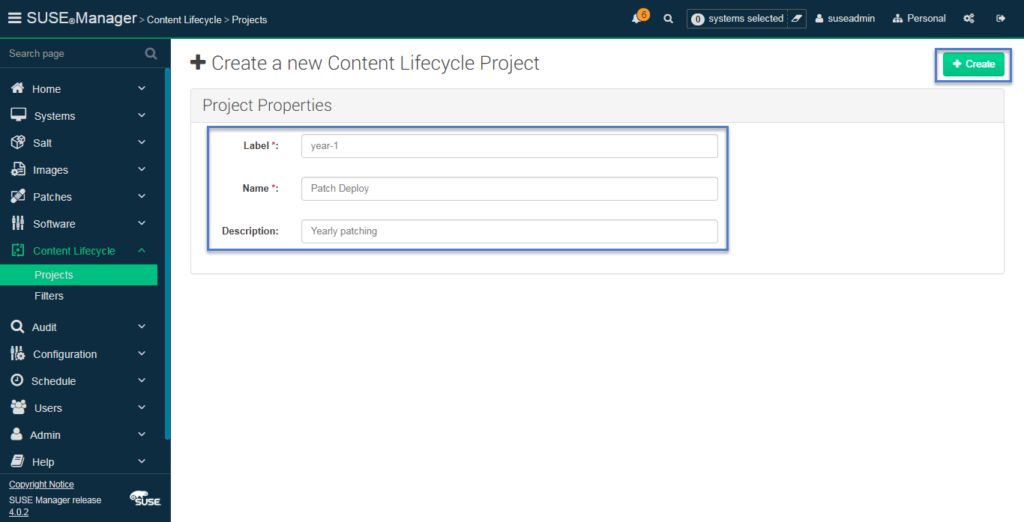
You will be presented with the below page: Fill in all relevant details and hit Create button. You can create a project for each flavor of Linux you have in your infra. For example, you can create projects for Suse Linux 11, Suse Linux 12, Suse Linux 12 sp 3, etc. So that you can select respective source channels in each of these projects and keep your SUSE Manager organized.
In our SUSE Manager, I synced only one product channels i.e. of Suse Linux 15 so I simply keyed in patch deploy as a name.
New Project in SUSE Manager CLM
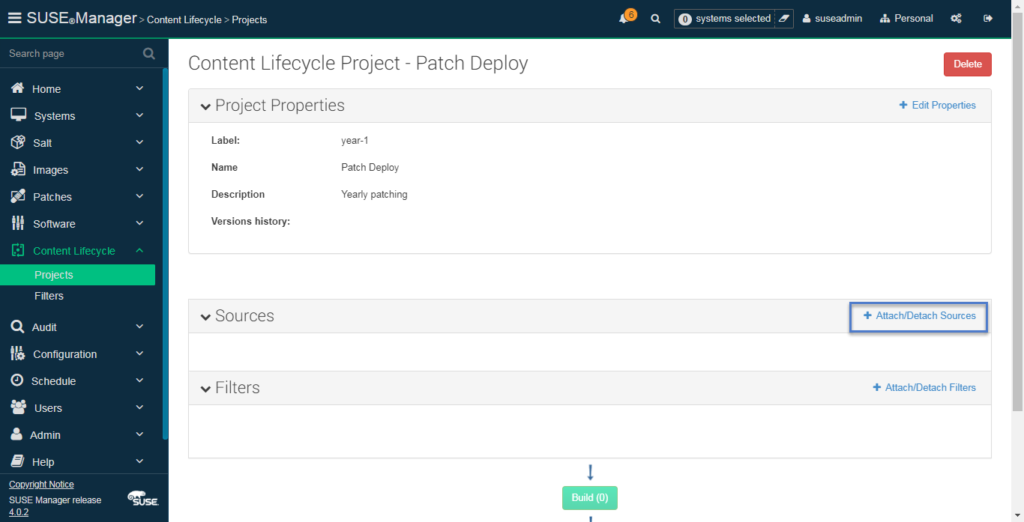
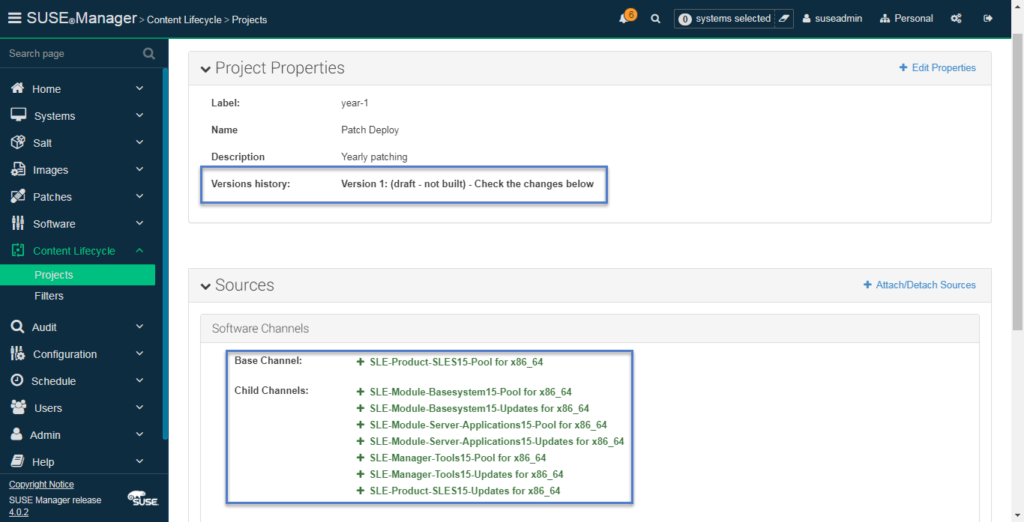
Once the project is created, you will be prompted to add source channels to it. Means from those channels packages, updates will be sourced (from SUSE) and distributed to your project channels.
These source channels are the ones you synced during initial setup of SUSE Manager. Read how to sync SUSE product channels in SUSE Manager for more details. So you need to select channels from these ones according to project requirement. Like for project Suse Linux 11 select only source channels of Suse Linux 11 and so on.
Click Attach/Detach sources to do that.
How to attach source channels in the SUSE Manager project
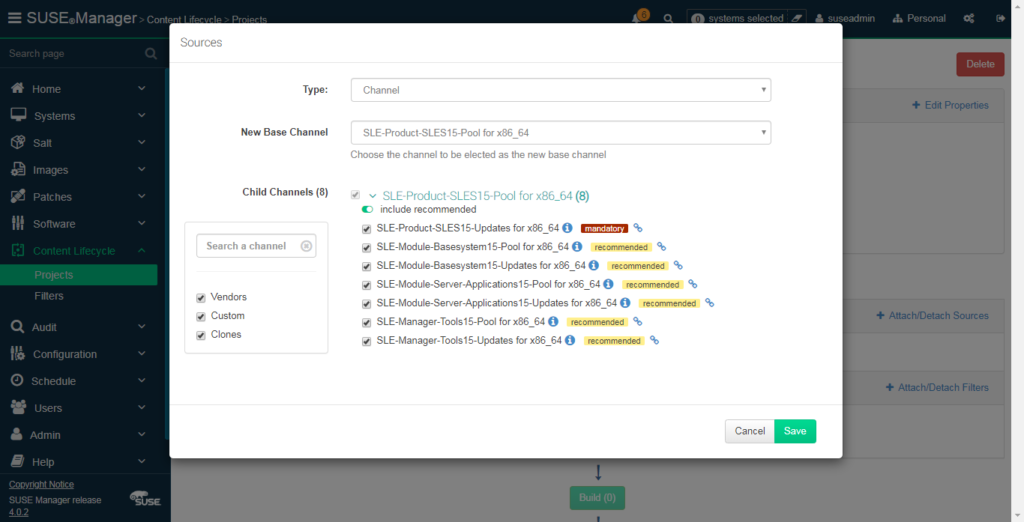
Now you can see in the below screenshot that only Suse Linux 15 channels are available for me to select since I synced only the Suse Linux product channel in the initial setup. You will see here all the products which you have synced.
Select product channels
Once selected and clicked save you will see sources are updated with your selected channel list. Also, notice that version history details under Project properties are set to version 1 (draft - Not built)
Project version history
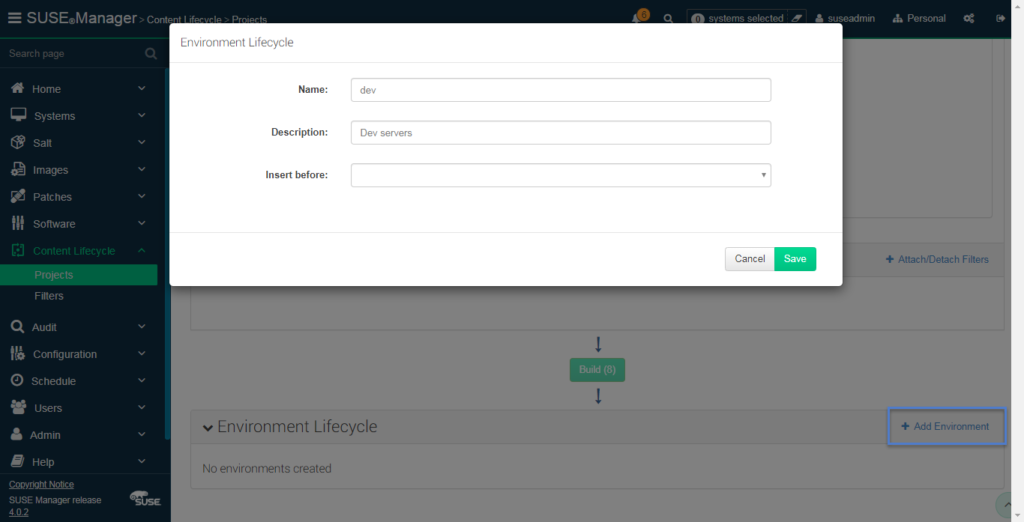
Now its time to add your destination! This means to create environments. As I explained earlier here we will flow patches from dev to QA to prod. So here it is where you define this hierarchy. In the interest of time, we will follow from dev to prod only.
So we will create the environment as dev and prod as below by clicking Add Environment button –
Create an environment
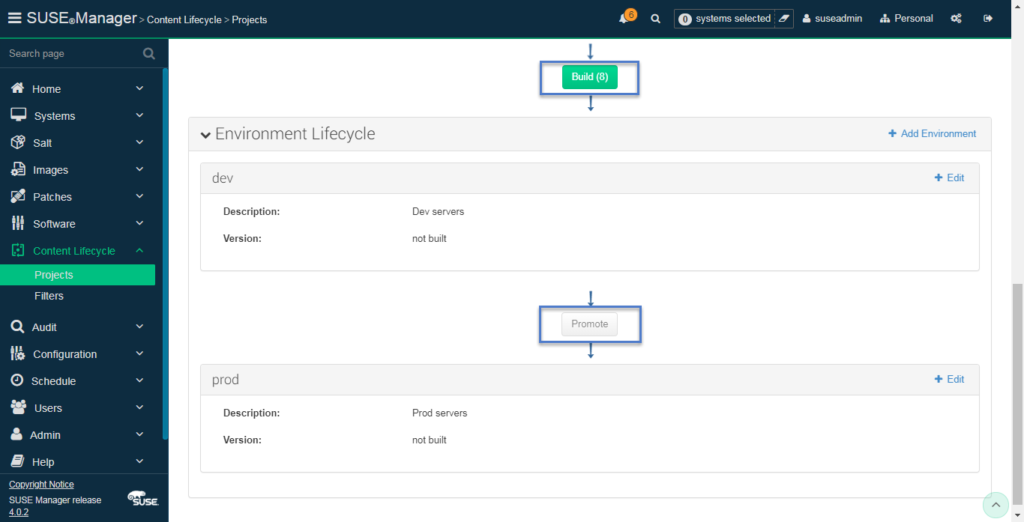
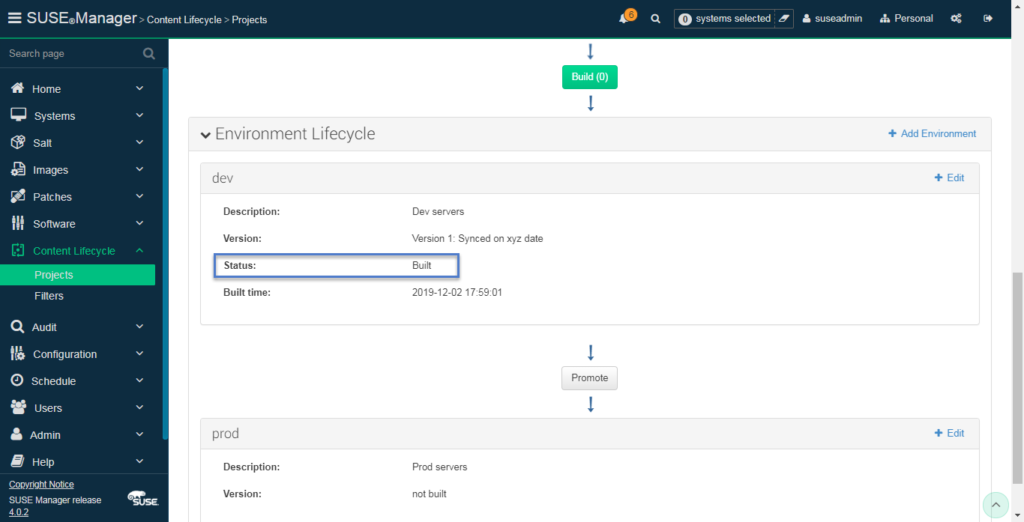
Once done you can see as below, dev and prod environments and buttons Build and Promote. Whereas version is marked as not built for all of them.
So you have to start patch flow now. As of now, all the latest patches are in source channels. Once you click Build button below they will be made available to the dev environment. Basically it will create child channels for dev where all these patches will be made available from source channel.
Build project in SUSE Manager
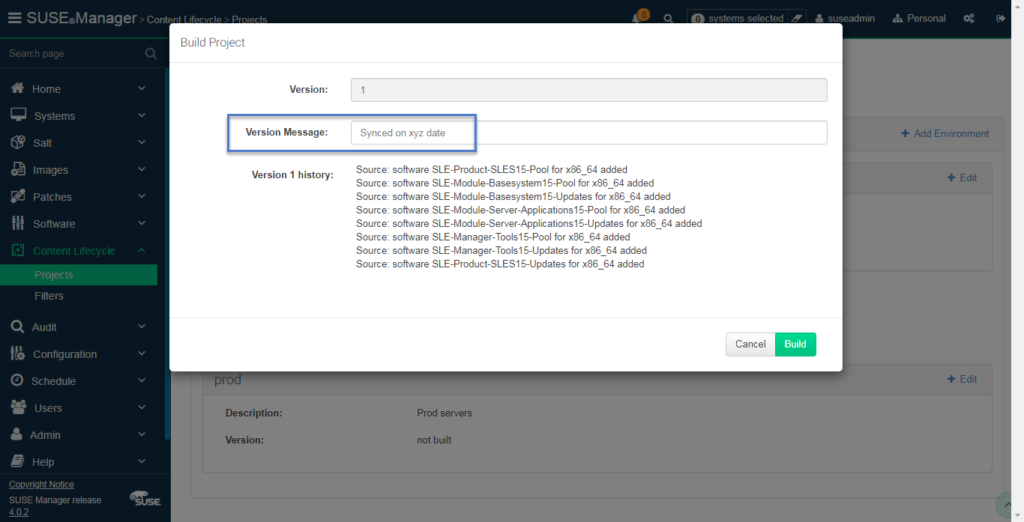
Once you click Build button you will see below version keeper window where you can add a version message note so that it will be easy to remember the purpose of this channel syncs or date/time of sync etc.
Start building the first environment
It will take time depending on the number of channels, number of patches within, size of them and of course your internet bandwidth! As Don Vosburg from SUSE commented below – ” This process is database intensive – so having the Postgres database on SSD helps speed it up a bit! “
The first environment built!
Patches will be built in new custom channels and only then you will be able to Promote them to the next stage.
What do you mean by promoting patches?
So once build is completed, the latest patches are now available to dev environment from source channels via custom channels. But still, the next environment i.e. prod still don’t have them. At this stage, you can install/test them on dev servers and isolate prod servers from them in case of any issues. If everything is working fine after installing/testing then you can promote them to the next environment (here its prod) and then all latest patches will be made available to the prod environment via custom channels.
You can then click Promote button and the same way they will be synced to the next environment.
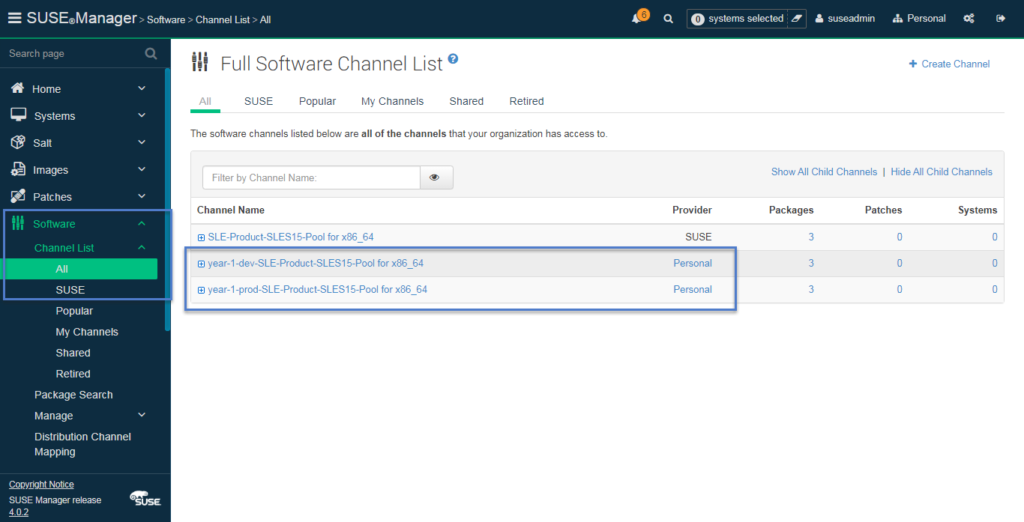
View custom channels in SUSE Manager
Now we built and promoted; dev and prod environments. I said they will have now custom channels through which the latest patches will be made available to respective environments. So its time to check these new custom channels created by content lifecycle management.
Navigate to Software > Channel List > All
You can see below dev and prod channel of project year-1 listed there. Where the provider is Personal. Remember, we added our organization name as Personal in our initial SUSE Manager setup.
That’s all for this article! We created new custom channels in SUSE Manager via Content Lifecycle Management feature. Using this feature we able to control the latest patches availability to different environments.
The next step is to create Activation Keys for these custom channels which can be used to register client systems to these channels in your infra.
A short article explaining product channels in SUSE Manager along with screenshots.
Product sync in SUSE Manager
In our previous article, we saw how to configure SUSE Manager 4.0 with screenshots. In this article, we will discuss channel management in SUSE Manager.
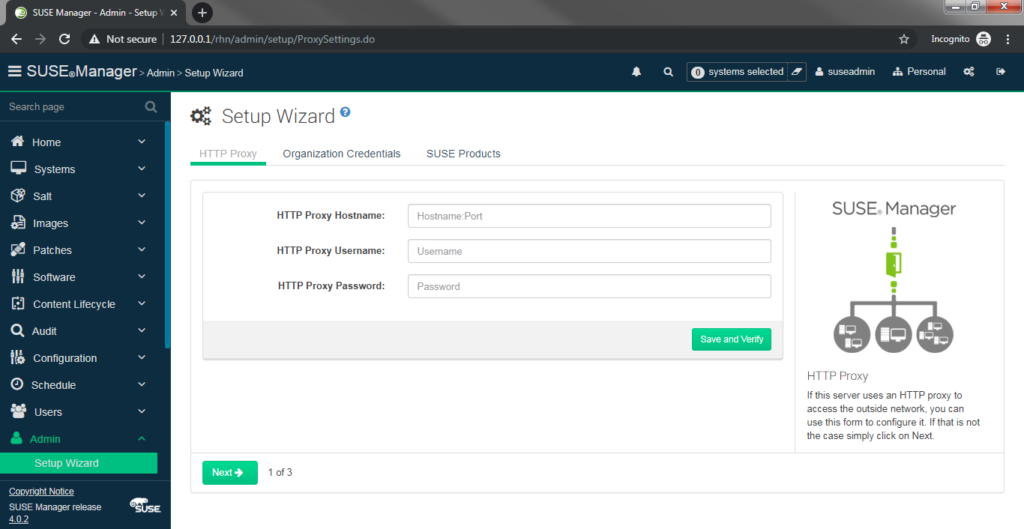
To start with you should have base product channels synced to SUSE Manager from Suse. For that goto to Admin > Setup Wizard in SUSE Manager web console. It’s a 3 step process which you need to complete for your first base channel syncs.
In the first step, you need to configure for internet access if applicable
Proxy configuration in SUSE Manager
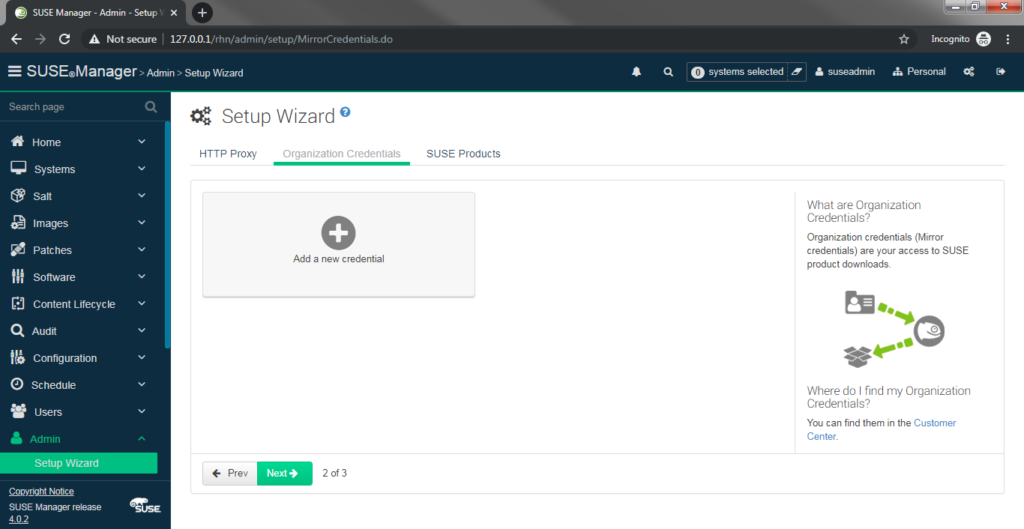
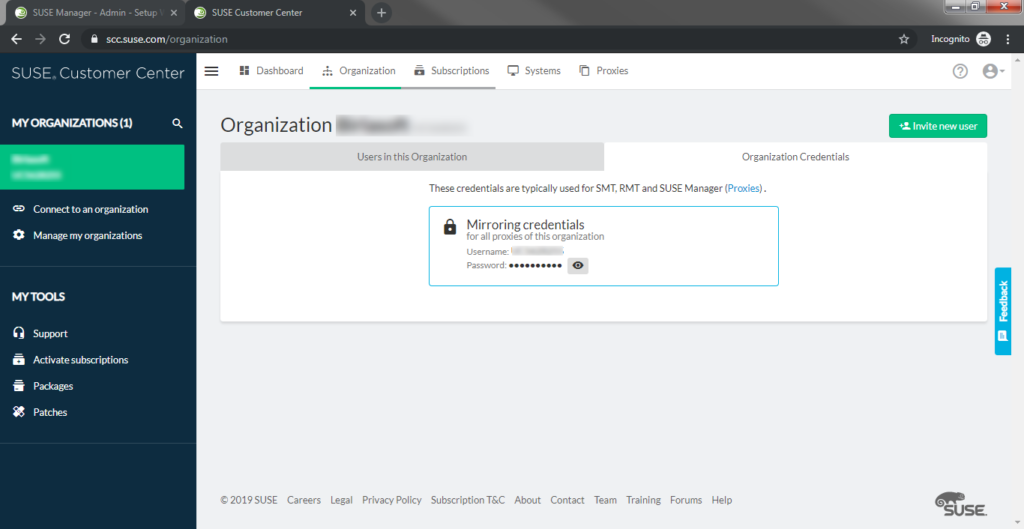
In the second step, you need to add your organizational credentials which will be used to verify your subscriptions and accordingly products will be made available to you for sync in SUSE Manager.
Organizational credentials in SUSE manager
You will find your organization credentials at https://scc.suse.com/organization . There you will find the username (same as organization id) and password which you need to fill up in SUSE Manager.
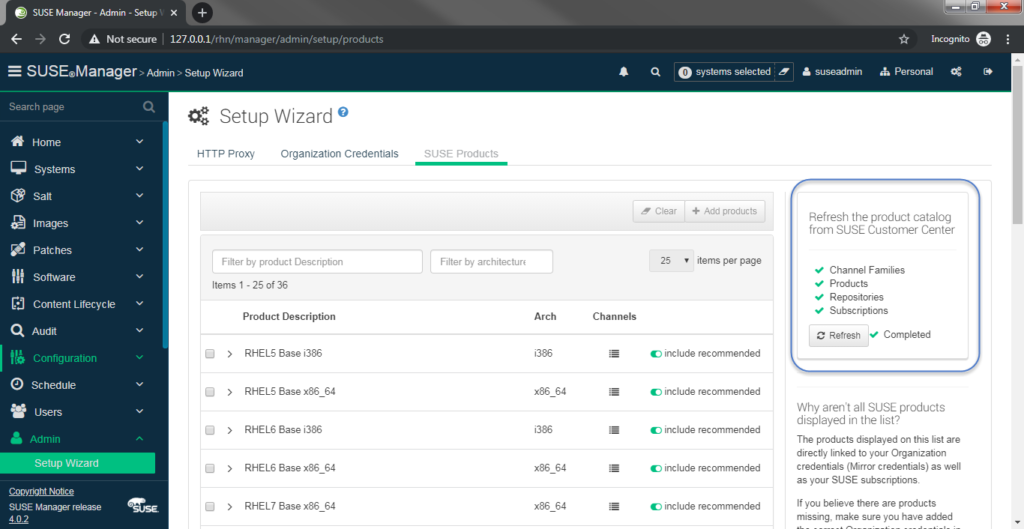
Enter it to the SUSE manager page above and move to the third step i.e. SUSE products. You will have to wait for a few minutes when you visit this page for the first time. It will download all products catalog from SUSE Customer Center depending on your organization’s credentials. Once the refresh is done, you will see a list of products available for you like below –
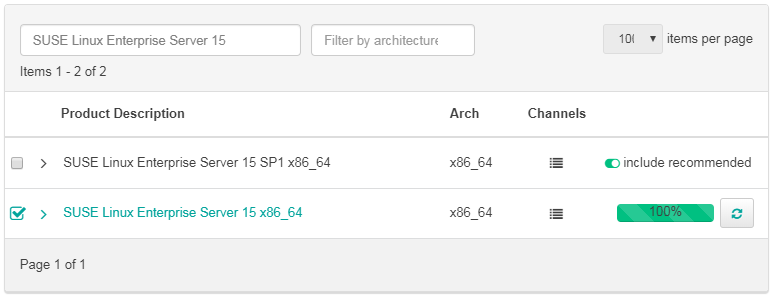
SUSE product catalog
Product channel sync
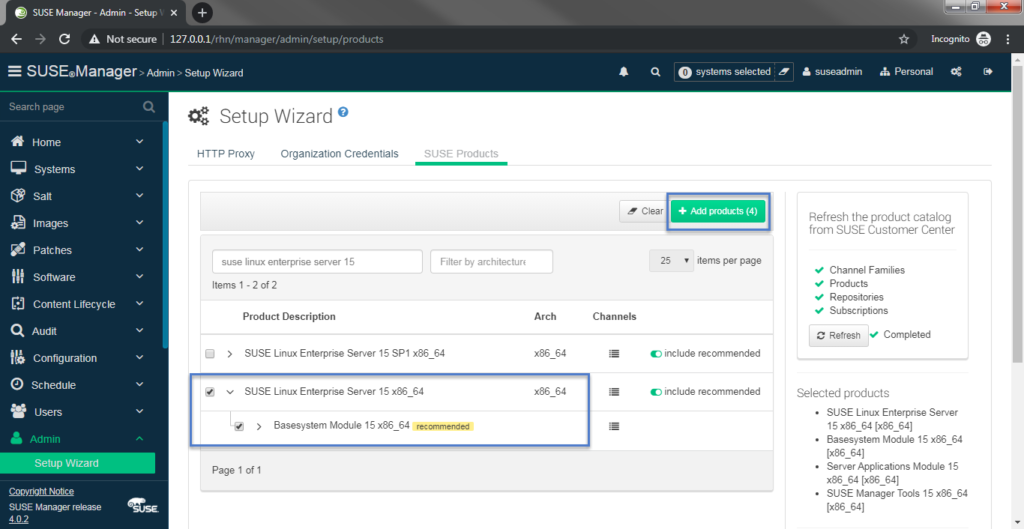
Now select product of your choice to sync its channels. It depends on what variety of OS flavors you have in your infra and which all you have subscribed to. I selected only SUSE 15 for now.
SUSE Manager product channel sync
And click on Add product button highlighted in the screenshot. They will start syncing. It takes time to sync channels depending on the number of products you selected to sync and the internet bandwidth of the server.
You can track progress in log files on the SUSE Manager server located at /var/log/rhn/reposync . You will see log file for each channel and it contains sync status progress for that channel.
kerneltalks:/var/log/rhn/reposync # ls -lrt
total 540
-rw-rw---- 1 wwwrun www   1474 Dec  3 12:02 sle-product-sles15-pool-x86_64.log
-rw-rw---- 1 wwwrun www   1731 Dec  3 12:02 sle-product-sles15-updates-x86_64.log
-rw-rw---- 1 wwwrun www 245815 Dec  3 12:16 sle-module-basesystem15-pool-x86_64.log
-rw-rw---- 1 wwwrun www 293137 Dec  3 13:05 sle-module-basesystem15-updates-x86_64.log
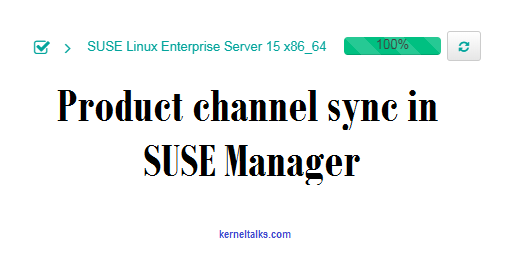
Once the sync is complete it will show as below –
Sync complete!
That’s it! You have added a product and associated channels to SUSE Manager.
How to remove product channels from SUSE Manager
If by mistake, you have added some products which you don’t want then it’s not easy to remove it from SUSE Manager. The webpage does not allow you to just de-select it. You have to follow another method to remove them. I explained all steps to remove product and channels from SUSE manager here
Step by step setup of SUSE Manager Server 4.0 configuration
SUSE Manager server 4 setup
In our previous post of SUSE Manager server installation, we walked you through how to install SUSE Manager step by step including screenshots. In this article, we will walk you through the SUSE Manager 4.0 configuration setup.
Considering you have the system installed with SUSE Manager package you can proceed to start SUSE Manager setup by running below command –
kerneltalks:~ # yast2 susemanager_setup
If you see an error saying No such client module susemanger_setup then you must not have susemanger package installed. Install it using zyapper in susemanager command and you will be able to run above setup command.
Once run, you will be presented with a text-based GUI setup and we will go through it step by step along with screenshots.
Obviously keep in mind you completed the disk space requirements before you start setup. Those are explained in the pre-requisite on the SUSE documentation.
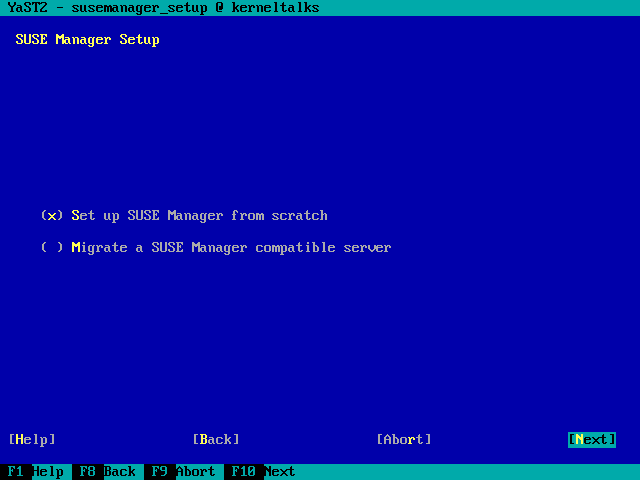
SUSE Manager Setup
The first screen to choose the type of setup which is a pretty obvious choice.
The first screen of the setup
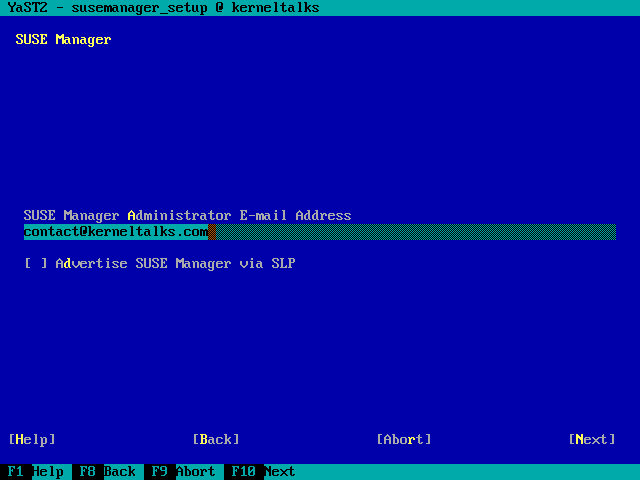
On the second screen, you will be asked to enter the SUSE Manager Administrator email address.
Admin email address
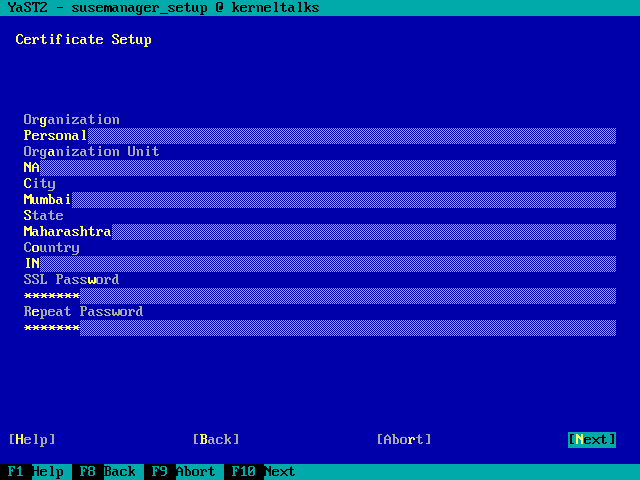
On the next screen, you need to provide details to create an SSL certificate of SUSE Manager.
Certificate setup
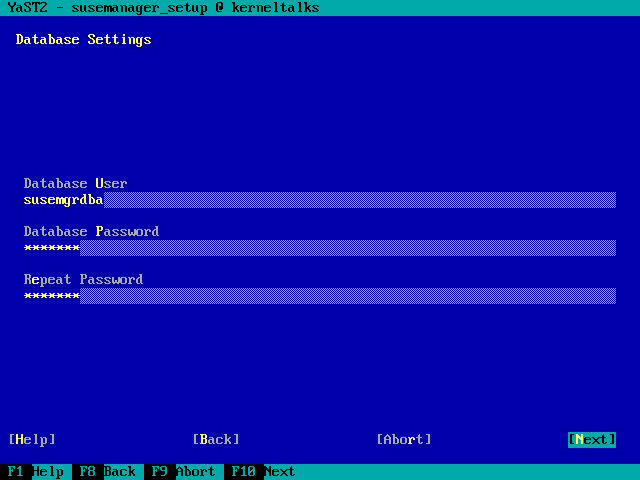
Now it will ask you for database details to be set. You can choose the database user of your choice.
Database settings
At this stage, all inputs have been collected and setup is ready to complete configurations. It still gives you another chance to modify your responses in answer file and run setup manually later in below window.
The setup is ready!
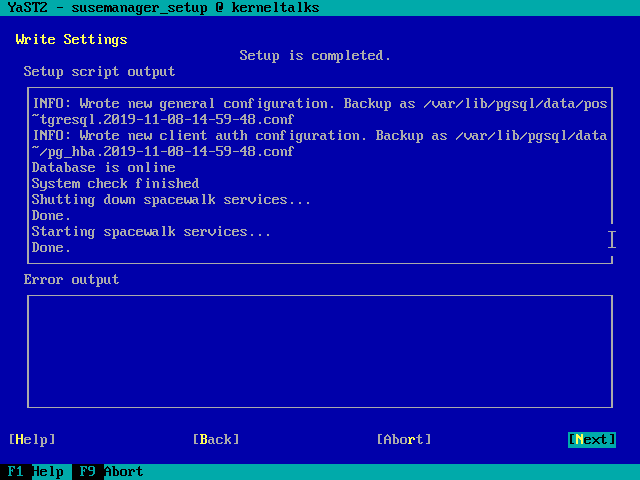
We made the obvious choice and hit the Yes button. Now, it will setup the SUSE manager and show you output as it goes. Finally, the SUSE Manager setup will be completed as below.
Setup is completed!
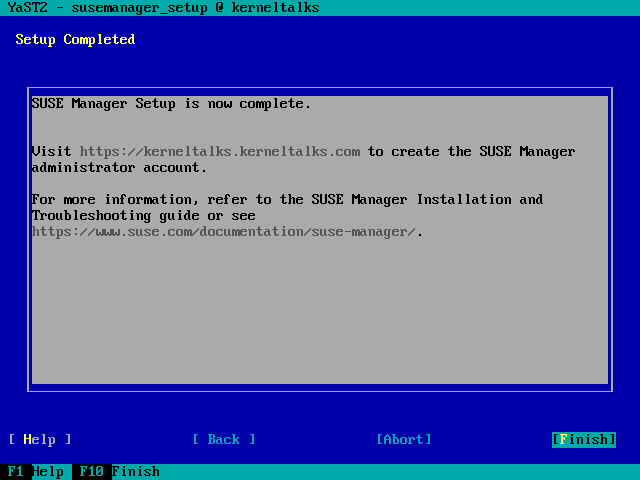
Hit Next and you will be shown web URL which can be used to administrator your SUSE Manager along with the instruction to create an account first.
SUSE Manager is configured!
SUSE Manager web console
As given in the last screen of setup, open your browser and head to the URL mentioned. Since I installed in VirtualBox, I used port forwards and opened it on loopback IP –
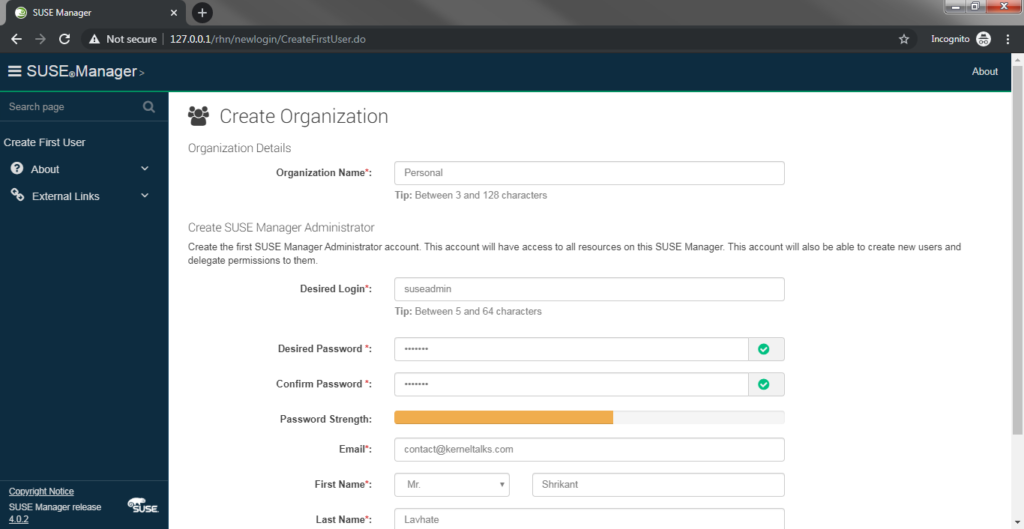
SUSE Manager console first page!
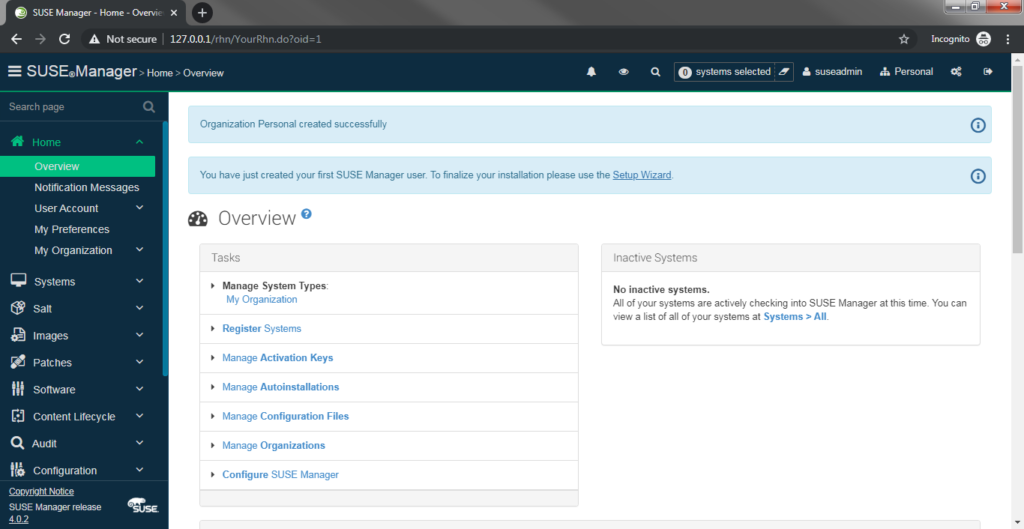
You need to fill in all the details to create your SUSE Administrator user and hit ‘Create Organization‘ button at the end of the page. And you are done! You will see below home page of the SUSE Manager console.
SUSE Manager console home page
Now your SUSE Manager setup is completed and you have web page console from where you can manage your SUSE Manager.
As very next step after this setup completion is to add subscription details to it and sync product channels so that it can be used in your organization for patching. We have covered it here in how to add product channels in SUSE Manager
Different steps to troubleshoot check_mk agent in Linux
check_mk agent checks
Before we start you may want to check our tutorial about setting up check_mk monitoring in Linux. You might experience issues when adding a server into check_mk monitoring. Below are a few steps, you can check to validate your configuration and communication between check_mk server and client works well.
Port 6556 communication
check_mk communicate over port 6556 by default. You need to check if port 6556 is open between client and server.
Also, you need to check if port 6556 is listening on your check_mk client so that server can fetch details by querying the client on port 6556.
You can even check using telnet on client and from server to client.
root@kerneltalks # telnet localhost 6556
Trying 127.0.0.1...
Connected to localhost.
Escape character is '^]'.
Connection closed by foreign host.
How to restart check_mk agent
check_mk agent runs on top of xinetd service in Linux. So if you make any changes to the config file then you need to reload configuration or restart the agent.
Reload check_mk configuration using below command –
root@kerneltalks # service xinetd reload
Redirecting to /bin/systemctl reload xinetd.service
Restart check_mk agent using below command –
root@kerneltalks # service xinetd stop
root@kerneltalks # service xinetd start
check_mk configuration file
Make sure you have a proper configuration file in place. check_mk configuration file is located at /etc/xinetd.d/check_mk_agent. The sample configuration file is as below –
# Created by Check_MK Agent Bakery.
# This file is managed via WATO, do not edit manually or you
# lose your changes next time when you update the agent.


service check_mk_agent
{
        type           = UNLISTED
        port           = 6556
        socket_type    = stream
        protocol       = tcp
        wait           = no
        user           = root
        server         = /usr/bin/check_mk_agent
        log_on_success =
        disable        = no
        only_from      = 10.10.1.2 10.10.1.3
}
only_from field denotes check_mk server IPs to which your agent will communicate. It will be populated by RPM you used to install. If it doesn’t reflect proper values you can edit it and reload check_mk configuration by using commands mentioned above.
check_mk agent updater
Check update for check_mk agent and download from the server using check_mk updater.
root@kerneltalks #  cmk-update-agent -v -v
+-------------------------------------------------------------------+
|                                                                   |
|  Check_MK Agent Updater - Update                                  |
|                                                                   |
+-------------------------------------------------------------------+
Read /etc/cmk-update-agent.state.
Getting target agent configuration from deployment server
Fetching URL: http://kerneltalks1/master/check_mk/deploy_agent.py?...
Response from deployment server:
AgentAvailable: False

Read /etc/cmk-update-agent.state.
Saved deployment status to /etc/cmk-update-agent.state.
No agent available for us.
Using this command you can even see to which server client is registered. If the client is not registered with check_mk server then you will see below error –
root@kerneltalks # cmk-update-agent -v -v
+-------------------------------------------------------------------+
|                                                                   |
|  Check_MK Agent Updater - Update                                  |
|                                                                   |
+-------------------------------------------------------------------+
Read /etc/cmk-update-agent.state.
Getting target agent configuration from deployment server
Fetching URL: http://kerneltalks1/master/check_mk/deploy_agent.py?...
ERROR This host is not registered for deployment
cmk-update-agent can not execute binary error
If you come across below error while executing cmk-update-agent command then it’s probably you are running binary of architecture it is not meant to run. e.g. you are running x86 binary on ARM server
/usr/bin/cmk-update-agent: line 8: /usr/lib/check_mk_agent/plugins/21600/cmk-update-agent: cannot execute binary file
Solution: Make sure you install the proper architecture package on your server which matches your server architecture. Generally x86 check_mk package is marked as noarch package but it will land you up in the above issue when you install it on the ARM arch server.
check_mk xinetd error
---------------------------------------------
WARNING
This package needs xinetd to be installed.
Currently you do not have installed xinetd.
Please install and start xinetd or install
and setup another inetd manually.
It's also possible to monitor via SSH without
an inetd.
---------------------------------------------
Solution: Install xinetd package. Start and enable xinetd service. If you are running a newer kernel/OS like Suse 15 SP1, xinetd is not available in it. Its sockets being served by systemd. You need to install a higher version of check_mk agent RPM which identifies systemd sockets and it won’t show you above error. e.g. version 1.4 packages were showing above error to me while when I used version 1.5 package, it got away and installation succeeded.
check_mk python error
---------------------------------------------
ERROR
Failed to install agent: Could not find a
'python' interpreter.
---------------------------------------------
Solution: It means you have a higher version of python like python3 and agent rpm is looking for python. Use the higher version of check_mk agent which understands the latest python binaries (which has nomenclature with like python3 and not python)
Learn how to use sudo access in winSCP with screenshots.
sudo access in winSCP
Before you move into configurations, make sure that the user is having NOPASSWD access to sudo to target user or root account. This means /etc/sudoers file must have entry something like below –
user1 ALL=(root) NOPASSWD: ALL
Once you have proper sudo configuration you can go ahead with WinSCP config. This is to ensure that once shell tries sudo it should be non-interactive.
First of all, you need to check where is your SFTP server binary located on the server you are trying to connect with WinSCP.
You can check SFTP server binary location with below command –
Here you can see sftp server binary is located at /usr/libexec/openssh/sftp-server
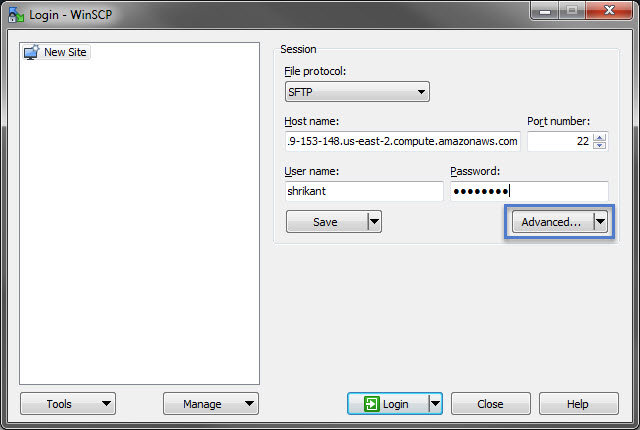
Now open winSCP and click Advanced button to open up advanced settings.
winSCP advance settings
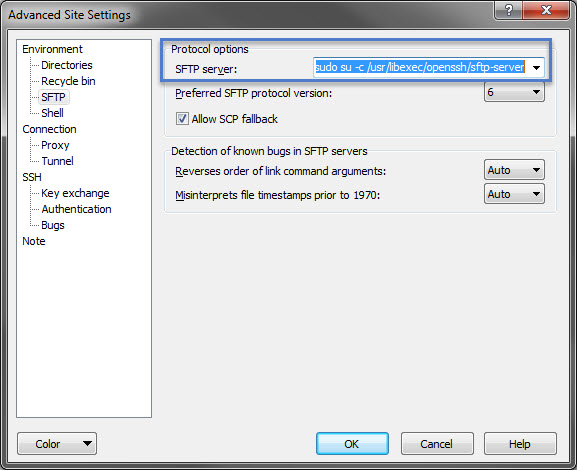
It will open up an advanced setting window like one below. Here select SFTP under Environment on the left-hand side panel. You will be presented with an option on the right hand side.
Now, add SFTP server value here with the command sudo su -c here as displayed in the screenshot below –
SFTP server setting in winSCP
So we added sudo su -c /usr/libexec/openssh/sftp-server in settings here. Now click Ok and connect to the server as you normally do.
After connection, you will be able to transfer files from the directory where you normally need sudo permission to access.
That’s it! You logged to server using WinSCP and sudo access.
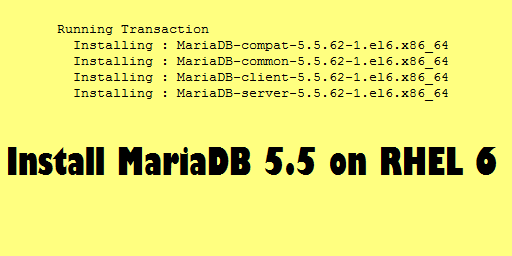
Learn how to install MariaDB 5.5 in RHEL 6 along with how to secure it and how to connect MariaDB from shell prompt.
MariaDB 5.5. installation
MariaDB is a MySQL based database management system. It is one of the components of the famous LAMP stack. In this article, we will walk you through how to install MariaDB, how to secure MariaDB installation, and how to connect MariaDB from shell prompt.
Without any further delay lets jump in to mariadb installation.
Create repo for downloading MariaDB packages
Mostly, package managers don’t come with MariaDB packages listed in RHEL 6 or lower. So, you have to add below the repo file on your server so that you can download and install the MariaDB server using yum.
Run below commands to start MariaDB with the boot. chkconfig manages processes at boot so use it here.
root@kerneltalks # chkconfig --add mysql
root@kerneltalks # chkconfig --level 345 mysql on
root@kerneltalks # chkconfig |grep mysql
mysql           0:off   1:off   2:on    3:on    4:on    5:on    6:off
Now, start MariaDB server process
root@kerneltalks # service mysql start
Starting MariaDB.190110 07:15:32 mysqld_safe Logging to '/var/lib/mysql/kerneltalks.test.err'.
190110 07:15:32 mysqld_safe Starting mysqld daemon with databases from /var/lib/mysql
.                                                          [  OK  ]
Use the below command to secure your MariaDB installation. Answer queries asked according to your requirement.
root@kerneltalks # mysql_secure_installation
/usr/bin/mysql_secure_installation: line 393: find_mysql_client: command not found

NOTE: RUNNING ALL PARTS OF THIS SCRIPT IS RECOMMENDED FOR ALL MariaDB
      SERVERS IN PRODUCTION USE!  PLEASE READ EACH STEP CAREFULLY!

In order to log into MariaDB to secure it, we'll need the current
password for the root user.  If you've just installed MariaDB, and
you haven't set the root password yet, the password will be blank,
so you should just press enter here.

Enter current password for root (enter for none):
OK, successfully used password, moving on...

Setting the root password ensures that nobody can log into the MariaDB
root user without the proper authorisation.

Set root password? [Y/n] y
New password:
Re-enter new password:
Password updated successfully!
Reloading privilege tables..
 ... Success!


By default, a MariaDB installation has an anonymous user, allowing anyone
to log into MariaDB without having to have a user account created for
them.  This is intended only for testing, and to make the installation
go a bit smoother.  You should remove them before moving into a
production environment.

Remove anonymous users? [Y/n] y
 ... Success!

Normally, root should only be allowed to connect from 'localhost'.  This
ensures that someone cannot guess at the root password from the network.

Disallow root login remotely? [Y/n] y
 ... Success!

By default, MariaDB comes with a database named 'test' that anyone can
access.  This is also intended only for testing, and should be removed
before moving into a production environment.

Remove test database and access to it? [Y/n] y
 - Dropping test database...
 ... Success!
 - Removing privileges on test database...
 ... Success!

Reloading the privilege tables will ensure that all changes made so far
will take effect immediately.

Reload privilege tables now? [Y/n] y
 ... Success!

Cleaning up...

All done!  If you've completed all of the above steps, your MariaDB
installation should now be secure.

Thanks for using MariaDB!
Test MariaDB server connection
Test connection to MariaDB server using below command and root account.
root@kerneltalks # mysql -u root -p
Enter password:
Welcome to the MariaDB monitor.  Commands end with ; or \g.
Your MariaDB connection id is 10
Server version: 5.5.62-MariaDB MariaDB Server

Copyright (c) 2000, 2018, Oracle, MariaDB Corporation Ab and others.

Type 'help;' or '\h' for help. Type '\c' to clear the current input statement.

MariaDB [(none)]> SELECT VERSION();
+----------------+
| VERSION()      |
+----------------+
| 5.5.62-MariaDB |
+----------------+
1 row in set (0.00 sec)

MariaDB [(none)]>