Learn how to boot SPYRUS WorkSafe PRO Linux2Go drive along with Video Demo.
how to boot Linux from Linux2Go drive
In this article, we will be walking you through steps to first boot your SPYRUS WorkSafe Pro Linux2Go drive and use it. More details about the SPYRUS WorkSafe Pro Linux2Go device. We will be covering more about the device in another article.
Step 1 :
Set your host machine which might be a laptop or desktop on which you are attaching SPYRUS Linux2Go drive in USB port to boot from USB. For altering boot sequences and priority you need to enter BIOS settings of your laptop or desktop.
The process to enter into BIOS changes from hardware to hardware and also the base Operating System you use. In most of the cases pressing orF2F8 or DEL key, while the system is booting, takes you to BIOS. You can search your hardware vendor support manual or website to find the process to get into BIOS.
Once you are in BIOS, you need to change the boot sequence. Normally its Optical drive, Hard Disk, and network/external. Means machine will search for the attached optical drive CD or DVD ROM for the operating system to boot. If not found then it will search attached hard disks. If it doesn’t found OS there it will proceed to check network boot or peripherals devices that have OS to boot.
In our case, we want to boot from USB change the sequence to the external boot method before the internal hard disk. So, the system will check peripheral i.e. USB i.e. our Linux2Go device to boot before internal hard disk which already has OS. This way we are booting from the Linux2Go device rather than the host computer’s hard disk.
Save the settings and reboot the system. Its usually can be done by pressing F10 key and then answering yes to prompt saying ‘save settings and reboot’. But again this might be little different depending on your hardware manufacturer standards.
Step 2:
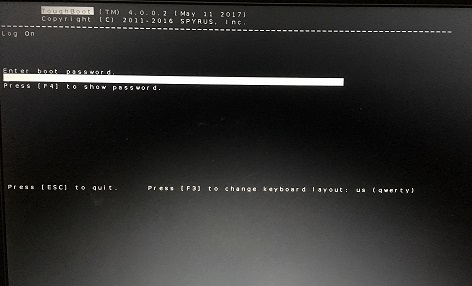
Connect Linux2Go device to the USB port and reboot the system. Now your system will boot from the SPYRUS Linux2Go device and it will display a bootloader security screen which is known as Toughboot as below.
Toughboot in linux2go drive
You need to enter the Toughboot password here to actually begin booting of OS installed on the Linux2Go device. This password can be found on paper you receive along with your Linux2Go drive. This is additional security by SPYRUS implemented on the drive.
That’s it! after successful password authentication, you will be booted into OS installed on your drive. I have Ubuntu 16.04 LTS installed on my drive. So I booted into it.
Here is a small video of booting SPYRUS WorkSafe Pro Linux2go drive!
Beginners guide to learn grep command with these 19 different practical examples.
Learn grep command with examples
grep : one of the widely used Linux / Unix commands which help sysadmins narrowing down their searches! grep stands for Global Regular Expression Print which is used for searching regular expressions within the source stream of data.
grep command syntax is simple.
grep <switch> <string to search> file
where the switch is from the variety of switches available to use with command. string to search is a regular expression that you want to search within source data. The file is a source of data in which you expect grep command to search.
It is also used widely with pipe for searching strings in data outputted by the previous command. In such a scenario, syntax followed is –
command1 | grep <switch> <string to search>
where output of command1 is being searched using grep command.
We are sharing here 19 grep command practical examples which will help beginners to well versed with this command and use it in their daily operations. Without further delay, let’s learn to grep command with below 20 examples. In all below examples, we will be searching string ‘kerneltalks’ in file1 which is as below –
root@kerneltalks # cat file1
This is demo file for kerneltalks.com
Demo file to be used for demonstrating grep commands on KernelTalks blog.
We are using kerneltalks as a search string for grep examples
Filling data with kernelTalks words for demo purpose.
This line does not contain our targeted search string.
Junk data kasdiohn fjad;ioe;ion cslfns;o;nfg
Find out string in file
# grep kerneltalks file1
This is demo file for kerneltalks.com
We are using kerneltalks as a search string for grep examples
Recursive search in the directory
You can use recursive grep in the directory to search for string/pattern in all files within a directory.
# grep -r "kerneltalks" /tmp/data
OR
# grep -R "kerneltalks" /tmp/data
Count pattern match in grep
You can use -c i.e. count switch with grep command to count how many times a pattern is matched in given data.
# grep -c kerneltalks file1
2
Search exact word in the file
Normally, grep returns lines from data that have pattern matching in it. If you want to search exact word in data then use -w switch.
# grep -w kerneltalks file1
This is demo file for kerneltalks.com
We are using kerneltalks as a search string for grep examples
You can combine it with count switch above and can get the number of times the exact word appeared in the file.
Ignore case while searching with grep
To ignore case while finding match use -i switch i.e. case-insensitive match. So when you search for kerneltalks with -i switch it will show the occurrence of kerneltalks, KERNELTALKS, KernelTalks, etc.
# grep -i kerneltalks file1
This is demo file for kerneltalks.com
Demo file to be used for demonstrating grep commands on KernelTalks blog.
We are using kerneltalks as a search string for grep examples
Filling data with kernelTalks words for demo purpose.
Use of wild card with grep
Wild cards or repetition operators can be used with grep command.
# grep kernel* file1
here, * match anything which precedes with string kernel. You can use repetition operators like ?, *, + with grep.
Reverse grep operation
If you want to display data just by omitting the lines containing your targeted string then you can use grep operation in a reverse way i.e. by using -v switch. Some people also call it an inverted match or grep operation.
# grep -v kerneltalks file1
Demo file to be used for demonstrating grep commands on KernelTalks blog.
Filling data with kernelTalks words for demo purpose.
This line does not contain our targeted search string.
Junk data kasdiohn fjad;ioe;ion cslfns;o;nfg
The above command displays all lines within file1 except the ones which contain string kerneltalks.
Display N lines before matching string using grep
Use of -B switch followed by N number argument will let you display N lines before matching string in a file.
# grep -B 2 targeted  file1
We are using kerneltalks as a search string for grep examples
Filling data with kernelTalks words for demo purpose.
This line does not contain our targeted search string.
The above command will display 2 lines above the line which contains string targeted including the line with the string.
Display N lines after matching string using grep
Opposite to above, if you want to display N lines after the match is found, use -A switch with the same above syntax.
# grep -A 2 targeted  file1
This line does not contain our targeted search string.
Junk data kasdiohn fjad;ioe;ion cslfns;o;nfg
Here it will display 2 lines below the line which has string targeted in it including a line with the string.
Display N lines around matching string using grep
Using both -A and -B switches, you can display N lines before and after of matching string line. But, grep comes with inbuild switch -C which will do this for you.
# grep -C 1 targeted  file1
Filling data with kernelTalks words for demo purpose.
This line does not contain our targeted search string.
Junk data kasdiohn fjad;ioe;ion cslfns;o;nfg
The above command will display 1 line above and 1 line after the line which has matching string.
Match multiple pattern with grep
Searching more than one pattern/string is possible with grep. Stack up your strings using -e switch.
# grep -e Junk -e KernelTalks file1
Demo file to be used for demonstrating grep commands on KernelTalks blog.
Junk data kasdiohn fjad;ioe;ion cslfns;o;nfg
It will search for string1 and string2 in file1 and display all lines with either string in them.
List only file names with matching string in them
When you are searching through a bunch of files and only interested in file names within which string is matched then use -l switch.
# grep -l kerneltalks *.log
Here, we are searching string kerneltalks in all files ending with .log. Since -l switch is used, grep will display only file names where string match is found.
Display line number of match with grep
If you want to get the line number where your string found the match, you can use -n switch.
# grep -n kerneltalks file1
1:This is demo file for kerneltalks.com
3:We are using kerneltalks as a search string for grep examples
Display matched string only rather than whole line of match
By default, grep displays the whole line which contains the match of your searched string. To display only matched string rather than the whole line, you need to use -o switch. Obviously, it not useful when you are searching for the whole string or word but it is very useful when you are searching with wild cards.
# grep -o kernel* file1
Coloring up your grep search output
To highlight matched strings in output use –-color switch
# grep --color=always kerneltalks file1 This is demo file for kerneltalks.com We are using kerneltalks as a search string for grep examples
You have three options to used with --color switch. auto, always and never
Grep out blank lines
You can search and count for blank lines with grep.
# grep -e ^$ file1
It’s helpful for removing blank lines from a file and get only data lines. Use reverse grep we saw earlier (-v switch)
# grep -v -e ^$ file1
It will show you only data lines, omitting all blank lines. You can redirect it to a new file and get a clean data file! You can use the same technique to remove hashed entries from the file by using ^# as a search string. This will helps to remove comments from scripts as well.
Invoke Egrep using grep
Egrep is extended grep with additional character support. egrep is derivative from grep utility. You can use it with egrep command or invoke using grep as below :
# grep -E
Fixed grep Fgrep using grep
Fixed grep is used for fast searching direct strings without any meta-characters or regular expressions. As the name suggests, fgrep is fixed grep! Only direct strings to search and it will be a bit fast than normal grep. fgrep is also another derivative from normal grep and used as fgrep separate command. But it can also be invoked using grep with below switch –
# grep -F
Search pattern in zip file
One more derivative of grep is zgrep. IT is used to find and match string in zip files. It uses almost the same switches as grep only difference is you have to source its zip file to search
# zgrep kerneltalks file2.gz
Let us know if you have any other grep command examples in comments below which re really helpful for sysadmin in day to day operations.
The article explaining How to resolve /bin/bash^M: bad interpreter: No such file or directory in Unix or Linux server.
How to resolve /bin/bash^M: bad interpreter: No such file or directory
Issue :
Sometimes we see below error while running scripts :
root@kerneltalks # ./test_script.sh
-bash: ./test_script.sh: /bin/bash^M: bad interpreter: No such file or directory
This is the issue with files that were created or updated in Windows and later copied over to Unix or Linux machine to execute. Since Windows (DOS) and Linux/Unix interpret line feeds and carriage returns differently. Window’s carriage returns interpreted as an illegal character ^M in *nix systems. Hence you can see ^M in the above error which is at the end of a very first line of script #!/bin/bash which invokes bash shell in the script.
To resolve this issue you need to convert the DOS file into Linux one. You can either re-write the whole file using text editors in Linux/Unix system or you can use tools like dos2unix or native commands like sed.
Solution:
Use dos2unix utility which comes pre-installed on almost all distributions nowadays. dos2unix project hosted here.
There are different encoding you can choose to convert your file. -ascii is default conversion mode & it only converts line breaks. I used here -iso which worked fine for me.
The syntax is pretty simple you need to give encoding format along with the source and destination filenames.
root@kerneltalks # dos2unix -iso -n test_script.sh script_new.sh
dos2unix: active code page: 0
dos2unix: using code page 437.
dos2unix: converting file backup.sh to file script_new.sh in Unix format ...
This way you can keep old files intact and don’t mess with the original file. If you are ok to directly edit the old file then you can try below command :
root@kerneltalks # dos2unix -k -o test_script.sh
dos2unix: converting file test_script.sh to Unix format ...
Where -k keeps the timestamp of the file intact and -o converts the file and overwrites changes to the same file.
Or
You can use streamline editor sed to globally search an replace
root@kerneltalks # sed -i -e 's/\r$//' test_script.sh
where, -i uses source file, edit, and overwrites to the same file. -e supplied the following script code to be run on the source file.
That’s it. You repaired your file from Windows to run fine on the Linux system! Go ahead… execute…!
Learn 8 different ways to generate a random password in Linux using Linux native commands or third-party utilities.
Different ways to generate password in Linux
In this article, we will walk you through various different ways to generate a random password in the Linux terminal. Few of them are using native Linux commands and others are using third-party tools or utilities which can easily be installed on the Linux machine. Here we are looking at native commands like,openssldd, md5sum, tr, urandom and third-party tools like mkpasswd, randpw, pwgen, spw, gpg, xkcdpass, diceware, revelation, keepaasx, passwordmaker.
These are actually ways to get some random alphanumeric string which can be utilized as a password. Random passwords can be used for new users so that there will be uniqueness no matter how large your user base is. Without any further delay, let’s jump into those 15 different ways to generate the random password in Linux.
Generate password using mkpasswd utility
mkpasswd comes with the install of expect package on RHEL based systems. On Debian based systems mkpasswd comes with package whois. Trying to install mkpasswd package will result in error –
No package mkpasswd available. on RHEL system and E: Unable to locate package mkpasswd in Debian based.
So install their parent packages as mentioned above and you are good to go.
Run mkpasswd to get passwords
root@kerneltalks# mkpasswd << on RHEL
zt*hGW65c

root@kerneltalks# mkpasswd teststring << on Ubuntu
XnlrKxYOJ3vik
Command behaves differently on different systems so work accordingly. There are many switches that can be used to control length etc parameters. You can explore them from man pages.
Generate password using OpenSSL
OpenSSL comes in build with almost all the Linux distributions. We can use its random function to get alphanumeric string generated which can be used as a password.
Here, we are using base64 encoding with random function and last digit for the argument to base64 encoding.
Generate password using urandom
The device file /dev/urandom is another source of getting random characters. We are using tr function and trimming output to get the random string to use as a password.
We can even use /dev/urandom device along with dd command to get a string of random characters.
root@kerneltalks# dd if=/dev/urandom bs=1 count=15|base64 -w 0
15+0 records in
15+0 records out
15 bytes (15 B) copied, 5.5484e-05 s, 270 kB/s
QMsbe2XbrqAc2NmXp8D0
We need to pass output through base64 encoding to make it human-readable. You can play with count value to get the desired length. For much cleaner output, redirect std2 to /dev/null. The clean command is –
Another way to get an array of random characters which can be used as the password is to calculate MD5 checksum! s you know checksum value indeed looks like random characters grouped together we can use it as the password. Make sure you use the source as something variable so that you get different checksum every time you run command. For example date ! date command always yields changing the output.
root@kerneltalks # date |md5sum
4d8ce5c42073c7e9ca4aeffd3d157102  -
Here we passed date command output to md5sum and get the checksum hash! You can use cut command to get the desired length of the output.
Generate password using pwgen
pwgen package comes with repositories like EPEL. pwgen is more focused on generating passwords that are pronounceable but not a dictionary word or not in plain English. You may not find it in standard distribution repo. Install the package and run pwgen command. Boom!
You will be presented with the list of passwords at your terminal! What else you want? Ok. You still want to explore, pwgen comes with many custom options that can be referred for man page.
Generate password using gpg tool
GPG is an OpenPGP encryption and signing tool. Mostly gpg tool comes pre-installed (at least it is on my RHEL7). But if not you can look for gpg or gpg2 package and install it.
Use below command to generate password from gpg tool.
Here we are passing generate random byte sequence switch (--gen-random) of quality 1 (first argument) with a count of 12 (second argument). Switch --armor ensures output is base64 encoded.
Generate password using xkcdpass
Famous geek humor website xkcd, published a very interesting post about memorable but still complex passwords. You can view it here. So xkcdpass tool took inspiration from this post and did its work! It’s a python package and available on python’s official website here
All installation and usage instructions are mentioned on that page. Here is install steps and outputs from my test RHEL server for your reference.
You can use these words as input to other commands like md5sum to get the random password (like below) or you can even use the Nth letter of each word to form your password!
Or even you can use all those words together as such a long password which is easy to remember for a user and very hard to crack using the computer program.
Beginners guide to learn dd command along with a list of examples. The article includes outputs for command examples too.
Learn dd command
Beginners guide to learn dd command! In this article, we will learn about dd (Disk Duplication) command and various usage of it along with examples.
dd command mainly used to convert and copy files in Linux and Unix systems. dd command syntax is
dd <options>
It has a very large list of options which can be used as per your requirement. Most of the commonly used options are :
bs=xxx Read and write xxx bytes at a time
count=n Copy only n blocks.
if=FILE Read from FILE
of=FILE Output to FILE
Let me walk you through examples to understand dd command usage.
Backup complete disk using dd
For copying the whole disk to another disk, dd is very helpful. You just need to give it disk to read from and disk to write. Check below example –
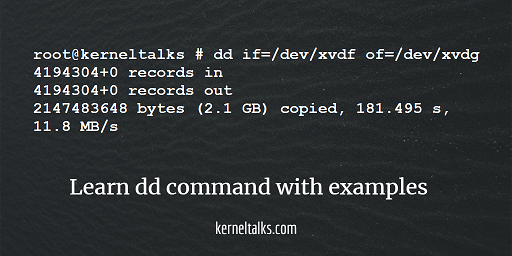
root@kerneltalks # dd if=/dev/xvdf of=/dev/xvdg
4194304+0 records in
4194304+0 records out
2147483648 bytes (2.1 GB) copied, 181.495 s, 11.8 MB/s
In the above output, you can see disk /dev/xvdf is copied to /dev/xvdg. Command will show you how much data and what speed it copied.
Identify disk physically using dd
When there are a bunch of disks attached to the server and if you want to trace a particular disk physically, then dd command might be helpful. You have to run dd command to read from disk and write into the void. This will keep the hard disk activity light solid (physical on disk).
root@kerneltalks # dd if=/dev/xvdf of=/dev/null
Normally all other disk blinking activity LED whereas this one will be having its LED solid. Easy to spot the disk then! Be careful with IF and OF. IF you switch their arguments, you will end up wiping out your hard disk clean.
Create image of hard disk using dd
You can create an image of hard disk using dd. It’s the same as what we saw in the first example backup of the disk. Here we will use output file OF as a data file on mount point and not another disk.
root@kerneltalks # dd if=/dev/xvdf of=/xvdf_disk.img
4194304+0 records in
4194304+0 records out
2147483648 bytes (2.1 GB) copied, 32.9723 s, 65.1 MB/s

root@kerneltalks # ls -lh /xvdf_disk.img
-rw-r--r--. 1 root root 2.0G Jan 15 14:36 /xvdf_disk.img
In the above output, we created an image of disk /dev/xvdf into a file located in / named xvdf_disk.img
Compressed image can be created as well using gzip along with dd
root@kerneltalks # dd if=/dev/xvdf |gzip -c >/xvdf_disk.img.gz
4194304+0 records in
4194304+0 records out
2147483648 bytes (2.1 GB) copied, 32.6262 s, 65.8 MB/s
root@kerneltalks # ls -lh /xvdf_disk.img.gz
-rw-r--r--. 1 root root 2.0M Jan 15 14:31 /xvdf_disk.img.gz
You can observe output zipped image is very much less in size.
Restore image of hard disk using dd
Yup, the next question will be how to restore this hard disk image on another disk? The answer is simply to use it as a source and destination as another disk.
root@kerneltalks # dd if=/xvdf_disk.img of=/dev/xvdg
4194304+0 records in
4194304+0 records out
2147483648 bytes (2.1 GB) copied, 175.748 s, 12.2 MB/s
Make sure your disk image and target disk has same size.
Restore compressed hard disk image using dd along with gzip command as below –
root@kerneltalks # gzip -dc /xvdf_disk.img.gz | dd of=/dev/xvdg
4194304+0 records in
4194304+0 records out
2147483648 bytes (2.1 GB) copied, 177.272 s, 12.1 MB/s
Create ISO from CD or DVD using dd
Another popular use of dd command is creating an optical disk image file i.e. ISO file from CD or DVD. You need to first mount CD or DVD on your server then use it as a source device and file on mount point as a destination.
Here, we specified the 4096 block size using bs option. Make sure no other application or user is accessing a CD or DVD when running this command. You can use fuser command to check if someone is accessing it.
The next question will be how to mount ISO file in Linux? Well we have already article on it here 🙂
Creating file of definite size with zero data using dd
Many times sysadmins or developers need files with junk data or zero data for testing. Using dd you can create such files with definite size.
Let’s say you want to create a file of 1GB then you define block size of 1M and count of 1024. So 1M x 1024 = 1024M = 1G.
root@kerneltalks # dd if=/dev/zero of=/testfile bs=1M count=1024
1024+0 records in
1024+0 records out
1073741824 bytes (1.1 GB) copied, 13.0623 s, 82.2 MB/s

root@kerneltalks # ls -lh /testfile
-rw-r--r--. 1 root root 1.0G Jan 15 14:29 /testfile
In the above output, you can see our math worked perfectly. 1G file is created out of our command.
Changing file uppercase to lowercase using dd
All the above examples we have seen so far are of data copy using dd command. Now, this example is of data convert using dd command. Using dd, you can change file data from all uppercase to lowercase and vice versa.
# cat /root/testdata
This is test data file on kerneltalks.com test server.

# dd if=/root/testdata of=/root/testdata_upper conv=ucase
0+1 records in
0+1 records out
55 bytes (55 B) copied, 0.000138394 s, 397 kB/s

# cat /root/testdata_upper
THIS IS TEST DATA FILE ON KERNELTALKS.COM TEST SERVER.
You can see all data in file is converted to uppercase. For changing data from uppercase to lowercase use option conv=lcase
If you another interesting use of dd command, let us know in the comments down below.
Step by step procedure to add Cloundfront CDN in WordPress blog with SSL certificate. Screenshot included for better understanding.
Add Cloundfront CDN in WordPress blog with SSL
In this article, we will walk you through steps where we gonna configure AWS CloudFront CDN for WordPress blog under W3TC (W3 Total Cache) plugin. We will be using basic setup under AWS CloudFront so we won’t be using IAM authentication and accesses in our configuration.
See Cloudfront content delivery network pricing here.
We assume below pre-requisites are completed before moving on with this tutorial.
You have logged in WordPress console of your blog with Admin login
You have W3TC plugin installed in WordPress blog
You have logged in AWS account
You have access to change zone files for your domain (required to have fancy CDN CNAMEs)
Without further delay lets jump in to step by step procedure to add Cloudfront CDN in WordPress blog with screenshots.
AWS certificate manager
You can skip this step if your blog is not https enabled.
In this step, we will import your SSL certificate in AWS which needs to be used with Cloudfront distributions in case you are using fancy URL (like c1.kerneltalks.com) for distributions instead of default system generated XXXXXX.cloudfront.net
You can skip this step if you want to buy an SSL certificate from Amazon and don’t want to use your own. If you are ok to use system-generated distributions name like askdhue.kerneltalks.com and don’t want custom CNAME like c1.kerneltalks.com then also you can skip this step.
You can buy an SSL certificate from many authorized bodies or you can get open source Lets Encrypt SSL certificate for free.
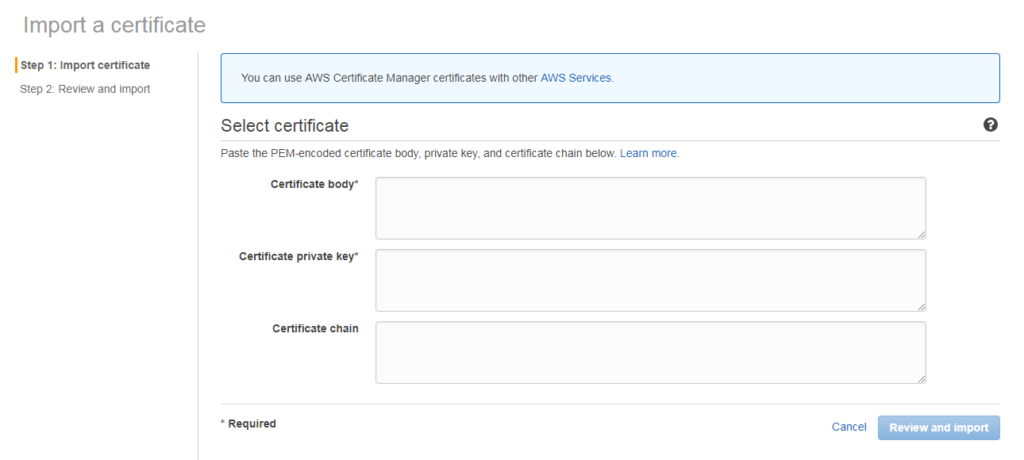
Log in to the AWS certificate manager console. Make sure you use region US East (N. Virginia). Since only certificates stored in this region are available to select while creating Cloudfront distributions. Click on Get Started and in the next screen click Import a certificate. You will be presented with the below screen.
Import certificate in aws
Fill in your certificate details in the fields above. Certificate body will have your SSL certificate content, then private key, and finally certificate chain (if any). Click Review and import.
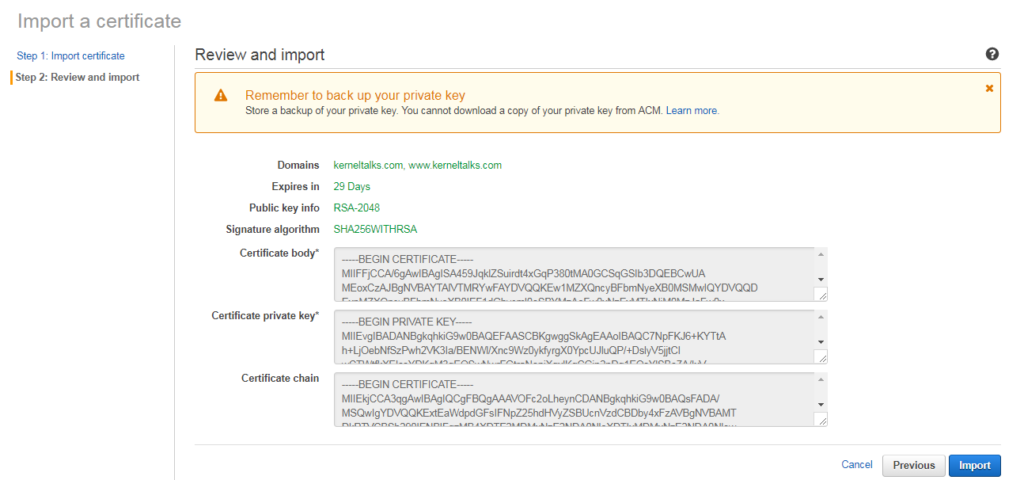
These filled in details will be verified and information fetched from it will be shown on screen for your review like below.
Review certificate in AWS certificate manager
If everything looks good click Import. Your certificate will be imported and details will be shown to you in the dashboard.
Now, we have our SSL certificate ready in AWS to be used with Cloudfront distributions custom URLs like c1.kerneltalks.com. Let’s move on to creating distributions.
AWS Cloudfront configuration
Login to AWS Cloudfront console using your Amazon account. On left hand side menu bar make sure you have Distributions selected. Click Create Distribution button. Now, you will be presented with wizard step 1. Select the delivery method.
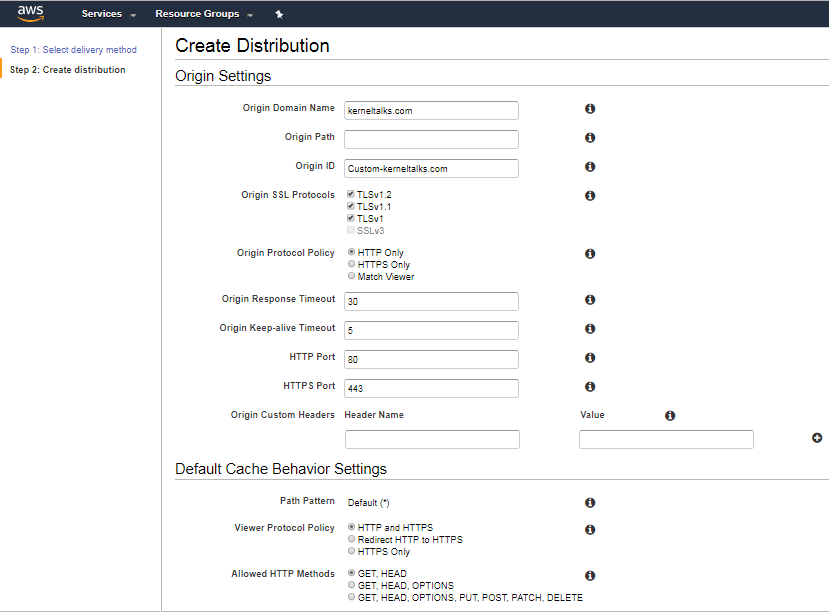
Click Get Started under the Web delivery method. You will see below screen where you need to fill in details –
cloudfront web distribution
Below are few fields you need to select/fill.
Origin Domain Name: Enter your blog’s naked domain name e.g. kerneltalks.com
Origin ID: If you like autogenerated value keep it or you can name it anything.
Origin protocol policy: Select HTTPS only.
Viewer Protocol Policy: Redirect HTTP to HTTPS
Alternate Domain Names: Enter fancy CDN name you want like c1.kerneltalks.com
SSL certificate -> Custom SSL certificate: You should see your imported certificate from the previous step here.
There are many other options which you can toggle based on your requirement. The above listed are the most basic and needed for normal CDN to work. Once done, click Create Distribution.
You will be redirected back to distributions dashboard where you can see your created distribution and its status as In progress. This means now AWS is fetching all content files like media, CSS, JS from your domain hosting server to their edge servers. In other words, you can say your CDN zone is being deployed. Once all sync completes, its state will be changed to Deployed . This process will take time depending on how big your blog is.
Meanwhile, your distribution is being deployed you can head back to your zone file editor (probably in cPanel) and add entries for CNAME you mentioned in distribution setting (e.g. c1.kerneltalks.com)
CNAME entry
You can skip this step if you are not using custom CNAME for your Cloudfront distribution
Goto zone file editor for your domain and add CNAME entry for the custom name you used above (here c1.kerneltalks.com) and point it to the Cloudfront URL of your distribution.
Cloudfront URL of your distribution can be found under Domain Name in above distributions dashboard screenshot. It’s generally in format XXXXXXX.cloudfront.net
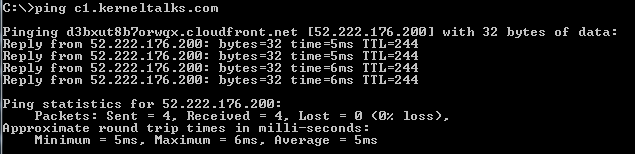
This will take a few mins to hours to propagate change through the internet web. You can check if it’s live on the internet by pinging your custom domain name. You should receive pingback from cloudfront.net
ping custom domain name
That’s it. You are done with your AWS configurations. Now, you need to add this custom CNAME or cloudfront.net name in W3TC settings in your WordPress admins panel.
W3TC settings
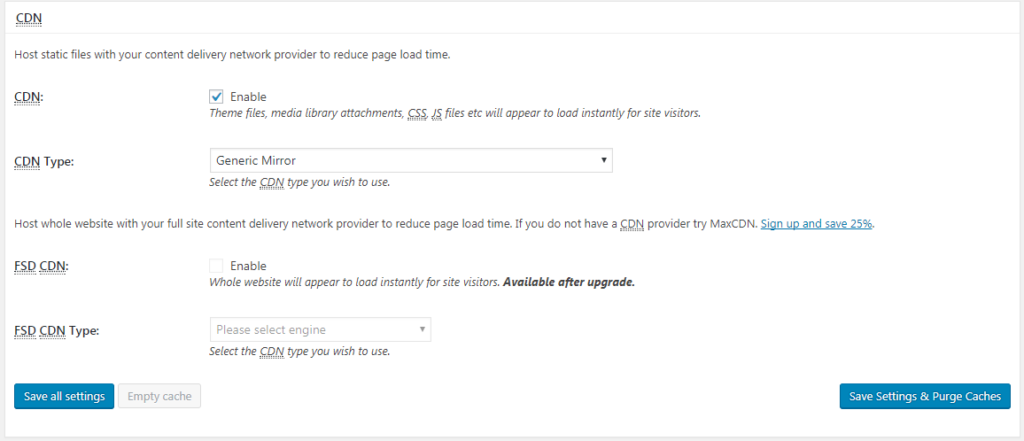
Login to the WordPress admin panel. Goto W3TC General Settings and enable CDN as per the below screenshot.
W3TC General settings CDN portion
Goto W3TC CDN settings.
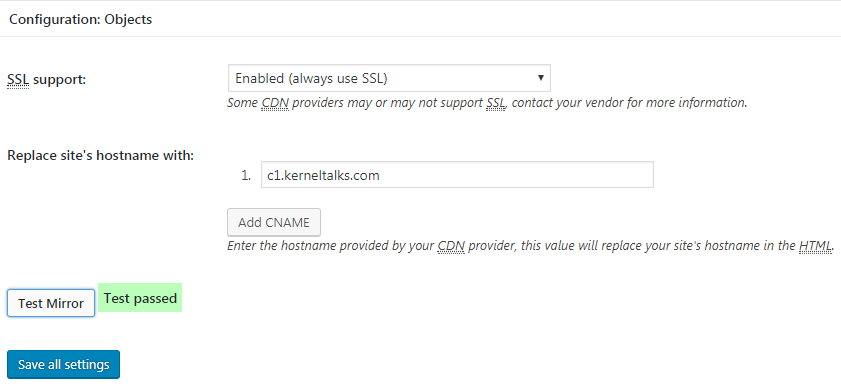
Scroll down to Configuration: Objects . Select SSL support as Enabled and add your CNAME in below Replace site's hostname with:
Once done click on Test Mirror and you should see it passed. Check the below screenshot for better understanding.
W3TC CDN mirror check
If your test is not being passed, wait for some time. Make sure you can ping that CNAME as explained above and your Cloudfront distribution is deployed completely.
Check blog for Cloudfront CDN
That’s it. Your blog is serving files from Cloudfront CDN now! You can open the website in a new browser after clearing cookies. View website’s source code and look for URLs with your custom domain name (here c1.kerneltalks.com) and you will see your CSS, JS, and media files URL are not of your naked domain (here kerneltalks.com) but from CDN (i.e. c1.kerneltalks.com)!
To server files parallelly you can create more than 1 (ideally 4) distributions in the same way and add their CNAMEs in W3TC settings.
The Code & Revolution OS! Documentary films on Linux released in 2001.
Documentary films on Linux
Yup, you read it right. The Code & Revolution OS! Those are documentary films released in 2001. The Code is based on birth and journey of Linux & Revolution OS is based on 20 years journey of Linux, GNU, Open Source world.
Have you watched them?
The Code (Wiki Page) is a 58-minute documentary featuring the creator of Linux, Linus Torvalds, and some of the programmers who contributed to Linux. And yeah, there is a piece of the interview where Linus talks about developers of India! Since I am from India, I feel like mentioning it here 🙂
Revolution OS is (Wiki Page) is 85 minutes long documentary which spans over 20 years journey of free software movement through Linux, GNU, and Open Source.
Documentary films are available on YouTube along with subtitles.
Learn how to remount the file system in the read-write mode under Linux. The article also explains how to check if the file system is read-only and how to clean the file system
Re-mount filesystem as read-write
Most of the time on newly created file systems of NFS filesystems we see an error like below :
This is because the file system is mounted as read-only. In such a scenario you have to mount it in read-write mode. Before that, we will see how to check if the file system is mounted in read-only mode and then we will get to how to remount it as a read-write filesystem.
How to check if file system is read only
To confirm file system is mounted in read only mode use below command –
Grep your mount point in cat /proc/mounts and observer third column which shows all options which are used in the mounted file system. Here ro denotes file system is mounted read-only.
You can also get these details using mount -v command
root@kerneltalks # mount -v |grep datastore
/dev/xvdf on /datastore type ext3 (ro,relatime,seclabel,data=ordered)
In this output. file system options are listed in braces at last column.
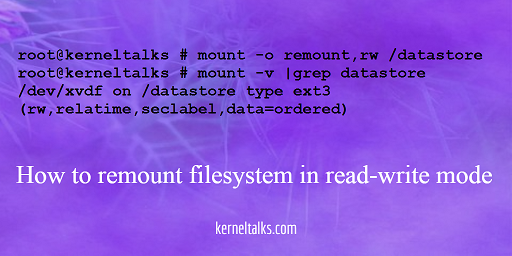
Re-mount file system in read-write mode
To remount file system in read-write mode use below command –
root@kerneltalks # mount -o remount,rw /datastore

root@kerneltalks # mount -v |grep datastore
/dev/xvdf on /datastore type ext3 (rw,relatime,seclabel,data=ordered)
Observe after re-mounting option ro changed to rw. Now, the file system is mounted as read-write and now you can write files in it.
Note : It is recommended to fsck file system before re mounting it.
You can check file system by running fsck on its volume.
Sometimes there are some corrections that need to be made on a file system that needs a reboot to make sure there are no processes are accessing the file system.
Learn how to list YUM repositories in RHEL / CentOS. This how-to guide includes various commands along with examples to check details about repositories and their packages in Red Hat systems.
Listing YUM repo in Red Hat systems
YUM (Yellow dog Updater Modified) is a package management tool in Red Hat Linux and its variants like CentOS. In this article, we will walk you through several commands which will be useful for you to get details of YUM repositories in RHEL.
Without any further delay, let’s see a list of commands and their example outputs.
List YUM repositories
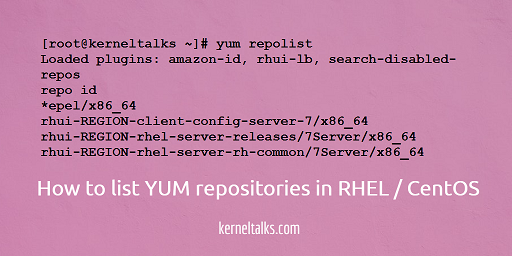
Run command yum repolist and it will show you all repositories configured under YUM and enabled for use on that server. To view, disabled repositories or all repositories refer below section in this article.
[root@kerneltalks ~]# yum repolist
Loaded plugins: amazon-id, rhui-lb, search-disabled-repos
repo id                                                                  repo name                                                                                status
*epel/x86_64                                                             Extra Packages for Enterprise Linux 6 - x86_64                                           12,448
rhui-REGION-client-config-server-7/x86_64                                Red Hat Update Infrastructure 2.0 Client Configuration Server 7                               2
rhui-REGION-rhel-server-releases/7Server/x86_64                          Red Hat Enterprise Linux Server 7 (RPMs)                                                 17,881
rhui-REGION-rhel-server-rh-common/7Server/x86_64                         Red Hat Enterprise Linux Server 7 RH Common (RPMs)                                          231
rsawaroha                                                                rsaw aroha rpms for Fedora/RHEL6+                                                            19
repolist: 30,581
In the above output, you can see the repo list with repo id, repo name, and status. You can see we have EPEL repo configured (repo id epel/x86_64) on the server. Also, last repo rsawaroha we added for installation of xsos tool used to read sosreport.
What is the status column in yum repolist ?
Last column of yum repolist output is status which has numbers in it. You might be wondering, what is the meaning of status numbers in yum repolist?
They are a number of packages included in the respective repository! If you see a number like XXXX+N i.e. followed by + sign and another number then it means that the repository has XXXX number of packages available for installation and N number of packages are excluded.
List details of YUM repositories
Each repositories details like name, id, number of packages available, total size, link details, timestamps, etc can be viewed by using verbose mode. Use -v switch with yum repolist to view repositories details.
[root@kerneltalks ~]# yum -v repolist
Not loading "rhnplugin" plugin, as it is disabled
Loading "amazon-id" plugin
Not loading "product-id" plugin, as it is disabled
Loading "rhui-lb" plugin
Loading "search-disabled-repos" plugin
Not loading "subscription-manager" plugin, as it is disabled
Config time: 0.048
Yum version: 3.4.3
mirrorlist: https://rhui2-cds01.ap-south-1.aws.ce.redhat.com/pulp/mirror/content/dist/rhel/rhui/server/7/7Server/x86_64/supplementary/os
mirrorlist: https://rhui2-cds01.ap-south-1.aws.ce.redhat.com/pulp/mirror/content/dist/rhel/rhui/server/7/7Server/x86_64/extras/os
mirrorlist: https://rhui2-cds01.ap-south-1.aws.ce.redhat.com/pulp/mirror/content/dist/rhel/rhui/server/7/7Server/x86_64/rh-common/debug
mirrorlist: https://rhui2-cds01.ap-south-1.aws.ce.redhat.com/pulp/mirror/content/dist/rhel/rhui/server/7/7Server/x86_64/supplementary/debug
mirrorlist: https://rhui2-cds01.ap-south-1.aws.ce.redhat.com/pulp/mirror/content/dist/rhel/rhui/server/7/7Server/x86_64/rhscl/1/debug
mirrorlist: https://rhui2-cds01.ap-south-1.aws.ce.redhat.com/pulp/mirror/rhui-client-config/rhel/server/7/x86_64/os
mirrorlist: https://rhui2-cds01.ap-south-1.aws.ce.redhat.com/pulp/mirror/content/dist/rhel/rhui/server/7/7Server/x86_64/rhscl/1/source/SRPMS
mirrorlist: https://rhui2-cds01.ap-south-1.aws.ce.redhat.com/pulp/mirror/content/dist/rhel/rhui/server/7/7Server/x86_64/rhscl/1/os
mirrorlist: https://rhui2-cds01.ap-south-1.aws.ce.redhat.com/pulp/mirror/content/dist/rhel/rhui/server/7/7Server/x86_64/source/SRPMS
mirrorlist: https://rhui2-cds01.ap-south-1.aws.ce.redhat.com/pulp/mirror/content/dist/rhel/rhui/server/7/7Server/x86_64/extras/debug
mirrorlist: https://rhui2-cds01.ap-south-1.aws.ce.redhat.com/pulp/mirror/content/dist/rhel/rhui/server/7/7Server/x86_64/optional/source/SRPMS
mirrorlist: https://rhui2-cds01.ap-south-1.aws.ce.redhat.com/pulp/mirror/content/dist/rhel/rhui/server/7/7Server/x86_64/optional/debug
mirrorlist: https://rhui2-cds01.ap-south-1.aws.ce.redhat.com/pulp/mirror/content/dist/rhel/rhui/server/7/7Server/x86_64/supplementary/source/SRPMS
mirrorlist: https://rhui2-cds01.ap-south-1.aws.ce.redhat.com/pulp/mirror/content/dist/rhel/rhui/server/7/7Server/x86_64/debug
mirrorlist: https://rhui2-cds01.ap-south-1.aws.ce.redhat.com/pulp/mirror/content/dist/rhel/rhui/server/7/7Server/x86_64/optional/os
mirrorlist: https://rhui2-cds01.ap-south-1.aws.ce.redhat.com/pulp/mirror/content/dist/rhel/rhui/server/7/7Server/x86_64/extras/source/SRPMS
mirrorlist: https://rhui2-cds01.ap-south-1.aws.ce.redhat.com/pulp/mirror/content/dist/rhel/rhui/server/7/7Server/x86_64/rh-common/os
mirrorlist: https://rhui2-cds01.ap-south-1.aws.ce.redhat.com/pulp/mirror/content/dist/rhel/rhui/server/7/7Server/x86_64/rh-common/source/SRPMS
mirrorlist: https://rhui2-cds01.ap-south-1.aws.ce.redhat.com/pulp/mirror/content/dist/rhel/rhui/server/7/7Server/x86_64/os
Setting up Package Sacks
pkgsack time: 0.009
Repo-id      : epel/x86_64
Repo-name    : Extra Packages for Enterprise Linux 6 - x86_64
Repo-revision: 1515267354
Repo-updated : Sat Jan  6 19:58:06 2018
Repo-pkgs    : 12,448
Repo-size    : 11 G
Repo-metalink: https://mirrors.fedoraproject.org/metalink?repo=epel-6&arch=x86_64
  Updated    : Mon Jan  8 15:45:02 2018
Repo-baseurl : http://mirror.sjc02.svwh.net/fedora-epel/6/x86_64/ (43 more)
Repo-expire  : 21,600 second(s) (last: Mon Jan  8 19:23:12 2018)
  Filter     : read-only:present
Repo-filename: /etc/yum.repos.d/epel.repo

Repo-id      : rhui-REGION-client-config-server-7/x86_64
Repo-name    : Red Hat Update Infrastructure 2.0 Client Configuration Server 7
Repo-revision: 1509723523
Repo-updated : Fri Nov  3 15:38:43 2017
Repo-pkgs    : 2
Repo-size    : 106 k
Repo-mirrors : https://rhui2-cds01.ap-south-1.aws.ce.redhat.com/pulp/mirror/rhui-client-config/rhel/server/7/x86_64/os
Repo-baseurl : https://rhui2-cds02.ap-south-1.aws.ce.redhat.com/pulp/repos//rhui-client-config/rhel/server/7/x86_64/os/ (1 more)
Repo-expire  : 21,600 second(s) (last: Mon Jan  8 19:23:13 2018)
  Filter     : read-only:present
Repo-filename: /etc/yum.repos.d/redhat-rhui-client-config.repo

Repo-id      : rhui-REGION-rhel-server-releases/7Server/x86_64
Repo-name    : Red Hat Enterprise Linux Server 7 (RPMs)
Repo-revision: 1515106250
Repo-updated : Thu Jan  4 22:50:49 2018
Repo-pkgs    : 17,881
Repo-size    : 24 G
Repo-mirrors : https://rhui2-cds01.ap-south-1.aws.ce.redhat.com/pulp/mirror/content/dist/rhel/rhui/server/7/7Server/x86_64/os
Repo-baseurl : https://rhui2-cds01.ap-south-1.aws.ce.redhat.com/pulp/repos//content/dist/rhel/rhui/server/7/7Server/x86_64/os/ (1 more)
Repo-expire  : 21,600 second(s) (last: Mon Jan  8 19:23:13 2018)
  Filter     : read-only:present
Repo-filename: /etc/yum.repos.d/redhat-rhui.repo

Repo-id      : rhui-REGION-rhel-server-rh-common/7Server/x86_64
Repo-name    : Red Hat Enterprise Linux Server 7 RH Common (RPMs)
Repo-revision: 1513002956
Repo-updated : Mon Dec 11 14:35:56 2017
Repo-pkgs    : 231
Repo-size    : 4.5 G
Repo-mirrors : https://rhui2-cds01.ap-south-1.aws.ce.redhat.com/pulp/mirror/content/dist/rhel/rhui/server/7/7Server/x86_64/rh-common/os
Repo-baseurl : https://rhui2-cds02.ap-south-1.aws.ce.redhat.com/pulp/repos//content/dist/rhel/rhui/server/7/7Server/x86_64/rh-common/os/ (1 more)
Repo-expire  : 21,600 second(s) (last: Mon Jan  8 19:23:13 2018)
  Filter     : read-only:present
Repo-filename: /etc/yum.repos.d/redhat-rhui.repo

Repo-id      : rsawaroha
Repo-name    : rsaw aroha rpms for Fedora/RHEL6+
Repo-revision: 1507778106
Repo-updated : Thu Oct 12 03:15:06 2017
Repo-pkgs    : 19
Repo-size    : 1.4 M
Repo-baseurl : http://people.redhat.com/rsawhill/rpms
Repo-expire  : 21,600 second(s) (last: Mon Jan  8 18:02:10 2018)
  Filter     : read-only:present
Repo-filename: /etc/yum.repos.d/rsawaroha.repo

repolist: 30,581
List enabled YUM repositories
Under YUM you have the choice to enable or disable repositories. During yum operations like installation of packages only enabled repositories are scanned/contacted to perform operations.
To view only enabled repositories in YUM, use yum repolist enabled
[root@kerneltalks ~]# yum repolist enabled
Loaded plugins: amazon-id, rhui-lb, search-disabled-repos
repo id                                                                  repo name                                                                                status
*epel/x86_64                                                             Extra Packages for Enterprise Linux 6 - x86_64                                           12,448
rhui-REGION-client-config-server-7/x86_64                                Red Hat Update Infrastructure 2.0 Client Configuration Server 7                               2
rhui-REGION-rhel-server-releases/7Server/x86_64                          Red Hat Enterprise Linux Server 7 (RPMs)                                                 17,881
rhui-REGION-rhel-server-rh-common/7Server/x86_64                         Red Hat Enterprise Linux Server 7 RH Common (RPMs)                                          231
rsawaroha                                                                rsaw aroha rpms for Fedora/RHEL6+                                                            19
repolist: 30,581
List disabled YUM repositories
Similarly, you can list only disabled yum repositories as well. Use yum repolist disabled
[root@kerneltalks ~]# yum repolist disabled
Loaded plugins: amazon-id, rhui-lb, search-disabled-repos
repo id                                                                          repo name
epel-debuginfo/x86_64                                                            Extra Packages for Enterprise Linux 6 - x86_64 - Debug
epel-source/x86_64                                                               Extra Packages for Enterprise Linux 6 - x86_64 - Source
epel-testing/x86_64                                                              Extra Packages for Enterprise Linux 6 - Testing - x86_64
epel-testing-debuginfo/x86_64                                                    Extra Packages for Enterprise Linux 6 - Testing - x86_64 - Debug
epel-testing-source/x86_64                                                       Extra Packages for Enterprise Linux 6 - Testing - x86_64 - Source
rhui-REGION-rhel-server-debug-extras/7Server/x86_64                              Red Hat Enterprise Linux Server 7 Extra Debug (Debug RPMs)
rhui-REGION-rhel-server-debug-optional/7Server/x86_64                            Red Hat Enterprise Linux Server 7 Optional Debug (Debug RPMs)
rhui-REGION-rhel-server-debug-rh-common/7Server/x86_64                           Red Hat Enterprise Linux Server 7 RH Common Debug (Debug RPMs)
rhui-REGION-rhel-server-debug-rhscl/7Server/x86_64                               Red Hat Enterprise Linux Server 7 RHSCL Debug (Debug RPMs)
rhui-REGION-rhel-server-debug-supplementary/7Server/x86_64                       Red Hat Enterprise Linux Server 7 Supplementary Debug (Debug RPMs)
rhui-REGION-rhel-server-extras/7Server/x86_64                                    Red Hat Enterprise Linux Server 7 Extra(RPMs)
rhui-REGION-rhel-server-optional/7Server/x86_64                                  Red Hat Enterprise Linux Server 7 Optional (RPMs)
rhui-REGION-rhel-server-releases-debug/7Server/x86_64                            Red Hat Enterprise Linux Server 7 Debug (Debug RPMs)
rhui-REGION-rhel-server-releases-source/7Server/x86_64                           Red Hat Enterprise Linux Server 7 (SRPMs)
rhui-REGION-rhel-server-rhscl/7Server/x86_64                                     Red Hat Enterprise Linux Server 7 RHSCL (RPMs)
rhui-REGION-rhel-server-source-extras/7Server/x86_64                             Red Hat Enterprise Linux Server 7 Extra (SRPMs)
rhui-REGION-rhel-server-source-optional/7Server/x86_64                           Red Hat Enterprise Linux Server 7 Optional (SRPMs)
rhui-REGION-rhel-server-source-rh-common/7Server/x86_64                          Red Hat Enterprise Linux Server 7 RH Common (SRPMs)
rhui-REGION-rhel-server-source-rhscl/7Server/x86_64                              Red Hat Enterprise Linux Server 7 RHSCL (SRPMs)
rhui-REGION-rhel-server-source-supplementary/7Server/x86_64                      Red Hat Enterprise Linux Server 7 Supplementary (SRPMs)
rhui-REGION-rhel-server-supplementary/7Server/x86_64                             Red Hat Enterprise Linux Server 7 Supplementary (RPMs)
repolist: 0
List all configured YUM repositories
List all YUM repositories available on server.
[root@kerneltalks ~]# yum repolist all
Loaded plugins: amazon-id, rhui-lb, search-disabled-repos
repo id                                                                  repo name                                                                       status
*epel/x86_64                                                             Extra Packages for Enterprise Linux 6 - x86_64                                  enabled: 12,448
epel-debuginfo/x86_64                                                    Extra Packages for Enterprise Linux 6 - x86_64 - Debug                          disabled
epel-source/x86_64                                                       Extra Packages for Enterprise Linux 6 - x86_64 - Source                         disabled
epel-testing/x86_64                                                      Extra Packages for Enterprise Linux 6 - Testing - x86_64                        disabled
epel-testing-debuginfo/x86_64                                            Extra Packages for Enterprise Linux 6 - Testing - x86_64 - Debug                disabled
epel-testing-source/x86_64                                               Extra Packages for Enterprise Linux 6 - Testing - x86_64 - Source               disabled
rhui-REGION-client-config-server-7/x86_64                                Red Hat Update Infrastructure 2.0 Client Configuration Server 7                 enabled:      2
rhui-REGION-rhel-server-debug-extras/7Server/x86_64                      Red Hat Enterprise Linux Server 7 Extra Debug (Debug RPMs)                      disabled
rhui-REGION-rhel-server-debug-optional/7Server/x86_64                    Red Hat Enterprise Linux Server 7 Optional Debug (Debug RPMs)                   disabled
rhui-REGION-rhel-server-debug-rh-common/7Server/x86_64                   Red Hat Enterprise Linux Server 7 RH Common Debug (Debug RPMs)                  disabled
rhui-REGION-rhel-server-debug-rhscl/7Server/x86_64                       Red Hat Enterprise Linux Server 7 RHSCL Debug (Debug RPMs)                      disabled
rhui-REGION-rhel-server-debug-supplementary/7Server/x86_64               Red Hat Enterprise Linux Server 7 Supplementary Debug (Debug RPMs)              disabled
rhui-REGION-rhel-server-extras/7Server/x86_64                            Red Hat Enterprise Linux Server 7 Extra(RPMs)                                   disabled
rhui-REGION-rhel-server-optional/7Server/x86_64                          Red Hat Enterprise Linux Server 7 Optional (RPMs)                               disabled
rhui-REGION-rhel-server-releases/7Server/x86_64                          Red Hat Enterprise Linux Server 7 (RPMs)                                        enabled: 17,881
rhui-REGION-rhel-server-releases-debug/7Server/x86_64                    Red Hat Enterprise Linux Server 7 Debug (Debug RPMs)                            disabled
rhui-REGION-rhel-server-releases-source/7Server/x86_64                   Red Hat Enterprise Linux Server 7 (SRPMs)                                       disabled
rhui-REGION-rhel-server-rh-common/7Server/x86_64                         Red Hat Enterprise Linux Server 7 RH Common (RPMs)                              enabled:    231
rhui-REGION-rhel-server-rhscl/7Server/x86_64                             Red Hat Enterprise Linux Server 7 RHSCL (RPMs)                                  disabled
rhui-REGION-rhel-server-source-extras/7Server/x86_64                     Red Hat Enterprise Linux Server 7 Extra (SRPMs)                                 disabled
rhui-REGION-rhel-server-source-optional/7Server/x86_64                   Red Hat Enterprise Linux Server 7 Optional (SRPMs)                              disabled
rhui-REGION-rhel-server-source-rh-common/7Server/x86_64                  Red Hat Enterprise Linux Server 7 RH Common (SRPMs)                             disabled
rhui-REGION-rhel-server-source-rhscl/7Server/x86_64                      Red Hat Enterprise Linux Server 7 RHSCL (SRPMs)                                 disabled
rhui-REGION-rhel-server-source-supplementary/7Server/x86_64              Red Hat Enterprise Linux Server 7 Supplementary (SRPMs)                         disabled
rhui-REGION-rhel-server-supplementary/7Server/x86_64                     Red Hat Enterprise Linux Server 7 Supplementary (RPMs)                          disabled
rsawaroha                                                                rsaw aroha rpms for Fedora/RHEL6+                                               enabled:     19
repolist: 30,581
List all available packages in repositories
To list all available packages for installation from all repositories use below command –
yum list available command is useful to list all available packages. If you want to list packages from the particular repository then use below switches –
disablerepo="*" which will exclude all repos from scanning
enablerepo="<repo>" which will include only your desired repo to scan for packages.
Learn how to use xsos tool to read sosreport in RHEL/CentOS. xsos is a very helpful tool for Linux sysadmins. Different options and their examples included in the article.
xsos tool to read sosreport
an xsos tool is a tool coded to read a sosreport on Linux systems. sosreport is a tool from RedHat which collects system information which helps vendors to troubleshoot issues. sosreportcreates the tarball which contains all the system information but you can not read it directly. For simplicity, Ryan Sawhill created a tool named xsos which will help you to read sosreport in a much easier way in your terminal itself. In this article, we will walk you through how to read sosreport on the Linux terminal.
Now there are different switches you can use with xsos command and get the required details. Frequently used switches given below –
 -a     show everything
 -b     show info from dmidecode
 -o     show hostname, distro, SELinux, kernel info, uptime, etc
 -k     inspect kdump configuration
 -c     show info from /proc/cpuinfo
 -m     show info from /proc/meminfo
 -d     show info from /proc/partitions
 -t     show info from dm-multipath
 -i     show info from ip addr
Above is a snippet from help. Full list of switches can be obtained by running help using xsos -h
Reading sosreport using xsos
To read sosreport using xsos tool, you need to first extract sosreport tarball and use the extracted directory path as a source for the xsos tool. The command format is –
xsos –<switch> <sosreport_dir_path>
For example, lets see CPU information read from sosreport.
root@kerneltalks # xsos -c /var/tmp/sosreport-kerneltalks-20180108180100
CPU
  1 logical processors
  1 Intel Xeon CPU E5-2676 v3 @ 2.40GHz (flags: aes,constant_tsc,ht,lm,nx,pae,rdrand)
Here, -c instructs xsos command to read CPU information from sosreport which is saved in /var/tmp/sosreport-kerneltalks-20180108180100 directory.
Another example below which reads IP information from sosreport.
root@kerneltalks # xsos -i /var/tmp/sosreport-kerneltalks-20180108180100
IP4
  Interface  Master IF  MAC Address        MTU     State  IPv4 Address
  =========  =========  =================  ======  =====  ==================
  lo         -          -                  65536   up     127.0.0.1/8
  eth0       -          02:e5:4c:f8:86:0e  9001    up     172.31.29.189/20

IP6
  Interface  Master IF  MAC Address        MTU     State  IPv6 Address                                 Scope
  =========  =========  =================  ======  =====  ===========================================  =====
  lo         -          -                  65536   up     ::1/128                                      host
  eth0       -          02:e5:4c:f8:86:0e  9001    up     fe80::e5:4cff:fef8:860e/64                   link
you can see IP information fetched from stored sosreport and displayed for your understanding.
You can use different switches to fetch different information as per your requirement from the sosreport. This way you need not go through each and every logfile or log directory extracted in the sosreport directory to get the information. Just use a relevant switch with xsos utility and it will scan the sosreport directory and present your data!