Quick post to troubleshoot issue with networker service startup
Networker process startup issue
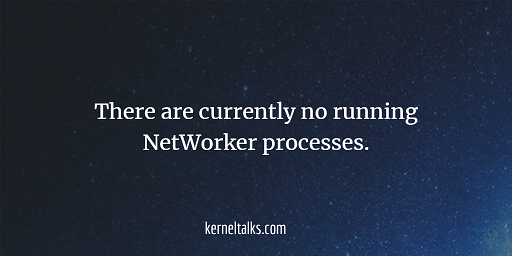
If you come across issue where you installed new networker agent on Linux server and service is not coming up. You will see below message –
root@kerneltalks ~# /etc/init.d/networker start
root@kerneltalks ~# /etc/init.d/networker status
There are currently no running NetWorker processes.
Troubleshooting
You can dig through logs or run a debug using below command :
root@kerneltalks ~# nsrexecd -D5
It will print lots of messages. You have go through them for possible cause of issue. I found below offending entries –
RAP critical 162 Attributes '%s' and/or '%s' of the %s resource do not resolve to the machine's hostname '%s'. To correct the error, it may be necessary to delete the %s database.
Solution
First check your /etc/hosts file is correct and having valid loopback entry.
A quick article to point out configurations to customize sar utility.
sar custom settings!
sar is monitoring utility on Linux which is used to monitor system resource utilization. We have covered different aspects of sar in the past. You can go through the below articles for the same.
In this article, we will walk you though for some custom settings you can configure for sar like below –
How to change monitoring frequency in sar
How to customize sar log rotation
How to change sar monitoring frequency?
As you are aware sar has 10 minutes default frequency. That means sar utility logs one data point of resource utilization per 10 minutes. If you want to change this frequency then you can do it by altering it in below file –
So you have to edit number 10 with the frequency of your choice. Let’s make it for 1 minute instead of 10 minutes.
Now, after editing the file you have to wait for that minimum time to pass which you choose as frequency and then you can verify it by using sar command.
kerneltalks:~ # sar
Linux 5.3.18-22-default (kerneltalks)      08/20/20        _x86_64_        (1 CPU)

14:16:18     LINUX RESTART      (1 CPU)

14:20:01        CPU     %user     %nice   %system   %iowait    %steal     %idle
14:21:01        all      0.02      0.00      0.02      0.00      0.00     99.97
14:22:01        all      0.02      0.00      0.03      0.00      0.02     99.93
14:23:01        all      0.00      0.00      0.00      0.00      0.00    100.00
14:24:01        all      0.02      0.00      0.02      0.00      0.00     99.97
Average:        all      0.01      0.00      0.02      0.00      0.00     99.97
You can see now that sar is collecting datapoints with frequency of 1 minute.
How to customize sar log rotation?
saar log rotation is controlled by /etc/sysstat/sysstat file. You can configure below parameters in the file.
In this quick walk-through we will upgrade OL 6.8 to OL 7.6
OL6 to OL7!
All outputs under this article are from the EC2 server running on AWS. I am using Oracle Linux Yum server public repo hence reference the names from it. If your system is registered to ULN then use respective repos accordingly.
First you need to prepare system for upgrade. Below are pre-requisites :
Make sure you have a proper backup of your data, disabled monitoring of server, stopped all applications on the server, etc.
Make sure the system is subscribed to ol6_latest repository
Once you are ready you can go ahead with running pre-upgrade checks to verify if your system is compatible to move on. For that, you need to install the below packages. Those are available from ol6_addons repo.
Once packages are installed you are ready to run a pre-upgrade check. Note: In my case, preupgrade-assistant-el6toel7-data-0 was not available from my repo but it did not hurt my upgrade.
Now run below command to run checks –
[root@kerneltalks ~]# preupg
The Preupgrade Assistant is a diagnostics tool
and does not perform the actual upgrade.
Do you want to continue? [Y/n]
Y
Gathering logs used by the Preupgrade Assistant:
All installed packages : 01/10 ...finished (time 00:00s)
All changed files : 02/10 ...finished (time 01:39s)
Changed config files : 03/10 ...finished (time 00:00s)
All users : 04/10 ...finished (time 00:00s)
All groups : 05/10 ...finished (time 00:00s)
Service statuses : 06/10 ...finished (time 00:00s)
All installed files : 07/10 ...finished (time 00:00s)
All local files : 08/10 ...finished (time 00:01s)
All executable files : 09/10 ...finished (time 00:00s)
Oracle signed packages : 10/10 ...finished (time 00:00s)
Assessment of the system, running checks / SCE scripts:
001/141 ...done (Configuration files to be reviewed) (time: 00:01s)
002/141 ...done (File lists for the manual migration) (time: 00:00s)
003/141 ...done (Bacula Backup Software) (time: 00:00s)
004/141 ...done (MySQL configuration) (time: 00:00s)
005/141 ...done (MySQL data stack) (time: 00:00s)
006/141 ...done (Changes related to moving from MySQL to MariaDB) (time: 00:00s)
007/141 ...done (PostgreSQL) (time: 00:00s)
008/141 ...done (GNOME desktop environment) (time: 00:00s)
009/141 ...done (KDE desktop environment) (time: 00:00s)
010/141 ...done (POWER6 processors) (time: 00:00s)
011/141 ...done (Graphic drivers not supported in Oracle Linux 7) (time: 00:00s)
012/141 ...done (Input drivers not supported in Oracle Linux 7) (time: 00:00s)
013/141 ...done (Kernel networking drivers not available in Oracle Linux 7) (time: 00:00s)
014/141 ...done (Kernel storage drivers not available in Oracle Linux 7) (time: 00:00s)
015/141 ...done (Oracle Directory Server) (time: 00:00s)
016/141 ...done (Arptables) (time: 00:00s)
017/141 ...done (BIND9 in a chroot environment) (time: 00:00s)
018/141 ...done (BIND9 configuration compatibility) (time: 00:00s)
019/141 ...done (Moving the 'dhcpd' and 'dhcrelay' arguments) (time: 00:00s)
020/141 ...done (Dnsmasq) (time: 00:00s)
021/141 ...done (Dovecot) (time: 00:00s)
022/141 ...done (Compatibility between iptables and ip6tables) (time: 00:00s)
023/141 ...done (Net-SNMP) (time: 00:00s)
024/141 ...done (NFSv2) (time: 00:00s)
025/141 ...done (OpenLDAP server daemon configuration) (time: 00:00s)
026/141 ...done (Moving openssh-keycat) (time: 00:00s)
027/141 ...done (SSH configuration file and SSH keys) (time: 00:00s)
028/141 ...done (Postfix) (time: 00:00s)
029/141 ...done (SMB) (time: 00:00s)
030/141 ...done (Sendmail) (time: 00:00s)
031/141 ...done (Squid) (time: 00:00s)
032/141 ...done (VSFTP daemon configuration) (time: 00:00s)
033/141 ...done (Reusable configuration files) (time: 00:00s)
034/141 ...done (Changed configuration files) (time: 00:00s)
035/141 ...done (Rsyslog configuration incompatibility) (time: 00:00s)
036/141 ...done (VCS repositories) (time: 00:00s)
037/141 ...done (Added and extended options for BIND9) (time: 00:00s)
038/141 ...done (Added options in dnsmasq) (time: 00:00s)
039/141 ...done (Changes in utilities) (time: 00:00s)
040/141 ...done (Packages from other system variants) (time: 00:00s)
041/141 ...done (Load balancer support) (time: 00:00s)
042/141 ...done (Packages not signed by Oracle) (time: 00:00s)
043/141 ...done (Obsolete RPM packages) (time: 00:01s)
044/141 ...done (w3m browser) (time: 00:00s)
045/141 ...done (The qemu-guest-agent package) (time: 00:00s)
046/141 ...done (The coreutils packages) (time: 00:00s)
047/141 ...done (The gawk package) (time: 00:00s)
048/141 ...done (Removed command line options) (time: 00:00s)
049/141 ...done (The netstat binary) (time: 00:00s)
050/141 ...done (Quota) (time: 00:00s)
051/141 ...done (The util-linux (util-linux-ng) binaries) (time: 00:00s)
052/141 ...done (Removed RPM packages) (time: 00:01s)
053/141 ...done (TaskJuggler) (time: 00:00s)
054/141 ...done (Replaced RPM packages) (time: 00:02s)
055/141 ...done (GMP library incompatibilities) (time: 00:00s)
056/141 ...done ("not-base" channels) (time: 00:05s)
057/141 ...done (Package downgrades) (time: 00:00s)
058/141 ...done (Custom SELinux policy) (time: 00:00s)
059/141 ...done (Custom SELinux configuration) (time: 00:03s)
060/141 ...done (Samba SELinux context check) (time: 00:00s)
061/141 ...done (Removing sandbox from SELinux) (time: 00:00s)
062/141 ...done (CUPS Browsing and BrowsePoll) (time: 00:00s)
063/141 ...done (CVS) (time: 00:00s)
064/141 ...done (FreeRADIUS) (time: 00:00s)
065/141 ...done (httpd) (time: 00:00s)
066/141 ...done (The bind-dyndb-ldap configuration file) (time: 00:00s)
067/141 ...done (Identity Management Server) (time: 00:00s)
068/141 ...done (IPA Server CA) (time: 00:00s)
069/141 ...done (Network Time Protocol) (time: 00:00s)
070/141 ...done (time-sync.target) (time: 00:00s)
071/141 ...done (OpenLDAP /etc/sysconfig and data compatibility) (time: 00:00s)
072/141 ...done (The OpenSSH sshd_config file migration) (time: 00:00s)
073/141 ...done (The OpenSSH sysconfig/sshd file migration) (time: 00:00s)
074/141 ...done (The quota_nld service) (time: 00:00s)
075/141 ...done (Moving the disk quota netlink message daemon into the quota-nld package) (time: 00:00s)
076/141 ...done (System Security Services Daemon) (time: 00:00s)
077/141 ...done (Tomcat configuration compatibility check) (time: 00:00s)
078/141 ...done (Detection of LUKS devices using Whirlpool for password hash) (time: 00:00s)
079/141 ...done (Detection of Direct Access Storage Device (DASD) format on s390x platform for LDL format) (time: 00:00s)
080/141 ...done (The clvmd and cmirrord daemon management) (time: 00:00s)
081/141 ...done (Logical Volume Management 2 services) (time: 00:00s)
082/141 ...done (Device Mapper Multipath) (time: 00:00s)
083/141 ...done (The scsi-target-utils packages) (time: 00:00s)
084/141 ...done (Backing up warnquota) (time: 00:00s)
085/141 ...done (The warnquota tool) (time: 00:00s)
086/141 ...done (Add-Ons) (time: 00:00s)
087/141 ...done (Unsupported architectures) (time: 00:00s)
088/141 ...done (Binaries to be rebuilt) (time: 00:25s)
089/141 ...done (Debuginfo packages) (time: 00:00s)
090/141 ...done (Read-only FHS directories) (time: 00:00s)
091/141 ...done (FHS incompatibilities) (time: 00:00s)
092/141 ...done (Requirements for the /usr/ directory) (time: 00:00s)
093/141 ...done (Cluster and High Availability) (time: 00:00s)
094/141 ...done (The quorum implementation) (time: 00:00s)
095/141 ...done (The krb5kdc configuration file) (time: 00:00s)
096/141 ...done (File systems, partitions, and the mounts configuration) (time: 00:00s)
097/141 ...done (Removable media in the /etc/fstab file) (time: 00:00s)
098/141 ...done (Libraries with their soname bumped) (time: 00:08s)
099/141 ...done (Libraries with their soname kept) (time: 00:07s)
100/141 ...done (Removed .so libraries) (time: 00:46s)
101/141 ...done (CGROUP_DAEMON in sysconfig scripts) (time: 00:00s)
102/141 ...done (Checking the system version and variant) (time: 00:00s)
103/141 ...done (Consequences of upgrading to RHEL 7.6 instead of the latest RHEL minor version) (time: 00:00s)
104/141 ...done (AIDE) (time: 00:00s)
105/141 ...done (CA bundles) (time: 00:00s)
106/141 ...done (Oracle Developer Toolset) (time: 00:00s)
107/141 ...done (GRUB to GRUB 2 migration) (time: 00:00s)
108/141 ...done (Grubby) (time: 00:00s)
109/141 ...done (Obsoleting Hardware Abstraction Layer) (time: 00:00s)
110/141 ...done (Hyper-V) (time: 00:00s)
111/141 ...done (Enabled and disabled services in Oracle Linux 6) (time: 00:02s)
112/141 ...done (Ethernet interface naming) (time: 00:00s)
113/141 ...done (The /etc/rc.local and /etc/rc.d/rc.local files) (time: 00:00s)
114/141 ...done (java-1.8.0-ibm compatibility check) (time: 00:00s)
115/141 ...done (Java upgrade) (time: 00:00s)
116/141 ...done (The kernel-kdump package) (time: 00:00s)
117/141 ...done (The cgroups configuration compatibility) (time: 00:00s)
118/141 ...done (Pluggable authentication modules (PAM)) (time: 00:00s)
119/141 ...done (Perl modules not distributed by Oracle) (time: 00:13s)
120/141 ...done (PHP modules not distributed by Oracle) (time: 00:00s)
121/141 ...done (PolicyKit) (time: 00:00s)
122/141 ...done (Python packages) (time: 00:03s)
123/141 ...done (Repositories for Kickstart) (time: 00:00s)
124/141 ...done (System requirements) (time: 00:00s)
125/141 ...done (Ruby 2.0.0) (time: 00:00s)
126/141 ...done (Oracle Software Collections (RHSCL)) (time: 00:00s)
127/141 ...done (Oracle Subscription Manager) (time: 00:00s)
128/141 ...done (Oracle Network Classic unsupported) (time: 00:00s)
129/141 ...done (Copying Kickstart) (time: 00:00s)
130/141 ...done (The 'tuned' profiles) (time: 00:00s)
131/141 ...done (UEFI boot loader) (time: 00:00s)
132/141 ...done (Yaboot) (time: 00:00s)
133/141 ...done (The yum configuration file) (time: 00:00s)
134/141 ...done (Dangerous ranges of UIDs and GIDs) (time: 00:00s)
135/141 ...done (Incorrect usage of reserved UIDs and GIDs) (time: 00:01s)
136/141 ...done (The libuser.conf file) (time: 00:00s)
137/141 ...done (NIS ypbind) (time: 00:00s)
138/141 ...done (NIS Makefile) (time: 00:00s)
139/141 ...done (NIS server maps) (time: 00:00s)
140/141 ...done (NIS server UID_MIN and GID_MIN limits) (time: 00:00s)
141/141 ...done (The NIS server configuration file) (time: 00:00s)
The assessment finished (time 02:18s)
The '/root/preupgrade/cleanconf/etc/ssh/sshd_config' configuration file already exists in the '/root/preupgrade/cleanconf/etc/ssh' directory
The '/root/preupgrade/cleanconf/etc/yum.conf' configuration file already exists in the '/root/preupgrade/cleanconf/etc' directory
Result table with checks and their results for 'main contents':
-------------------------------------------------------------------------------------------------------------------
|Bacula Backup Software |notapplicable |
|MySQL configuration |notapplicable |
|MySQL data stack |notapplicable |
|Changes related to moving from MySQL to MariaDB |notapplicable |
|PostgreSQL |notapplicable |
|GNOME desktop environment |notapplicable |
|KDE desktop environment |notapplicable |
|Graphic drivers not supported in Oracle Linux 7 |notapplicable |
|Input drivers not supported in Oracle Linux 7 |notapplicable |
|Oracle Directory Server |notapplicable |
|Arptables |notapplicable |
|BIND9 in a chroot environment |notapplicable |
|BIND9 configuration compatibility |notapplicable |
|Moving the 'dhcpd' and 'dhcrelay' arguments |notapplicable |
|Dnsmasq |notapplicable |
|Dovecot |notapplicable |
|Net-SNMP |notapplicable |
|OpenLDAP server daemon configuration |notapplicable |
|Postfix |notapplicable |
|SMB |notapplicable |
|Squid |notapplicable |
|VSFTP daemon configuration |notapplicable |
|Added and extended options for BIND9 |notapplicable |
|Added options in dnsmasq |notapplicable |
|Load balancer support |notapplicable |
|w3m browser |notapplicable |
|The qemu-guest-agent package |notapplicable |
|Quota |notapplicable |
|TaskJuggler |notapplicable |
|Samba SELinux context check |notapplicable |
|CUPS Browsing and BrowsePoll |notapplicable |
|CVS |notapplicable |
|FreeRADIUS |notapplicable |
|The bind-dyndb-ldap configuration file |notapplicable |
|Identity Management Server |notapplicable |
|IPA Server CA |notapplicable |
|OpenLDAP /etc/sysconfig and data compatibility |notapplicable |
|The quota_nld service |notapplicable |
|Moving the disk quota netlink message daemon into the quota-nld package |notapplicable |
|System Security Services Daemon |notapplicable |
|Tomcat configuration compatibility check |notapplicable |
|Detection of LUKS devices using Whirlpool for password hash |notapplicable |
|Detection of Direct Access Storage Device (DASD) format on s390x platform for LDL format |notapplicable |
|The clvmd and cmirrord daemon management |notapplicable |
|Logical Volume Management 2 services |notapplicable |
|Device Mapper Multipath |notapplicable |
|The scsi-target-utils packages |notapplicable |
|Backing up warnquota |notapplicable |
|The warnquota tool |notapplicable |
|The quorum implementation |notapplicable |
|The krb5kdc configuration file |notapplicable |
|AIDE |notapplicable |
|Obsoleting Hardware Abstraction Layer |notapplicable |
|Java upgrade |notapplicable |
|java-1.8.0-ibm compatibility check |notapplicable |
|The kernel-kdump package |notapplicable |
|PHP modules not distributed by Oracle |notapplicable |
|Ruby 2.0.0 |notapplicable |
|Oracle Software Collections (RHSCL) |notapplicable |
|Oracle Network Classic unsupported |notapplicable |
|Oracle Subscription Manager |notapplicable |
|Copying Kickstart |notapplicable |
|The 'tuned' profiles |notapplicable |
|Yaboot |notapplicable |
|NIS ypbind |notapplicable |
|NIS Makefile |notapplicable |
|NIS server maps |notapplicable |
|NIS server UID_MIN and GID_MIN limits |notapplicable |
|The NIS server configuration file |notapplicable |
|POWER6 processors |pass |
|Kernel networking drivers not available in Oracle Linux 7 |pass |
|Kernel storage drivers not available in Oracle Linux 7 |pass |
|Sendmail |pass |
|Reusable configuration files |pass |
|time-sync.target |pass |
|The OpenSSH sshd_config file migration |pass |
|Add-Ons |pass |
|Unsupported architectures |pass |
|Debuginfo packages |pass |
|Read-only FHS directories |pass |
|Requirements for the /usr/ directory |pass |
|Cluster and High Availability |pass |
|CGROUP_DAEMON in sysconfig scripts |pass |
|Checking the system version and variant |pass |
|CA bundles |pass |
|Oracle Developer Toolset |pass |
|Hyper-V |pass |
|The /etc/rc.local and /etc/rc.d/rc.local files |pass |
|Pluggable authentication modules (PAM) |pass |
|Python packages |pass |
|System requirements |pass |
|The libuser.conf file |pass |
|NFSv2 |informational |
|Rsyslog configuration incompatibility |informational |
|VCS repositories |informational |
|The coreutils packages |informational |
|The gawk package |informational |
|Removed command line options |informational |
|The netstat binary |informational |
|The util-linux (util-linux-ng) binaries |informational |
|GMP library incompatibilities |informational |
|httpd |informational |
|Network Time Protocol |informational |
|File systems, partitions, and the mounts configuration |informational |
|Removable media in the /etc/fstab file |informational |
|Libraries with their soname kept |informational |
|Consequences of upgrading to RHEL 7.6 instead of the latest RHEL minor version |informational |
|Perl modules not distributed by Oracle |informational |
|PolicyKit |informational |
|The yum configuration file |informational |
|SSH configuration file and SSH keys |fixed |
|Replaced RPM packages |fixed |
|Package downgrades |fixed |
|Custom SELinux policy |fixed |
|Custom SELinux configuration |fixed |
|The OpenSSH sysconfig/sshd file migration |fixed |
|Grubby |fixed |
|Dangerous ranges of UIDs and GIDs |fixed |
|File lists for the manual migration |needs_inspection |
|Compatibility between iptables and ip6tables |needs_inspection |
|Moving openssh-keycat |needs_inspection |
|Changed configuration files |needs_inspection |
|Changes in utilities |needs_inspection |
|Obsolete RPM packages |needs_inspection |
|Binaries to be rebuilt |needs_inspection |
|FHS incompatibilities |needs_inspection |
|Libraries with their soname bumped |needs_inspection |
|Removed .so libraries |needs_inspection |
|Ethernet interface naming |needs_inspection |
|Repositories for Kickstart |needs_inspection |
|Incorrect usage of reserved UIDs and GIDs |needs_inspection |
|Configuration files to be reviewed |needs_action |
|Packages from other system variants |needs_action |
|Packages not signed by Oracle |needs_action |
|Removed RPM packages |needs_action |
|"not-base" channels |needs_action |
|Removing sandbox from SELinux |needs_action |
|GRUB to GRUB 2 migration |needs_action |
|Enabled and disabled services in Oracle Linux 6 |needs_action |
|The cgroups configuration compatibility |needs_action |
|UEFI boot loader |needs_action |
-------------------------------------------------------------------------------------------------------------------
The tarball with results is stored in '/root/preupgrade-results/preupg_results-200723042538.tar.gz' .
The latest assessment is stored in the '/root/preupgrade' directory.
Summary information:
We have found some potential risks.
Read the full report file '/root/preupgrade/result.html' for more details.
Please ensure you have backed up your system and/or data
before doing a system upgrade to prevent loss of data in
case the upgrade fails and full re-install of the system
from installation media is needed.
Upload results to UI by the command:
e.g. preupg -u http://example.com:8099/submit/ -r /root/preupgrade-results/preupg_results-200723042538.tar.gz .
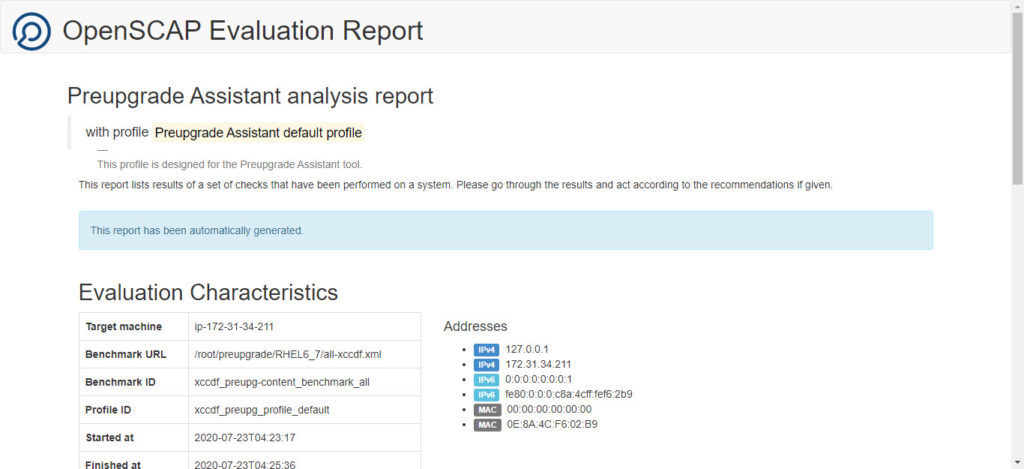
Once the tool completes checks, download, and review /root/preupgrade/result.html It will be something like below –
Pre-upgrade report
It will be having all the checks, their results, what is actionable and what actions to be taken.
Spare some time to read the report thoroughly, read the actionable, action on it if it suits your environment/needs, etc. and then move ahead with the upgrade. Since I am running a test instance on AWS, I did not care to consider actionable and I moved ahead with the upgrade.
The upgrade needs an ISO or network path from where it can read OL7 packages for an upgrade. I downloaded OL7 ISO from Oracle using get. To start upgrade with ISO use below command –
[root@kerneltalks ~]# redhat-upgrade-tool-cli --iso OracleLinux-R7-U6-Server-x86_64-dvd.iso --debuglog=/tmp/upgrade.log --cleanup-post
setting up repos...
upgradeiso                                                                                                                                       | 3.6 kB     00:00 ...
upgradeiso/primary_db                                                                                                                            | 5.0 MB     00:00 ...
The Preupgrade Assistant has found upgrade risks.
 You can run 'preupg --riskcheck --verbose' to view these risks.
Addressing high risk issues is mandatory before continuing with the upgrade.
Ignoring these risks may result in a broken and/or unsupported upgrade.
Please backup your data.

List of issues:
preupg.risk.MEDIUM: Some packages installed on the system were removed between Oracle Linux 6 and Oracle Linux 7. This might break the functionality of the packages that depend on the removed packages.
preupg.risk.MEDIUM: After the upgrade, migrate GRUB to GRUB 2 manually.
preupg.risk.MEDIUM: The  name distros was changed in Oracle Linux 7 to one of these services:  cloud-config.service cloud-config.target cloud-final.service cloud-init-local.service cloud-init.service
preupg.risk.MEDIUM: The  name __init__.py was changed in Oracle Linux 7 to one of these services:  cloud-config.service cloud-config.target cloud-final.service cloud-init-local.service cloud-init.service
preupg.risk.MEDIUM: The  name __init__.pyc was changed in Oracle Linux 7 to one of these services:  cloud-config.service cloud-config.target cloud-final.service cloud-init-local.service cloud-init.service
preupg.risk.MEDIUM: The  name __init__.pyo was changed in Oracle Linux 7 to one of these services:  cloud-config.service cloud-config.target cloud-final.service cloud-init-local.service cloud-init.service
preupg.risk.MEDIUM: The  name arch.py was changed in Oracle Linux 7 to one of these services:  cloud-config.service cloud-config.target cloud-final.service cloud-init-local.service cloud-init.service
preupg.risk.MEDIUM: The  name arch.pyc was changed in Oracle Linux 7 to one of these services:  cloud-config.service cloud-config.target cloud-final.service cloud-init-local.service cloud-init.service
preupg.risk.MEDIUM: The  name arch.pyo was changed in Oracle Linux 7 to one of these services:  cloud-config.service cloud-config.target cloud-final.service cloud-init-local.service cloud-init.service
preupg.risk.MEDIUM: The  name debian.py was changed in Oracle Linux 7 to one of these services:  cloud-config.service cloud-config.target cloud-final.service cloud-init-local.service cloud-init.service
preupg.risk.MEDIUM: The  name debian.pyc was changed in Oracle Linux 7 to one of these services:  cloud-config.service cloud-config.target cloud-final.service cloud-init-local.service cloud-init.service
preupg.risk.MEDIUM: The  name debian.pyo was changed in Oracle Linux 7 to one of these services:  cloud-config.service cloud-config.target cloud-final.service cloud-init-local.service cloud-init.service
preupg.risk.MEDIUM: The  name fedora.py was changed in Oracle Linux 7 to one of these services:  cloud-config.service cloud-config.target cloud-final.service cloud-init-local.service cloud-init.service
preupg.risk.MEDIUM: The  name fedora.pyc was changed in Oracle Linux 7 to one of these services:  cloud-config.service cloud-config.target cloud-final.service cloud-init-local.service cloud-init.service
preupg.risk.MEDIUM: The  name fedora.pyo was changed in Oracle Linux 7 to one of these services:  cloud-config.service cloud-config.target cloud-final.service cloud-init-local.service cloud-init.service
preupg.risk.MEDIUM: The  name freebsd.py was changed in Oracle Linux 7 to one of these services:  cloud-config.service cloud-config.target cloud-final.service cloud-init-local.service cloud-init.service
preupg.risk.MEDIUM: The  name freebsd.pyc was changed in Oracle Linux 7 to one of these services:  cloud-config.service cloud-config.target cloud-final.service cloud-init-local.service cloud-init.service
preupg.risk.MEDIUM: The  name freebsd.pyo was changed in Oracle Linux 7 to one of these services:  cloud-config.service cloud-config.target cloud-final.service cloud-init-local.service cloud-init.service
preupg.risk.MEDIUM: The  name gentoo.py was changed in Oracle Linux 7 to one of these services:  cloud-config.service cloud-config.target cloud-final.service cloud-init-local.service cloud-init.service
preupg.risk.MEDIUM: The  name gentoo.pyc was changed in Oracle Linux 7 to one of these services:  cloud-config.service cloud-config.target cloud-final.service cloud-init-local.service cloud-init.service
preupg.risk.MEDIUM: The  name gentoo.pyo was changed in Oracle Linux 7 to one of these services:  cloud-config.service cloud-config.target cloud-final.service cloud-init-local.service cloud-init.service
preupg.risk.MEDIUM: The  name net_util.py was changed in Oracle Linux 7 to one of these services:  cloud-config.service cloud-config.target cloud-final.service cloud-init-local.service cloud-init.service
preupg.risk.MEDIUM: The  name net_util.pyc was changed in Oracle Linux 7 to one of these services:  cloud-config.service cloud-config.target cloud-final.service cloud-init-local.service cloud-init.service
preupg.risk.MEDIUM: The  name net_util.pyo was changed in Oracle Linux 7 to one of these services:  cloud-config.service cloud-config.target cloud-final.service cloud-init-local.service cloud-init.service
preupg.risk.MEDIUM: The  name parsers was changed in Oracle Linux 7 to one of these services:  cloud-config.service cloud-config.target cloud-final.service cloud-init-local.service cloud-init.service
preupg.risk.MEDIUM: The  name hostname.py was changed in Oracle Linux 7 to one of these services:  cloud-config.service cloud-config.target cloud-final.service cloud-init-local.service cloud-init.service
preupg.risk.MEDIUM: The  name hostname.pyc was changed in Oracle Linux 7 to one of these services:  cloud-config.service cloud-config.target cloud-final.service cloud-init-local.service cloud-init.service
preupg.risk.MEDIUM: The  name hostname.pyo was changed in Oracle Linux 7 to one of these services:  cloud-config.service cloud-config.target cloud-final.service cloud-init-local.service cloud-init.service
preupg.risk.MEDIUM: The  name hosts.py was changed in Oracle Linux 7 to one of these services:  cloud-config.service cloud-config.target cloud-final.service cloud-init-local.service cloud-init.service
preupg.risk.MEDIUM: The  name hosts.pyc was changed in Oracle Linux 7 to one of these services:  cloud-config.service cloud-config.target cloud-final.service cloud-init-local.service cloud-init.service
preupg.risk.MEDIUM: The  name hosts.pyo was changed in Oracle Linux 7 to one of these services:  cloud-config.service cloud-config.target cloud-final.service cloud-init-local.service cloud-init.service
preupg.risk.MEDIUM: The  name resolv_conf.py was changed in Oracle Linux 7 to one of these services:  cloud-config.service cloud-config.target cloud-final.service cloud-init-local.service cloud-init.service
preupg.risk.MEDIUM: The  name resolv_conf.pyc was changed in Oracle Linux 7 to one of these services:  cloud-config.service cloud-config.target cloud-final.service cloud-init-local.service cloud-init.service
preupg.risk.MEDIUM: The  name resolv_conf.pyo was changed in Oracle Linux 7 to one of these services:  cloud-config.service cloud-config.target cloud-final.service cloud-init-local.service cloud-init.service
preupg.risk.MEDIUM: The  name sys_conf.py was changed in Oracle Linux 7 to one of these services:  cloud-config.service cloud-config.target cloud-final.service cloud-init-local.service cloud-init.service
preupg.risk.MEDIUM: The  name sys_conf.pyc was changed in Oracle Linux 7 to one of these services:  cloud-config.service cloud-config.target cloud-final.service cloud-init-local.service cloud-init.service
preupg.risk.MEDIUM: The  name sys_conf.pyo was changed in Oracle Linux 7 to one of these services:  cloud-config.service cloud-config.target cloud-final.service cloud-init-local.service cloud-init.service
preupg.risk.MEDIUM: The  name rhel.py was changed in Oracle Linux 7 to one of these services:  cloud-config.service cloud-config.target cloud-final.service cloud-init-local.service cloud-init.service
preupg.risk.MEDIUM: The  name rhel.pyc was changed in Oracle Linux 7 to one of these services:  cloud-config.service cloud-config.target cloud-final.service cloud-init-local.service cloud-init.service
preupg.risk.MEDIUM: The  name rhel.pyo was changed in Oracle Linux 7 to one of these services:  cloud-config.service cloud-config.target cloud-final.service cloud-init-local.service cloud-init.service
preupg.risk.MEDIUM: The  name rhel_util.py was changed in Oracle Linux 7 to one of these services:  cloud-config.service cloud-config.target cloud-final.service cloud-init-local.service cloud-init.service
preupg.risk.MEDIUM: The  name rhel_util.pyc was changed in Oracle Linux 7 to one of these services:  cloud-config.service cloud-config.target cloud-final.service cloud-init-local.service cloud-init.service
preupg.risk.MEDIUM: The  name rhel_util.pyo was changed in Oracle Linux 7 to one of these services:  cloud-config.service cloud-config.target cloud-final.service cloud-init-local.service cloud-init.service
preupg.risk.MEDIUM: The  name sles.py was changed in Oracle Linux 7 to one of these services:  cloud-config.service cloud-config.target cloud-final.service cloud-init-local.service cloud-init.service
preupg.risk.MEDIUM: The  name sles.pyc was changed in Oracle Linux 7 to one of these services:  cloud-config.service cloud-config.target cloud-final.service cloud-init-local.service cloud-init.service
preupg.risk.MEDIUM: The  name sles.pyo was changed in Oracle Linux 7 to one of these services:  cloud-config.service cloud-config.target cloud-final.service cloud-init-local.service cloud-init.service
preupg.risk.MEDIUM: The  name ubuntu.py was changed in Oracle Linux 7 to one of these services:  cloud-config.service cloud-config.target cloud-final.service cloud-init-local.service cloud-init.service
preupg.risk.MEDIUM: The  name ubuntu.pyc was changed in Oracle Linux 7 to one of these services:  cloud-config.service cloud-config.target cloud-final.service cloud-init-local.service cloud-init.service
preupg.risk.MEDIUM: The  name ubuntu.pyo was changed in Oracle Linux 7 to one of these services:  cloud-config.service cloud-config.target cloud-final.service cloud-init-local.service cloud-init.service
preupg.risk.SLIGHT: We detected some files where their modifications are not tracked by the RPM packages. Check the functionality of the files after the successful upgrade.
preupg.risk.HIGH: The /etc/shadow and /etc/gshadow files must be backed up manually by the administrator.
preupg.risk.HIGH: You have installed some packages signed by Oracle for a different variant of the Oracle Linux system.
preupg.risk.HIGH: We detected some packages not signed by Oracle. You can find the list in the /root/preupgrade/kickstart/nonrhpkgs file. Handle them yourself.
preupg.risk.HIGH: After upgrading to Oracle Linux 7, there are still some el6 packages left. Add the '--cleanup-post' option to redhat-upgrade-tool to remove them automatically.
preupg.risk.HIGH: The apr-util-ldap package moved to the Optional channel between Oracle Linux 6 and Oracle Linux 7.
preupg.risk.HIGH: The groff package moved to the Optional channel between Oracle Linux 6 and Oracle Linux 7.
preupg.risk.HIGH: The openscap-engine-sce package is available in the Optional channel.
preupg.risk.HIGH: The python-pygments package moved to the Optional channel between Oracle Linux 6 and Oracle Linux 7.
preupg.risk.HIGH: The system-config-firewall-tui package moved to the Optional channel between Oracle Linux 6 and Oracle Linux 7.
preupg.risk.HIGH: The xz-lzma-compat package moved to the Optional channel between Oracle Linux 6 and Oracle Linux 7.
preupg.risk.HIGH: There were changes in SELinux policies between Oracle Linux 6 and Oracle Linux 7. See the solution to resolve this problem.
preupg.risk.HIGH: Back up the grub RPM manually before the upgrade. See the remediation instructions for more info.
preupg.risk.HIGH: The blk-availability service is disabled by default in Oracle Linux 7. Enable it by typing: systemctl enable blk-availability && systemctl start blk-availability.service .
preupg.risk.HIGH: The cloud-config service is disabled by default in Oracle Linux 7. Enable it by typing: systemctl enable cloud-config && systemctl start cloud-config.service .
preupg.risk.HIGH: The cloud-final service is disabled by default in Oracle Linux 7. Enable it by typing: systemctl enable cloud-final && systemctl start cloud-final.service .
preupg.risk.HIGH: The cloud-init service is disabled by default in Oracle Linux 7. Enable it by typing: systemctl enable cloud-init && systemctl start cloud-init.service .
preupg.risk.HIGH: The cloud-init-hotplugd service is disabled by default in Oracle Linux 7. Enable it by typing: systemctl enable cloud-init-hotplugd && systemctl start cloud-init-hotplugd.service .
preupg.risk.HIGH: The cloud-init-local service is disabled by default in Oracle Linux 7. Enable it by typing: systemctl enable cloud-init-local && systemctl start cloud-init-local.service .
preupg.risk.HIGH: The ip6tables service is disabled by default in Oracle Linux 7. Enable it by typing: systemctl enable ip6tables && systemctl start ip6tables.service .
preupg.risk.HIGH: The messagebus service is disabled by default in Oracle Linux 7. Enable it by typing: systemctl enable messagebus && systemctl start messagebus.service .
preupg.risk.HIGH: The netfs service is disabled by default in Oracle Linux 7. Enable it by typing: systemctl enable netfs && systemctl start netfs.service .
preupg.risk.HIGH: The network service is disabled by default in Oracle Linux 7. Enable it by typing: systemctl enable network && systemctl start network.service .
preupg.risk.HIGH: The ntpd service is disabled by default in Oracle Linux 7. Enable it by typing: systemctl enable ntpd && systemctl start ntpd.service .
preupg.risk.HIGH: The sendmail service is disabled by default in Oracle Linux 7. Enable it by typing: systemctl enable sendmail && systemctl start sendmail.service .
preupg.risk.HIGH: The udev-post service is disabled by default in Oracle Linux 7. Enable it by typing: systemctl enable udev-post && systemctl start udev-post.service .
preupg.risk.HIGH: Additional libcgroup configuration files were created (/etc/cgconfig.d).
preupg.risk.HIGH: Binary efibootmgr is not installed.
preupg.risk.HIGH: Please, install all required packages (and binaries) and run preupg again to process check properly.
preupg.risk.MEDIUM: The ssh-keycat files are moved to the openssh-keycat package.
preupg.risk.MEDIUM: Some packages installed on the system were removed between Oracle Linux 6 and Oracle Linux 7. This might break the functionality of the packages depending on these removed packages.
preupg.risk.MEDIUM: Conflict with the file structure: the /run/ directory already exists.
preupg.risk.MEDIUM:  Some soname bumps in the libraries installed on the system were detected, which might break the functionality of some of your third-party applications. They might need to be rebuilt, so check their requirements.
preupg.risk.MEDIUM: Some .so libraries installed on the system were removed between Oracle Linux 6 and Oracle Linux 7. This might break the functionality of some of your third-party applications.
preupg.risk.MEDIUM: Reserved user and group IDs by the setup package changed between Oracle Linux 6 and Oracle Linux 7.
preupg.risk.SLIGHT: Some files untracked by RPM packages were detected. Some of these files might need a manual check or migration after redhat-upgrade-tool and/or might cause conflicts during the installation. Try to reduce the number of the unnecessary untracked files before running redhat-upgrade-tool.
preupg.risk.SLIGHT: The iptables or ip6tables service is enabled.Read the remediation instructions.
preupg.risk.SLIGHT: Certain configuration files are changed and the .rpmnew files will be generated.
preupg.risk.SLIGHT: Some utilities were replaced, removed, moved between packages, or their location changed.
preupg.risk.SLIGHT: Some scripts untracked by RPM were discovered on the system. The scripts might not work properly after the upgrade.
preupg.risk.SLIGHT: /etc/sysconfig/network-scripts/ifcfg-eth0 is old style ethX name without HWADDR, its name can change after the upgrade.
preupg.risk.SLIGHT: You use one network device with an old style 'ethX' name.
preupg.risk.SLIGHT: The public_ol6_latest repository is enabled.
preupg.risk.SLIGHT: The public_ol6_addons repository is enabled.
preupg.risk.SLIGHT: The public_ol6_ga_base repository is not enabled.
preupg.risk.SLIGHT: The public_ol6_u1_base repository is not enabled.
preupg.risk.SLIGHT: The public_ol6_u2_base repository is not enabled.
preupg.risk.SLIGHT: The public_ol6_u3_base repository is not enabled.
preupg.risk.SLIGHT: The public_ol6_u4_base repository is not enabled.
preupg.risk.SLIGHT: The public_ol6_u5_base repository is not enabled.
preupg.risk.SLIGHT: The public_ol6_u6_base repository is not enabled.
preupg.risk.SLIGHT: The public_ol6_u7_base repository is not enabled.
preupg.risk.SLIGHT: The public_ol6_u8_base repository is not enabled.
preupg.risk.SLIGHT: The public_ol6_UEK_latest repository is not enabled.
preupg.risk.SLIGHT: The public_ol6_UEKR3_latest repository is not enabled.
preupg.risk.SLIGHT: The public_ol6_UEKR4 repository is enabled.
preupg.risk.SLIGHT: The public_ol6_UEK_base repository is not enabled.
preupg.risk.SLIGHT: The public_ol6_MySQL repository is not enabled.
preupg.risk.SLIGHT: The public_ol6_gdm_multiseat repository is not enabled.
preupg.risk.SLIGHT: The public_ol6_MySQL56 repository is not enabled.
preupg.risk.SLIGHT: The public_ol6_MySQL57 repository is not enabled.
preupg.risk.SLIGHT: The public_ol6_ceph10 repository is not enabled.
preupg.risk.SLIGHT: The public_ol6_spacewalk20_server repository is not enabled.
preupg.risk.SLIGHT: The public_ol6_spacewalk20_client repository is not enabled.
preupg.risk.SLIGHT: The public_ol6_ofed_UEK repository is not enabled.
preupg.risk.SLIGHT: The public_ol6_UEKR4_OFED repository is not enabled.
preupg.risk.SLIGHT: The public_ol6_playground_latest repository is not enabled.
preupg.risk.SLIGHT: The public_ol6_spacewalk22_server repository is not enabled.
preupg.risk.SLIGHT: The public_ol6_spacewalk22_client repository is not enabled.
preupg.risk.SLIGHT: The public_ol6_software_collections repository is not enabled.
preupg.risk.SLIGHT: The public_ol6_spacewalk24_server repository is not enabled.
preupg.risk.SLIGHT: The public_ol6_spacewalk24_client repository is not enabled.
preupg.risk.SLIGHT: Enabled repository files for the Kickstart generation are stored in the /root/preupgrade/kickstart/available-repos file.
preupg.risk.SLIGHT: Some packages installed on the system changed their names between Oracle Linux 6 and Oracle Linux 7. Although they should be compatible, monitor them after the update.
Continue with the upgrade [Y/N]? Y
Once again it will list out risks of upgrade and ask your confirmation to move ahead. Once you confirm it with Y, the upgrade starts.
Once command completes it will ask you to reboot the server. Reboot will take a while since upgrade process completes during reboot and then login to system to check.
[root@kerneltalks ~]# cat /etc/*release
Oracle Linux Server release 7.6
NAME="Oracle Linux Server"
VERSION="7.6"
ID="ol"
VARIANT="Server"
VARIANT_ID="server"
VERSION_ID="7.6"
PRETTY_NAME="Oracle Linux Server 7.6"
ANSI_COLOR="0;31"
CPE_NAME="cpe:/o:oracle:linux:7:6:server"
HOME_URL="https://linux.oracle.com/"
BUG_REPORT_URL="https://bugzilla.oracle.com/"

ORACLE_BUGZILLA_PRODUCT="Oracle Linux 7"
ORACLE_BUGZILLA_PRODUCT_VERSION=7.6
ORACLE_SUPPORT_PRODUCT="Oracle Linux"
ORACLE_SUPPORT_PRODUCT_VERSION=7.6
Red Hat Enterprise Linux Server release 7.6 (Maipo)
Oracle Linux Server release 7.6
And we are upgraded to Ol7.6! You have to read all the reports and messages before you actually hit confirmation to upgrade. This will make your life easy post upgrade!
Issue with tool version
Redhat upgrade tool always looks for the latest OS that is known to it for an upgrade. So if you are using newer tool version and trying to upgrade OS to old version than the version known to the tool then you will see below error –
The installed version of Preupgrade Assistant allows upgrade only to the system version 7.5
I was trying to upgrade to OL 7.4 and tool was looking for 7.5 only. So in such case, you have to downgrade tool version and try.
For OL 7.4 upgrade below version worked for me –
redhat-upgrade-tool-0.7.50-1.0.1.el6.noarch.rpm
If you use any version below 0.7.50, it will land you up in issue where you see lots of couldn’t add media errors and failed to open file errors in the console –
Warning: couldn't add media/Packages/dracut-network-033-502.0.1.el7.x86_64.rpm to the transaction
Warning: failed to open file /sysroot/var/lib/system-upgrade/media/Packages/xulrunner-31.6.0-2.0.1.el7_1.x86_64.rpm
If you use any version above 0.7.50, you will land in the issue explained above. Decompress kernel modules capability introduced in 0.7.50 makes it best bet in the above-explained scenario.
Few redhat-upgrade-tool versions mapping with their supported upgrades.
In this article we will look at pod concept in Kubernetes
pods in K8s.
What is pod in kubernetes?
The pod is the smallest execution unit in Kubernetes. It’s a single container or group of containers that serve a running process in the K8s cluster. Read what is container? if you are not familiar with containerization.
Each pod has a single IP address that is shared by all the containers within. Also, the port space is shared by all the containers inside.
You can view running pods in K8s by using below command –
$ kubectl get pods
NAME        READY   STATUS    RESTARTS   AGE
webserver   1/1     Running   0          10s
View pod details in K8s
To get more detailed information on each pod, you can run below command by supplying its pod name as argument –
$ kubectl describe pods webserver
Name:         webserver
Namespace:    default
Priority:     0
Node:         node01/172.17.0.9
Start Time:   Sun, 05 Jul 2020 13:50:41 +0000
Labels:       <none>
Annotations:  <none>
Status:       Running
IP:           10.244.1.3
IPs:
  IP:  10.244.1.3
Containers:
  webserver:
    Container ID:   docker://8b260effa4ada1ff80e106fb12cf6e2da90eb955321bbe3b9e302fdd33b6c0d8
    Image:          nginx
    Image ID:       docker-pullable://nginx@sha256:21f32f6c08406306d822a0e6e8b7dc81f53f336570e852e25fbe1e3e3d0d0133
    Port:           80/TCP
    Host Port:      0/TCP
    State:          Running
      Started:      Sun, 05 Jul 2020 13:50:50 +0000
    Ready:          True
    Restart Count:  0
    Environment:    <none>
    Mounts:
      /var/run/secrets/kubernetes.io/serviceaccount from default-token-bjcwg (ro)
Conditions:
  Type              Status
  Initialized       True
  Ready             True
  ContainersReady   True
  PodScheduled      True
Volumes:
  default-token-bjcwg:
    Type:        Secret (a volume populated by a Secret)
    SecretName:  default-token-bjcwg
    Optional:    false
QoS Class:       BestEffort
Node-Selectors:  <none>
Tolerations:     node.kubernetes.io/not-ready:NoExecute for 300s
                 node.kubernetes.io/unreachable:NoExecute for 300s
Events:
  Type    Reason     Age   From               Message
  ----    ------     ----  ----               -------
  Normal  Scheduled  25s   default-scheduler  Successfully assigned default/webserver to node01
  Normal  Pulling    23s   kubelet, node01    Pulling image "nginx"
  Normal  Pulled     17s   kubelet, node01    Successfully pulled image "nginx"
  Normal  Created    16s   kubelet, node01    Created container webserver
  Normal  Started    16s   kubelet, node01    Started container webserver
pod configuration file
One can create a pod configuration file i.e. yml file which has all the details to start a pod. K8s can read this file and spin up your pod according to specifications. Sample file below –
Its a single container pod file since we specified specs for only one kind of container in it.
Single container pod
Single container pod can be run without using a yml file. Like using simple command –
$ kubectl run single-c-pod --image=nginx
pod/single-c-pod created
$ kubectl get pods
NAME           READY   STATUS    RESTARTS   AGE
single-c-pod   1/1     Running   0          35s
webserver      1/1     Running   0          2m52s
You can spin the single container pod using simple yml file stated above.
Multiple container pod
For multiple container pods, let’s edit the above yml file to add another container specs as well.
In the above file, we are spinning up a pod that has 1 webserver container and another is Ubuntu Linux container.
$ kubectl create -f web-bash.yml
pod/web-bash created
$ kubectl get pods
NAME       READY   STATUS    RESTARTS   AGE
web-bash   2/2     Running   0          12s
How to delete pod
Its a simple delete pod command
$ kubectl delete pods web-bash
pod "web-bash" deleted
How to view pod logs in Kubernetes
I am running a single container pod of Nginx. We will then check pod logs to confirm this messages.
$ kubectl run single-c-pod --image=nginx
pod/single-c-pod created
$ kubectl logs single-c-pod
/docker-entrypoint.sh: /docker-entrypoint.d/ is not empty, will attempt to perform configuration
/docker-entrypoint.sh: Looking for shell scripts in /docker-entrypoint.d/
/docker-entrypoint.sh: Launching /docker-entrypoint.d/10-listen-on-ipv6-by-default.sh
10-listen-on-ipv6-by-default.sh: Getting the checksum of /etc/nginx/conf.d/default.conf
10-listen-on-ipv6-by-default.sh: Enabled listen on IPv6 in /etc/nginx/conf.d/default.conf
/docker-entrypoint.sh: Launching /docker-entrypoint.d/20-envsubst-on-templates.sh
/docker-entrypoint.sh: Configuration complete; ready for start up
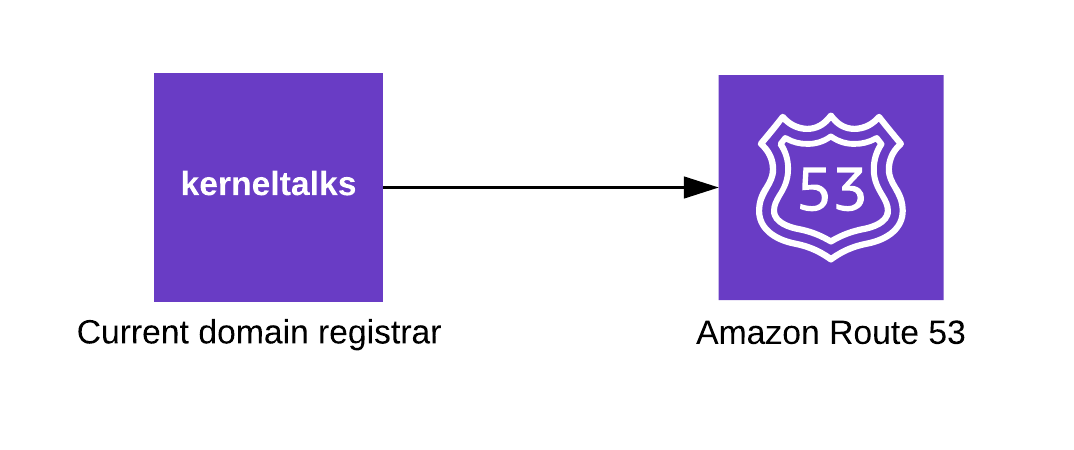
Step by step procedure to transfer domain from Godaddy to Route 53
Domain migration to Route 53
In this article, we will walk you through the migrating a domain from Godaddy to AWS Route 53. The process remains almost similar to even another domain registrar to Route 53 but I provided screenshots from Godaddy since I had a domain registered there which I transferred.
We will be migrating my other domain (shrikantlavhate.in) from Godaddy to Route 53 in this article. It’s a 5-6 days procedure where domain transfer approval will be held by the previous registrar. Its a failsafe so you can cancel the transfer if you have not initiated it or want to rollback your action.
Unlock domain for transfer
Login to your current registrar (in our case Godaddy) and unlock the domain for transfer. Goto Manage domains or domain settings and turn off domain lock.
In Godaddy navigation is – Products page > Domains > Click Manage
Then on the domain settings page, scroll down to domain lock where it says – ‘Locking prevents unauthorized changes, including transfer to another registrar. Domain lock: On‘
Click on Edit button beside it, and turn it off.
Now, your domain is unlocked for transfer.
Initiate transfer from AWS Route 53
To start with you should be having an AWS account (comes with 12 months free tier for new accounts). If you haven’t done this already then, go ahead and sign up for it. You will need a valid email address and credit card information during the signup procedure.
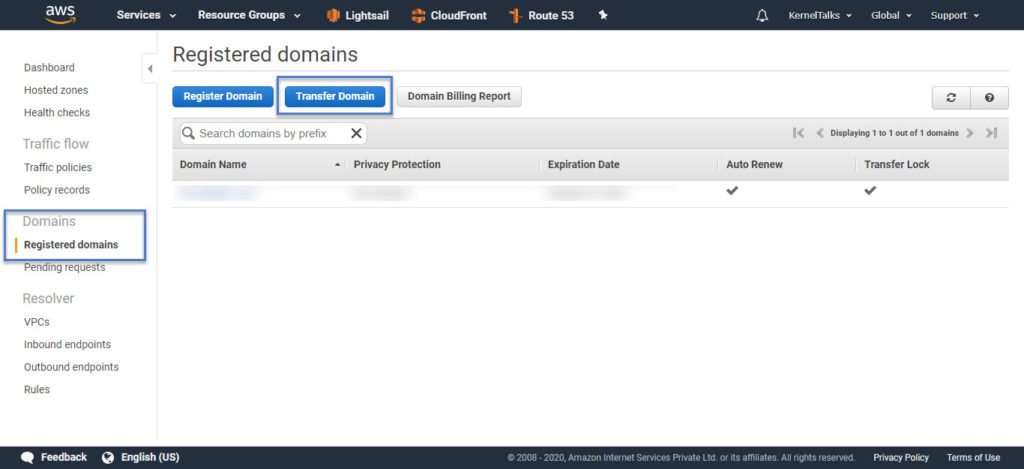
Once done, sign in to Route 53 management console. Click on ‘Registered domains‘ link in the left-hand side menu and then click ‘Transfer domain‘
Start your domain transfer in Route 53
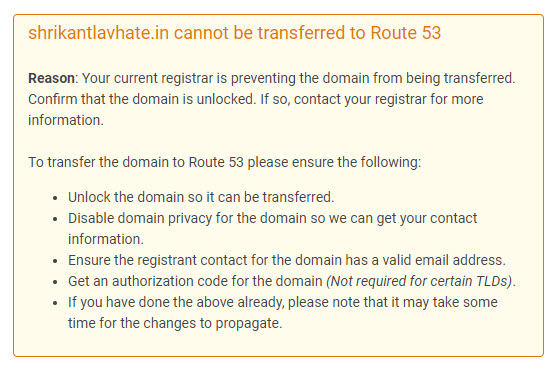
If you missed unlocking your domain in the current registrar as mentioned above you will see the error here like domain can not be transferred to Route 53. Example below –
Domain transfer error
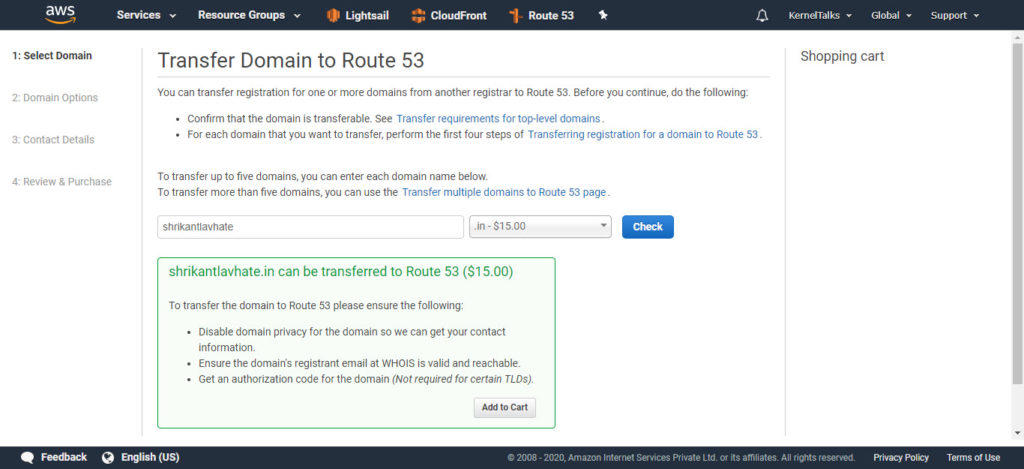
So ensure you have unlocked domain for transfer and punch in domain name in the wizard and hit check. It will confirm domain can be transferred now.
Domain is ready to transfer
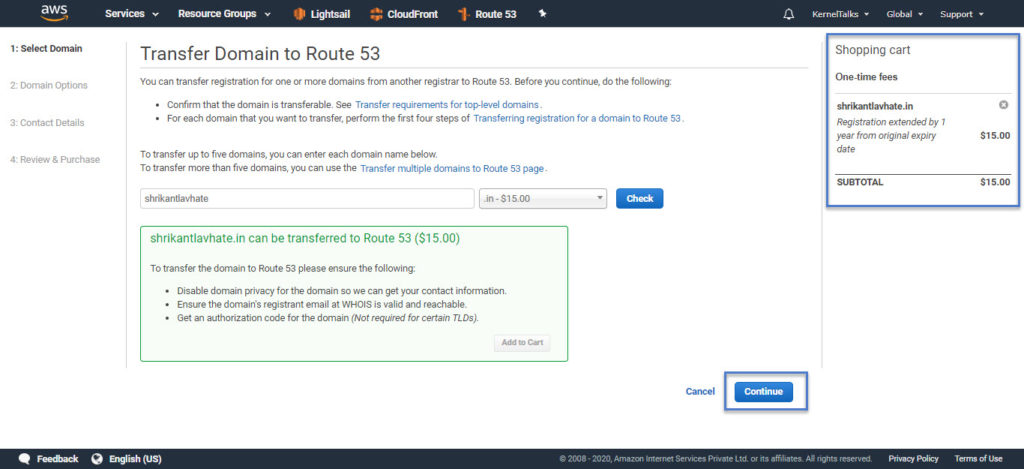
Click on ‘Add to cart‘ and it will show you billing total on the right-hand side. Make a note that, AWS renews your domain for one year from its current expiry date during transfer and this renewal fee is also included in that billing total. Confirm and click ‘Continue‘
Domain transfer billing total
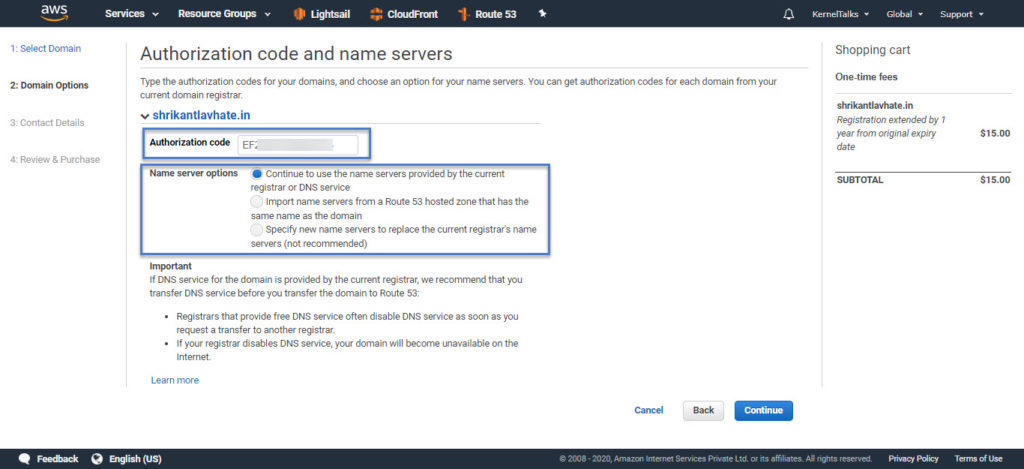
On the next screen you need to provide –
Authorization code
You can get this from current domain registrar portal
Nameservers
You can choose to keep the same nameservers currently being used by a domain. AWS will copy them.
Import from hosted one in Route 53 (if you have created it already)
Specify manually
In the Godaddy domain manager page, click on ‘Transfer domain away from GoDaddy‘ link to get authorization code. I choose to keep current nameservers for now.
Transfer authorization code and nameservers
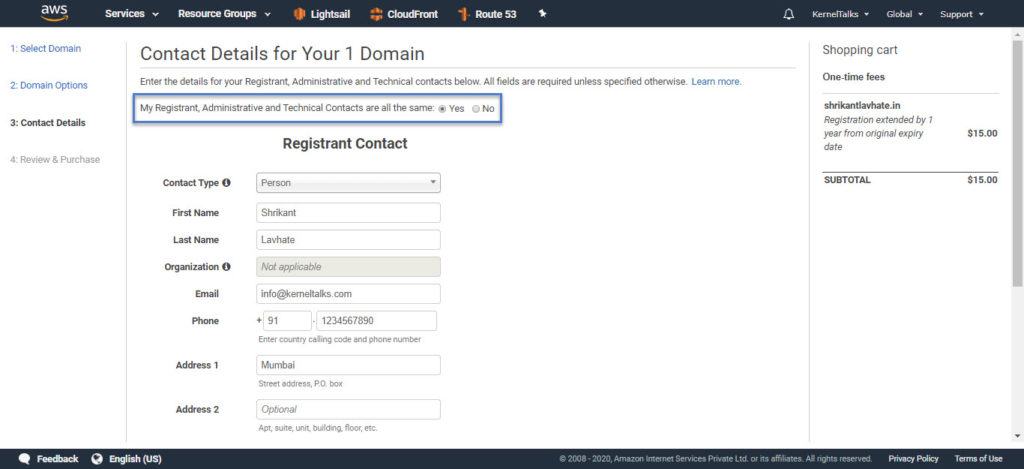
On the next page, you need to fill in contact details. Note that these details will be publicly accessible from the WHOIS database. You can choose to opt-out of it by enabling ‘Privacy protection‘ at the end of the same page. But this option is not available for some domains like .in 🙁
You can define 3 different contact details for Registrant, Administrative, and Technical context. I choose to keep one for all.
Domain contact details
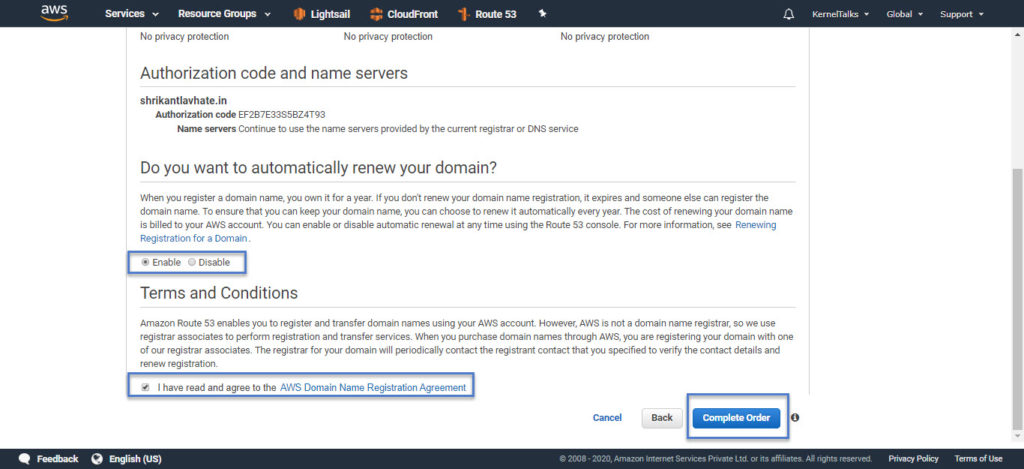
Once done hit the ‘Continue‘ button at the bottom of the page. On the next page, it will ask you to confirm all the details you filled in since the beginning. Choose here if you want to auto-renew your domain or not (this can be changed later as well) and accept the terms to complete your order.
Complete domain transfer order
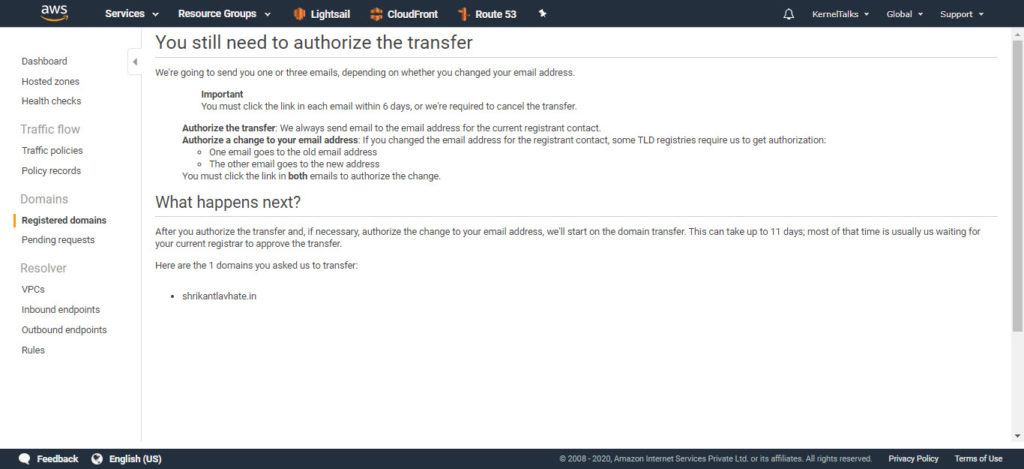
That’s all. Your order has been placed and the billed amount will be debited from your card which you provided at the time of AWS account creation.
You will be presented with an informational page below which is self-explanatory.
Authorize domain transfer
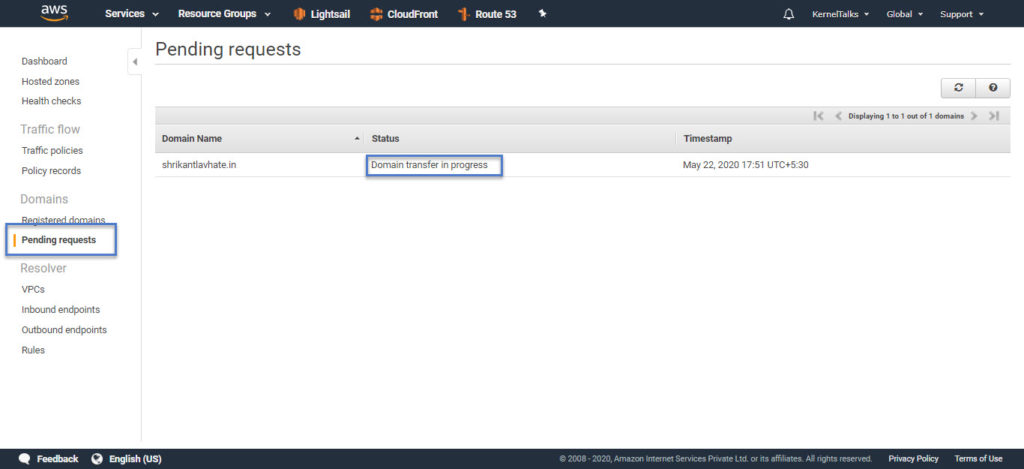
You can verify domain transfer status be navigating to ‘Pending requests‘ in the left hand side menu.
Domain transfer status
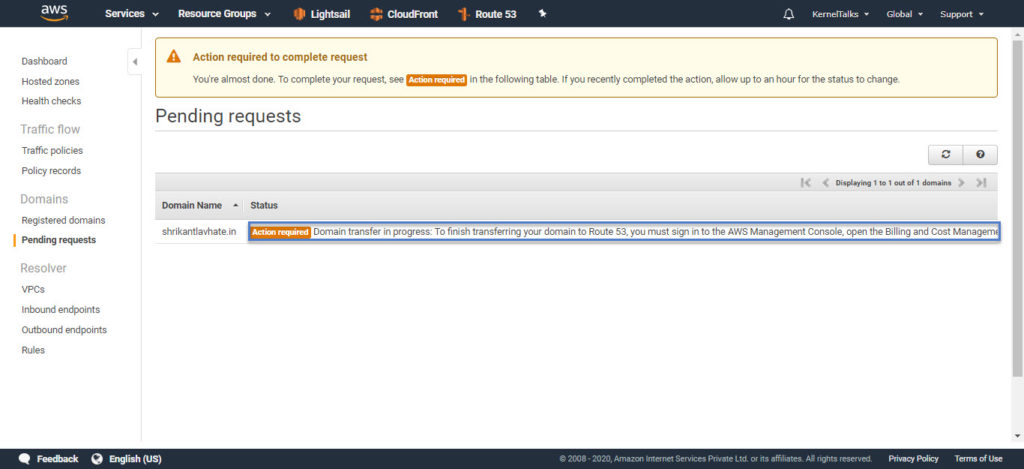
In some countries credit cards can not be debited directly as OTP is mandated by their federal bank regulations. In such cases, you might see ‘action required’ status as below which itself tells you what to do. In my case it’s asking me to complete the billing transaction (using OTP).
Billing action required!
So, I completed the payment by navigating to AWS billing dashboard > Order and invoices > Verify and pay
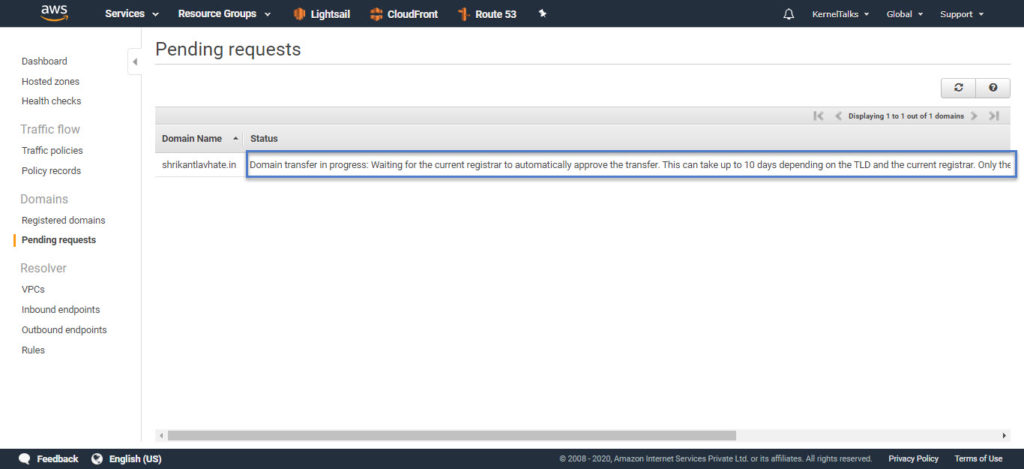
After completing the payment, head back to Route 53 management console and verify the status. Allow some time for changes to propagate in system and status to update. Status should change back to ‘Domain transfer in progress: Waiting for the current registrar to automatically approve the transfer. This can take up to 10 days depending on the TLD and the current registrar. Only the current registrar can accelerate the process. (step 7 of 14)‘.
Domain transfer approval pending
Meanwhile, you will receive an automated email from your current domain registrar confirming if you initiated the domain transfer. And it also contains a link that you can use to cancel the domain transfer request. Since we did want to transfer a domain, no action required.
Now, you have to sit back and relax. Let the transfer period pass and then your domain transfer will be complete. Typically it takes 5-10 days to complete this transfer.
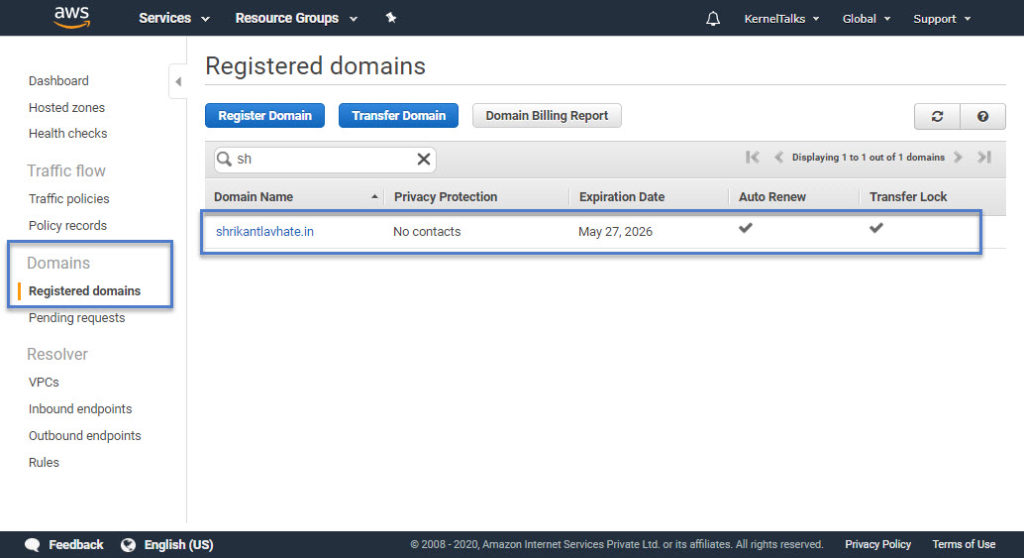
After 6 days I received an email from AWS that domain transfer is completed. I log in to Route 53 console and now I can see the domain is transferred to Route 53 completely.
Domain transferred to Route53
Since we choose to keep current nameservers while transferring the domain to Route 53, AWS will not create any hosted zone for your domain.
If you choose to opt for Route 53 as a DNS Manager for domain, then after transfer AWS will create public hosted zone in Route 53 automatically once transfer is complete. This public hosted one will has entries of SOA and nameserver. Note that you will be billed for 0.5$ per month for this hosted zone.
That’s it. We successfully transferred our domain from Godaddy to AWS Route 53.
A quick article on how to prepare for SOA-C01 AWS Certified SysOps Administrator – Associate Exam
AWS Sysops Associate!
It’s a short article on AWS Sysops Associate certification exam. These are extracts from my personal experience which might help you in clearing the exam.
Sysops exam is aimed at you have good knowledge about a few core services like EC2, Cloudformation, Cloudwatch, etc. and AWS CLI. There are many references to CLI options or commands. This exam does not judge you for knowing all AWS services like Solution Architect one but it does check you for a few core services with deeper knowledge.
You must have already gone through the AWS certification page for details about this exam. Let me jot it down for your quick reference.
The exam result will appear on the screen as soon as you submit the exam.
Questions vary in length (short/long) but time should not be constraint here as it could be in SA professional exam.
Topics you should study
Its recommended that you should at least consider clearing AWS certified solution architect exam before appearing this one. It will firm your AWS foundational knowledge for many services and help you get a grip on the learning path for Sysops.
Below are few service which you should deep dive –
How to re-use templates in other regions/accounts etc.
Create, update, and delete template/stack. All its stages, CLI options, console, etc.
EC2
Pricing classes, how EC2 is billed and use cases
I did not get many questions on EC2 apart from identifying the correct EC2 class in a given scenario
Spot block
System status checks and Instance status checks
Autoscaling group deep dive
Root cause analysis of EC2 termination on launch
AWS Systems Manager deep dive
AWS Inspector
S3
Different classes and use cases
Encryption
Security using ACL and bucket policies
CORS and CRR
Cross account Access control & signed URLs
Website hosting basics
MFA delete deep dive along with CLI options
Versioning fundamentals
RDS, Redshift
I got the only couple of questions on RDS
Enhanced monitoring
Multi-AZ and read replica deep dive
How to DR, HA, and FT in RDS
Redshift enhanced VPC routing
Redshift basics
VPC and networking
VPC flow logs deep dive
Security group, NACLs, and route tables
NAT, IG, VPC Endpoints
Public, private subnets
VPC peering process
VPC, On-prem connectivity
On-prem extension services for AWS
WAF, Cloudfront
Assorted
IAM, KMS deep dive
AWS Trusted advisor
AWS config deep dive
Shared responsibility model
AWS certificate manager
ELB – ALB, NLB and Classis LB
AWS Beanstalk, AWS Op works
SNS, SQS, Lambda
Health dashboards
Billing tools
Online courses
I relied on only one course for this exam since I backpacked foundational, associate, and professional level certifications before this one. So a few refreshers were required. Here is a list of online courses from well-known websites –
Here is a list of practice tests that you can take online to test your knowledge. If you are already certified you can get a free practice test from AWS itself. You have to claim it under benefits in your AWS certification portal.
A quick article on how to prepare for CLF-C01 AWS Certified Cloud Practitioner Exam
AWS CLF!
I am writing this article as a preparation guide for the AWS Certified Cloud Practitioner Certification exam. I recently cleared the exam and hence thought of sharing a few pointers which may help you in your journey to get certified.
This is foundational level certification from AWS and aims at getting acquainted with Cloud and then AWS Cloud fundamentals. If you are looking for a career in the AWS ecosystem then this is your first step. This is also helpful for sales personals, managers, etc i.e. non-technical population to get familiar with Cloud and AWS terminologies.
If you are coming from a background of working locally or remotely on traditional data center equipment like servers, storage, network, etc or if you are possessing another cloud technology background then it’s a walk-in garden for you. Since I completed professional level AWS certification, I literally sit for this one with no such prior study.
You can refer to AWS’s own study guide for a detailed curriculum for the exam and other details.
Its a 90-minute exam with 60 questions to attend. Questions and choices are fairly short hence there should not be a time constraint for you.
Passing score is 700 out of 1000 and your result will be shown on screen PASS/FAIL immediately after you submit the exam.
The exam costs USD $100. If you have completed any previous AWS certification then you can make use of a 50% discount coupon in your AWS certification account.
It won’t hurt to know a few more services around the above core ones at a very high level i.e. name of service and what it is used for.
AWS Billing and pricing, how it works, how to get discounts etc.
AWS support tiers
Differnt AWS support teams
Cloud security
Security of the cloud (AWS responsibility)
Security in the cloud (User’s responsibility)
Learn the shared responsibility model
AWS Access management
Compliance aspect of AWS
While studying AWS services make sure you know their use cases, billing logics, pricings, service limits, integration with other services, access control, types/classes within, etc. You are not expected to remember numbers of any kind but you should know the contextual comparison. Like you are not expected to remember IO or throughput exact numbers of EBS volumes but you should know which EBS type gives more throughput or IOPS than others.
Online courses
I try to curate few online course list here which you can take to build solid AWS foundation.
There are practice test exams included in the above courses by LA and ACG. But if you want to purchase practice exams only then you can do so. AWS offers a practice exam too for USD $20. You can attempt it only once and no point in re-purchasing since every time you will see the same questions. You can get a free voucher for this to practise test if you have completed other AWS certification.
A quick article on how to prepare for 1Z0-1085-20 Oracle Cloud Infrastructure Foundations 2020 Associate certification exam.
OCI Foundations Associate 2020
OCI (Oracle Cloud Infrastructure) Foundations 2020 Associate is a foundation level exam. If you are coming from another cloud service provider background then it will be a piece of cake for you. Being a foundation level exam will test you on a conceptual basis only.
Its a 60 multiple choice questions exam which you have to complete in 105 minutes. Approximately 2 minutes to spare per question which is pretty good enough for foundation level exam. Questions and answers are small so you don’t have to invest much time in reading and you can complete the exam well before time.
The exam costs $95 and the passing score is 68%. At the time of writing this article, due to the COVID-19 epidemic, Oracle announced course material and exam free of cost for a specific period of time. The exam currently available under online proctored mode from Pearson since most of the exam centers are closed in view of COVID-19 lock-down.
Read our another article about preparation for the AWS certification
Let’s walk through exam topics and points you need to consider while preparing for this certification. An exam guide from Oracle can be viewed here.
Exam topics are :
Cloud concepts
OCI fundamentals
Core OCI services
Security and compliance
OCI Pricing, billing, and support
Cloud concepts
If you are coming with a background of any other cloud provider like AWS, then you got it covered already.
You should be through with concepts of HA (High Availability), FT (Fault Tolerance) and the difference between them.
What is the cloud?
Know the advantages of cloud over the on-prem data center.
Get familiar with RTO and RPO concepts.
OCI Fundamentals
This topic covers basics of OCI i.e. how it is architected.
Understand concepts of the region, AD (Availability Domain)and FD (Fault Domain)
Types of the region – Single AD and multi AD
Learn about compartments and tenancy
Core OCI services
In this topic, you are introduced to core OCI services at a higher level. There is no need for a deep dive into each service. A high-level understanding of each is enough for this exam.
OCI Compute service. Learn all the below offerings.
Bare metal
Dedicated virtual host
Virtual Machine
Container engine
Functions
OCI Storage services. Learn below offerings
Block Volume
Local NVMe
File Storage service
Object service
Archive storage
Data transfer service
OCI Networking services
VCN (Virtual Cloud Network)
Peering
Different kind of gateways
NAT Gateway
DRG Gateway
Internet Gateway
Load balancers
NSG (Network Security Groups) and SL (Security Lists)
OCI IAM service
Concept of principals and Instance principals
Groups and dynamic groups
Policy understanding along with syntax and parameters
OCI Database service. Study all below offerings
VM DB systems
Bare Metal DB systems
RAC
Exadata DB systems
Autonomous data warehouse
Study backup, HA, DR strategies
Have a high-level understanding of below services :
OCI Key management service
OCI DNS service
Data safe
OS Management service
OCI WAF
Audit log service
Tagging
Usages
Type: free form and defined
Tag namespaces
Security and complilance
OCI security consists of different facets. Understand below areas in context to security
Cloud shared security model
Securing OCI using IAM
data at rest and data in transit protection
Key management service
HA, FT using AD, FD or services for data protection
OCI Pricing, billing and support
Understand how pricing and billing work in each service we saw above. Learn pricing high/low among tiers in storage services. You don’t need to remember any numbers but you should know it contextually like which is priced high and which one is low etc.
Learn billing models in OCI
PAYG (Pay as you go)
Monthly Flex
BYOL
Understand budget service and how tags, compartments can help in billing and budgeting.
Learn about the SLA structure offered by Oracle. This part is missing in OCI online training.
That’s all you have to know to clear this exam. As I said if you are coming from AWS, Azure then you can relate almost everything to those cloud services which makes it easy to learn and understand.
I created my last day revision notes here (most of the reference to AWS for comparison) which might be useful for you as well.
Now, just little bit of study and go for it! All the best!
In this article, we will walk you through a list of useful commands to interact with salt clients and get your work done.
We have covered SUSE Manager right from installation till configuration and client registration in our list of articles in the past. For now, let’s dive into a list of commands you can use to complete tasks on salt clients remotely via SUSE Manager.
You can always check out the list of salt modules available to choose from. I am listing our only a few of them which are useful in day-to-day tasks. Few of these tasks can be done from SUSE Manager UI as well but if you want to script them then using salt CLI is a way better option.
In the below examples, we have our SUSE Manager kerneltalks and salt client k-client1
Copy files from SUSE Manager to salt clients
There are two ways to copy a file. If you are copying simple text files then below command is just fine for you. salt-cp clientname/FQDN source destination
Here we copied test1 file in the current directory from SUSE Manager to k-client1:/tmp.
It will treat files in question as text files and hence should not be used for a binary files. It will corrupt binary files or just fails to copy them. So if I try to copy zip file from SUSE Manager I see below error –
kerneltalks:~ # salt-cp k-client1 test2.gz /tmp/
[ERROR   ] An un-handled exception was caught by salt's global exception handler:
UnicodeDecodeError: 'utf-8' codec can't decode byte 0x8b in position 1: invalid start byte
Traceback (most recent call last):
  File "/usr/bin/salt-cp", line 10, in <module>
    salt_cp()
  File "/usr/lib/python3.6/site-packages/salt/scripts.py", line 418, in salt_cp
    client.run()
  File "/usr/lib/python3.6/site-packages/salt/cli/cp.py", line 52, in run
    cp_.run()
  File "/usr/lib/python3.6/site-packages/salt/cli/cp.py", line 142, in run
    ret = self.run_oldstyle()
  File "/usr/lib/python3.6/site-packages/salt/cli/cp.py", line 153, in run_oldstyle
    arg = [self._load_files(), self.opts['dest']]
  File "/usr/lib/python3.6/site-packages/salt/cli/cp.py", line 126, in _load_files
    files.update(self._file_dict(fn_))
  File "/usr/lib/python3.6/site-packages/salt/cli/cp.py", line 115, in _file_dict
    data = fp_.read()
  File "/usr/lib64/python3.6/codecs.py", line 321, in decode
    (result, consumed) = self._buffer_decode(data, self.errors, final)
UnicodeDecodeError: 'utf-8' codec can't decode byte 0x8b in position 1: invalid start byte
In such cases, you can use the below salt module to copy over files from SUSE Manager to salt clients. For that, you need to keep your file under /srv/salt directory on the SUSE Manager server.
kerneltalks:/srv/salt # ls -lrt
total 4
-rw-r--r-- 1 root root 44 Apr  3 12:26 test2.gz
kerneltalks:~ # salt k-client1 cp.get_file salt://test2.gz /tmp/
k-client1:
    /tmp/test2.gz
Now we successfully copied zip file from SUSE Manager kerneltalks:/srv/salt/test2.gz to salt client k-client1:/tmp
Execute remote commands on salt clients from SUSE Manager
Now this part where we will run commands on the salt client from SUSE Manager. The command output will be returned to you on current session. You can run a couple of commands together separated by ; same as the shell.
Here we successfully ran df -Ph and date command on salt client remotely from SUSE Manager.
Make sure if you have multiple commands to run then bundle them to script, copy it over to the client using the above method and then execute the script on the client from SUSE Manager using run command module.
If you see below error that means your mentioned client is not registered with SUSE Manager or you have misspelled client name or use FQDN
kerneltalks:~ # salt-cp k-client1 test1 /tmp/
No minions matched the target. No command was sent, no jid was assigned.
Installing packages on salt client using salt cli
You can execute this task from the SUSE Manager web UI as well. But if you want to script it then salt CLI is a better option.
Installing a package is an easy task. Use pkg.install salt module and submit one or more lists of packages to be installed on the remote salt system.
Here you can see it installed telnet and apache2 packages remotely along with its dependencies. Be sure that if the package is already installed and its updated version is available to install then the salt will update it. Hence you can see new and old version details in output.
Let me share my experience to clear the toughest AWS exam ‘AWS Certified Solutions Architect – Professional’. This article might help you in your journey to get AWS CSA PRO certified.
Getting AWS CSA PRO certified!
In this article, I am going to cover the last few months of the certification journey which can prove useful to you as it was for me.
As I said last few months, so I assume you have good hands-on experience (might be via personal account/corporate projects) of AWS services. Obviously services like Snowball, Direct Connect are rare to get hands-on but you need to have a solid understanding of these services at least.
Let’s begin with the non-technical aspect of this journey which plays a key role in completing your Exam.
Your reading skills matters!
Yup, you read it right. AWS CSA PRO exam is having 75 questions which you need to answer in 180 minutes. Which drills down to approx 2 minutes per question.
Most of the questions are 3-4 or more statements long and so are the choices in answers. So you need to read through almost a big paragraph of text for a single question. Then you understand what is being asked, analyze answers and choosing best which fits the ask. That’s too much of work to be accomplished in 2 mins!
And there are very few questions where answers are just incorrect and you can eliminate them quickly in first glance. Most of the answers are correct but you need to choose the most appropriate one to suit the question’s requirement. So that’s a tedious task which requires more time. Hence I said reading skills do matter.
A tip (might be a crazy one): Watching videos with subtitles is an easy way you can train your brain to read speedily and grasp the context parallelly!
Obviously you should make yourself comfortable before you sit for your exam. Since its a 3 hour, long course and you don’t want to get distracted by anything.
Last month revisions using online training courses
In last month before the exam, you might want to subscribe to online courses specifically structured and targeted to the scope of the exam and their material is designed across the core services appearing in the exam.
These courses are a bit on a longer side like 40-50 hours of video but you can always use video speeds (set to 1.5x generally) to go through the course quickly. I took Linux Academy’s course by Adrian Cantrill & A Cloud Guru’s course by Scott Pletcher. But do not attempt the practice exams at the end of the course right away. Keep them for your final stage before the exam.
There are free courses available on the AWS training portal as well which you can check in the meantime. You should be knowing all AWS services at least by name and their use. Services launched in the last 1 year are less likely to appear on the exam so you can skip them.
Refer AWS documents and videos (Mandatory)
Once you are through online training courses for the exam, you will be well versed in the idea of what you can expect in the exam. These courses often supplemented with the links to AWS whitepapers or re-invent videos related to the chapter topic. Yup, those are essential things to go through.
AWS whitepapers and FAQ pages give you many minute things that you may have missed and help you to determine the validity of your choice for the situation in question. If you are short on time, then at least go through documents for the services in which you are weak or have little knowledge/experience.
AWS re:Invent videos on Youtube is another content-rich platform that gives you some insights/points which you may have missed in your preparation. They are also helpful since many customers are coming in re:Invent and present their use cases. This will help you to map real-world use cases with that in exams and get solid confirmation about your answer. And you can use Youtube’s video speed control to go through videos quickly!
Getting there
All right now we are at the stage that all knowledge sourcing has been done and its time to test that knowledge. Now its time to hit those practice exams from your online courses. Be sure to get these practice exams by Jon Bonso. Its a set of 4 practice tests and worth investing.
Also, you should consider taking AWS’s own practice exam. If you are lucky you might encounter some questions from it, in real exam. Also, if you hold any previous AWS certification, you must have coupon code in your AWS learning account which you can use to take this test for free.
You are good to book your exam when you can score 90% and above in all the above practice tests by understanding why a particular answer is correct and why others not. Memorizing answers not gonna help you in any way.
I uploaded my 50 page long handwritten notes. They might serve you for last day revision like flashcards.
And here you are! The deal day! On exam day, just keep calm and give the exam. Don’t rush for any last-minute reads etc. Its gonna confuse and complicate things. Better be in a peaceful state since your mind is much important on exam day because that’s what gonna help you to read and understand essays! of the exam in the first go. This way you don’t waste your precious time in re-reading questions/answers.
Always keep in mind you can not spend more than 2 mins on a single question. Time is precious!
If you are cant figure out answers quickly then flag it and move on.
If you see answers with the same solutions & only one/two keywords different then easy to finalize answer quickly without reading through the whole statements
Scan through question and capture keywords like a highly available solution, less cost, multi-region, load balancing, etc. This helps you to narrow down to particular services
Start building solutions in mind as you read through questions using the above-said keywords. This helps to look at answers and match the solution you have in mind. It helps you save a lot on time!
Do not submit the exam till last second, even if you manage to complete all questions and review of flagged ones before time. Use the remaining time to go through answers again.
Result?
Your result will be emailed to you within 5 business days. But you can make it out from the messages displayed on the screen once you submit the exam that you made it or not. The message is quite confusing (it’s more when you fried your brain for the last 3 hours!) since it states that you complete the exam! (Diff messages mentioned here in the forum) But, in a nutshell, if you see it starts with Congratulations then you made it! and if it starts with Thank You then you need a re-attempt.