Yearly Archives: 2017

Difference between elastic IP and public IP

Learn what is elastic IP and public IP means in AWS. List out all differences between elastic IP and public IP in AWS.

Elastic IP vs Public IP in AWS

I was having a conversation about AWS with one of my friends and he came up with the question what is the difference between elastic IP and public IP? So, I explained to him and thought why not draft a post about it! So in this article, we will see the difference between elastic IP and public IP in AWS. This can be a cloud interview question so without much delay lets get into elastic IP vs public IP battle.

What is elastic IP in AWS?

First thing first, let’s get basics clear. What is the elastic IP? It is IPv4 IP address designed and exists for dynamic cloud computing and reachable over the internet. By name, you can imagine it’s a flexible IP that can be used or mapped rapidly from one EC2 instance to another when a currently associated instance fails. This way end-user or application continues to talk to the same IP even if the instance behind it fails. They are like static public IPs allocated for your AWS account.

What is Public IP in AWS?

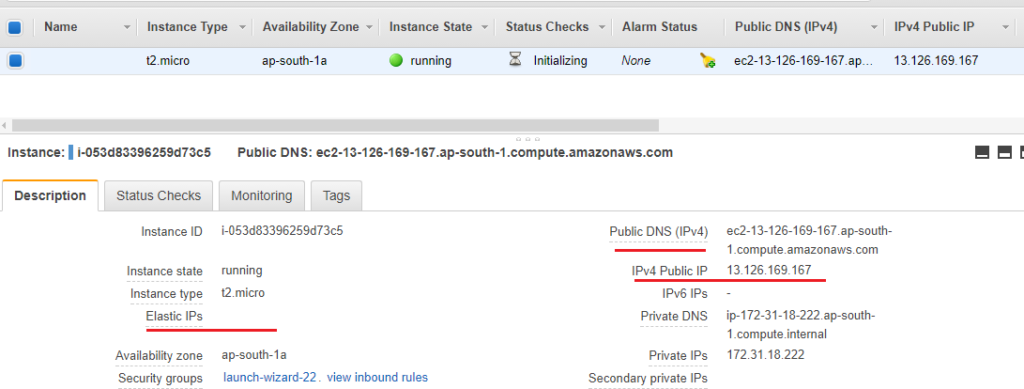
Public IP is IPv4 IP address which is reachable over the internet. Remember switching flexibility of Elastic IP is not available for this IP. Amazon also assigns external/Public DNS name (shown in the screenshot) to instances who receives public IP. The public IP of the instance is mapped to the primary private IP of that instance via NAT (Network Address Translation) by default.

Refer below screenshot from the EC2 console of AWS and observe where you can check your elastic IP, public IP, and public DNS name.

Check elastic IP, public IP and public DNS in EC2 AWS console

Difference between elastic IP and Public IP

Now let’s look at the difference between these two IP types.

  1. Whenever a new EC2 instance spins up, it’s assigned with public IP by default. Elastic IP is not assigned by default.
  2. Elastic IPs are assigned to AWS accounts which you can attach to instances. Public IPs assigned to instances directly.
  3. When an instance is stopped and started again, public IP gets changed. But if the instance is assigned with elastic IP, it will remain the same even if the instance is stopped and started again.
  4. If elastic IP is allocated to your account and not in use then you will be charged for it on an hourly basis.
  5. Public IP released once your instance is stopped so no question of getting charged for not using it.
  6. You won’t be able to re-use the same public IP since its allocated from the free IP pool. You can always re-use, re-attach elastic IP to other instances when it is released from the current instance.
  7. You can not manually attach or detach public IP from the instance. It’s auto allocated from the pool. Elastic IP can be manually attached and detach from the instance.
  8. You can have a maximum of 5 elastic IP to your account per region. But, you can have as many public IPs as EC2 instances you spin up.
  9. You can have either of them for an instance. If you assign elastic IP to instance then its currently assigned public IP will be released to the free pool.

Datacenter presence of top Cloud providers

An overview of the global data center presence of top Cloud companies like AWS, Google Cloud, Azure, etc. This article lists maps and links which will help you understand the data center presence of various firms.

Data center presence of Cloud providers

All companies are moving to the cloud now. Since the cloud model aims at pay-per-use its best fit in cost-cutting for every company that works in the IT field. The latest hardware and technologies are at your service without investing and worrying about the maintenance of hardware and facilities is the biggest benefit luring customers to cloud companies.

Since the cloud is a hot cake and its demand is growing day by day, we see lots of players in the cloud providers market. It’s not easy to offer cloud services since you need huge facilities all over the globe rather a network of such facilities across the globe to build your own cloud. It’s not an easy task, not at all! Data centers are the backbone of these clouds. They house the hardware which actually runs cloud services. So it’s important to know your cloud provider’s data center locations which helps you deciding many aspects of your services before moving in.

Here in this article, we will be listing all top-level cloud provider’s data center locations. This information is available on their respective websites, but we are consolidating it here for your quick reference!

Below data is as on 24th May 2020

Amazon Web Service (AWS)

AWS global infrastructures consist of 24 regions with 76 availability zones within & 216 Point of Presence. Zone normally indicates one or more datacenter. The latest updated details can be found on their page here. AWS global infrastructure map looks like :

AWS Global Infrastructure. Image credit : Amazon

Where, numbers denote the number of availability zones in that region and green circles show upcoming regions.

AWS Infrastructure is visually represented on this website which is nice to understand.

Google Cloud Platform

Another biggie in the Cloud service market. Google has a presence in 23 regions with 70 zones within & 140 Network Edge Locations. Google also shared their network map details along with data center presence here on this page. Their global locations map looks like below :

Google Cloud global locations. Image credit : Google

Where number denotes available zones and blue ones are upcoming locations.

Microsoft Azure

Azure is a cloud service from Microsoft. Their global infrastructure consists of 60+ regions. The latest and updated info can be grabbed from this page. Microsoft’s data center map looks like one below :

Microsoft Azure global infrastructure map. Image credit : Microsoft

Where triangle ones are upcoming locations.

IBM Bluemix

IBM offers its cloud platform as a service in Bluemix. The latest updated infra details can be found here on this page.

IBM Bluemix data centers. Image credit : IBM

HP Cloud

I could not find infrastructure maps or consolidated information for the Hewlett Packard (HP) cloud global infrastructure. However I got some info on the HP UK website here. Where HP states they have 28 data centers powering their cloud and they are building new 5 data centers in the EMEA region.

vCloud

VMware cloud also referred to as vCloud has 11 zones in a total of 4 countries. VMware doesn’t define regions, rather they deny zones within countries. VMware released this PDF which has all these details.

So looking at above maps and numbers we can jot down current infrastructure reach of  three top cloud companies in below table :

Amazon web services Google Cloud Microsoft Azure
Regions 161136
Zones 4433
Upcoming regions 566

Every company uses different terminology. Where regions are common for all but not zones. Zones are referred to as single or multiple data centers in that geographical vicinity. Microsoft, IBM doesn’t refer zones term they only refer to regions. VMware doesn’t refer regions they only refer to country-wise zones. So the exact data center count for each company is not known rather shouldn’t be!

Let us know if you have more information of links regarding data center details of cloud providers (publically made available by owners) in comments below.

Double century! Celebrating 200 posts!

Here we are on the 200th block! Kerneltalks journey of 10 months! Crawling web of Linux, Unix & scripts for the goodness of sysadmin!

200 posts! Yay!

And here we are on another milestone 200 posts! Six months ago we hit 100 posts milestone and now double century!

KernelTalks grew big and steadily past few months. Our pageviews increased which almost totaled to 160K as I am writing this article. Our social reach extended too in terms of fan page followers, likes, shares, comments on, or posts. We are also observing daily email subscribers signing up for our newsletters which indicates the reader’s interest in upcoming articles! All these numbers are available here.

In terms of traffic, we observe a significant rise in organic search traffic from search engines which is almost 15-20% of total traffic. SEO tuning, SSL implementation, and speed-boosting with CDN helped us to climb the search engine ladder. Alexa ranking is leaping day by day confirming increasing traffic to blog. Currently holding 380K rank globally. KernelTalks also featured in the top 60 Linux blog list by Feedspot.

KernelTalks gonna complete one year in a couple of months! Considering millions of blogs on the internet and budding new ones every other day, this progress is pretty good for the first year. Hope to see some more good numbers on our first anniversary! Till then have a happy read!


                                                  *   )    )                  )
    +------------------------------------+      ` )  /( ( /(     )         ( /(   (            (
    |                                    |       ( )(_)))\()) ( /(   (     )\())  )\ )   (    ))\
    |    +------> 200 posts! <------+    |      (_(_())((_)\  )(_))  )\ ) ((_)\  (()/(   )\  /((_)
    |                                    |      |_   _|| |(_)((_)_  _(_/( | |(_)  )(_)) ((_)(_))(
    |         www.kerneltalks.com        |        | |  | ' \ / _` || ' \))| / /  | || |/ _ \| || |
    |                                    |        |_|  |_||_|\__,_||_||_| |_\_\   \_, |\___/ \_,_|
    +------------------------------------+                                        |__/


XFS filesystem in Linux

Learn about the XFS filesystem in Linux. An article explaining what is xfs, features, and commands of XFS. Also, how to migrate from EXT to the XFS file system.

Learn XFS filesystem

What is xfs?

XFS is a high-performance file system designed by Silicon Graphics Inc in 1993. It is the default file system in RHEL7. XFS supports parallel IO operations because of its allocation group structure which makes it high performance operating file system. Journaling features helps it in faster data recovery in case of a crash. Lets quickly walk through a few aspects of XFS for your understanding.

Features of XFS

  • Its 64-bit file system with a max file system size of 8EB.
  • Supports metadata journaling which helps in faster data recovery in case of a system crash.
  • It can be extended while mounted and active.
  • It is internally partitioned into allocation groups. 4 different allocation groups available.
  • Directory quotas help to limit quota over the directory tree.
  • Quota journaling avoids quota consistency checks after the crash and hence quicker recovery
  • Extended attributes associated with each file. Those are additional name/value pairs.
  • Online de-fragmentation is supported.
  • It has native backup (xfsdump) & restore (xfsrestore) utilities.

How to upgrade EXT to XFS

The obvious question is how to upgrade from ext4 to xfs? or upgrade from ext3 to xfs etc. We have different ways to upgrade ext file systems but there is no full-proof way to upgrade ext to xfs. You can have below approach to migrate from ext to xfs filesystem –

  1. Create a new xfs file system
  2. Copy over data from old ext file system to xfs using copy or rsync
  3. Remove old ext file system

Commands for XFS file system management

  • Create xfs file system : mkfs.xfs command.
  • Mount xfs file system : No extra switch for mount command
  • Quota management : xfs_quota command
  • Extending file system : xfs_growfs command
  • Repair file system : xfs_repair command
  • Suspend write on file system : xfs_freeze command (-f for suspend, -u for resume)
  • Bakcup : xfsdump command
  • Restore : xfsrestore command
  • Print file system information : xfs_info command
  • De-fragmentation : xfs_fsr command with no argument
  • Debug mode : xfs_db command

We covered few of these commands in detail in our next article.

Conclusion

XFS is a high-performance filesystem available in most Linux distro and as a default in some. We will see the difference between ext3, ext4, and xfs in upcoming articles along with the XFS command in detail.

Upgrade EXT filesystem in Linux (RHEL, CentOS, Ubuntu)

Learn how to upgrade the ext filesystem in Linux like RHEL, Centos, Ubuntu, etc. Steps for upgrading ext2 to ext3, ext3 to ext4, and ext2 to ext4.

Upgrade filesystem from ext2 to ext3 to ext4

In our last article we saw the difference between ext2, ext3, and ext4 file systems in Linux. In this article we will walk through how to upgrade ext2 to ext3 or ext4 on RHEL, CentOS, or Ubuntu.

How to upgrade ext2 to ext3

To upgrade ext2 volume lets first format volume with ext2 filesystem.

# mke2fs /dev/vg01/lvol0
mke2fs 1.42.13 (17-May-2015)
Creating filesystem with 53248 1k blocks and 13328 inodes
Filesystem UUID: b3c39dcf-e00f-414c-8306-46d985674b6e
Superblock backups stored on blocks:
        8193, 24577, 40961

Allocating group tables: done
Writing inode tables: done
Writing superblocks and filesystem accounting information: done

Lets confirm file system type which we just formatted.

# df -T /mydata
Filesystem             Type 1K-blocks  Used Available Use% Mounted on
/dev/mapper/vg01-lvol0 ext2     51559   842     48055   2% /mydata

You can see its ext2 type in above output under second column.

Now to upgrade it to ext3 you need to unmount it, so there is downtime involved. After un-mount use tune2fs command to upgrade and mount it.

# umount /mydata

# tune2fs -j /dev/vg01/lvol0
tune2fs 1.42.13 (17-May-2015)
Creating journal inode: done

# mount /dev/vg01/lvol0 /mydata

#  df -T /mydata
Filesystem             Type 1K-blocks  Used Available Use% Mounted on
/dev/mapper/vg01-lvol0 ext3     47463   859     43942   2% /mydata

Observe above outputs carefully. We did –

  • Un-mount filesystem
  • Run tune2fs command with -j switch
  • Mount file system

ext2 has been upgraded to ext3 which can be confirmed in last output.

Make sure you make changes in /etc/fstab to reflect proper file system type for your related mount point.

How to upgrade ext3 to ext4

To upgrade to ext4 filesystem you need to enable file system features on the file system with tune2fs command. Those are – dir_index (Speed up directory lookups), extents (Stores locations in inodes), uninit_bg (reduce e2fsck time).

After successful setting features of file system you need to run e2fsck to fix file system data structures on disk for new modified features. To run e2fsck you have to unmount the file system.

# tune2fs -O extents,uninit_bg,dir_index /dev/vg01/lvol0
tune2fs 1.42.13 (17-May-2015)

# e2fsck -pf /dev/vg01/lvol0
/dev/vg01/lvol0 is mounted.
e2fsck: Cannot continue, aborting.

# umount /mydata

# e2fsck -pf /dev/vg01/lvol0
/dev/vg01/lvol0: 11/13328 files (0.0% non-contiguous), 6644/53248 blocks

# mount /dev/vg01/lvol0 /mydata

# df -T /mydata
Filesystem             Type 1K-blocks  Used Available Use% Mounted on
/dev/mapper/vg01-lvol0 ext4     47463   859     42878   2% /mydata

In the above output, we tried to run FS check while volume is mounted and it gave us an error. Finally, the file system upgraded to ext4 which can be verified in the last output. Make a note that this is irreversible change and you can not go back to ext3 once you did this upgrade.

There is another way as well to have a file system of ext4 as below –

ext4 file system is backward compatible with ext2 and ext3. This means you can directly mount any ext2 or ext3 filesystem as ext4 without upgrading. You just simply un-mount filesystem and mount it as ext4 by supplying -t switch with mount command.

# umount /mydata

# mount -t ext4 /dev/vg01/lvol0 /mydata

# df -T /mydata
Filesystem             Type 1K-blocks  Used Available Use% Mounted on
/dev/mapper/vg01-lvol0 ext4     47463   859     43942   2% /mydata

In the above output, we un-mount out ext3 mount point and remounted it as ext4! This process is reversible means you can un-mount the ext4 file system and re-mount it as ext3 again.

How to upgrade ext2 to ext4

As we saw above you need to enable file system features to upgrade to ext4. While upgrading from ext2 to ext4 you need to enable has_journal extra features than the above list. Since you know ext2 doesn’t have journaling available.

# umount /mydata

# tune2fs -O extents,uninit_bg,dir_index,has_journal /dev/vg01/lvol0
tune2fs 1.42.13 (17-May-2015)
Creating journal inode: done

# e2fsck -pf /dev/vg01/lvol0
/dev/vg01/lvol0: 11/13328 files (0.0% non-contiguous), 6627/53248 blocks

# mount /dev/vg01/lvol0 /mydata

# df -T /mydata
Filesystem             Type 1K-blocks  Used Available Use% Mounted on
/dev/mapper/vg01-lvol0 ext4     47463   842     42895   2% /mydata

Make a note that this is irreversible change and you can not go back to ext3 once you did this upgrade.

Another method would be directly mounting FS as ext4 as below –

As stated earlier, the ext4 file system is backward compatible with ext2 and ext3, means you can directly mount any ext2 or ext3 filesystem as ext4 without upgrading

# df -T /mydata
Filesystem             Type 1K-blocks  Used Available Use% Mounted on
/dev/mapper/vg01-lvol0 ext2     51559   842     48055   2% /mydata

# umount /mydata

# mount -t ext4 /dev/vg01/lvol0 /mydata

# df -T /mydata
Filesystem             Type 1K-blocks  Used Available Use% Mounted on
/dev/mapper/vg01-lvol0 ext4     51559   842     48055   2% /mydata


Previously ext2 file system is mounted as ext4 in the above output without upgrading!

How to check if Linux server is physical or VM or cloud

Learn how to check if the Linux server is a physical or VM or cloud server by observing ‘dmidecode’ command output fields.

Identify physical or VM or cloud server

Recently one of my friends came across a situation where he didn’t know logged in the server is physical server, virtual machine, or cloud server. So here in this article we will walk you through how to check if the server is a physical server or virtual machine. Since cloud servers are also VM there is a very thin line between identifying them as different. It takes some infrastructure knowledge and sense to differentiate between VM and cloud-hosted servers.

dmidecode command helps you through this process. This command helps you to identify the manufacturer of the system. Let’s look at its output :

root@kerneltalks# dmidecode -t system
# dmidecode 3.0
Scanning /dev/mem for entry point.
SMBIOS 2.4 present.

Handle 0x0100, DMI type 1, 27 bytes
System Information
        Manufacturer: Xen
        Product Name: HVM domU
        Version: 4.2.amazon
        Serial Number: ec27c3cb-8e3b-8a30-4325-3f388b0fxxxx
        UUID: EC27C3CB-8E3B-8A30-4325-3F388B0Fxxxx
        Wake-up Type: Power Switch
        SKU Number: Not Specified
        Family: Not Specified
-----output trimmed-----

This is output from the AWS cloud server. In the above output you have to observe the System Information‘ section.

Manufacturer :

If you see Xen, VMware, Red Hat, etc here its a VM (virtual machine). VM host KVM also shows the same manufacturers. Anything other than these like Dell Inc, HP, etc (hardware manufacturing companies name) shows that you are on real physical hardware means its physical server.

Product Name :

This parameter also helps further to confirm it’s physical or VM. Here HVM denotes its virtual machine clearly. For a physical server you see the physical server model name here.

Version :

Its again narrowing down your search. Word amazon here denotes its a VM from Amazon (most likely AWS). So as I said if you know your infrastructure well, so must be knowing you have AWS servers or not. And hence you can be sure here that it’s AWS cloud server.

Even serial numbers can be a confirmation but you should have in-depth knowledge of hardware serial number nomenclature used by industry manufacturers. Mostly, physical hardware has much short, clean and human-readable serial number whereas VM has long serial which starts with virtual service name (eg, ec2 for AWS cloud, VMWare for VMware VM, etc.) This can be added confirmation and not the primary parameter for validation.

For more understanding lets look at output from virtual machine :

root@kerneltalks_vm1# dmidecode -t system
# dmidecode 2.12
SMBIOS 2.4 present.

Handle 0x0001, DMI type 1, 27 bytes
System Information
        Manufacturer: VMware, Inc.
        Product Name: VMware Virtual Platform
        Version: None
        Serial Number: VMware-56 4d c7 47 54 09 d6 39-xx xx xx xx xx xx xx xx
        UUID: 564DC747-xxxx-D639-xxxx-xxxxxxxxxx
        Wake-up Type: Power Switch
        SKU Number: Not Specified
        Family: Not Specified
-----output trimmed-----

In above output,

The manufacturer is VMware Inc. which denotes its a VM. Product Name VMware Virtual Platform clearly states its VM

Like the cloud server above we do not have version value here. But the above two values are sufficient to confirm its a VM. These values put up by hardware or system image manufacturer hence can be blank at times.

Finally, before signing off lets check output from physical machine as well –

root@kerneltalks_phy # dmidecode -t system
# dmidecode 2.11
SMBIOS 2.7 present.

Handle 0x0001, DMI type 1, 27 bytes
System Information
        Manufacturer: Cisco Systems Inc
        Product Name: UCSB-B200-M3
        Version: 1
        Serial Number: XXXXXXXXXX
        UUID: 00000000-0000-0000-0000-000000000000
        Wake-up Type: Other
        SKU Number:
        Family:
-----output trimmed-----

Here,

The manufacturer is Cisco System Inc (who is hardware manufacturer) confirming its server hosted on bare metal.

Product Name is a UCSB-B200-M3 which is the model name of Cisco Blade. Confirms server is Cisco Blade hardware (Physical server)

Checks submitted by readers

Few readers posted these commands on social media comments.

lscpu: One can observe hypervisor vendor determine if its virtual or physical server

# lscpu |grep -i hypervisor
Hypervisor vendor:     Xen

hostnamectl: Works on a new distro like RHEL7. The virtualization field gives you an idea about if its physical or virtual.

root@kerneltalks # hostnamectl status |grep -i virtual
    Virtualization: xen

dmesg: Check for words like KVM, hvm, or virtual in boot messages. Here Xen virtualization detected confirming its a virtual box.

# dmesg |grep -i virtual
[    0.000000] Booting paravirtualized kernel on Xen HVM
[    1.403040] systemd[1]: Detected virtualization xen.
[    1.889088] xen_netfront: Initialising Xen virtual ethernet driver

Conclusion

System information like manufacturer, product name, version, the serial number can be used to observe and understand whether logged in the server is a physical server or VM (physically hosted or cloud).

If you have any other tricks or solid methods to confirm the server is physical or virtualized, please let us know in the comments below.

Difference between ext2, ext3 and ext4

List of differences between ext2, ext3, and ext 4 Linux file systems. One of the Linux interview questions answered in this article!

Comparison : ext2 vs ext3 vs ext4

This is another Linux interview question. What is the difference between ext2, ext3, and ext4 file systems? Or Explain Linux file system ext2 vs ext3 vs ext4? In this article we will walk through these differences and lastly I will present you all of them in tabular format so that they are easy to quickly read during your preparations.

Let’s see each file system’s features and lastly their comparison with other file systems.

EXT2 file system

  • It’s a second extended file system that was created to overcome limitations of the EXT file system.
  • Introduced in 1993 by Remy Card. It was the first commercial-grade filesystem for Linux
  • Does not supports Journaling
  • Fit for SD cards & USB drives since it has high performance and low writes (as journaling is not available). USB and SD storage are limited with write cycles hence its best fit for them.
  • Limits: Individual file size 16GB to 2TB. File system size 2TB to 32TB.

Limits are calculated based on block size used.  Block size varies from 1KB to 8KB. For example,  If 1KB block size is used max file size can go up to 16GB and for 8KB it’s 2TB. Middle range sizes being 2KB and 4KB which has file size limits of 256GB & 2TB (not mentioned in above limits) respectively. The same applies to the File system size limits defined above.

EXT3 file system

  • It’s third extended file system was created to overcome limitations of the EXT2 file system.
  • Introduced in 2001 by Stephen Tweedie. It was the most common filesystem in any Linux distro.
  • Supports Journaling
  • Journaling keeps track of file changes which helps in fast recovery and reduce chances of data loss in case of a system crash
  • Limits: Individual file size 16GB to 2TB. File system size 4TB to 32TB.
  • Upgrading FS from ext2 to ext3 is an online process without downtime.

EXT4 file system

  • It’s the fourth extended file system that was created to overcome limitations of the EXT3 file system.
  • Introduced in 2008 by a team of developers. Its most the latest filesystem in ext family.
  • Supports Journaling
  • Lots of new features introduced. Extents, Backward compatibility, Persistent pre-allocation, Delayed allocation, Unlimited number of subdirectories, Journal checksum, Faster FS check, Transparent encryption.
  • Limits: Individual file size 16GB to 16TB. File system size up to 1EB.
  • Upgrading FS not needed. Due to backward compatibility, ext2, ext3 can be directly mounted as ext4.

All above points can be formatted in tabular format as below :

ParameterEXT2EXT3EXT4
Introduced year

199320012008
Developed by

Remy Card Stephen Tweedie Team of developers
Journaling Not available Available Available
Individual file size

16GB to 2TB 16GB to 2TB 16GB to 16TB
File system size

2TB to 32TB 4TB to 32TB up to 1EB
Upgrade Can be done online to EXT3. Can be mounted as EXT4. No upgrade needed Can be mounted as EXT4. No upgrade needed NA

Get your Linux ISO download from these URLs

List of all Linux ISO download links. The latest and old releases of various Linux distro can be downloaded using links listed on this page.

Linux download links

Many times I come across questions from people or readers that where I can download RHEL iso? Where to download Ubuntu Linux? etc. Actually these download links are very easy to get from Google but still I thought of publishing them all in one place.

In this post, I will list all possible Linux download websites. Please note that all Linux distro’s server copy is taken into consideration for choosing download links.

  1. Red Hat Enterprise Linux RHEL latest release download link.  Old releases download link. You have to create a developer account here to get your ISO copy.
  2. CentOS Linux latest release download link. Old releases download link. No signup needed.
  3. Fedora Linux download link. No signup needed.
  4. Debian Linux download link. There are country wise FTP mirrors listed. Choose your nearest one and download it.
  5. Ubuntu Linux Latest release download link. Old releases download link
  6. Arch Linux download link. Country-wise HTTP mirror list.
  7. Kali Linux latest release download link. Old releases download link
  8. Linux mint latest release download link. Old releases download link
  9. OpenSUSE Linux latest release download link
  10. SUSE Linux 60 days trial download link
  11. Open Mandriva Linux download link
  12. Kubuntu Linux download link
  13. Bodhi Linux download link
  14. Gentoo Linux download link

The list will go on since Linux is open source and there are many distros floating around the internet! Report broken links and any additions in the comments below.

7 new features in RHEL7!

Listing new features in RHEL7. These 7 new features making RHEL7 stand out from its predecessor. 

New features in RHEL7

Its been a while RHEL7 is launched and nicely accommodated in Linux world by now. What’s new in RHEL7? What is the difference between RHEL7 and its precedence versions? these kinds of questions are flowing through interviews these days. So thought of jotting them down. In this post I will quickly walk through some new key features launched in RHEL7 by Red Hat.

What’s new in RHEL7?

RHEL7 officially released in June 2014 with codename Maipo. It took time for the market to absorb this new release since there are many new features launched in this release. Red Hat launched many new ways, commands to do traditional stuff. We are going to see them now –

  1. The default file system is XFS. RHEL6 was launched with EXT4 as the default file system. XFS is a highly scalable, high-performance file system. XFS supports metadata journaling, which helps in quicker crash recovery. This means file system checks will take very little time. The XFS file system can be defragmented and extended while mounted. This makes it more admin friendly in a production environment since it avoids downtime of file systems for activities. Supports only 64 bit systems.
  2. Introduction of systemctl. A new way to manage services on RHEL7 is systemctl. Older service and chkconfig command is being replaced with systemctl.
  3. Run levels being called as targets. In RHEL7 run levels are called targets. Default target (run-level) is defined in /etc/systemd/system/default.target
  4. Fast boot. RHEL7 boots faster than its predecessors. This is achieved by simultaneously starting services that are not dependent on each other. In older versions, services used to start one after another. So if one service stuck or delays to start it subsequently delays the following process and boot time. This hurdle is removed in RHEL7 allowing it to boot much faster.
  5. New system service manager: systemd. The former init process is no more PID 1 or first process. Systemd is introduced which controls standard base init scripts.
  6. Bigger filesystem limits. RHEL7 now supports filesystem size up to 500TB. This limit is also the same for an individual file. This is due to the XFS file system on a 64-bit machine. RHEL6 supports the 16TB filesystem.
  7. New firewall identity. Former firewall iptables now replaces by firewalld (Firewall Dynamic). iptables still exist in the system and you can disable firewalld and use iptables.

These are key differences in the new RHEL7 release. apart from this there are many new things added in RHEL7. The whole list is compiled by Red Hat here.

Let us know your suggestions/feedback in comments section below!

How to unmount NFS when the server is offline

Learn how to unmount NFS when the server is gone. Dead NFS mounts can be un-mounted using forceful and lazy umount command.

Unmount NFS share when server is gone

This article will help you to un-mount NFS share from the client when the NFS server is gone or offline or un-available or decommissioned. We have seen how to configure the NFS server and how to handle NFS stale file error. But what if your NFS server is gone and its shares are still mounted on clients. Normally, before shutting down the NFS server, all clients should be notified and advised to unmount NFS shares they are using from this server.

But, in case if any of the clients have still NFS mounted when the server goes down, then the client should forcefully un-mount it. Normal mount operation won’t be effective in such cases. When the NFS server is down, you observe below things on the client who has NFS share still mounted.

  1. df command hangs since it tries to fetch NFS information but the NFS server is not responding.
  2. Tools, utilities who use/check mount point information like Ignite backup shows below error.
    NFS server xyz not responding still trying
  3. fuser command hangs when running for the NFS mount point.
  4. umount (normal) command fails with the below error.
    root@kerneltalks # umount /data nfs umount: nfs_unmount: /data: is busy umount: return error 1. 

In this case, you need to use forceful (-f switch) and lazy umount (-l switch) to un-mount this dead NFS mount point. Lazy un-mount detach the said mount point from file system tree and cleans its all references once it’s not busy anymore.

Lazy un-mount is available in most Linux distributions. If not, you should be fine with only forceful un-mount too. In HPUX lazy un-mount is not available.

root@kerneltalks # umount -f -l /data

Conclusion

You can identify dead NFS share by df, fuser commands that appear to hang, failing to umount command. Such a dead NFS mount point can be un-mounted using forceful and lazy umount command.