Category Archives: Virtualization

Beginners guide to Docker Image

Learn the basics of the Docker image. Beginners guide explaining What is Docker image, what are different types of Docker images, and how to pull/push docker image?

Learn basics of Docker Image

In this article, we will be discussing the Docker image mainly. We will touch base all the below points :

  1. What is the Docker image?
  2. Difference between Docker image and Docker container
  3. What is the official Docker image
  4. Public and private Docker image
  5. How to download/upload pull/push Docker image from/to Docker hub

What is Docker image?

The official definition of Docker image is – ” Docker images are the basis of containers. An Image is an ordered collection of root filesystem changes and the corresponding execution parameters for use within a container runtime. An image typically contains a union of layered filesystems stacked on top of each other. An image does not have state and it never changes.

Read all docker or containerization related articles here from KernelTalk’s archives.

Lets cut this definition for our understanding. The first sentence means containers are launched using images. The second one tells it has binaries, dependencies & parameters to run a container (i.e. application). Third denotes image changes are layered and it never changes actual image file which means the image is the read-only file.

In the virtualization world’s concept Image can be visualized as a template from which you can launch as many containers as you want. In short, Image is an application binary along with its dependencies and metadata which tells how this image should be run in the container.

The image is named with the syntax:software_name:version_tag if the tag is not specified then latest is considered as default tag.

Difference between Docker image and Docker container

Let me summarize the difference between Docker image and container in tabular format for easy understanding :

Docker Image
Docker container
An ordered collection of root filesystem changes and the corresponding execution parameters for use within a container runtime An active (or inactive if exited) stateful instantiation of an image.
Can be pulled from Docker hub Runs locally on your host OS
Its read only Dynamic
Its a template from which container launches Its running/stopped instance of image
It’s a file It’s a process
Management command : #docker image <..> Management command : #docker container <..>

What is official Docker image?

Docker hub is a repository like Git for Docker images. Any registered user can upload images to it. But, for popular software like Nginx, alpine, Redis, Mongo Docker has a team which creates, test, verify images with standard settings and keep them for public use on Docker hub. The official docker image always has an only software name as its image name. Any other image other than official is named with syntax username/software_name where username is a user who uploaded that image on Docker hub. Also, the official image has official written below it in listing as shown in the below screenshot.

Identify official docker image

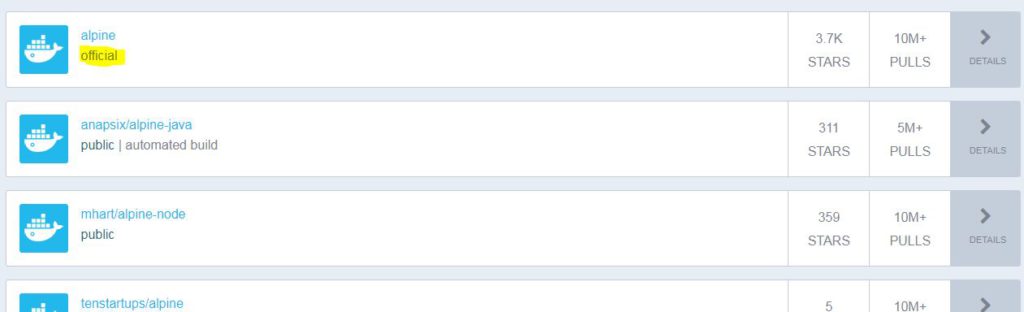
You can see apart from the first official image all other images of alpine are named username on the left. Only the official image has only the software name in its name.

Public and private Docker image

You can upload your image to a private or public on Docker hub. Public images are available to download for free for everyone. Private images are access restrictions defined by the uploader. While using the public image you should be very careful to choose which image to pull.

Docker hub has a star grading system for images. The user can star images and the total number of stars earned by the image are shown on the right column in listing (it can be seen in the above screenshot). Also, alongside stars, you can see the number of pulls images witnessed. Image with maximum stars and/or pulls considered a good image.

How to pull or download image from Docker hub?

You don’t need a Docker account to pull the image from the Docker hub. You only need to have an active internet connection on the server and you can use docker image pull to download the image from the Docker hub.

root@kerneltalks # docker image pull alpine
Using default tag: latest
latest: Pulling from library/alpine
Digest: sha256:e1871801d30885a610511c867de0d6baca7ed4e6a2573d506bbec7fd3b03873f
Status: Image is up to date for alpine:latest

Since my local image cache already has alpine image downloaded, pull command verified its SHA. Once it found that the cached image is the same as the one available on Docker hub so it didn’t download image! It saved bandwidth and storage both.

Now, I will pull the alpine image which has java available in it. Also, it’s not in my local image cache.

root@kerneltalks # docker image pull  anapsix/alpine-java
Using default tag: latest
latest: Pulling from anapsix/alpine-java
ff3a5c916c92: Already exists
b2573fe715ab: Pull complete
Digest: sha256:f4271069aa69eeb4cfed50b6a61fb7e4060297511098a3605232dbfe8f85de74
Status: Downloaded newer image for anapsix/alpine-java:latest

If you observe output above, command pulled only one file with ID b2573fe715ab whereas the other one it says already exists! So here comes the logic of Union layered filesystem.

As explained in the definition image is consists of a layered union filesystem. Since this image is alpine with java, it has the base of alpine image (which I already have in my image cache). And hence only extra java layer on this image is downloaded by pull command. And then together it stored alpine java image in my local cache!

You can even check details of this image on Docker hub and it indeed mentions that its build on top of the base alpine image. Which explains pull behavior and support our above explanation.

How to push or upload image to Docker hub?

To upload the image on Docker hub you will need a Docker account. It’s free to create. Just head to https://hub.docker.com/ and sign up. Once logged in you can create your private repo in which you can upload images and those will be private images. Otherwise, images uploaded will be public.

You need to login to Docker account from server where you have locally built images stored using docker login command.

root@kerneltalks # docker login
Login with your Docker ID to push and pull images from Docker Hub. If you don't have a Docker ID, head over to https://hub.docker.com to create one.
Username: shrikantlavhate
Password:
WARNING! Your password will be stored unencrypted in /root/.docker/config.json.
Configure a credential helper to remove this warning. See
https://docs.docker.com/engine/reference/commandline/login/#credentials-store

Login Succeeded

Now you can push your image to the public repo or private repo. I created my private repo with the name kerneltalks. So I am pushing the image to Docker hub in my private repo. But before pushing the image to Docker hub you need to properly tag it. To upload the image in the private repo you need to tag it like – username/reponame

root@kerneltalks # docker image tag 3fd9065eaf02 shrikantlavhate/kerneltalks
root@kerneltalks # docker image push shrikantlavhate/kerneltalks
The push refers to repository [docker.io/shrikantlavhate/kerneltalks]
cd7100a72410: Pushed
latest: digest: sha256:8c03bb07a531c53ad7d0f6e7041b64d81f99c6e493cb39abba56d956b40eacbc size: 528

Once the image is tagged properly it can be pushed to Docker hub. Using the tag Docker hub determines it’s a public or private image and accordingly uploads it.

Be noted that your login information is kept in local profiles for the seamless experience. Don’t forget to logout from the Docker account if you are on the shared machine.

root@kerneltalks # cat $HOME/.docker/config.json
{
        "auths": {
                "https://index.docker.io/v1/": {
                        "auth": "c2hyaWthXXXXXXXXXXXkRkdjflcXXXXg1"
                }
        },
        "HttpHeaders": {
                "User-Agent": "Docker-Client/18.05.0-ce (linux)"
        }


You can see config.json file under .docker directory saved login details.  You can logout to wipe out this info from the machine using docker logout.

root@kerneltalks # docker logout
Removing login credentials for https://index.docker.io/v1/
root@kerneltalks # cat $HOME/.docker/config.json
{
        "auths": {},
        "HttpHeaders": {
                "User-Agent": "Docker-Client/18.05.0-ce (linux)"
        }

Once we logged out of Docker account, login details wiped out from the file!

Docker container utilization monitoring

An article explaining Docker container utilization monitoring. How to monitor or save reports of Docker container resource utilization and how to format output according to your requirement.

Monitor your Docker containers

Docker containers are processes running on host OS using its resources. It means Docker containers are using CPU, Memory, and IO from Host OS to execute their commands or perform their tasks. Resource utilization is a major area leading to the performance of a server or application.

Host OS being a Linux in our case can be monitored using tools like sar, top, etc for resource utilization. You can trace down PID of Docker containers and then drill down to those PID’s utilization in the host’s monitoring tool to get container utilization. But this is a bit tedious job and not feasible in case you have the number of containers running on your server. Docker already took care of it and provided its own real-time monitoring tool which reports resource utilization by each container in real-time.

If you still don’t have Docker on your system, read here how to install Docker in Linux and 8 basic Docker management commands.

How to monitor Docker container utilization?

Docker provided command stats to provide real-time container’s resource utilization statistics. Commands run in terminal like top command and update values in real-time.

Read all docker or containerization related articles here from KernelTalk’s archives.

You can supply a container ID or name to this command to view the statistics of that specific container. If no container name/ID supplied, it will show stats of all running containers.

root@kerneltalks # docker container stats
CONTAINER ID        NAME                    CPU %               MEM USAGE / LIMIT   MEM %               NET I/O             BLOCK I/O           PIDS
2554070a4ba7        friendly_hodgkin        0.19%               205MiB / 991MiB     20.69%              1.21kB / 767B       105MB / 8.7kB       31
b60fa988daee        condescending_galileo   0.18%               201MiB / 991MiB     20.29%              1.21kB / 761B       96.3MB / 9.22kB     31

root@kerneltalks # docker container stats friendly_hodgkin
CONTAINER ID        NAME                CPU %               MEM USAGE / LIMIT   MEM %               NET I/O             BLOCK I/O           PIDS
2554070a4ba7        friendly_hodgkin    0.15%               205.2MiB / 991MiB   20.71%              1.21kB / 767B       105MB / 8.7kB       31

The output is tabulated and column-wise it has –

  • Container ID: Docker container ID
  • Name: Docker container name
  • CPU %: CPU percentage of the host being utilized by container right now.
  • MEM USAGE / LIMIT: Memory being utilized by container right now / Max memory which can be used by the container
  • MEM %: Memory percentage of Host being utilized by container right now.
  • NET I/ O: Network Input Output traffic on container’s network interface
  • BLOCK I/ O: Disk IO did on the Host storage
  • PIDS: Total number of processes/threads container created/forked.

You have to press cntrl+c to return to a prompt from real-time updating stats screen.

How to save Docker container utilization?

Now, if you want to save container utilization or you want to use stats command in some script then you may want to run it for 1 iteration only and exits automatically rather than keep running.

In such a case, you need to use --no-stream switch along with stats command.

root@kerneltalks # docker container stats --no-stream
CONTAINER ID        NAME                    CPU %               MEM USAGE / LIMIT   MEM %               NET I/O             BLOCK I/O           PIDS
2554070a4ba7        friendly_hodgkin        0.15%               205.2MiB / 991MiB   20.71%              1.21kB / 767B       105MB / 8.7kB       31
b60fa988daee        condescending_galileo   0.15%               201.3MiB / 991MiB   20.31%              1.21kB / 761B       96.3MB / 9.22kB     31
root@kerneltalks #

You can redirect this output to file for further processing.

CPU and Memory utilization of Docker container

stats command offers to format according to your need by using --format switch. It has GO template formatting available with this switch.

Using it, you can make stats command to display only CPU and MEM utilization of containers like below :

root@kerneltalks # docker container stats --format "table {{.Container}}\t{{.CPUPerc}}\t{{.MemPerc}}"
CONTAINER           CPU %               MEM %
2554070a4ba7        0.18%               20.71%
b60fa988daee        0.18%               20.32%

Placeholders of this formatting are as below –

  • .Container Container name or ID (user input)
  • .Name Container name
  • .ID Container ID
  • .CPUPerc CPU %
  • .MemPerc Memory %
  • .MemUsage Memory usage
  • .NetIO Network IO
  • .BlockIO Block IO
  • .PIDs Number of PIDs

So you can format the output the way you want it and with only values, you are interested in. Then you can use no-stream and get the utilization figures to another file or pipe them to other commands for further processing.

How to execute command inside Docker container

Learn how to access shell and execute a command inside a Docker container. Explains running commands inside already running containers or while launching containers.

Execute commands in Docker container

If you are following the Docker series on my blog then you must have been gone through Docker basics and Docker container maintenance commands by now. In this tutorial, we will walk you through how to access shell inside Docker container and how to execute commands inside the container.

First of all, you can not execute commands or access shells in any container. Basically, the container image you are using to launch your container should have a shell in it. If the image does not support shell then you can not do anything inside the container during launch or even after launch. 

Read all docker or containerization related articles here from KernelTalk’s archives.

For example, if you are launching a container from Nginx image i.e. web-server container then you won’t be able to access the shell or execute the command within it. Since its just a web-server process! But, if you are launching a container from the ubuntu image or alpine image then you will be able to access its shell since those images/software does support shell.

You can access shell inside a docker container and execute commands inside container either of using two ways –

  1. Execute bash shell while launching container
  2. Use docker command to execute single command inside container

Remember, each Docker image has a default command defined in it which it executes whenever it launches any container. You can edit it anytime but if you want to change it on the fly then you need to specify it at the end of the run command.  So, image ignores default defined command and it executes a command specified in docker run command after it launches container.

Access shell & execute command in Docker container while launching it

Once you are confirmed that the image you are using to launch container does support shell (mostly its bash) then you need to launch a container using -it switch. where –

  • -i is the interactive mode.It keeps STDIN open even if you choose to detach container after launch
  • -t is to assign pseudo-terminal through which STDIN is kept open for user input.

I launched Ubuntu container with -it switch and I presented with shell prompt within. Observe output below –

root@kerneltalks# docker container run -it ubuntu:latest
root@2493081de86f:/# hostname
2493081de86f
root@2493081de86f:/# ls -lrt
total 20
drwxr-xr-x.   2 root root    6 Apr 24 08:34 home
drwxr-xr-x.   2 root root    6 Apr 24 08:34 boot
drwxr-xr-x.   8 root root   96 Apr 26 21:16 lib
drwxr-xr-x.  10 root root 4096 Apr 26 21:16 usr
drwxr-xr-x.   2 root root    6 Apr 26 21:16 srv
drwxr-xr-x.   2 root root    6 Apr 26 21:16 opt
drwxr-xr-x.   2 root root    6 Apr 26 21:16 mnt
drwxr-xr-x.   2 root root    6 Apr 26 21:16 media
drwxr-xr-x.   2 root root   34 Apr 26 21:16 lib64
drwx------.   2 root root   37 Apr 26 21:17 root
drwxr-xr-x.  11 root root 4096 Apr 26 21:17 var
drwxr-xr-x.   2 root root 4096 Apr 26 21:17 bin
drwxrwxrwt.   2 root root    6 Apr 26 21:17 tmp
drwxr-xr-x.   2 root root 4096 Apr 27 23:28 sbin
drwxr-xr-x.   5 root root   58 Apr 27 23:28 run
dr-xr-xr-x.  13 root root    0 Jun  2 14:40 sys
drwxr-xr-x.  29 root root 4096 Jun  2 14:58 etc
dr-xr-xr-x. 114 root root    0 Jun  2 14:58 proc
drwxr-xr-x.   5 root root  360 Jun  2 14:58 dev
root@2493081de86f:/# date
Sat Jun  2 15:00:17 UTC 2018
root@2493081de86f:/# exit

With the output, you can see after the container is launched promptly is given root@2493081de86f . Now you are within the container with root the account. Keep in mind everything inside the container happens with root id. If you see hostname of Ubuntu container is set the same as container ID. I executed a couple of commands inside the container in the above output.

Keep in mind, since the container is aimed to be very lightweight they always consist of minimal software inside. So if you are running any Linux distribution container, you won’t be able to run all commands as you would normally do in VM or Linux server.

Execute command inside already running container

The above process is applicable for the container you are about to launch. But what if you want to execute a command on the container which is already running on the system. Docker provided exec switch to access running container shell. Syntax is docker container exec <container name/ID> <command to run>

I have already a ubuntu container running in my system. I used exec switch to execute hostname,  date and df commands inside the container.

root@kerneltalks # docker container ls
CONTAINER ID IMAGE COMMAND CREATED STATUS PORTS NAMES
ae0721fb8ecf ubuntu:latest "/bin/bash" 2 minutes ago Up 2 minutes loving_bohr

root@kerneltalks # docker container exec ae0721fb8ecf date
Sat Jun 2 15:41:24 UTC 2018
root@kerneltalks # docker container exec ae0721fb8ecf hostname
ae0721fb8ecf
root@kerneltalks # docker container exec ae0721fb8ecf df
Filesystem                                                                                         1K-blocks    Used Available Use% Mounted on
/dev/mapper/docker-202:1-26198093-57ab60113158ca3f51c470fefb25a3fdf154a5309f05f254c660dba2a55dbab7  10474496  109072  10365424   2% /
tmpfs                                                                                                  65536       0     65536   0% /dev
tmpfs                                                                                                 507368       0    507368   0% /sys/fs/cgroup
/dev/xvda1                                                                                           8376320 5326996   3049324  64% /etc/hosts
shm                                                                                                    65536       0     65536   0% /dev/shm
tmpfs                                                                                                 507368       0    507368   0% /proc/scsi
tmpfs                                                                                                 507368       0    507368   0% /sys/firmware

Observe about output and all 3 commands ran successfully inside container and shown output on our host machine terminal.

8 basic Docker container management commands

Learn basic Docker container management with the help of these 8 commands. A useful guide for Docker beginners which includes sample command outputs.

Docker container management

In this article we will walk you through 6 basic Docker container commands which are useful in performing basic activities on Docker containers like run, list, stop, view logs, delete, etc. If you are new to the Docker concept then do check our introduction guide to know what is Docker & how-to guide to install Docker in Linux. Without further delay lets directly jump into commands.

How to run Docker container?

As you know, the Docker container is just an application process running on the host OS. For Docker container, you need a image to run from. Docker image when runs as process called a Docker container. You can have Docker image available locally or you have to download it from Docker hub. Docker hub is a centralized repository that has public and private images stored to pull from. Docker’s official hub is at hub.docker.com. So whenever you instruct the Docker engine to run a container, it looks for image locally, and if not found it pulls it from Docker hub.

Read all docker or containerization related articles here from KernelTalk’s archives.

Let’s run a Docker container for Apache web-server i.e httpd process. You need to run the command docker container run. The old command was just docker run but lately, Docker added sub-command section so new versions support below command –

root@kerneltalks # docker container run -d -p 80:80 httpd
Unable to find image 'httpd:latest' locally
latest: Pulling from library/httpd
3d77ce4481b1: Pull complete
73674f4d9403: Pull complete
d266646f40bd: Pull complete
ce7b0dda0c9f: Pull complete
01729050d692: Pull complete
014246127c67: Pull complete
7cd2e04cf570: Pull complete
Digest: sha256:f4610c3a1a7da35072870625733fd0384515f7e912c6223d4a48c6eb749a8617
Status: Downloaded newer image for httpd:latest
c46f2e9e4690f5c28ee7ad508559ceee0160ac3e2b1688a61561ce9f7d99d682

Docker run command takes image name as a mandatory argument along with many other optional ones. Commonly used arguments are –

  • -d : Detach container from the current shell
  • -p X:Y : Bind container port Y with host’s port X
  • --name : Name your container. If not used, it will be assigned randomly generated name
  • -e : Pass environmental variables and their values while starting a container

In the above output you can see, we supply httpd as an image name to run a container from. Since the image was not locally found, the Docker engine pulled it from Docker Hub. Now, observe it downloaded image httpd:latest where: is followed by version. That’s the naming convention of Docker container image. If you want a specific version container to run from then you can provide a version name along with image name. If not supplied, the Docker engine will always pull the latest one.

The very last line of output shown a unique container ID of your newly running httpd container.

How to list all running Docker containers?

Now, your container is running, you may want to check it or you want to list all running containers on your machine. You can list all running containers using docker container ls command. In the old Docker version, docker ps does this task for you.

root@kerneltalks # docker container ls
CONTAINER ID        IMAGE               COMMAND              CREATED             STATUS              PORTS                NAMES
c46f2e9e4690        httpd               "httpd-foreground"   11 minutes ago      Up 11 minutes       0.0.0.0:80->80/tcp   cranky_cori

Listing output is presented in column-wise format. Where column-wise values are –

  1. Container ID: First few digits of the unique container ID
  2. Image: Name of the image used to run the container
  3. Command: Command ran by container after it ran
  4. Created: Time created
  5. Status: Current status of the container
  6. Ports: Port binding details with host’s ports
  7. Names: Name of the container (since we haven’t named our container you can see randomly generated name assigned to our container)

How to view logs of Docker container?

Since during the first step we used -d switch to detach container from the current shell once it ran its running in the background. In this case, we are clueless about what’s happening inside the container. So to view logs of the container, Docker provided logs command. It takes a container name or ID as an argument.

root@kerneltalks # docker container logs cranky_cori
AH00558: httpd: Could not reliably determine the server's fully qualified domain name, using 172.17.0.2. Set the 'ServerName' directive globally to suppress this message
[Thu May 31 18:35:07.301158 2018] [mpm_event:notice] [pid 1:tid 139734285989760] AH00489: Apache/2.4.33 (Unix) configured -- resuming normal operations
[Thu May 31 18:35:07.305153 2018] [core:notice] [pid 1:tid 139734285989760] AH00094: Command line: 'httpd -D FOREGROUND'

I used the container name in my command as an argument. You can see the Apache related log within our httpd container.

How to identify Docker container process?

The container is a process that uses host resources to run. If it’s true, then you will be able to locate the container process on the host’s process table. Let’s see how to check the container process on the host.

Docker used famous top command as its sub-commands name to view processes spawned by the container. It takes the container name/ID as an argument. In the old Docker version, only docker top command works. In newer versions, docker top and docker container top both works.

root@kerneltalks # docker container top  cranky_cori
UID                 PID                 PPID                C                   STIME               TTY                 TIME                CMD
root                15702               15690               0                   18:35               ?                   00:00:00            httpd -DFOREGROUND
bin                 15729               15702               0                   18:35               ?                   00:00:00            httpd -DFOREGROUND
bin                 15730               15702               0                   18:35               ?                   00:00:00            httpd -DFOREGROUND
bin                 15731               15702               0                   18:35               ?                   00:00:00            httpd -DFOREGROUND

root@kerneltalks # ps -ef |grep -i 15702
root     15702 15690  0 18:35 ?        00:00:00 httpd -DFOREGROUND
bin      15729 15702  0 18:35 ?        00:00:00 httpd -DFOREGROUND
bin      15730 15702  0 18:35 ?        00:00:00 httpd -DFOREGROUND
bin      15731 15702  0 18:35 ?        00:00:00 httpd -DFOREGROUND
root     15993 15957  0 18:59 pts/0    00:00:00 grep --color=auto -i 15702

In the first output, the list of processes spawned by that container. It has all details like use, PID, PPID, start time, command, etc. All those PID you can search in your host’s process table and you can find them there. That’s what we did in the second command. So, this proves containers are indeed just processes on Host’s OS.

How to stop Docker container?

It’s simple stop command! Again it takes container name /ID as an argument.

root@kerneltalks # docker container stop cranky_cori
cranky_cori

How to list stopped or not running Docker containers?

Now we stopped our container if we try to list container using ls command, we won’t be able to see it.

root@kerneltalks # docker container ls
CONTAINER ID        IMAGE               COMMAND             CREATED             STATUS              PORTS               NAMES

So, in this case, to view stopped or nonrunning container you need to use -a switch along with ls command.

root@kerneltalks # docker container ls -a
CONTAINER ID        IMAGE               COMMAND              CREATED             STATUS                     PORTS               NAMES
c46f2e9e4690        httpd               "httpd-foreground"   33 minutes ago      Exited (0) 2 minutes ago                       cranky_cori

With -a switch we can see stopped container now. The notice status of this container is mentioned  ‘Exited’. Since the container is just a process its termed as ‘exited’ rather than stopped!

How to start Docker container?

Now, we will start this stopped container. There is a difference between running and starting a container. When you run a container, you are starting a command in a fresh container. When you start a container, you are starting an old stopped container which has an old state saved in it. It will start it from that state forward.

root@kerneltalks #  docker container start c46f2e9e4690
c46f2e9e4690

root@kerneltalks # docker container ls -a
CONTAINER ID        IMAGE               COMMAND              CREATED             STATUS              PORTS                NAMES
c46f2e9e4690        httpd               "httpd-foreground"   35 minutes ago      Up 8 seconds        0.0.0.0:80->80/tcp   cranky_cori

How to remove Docker container?

To remove the container from your Docker engine use rm command. You can not remove the running containers. You have to first stop the container and then remove it. You can remove it forcefully using -f switch with rm command but that’s not recommended.

root@kerneltalks # docker container rm cranky_cori
cranky_cori
root@kerneltalks # docker container ls -a
CONTAINER ID        IMAGE               COMMAND             CREATED             STATUS              PORTS               NAMES

You can see once we remove container, its not visible in ls -a listing too.

What is Docker? Introduction guide to Docker

What is Docker? Introduction guide to Docker for beginners.

Docker introduction

Docker! It’s a kind of hot cake right now in the IT industry. Docker is a thing now! If you are into system administration, IT operations, developments, or DevOps then at some point in time you may have or will come across work Docker and you wonder what is docker? Why is docker so famous? So, in this small introduction guide to Docker, we will explain to you about Docker.

Read all docker or containerization related articles here from KernelTalk’s archives.

What is Docker?

Docker is another layer of virtualization where virtualization happens at the operating system level. It’s a software container platform and currently leading this sector globally. You must be familiar with VMware which is virtualization at bare metal level but docker takes one step forward and virtualize things at OS level and hence removing all hardware management, capacity planning, resource management, etc. VMware runs a number of virtual machines (VMs) on single server hardware (refer Figure 1) whereas Docker runs a number of containers on a single Operating System (refer Figure 2). So in simple terms, Docker containers are just processes sharing a host operating system to perform their tasks.

Lets quickly run through the difference between VM and Docker containers. I tabulated the difference for a quick read.

Virtual machine v/s Docker container

Virtual Machine
Docker container
Its a mini version of physical machine Its just a process
Runs on hypervisor virtualization Runs on Linux. (HyperV needed if you run on Windows/MAC)
Has its own guest OS No OS
Can be used only after guest OS boot finishes Immediately ready to use when launched
SlowFast
Uses hardware resources of Host Uses only OS resources like binaries/libraries of Host
Resource management needed No resource management
It runs as long as admin/guest OS doesnt power it off It runs as long as command runs which container executed at startup.
VM stops when you shutdown guest OS Once the command exits, container stops

Docker engine mainly runs on Linux. So if you are running Docker on Windows or MAC then it’s actually running tiny Linux VM in the background on your Windows or MAC and on top of it, it’s running its own engine to provide you Docker functionalities on non-Linux platform.

Since Docker engine runs containers it also termed as containerization!

Why use Docker?

Docker containers are portable. They can be stored as an image which can be copied to any other machine and can be launched there. This ensures even if host OS parameters, version changes containers still functions the same across the different OS.

Containers use the host operating system, they don’t have their own OS to boot when containers are launched. It means they are almost available for use immediately as there is not booting of OS of anything that sort which takes time to prepare the container for use. Docker containers are fast to use!

They use resources from host OS, there is no resource management like adding/removing CPU, memory, storage, etc tasks on containers!

There are lots of functionality, flexibility being added to Docker every month. Its fast-evolving virtualization concept and gives you more ease of managing IT infra.

What are Docker variants available to use?

Docker Editions

At present, there are two editions available. CE and EE. CE stands for Community Edition and EE stands for Enterprise Edition. Let’s see the difference between Docker CE and Docker EE.

Docker CE
Docker EE
Community Edition Enterprise Edition
It’s free It’s paid
Primarily for development use Use this edition for Production environment
Do it yourself. No support Support subscription from Docker
For personal use For enterprise/big/production use

Docker releases

Docker also releases in two forms. Stable and Edge. Let’s see the difference between Docker stable release and Docker edge release.

Docker stable release
Docker edge release
Its tested final release Its kind of beta release
Stable version. Includes upcoming features/functionalities
For dev/prod use For experimental use only
New release every quarter New release every month
Support available No support for issues faced

Where to get Docker?

Docker can be downloaded from Docker’s official store. For each platform, related instructions are included. Detailed installation steps and other information on Docker can be found on Docker’s official documentation portal. You can also refer to our article to install Docker on Linux.

I believe that should be enough for an introductory article on Docker. If you have any questions/feedback, please leave us to comment below or reach us using the contact form.

How to install docker in Linux

Learn how to install Docker in Linux. Docker is the next step of virtualization which does Operating system level virtualization also known as containerization.

Install docker in Linux

In this article, we will walk you through the procedure to install Docker in any Linux distro like RHEL, SUSE, OEL, CentOS, Debian, Fedora, Ubuntu, etc. Sometimes your package manager like YUM or apt-get may offer package docker* to install docker on your server but it’s always good to get a fresh Docker setup. Since Docker is changing fast and it’s always advisable to install the latest version of Docker which might not be available with your package manager.

Read all docker or containerization related articles here from KernelTalk’s archives.

Install docker using package

If your package manager has a Docker package available to install then it’s an easy way to get Docker on your system.

Before going got Docker installation you should install below packages on your system to use the full flexible functionality of Docker. These packages are not dependencies but its good to have them pre-installed so that all Docker functions/drivers you can use.

  • For CenOs, Redhat etc YUM based systems – yum-utils device-mapper-persistent-data lvm2
  • For Debian, Ubuntu etc apt based systems – apt-transport-https ca-certificates curl software-properties-common

But you may not be getting the latest version of Docker in this case. You can install a package simply using yum or apt-get command. Below sample output for your reference from the OpenSuse server.

root@kerneltalks # zypper in docker
Building repository 'openSUSE-13.2-Update' cache .................................................................................................................[done]
Retrieving repository 'openSUSE-13.2-Update-Non-Oss' metadata ....................................................................................................[done]
Building repository 'openSUSE-13.2-Update-Non-Oss' cache .........................................................................................................[done]
Loading repository data...
Reading installed packages...
Resolving package dependencies...

The following NEW package is going to be installed:
  docker

1 new package to install.
Overall download size: 6.2 MiB. Already cached: 0 B  After the operation, additional 22.9 MiB will be used.
Continue? [y/n/? shows all options] (y): y
Retrieving package docker-1.9.1-56.1.x86_64                                                                                        (1/1),   6.2 MiB ( 22.9 MiB unpacked)
Retrieving: docker-1.9.1-56.1.x86_64.rpm .............................................................................................................[done (2.5 MiB/s)]
Checking for file conflicts: .....................................................................................................................................[done]
(1/1) Installing: docker-1.9.1-56.1 ..............................................................................................................................[done]
Additional rpm output:
creating group docker...
Updating /etc/sysconfig/docker...

Install docker using the script

In the below procedure, we will be using the script from Docker’s official website which will scan your system for details and automatically fetch the latest and compatible docker version for your system and installs it. We will be fetching script from this docker URL and using it to install the latest Docker on the list of Linux distros.

Fetch the latest script from docker official website using curl. If you read this script, SUPPORT_MAP variable shows the list of Linux distros this script support. If you are running any other Linux version than listed here then this method won’t be useful for you.

root@kerneltalks # curl -fsSL get.docker.com -o get-docker.sh
root@kerneltalks # ls -lrt
-rw-r--r--. 1 root root 13847 May 30 18:59 get-docker.sh

Now we have latest get-docker.sh script from docker official website on our server. Now, you just have to run the script and it will do the rest!

# sh get-docker.sh
# Executing docker install script, commit: 36b78b2
+ sh -c 'yum install -y -q yum-utils'
Package yum-utils-1.1.31-45.el7.noarch already installed and latest version
+ sh -c 'yum-config-manager --add-repo https://download.docker.com/linux/centos/docker-ce.repo'
Loaded plugins: fastestmirror
adding repo from: https://download.docker.com/linux/centos/docker-ce.repo
grabbing file https://download.docker.com/linux/centos/docker-ce.repo to /etc/yum.repos.d/docker-ce.repo
repo saved to /etc/yum.repos.d/docker-ce.repo
+ '[' edge '!=' stable ']'
+ sh -c 'yum-config-manager --enable docker-ce-edge'
Loaded plugins: fastestmirror
========================================================================= repo: docker-ce-edge =========================================================================
[docker-ce-edge]
async = True
bandwidth = 0
base_persistdir = /var/lib/yum/repos/x86_64/7
baseurl = https://download.docker.com/linux/centos/7/x86_64/edge
cache = 0
cachedir = /var/cache/yum/x86_64/7/docker-ce-edge
check_config_file_age = True
compare_providers_priority = 80
cost = 1000
deltarpm_metadata_percentage = 100
deltarpm_percentage =
enabled = 1
enablegroups = True
exclude =
failovermethod = priority
ftp_disable_epsv = False
gpgcadir = /var/lib/yum/repos/x86_64/7/docker-ce-edge/gpgcadir
gpgcakey =
gpgcheck = True
gpgdir = /var/lib/yum/repos/x86_64/7/docker-ce-edge/gpgdir
gpgkey = https://download.docker.com/linux/centos/gpg
hdrdir = /var/cache/yum/x86_64/7/docker-ce-edge/headers
http_caching = all
includepkgs =
ip_resolve =
keepalive = True
keepcache = False
mddownloadpolicy = sqlite
mdpolicy = group:small
mediaid =
metadata_expire = 21600
metadata_expire_filter = read-only:present
metalink =
minrate = 0
mirrorlist =
mirrorlist_expire = 86400
name = Docker CE Edge - x86_64
old_base_cache_dir =
password =
persistdir = /var/lib/yum/repos/x86_64/7/docker-ce-edge
pkgdir = /var/cache/yum/x86_64/7/docker-ce-edge/packages
proxy = False
proxy_dict =
proxy_password =
proxy_username =
repo_gpgcheck = False
retries = 10
skip_if_unavailable = False
ssl_check_cert_permissions = True
sslcacert =
sslclientcert =
sslclientkey =
sslverify = True
throttle = 0
timeout = 30.0
ui_id = docker-ce-edge/x86_64
ui_repoid_vars = releasever,
   basearch
username =

+ sh -c 'yum makecache'
Loaded plugins: fastestmirror
base                                                                                                                                             | 3.6 kB  00:00:00
docker-ce-edge                                                                                                                                   | 2.9 kB  00:00:00
docker-ce-stable                                                                                                                                 | 2.9 kB  00:00:00
epel/x86_64/metalink                                                                                                                             |  21 kB  00:00:00
extras                                                                                                                                           | 3.4 kB  00:00:00
updates                                                                                                                                          | 3.4 kB  00:00:00
(1/15): docker-ce-stable/x86_64/filelists_db                                                                                                     | 7.7 kB  00:00:03
(2/15): base/7/x86_64/other_db                                                                                                                   | 2.5 MB  00:00:04
(3/15): docker-ce-edge/x86_64/filelists_db                                                                                                       | 9.6 kB  00:00:04
(4/15): docker-ce-edge/x86_64/other_db                                                                                                           |  62 kB  00:00:04
(5/15): docker-ce-stable/x86_64/other_db                                                                                                         |  66 kB  00:00:00
(6/15): base/7/x86_64/filelists_db                                                                                                               | 6.9 MB  00:00:05
(7/15): epel/x86_64/filelists_db                                                                                                                 |  10 MB  00:00:01
(8/15): epel/x86_64/prestodelta                                                                                                                  | 2.8 kB  00:00:00
(9/15): epel/x86_64/other_db                                                                                                                     | 3.1 MB  00:00:01
(10/15): extras/7/x86_64/prestodelta                                                                                                             |  48 kB  00:00:02
(11/15): extras/7/x86_64/other_db                                                                                                                |  95 kB  00:00:02
(12/15): extras/7/x86_64/filelists_db                                                                                                            | 519 kB  00:00:02
(13/15): updates/7/x86_64/filelists_db                                                                                                           | 1.3 MB  00:00:02
(14/15): updates/7/x86_64/prestodelta                                                                                                            | 231 kB  00:00:00
(15/15): updates/7/x86_64/other_db                                                                                                               | 228 kB  00:00:00
Loading mirror speeds from cached hostfile
 * base: mirror.genesisadaptive.com
 * epel: s3-mirror-us-east-1.fedoraproject.org
 * extras: mirror.math.princeton.edu
 * updates: mirror.metrocast.net
Metadata Cache Created
+ sh -c 'yum install -y -q docker-ce'
If you would like to use Docker as a non-root user, you should now consider
adding your user to the "docker" group with something like:

  sudo usermod -aG docker your-user

Remember that you will have to log out and back in for this to take effect!

WARNING: Adding a user to the "docker" group will grant the ability to run
         containers which can be used to obtain root privileges on the
         docker host.
         Refer to https://docs.docker.com/engine/security/security/#docker-daemon-attack-surface
         for more information.

If you observe the above output then you will get to know that script will detect your OS and will download, configure, and use supported repo to install Docker on your machine. It also notifies you to add non-root user to group docker so that he/she can run docker commands with root privileges.

You can download and run the script this in a single command as well like below –

root@kerneltalks # curl -fsSL get.docker.com -o - get-docker.sh | bash -s

If you are running the script on un-supported Linux version (which is not mentioned in SUPPORT_MAP list) then you will see below error.

root@kerneltalks # sh get-docker.sh
Executing docker install script, commit: 36b78b2

Either your platform is not easily detectable or is not supported by this
installer script.
Please visit the following URL for more detailed installation instructions:

https://docs.docker.com/engine/installation/

If you are on RHEL, SLES (basically Enterprise Linux editions) then only Docker EE i.e. Enterprise Edition (paid) is supported on them. You will need to purchase appropriate subscriptions to use them. You will see below message –

# sh get-docker.sh
# Executing docker install script, commit: 36b78b2


  WARNING: rhel is now only supported by Docker EE
           Check https://store.docker.com for information on Docker EE

Install with help from docker store

If both above methods are not suitable for you then you can always opt for the last method. Head to Docker online store. Goto Docker CE i.e. Community Edition (the free one) and choose your Linux distro. Currently, they have listed AWS, Azure, Fedora, CentOS, Ubuntu & Debian. Click on your choice, head to Resources tab, and click Detailed installation instructions. You will be redirected to appropriate documents on Docker documents which have detailed step by step commands to perform a clean install of Docker on Linux of your choice! Or you can always head to this home page of installation and choose your host.

Check if Docker is installed

Finally, you have to check if Docker is installed on the system. To check if docker is installed, simply run the command docker version

root@kerneltalks # docker version
Client:
 Version:      18.05.0-ce
 API version:  1.37
 Go version:   go1.9.5
 Git commit:   f150324
 Built:        Wed May  9 22:14:54 2018
 OS/Arch:      linux/amd64
 Experimental: false
 Orchestrator: swarm
Cannot connect to the Docker daemon at unix:///var/run/docker.sock. Is the docker daemon running?

The last line in the above output shows that the Docker service is not yet running on the server. You can start the service and then the output will show your Docker server details as well.

root@kerneltalks # service docker start
root@kerneltalks # docker version
Client:
 Version:      18.05.0-ce
 API version:  1.37
 Go version:   go1.9.5
 Git commit:   f150324
 Built:        Wed May  9 22:14:54 2018
 OS/Arch:      linux/amd64
 Experimental: false
 Orchestrator: swarm

Server:
 Engine:
  Version:      18.05.0-ce
  API version:  1.37 (minimum version 1.12)
  Go version:   go1.9.5
  Git commit:   f150324
  Built:        Wed May  9 22:18:36 2018
  OS/Arch:      linux/amd64
  Experimental: false

So, now you have successfully installed Docker on your machine and started the Docker server. You are yet to create containers in it!

Setting up docker for non-root user

For non-root user to use Docker, you need to add the user into a group called docker. This group is automatically gets created when you install Docker.

root@kerneltalks # usermod -aG <user> docker

Run above command to add non-root user in docker group and then that user will be able to run all docker commands without root privileges.

Also, you need to make sure that docker services start automatically when the server reboots. Since system control systemctl is becoming standard on all latest Linux versions, below command will suit on nearly major Linux distros

root@kerneltalks # systemctl enable docker

This command will enable docker to run with system boot and hence no root intervention needed when the system reboots. Non-root users will continue to use docker even after a reboot.

Try Docker without installing!

If you want to try Docker without installing it on your machine then just head to Play with Docker website and you will be able to spin up machines having Docker in it. You can try Docker commands in it from your web browser!

The only limitation they have is your session will be auto closed after 4 hours. You have a clock ticking in your browser window set to 4 hours once you log in.

How to reset iptables to the default settings

Learn how to reset iptables to default settings. The default setting of iptable is to accept all for all types of connections.

Reset iptables to default

In our last post, we saw iptables basics, where we learned about how iptables works, what are the policies, and how to configure iptables policies.

While working on iptables, if you get confused about policies and you need to start afresh then you need to reset iptables to default settings. By default, I mean to set accept all policy and flush any existing configured rules from settings.

In this article, we will walk through a set of commands to reset iptables to default settings. This can also be treated as how to reset firewall in Linux like ubuntu, centos, Redhat, Debian, etc. It’s a pretty simple 2 steps process.

Step 1 : Set accept all policy to all connections

Using the below set of commands you will set accept rule for all types of connections.

root@kerneltalks # iptables -P INPUT ACCEPT
root@kerneltalks # iptables -P OUTPUT ACCEPT
root@kerneltalks # iptables -P FORWARD ACCEPT

This will confirm, iptables gonna accept all requests for all types of connections.

Step 2 : Delete all existing rules.

Using below set of commands, delete your currently configured rules from iptables.

root@kerneltalks # iptables -F INPUT
root@kerneltalks # iptables -F OUTPUT
root@kerneltalks # iptables -F FORWARD

Or you can do it in single command –

root@kerneltalks # iptables -F

That’s it! Your iptables are reset to default settings i.e. accept all! Now, neatly and carefully design your policies and configure them.

How to install VMware Tools on Linux guest machine

Learn to install VMware tools in Linux VMs like RedHat, Suse, Debian, Ubuntu, CentOS, etc. The article includes screenshots, commands, and a complete installation log.

VMware tools installation on Linux

Even the cloud market is bursting nowadays, many corporations still prefer to have in-house Infra virtualization using technologies like VMware. A wide variety of Operating systems can be hosted on virtual machines created under it.

Linux servers like Red Hat, Ubuntu, Suse, Fedora are hosted on VMware infra. After fresh installation you will see warning under VMware console that VMware Tools are not installed on your guest machine. Like below :

VMware Tools is not installed on this virtual machine!

vmware tools warning

It is not mandatory to install these tools but recommended having them on the guest machine so that host and guest can communicate properly. As a result, your VMware console has more power, visibility over your guest machine.

In this article, we will walk through steps on how to install VMWare tools on Linux guest OS like Red Hat, Ubuntu, Kali, Suse, Debian, etc.

Step 1.

First make sure you have one empty CD-ROM drive attached with the guest machine. Click on the Install VMware Tools” link in the warning shown above. That will be under the ‘Summary‘ tab of your virtual machine in the VMware console. This will pop up a message confirming to mount VMware tools cdrom on your guest OS.

Mounting VMware tools disc

Click ‘Mount‘ on the pop-up and it will mount VMware tools disc on your guest Linux machine. If you have VMware tools ISO, you can mount ISO as well.

Step 2.

Login to guest Linux machine and you will notice disc is automatically mounted on /media/VMware Tools. Verify it using df command.

root@kerneltalks # df -h
Filesystem                 Size  Used Avail Use% Mounted on
/dev/sr0                    71M   71M     0 100% /media/VMware Tools

If it’s not mounted automatically, you can mount it manually with below set of commands –

root@kerneltalks # mkdir /mnt/cdrom
root@kerneltalks # mount /dev/cdrom /mnt/cdrom
root@kerneltalks # df -h
Filesystem                 Size  Used Avail Use% Mounted on
/dev/sr0                    71M   71M     0 100% /mnt/cdrom

Once mounted confirm the content of discs are visible to you.

root@kerneltalks # cd "/media/VMware Tools"
root@kerneltalks # ll
total 71888
-r--r--r-- 1 root root 72162730 Feb 17  2016 VMwareTools-10.0.6-3560309.tar.gz
-r-xr-xr-x 1 root root     2012 Feb 17  2016 manifest.txt
-r-xr-xr-x 1 root root     1850 Feb 17  2016 run_upgrader.sh
-r-xr-xr-x 1 root root   687524 Feb 17  2016 vmware-tools-upgrader-32
-r-xr-xr-x 1 root root   757944 Feb 17  2016 vmware-tools-upgrader-64

It is important to copy files from disc to local directory. Since if you try to directly run things from the disc you may encounter permission related errors because the disc is mounted as read-only.

Step 3.

Copy installers in the local directory. Goto disc and copy tar file in it to local directory e.g. /tmp/vmware

root@kerneltalks # mkdir /tmp/vmware
root@kerneltalks # cp VMwareTools-10.0.6-3560309.tar.gz /tmp/vmware

Now, untar and unzip this file. You will see newly created directory named vmware-tools-distrib

root@kerneltalks # cd /tmp/vmware
root@kerneltalks # tar -zxpf VMwareTools-10.0.6-3560309.tar.gz
root@kerneltalks # ll
total 140944
-r--r--r-- 1 root root 72162730 Sep 23 09:46 VMwareTools-10.0.6-3560309.tar.gz
drwxr-xr-x 1 root root      162 Feb 17  2016 vmware-tools-distrib

Navigate to vmware-tools-distrib where the actual installer script is located. Its a Perl script vmware-install.pl so make sure you have Perl installed on your server.

root@kerneltalks  # cd vmware-tools-distrib
root@kerneltalks  # ll
total 488
-rw-r--r-- 1 root root 282475 Feb 17  2016 FILES
-rw-r--r-- 1 root root   2538 Feb 17  2016 INSTALL
drwxr-xr-x 1 root root    114 Feb 17  2016 bin
drwxr-xr-x 1 root root     18 Feb 17  2016 caf
drwxr-xr-x 1 root root     74 Feb 17  2016 doc
drwxr-xr-x 1 root root    598 Feb 17  2016 etc
drwxr-xr-x 1 root root    114 Feb 17  2016 installer
drwxr-xr-x 1 root root    158 Feb 17  2016 lib
drwxr-xr-x 1 root root     14 Feb 17  2016 vgauth
-rwxr-xr-x 1 root root    243 Feb 17  2016 vmware-install.pl
-rwxr-xr-x 1 root root 205571 Feb 17  2016 vmware-install.real.pl

Step 4.

Install VMware tools. The final step is to run the Perl script and install tools. It will ask you a couple of questions regarding directory structures, you can customize or just accept defaults.

All the below installation logs are minimized for the better reading experience. To view them, click on them to expand code.

root@kerneltalks # ./vmware-install.pl
Creating a new VMware Tools installer database using the tar4 format.

Installing VMware Tools.

In which directory do you want to install the binary files?
[/usr/bin]

What is the directory that contains the init directories (rc0.d/ to rc6.d/)?
[/etc/init.d]

What is the directory that contains the init scripts?
[/etc/init.d]

In which directory do you want to install the daemon files?
[/usr/sbin]

In which directory do you want to install the library files?
[/usr/lib/vmware-tools]

The path "/usr/lib/vmware-tools" does not exist currently. This program is
going to create it, including needed parent directories. Is this what you want?
[yes]

In which directory do you want to install the common agent library files?
[/usr/lib]

In which directory do you want to install the common agent transient files?
[/var/lib]

In which directory do you want to install the documentation files?
[/usr/share/doc/vmware-tools]

The path "/usr/share/doc/vmware-tools" does not exist currently. This program
is going to create it, including needed parent directories. Is this what you
want? [yes]

The installation of VMware Tools 10.0.6 build-3560309 for Linux completed
successfully. You can decide to remove this software from your system at any
time by invoking the following command: "/usr/bin/vmware-uninstall-tools.pl".

Before running VMware Tools for the first time, you need to configure it by
invoking the following command: "/usr/bin/vmware-config-tools.pl". Do you want
this program to invoke the command for you now? [yes]

Once it receives all the answers, installation begins –

Initializing...


Making sure services for VMware Tools are stopped.

Stopping VMware Tools services in the virtual machine:
   Guest operating system daemon:                                      done
   VMware User Agent (vmware-user):                                    done
   Unmounting HGFS shares:                                             done
   Guest filesystem driver:                                            done


Found a compatible pre-built module for vmci.  Installing it...


Found a compatible pre-built module for vsock.  Installing it...


The module vmxnet3 has already been installed on this system by another
installer or package and will not be modified by this installer.

The module pvscsi has already been installed on this system by another
installer or package and will not be modified by this installer.

The module vmmemctl has already been installed on this system by another
installer or package and will not be modified by this installer.

During installation it will ask you if you want to enable specific features or not. Submit your choices accordingly.

The VMware Host-Guest Filesystem allows for shared folders between the host OS
and the guest OS in a Fusion or Workstation virtual environment.  Do you wish
to enable this feature? [no]

Found a compatible pre-built module for vmxnet.  Installing it...


The vmblock enables dragging or copying files between host and guest in a
Fusion or Workstation virtual environment.  Do you wish to enable this feature?
[no]

VMware automatic kernel modules enables automatic building and installation of
VMware kernel modules at boot that are not already present. This feature can
be enabled/disabled by re-running vmware-config-tools.pl.

Would you like to enable VMware automatic kernel modules?
[no]


Disabling timer-based audio scheduling in pulseaudio.

Do you want to enable Guest Authentication (vgauth)? Enabling vgauth is needed
if you want to enable Common Agent (caf). [yes]

Do you want to enable Common Agent (caf)? [yes]

Finally it will detect and confirms  GUI related parameters and builds boot image.

Detected X server version 1.6.5


Unable to detect guest resolution.


Please choose one of the following display sizes that X will start with:

[1]< 640x480
[2]  800x600
[3]  1024x768
[4]  1280x800
Please enter a number between 1 and 4:

[1] 2


X is running fine with the new config file.

Creating a new initrd boot image for the kernel.

Kernel image:   /boot/vmlinuz-3.0.101-63-default
Initrd image:   /boot/initrd-3.0.101-63-default
Root device:    UUID=6b24d38e-094f-471b-8215-aaf85a47fe8e (/dev/dm-2) (mounted on / as btrfs)
Resume device:  /dev/swapvg/swaplv
modprobe: Module crct10dif not found.
WARNING: no dependencies for kernel module 'crct10dif' found.
Kernel Modules: hwmon thermal_sys thermal processor fan scsi_mod libata libahci ahci scsi_transport_spi mptbase mptscsih mptspi ata_piix ata_generic vmxnet3 

vmw_pvscsi vmxnet dm-mod dm-log dm-region-hash dm-mirror dm-snapshot scsi_dh scsi_dh_alua scsi_dh_emc scsi_dh_hp_sw scsi_dh_rdac libcrc32c zlib_deflate btrfs 

usb-common usbcore ohci-hcd uhci-hcd ehci-hcd xhci-hcd hid usbhid linear crc-t10dif sd_mod crc32c
Features:       acpi dm block usb lvm2 btrfs resume.userspace resume.kernel
Bootsplash:     SLES (800x600)
51984 blocks
>>> Network: auto
>>> Calling mkinitrd -k /boot/vmlinuz-3.0.101-63-default -i /tmp/mkdumprd.XwBasPAr7V -f 'kdump network' -B  -s ''
Regenerating kdump initrd ...

Kernel image:   /boot/vmlinuz-3.0.101-63-default
Initrd image:   /tmp/mkdumprd.XwBasPAr7V
Root device:    UUID=6b24d38e-094f-471b-8215-aaf85a47fe8e (/dev/dm-2) (mounted on / as btrfs)
Resume device:  /dev/swapvg/swaplv
Dump device:    UUID=cbc439cd-3514-442e-bb42-b80f7823bdc1 (/dev/dm-3)
Boot device:    /dev/disk/by-uuid/9278503b-3bed-45b0-968a-6de4c9264d94 (/dev/sda1)
modprobe: Module crct10dif not found.
WARNING: no dependencies for kernel module 'crct10dif' found.
Kernel Modules: hwmon thermal_sys thermal processor fan scsi_mod libata libahci ahci scsi_transport_spi mptbase mptscsih mptspi ata_piix ata_generic vmxnet3 

vmw_pvscsi vmxnet dm-mod dm-log dm-region-hash dm-mirror dm-snapshot scsi_dh scsi_dh_alua scsi_dh_emc scsi_dh_hp_sw scsi_dh_rdac libcrc32c zlib_deflate btrfs 

usb-common usbcore ohci-hcd uhci-hcd ehci-hcd xhci-hcd hid usbhid af_packet linear nls_utf8 mbcache jbd ext3 crc-t10dif sd_mod crc32c
Features:       acpi dm block usb network lvm2 btrfs resume.userspace resume.kernel kdump
64862 blocks
Generating the key and certificate files.
Successfully generated the key and certificate files.
   Checking acpi hot plug                                              done
Starting VMware Tools services in the virtual machine:
   Switching to guest configuration:                                   done
   VM communication interface:                                         done
   VM communication interface socket family:                           done
   Guest operating system daemon:                                      done
   VGAuthService:                                                      done
   Common Agent:                                                       done
The configuration of VMware Tools 10.0.6 build-3560309 for Linux for this
running kernel completed successfully.

In the end, it presents you with the command to be used for VMware tools, greets and un-mount VMware tools disc (if it was mounted automatically in beginning)

You must restart your X session before any mouse or graphics changes take
effect.

You can now run VMware Tools by invoking "/usr/bin/vmware-toolbox-cmd" from the
command line.

To enable advanced X features (e.g., guest resolution fit, drag and drop, and
file and text copy/paste), you will need to do one (or more) of the following:
1. Manually start /usr/bin/vmware-user
2. Log out and log back into your desktop session; and,
3. Restart your X session.

Enjoy,

--the VMware team

Found VMware Tools CDROM mounted at /media/VMware Tools. Ejecting device
/dev/sr0 ...

VMware tools silent install on Linux VM

If you do not want to customize any of the answers asked during installation and want to go with all default values then you can use below command for starting non-interactive installation :

root@kerneltalks # ./vmware-install.pl -d default

This will install VMware tools in silent mode. No human interaction required and all default settings will be used for installation.

That’s it! You have successfully installed VMware tools on your Linux guest machine in VMware. You can now see IP details of guests in the VMware console. Also VMware tools status will be shown as ‘Installed and running‘.

Complete AWS CSA Associate exam preparation guide!

Small AWS CSA Associate exam preparation guide to help you get ready for the certification exam. Get confident with the list of test quizzes listed here.

AWS CSA Associate exam preparation guide

Note: SAA-C01 is retiring now and being replaced with SAA-C02.

Recently I cleared the Amazon Web Services Certified Solutions Architect Associate-level exam and I was bombarded with many questions like How to prepare for the AWS CSA exam? Which book to refer to preparing AWS CSA certification? How to study for AWS CSA? Which online resources available for the certified solutions architect exam? So I thought of summing all this up in a small post which can be useful for AWS CSA aspirants.

Remember this post is compiled from my own experience and should not be taken as the final benchmark for taking the certification exams. This post is mainly aimed to help you gaining confidence in taking examination once you are through your syllabus and hands-on experience.

AWS has three streams where you can pursue your cloud career.

  • AWS Certified Solutions Architect (Architecture context)
  • AWS Certified Developer (Developer context)
  • AWS Certified SysOps Administrator (Operations context)

All these three streams have an associate-level (primary or base) level certification. Later professional (higher level) certification is available for solution architect only. Developer and SysOps get merged into single AWS certified DevOps Engineer professional certification.

So, we are talking here about the Amazon Web Services Certified Solutions Architect Associate level exam! Obviously you should be well versed with AWS and requirements stated by Amazon on exam link. Let’s have some examination details :

AWS CSA Exam details :

  • Total number of questions: 60-65
  • Duration: 130 minutes
  • Cost : $150
  • Type: Multiple choice questions
  • Can be retaken after 7 days of cooldown period if failed in the first attempt
  • Syllabus: Download here.
  • Pass criteria: 720/1000.

AWS CSA Study material :

Quick recap before exam :

I have compiled a series of quick reviews before taking the exam. Feel free to refer and suggest your addition/feedback.

Below is a list of AWS quiz which I gathered from the web which can help you to put your cloud knowledge to test and gain the confidence to get ready for the exam.

Free Quiz

Premium (paid) Quiz

  • Cloud academy: 241 Questions. Signup needed (first 7 days free access then paid account)
  • Linux Academy: 117 Questions. Signup needed (first 7 days free access then paid account)
  • A Cloud Guru: 294 Questions. Signup needed.
  • AWS Training practice tests $20. It’s free if you are AWS certified. You can get a voucher from your certification benefits section on the AWS certification portal.
  • Practice exam by tutorialsdojo

All the best !

Our other certification preparation articles

  1. Preparing for 1Z0-1085-20 Oracle Cloud Infrastructure Foundations 2020 Associate Exam
  2. Journey to AWS Certified Solutions Architect – Professional Certification SAP-C01
  3. Preparing for CLF-C01 AWS Certified Cloud Practitioner Exam
  4. Preparing for SOA-C01 AWS Certified SysOps Administrator Associate Exam

AWS SWF, Beanstalk, EMR, Cloudfomation revision before the CSA exam

Quick revision on topics AWS SWF, Beanstalk, EMR, Cloudfomation before appearing AWS Certified Solutions Architect – Associate exam.

This article notes down a few important points about AWS (Amazon Web Services) SWF, Beanstalk, EMR, Cloudfomation. This can be helpful in last-minute revision before appearing for the AWS Certified Solutions Architect – Associate level certification exam.

This is forth part of AWS CSA revision series. Rest of the series listed below :

In this article we are checking out key points about SWF (Simple Work Flow), Beanstalk (App deployment Service), EMR (Elastic MAp Reduce), Cloudfomation (Infrastructure as code).

Recommended read : AWS CSA exam preparation guide

Lets get started :

SWF

  • Max simultaneous workflows executions 1,00,000
  • C++ is not supported in SWF
  • There are three actors :
    • activity workers
    • workflow starters
    • deciders
  • Each workflow runs in the domain which is a collection of tasks.
  • Workflows in different domains can not interact

Beanstalk

  • Scala, WebSphere is not available in Beanstalk
  • Its free service. You will be charged for resources it provisions for your application
  • Supported platforms :
    • Java
    • Ruby
    • Python
    • PHP
    • Node.js
    • .net
    • Go
    • Docker

Cloudfront

  • One AWS account can have 100 CF origin access identities at max.
  • Key pairs are only used for EC2 and CloudFront.
  • All CloudFront URL ends with cloudfront.net
  • Cloudfront origins can be S3 bucket, EC2, webserver in an on-premise datacenter
  • It can serve private content by S3 origin access identifiers, signed URLs, and signed cookies.
  • Limits :
    • Req per sec per distribution : 1,00,000
    • Transfer rate per distribution : 40 Gbps
    • Origins per distribution : 25
    • web distributions per account : 200

AWS Infra

  • Total availability zones currently are 42.
  • The total regions are 16.
  • First 3 services launched by AWS are SQS (2004), S3 (2006), EC2 (later in 2006)